Esshahn / Acme Assembly Vscode Template
Programming Languages
Projects that are alternatives of or similar to Acme Assembly Vscode Template
acme-assembly-vscode-template
At a glance
- VSCode template that helps you compile 8 bit assembly code with ACME
- Works on Mac, Linux and Windows
- Binaries of ACME, Pucrunch & Exomizer included
- Compiled file is displayed in VICE emulator
- Example file for Commodore 64, Commodore 128 and Commodore 16, 116 & Plus/4, VIC20
- Very easy to adapt for other platforms (send me your PR's)
With this basic setup you will be able to write and compile 6502 assembly code on Mac, Linux or Windows. It is by no means perfect, but it should get most beginners started and is easy to setup and configure. I'm hoping to help more people with their first attempts at writing 8 bit assembly code. Also consider this repo as an invitation to improve and share my setup. Any feedback is very welcome, share your ideas in the issues section or contribute to the repo with your pull requests. Thanks!
The setup
You will need the following:
- Visual Studio Code
- Acme Cross Assembler extension for VSCode
- Vice Emulator
- This template
Visual Studio Code
First, get VSCode. It's a free editor by Microsoft. Now before you scream "nooooooo!!!!!!1", it is actually extremely good (I switched from a licenced version of Sublime Text happily), multi platform (Mac, Win, Linux) and most importantly free!
Get it here: https://code.visualstudio.com/
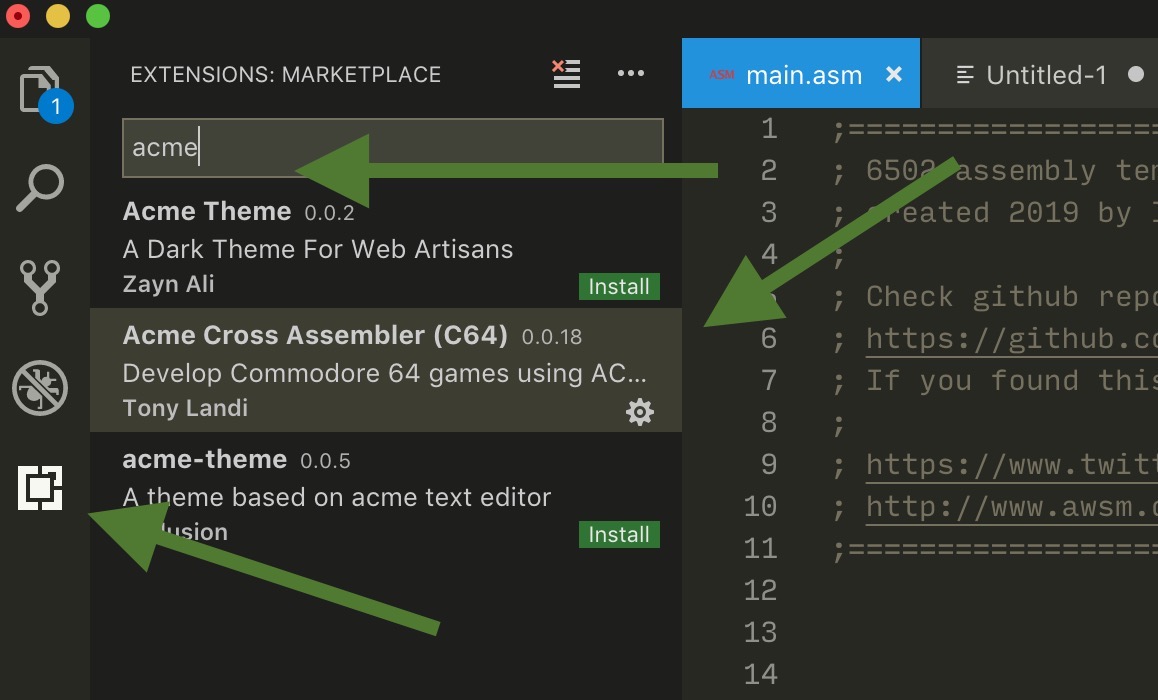
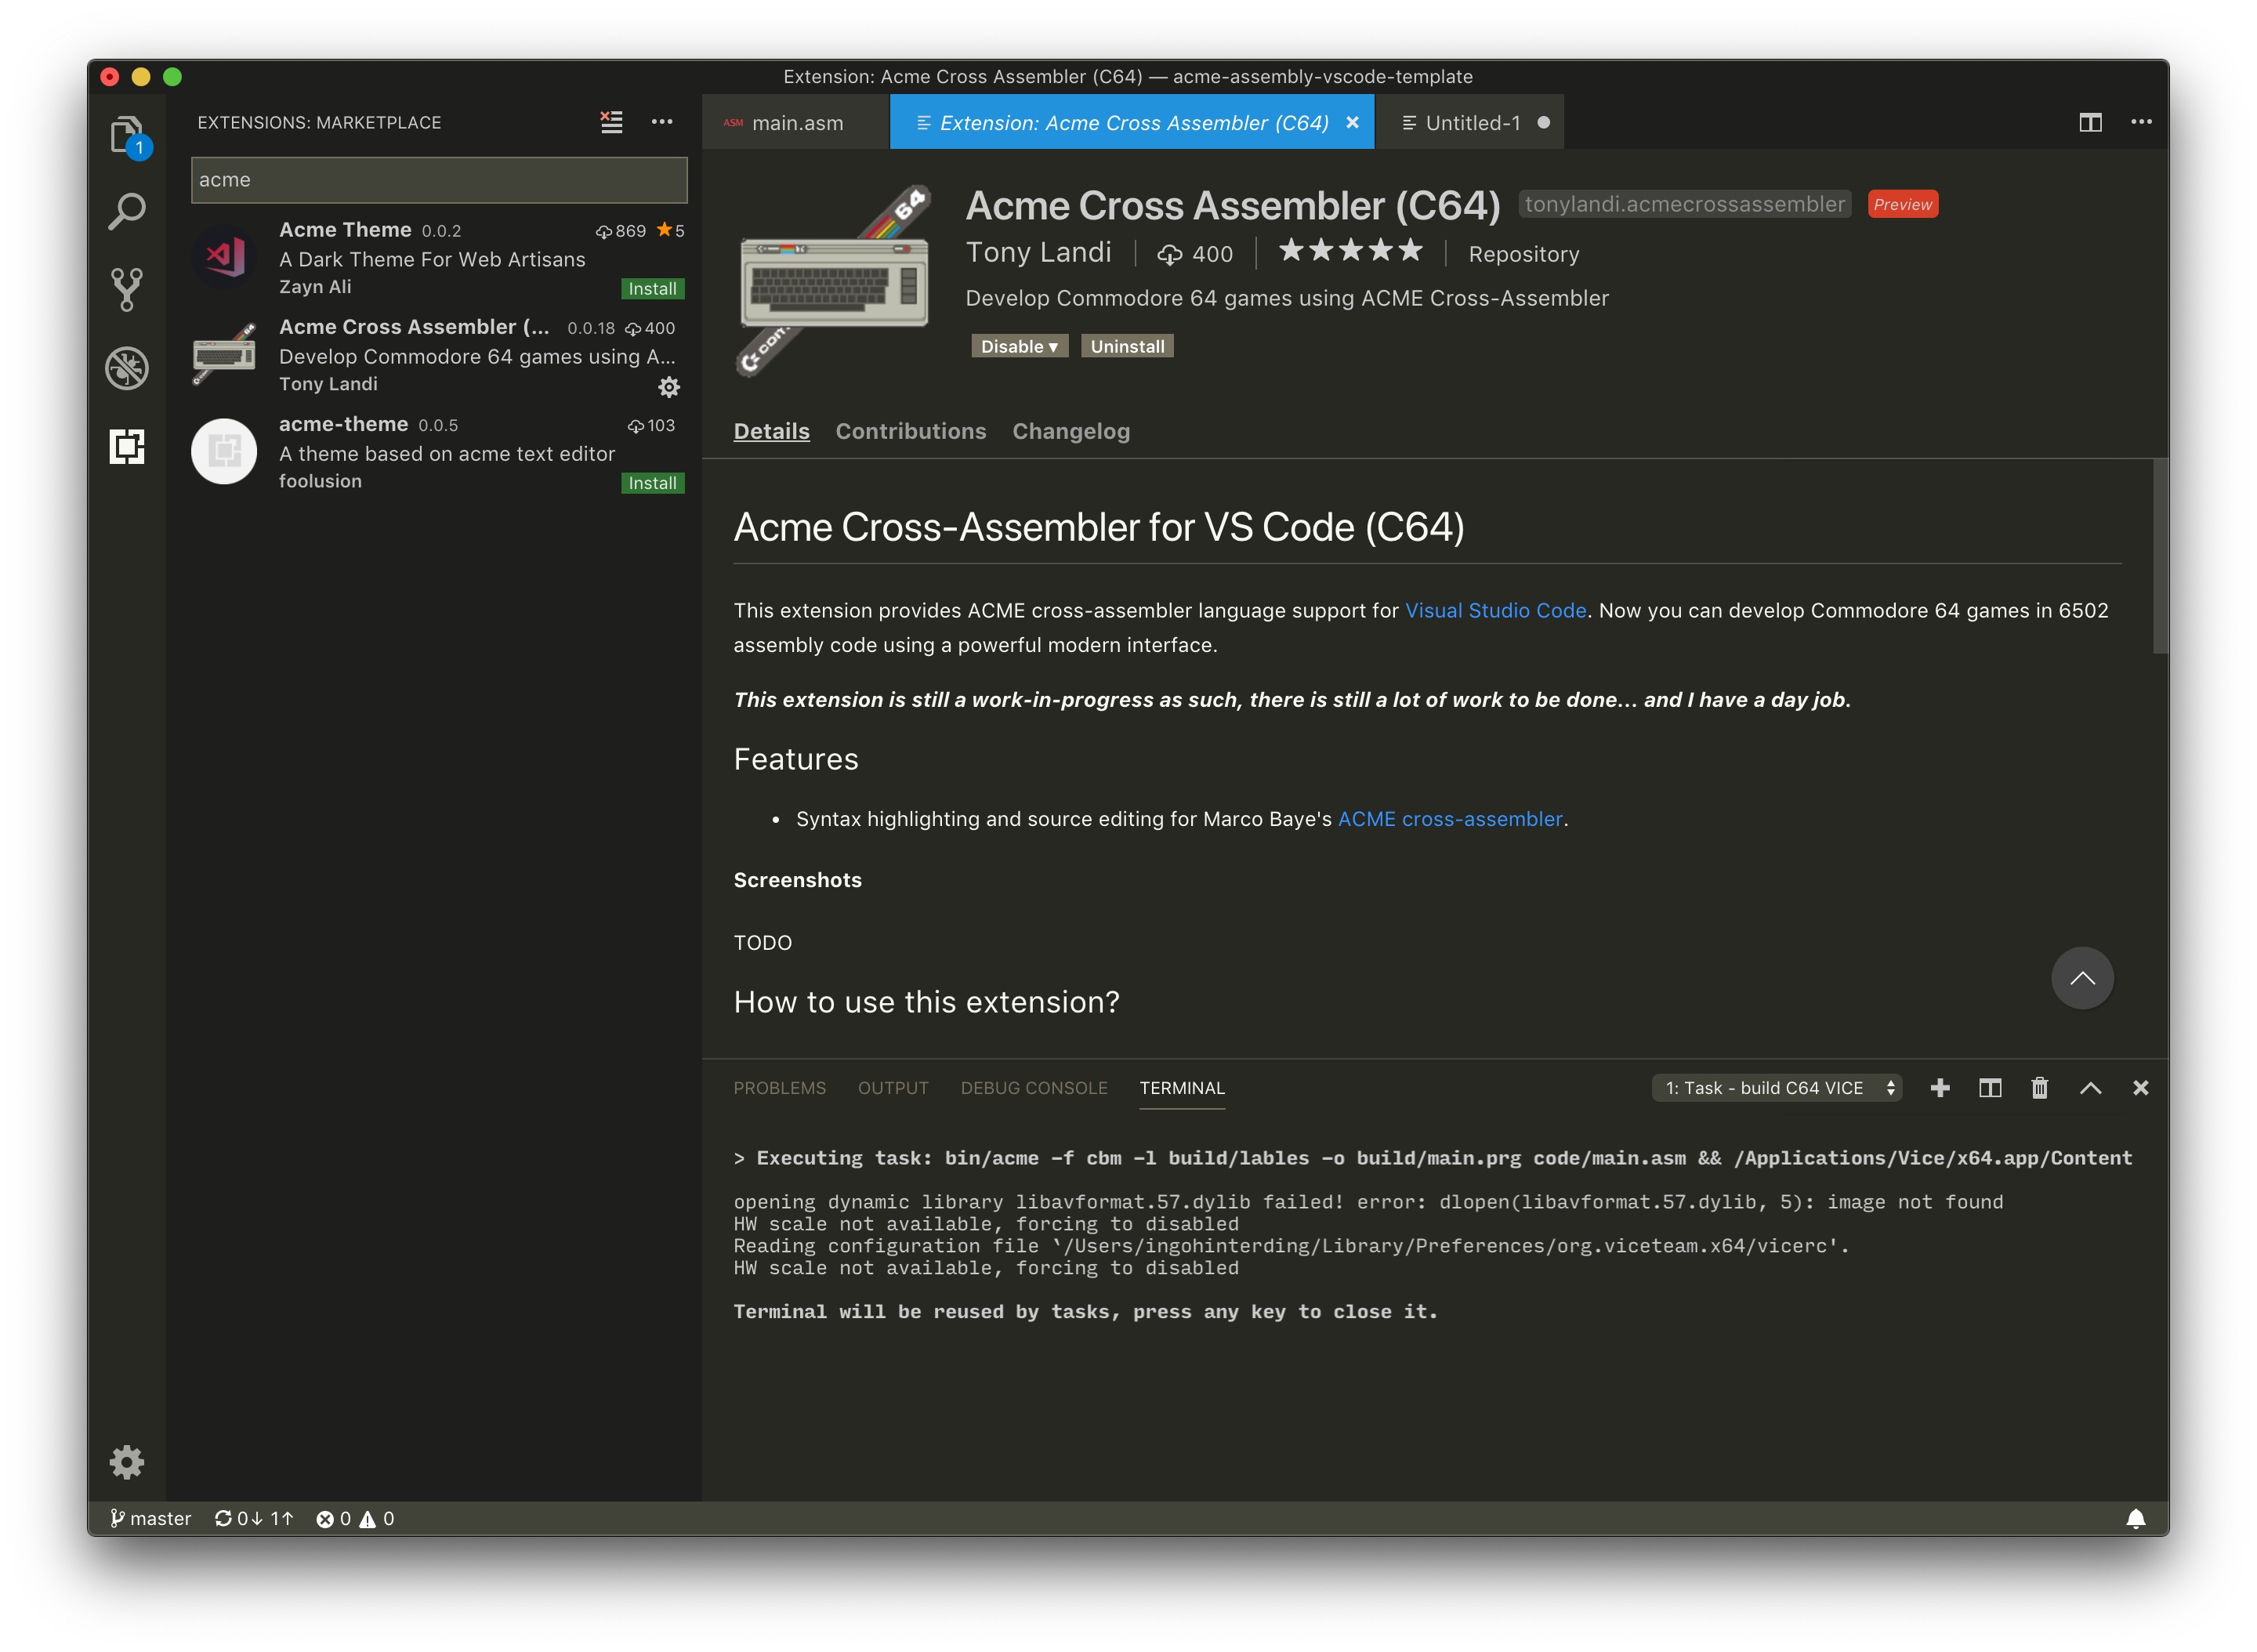
Now let's add an extension for syntax highlighting. Click on the extension icon, enter 'acme' in the search bar and click on the 'Acme Cross Aseembler' extension. There's an install button on the right side where the extension is previewed. Unfortunately, the extension does not have any compiler functionality, so we will have to deal with that in another way.
Your VSCode setup is basically complete now, but I would recommend spending some time getting comfortable with it. The documentation is great, well done Microsoft.
Some recommendations to configure VSCode:
- get the "Material Icon Theme"
- I'm using the "Monokai" Color Theme (Code -> Preferences -> Color Theme)
VICE Emulator
If you have VICE already installed, which is very likely the case, there's nothing else to do for you here. Otherwise, get it here: http://vice-emu.sourceforge.net/index.html#download
Download & configure this repository
Save it anywhere you like.
So the magic of this template lies in two things. First, all binaries needed for compiling (the ACME assembler, the Pucrunch & Exomizer packers) are included in the bin folder. Code purists might wave their fist in agony now (as it is usually not advised to check in binaries in git), but I found this to be the most comfortable way for newbies to not get lost in configuration. There are folders for Mac, Windows and Linux binaries.
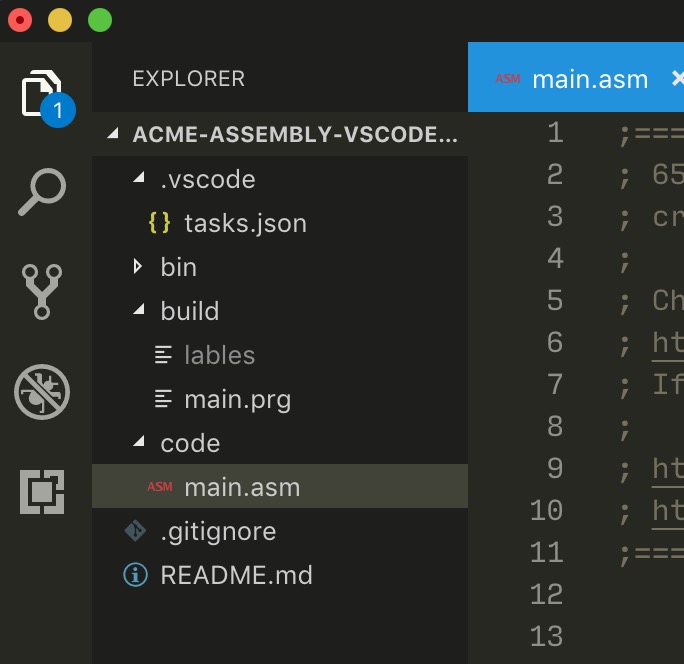
Second, there's a folder called .vscode with a file called tasks.json. This is where the files are send to the compiler. Depending on your operating system, the folder might be invisible, but VSCode is your friend. Drag and drop the repository folder into VSCode and it will display the folder structure on the left side, including the hidden .vscode folder.
Configure tasks.json
Click on the tasks.json file. It will look like this:
{
    // See https://go.microsoft.com/fwlink/?LinkId=733558
    // for the documentation about the tasks.json format
    "version": "2.0.0",
    "tasks": [
        {
            "label": "build C64 VICE",
            "type": "shell",
            "osx": {
                "command": "bin/mac/acme -f cbm -l build/labels -o build/main.prg code/main.asm && /Applications/Vice/x64.app/Contents/MacOS/x64 -moncommands build/labels build/main.prg 2> /dev/null",
            },
            "windows": {
                "command": "bin\\win\\acme -f cbm -l build/labels -o build/main.prg code/main.asm"
            },
            "linux": {
                "command": "./bin/linux/acme -f cbm -l build/labels -o build/main.prg code/main.asm && x64 -moncommands build/labels build/main.prg 2> /dev/null"
            },
            "group": {
                "kind": "build",
                "isDefault": true
            },
            "presentation": {
                "clear": true
            }
        },
        {
            "label": "build C64 Pucrunch VICE",
            "type": "shell",
            "osx": {
                "command": "bin/mac/acme -f cbm -l build/labels -o build/main.prg code/main.asm && bin/mac/pucrunch build/main.prg build/main.prg && /Applications/Vice/x64.app/Contents/MacOS/x64 -moncommands build/labels build/main.prg 2> /dev/null",
            },
            "windows": {
                "command": "bin\\win\\acme -f cbm -l build/labels -o build/main.prg code/main.asm"
            },
            "linux": {
                "command": "./bin/linux/acme -f cbm -l build/labels -o build/main.prg code/main.asm && bin/linux/pucrunch build/main.prg build/main.prg && x64 -moncommands build/labels build/main.prg 2> /dev/null"
            },
            "group": "build",
            "presentation": {
                "clear": true
            }
        },
        {
            "label": "build C16 VICE",
            "type": "shell",
            "osx": {
                "command": "bin/mac/acme -f cbm -l build/labels -o build/main.prg code/main.asm && /Applications/Vice/xplus4.app/Contents/MacOS/xplus4 -moncommands build/labels build/main.prg 2> /dev/null",
            },
            "windows": {
                "command": "bin\\win\\acme -f cbm -l build/labels -o build/main.prg code/main.asm"
            },
            "linux": {
                "command": "./bin/linux/acme -f cbm -l build/labels -o build/main.prg code/main.asm"
            },
            "group": "build",
            "presentation": {
                "clear": true
            }
        }
    ]
}
Don't worry if it looks complicated at first. We'll get through it together, it's easier than you think. VSCode uses a concept called 'tasks' for handling build setups. These tasks are stored in JSON format in this tasks.json file. I've created three build tasks here:
- compile and display in Vice 64 Emulator (Commodore 64)
- compile, crunch with Pucrunch and display in Vice 64 Emulator (Commodore 64)
- compile and display in Vice Plus/4 Emulator (Commodore C16, C116 & Plus/4)
Let's check out the second one in detail:
{
    "label": "build C64 Pucrunch VICE",
    "type": "shell",
    "osx": {
        "command": "bin/mac/acme -f cbm -l build/labels -o build/main.prg code/main.asm && bin/mac/pucrunch build/main.prg build/main.prg && /Applications/Vice/x64.app/Contents/MacOS/x64 -moncommands build/labels build/main.prg 2> /dev/null",
    },
    "windows": {
        "command": "bin\\win\\acme -f cbm -l build/labels -o build/main.prg code/main.asm"
    },
    "linux": {
        "command": "./bin/linux/acme -f cbm -l build/labels -o build/main.prg code/main.asm && bin/linux/pucrunch build/main.prg build/main.prg && x64 -moncommands build/labels build/main.prg 2> /dev/null"
    },
    "group": "build",
    "presentation": {
        "clear": true
    },
}
"label": "build C64 Pucrunch VICE"
This is the label (task name) that will show up in VSCode so that you know which task to choose. You can rename this to whatever you want. Name it "Compile that shit, sucker!". Have some fun while coding.
"type": "shell"
This means that the following command will be executed using the shell (terminal command). Don't change this.
The Command instruction
The shell commands as well as the binaries are specific for each operating system. Luckily, VSCode let's us define that easily by using either "osx", "windows" or "linux" as the identifier. If you want a cleaner setup, you can delete the lines that contain information for the OS you're not using. You can even delete the OS subfolders in the bin folder if you like.
"command": "bin/acme -f cbm -l build/labels -o build/main.prg code/main.asm && bin/pucrunch build/main.prg build/main.prg && /Applications/Vice/x64.app/Contents/MacOS/x64 -moncommands build/labels build/main.prg 2> /dev/null"
Whoa, a lot happening here. Well, this is where all the magic happens really. This is a chain of commands (separated by '&&') VSCode executes for you every time you start a new build. Let's look at it in more detail:
bin/acme -f cbm -l build/labels -o build/main.prg code/main.asm
This section starts the acme compiler that resides in the bin folder of the repository. If you have acme already installed on your system, feel free to use the path to that installation. You can delete the binary in the bin folder then.
The command reads like this:
run the acme compiler, set the file format to cbm (-f cbm), create a labels file in the build folder (-l build/labels), output the compiled program as main.prg in the build folder (-o build/main.prg) and take main.asm as the input (code/main.asm).
There's a lot that you can adjust to your liking here. I recommend to check out the acme quick reference for further information: https://sourceforge.net/p/acme-crossass/code-0/6/tree/trunk/docs/QuickRef.txt
bin/pucrunch build/main.prg build/main.prg
Similar to the acme compiler, this line executes the pucrunch packer which makes binary files significantly smaller. The first build/main.prg is the input file, the second build/main.prg is the output file (hence overwriting itself). You might want to check out the Pucrunch documentation for further tweaking.

/Applications/Vice/x64.app/Contents/MacOS/x64
Ok this line is extremely important to make your setup work. It calls Vice to execute your shiny little program. As you can see this is a local path to where your Vice installation resides. In this case, it's a folder called 'Vice' in the 'Applications' folder of MacOS. You need to adapt this line to your setup. I hope you get through this!
The parameters
-moncommands build/labels build/main.prg 2> /dev/null
-moncommands build/labels sends the generated labels to Vice, making it easier to debug your code in the monitor. build/main.prg is the actual program to run and 2> /dev/null sends some of the terminal output text into nirvana as Vice is quite chatty. You can also remove this part of the line if you want to play around with it.
"group": "build",
Tells VSCode that the command is a build command. Don't modify this.
"group": {
    "kind": "build",
    "isDefault": true
},
This is the same as above with the addition that VSCode should take this as the default command when pressing _SHIFT + COMMAND + B (on Mac, check out the hotkey for your system in VSCode under Terminal -> Run Build Task...).
"presentation": {
        "clear": true
},
This clears the VSCode terminal output. I found this less cluttered, but feel free to remove this line.
"problemMatcher": { .. details omitted ... }
This teaches VSCode to parse the error messages reported by the ACME compiler. This integrates errors with VSCode so that you can see current compilation errors under the Problems tab.
You can use F8 to cycle through errors within VSCode.
Phew... we're finally done with all configuration. Now to the fun part!
Writing and compiling your code!
Open the file code/main.asm. It should look like this:
This is a simple template for 6502 code. If you're new to this, I recommend to check out these excellent tutorials:
Easy 6502 by Nick Morgan: https://skilldrick.github.io/easy6502/
Dustlayer by Actraiser: https://dustlayer.com/tutorials/
Just as a quick start:
;==========================================================
; LABELS
; Comment or uncomment the lines below
; Depending on your target machine
;==========================================================

; C16, C116, Plus/4
;BGCOLOR      = $ff15
;BORDERCOLOR  = $ff19
;BASIC        = $1001
;SCREENRAM    = $0c00

; C128
;BGCOLOR       = $d020
;BORDERCOLOR   = $d021
;BASIC         = $1c01
;SCREENRAM     = $0400

; C64
BGCOLOR       = $d020
BORDERCOLOR   = $d021
BASIC         = $0801
SCREENRAM     = $0400
Labels are a great way to keep your code readable and help you manage compiling to different platforms. A label in this case is just a synonyme, e.g. the compiler replaces each occurrance of BGCOLOR with $d020.
I've created example labels for different memory addresses of the Commodore 64, the Commodore 128 and the Commodore 16, 116, Plus/4. You can comment out or delete the ones that you don't need.
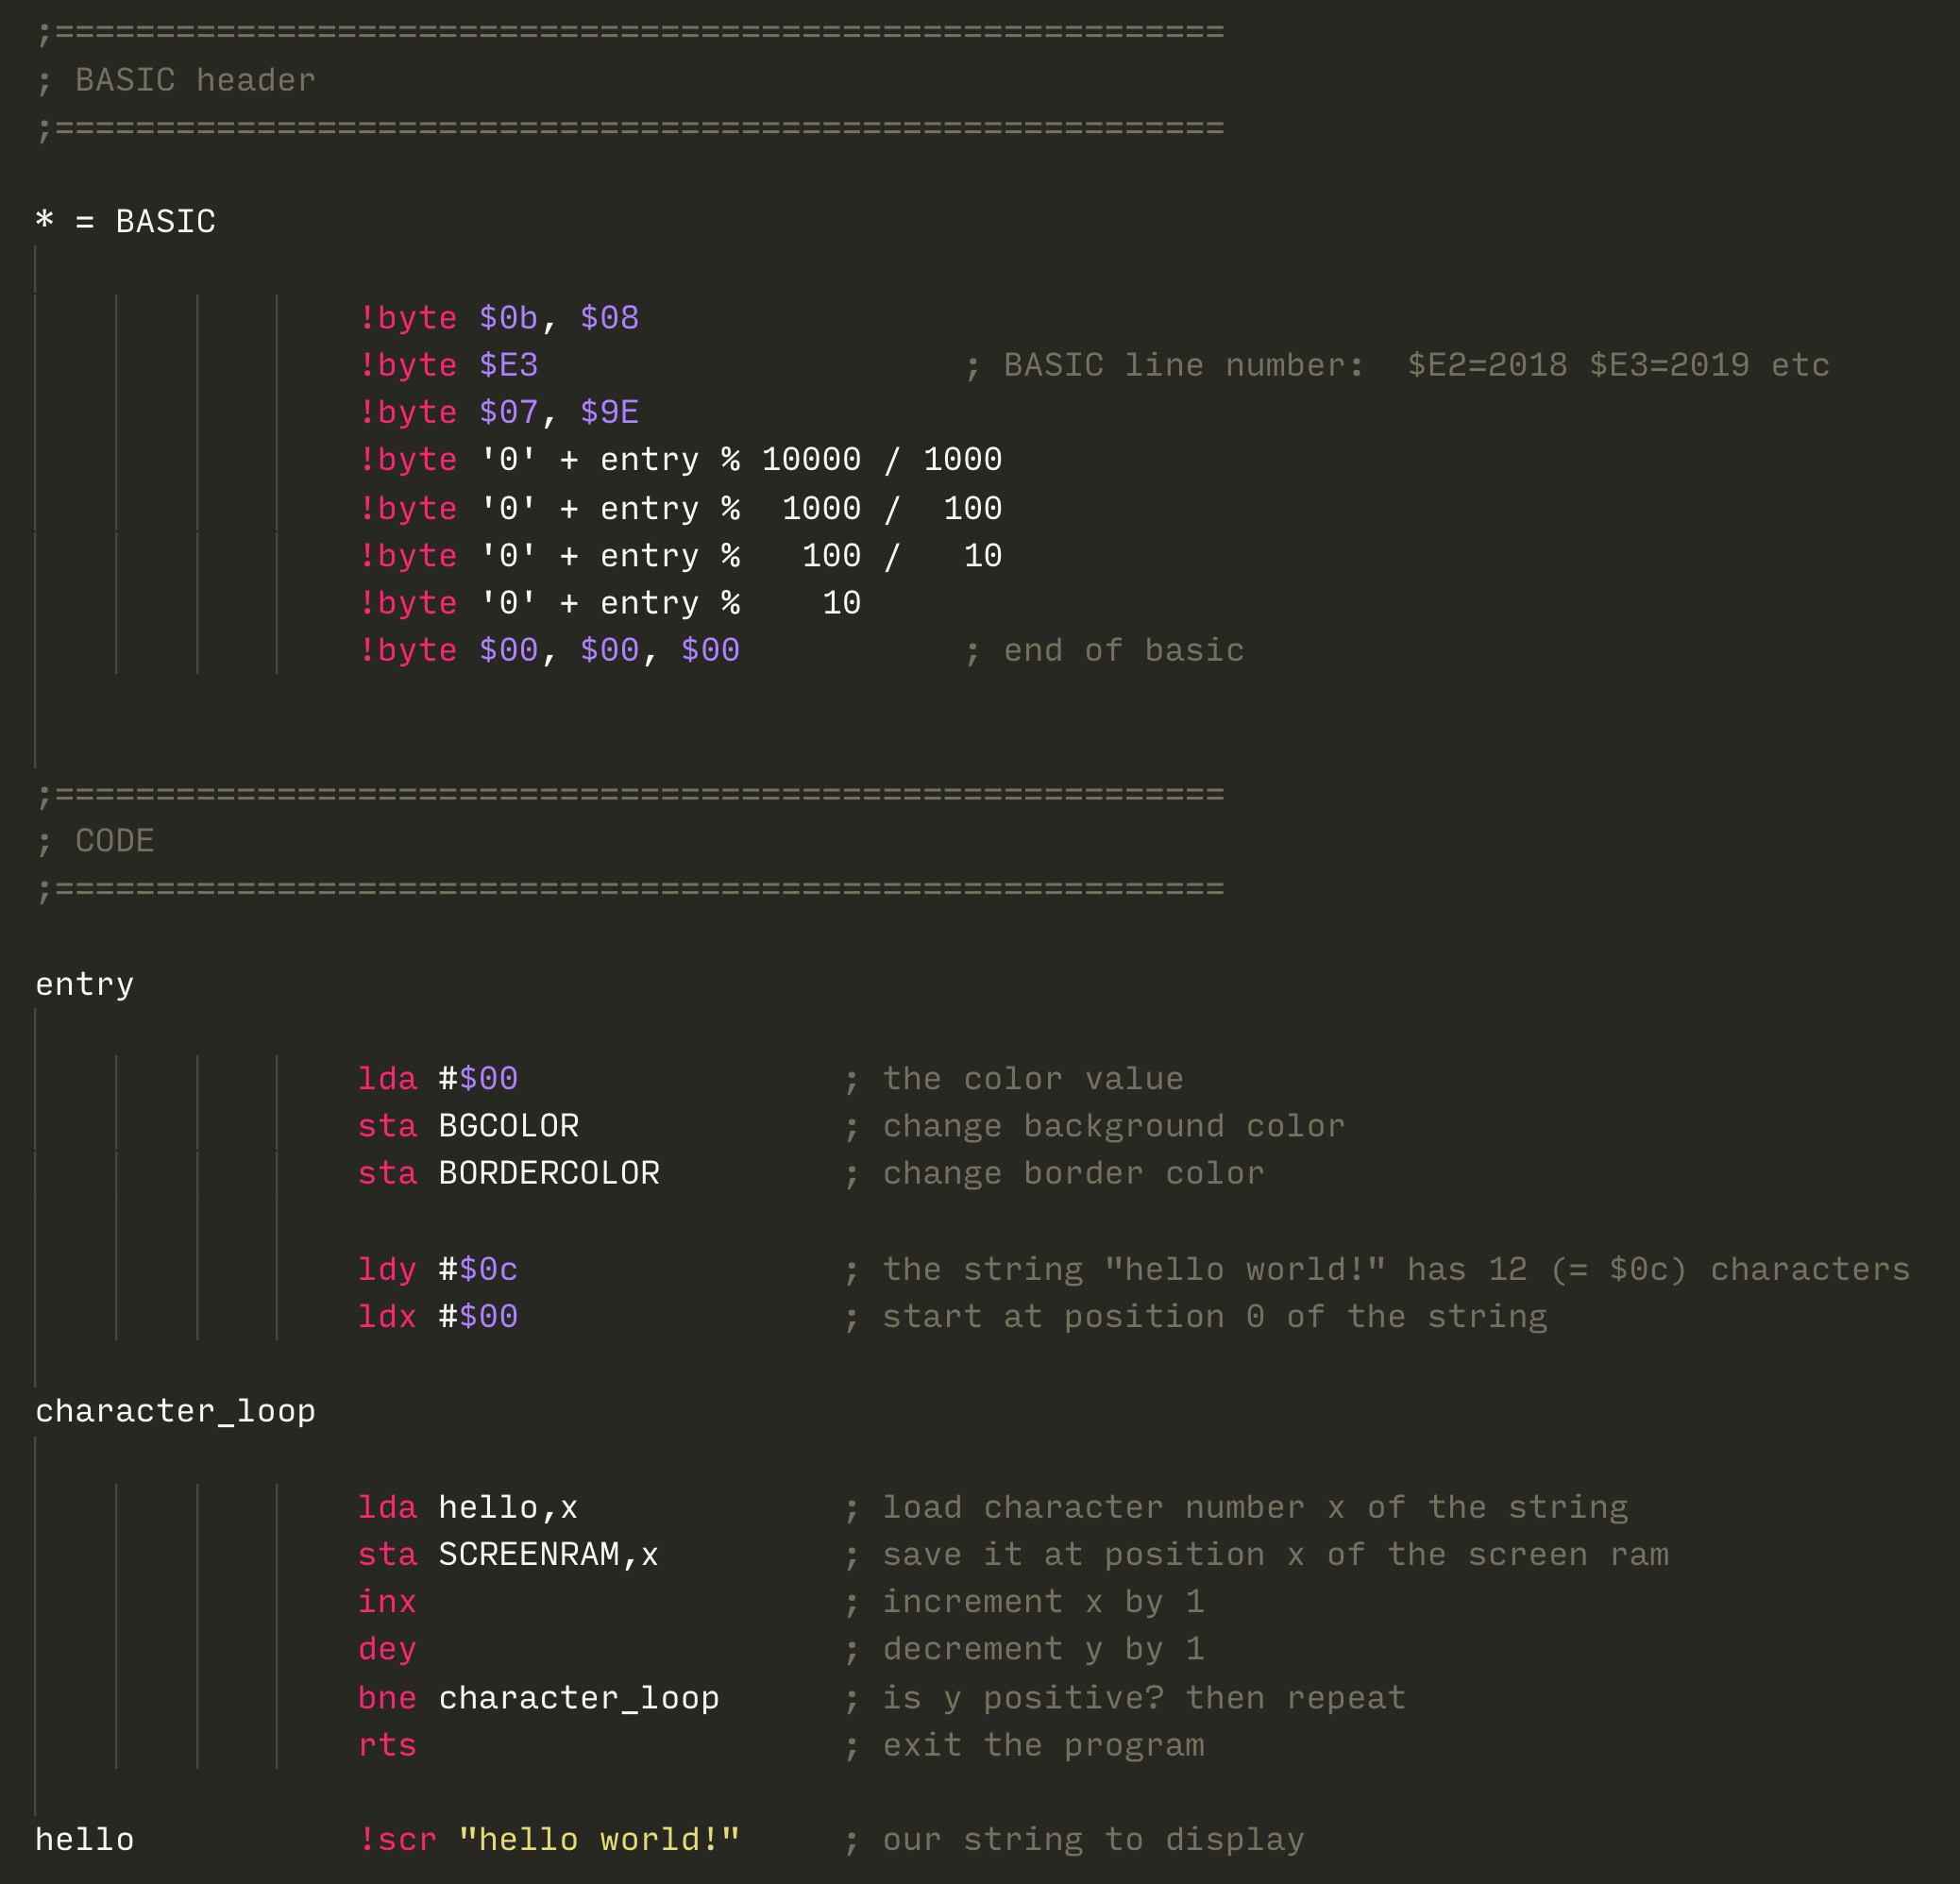
;==========================================================
; BASIC header
;==========================================================

* = BASIC

                !byte $0b, $08
                !byte $E3                     ; BASIC line number:  $E2=2018 $E3=2019 etc
                !byte $07, $9E
                !byte '0' + entry % 10000 / 1000
                !byte '0' + entry %  1000 /  100
                !byte '0' + entry %   100 /   10
                !byte '0' + entry %    10
                !byte $00, $00, $00           ; end of basic
This creates a BASIC listing executing your machine program: 2019 SYS2061
;==========================================================
; CODE
;==========================================================

entry

                lda #$00                ; the color value
                sta BGCOLOR             ; change background color
                sta BORDERCOLOR         ; change border color

                ldy #$0c                ; the string "hello world!" has 12 (= $0c) characters
                ldx #$00                ; start at position 0 of the string

character_loop

                lda hello,x             ; load character number x of the string
                sta SCREENRAM,x         ; save it at position x of the screen ram
                inx                     ; increment x by 1
                dey                     ; decrement y by 1
                bne character_loop      ; is y positive? then repeat
                rts                     ; exit the program

hello           !scr "hello world!"     ; our string to display
This is the actual program. It loads the value 0 into the accumulator and stores it in the memory locations for the border and background color, resulting in a black screen. Next, it reads the content at position 'hello' character by character and outputs it on the screen, resulting in 'hello world!". The rts exits the program.
Okay, let's compile the code and watch it in Vice.
Press SHIFT + COMMAND + B (On Windows, it's SHIFT + CNTRL + B)
If all worked well, VSCode should run the tasks.json file, execute the acme compiler and display your program in the Vice Emulator. It should look like this:

Congratulations! You've successfully compiled 8 bit assembly code!
Hints & Help
This section will probably grow as you report all the silly mistakes I made in my setup guide.
Windows Command Line Syntax
Some Windows Users had issues with the Command Line Chaining and found out that replacing the && with ; works. So instead of
"command": "bin\\win\\acme -f cbm -l build/labels -o build/main.prg code/main.asm && C:/tools/vice/x64.exe -moncommands build/labels build/main.prg"
try
"command": "bin\\win\\acme -f cbm -l build/labels -o build/main.prg code/main.asm ; C:/tools/vice/x64.exe -moncommands build/labels build/main.prg"
How to use the file name of your asm file instead of "main" for the compiled PRG
If you want to compile e.g. "mycoolcode.asm" to "mycoolcode.prg" instead of "main.prg", you can do that by using a VSCode variable ${fileBasenameNoExtension}, for example:
"command": "bin/win/acme -f cbm -l build/labels -o build/${fileBasenameNoExtension}.prg code/${fileBasenameNoExtension}.asm ; D:/Studio/Vice64/x128.exe -moncommands build/labels build/${fileBasenameNoExtension}.prg"
Be aware though that if you have multiple asm files you generally want to compile the one that hosts the includes, not neccessarily the one you're currently working in (e.g. "spritesconfig.asm").
FAQ
How do I get rid of the annoying 'the task is already active' modal each time I build?
It only comes up if Vice is still running. Easiest would be to quit Vice every time. I haven't found out yet how to handle this automatically (e.g. setting up task watchers). If you know how to do this, please let me know.
I'm stuck at [insert random problem]
I'm happy to help you out - if I can. I do not have any Windows or Linux machine at hand though. Write an issue in github or tweet @awsm9000.
How do I switch to another build task than the default one?
Two ways: either move the "isDefault": true setting in the tasks.json to the one you prefer, or in VSCode go to Terminal -> Run Task... and select a different build task.
This stuff is awesome! How can I contribute?
Cheers!
You can contribute in many ways:
- Share this repo with other likeminded fellas in your social filter bubble. Spread the word. 8 bit hacking is easy!
- If you're a VSCode pro knowing all about tasks or have found out something to improve this guide, create an issue or fork the repo and do a pull request. I'm thankful for any help.
- Are you producing youtube videos? A guided tutorial might be perfect for many beginners. I would make sure to link it here.
Thanks
Special thanks to Janne Hellsten (nurpax https://github.com/nurpax) for converting me to VSCode and supporting me on every step of the way. He's created many great retro projects himself, including the best PETSCII editor Petmate or the JavaScript C64 compiler c64jasm.
Thanks to SpiderJ for providing the Linux binaries.
Thanks to dmc6297 for the windows configuration.
Thanks to nurpax for adding a problem matcher so that error messages from ACME are displayed in VSCode now - awesome.
Thanks to Chris Toast for additonal some settings options.
About me
I'm a hobby dev growing up in the 80s. It was great back then. Every line of code a magic door.
My website: http://www.awsm.de
Follow me on twitter: http://www.twitter.com/awsm9000
I created Spritemate, the free online C64 sprite editor: http://www.spritemate.com
Check out my other github projects: https://github.com/Esshahn