Waytoon / Chimera_flutter_code_push
Programming Languages
Projects that are alternatives of or similar to Chimera flutter code push
Chimera_Flutter_Code_Push
Enjoy it! Chimera implements/supports iOS and android app code push!


What is Chimera Flutter Code Push?
Enjoy it! Chimera support iOS and android app code push!
Chimera Flutter CodePush is an SDK that has been developing for more than 2 years for flutter app code push enhancement and accomplishment.
As you know, the google flutter team has announced that flutter would not support the code push function in their engine.
Google mentioned here:
This was previously on our roadmap for 2019. After investigating this in greater detail, we have decided not to proceed with this work for now.
There were several factors that led us to this decision:
- To comply with our understanding of store policies on Android and iOS, any solution would be limited to JIT code on Android and interpreted code on iOS. We are not confident that the performance characteristics of such a solution on iOS would reach the quality that we demand of our product. (In other words, "it would be too slow".)
- There are some serious security concerns. Since these patches would essentially allow arbitrary code execution, they would be extremely attractive malware vectors. We could mitigate this by requiring that patches be signed using the same key as the original package, but this is error prone and any mistake would have serious consequences. This is, fundamentally, the same problem that has plagued platforms that allow execution of code from third-party sources. This problem could be mitigated by integrating with a platform update mechanism, but this defeats the purpose of an out-of-band patching mechanism.
- There is currently no out-of-the-box open source hosting solution for patching applications, so we would either have to rely on people configuring their Web servers accordingly, or we would have to create integrations for proprietary third-party services, or we would have to create our own bespoke solution. Hosting patches is a space we are not eager to enter. Having people configure their own server leaves them open to making mistakes with potentially serious implications as explained in the previous point about security. Depending on third-party services puts Flutter in an awkward position of having to pick winners and exposes us to the risk of those projects themselves making policy changes that would affect this feature.
So Chimera flutter CodePush was initialized and developed at that moment: Chimera CodePush is a cloud service that enables flutter developers to deploy mobile app updates directly to their users' devices. It works by acting as a central repository that developers can publish updates to, and that apps can query for updates from. This allows you to have a more deterministic and direct engagement model with your userbase when addressing bugs and/or adding small features that don't require you to re-build a binary and re-distribute it through the respective app stores.
Chimera can dispatch UI/Logic/..(all you want) changes to users as a bundle(s), the way similar to React Native. With Flutter Chimera integrated, you can publish all your app pages without waiting for the next release date of your App. Chimera provides a wonderful compiler, it can be used as a new magic tool to convert, run, upgrade your Flutter pages/apps.
To get started using Chimera CodePush, refer to this documentation, and read the following steps if you'd like to build/contribute to the project from the source.
All apps written in flutter will be supported by Chimera SDK, don't hesitate to start to use this super code push SDK.
Dev Setup
Now let’s start the journey:
🚩 First of all, you may need to be an excellent Flutter programmer or a flutter programming enthusiast, like me :-), mainly needs to be familiar with Flutter programming, and has a heart that likes to study and learn.
Set up Flutter ENV:here.
You need a good IDE, Android Studio or VSCODE are recommended.
Remember to install http-server, because subsequent work requires http-server:
brew install http-server
The big killer is here, our compiler! This compiler is the main tool to serve Chimera CodePush.
   # Compilation tool download link

   https://github.com/Waytoon/chimera_flutter_code_push/releases/download/v1.0.0/rust_compile
For Chinese users, you can refer to the following instructions link to speed up the download speed of GitHub files.
The current SDK does not support the following environments:
- Windows
The important thing: The compiler needs to be connected to the Internet while it is running. Full support for Mac, including M1.
🏁 Please check the runtime environment on your computer. Chimera is based on the latest stable version of Flutter. And the SDK will continue to support the latest stable Flutter version in the future.
https://flutter.dev/docs/development/tools/sdk/releases?tab=macos(opens new window)
The flutter version we use (stable version)
~/Desktop/tool flutter --version Flutter 1.22.6 • channel stable • https://github.com/flutter/flutter.git Framework • revision 9b2d32b605 (6 weeks ago) • 2021-01-22 14:36:39 -0800 Engine • revision 2f0af37152 Tools • Dart 2.10.5If you are using flutter 2 now, please switch to
flutter 1.22.6 staleSwitching method : Please run
flutter downgradein the terminal
Use CodePush SDK
-
First run
mkdir testto create atestfolder. As shown below: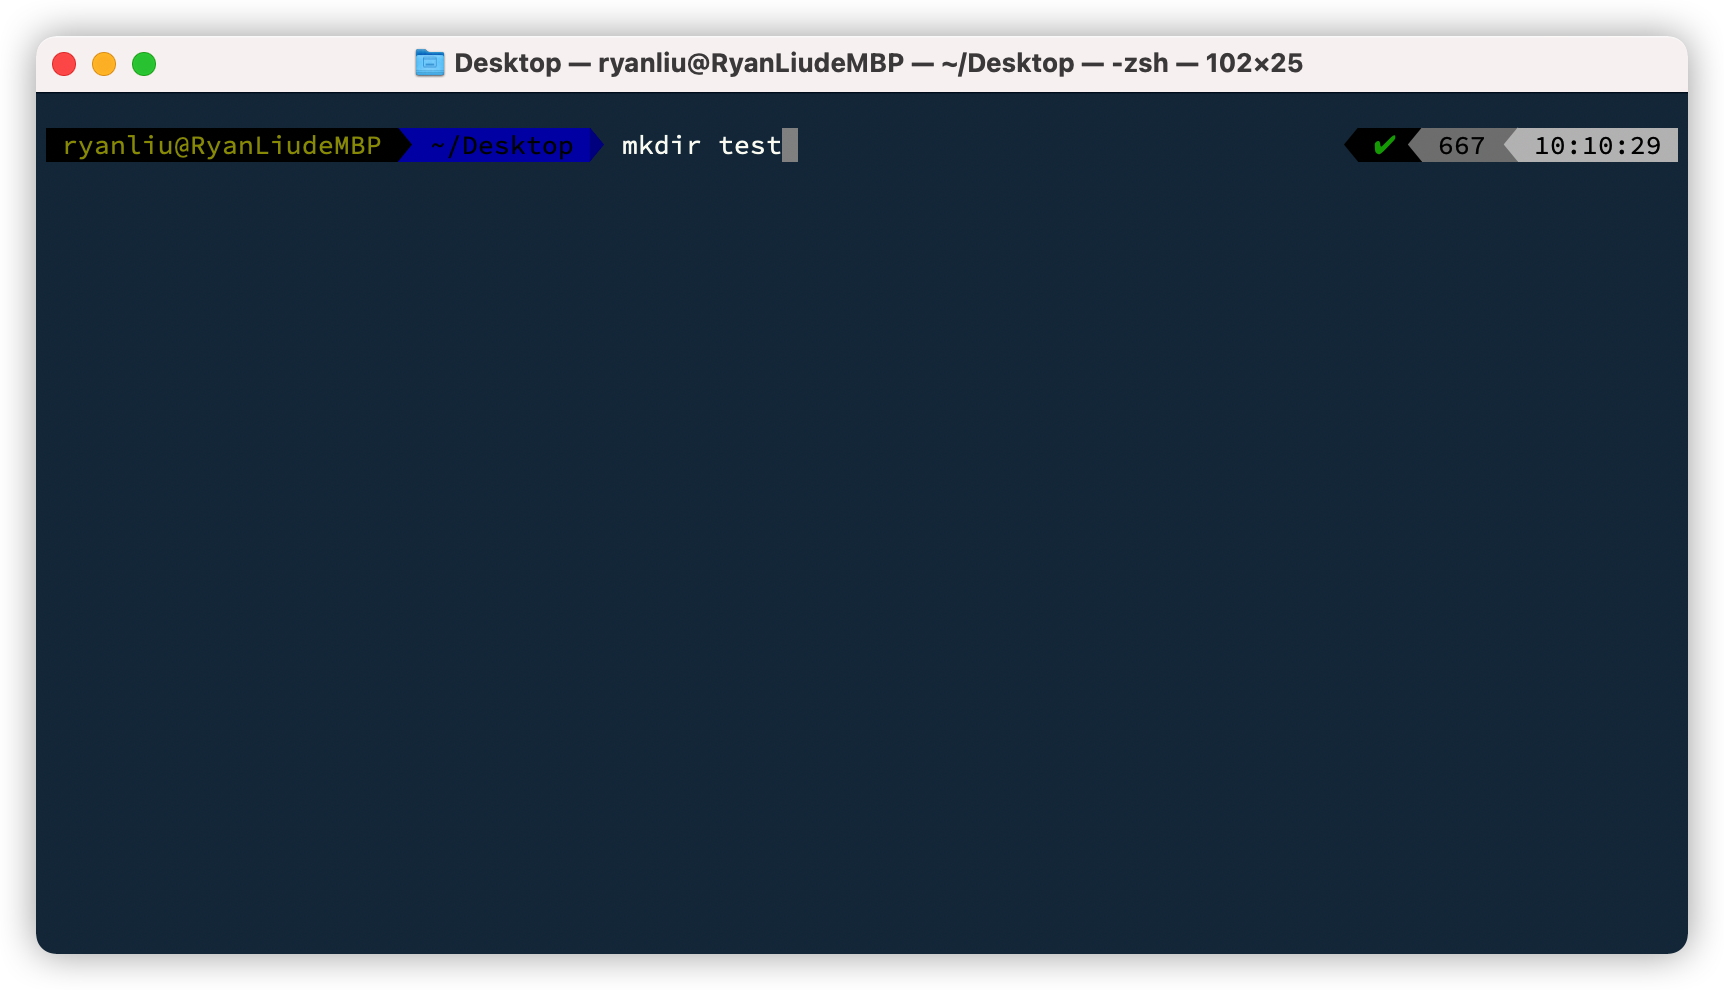
cd testenter the test directory and create ahelloproject:flutter create hello.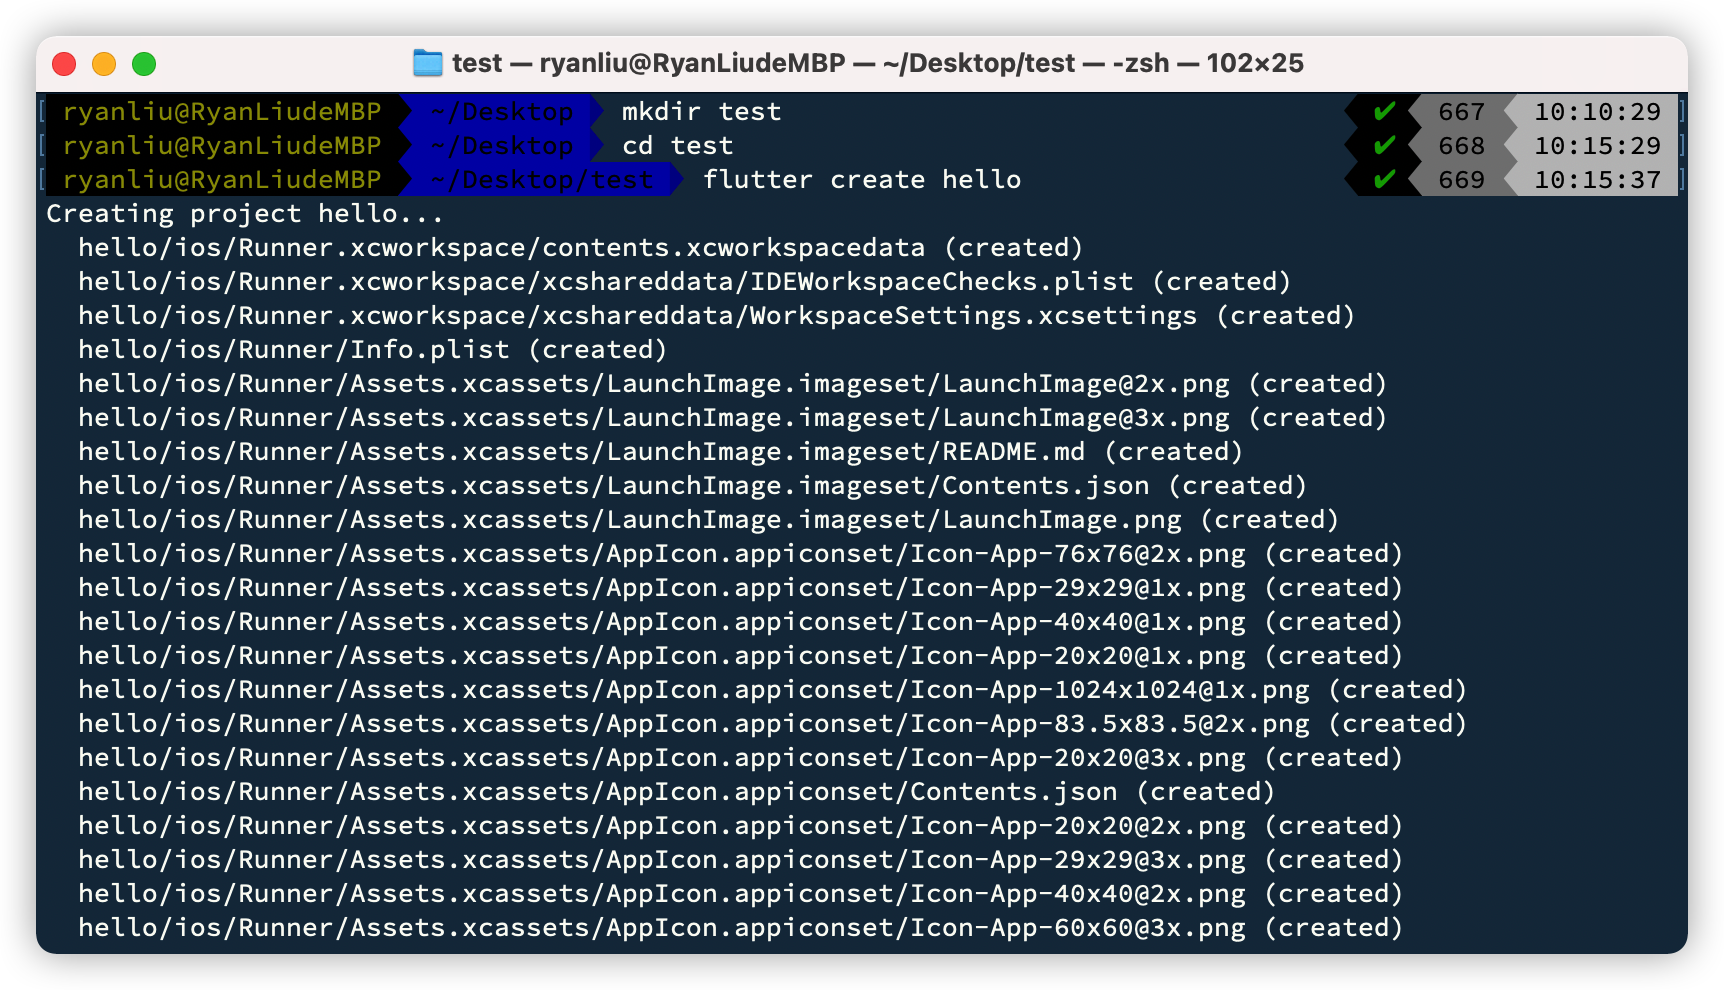
hellodirectory structure is as follows:.hello folder ├── README.md ├── android ├── hello.iml ├── ios ├── lib ├── pubspec.lock ├── pubspec.yaml └── test -
Open the
helloproject with IDE: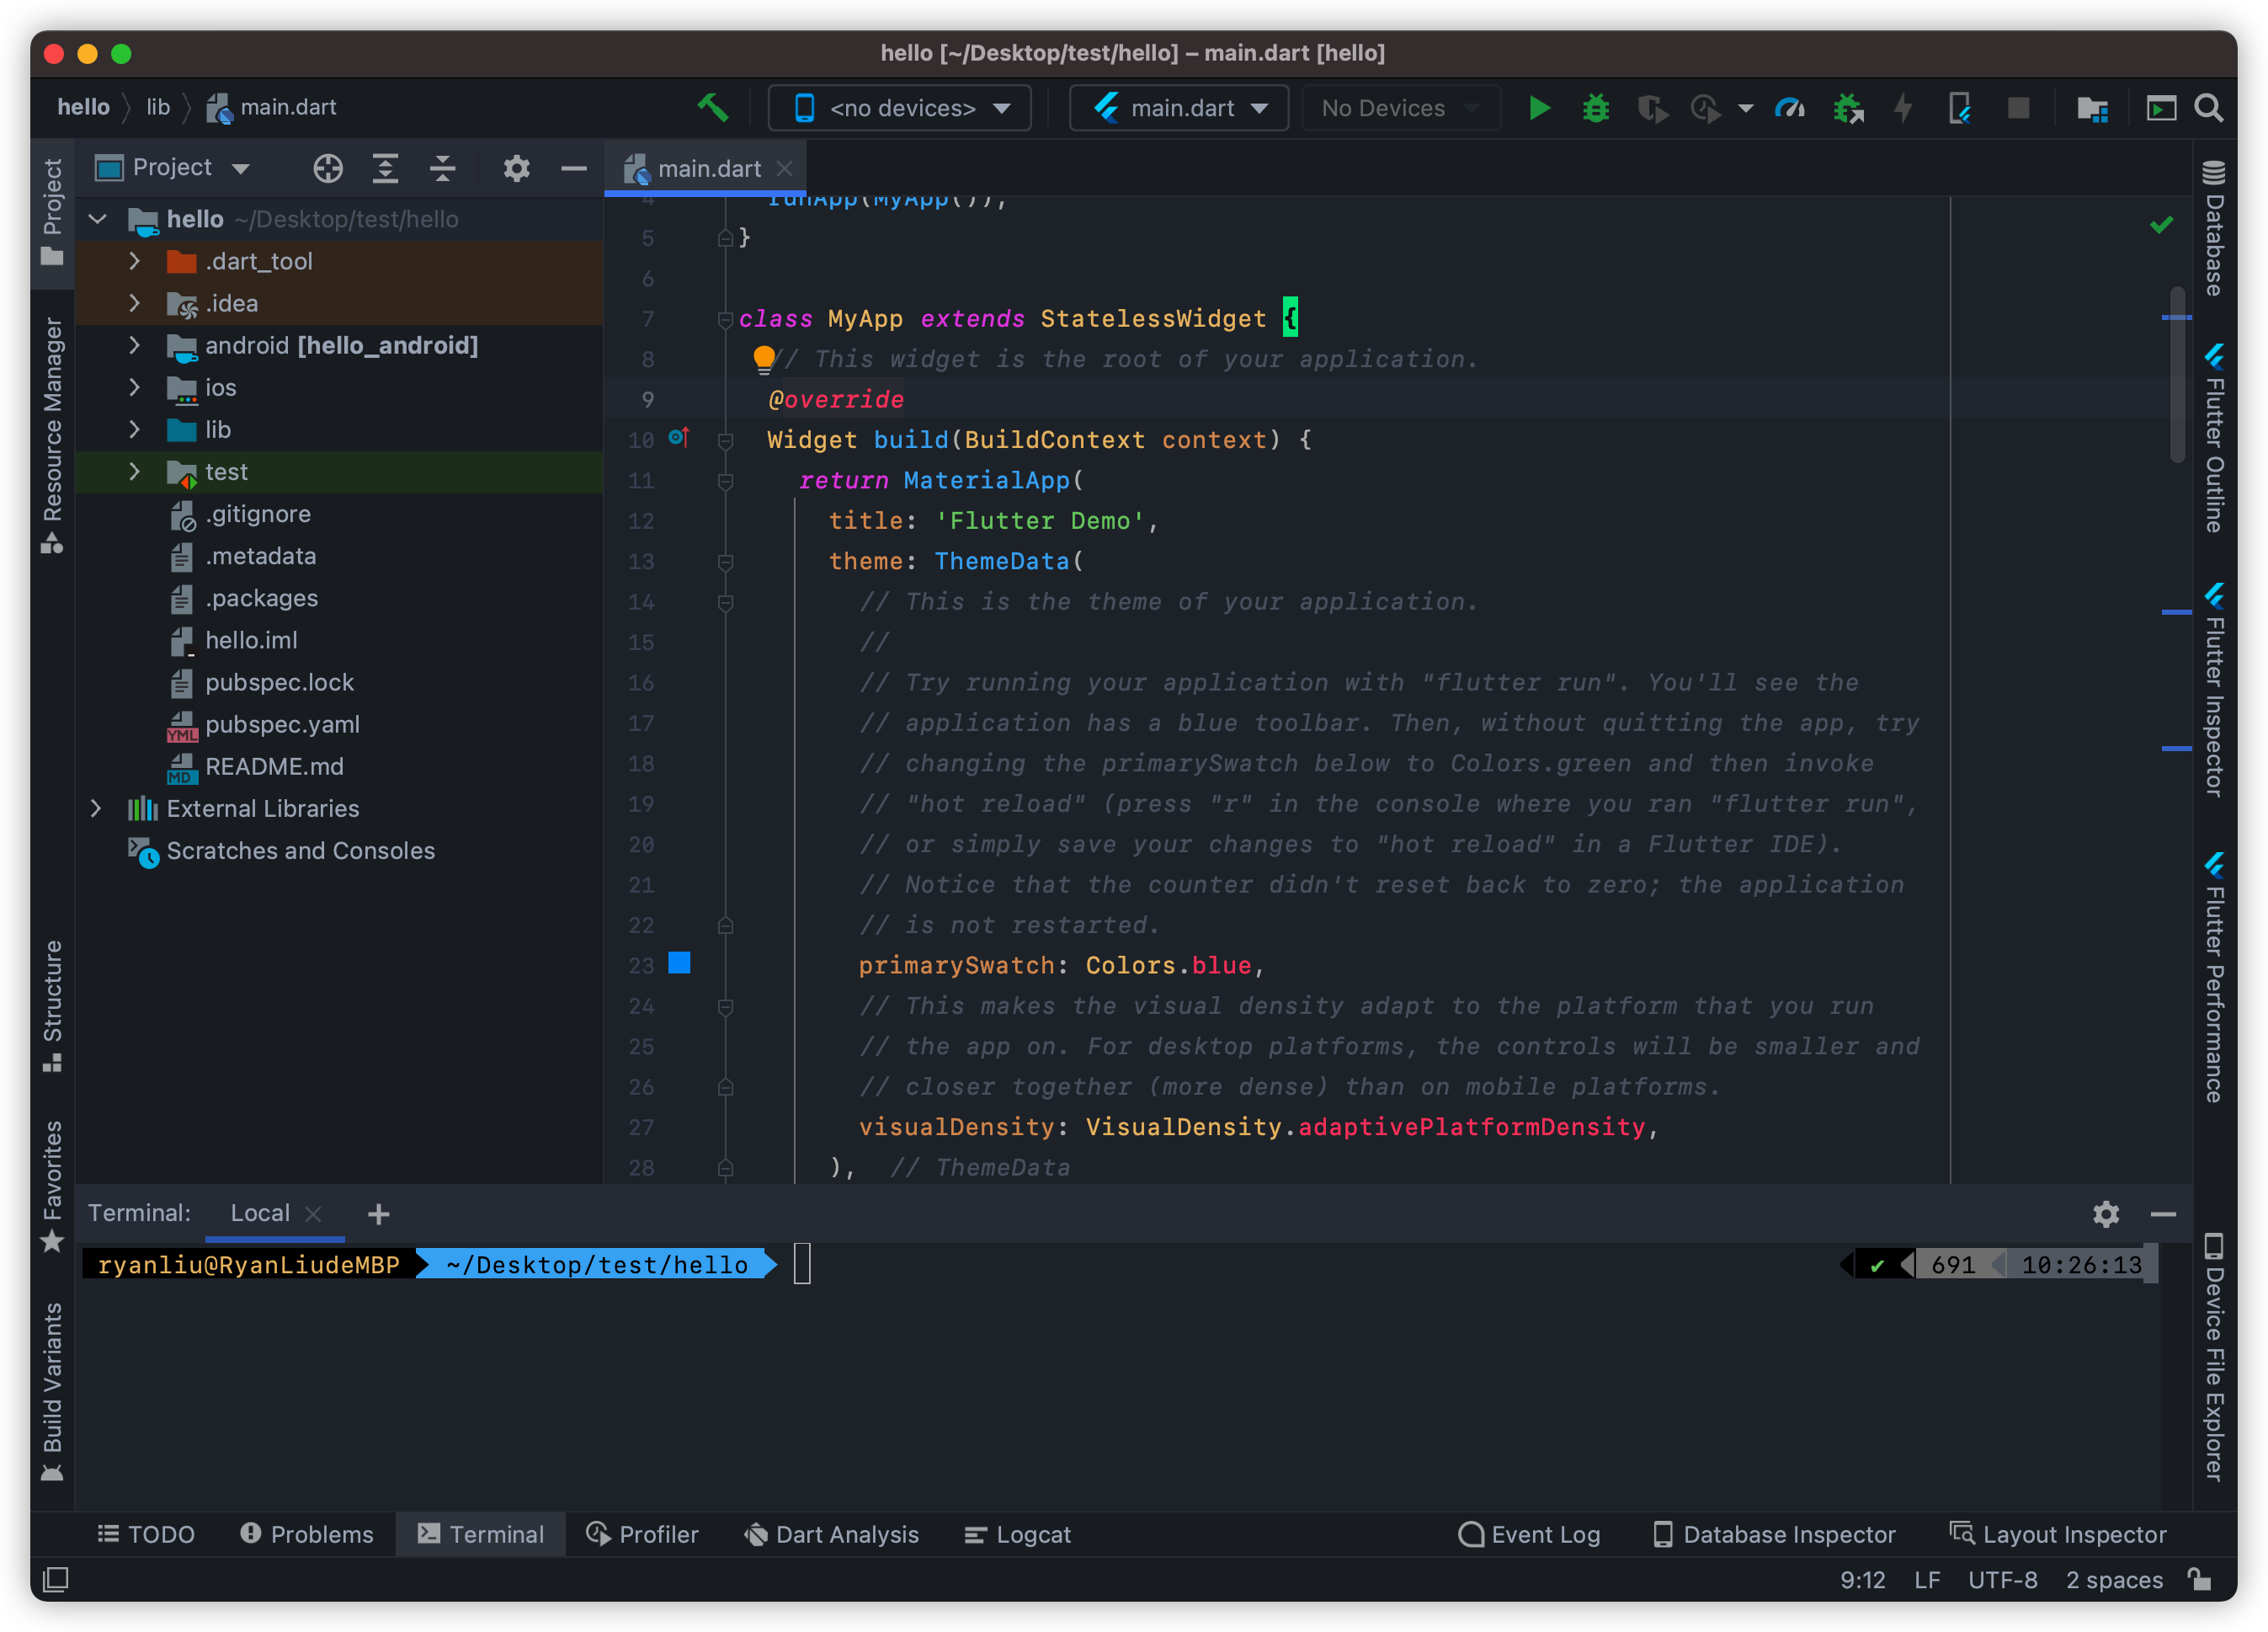
**Be careful here! ! ** Use the IDE to debug the
helloproject, whether using the simulator or the real phone, below we use the simulator as an example demonstration.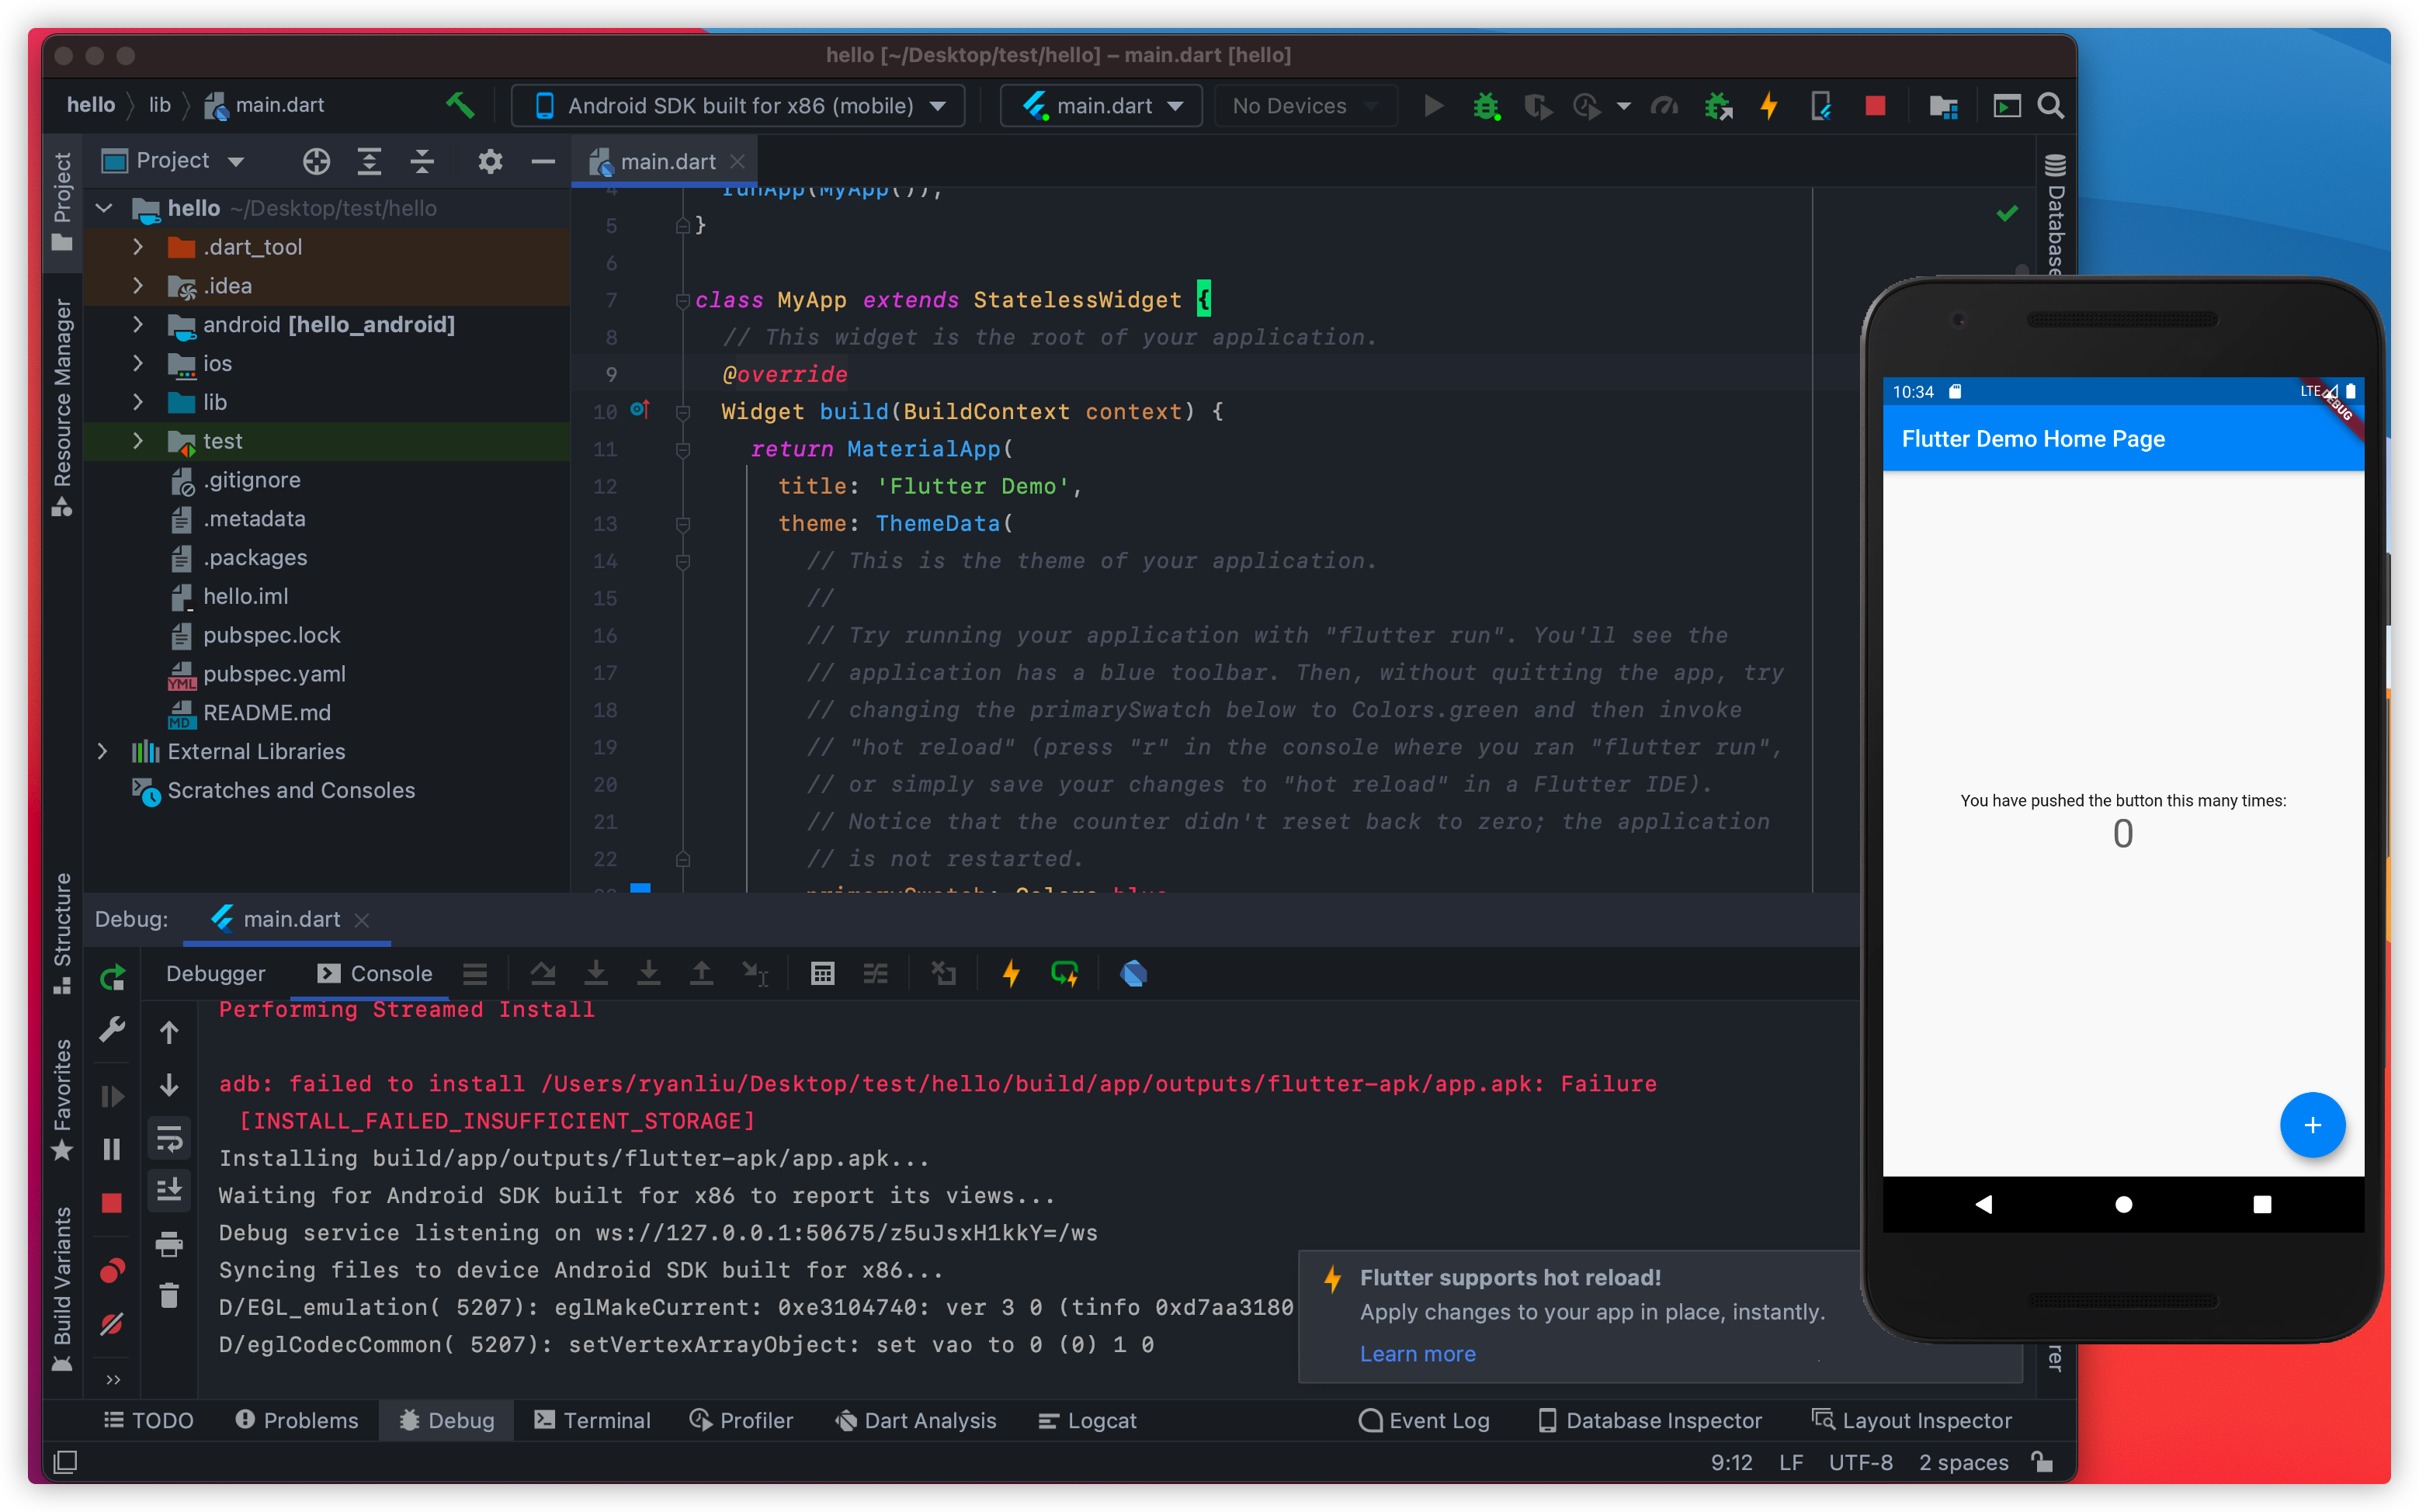
-
Very important step Download our compiler, link:
https://github.com/Waytoon/chimera_flutter_code_push/releases/download/v1.0.0/rust_compilePlease pay attention to check and pay attention to the release of the release file in the release section. In the recent period, we will update the compiler every night.
Download to a designated directory, give a name at will, let's use
tool: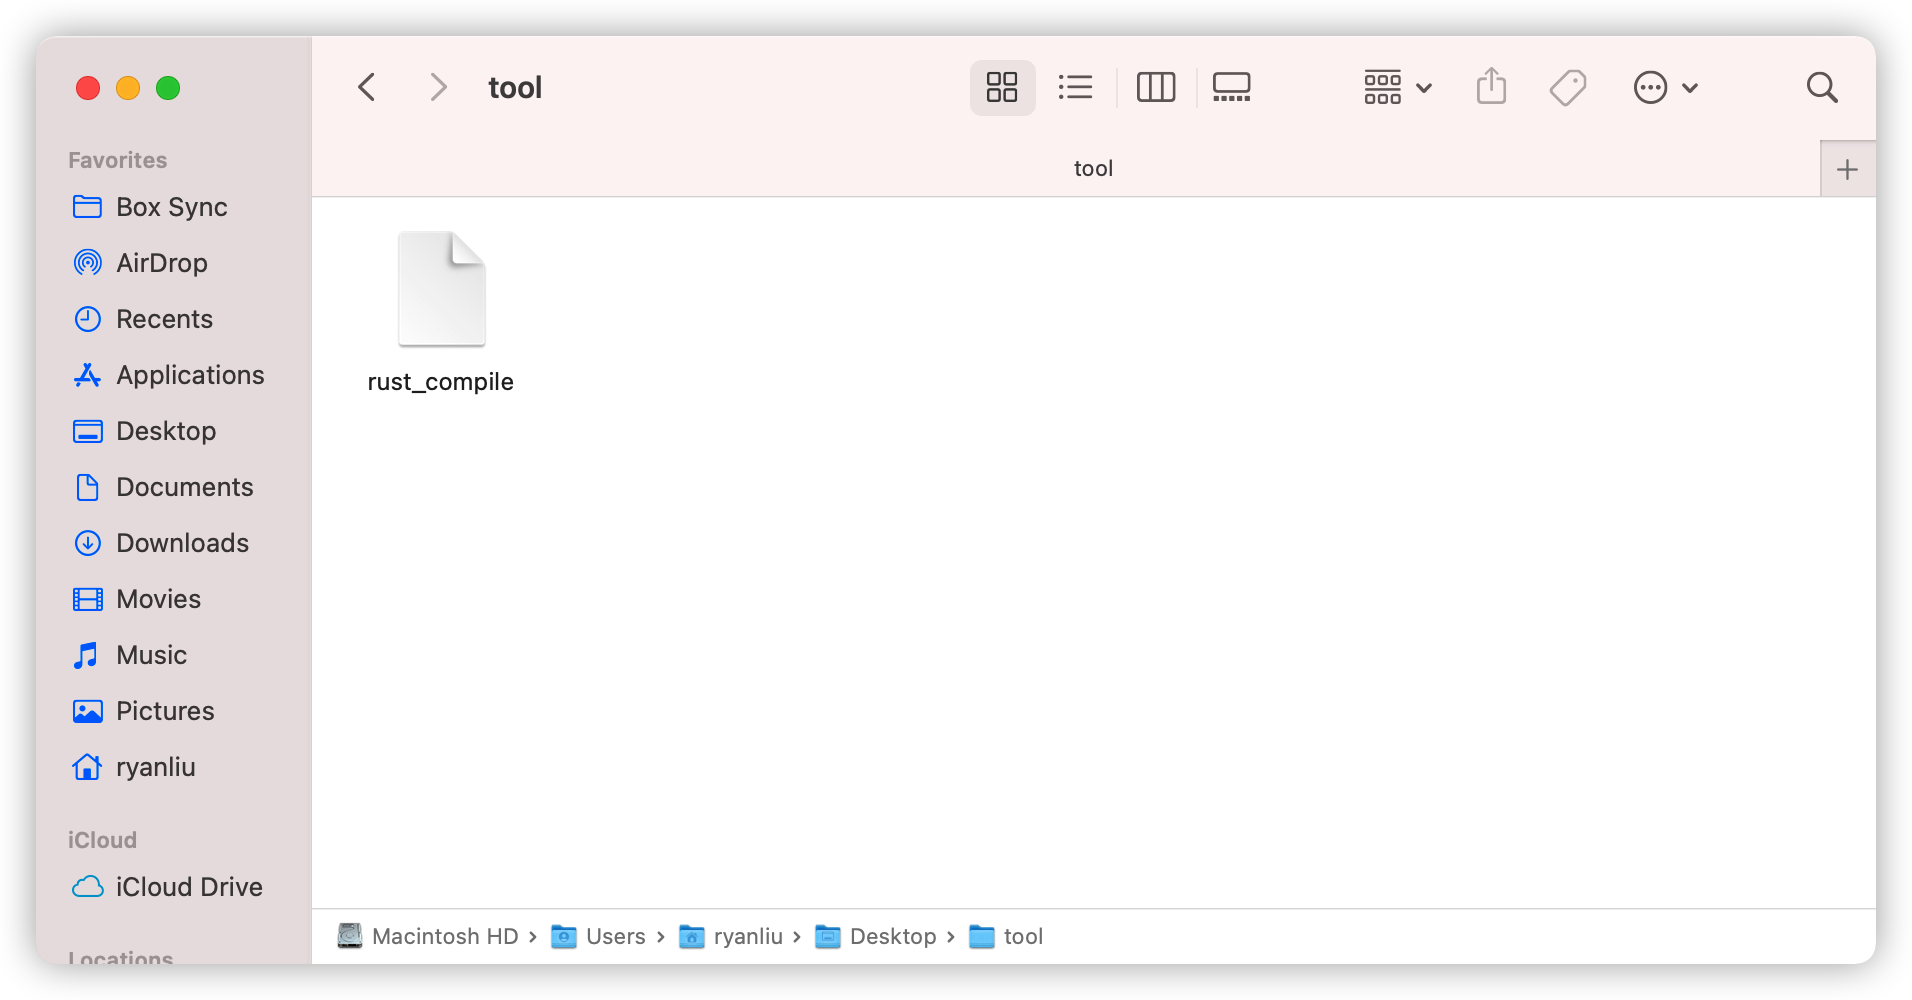
Then open the terminal, enter the directory of the compiler, and run the command
chmod 777 rust_compileto make the compiler have permission to run.Next run
./rust_compilein the terminal: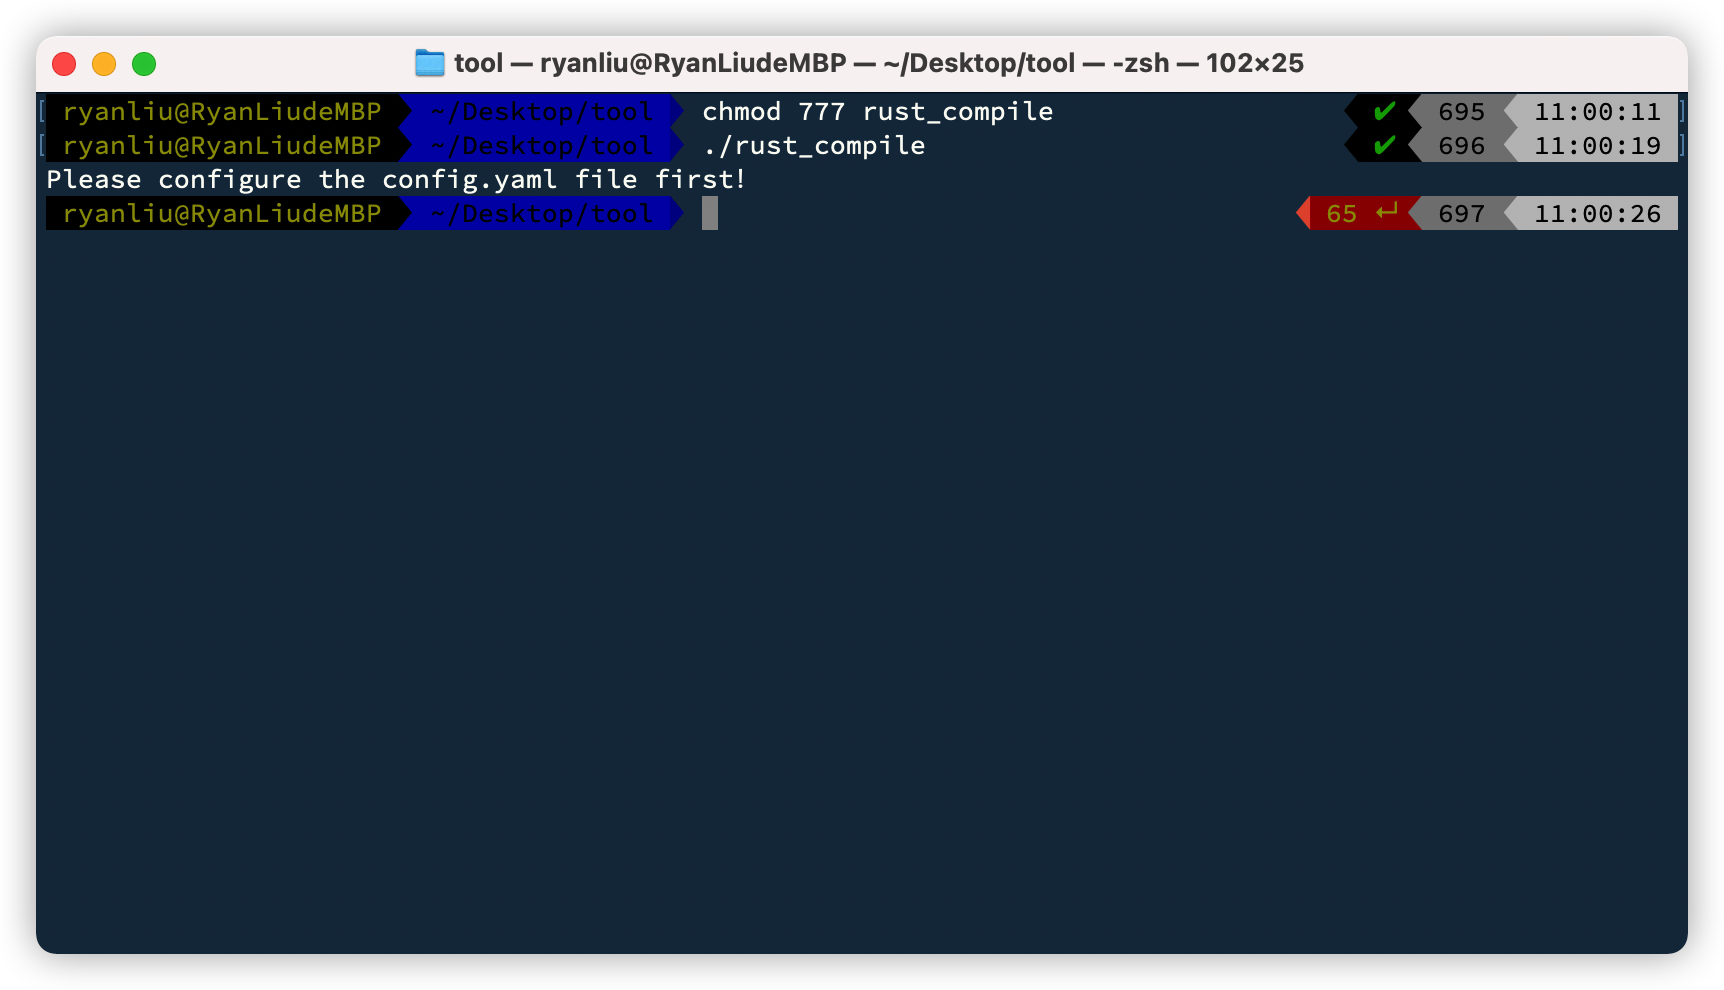
The first time you run the compiler, the configuration file
config.yamlwill be generated.-
After running, you will be prompted to configure
config.yaml, as shown in the figure above.Open
config.yamland configure it as following:
     # Project path
     projectPath: /Users/ryanliu/Desktop/test/hello #Modify the directory of hello
     # Flutter SDK
     flutterSdkPath: /Users/ryanliu/development/flutter #Modify the SDK directory of the current flutter environment
     # Compile cache path
     buildCachePath: /Users/ryanliu/Desktop/temp/dart_compile_cache #Set up a directory to save dart_compile_cache
     # FTP
     #ftpConfig: 192.168.80.141|root|123456  ignore this optional setting
-
-
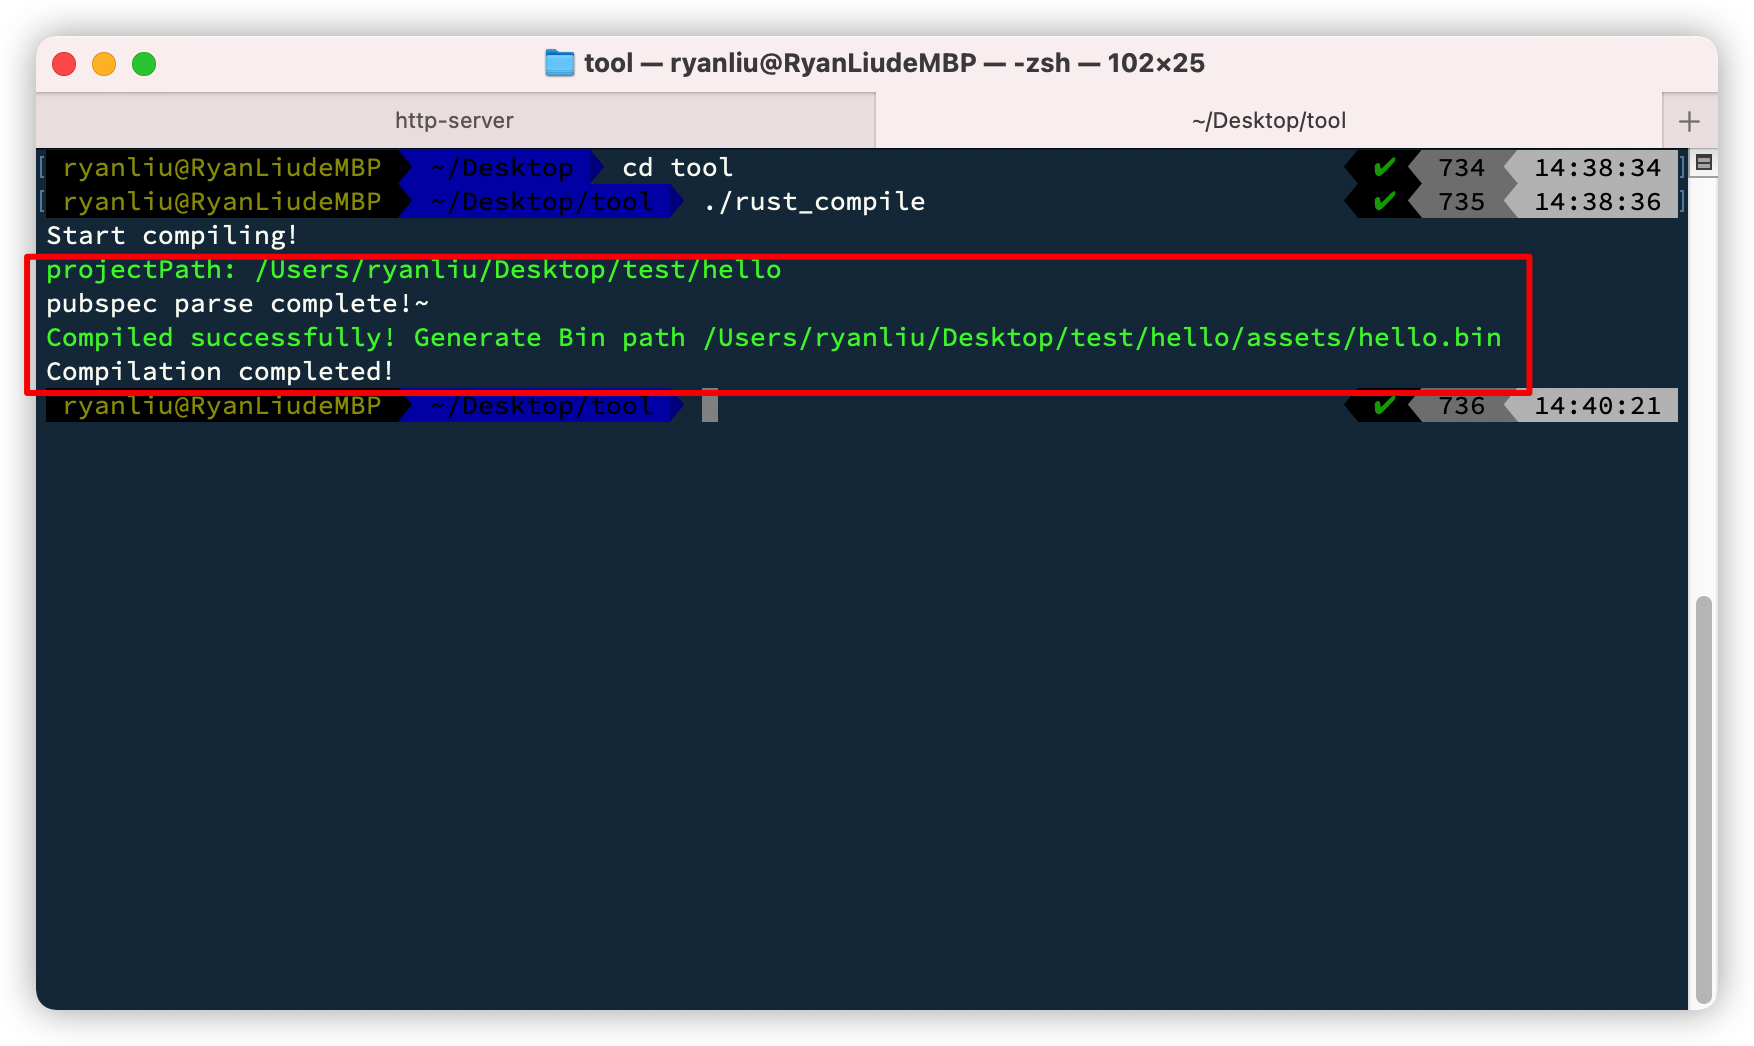
Then run
./rust_compileagain in the terminal to execute our compilation process. In about 2-5 minutes, you can get the following screen results. The compiled producthello.binis in the projecthello/assets/directory, and there are morewtbaseLibrary directory.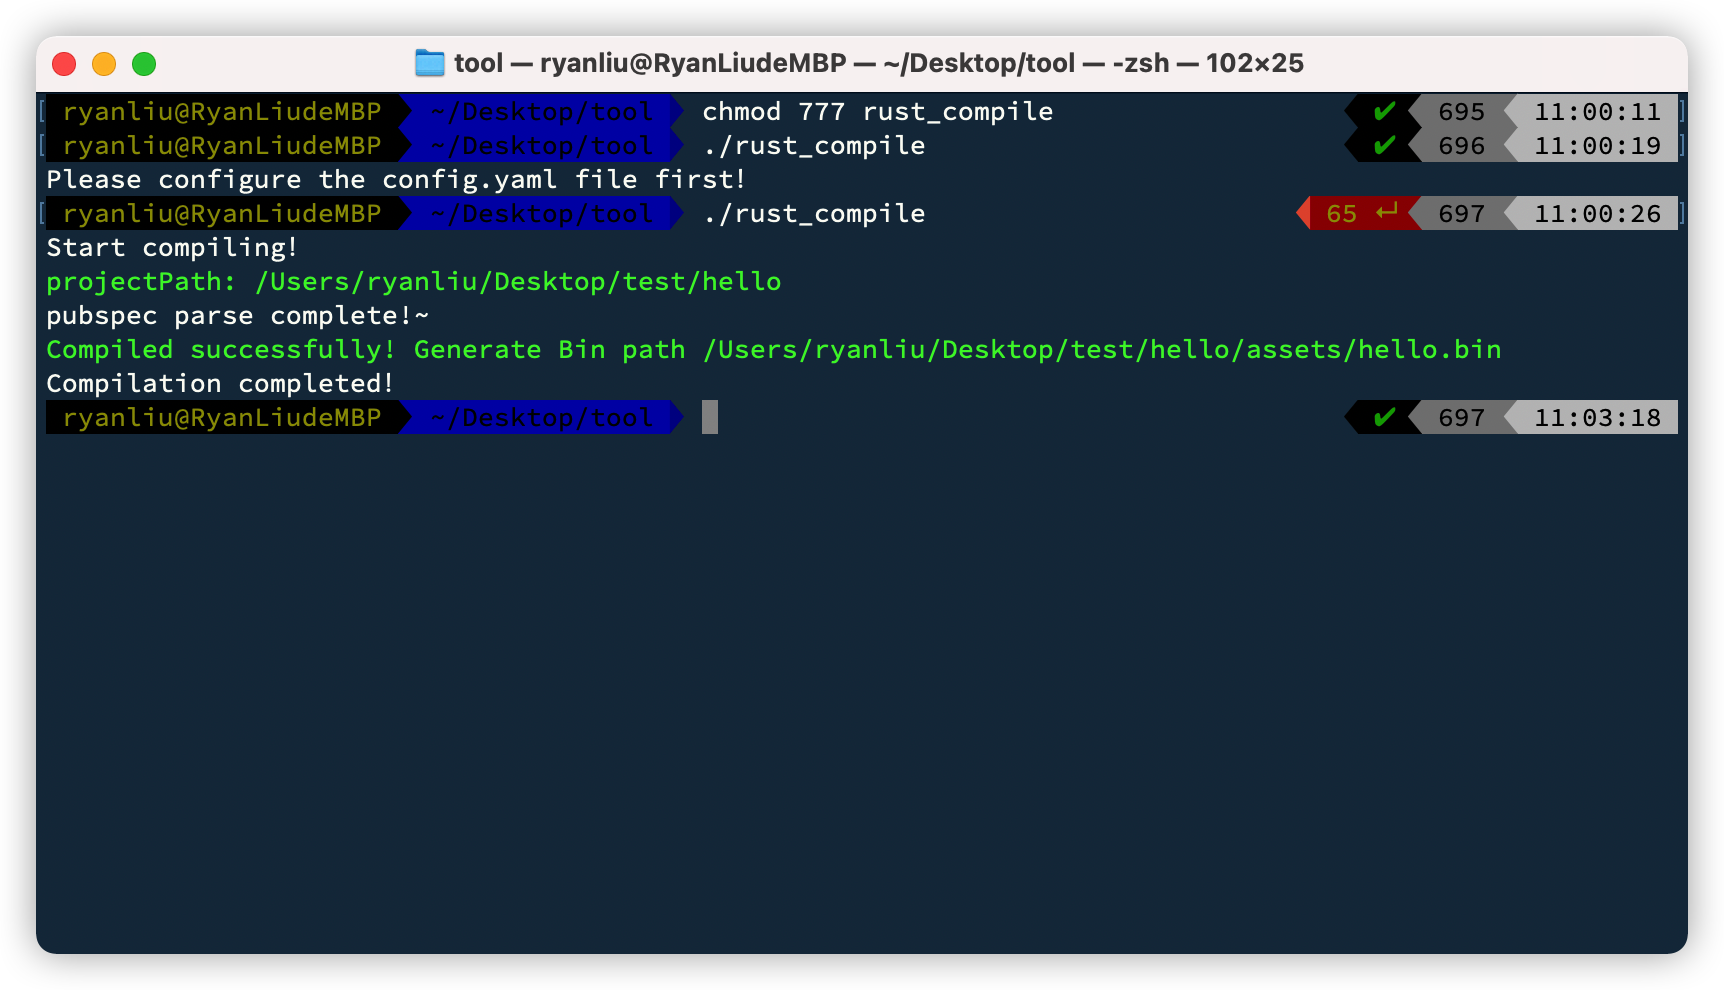
We can see that the directory of the
hellofolder has been changed, notice that there are two new foldersassetsandwtbasein the directory:├── README.md ├── android ├── assets ├── build ├── hello.iml ├── ios ├── lib ├── pubspec.lock ├── pubspec.yaml ├── test └── wtbase -
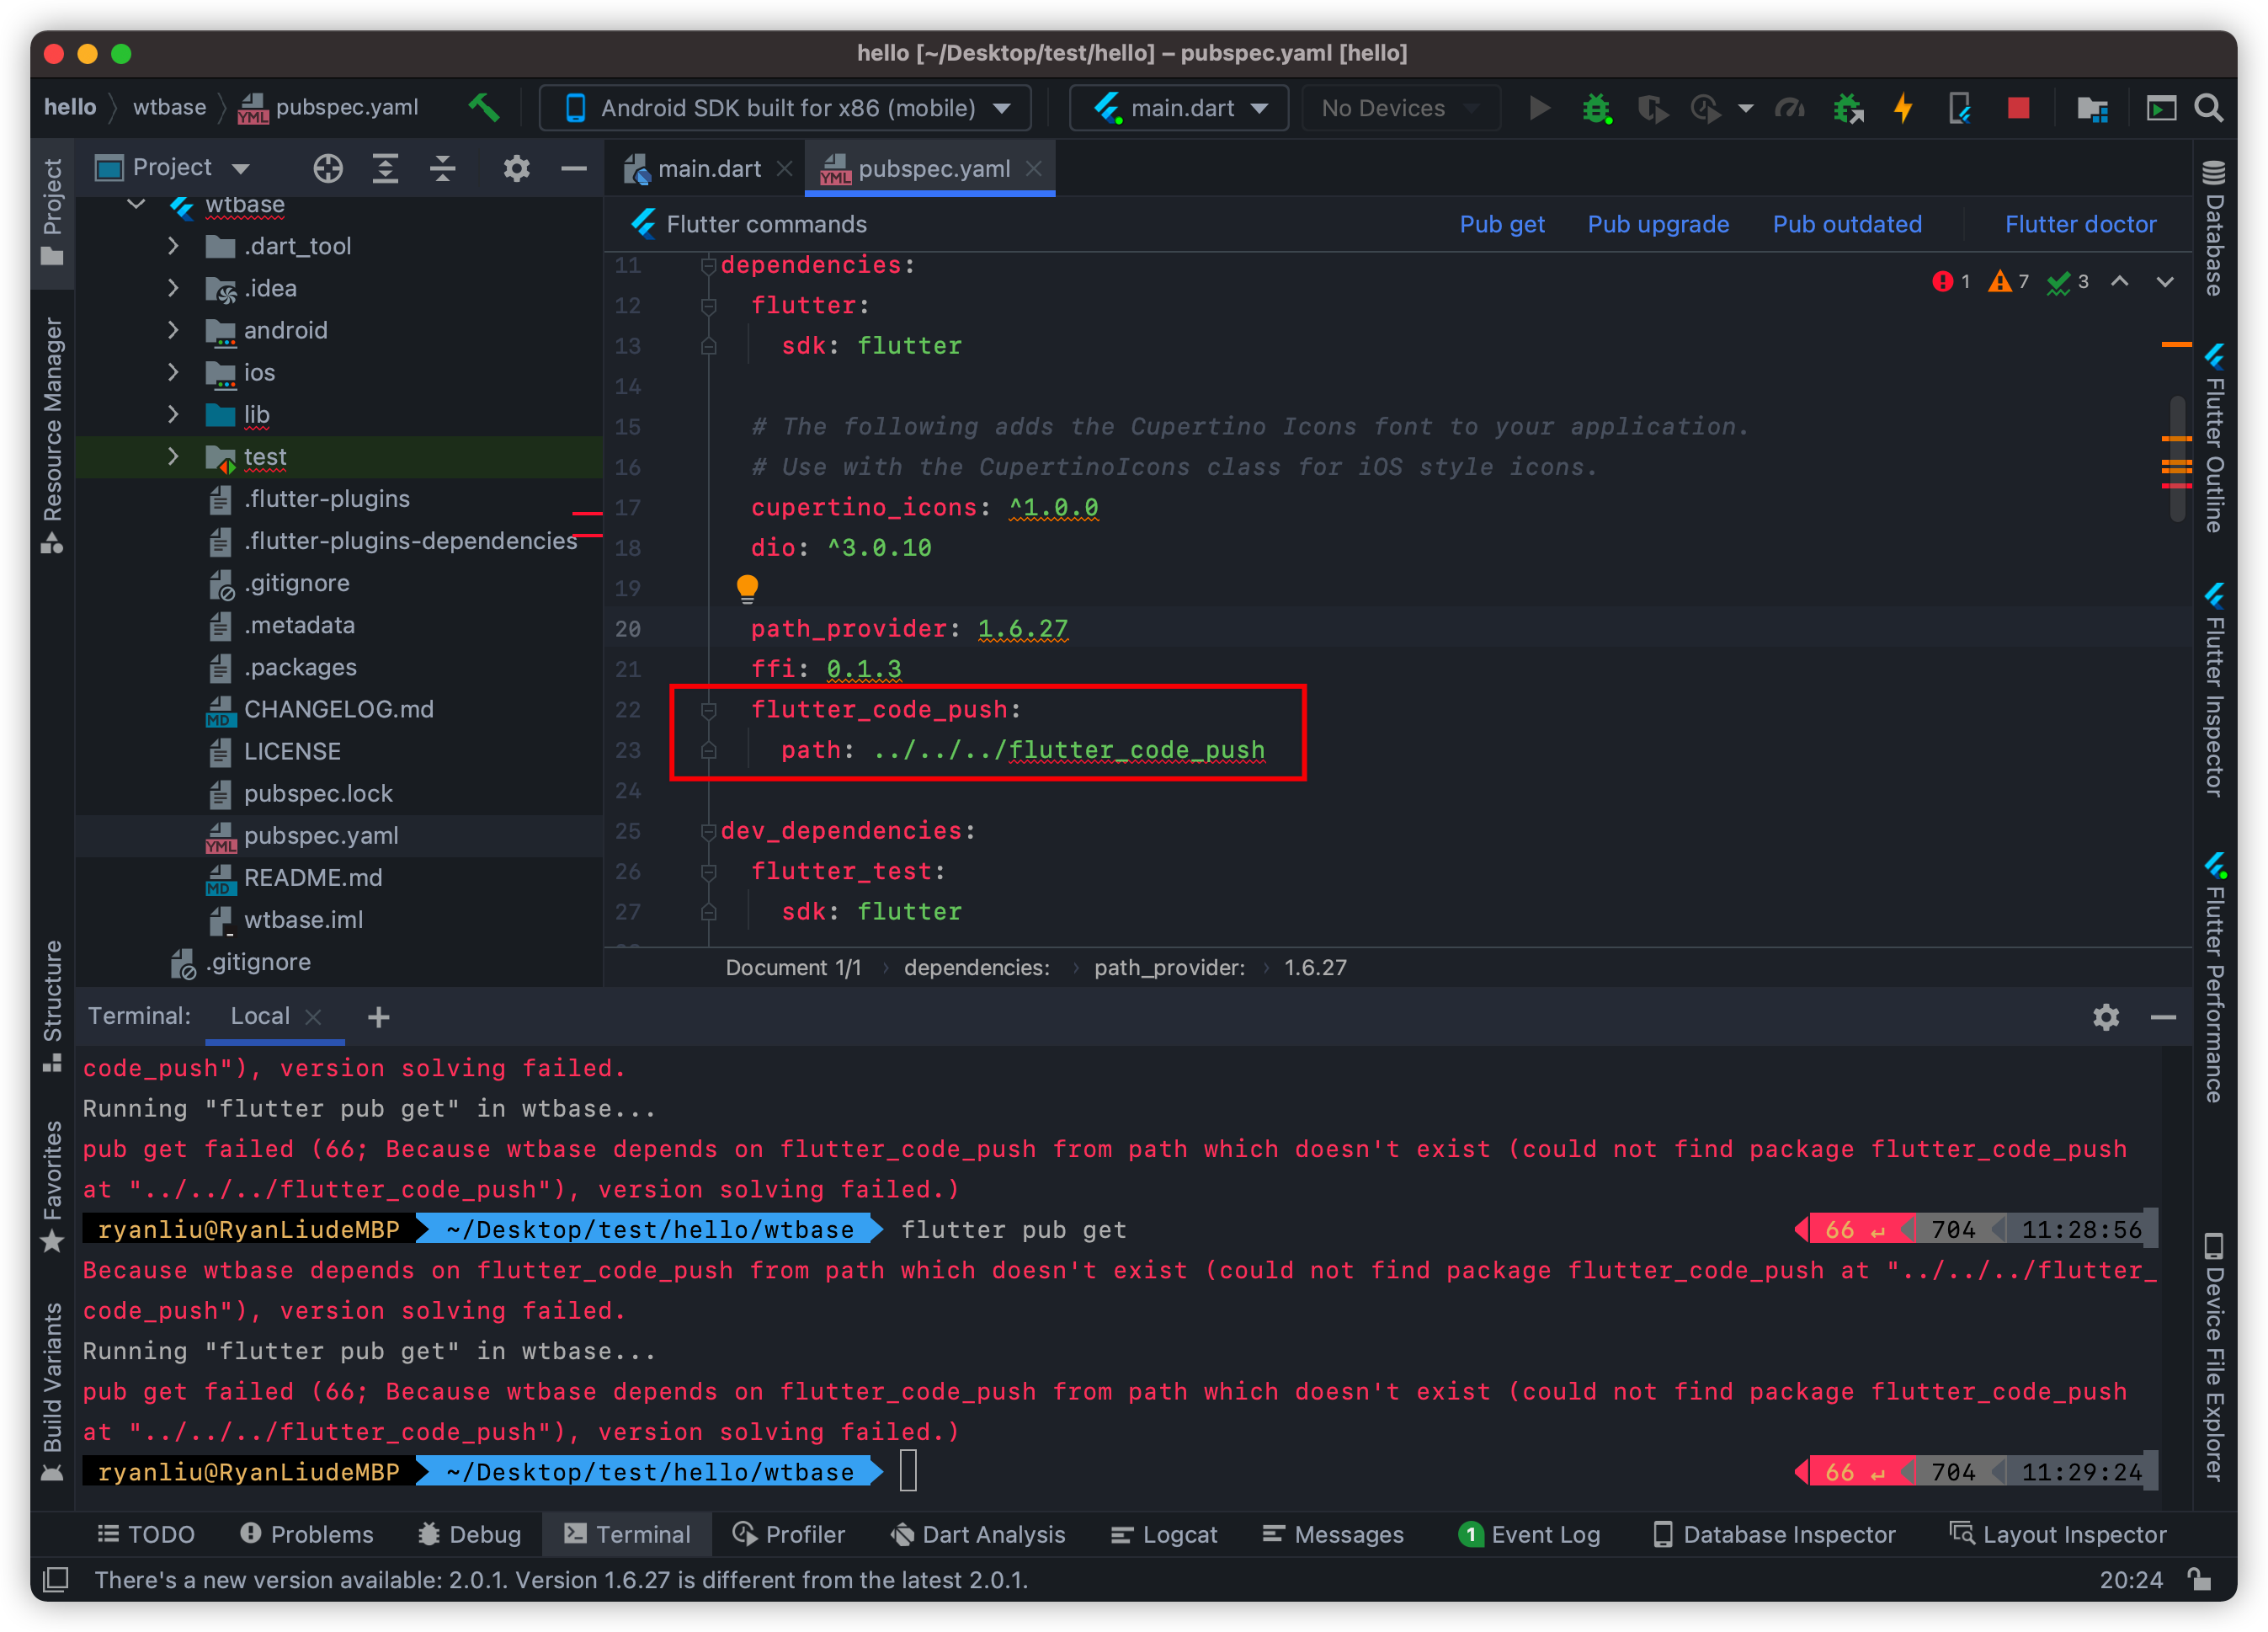
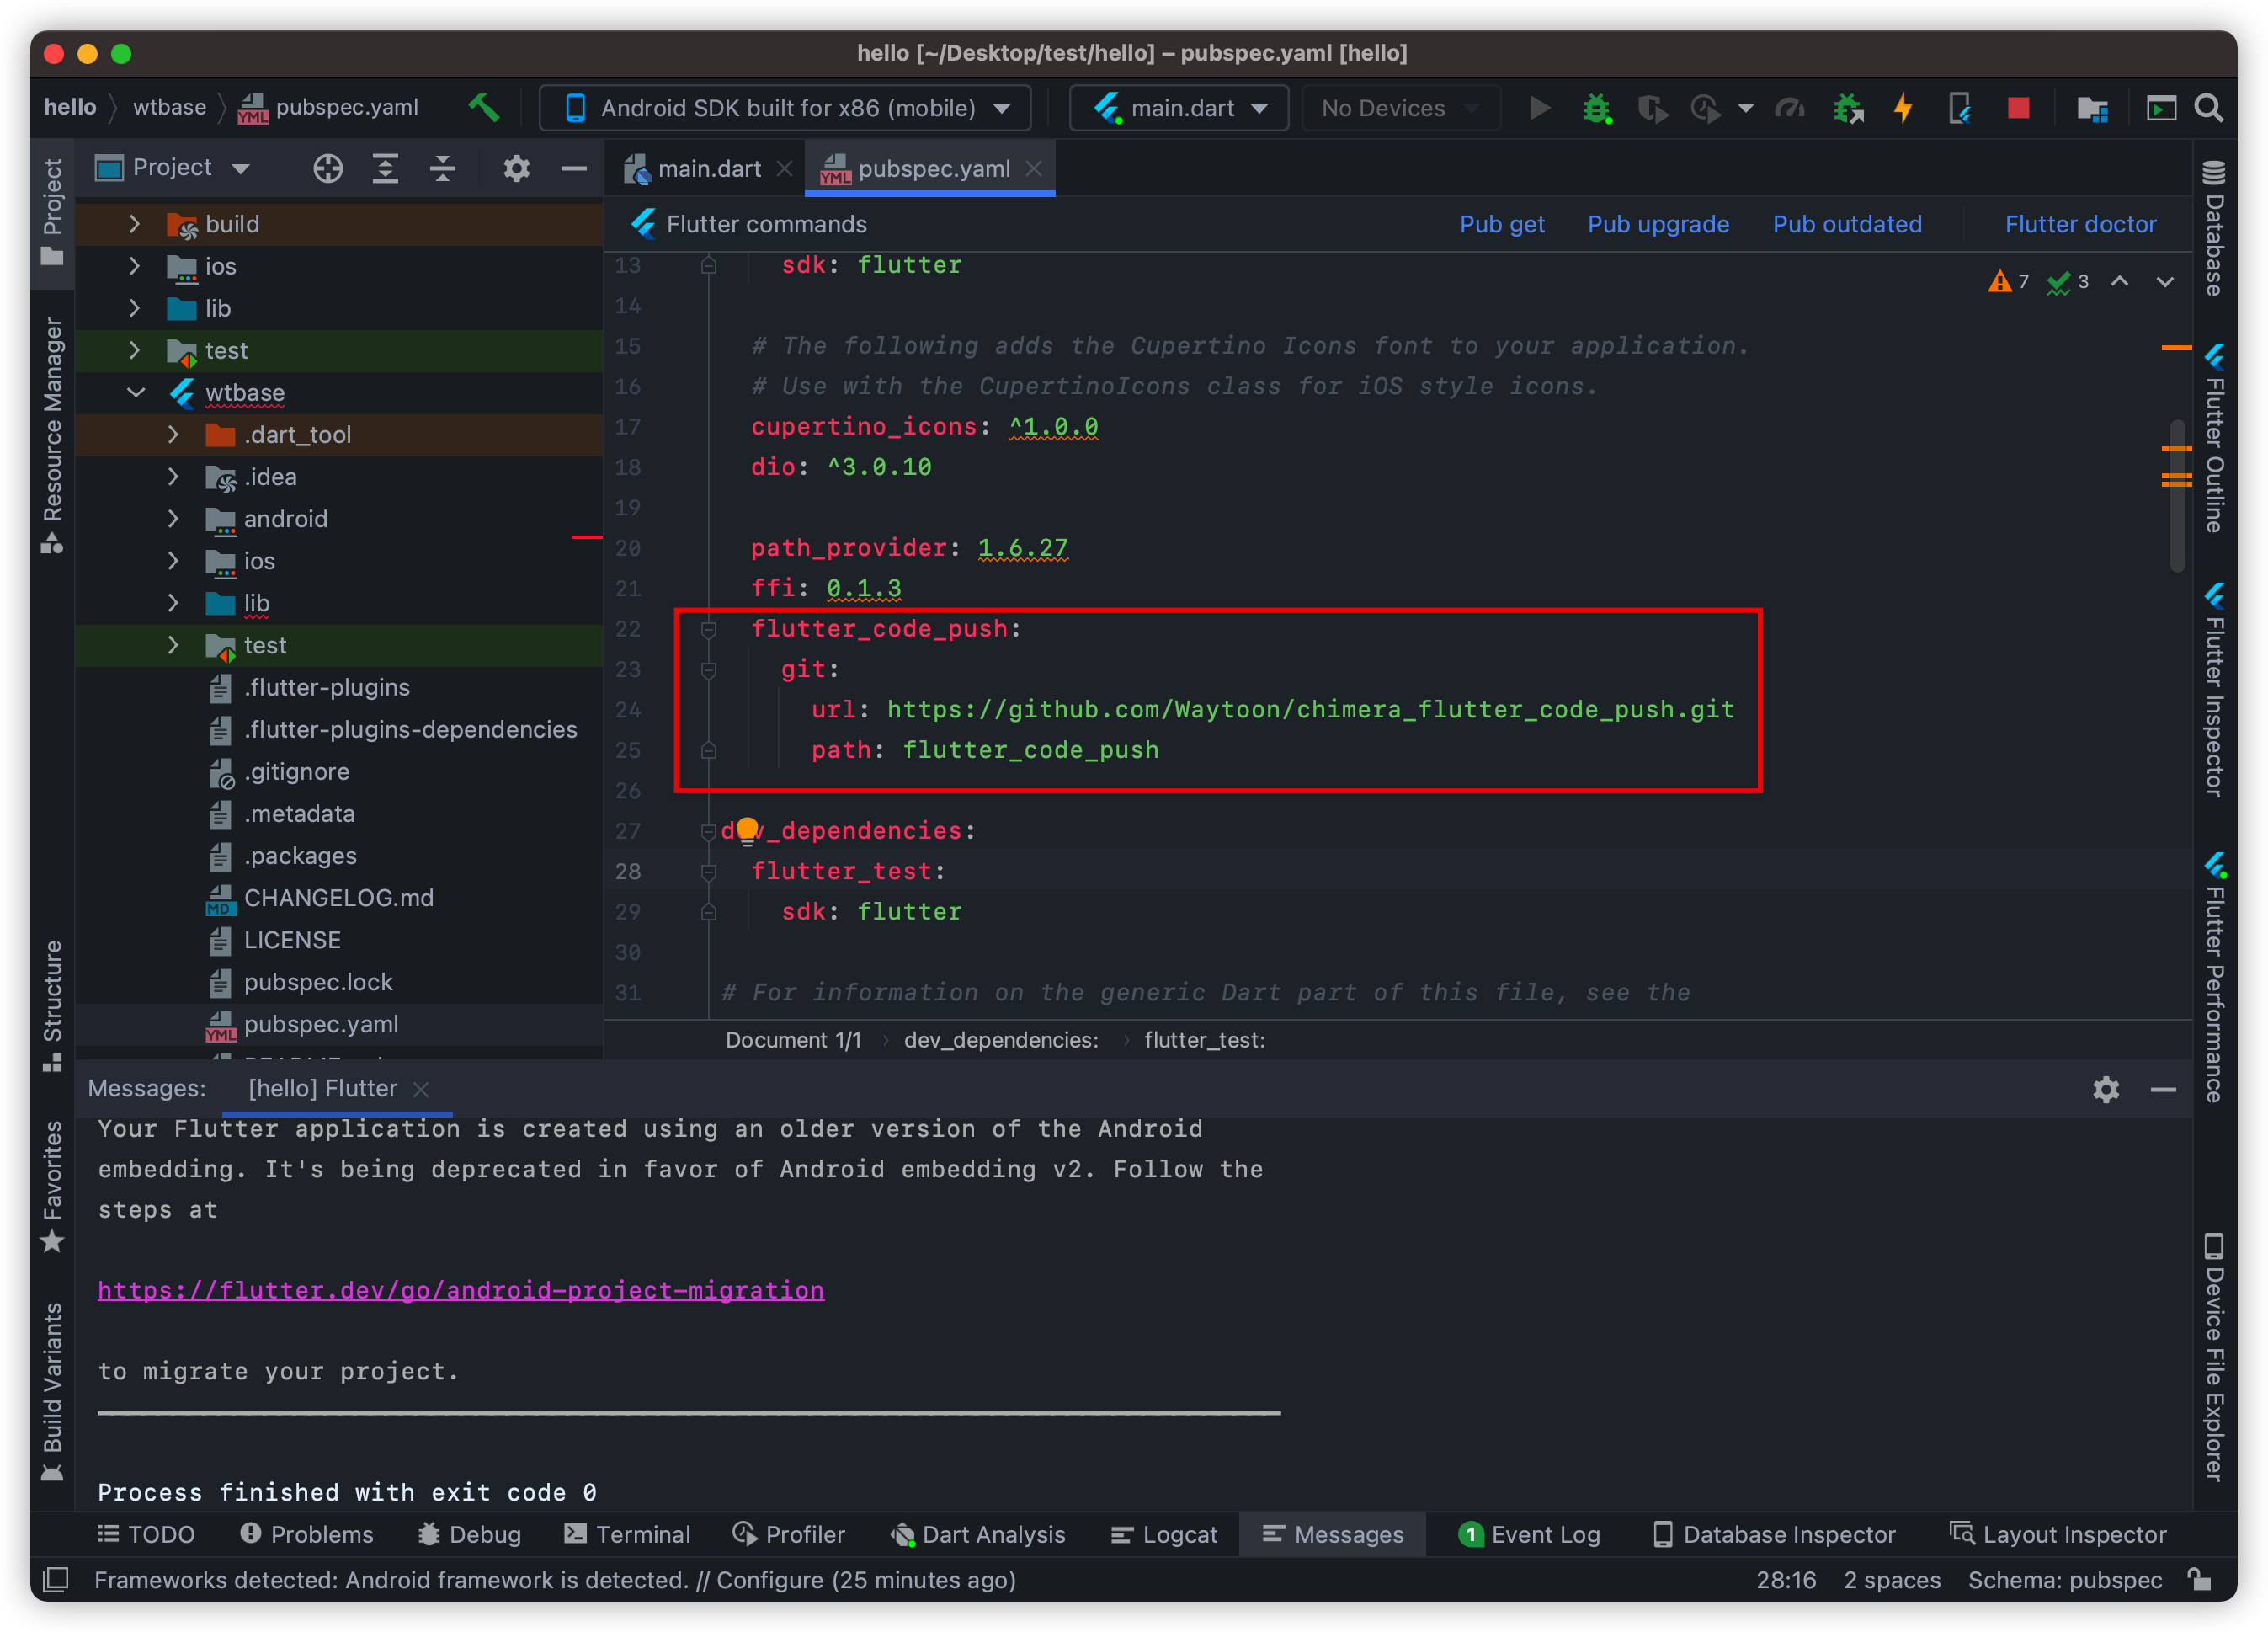
**The next step is very important! ** Configure
wtbase/pubspec.yamlindependenciesto modify the boot path of flutter_code_push as follows:... flutter_code_push: git: url: https://github.com/Waytoon/chimera_flutter_code_push.git path: flutter_code_push
Original configuration:
 Code used:
  flutter_code_push:
    git:
      url: https://github.com/Waytoon/chimera_flutter_code_push.git
      path: flutter_code_push
After modification:
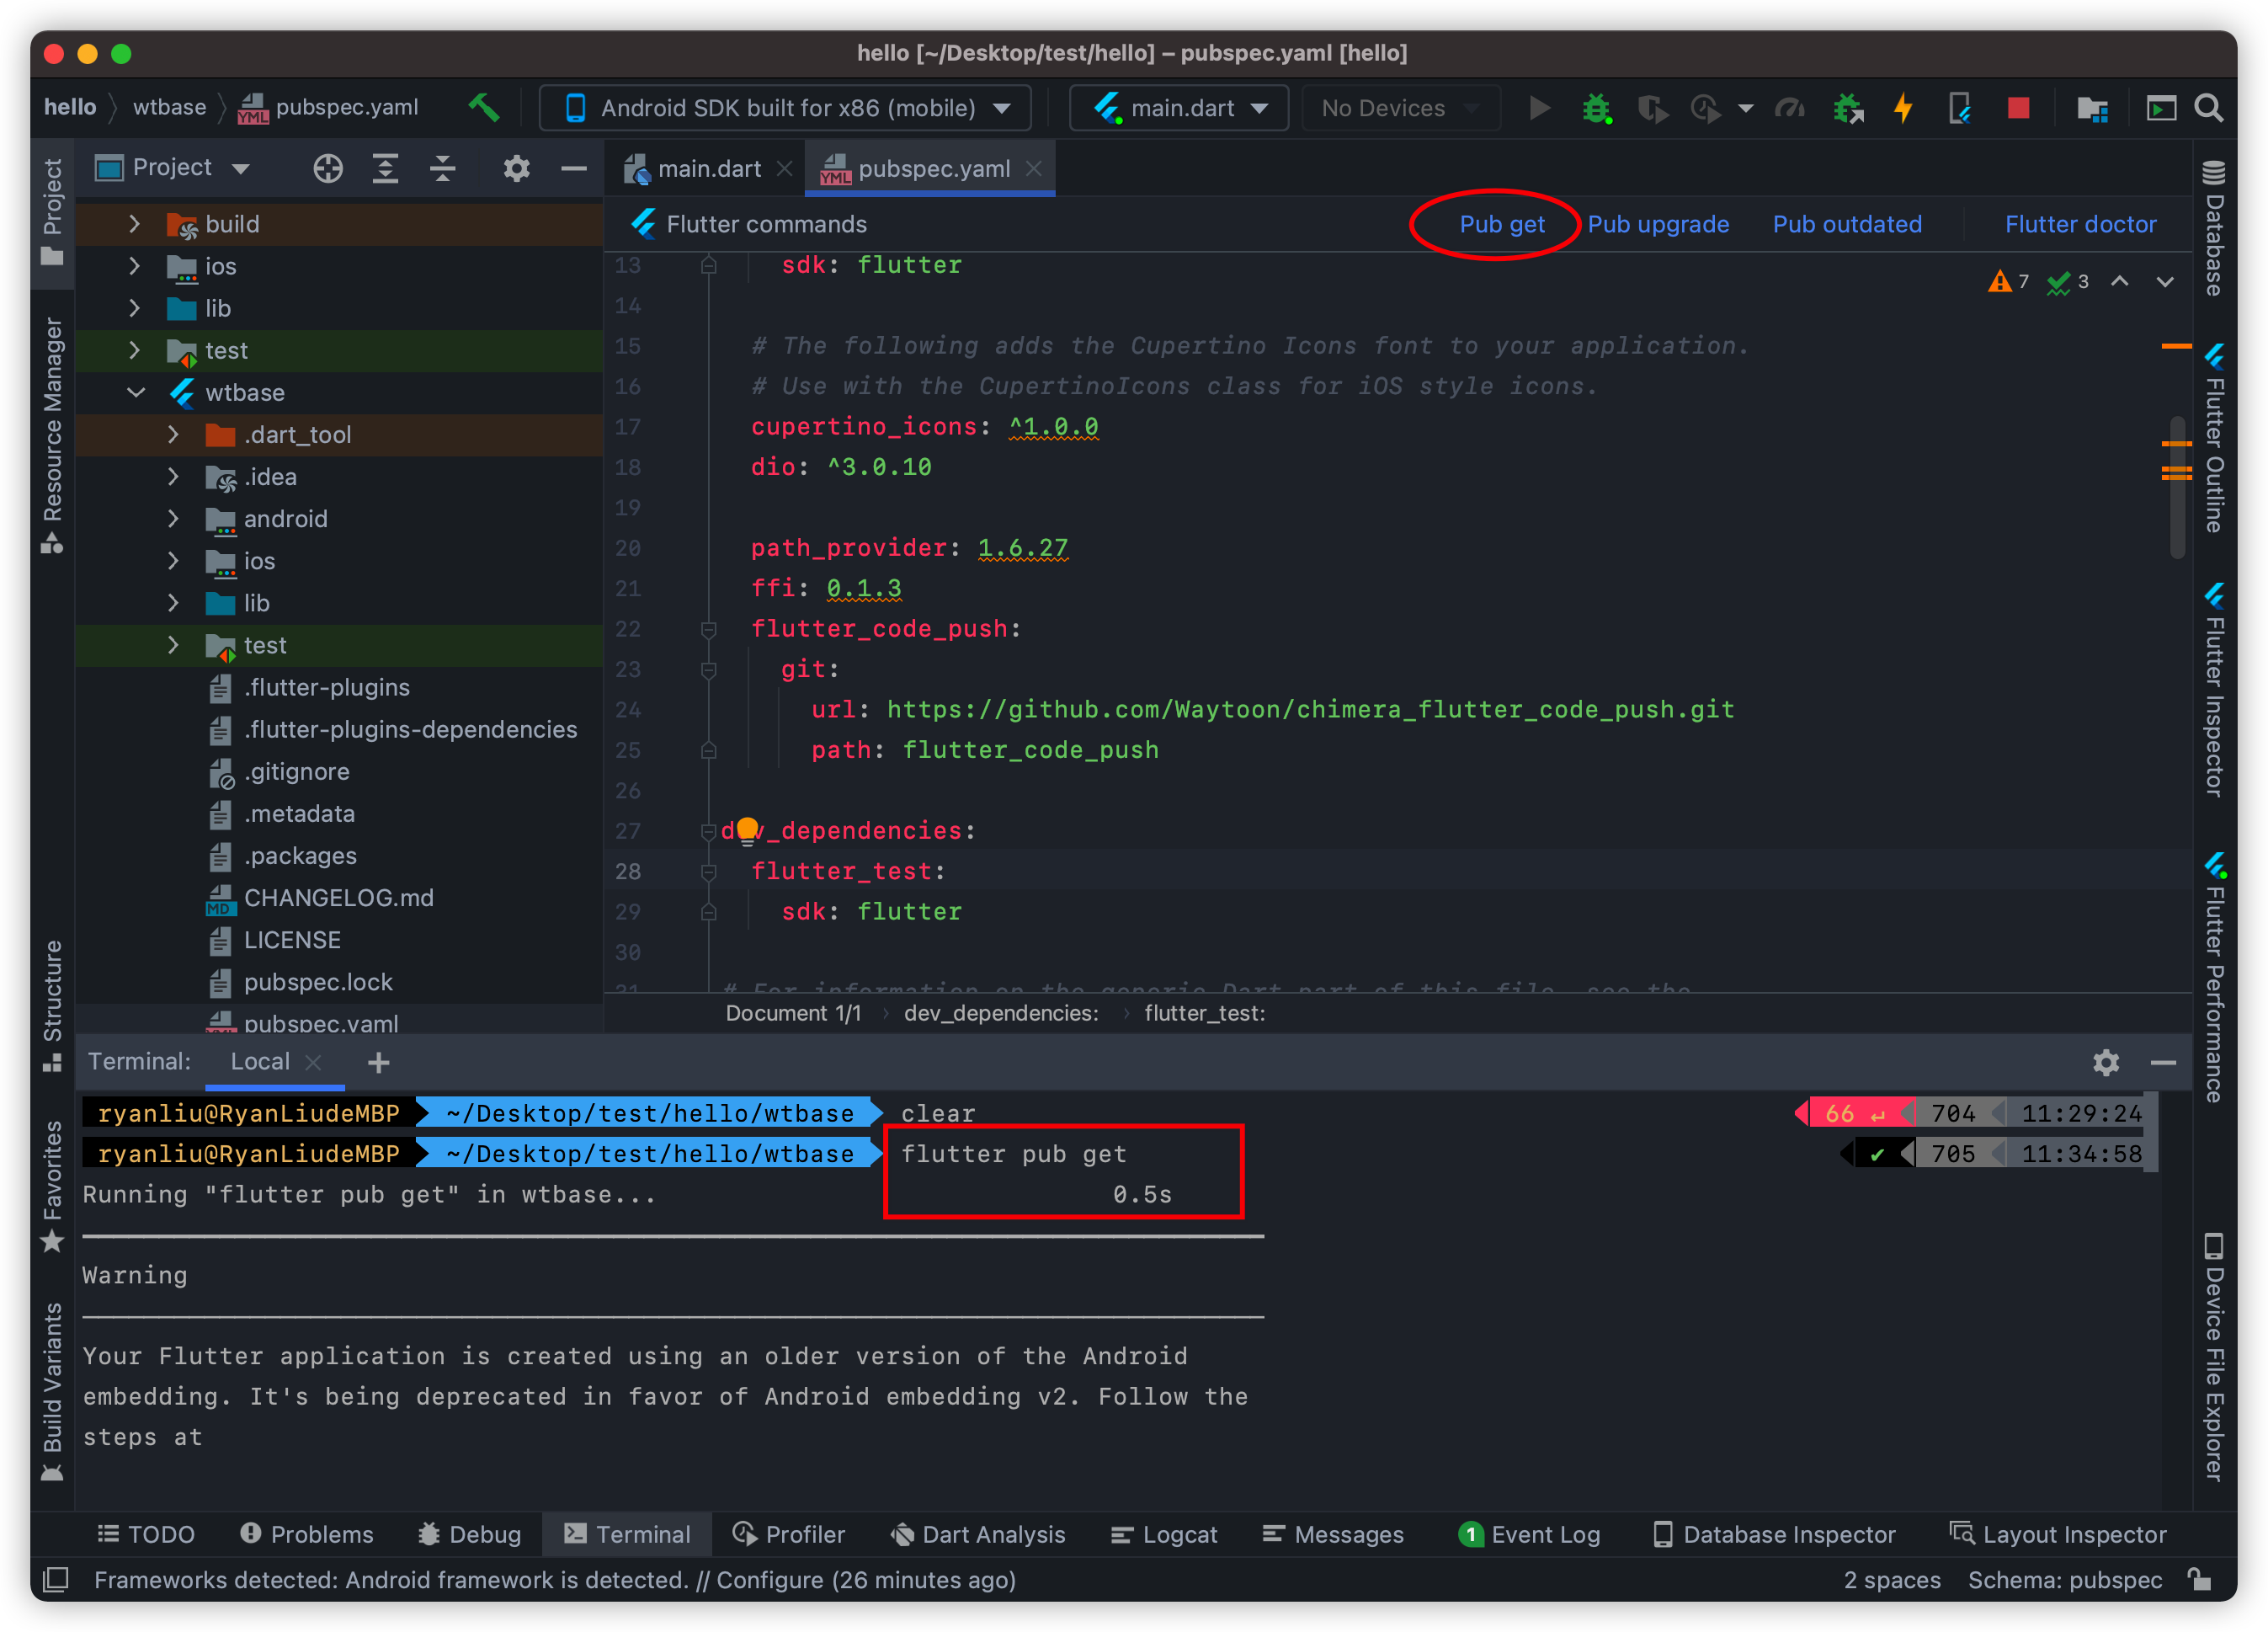
Remember to click pub get above, or type flutter pub get in the terminal.
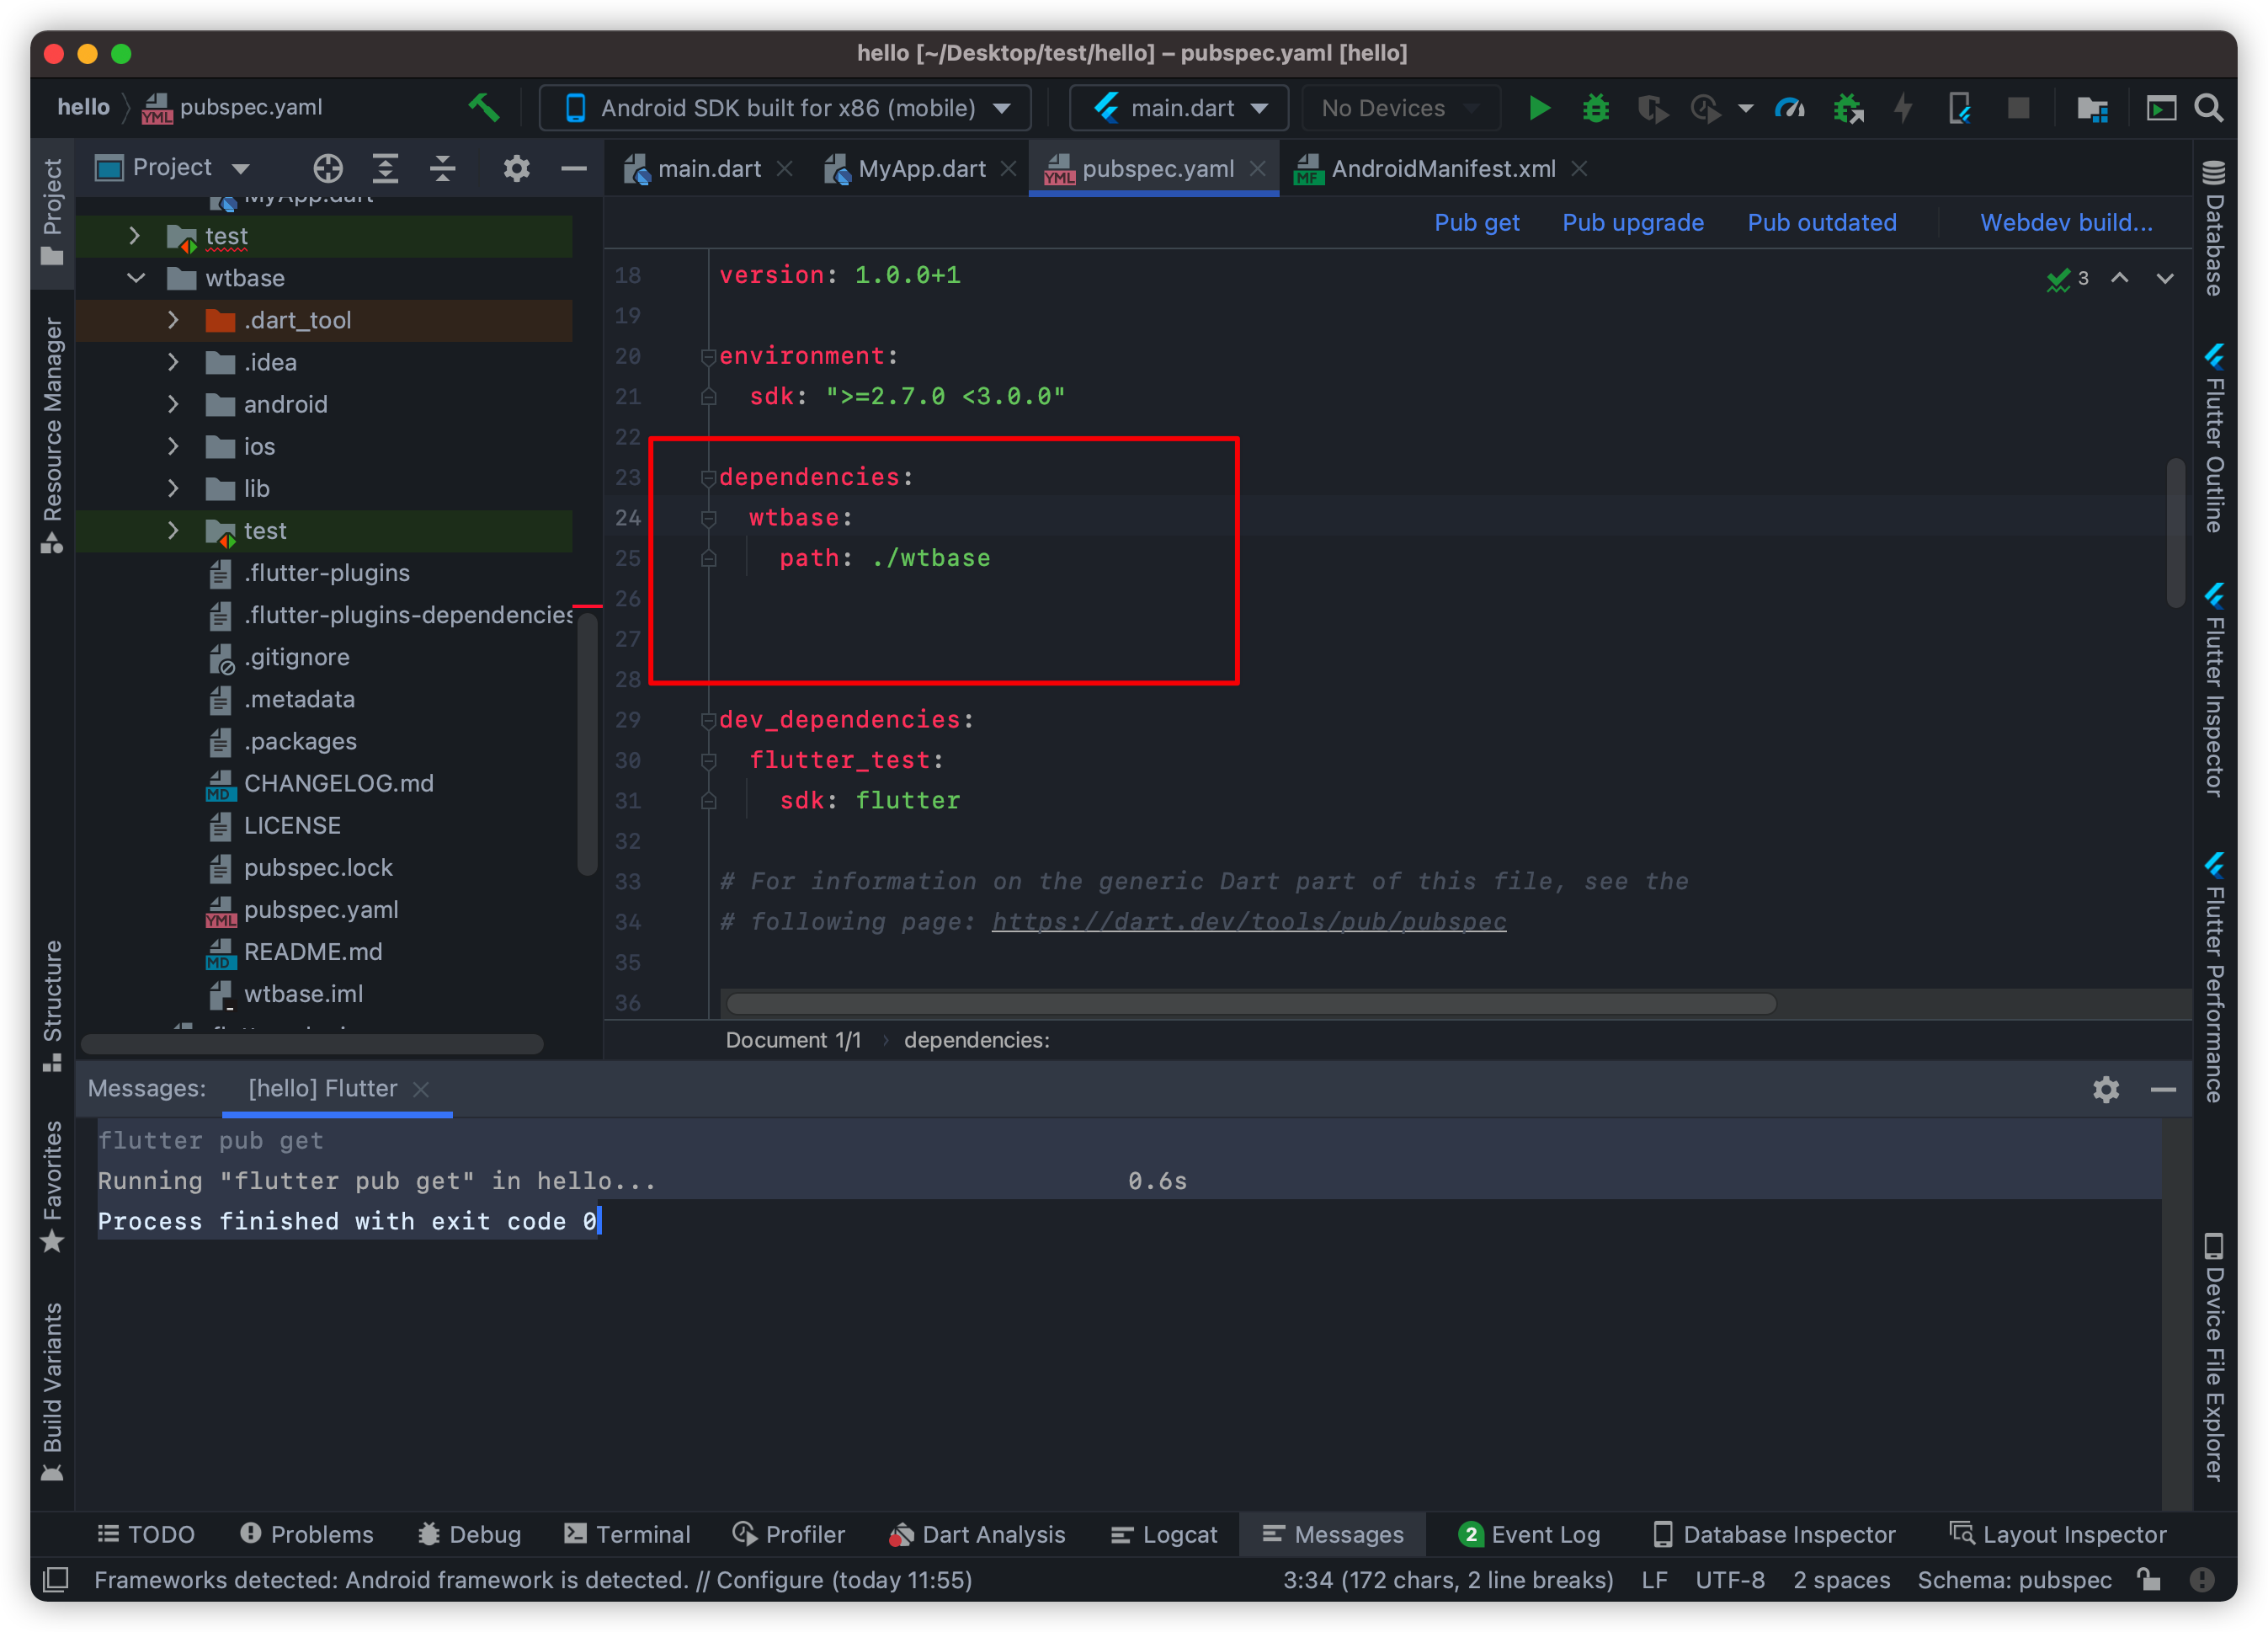
- Then modify
hello/pubspec.yamland add the following independencies:
    wtbase:
      path: ./wtbase
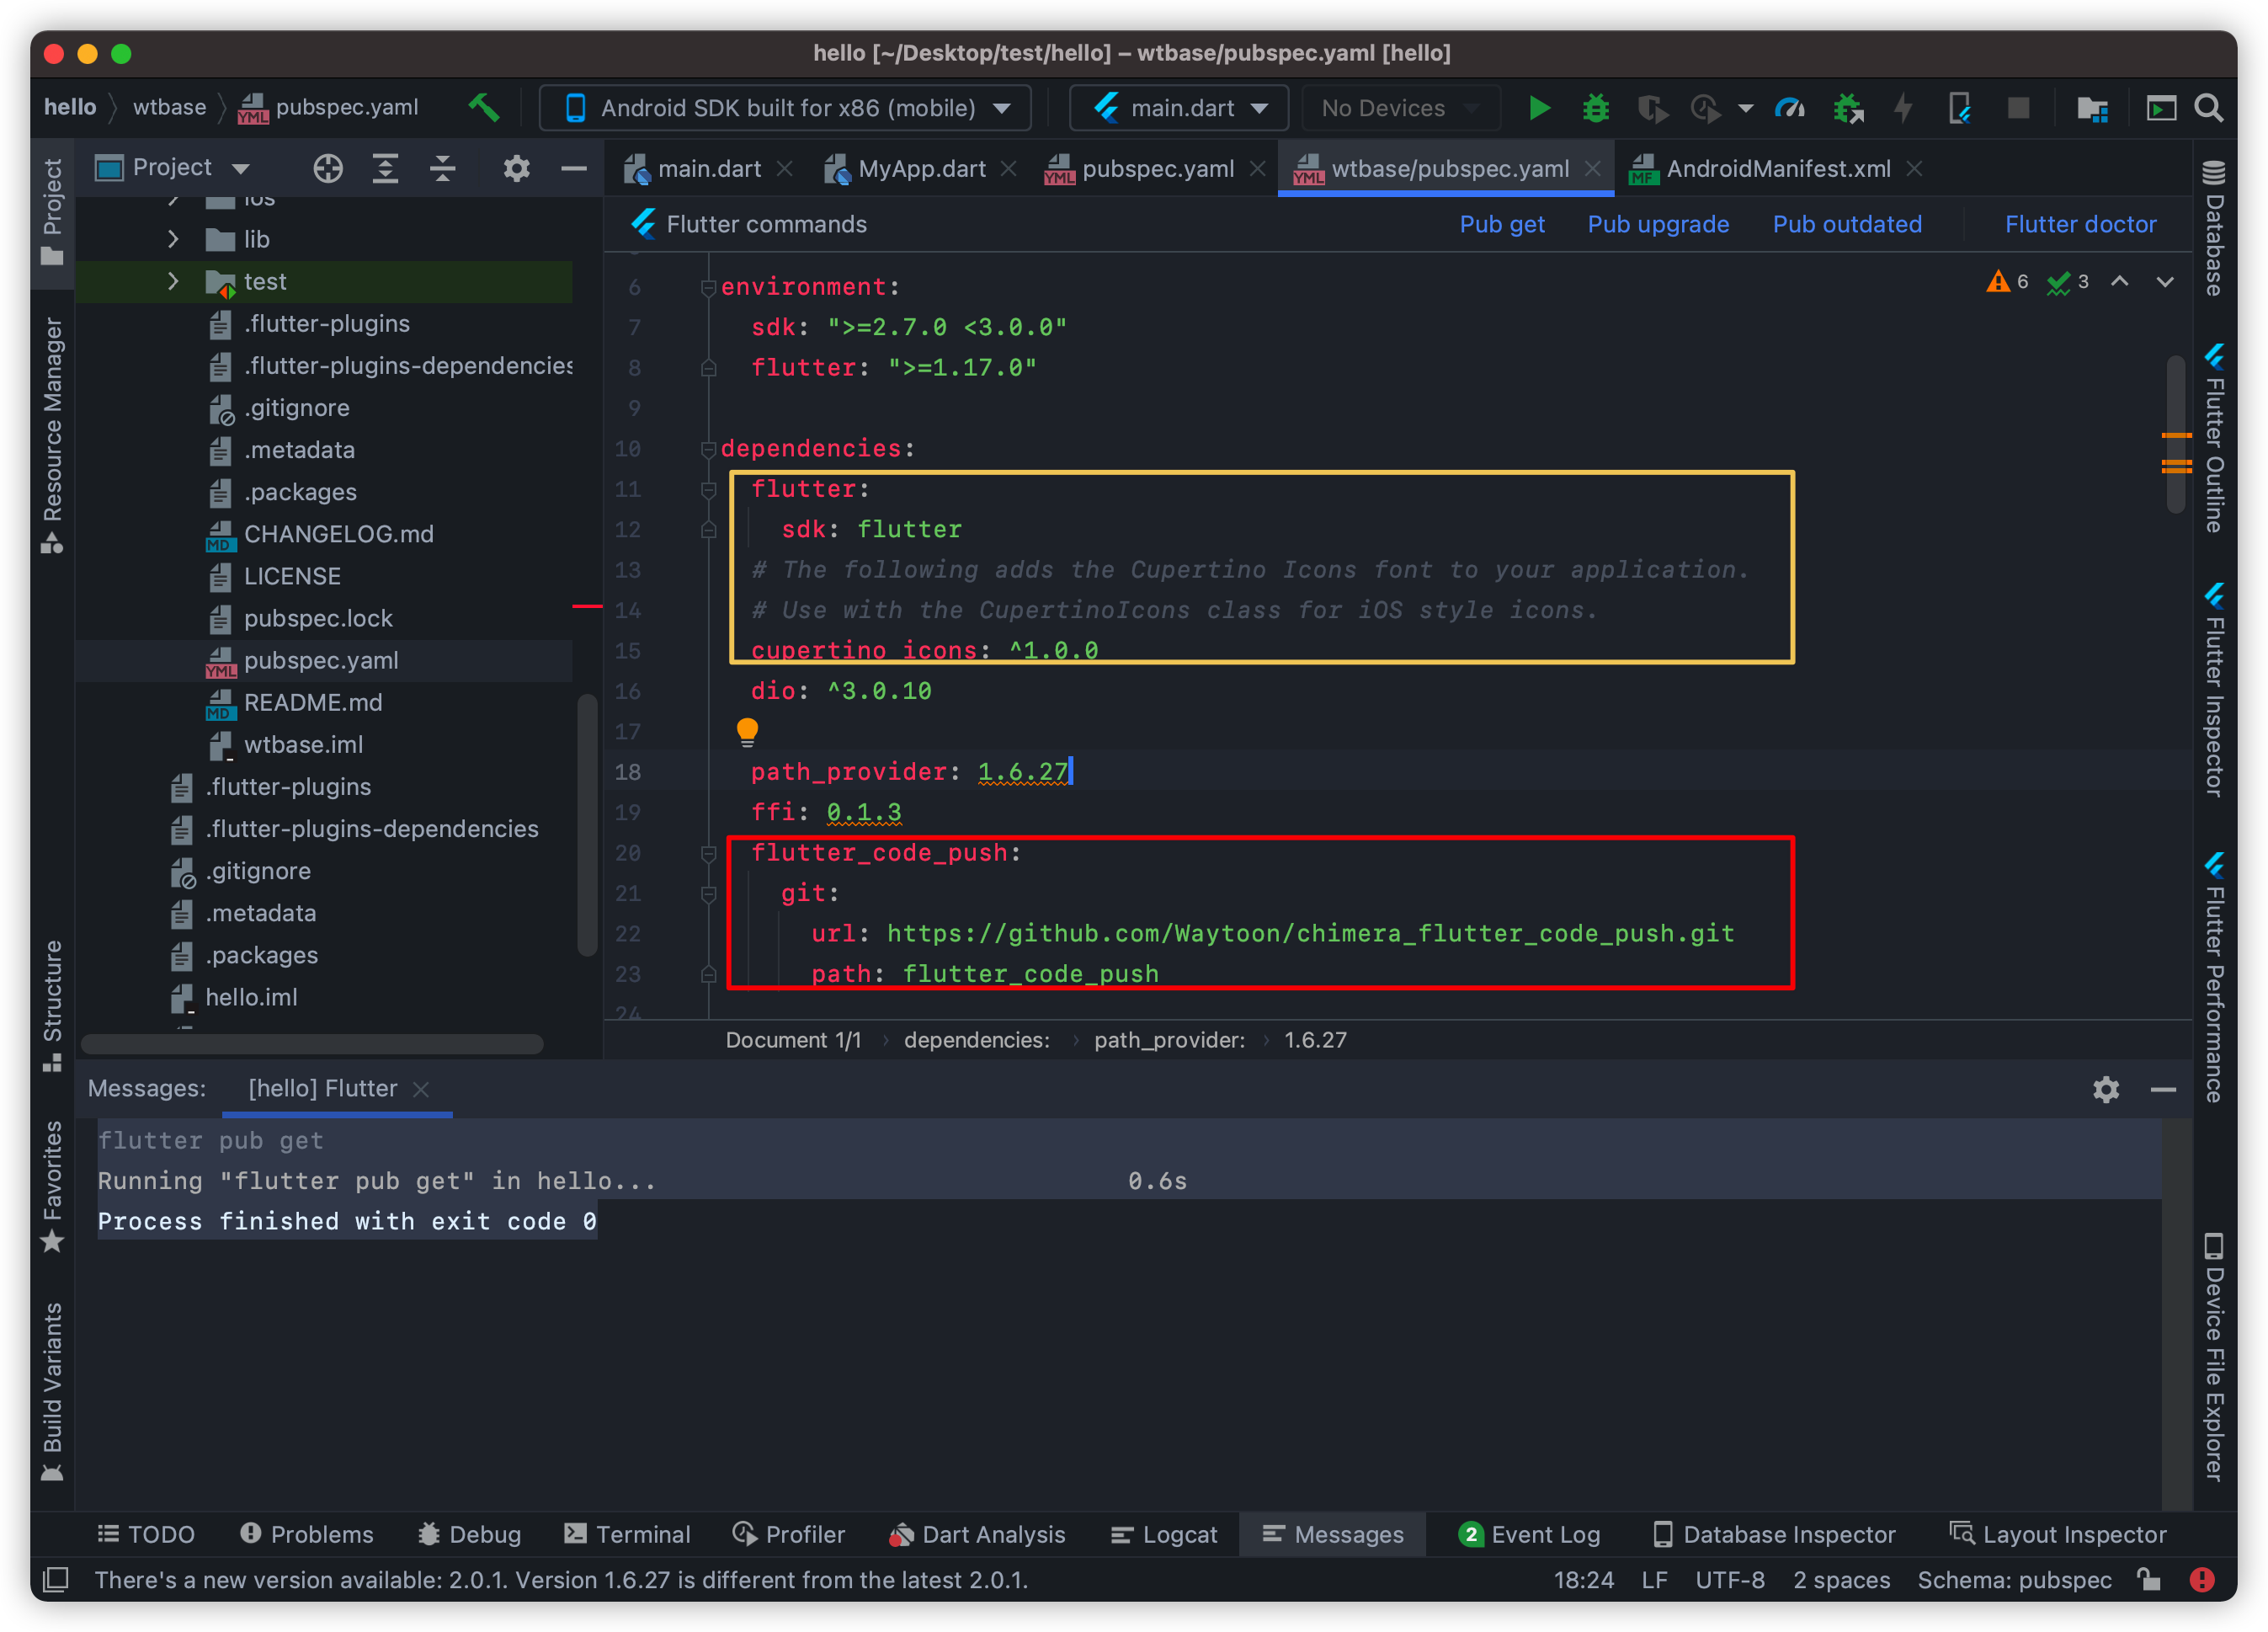
And cut and copy other dependent libraries under dependencies to dependencies under `wtbase/pubspec.yaml’, the final effect is as follows:
hello/pubspec.yaml:
hello/wtbase/pubspec.yaml:
Remember to run flutter pub get, or click the Pub get button.
Note: Please run Pub get of the wtbase directory first, and then run Pub get of the hello project. The purpose of this is to ensure that the version numbers of the dependent libraries of the project remain consistent.
Up to this point, the preliminary SDK configuration work has been completed. Below we explain how to use and implement hot updates in our source code.
-
Now create
MyApp.dartinhello/libDirectory,Source code :import 'package:flutter/material.dart'; import 'package:dio/dio.dart'; void initApp() { runApp(MyApp()); } class MyApp extends StatelessWidget { // This widget is the root of your application. @override Widget build(BuildContext context) { return MaterialApp( title: 'Flutter Demo', theme: ThemeData( // This is the theme of your application. // // Try running your application with "flutter run". You'll see the // application has a blue toolbar. Then, without quitting the app, try // changing the primarySwatch below to Colors.green and then invoke // "hot reload" (press "r" in the console where you ran "flutter run", // or simply save your changes to "hot reload" in a Flutter IDE). // Notice that the counter didn't reset back to zero; the application // is not restarted. primarySwatch: Colors.blue, // This makes the visual density adapt to the platform that you run // the app on. For desktop platforms, the controls will be smaller and // closer together (more dense) than on mobile platforms. visualDensity: VisualDensity.adaptivePlatformDensity, ), home: MyHomePage(title: 'Flutter Demo Home Page'), ); } } class MyHomePage extends StatefulWidget { MyHomePage({Key key, this.title}) : super(key: key); // This widget is the home page of your application. It is stateful, meaning // that it has a State object (defined below) that contains fields that affect // how it looks. // This class is the configuration for the state. It holds the values (in this // case the title) provided by the parent (in this case the App widget) and // used by the build method of the State. Fields in a Widget subclass are // always marked "final". final String title; @override _MyHomePageState createState() => _MyHomePageState(); } class _MyHomePageState extends State<MyHomePage> { int _counter = 0; String _response; void _incrementCounter() { setState(() { // This call to setState tells the Flutter framework that something has // changed in this State, which causes it to rerun the build method below // so that the display can reflect the updated values. If we changed // _counter without calling setState(), then the build method would not be // called again, and so nothing would appear to happen. _counter++; }); } void _getHttp() async { try { Response response = await Dio().get("http://www.google.com"); setState(() { String temp = '$response'; for (var i = 0; i < 10; ++i) { temp = '$i' + temp; } _response = temp.substring(0, 100); }); } catch (e) { print(e); } } @override void initState() { _getHttp(); super.initState(); } @override Widget build(BuildContext context) { // This method is rerun every time setState is called, for instance as done // by the _incrementCounter method above. // // The Flutter framework has been optimized to make rerunning build methods // fast, so that you can just rebuild anything that needs updating rather // than having to individually change instances of widgets. return Scaffold( appBar: AppBar( // Here we take the value from the MyHomePage object that was created by // the App.build method, and use it to set our appbar title. title: Text(widget.title), ), body: Center( // Center is a layout widget. It takes a single child and positions it // in the middle of the parent. child: Column( // Column is also a layout widget. It takes a list of children and // arranges them vertically. By default, it sizes itself to fit its // children horizontally, and tries to be as tall as its parent. // // Invoke "debug painting" (press "p" in the console, choose the // "Toggle Debug Paint" action from the Flutter Inspector in Android // Studio, or the "Toggle Debug Paint" command in Visual Studio Code) // to see the wireframe for each widget. // // Column has various properties to control how it sizes itself and // how it positions its children. Here we use mainAxisAlignment to // center the children vertically; the main axis here is the vertical // axis because Columns are vertical (the cross axis would be // horizontal). mainAxisAlignment: MainAxisAlignment.center, children: <Widget>[ Text( 'You have pushed the button this many times:', ), Text( '$_counter', style: Theme.of(context).textTheme.headline4, ), Text( 'Server Response:\n$_response' ) ], ), ), floatingActionButton: FloatingActionButton( onPressed: _incrementCounter, tooltip: 'Increment', child: Icon(Icons.add), ), // This trailing comma makes auto-formatting nicer for build methods. ); } }
After adding this file, remember to run
flutter pub getto ensure that the dependencies are imported correctly.Then we modify the
main.dartfile as follows:import 'package:hello/MyApp.dart'; import 'package:wtbase/wtbase.dart'; import 'package:flutter/material.dart'; void main() async { WidgetsFlutterBinding.ensureInitialized(); bool isNative = false; if (isNative) { initApp(); } else { String downloadUrl = "http://yourlocalhost/hello.bin"; readCode = WTAnalysisReadCode(); await readCode.loadFile(downloadUrl); readCode.executeMethod( 'package:hello/MyApp.dart', 'initApp'); } }
Please note that
downloadUrlnow only supports intranet testing.downloadUrlneeds to start withhttp://192.168.If you need to support extranet requests, please contact
[email protected].Another crucial step:
Open the terminal and enter the
hello/assetsdirectory: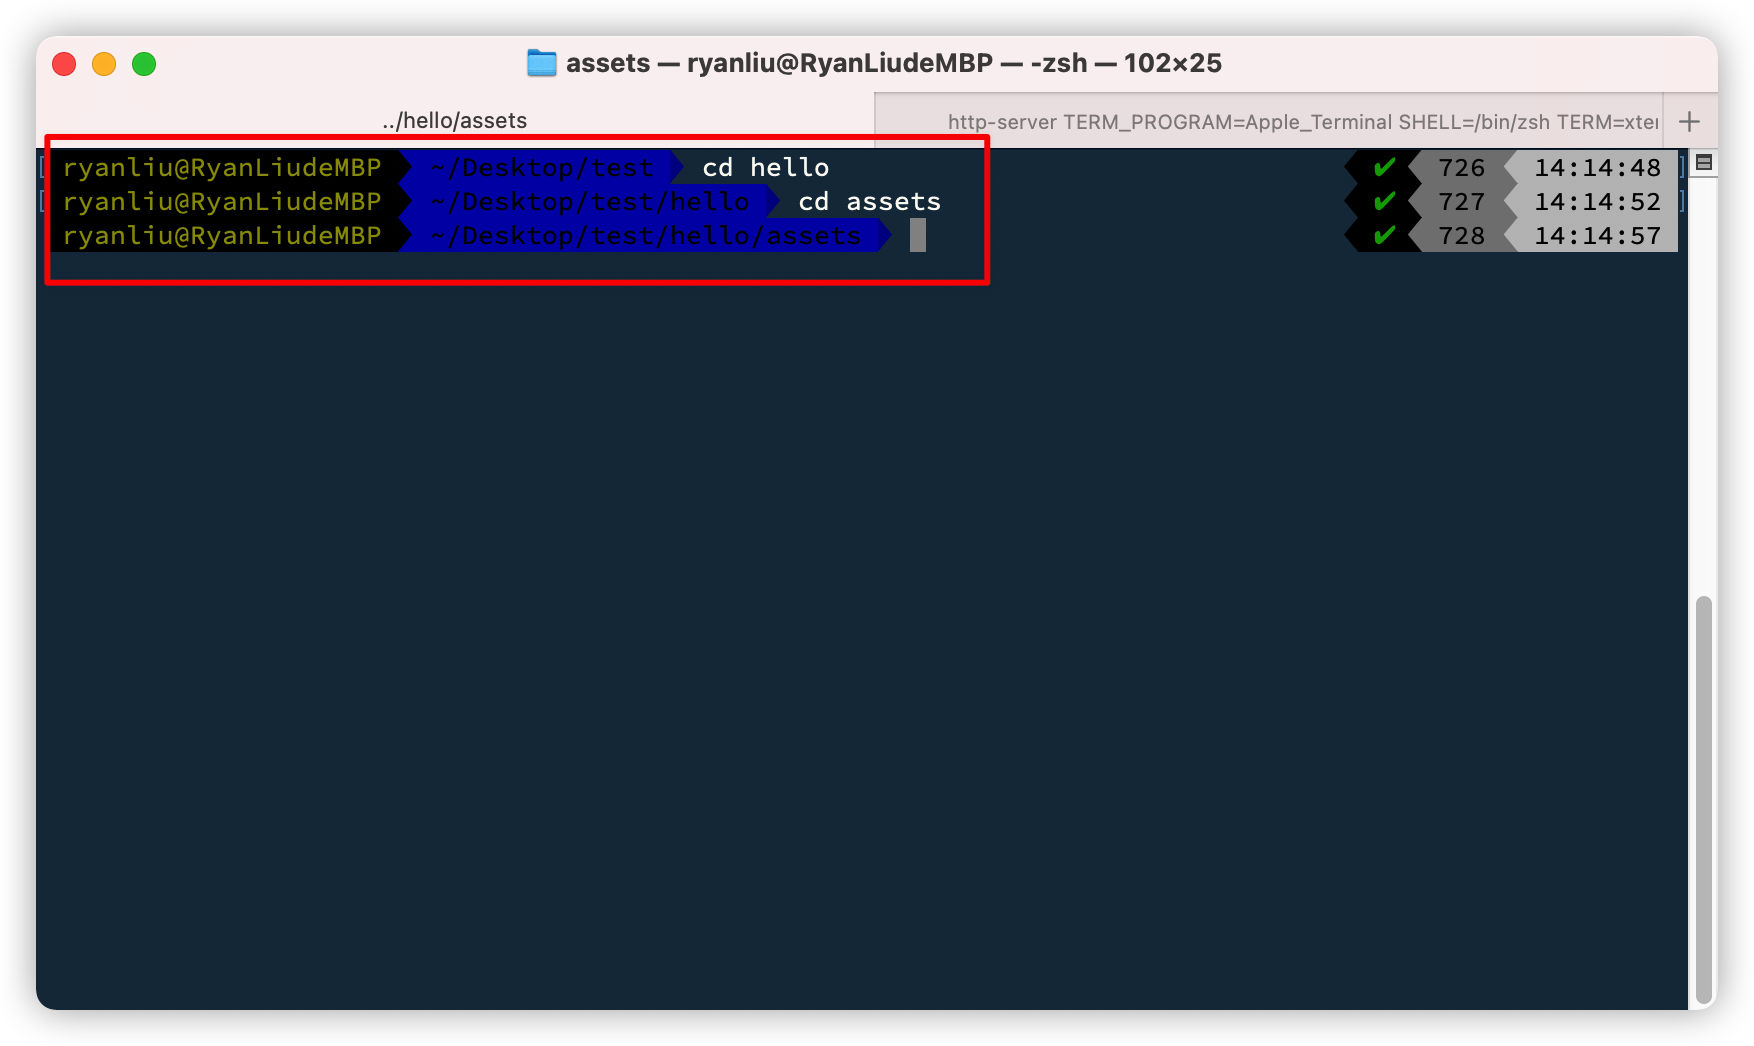
Then type in the terminal:
http-server -c -1The results are as follows:

Copy the link below
http-server, mine ishttp://192.168.80.115:8080, used to modifymain.dartString downloadUrl = "http://yourlocalhost/hello.bin";
Change to:
String downloadUrl = "http://192.168.80.115:8080/hello.bin";
So far, the entire access process has come to an end..
Run App with Code Push
-
The next thing is to run your APP from the IDE by clicking on the green bug.
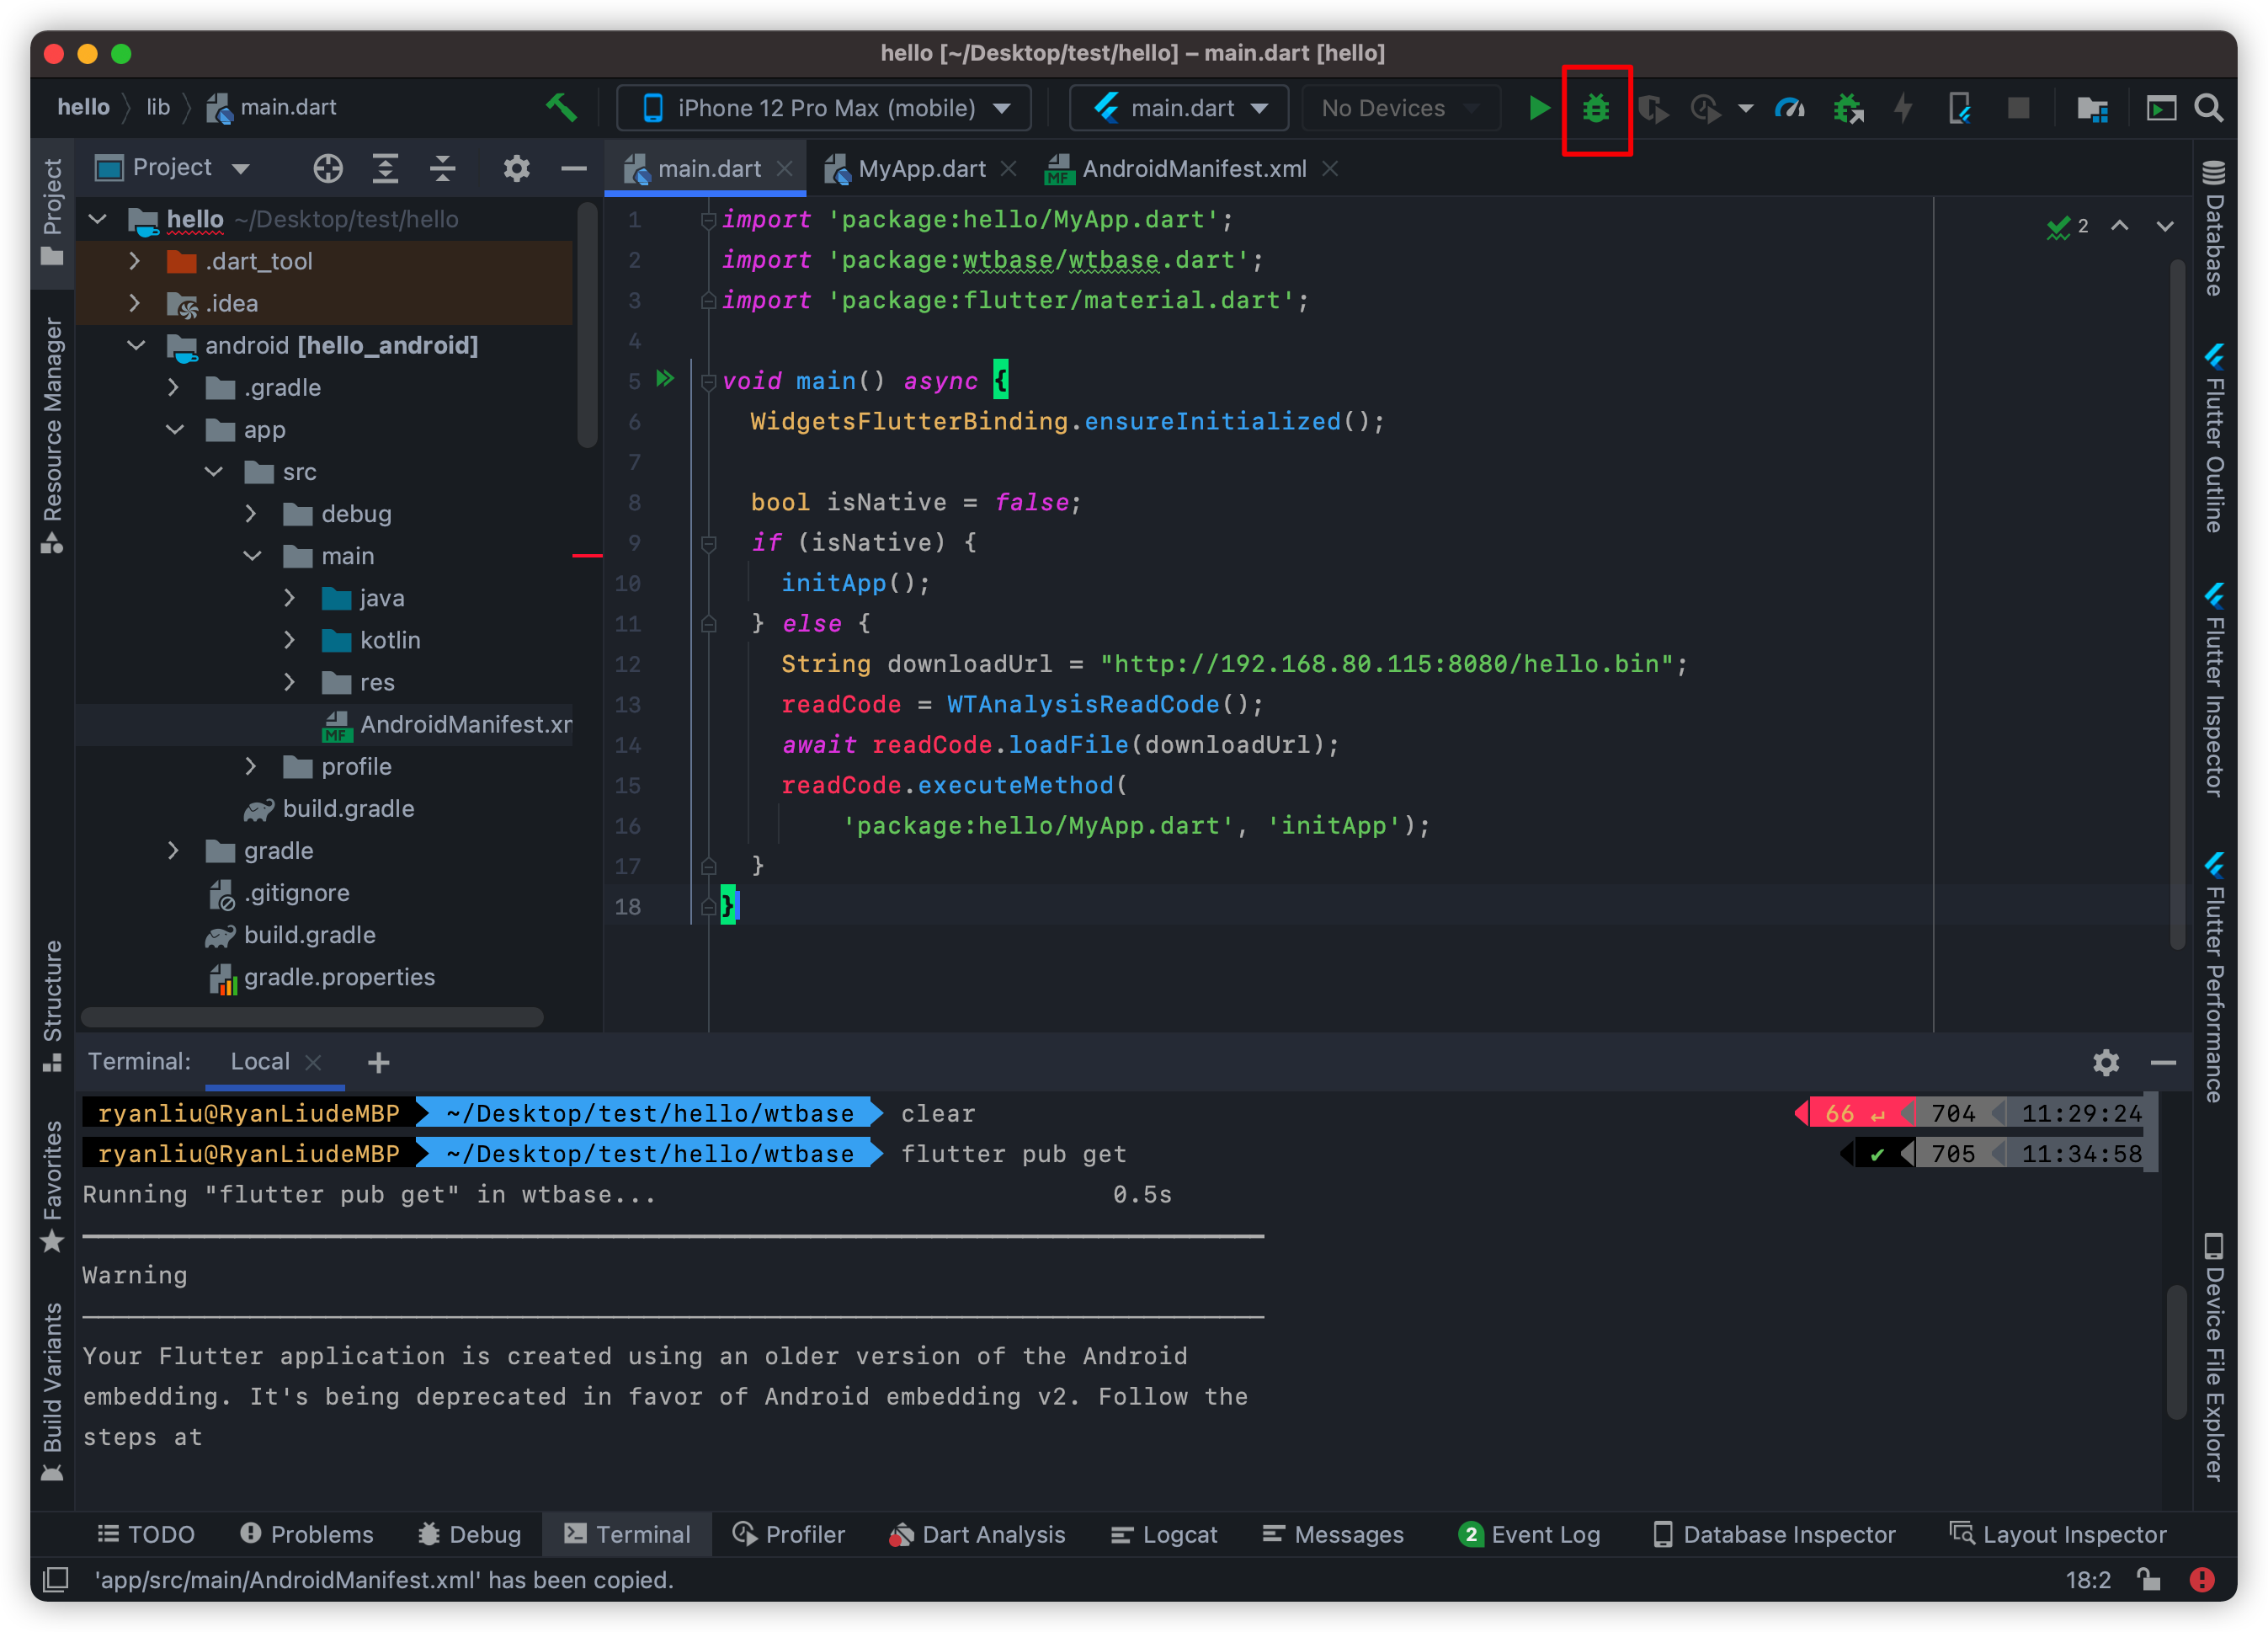
No surprises, IDE compilation will not cause any problems. The display on the simulator is like this.

IDE's
debug console logis as follows:Launching lib/main.dart on Android SDK built for x86 in debug mode... Running Gradle task 'assembleDebug'... ✓ Built build/app/outputs/flutter-apk/app-debug.apk. Installing build/app/outputs/flutter-apk/app.apk... Waiting for Android SDK built for x86 to report its views... Debug service listening on ws://127.0.0.1:65046/r1MGSW-wdg4=/ws Syncing files to device Android SDK built for x86... W/m.example.hell( 6898): Accessing hidden method Lsun/misc/Unsafe;->getUnsafe()Lsun/misc/Unsafe; (greylist,core-platform-api, linking, allowed) W/m.example.hell( 6898): Accessing hidden method Lsun/misc/Unsafe;->objectFieldOffset(Ljava/lang/reflect/Field;)J (greylist,core-platform-api, linking, allowed) W/m.example.hell( 6898): Accessing hidden method Lsun/misc/Unsafe;->compareAndSwapObject(Ljava/lang/Object;JLjava/lang/Object;Ljava/lang/Object;)Z (greylist, linking, allowed) W/m.example.hell( 6898): Accessing hidden method Lsun/misc/Unsafe;->putObject(Ljava/lang/Object;JLjava/lang/Object;)V (greylist, linking, allowed) D/EGL_emulation( 6898): eglMakeCurrent: 0xd7a8e900: ver 3 0 (tinfo 0xdaf0f820) D/eglCodecCommon( 6898): setVertexArrayObject: set vao to 0 (0) 1 0 I/flutter ( 6898): download file! I/flutter ( 6898): vmClassName: MyApp className: WTStatelessWidget1 I/flutter ( 6898): vmClassName: MyHomePage className: WTStatefulWidget1
I/flutter ( 6898): vmClassName: _MyHomePageState className: WTState1
2. The next thing is to let you do it yourself. For example, let's modify the code in `MyApp.dart` and try it. Try modifying the icon of `floatingActionButton`:

```dart
floatingActionButton: FloatingActionButton(
        onPressed: _incrementCounter,
        tooltip: 'Increment',
        child: Icon(Icons.add),
   ),
Modify
Icons.addtoIcons.home. It looks like this after completion:floatingActionButton: FloatingActionButton( onPressed: _incrementCounter, tooltip: 'Increment', child: Icon(Icons.home), ),
Save the changes you made, then go back to the terminal, enter your compiler directory, and run
./rust_compile: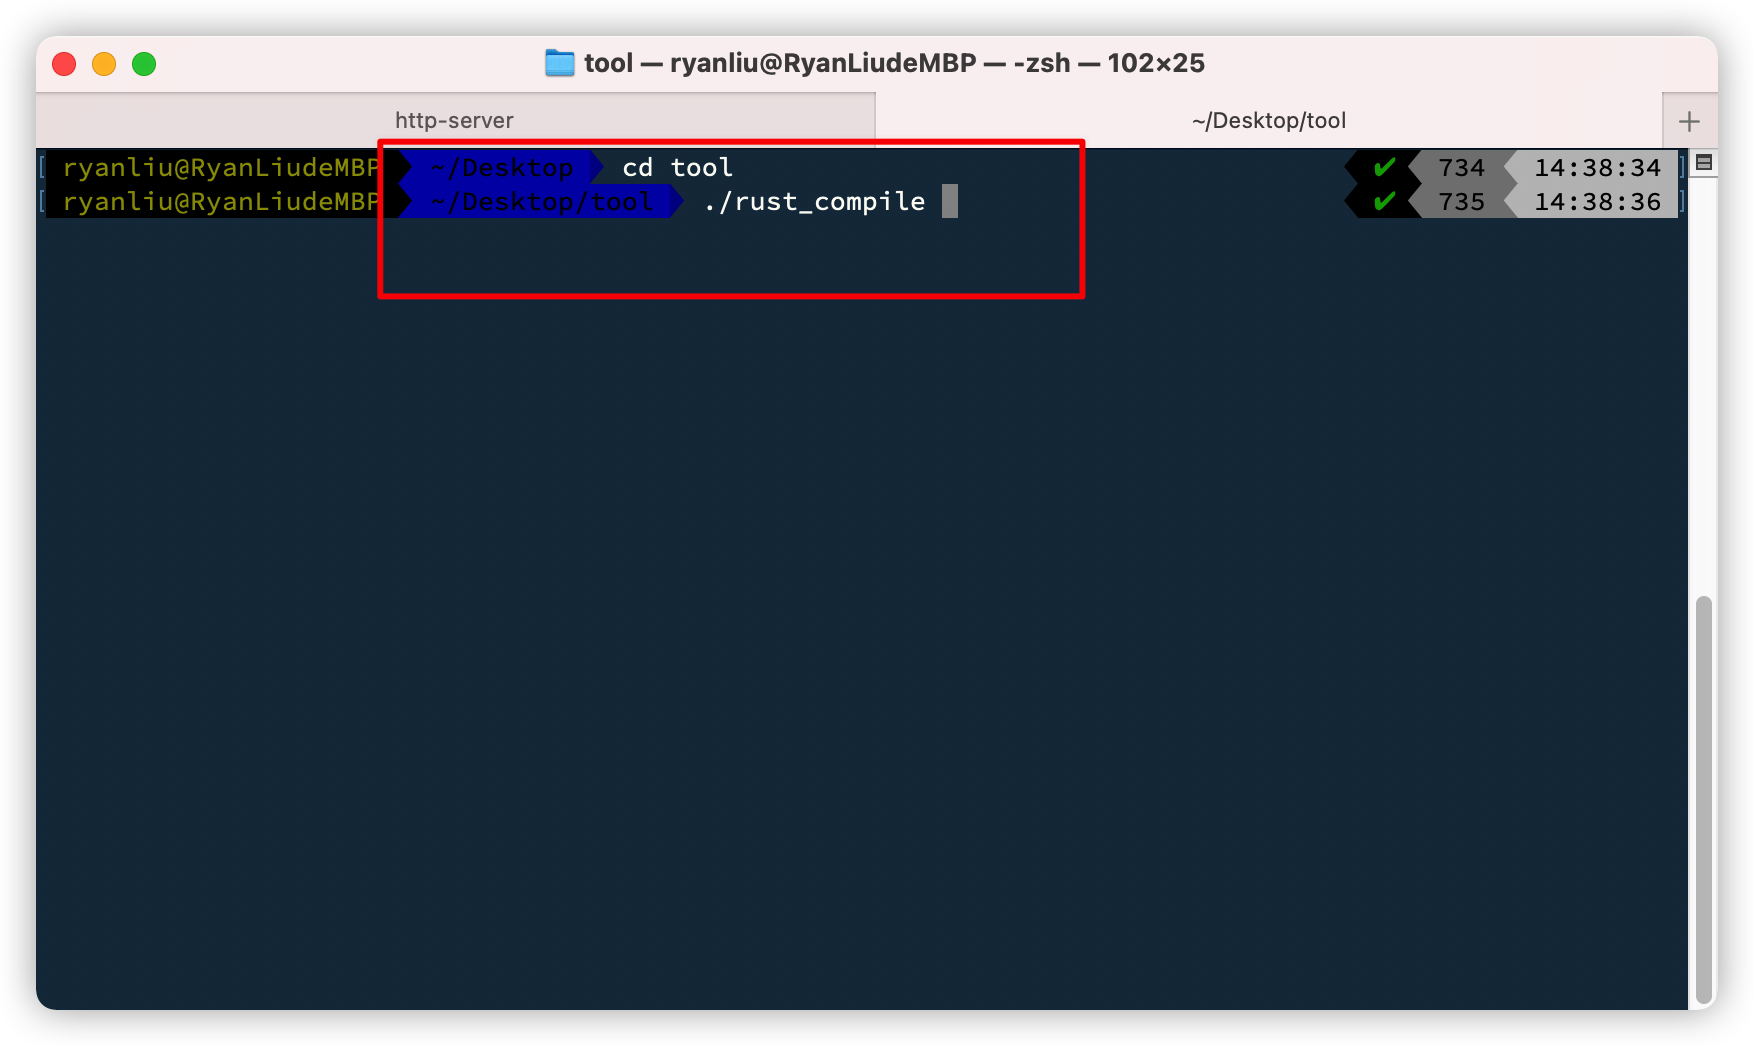
After running this command, wait for a while, the final effect is as follows:
Please pay attention here, we don't need an IDE to do anything at this point, just close the currently running app in the simulator, reopen it, and you will find that it becomes the following:

Once again, we have not used any functions of the IDE in this step of the operation so far. We just compiled the new
hello.binfile with our own compiler, and then loaded thebinfile remotely through the simulator. .###This is an APP that can be fully updated.
So far, you have developed an App with hot update function, isn't it amazing? ! You can try to modify some code at will, and remember to compile again after changing your code (repeat step 10).
If you like, please give us a star ✨!
##Notes:
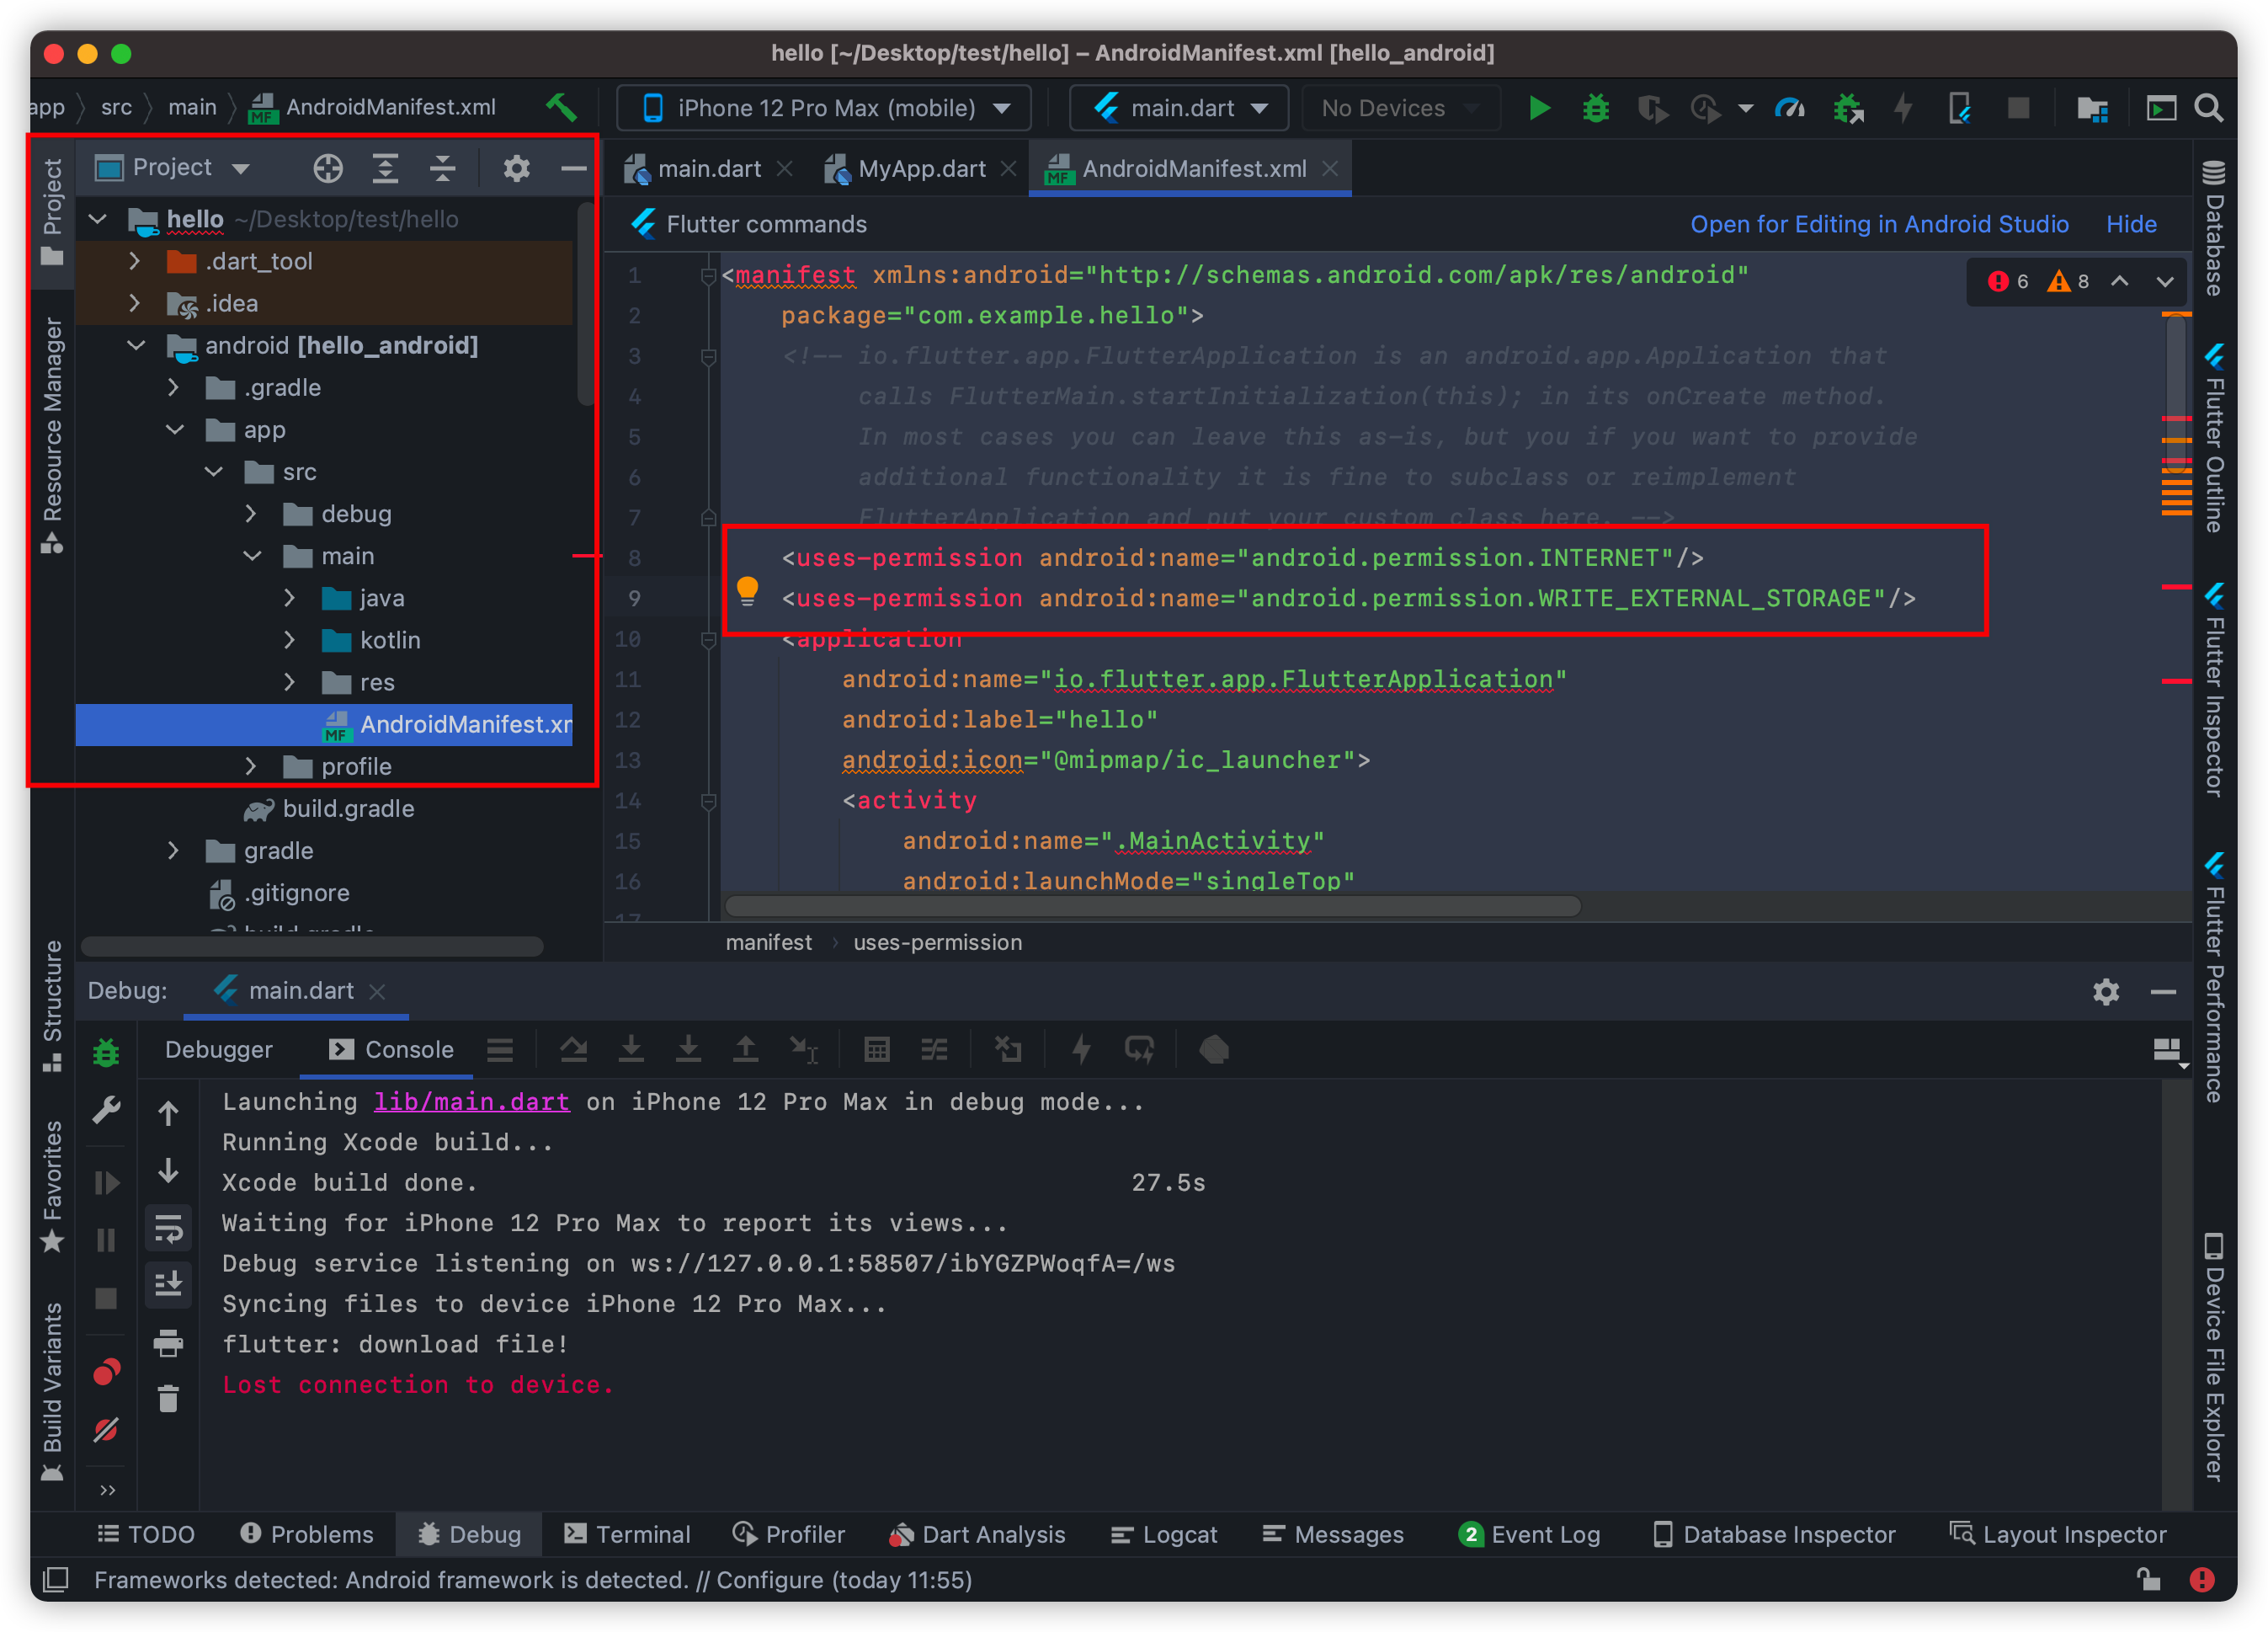
First: For android app release:
For Android App development, it is important to give the App network and storage permissions in advance. Modify
hello/app/src/main/AndroidManifest.xml -
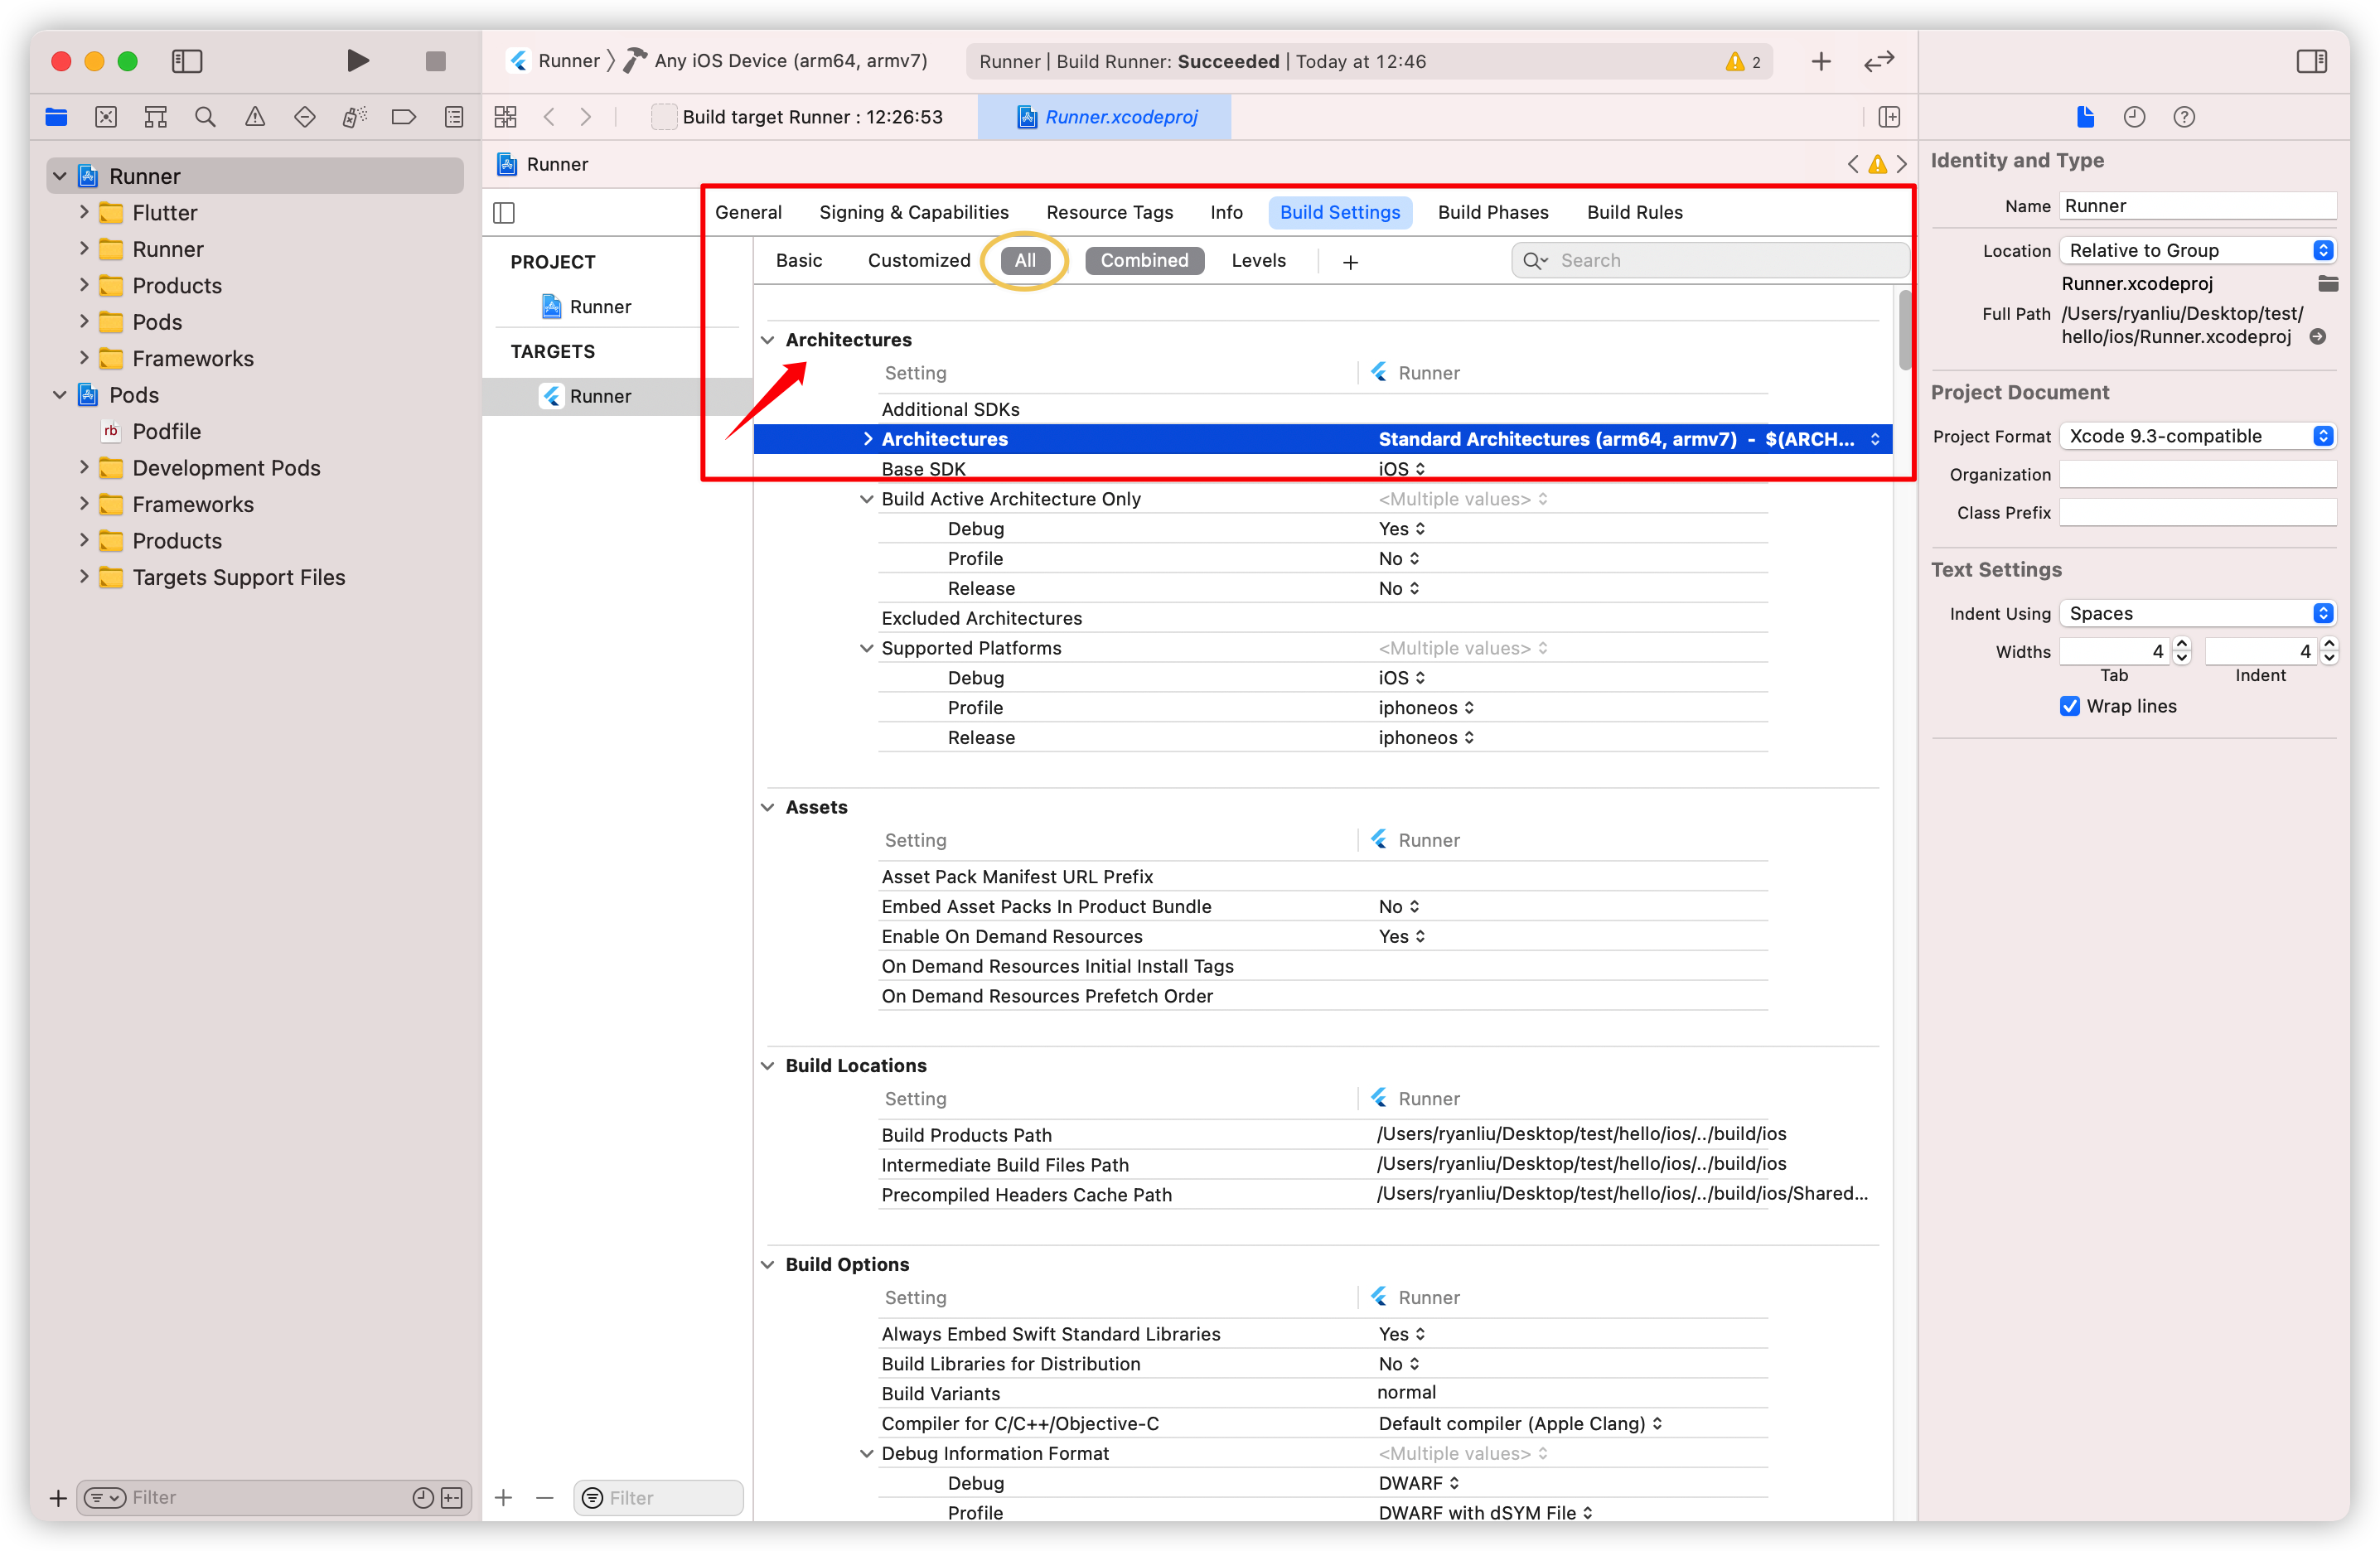
Second: For iOS app release:
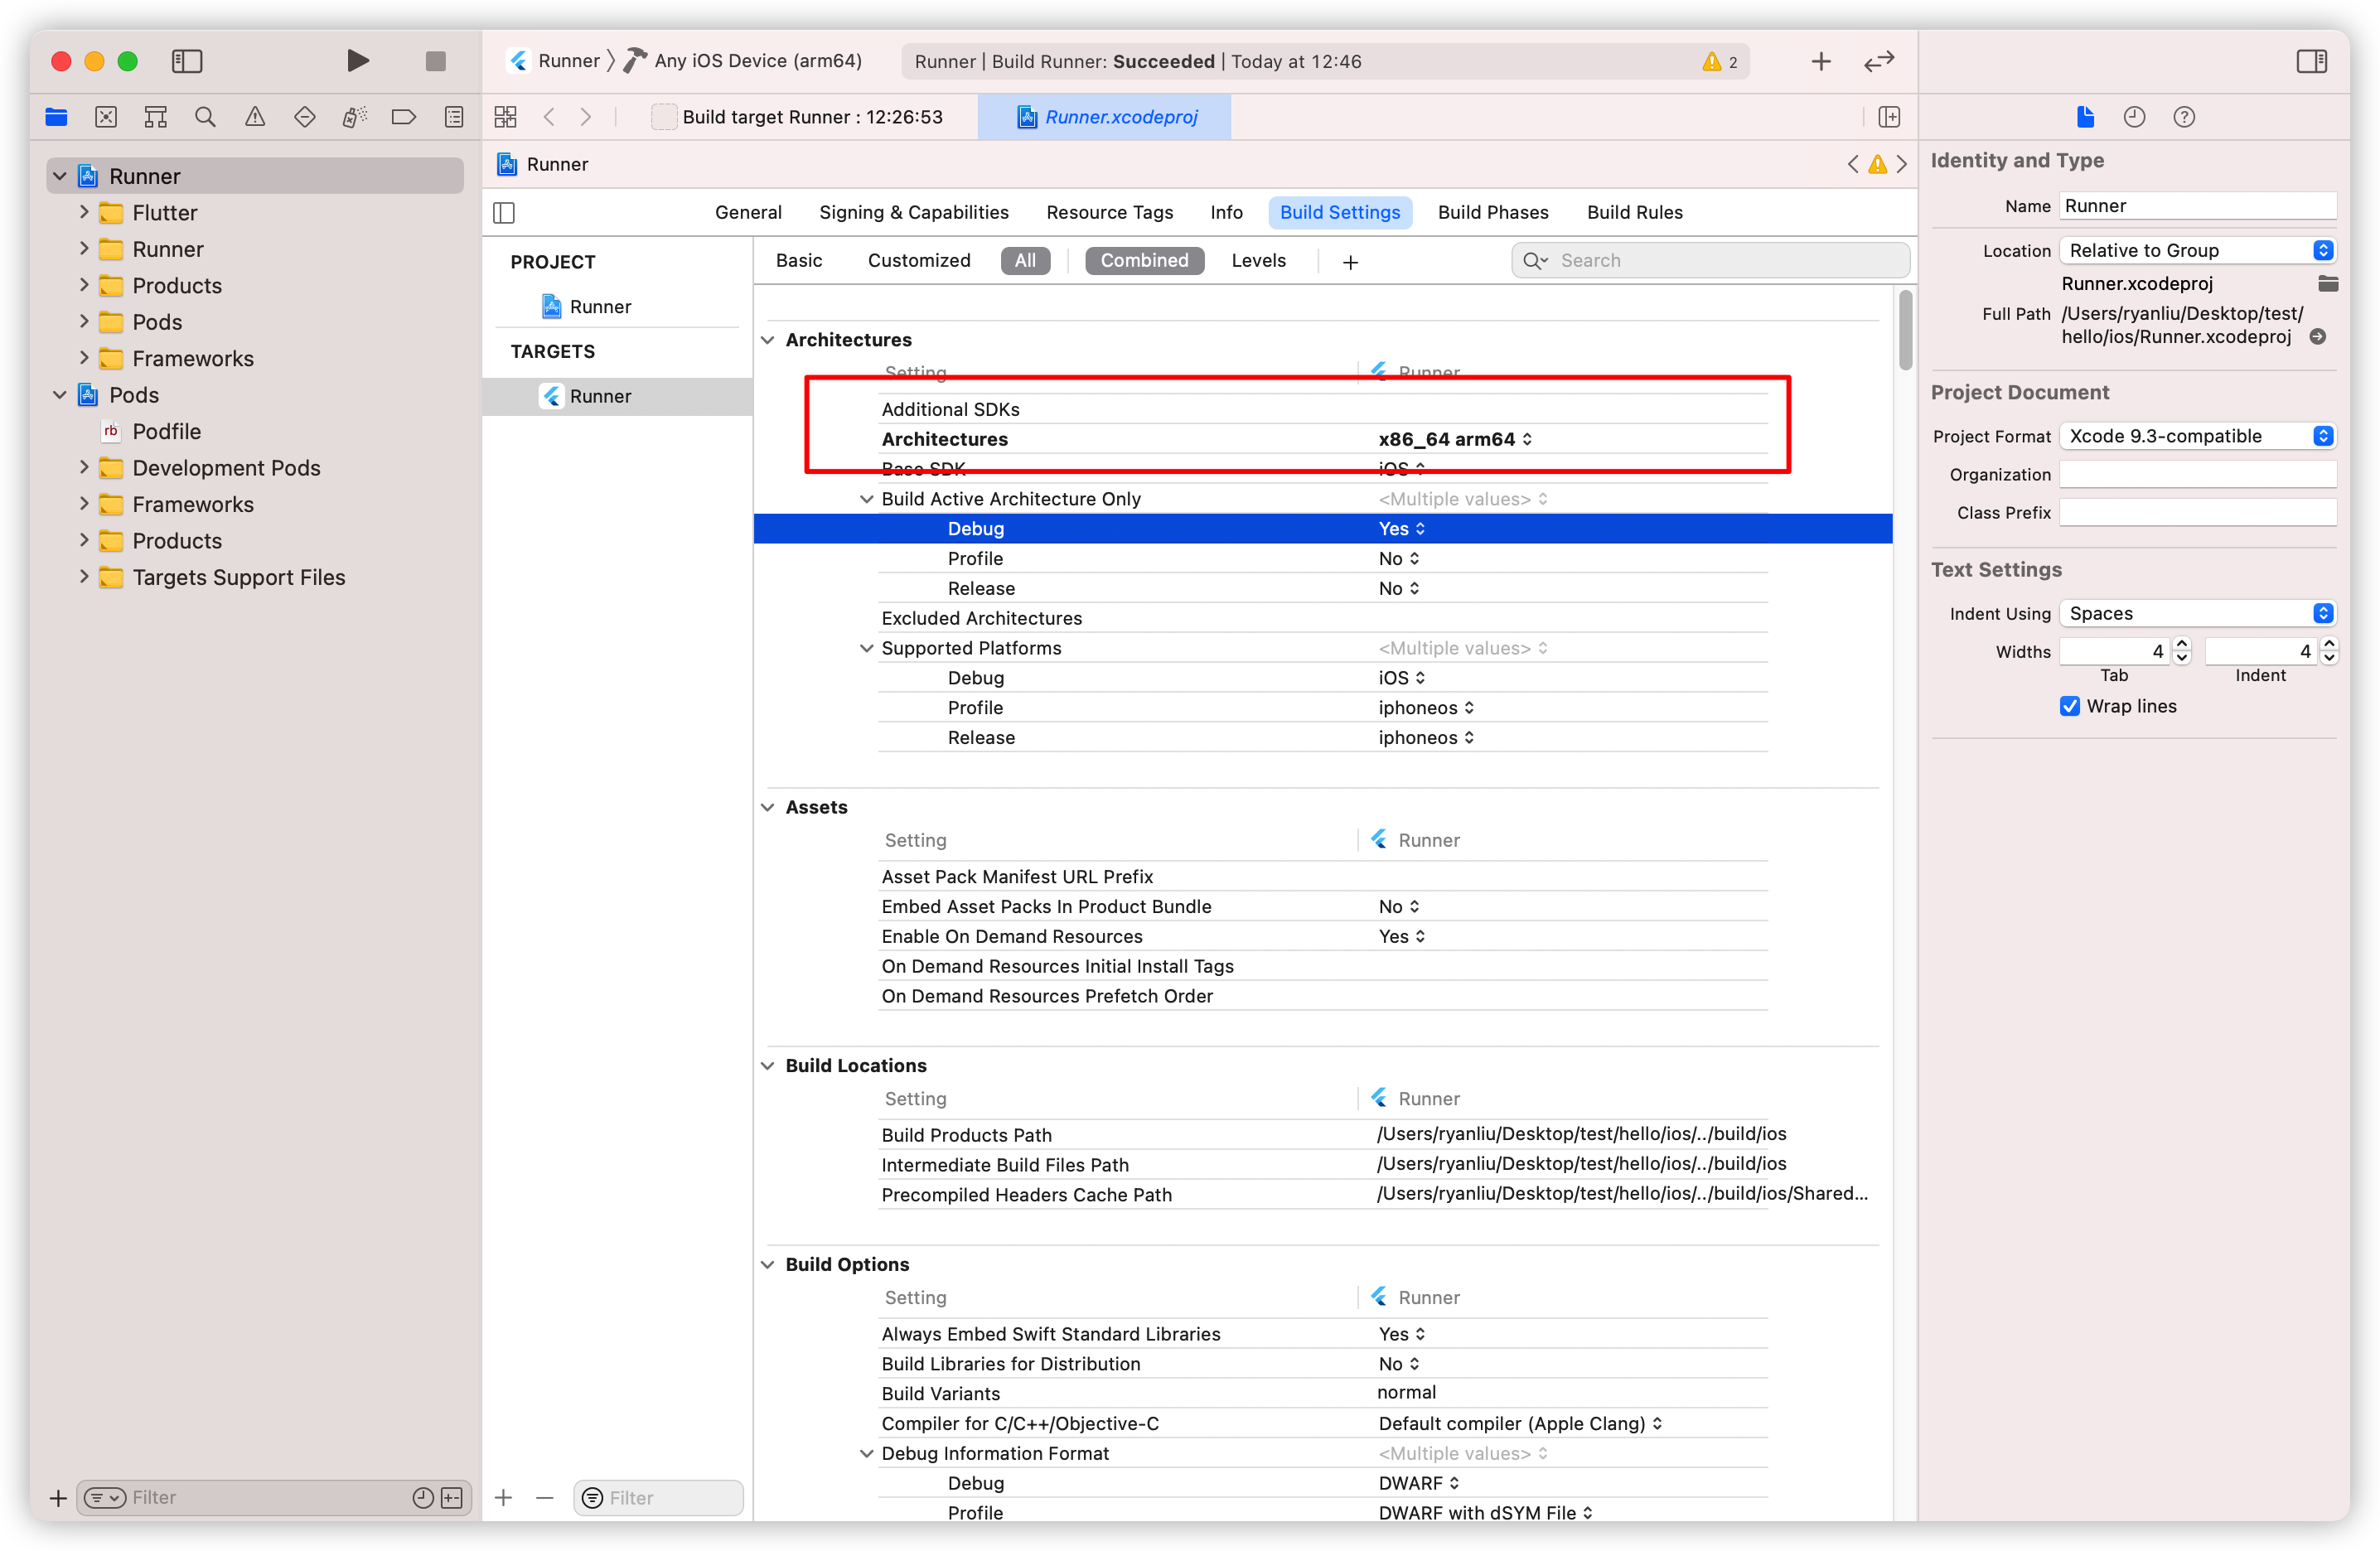
For iOS App development: Need to add "arm64 & x86_64" in the "Architectures" setting. Otherwise, some errors will be reported when you compile.
The change steps are as follows:
The initial default is this:
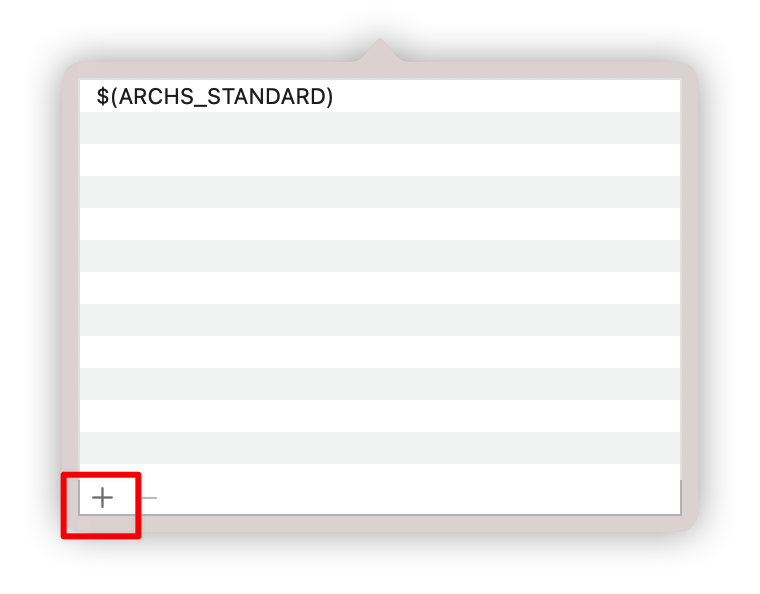
Modification process: first click
other,
The following window will appear:
Then click
+and the following appears:
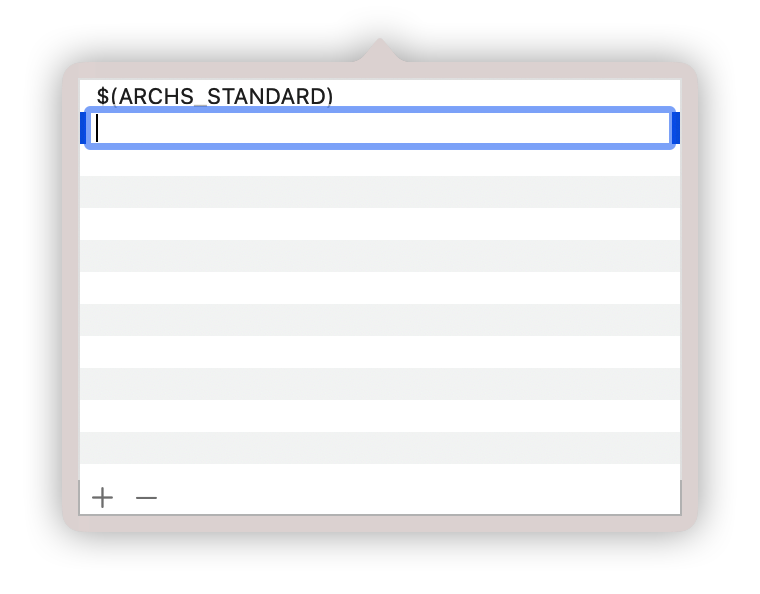
Input
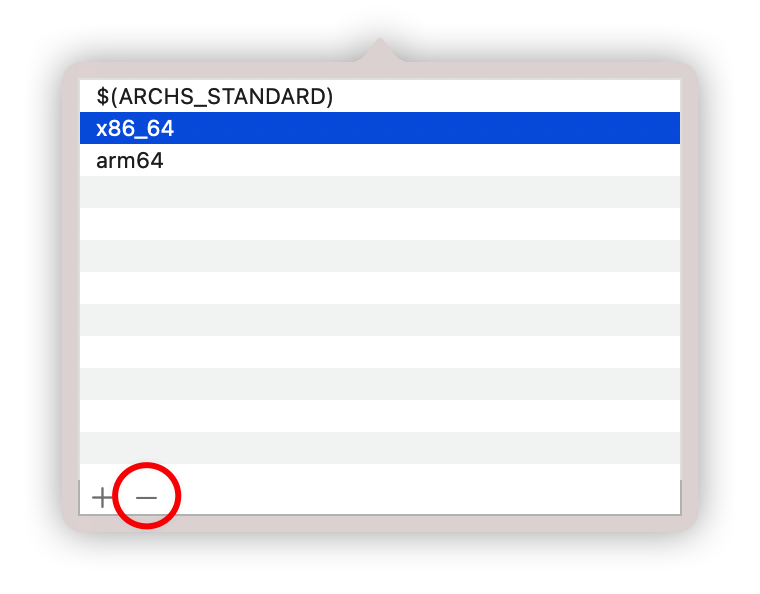
arm64in the text box. Click+again to addx86_64; two items will be added.
Finally select
$(ARCHS_STANDARD), click-in the figure above, and delete$(ARCHS_STANDARD).Final result:
Note that if XCODE reports compilation errors related to the
.afile ofx86_64when compiling iOS, please delete thex86_64ofArchitecturesand run XCODE to run again. Deletingx86_64will no longer support the iOS simulator.Reminder, if you want to deploy the APP to the real iPhone without connecting the iPhone data cable to the computer, please profile your APP to the phone. The XCODE shortcut is
⌘ + i。

For the release of Android apk, problems that may be encountered:
When releasing android apk, if you use flutter build apk, the following error will be reported:
   This application cannot tree shake icons fonts. It has non-constant instances of IconData at the following locations:
     - file:///Users/ryanliu/Desktop/test/hello/wtbase/lib/generate/mapping/WTVMIconData.dart:31:12
Please use the following command to release the apk:
flutter build apk --no-tree-shake-icons
You won't encounter the error above again.
Enjoy it!
Relevant Instruction Reference
More information you can refer to our GitBook link as below:
🛣️ Our 2021 Roadmap
- Open Source in 2021
- Project kickoff ✅
- Instruction ready ✅
- Github Open https://github.com/Waytoon/chimera_flutter_code_push ✅
- Next Generation V2 in 2021
- Patch-Diff Code Push
- Full AOT excution
- AI compiler
⚠️Unsupported Features
- Current all Dart language is fully supported.
- Might have some bugs, you can submit the bug you meet during development.
Store Guideline Compliance
Android Google Play and iOS App Store have corresponding guidelines that have rules you should be aware of before integrating the CodePush solution within your application.
Google play
Third paragraph of Device and Network Abuse topic describe that updating source code by any method other than Google Play's update mechanism is restricted. But this restriction is not apply to updating javascript bundles.
This restriction does not apply to code that runs in a virtual machine and has limited access to Android APIs (such as JavaScript in a webview or browser).
That fully allow CodePush as it updates just JS bundles and can't update native code part.
App Store
Paragraph 3.3.2, since back in 2015's Apple Developer Program License Agreement fully allowed performing over-the-air updates of JavaScript and assets - and in its latest version (20170605) downloadable here this ruling is even broader:
Interpreted code may be downloaded to an Application but only so long as such code: (a) does not change the primary purpose of the Application by providing features or functionality that are inconsistent with the intended and advertised purpose of the Application as submitted to the App Store, (b) does not create a store or storefront for other code or applications, and (c) does not bypass signing, sandbox, or other security features of the OS.
CodePush allows you to follow these rules in full compliance so long as the update you push does not significantly deviate your product from its original App Store approved intent.
To further remain in compliance with Apple's guidelines we suggest that App Store-distributed apps don't enable the updateDialog option when calling sync, since in the App Store Review Guidelines it is written that:
Apps must not force users to rate the app, review the app, download other apps, or other similar actions in order to access functionality, content, or use of the app.
This is not necessarily the case for updateDialog, since it won't force the user to download the new version, but at least you should be aware of that ruling if you decide to show it.
🔧Contributing
Submit issues through Issue catogary, if you want to contribute code, please send a Pull Request, and the administrator will review the code.
Any friend who are interested in Chimera code push can join our WeChat group by scanning the QR code as below: