GottaYotta / Pixelsdk
Programming Languages
Projects that are alternatives of or similar to Pixelsdk
Pixel SDK
Pixel SDK is a photo and video editing framework written in Swift.


- Features
- Getting Started
- Restrict the SDK
- Present the Editor
- Programmatic Editing
- Export Media
- Transcode Media
- Write Custom Filters
- Customize Colors
- License
Features
✅ Fully Customizable Filters with 40+ Included Filters and Visual Effects
✅ Vine Style Video Camera
✅ Auto-Saving Drafts
✅ Video Segment Composing, Trimming, Scaling, and Re-ordering
✅ Photo and Video Adjustments (Brightness, Vibrance, Saturation, Contrast, Exposure, Hue, Warmth, Sharpness, Gamma, Highlights, Shadows, Vignette)
✅ Cropping, Rotation, and Horizontal/Vertical Perspective Correction
✅ Adjust Individual Video Segments and Whole Video Composition
✅ Press and Hold Photo/Video to See Original While Editing
✅ Landscape, Portrait and or Square Support
✅ Swipe for Realtime Camera Filters
✅ Top Down Photo Mode
✅ Camera Brightness and Tap to Focus
✅ Share Directly to Facebook, Instagram or Twitter.
✅ Custom Colors and Dark Mode Support.
✅ Localized in 40+ Languages and Dynamic Type Accessibility Support.
✅ Import Photos and Videos from DSLR Camera. Lightning to USB Cable Required.
✅ Direct GPU Access with Metal and GPUImage3.
✅ RAW Images and 60fps 4K UHD Video Support. HEVC Support.
✅ Full Documentation.


Requirements
- iPhone or iPad
- iOS 11+
- Xcode 11.4+
Getting Started
Note: Extensive sample code can be found in the Xcode sample project.
CocoaPods
CocoaPods is a dependency manager for iOS projects. To integrate PixelSDK into your Xcode project, first verify you have at least Xcode 11.4 or greater installed.
Then, ensure you have the latest version of CocoaPods installed by running the following command:
$ sudo gem install cocoapods
Specify PixelSDK in your Podfile:
pod 'PixelSDK'
Run the following command from within your project directory:
$ pod install
Setup
Include the following lines in your application Info.plist:
<key>NSPhotoLibraryUsageDescription</key>
<string>Photo access is needed so you can select photos from your library.</string>
<key>NSMicrophoneUsageDescription</key>
<string>Microphone access is needed so you can record video with sound.</string>
<key>NSCameraUsageDescription</key>
<string>Camera access is needed so you can take photos.</string>
Import PixelSDK into the file you are working on.
import PixelSDK
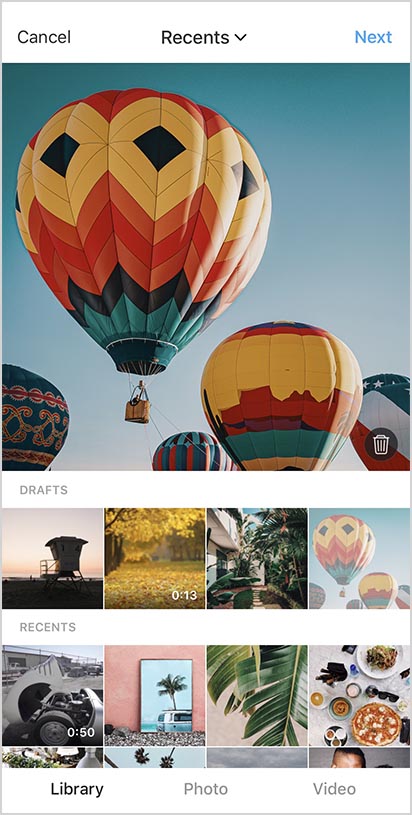
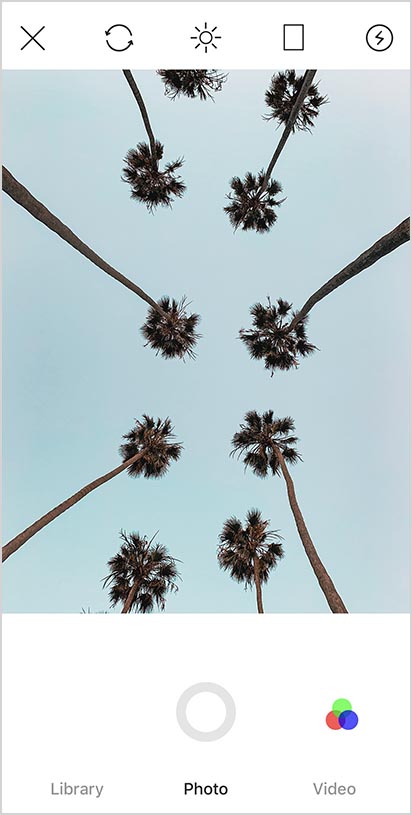
Present the SDK in response to a user action, for example, clicking a button. The default primary filters and adjustment filters will be used. The SDK will support both photo and video of any dimension with access to both the camera and library.
let container = ContainerController()
container.editControllerDelegate = self

let nav = UINavigationController(rootViewController: container)
nav.modalPresentationStyle = .fullScreen

self.present(nav, animated: true, completion: nil)
Also implement its delegate method. This delegate method will be called when the Next button in the EditController is pressed. In response you should either dismiss the UINavigationController or push a new controller on. The below example pushes a blank controller on. Then use the provided session parameter to export your photo or video at your own convenience.
extension ViewController: EditControllerDelegate {

    func editController(_ editController: EditController, didFinishEditing session: Session) {
        let controller = UIViewController()

        editController.navigationController?.pushViewController(controller, animated: true)
    }
}
Generate an API key and specify it in your application(_, didFinishLaunchingWithOptions:) of your App Delegate. The following pricing matrix applies to exports from your API key. Without an API key, image and video exports will include a watermark. Keep your API key private.
import PixelSDK

func application(_ application: UIApplication, didFinishLaunchingWithOptions launchOptions: [UIApplication.LaunchOptionsKey: Any]?) -> Bool {

    PixelSDK.setup("YOUR API KEY")

    return true
}
Optionally, specify a maximum video duration. The default maximum video duration is 80 seconds.
// Set the maximum video duration to 3 minutes.
PixelSDK.shared.maxVideoDuration = 60*3
That's it! You now have full access to the SDK.
Restrict the SDK
Images Only
The below example presents the SDK with only support for images. The user will have access to both the library and camera.
// Show only the library and photo camera modes in the tab bar
let container = ContainerController(modes: [.library, .photo])
container.editControllerDelegate = self

// Include only images from the users photo library
container.libraryController.fetchPredicate = NSPredicate(format: "mediaType == %d", PHAssetMediaType.image.rawValue)
// Include only images from the users drafts
container.libraryController.draftMediaTypes = [.image]

let nav = UINavigationController(rootViewController: container)
nav.modalPresentationStyle = .fullScreen

self.present(nav, animated: true, completion: nil)
Videos Only
The below example presents the SDK with only support for videos. The user will have access to both the library and camera.
// Show only the library and video camera modes in the tab bar
let container = ContainerController(modes: [.library, .video])
container.editControllerDelegate = self

// Include only videos from the users photo library
container.libraryController.fetchPredicate = NSPredicate(format: "mediaType == %d", PHAssetMediaType.video.rawValue)
// Include only videos from the users drafts
container.libraryController.draftMediaTypes = [.video]

let nav = UINavigationController(rootViewController: container)
nav.modalPresentationStyle = .fullScreen

self.present(nav, animated: true, completion: nil)
Square Content Only
The below example presents the SDK with only support for creating square photos and videos. The user will have access to both the library and camera.
let container = ContainerController()
container.editControllerDelegate = self

// Only allow square content from the library cropper
container.libraryController.previewCropController.aspectRatio = CGSize(width: 1, height: 1)
// Only allow square content from the camera controller
container.cameraController.aspectRatio = CGSize(width: 1, height: 1)

let nav = UINavigationController(rootViewController: container)
nav.modalPresentationStyle = .fullScreen
self.present(nav, animated: true, completion: nil)
Portrait Content Only
The below example presents the SDK with only support for creating portrait photos and videos. The user will have access to both the library and camera.
let container = ContainerController()
container.editControllerDelegate = self

// Only allow portrait content from the library cropper
container.libraryController.previewCropController.aspectRatio = CGSize(width: 3, height: 4)
// Only allow portrait content from the camera controller
container.cameraController.aspectRatio = CGSize(width: 3, height: 4)

let nav = UINavigationController(rootViewController: container)
nav.modalPresentationStyle = .fullScreen
self.present(nav, animated: true, completion: nil)
Library Only
The below example presents the SDK with only support for the library.
let container = ContainerController(mode: .library)
container.editControllerDelegate = self

let nav = UINavigationController(rootViewController: container)
nav.modalPresentationStyle = .fullScreen
self.present(nav, animated: true, completion: nil)
Camera Only
The below example presents the SDK with only support for the video camera.
let container = ContainerController(mode: .video)
container.editControllerDelegate = self

let nav = UINavigationController(rootViewController: container)
nav.modalPresentationStyle = .fullScreen
self.present(nav, animated: true, completion: nil)
Present the Editor
The camera and library can be bypassed by presenting the EditController with your own media.

Images
The below example presents the EditController with an image named "test_image" and sets the initial primary filter to Wilshire.
let image = UIImage(named: "test_image")!

let session = Session(image: image)
session.image!.primaryFilter = SessionFilterWilshire()

let editController = EditController(session: session)
editController.delegate = self

let nav = UINavigationController(rootViewController: editController)
nav.modalPresentationStyle = .fullScreen
self.present(nav, animated: true, completion: nil)
Videos
The below example presents the EditController with two AVAssets named "test.mov" and "test2.mp4" and sets the initial primary filter to Sepulveda. These two assets will become segments of the video in their respective order.
You can also manually pass a renderSize into the Session initializer. For more information see Session documentation.
let asset1 = AVAsset(url: Bundle.main.url(forResource: "test", withExtension: "mov")!)
let asset2 = AVAsset(url: Bundle.main.url(forResource: "test2", withExtension: "mp4")!)

let _ = Session(assets: [asset1, asset2], sessionReady: { (session, error) in
    guard let session = session,
        let video = session.video else {
        print("Unable to create session: \(error!)")
        return
    }

    // Set the initial primary filter to Sepulveda
    video.primaryFilter = SessionFilterSepulveda()

    let editController = EditController(session: session)
    editController.delegate = self

    let nav = UINavigationController(rootViewController: editController)
    nav.modalPresentationStyle = .fullScreen
    self.present(nav, animated: true, completion: nil)
})
Programmatic Editing
Images and videos can also be edited programmatically instead of visually. For more information see Session documentation.
For example, setting the primaryFilter of an image to Wilshire:
session.image!.primaryFilter = SessionFilterWilshire()
Applying a Brightness filter to an image:
let brightnessFilter = SessionFilterBrightness()
brightnessFilter.normalizedIntensity = 0.2
session.image!.filters = [brightnessFilter]
Applying a Saturation filter to a whole video:
let saturationFilter = SessionFilterSaturation()
saturationFilter.normalizedIntensity = 0.3
session.video!.filters = [saturationFilter]
Applying a Contrast filter to the first segment of a video:
let segment = session.video!.videoSegments.first!
let contrastFilter = SessionFilterContrast()
contrastFilter.normalizedIntensity = 0.2
segment.filters = [contrastFilter]
Trimming a segment so it starts at one second in, with a duration of two seconds:
let segment = session.video!.videoSegments.first!
segment.trimStartTime = CMTime(seconds: 1, preferredTimescale: segment.duration.timescale)
segment.trimDuration = CMTime(seconds: 2, preferredTimescale: segment.duration.timescale)
Rotating the first segment of a video with preferredTransform:
let segment = session.video!.videoSegments.first!
segment.preferredTransform = .rotated180Degrees(segment.naturalSize)
segment.cropRect = segment.suggestedCropRect()
Increasing the speed of the first segment of a video:
let segment = session.video!.videoSegments.first!
segment.speedMultiplier = 2 // 2x faster
You can present the EditController after making programmatic edits and it will reflect your changes. Additionally, the PreviewController will reflect all programmatic edits in real-time.
After making programmatic edits to a session, you should manually call session.save().
Export Media
Image Exports
The below example demonstrates exporting to a UIImage:
if let image = session.image {
    ImageExporter.shared.export(image: image, completion: { (error, uiImage) in
        if let error = error {
            print("Unable to export image: \(error)")
            return
        }

        print("Finished image export with UIImage: \(uiImage!)")
    })
}
In addition to exporting as a UIImage, the exported image is saved to file as a JPEG at the image.exportedImageURL variable. After the export has completed, you may use, move or copy this file. Once you are finished with the file, you should call session.destroy() in order to remove the image from the users drafts and delete its associated files.
Video Exports
The below example demonstrates exporting a video to an mp4 file:
if let video = session.video {
    VideoExporter.shared.export(video: video, progress: { progress in
        print("Export progress: \(progress)")
    }, completion: { error in
        if let error = error {
            print("Unable to export video: \(error)")
            return
        }

        print("Finished video export at URL: \(video.exportedVideoURL)")
    })
}
After the export has completed, you should use, move or copy the file found at the video.exportedVideoURL. Once you are finished with the file, you should call session.destroy() in order to remove the video from the users drafts and delete its associated files.
Frame rate can be customized by setting the video.frameDuration variable before exporting the video.
You can also change video.renderSize but we recommend you instead set the PreviewCropController aspectRatio and CameraController aspectRatio. See the square content example. These properties allow you to preserve video quality by delaying any upscaling or downscaling until a later point in your video processing logic. If you plan on converting your video to HLS on a server that encoder should handle any upscaling or downscaling.
Encoding Settings
If you do not customize the video and audio encoding settings, the default settings will be an mp4 file with H.264 video encoding and stereo AAC audio encoding:
import PixelSDK
import AVFoundation
var acl = AudioChannelLayout()
memset(&acl, 0, MemoryLayout<AudioChannelLayout>.size)
acl.mChannelLayoutTag = kAudioChannelLayoutTag_Stereo

let audioEncodingSettings: [String: Any] = [
    AVFormatIDKey: kAudioFormatMPEG4AAC,
    AVNumberOfChannelsKey: 2,
    AVSampleRateKey: AVAudioSession.sharedInstance().sampleRate,
    AVChannelLayoutKey: NSData(bytes:&acl, length:MemoryLayout<AudioChannelLayout>.size),
    AVEncoderBitRateKey: 96000
]

let videoEncodingSettings: [String: Any] = [
    AVVideoCompressionPropertiesKey: [
        AVVideoProfileLevelKey: AVVideoProfileLevelH264HighAutoLevel,
        AVVideoH264EntropyModeKey: AVVideoH264EntropyModeCABAC],
    AVVideoCodecKey: AVVideoCodecType.h264
]

VideoExporter.shared.export(video: session.video!,
                            fileType: .mp4,
                            videoEncodingSettings: videoEncodingSettings,
                            audioEncodingSettings: audioEncodingSettings,
                            progress: nil,
                            completion: { error in
})
There are many combinations of encoding settings you can provide. They must conform to the specifications set forth in AVFoundations AVVideoSettings.h and AVAudioSettings.h headers. There is also a list of available codecs. Keep in mind each codec may have different requirements for the settings you provide.
Below is an example of HEVC video encoding settings:
import PixelSDK
import AVFoundation
import VideoToolbox
let videoEncodingSettings: [String: Any] = [
    AVVideoCompressionPropertiesKey: [
        AVVideoProfileLevelKey: kVTProfileLevel_HEVC_Main_AutoLevel],
    AVVideoCodecKey: AVVideoCodecType.hevc
]
Transcode Media
Media files can also be transcoded without using UI.
This example stitches two AVAssets named "test.mov" and "test2.mp4" into a single 60 fps mp4 file with H.264 video encoding and stereo AAC audio encoding.
Additionally, a Saturation filter is applied to the first segment (asset), and a Pixellate filter is applied to the second segment.
import PixelSDK
import AVFoundation
let asset1 = AVAsset(url: Bundle.main.url(forResource: "test", withExtension: "mov")!)
let asset2 = AVAsset(url: Bundle.main.url(forResource: "test2", withExtension: "mp4")!)

let _ = Session(assets: [asset1, asset2], sessionReady: { (session, error) in
    guard let session = session,
        let video = session.video else {
        print("Unable to create session: \(error!)")
        return
    }

    // Mark the session as transient so it does not persist on disk/appear in the users drafts
    session.isTransient = true

    // Set the video frame rate to 60 fps
    video.frameDuration = CMTime(value: 1, timescale: 60)

    // Apply a Saturation filter to the first segment
    let saturationFilter = SessionFilterSaturation()
    saturationFilter.normalizedIntensity = 0.2
    video.videoSegments[0].filters = [saturationFilter]

    // Apply a Pixellate filter to the second segment
    let pixellateFilter = SessionFilterPixellate()
    video.videoSegments[1].filters = [pixellateFilter]

    // Write to an MP4 file with H.264 video encoding and stereo AAC audio encoding

    var acl = AudioChannelLayout()
    memset(&acl, 0, MemoryLayout<AudioChannelLayout>.size)
    acl.mChannelLayoutTag = kAudioChannelLayoutTag_Stereo

    let audioEncodingSettings: [String: Any] = [
        AVFormatIDKey: kAudioFormatMPEG4AAC,
        AVNumberOfChannelsKey: 2,
        AVSampleRateKey: AVAudioSession.sharedInstance().sampleRate,
        AVChannelLayoutKey: NSData(bytes:&acl, length:MemoryLayout<AudioChannelLayout>.size),
        AVEncoderBitRateKey: 96000
    ]

    let videoEncodingSettings: [String: Any] = [
        AVVideoCompressionPropertiesKey: [
            AVVideoProfileLevelKey: AVVideoProfileLevelH264HighAutoLevel,
            AVVideoH264EntropyModeKey: AVVideoH264EntropyModeCABAC],
        AVVideoCodecKey: AVVideoCodecType.h264
    ]

    VideoExporter.shared.export(video: video,
                                fileType: .mp4,
                                videoEncodingSettings: videoEncodingSettings,
                                audioEncodingSettings: audioEncodingSettings,
                                progress: { (progress) in
        print("Transcode progress: \(progress)")
    }, completion: { (error) in
        if let error = error {
            print("Unable to transcode video: \(error)")
            return
        }

        print("Finished video transcode at URL: \(video.exportedVideoURL)")
    })
})
After your transcode has completed, you may move, copy or delete the file found at the video.exportedVideoURL.
There are many combinations of encoding settings you can provide. They must conform to the specifications set forth in AVFoundations AVVideoSettings.h and AVAudioSettings.h headers. There is also a list of available codecs. Keep in mind each codec may have different requirements for the settings you provide.
Write Custom Filters
Easily create your own filters with Photoshop, Lightroom presets, 3D LUT files, or your favorite photo editing application. An RGB lookup image is used to remap the colors in photos and videos. This is the same method used by common social media apps. For more complex filters you can chain GPUImage3 operations e.g. LookupFilter --> Saturation --> Sharpen.
Step 1: Open any test image of your choosing in your photo editor.
Step 2: Apply filters and changes to the test image until you are satisfied with the end result.
Step 3: Download the original lookup.png image from the repository and open it in your photo editor.
Step 4: Apply the same changes you made on your test image to the lookup.png image and save the result to a new image lookup_example.png. Do not downsize the lookup image, reduce its quality or change its format. In some photo editors you can simply copy your adjustment layers from your test image to the lookup image.
Note: Each pixel color must be independent of other pixels (e.g. sharpen will not work). If you need a more complex filter you can chain GPUImage3 operations e.g. LookupFilter --> Sharpen --> Saturation. An example of chaining operations is also included in the Xcode sample project.
Step 5: Use the below code to create your own SessionFilter subclass that utilizes a LookupFilter operation and your newly created lookup_example.png image. Be sure to add your lookup_example.png image to your Xcode project.
import Foundation
import PixelSDK
import GPUImage

class SessionFilterExample: SessionFilter {
    public required init() {
        super.init()

        self.commonInit()
    }

    public required init(from decoder: Decoder) throws {
        try super.init(from: decoder)

        self.commonInit()
    }

    public override func encode(to encoder: Encoder) throws {
        try super.encode(to: encoder)
    }

    func commonInit() {
        self.displayName = "Example Filter"
        self.version = "1.0"
        self.cameraThumbnailImage = UIImage(named: "thumbnail_example.png")

        // self.normalizedIntensityDefault = 100 // This value gets computed
        self.normalizedIntensityRange = (0, 100)
        self.actualIntensityDefault = 1
        self.actualIntensityRange = (0, 1)
    }

    override public func operation() -> ImageProcessingOperation {
        let lookupFilter = LookupFilter()

        do {
            lookupFilter.lookupImage = try PictureInput(image: UIImage(named: "lookup_example.png")!)
        }
        catch {
            print("ERROR: Unable to create PictureInput \(error)")
        }

        return lookupFilter
    }

    override public func operationUpdateNeeded(_ op: ImageProcessingOperation) {
        let op = op as! LookupFilter

        op.intensity = Float(self.actualIntensity)
    }
}
Step 6: Include your custom filter in the list of available filters. Do this before you present the ContainerController or EditController.
PixelSDK.shared.primaryFilters = [
    SessionFilterExample(), // Your custom filter
    SessionFilterWilshire(),
    SessionFilterMontana(),
    SessionFilterSanVicente(),
    SessionFilterMelrose(),
    SessionFilterSepulveda(),
    SessionFilterLaCienega(),
    SessionFilterAbbotKinney(),
    SessionFilterMulholland(),
    SessionFilterSunset()
]
That's it! Enjoy your new custom filter.
Customize Colors
Customize UI colors in the framework by adding color assets to your asset catalog:

The color assets you add can have any of the following names:
 |
Pixel SDK Theme Color |
 |
Pixel SDK Label Color |
 |
Pixel SDK Label Inactive Color |
 |
Pixel SDK Shadow Color |
 |
Pixel SDK Background Color |
 |
Pixel SDK Placeholder Color |
 |
Pixel SDK Destructive Color |
 |
Pixel SDK Face Up Color |
 |
Pixel SDK Camera Overlay Color |
 |
Pixel SDK Gray 1 Color |
 |
Pixel SDK Gray 2 Color |
 |
Pixel SDK Gray 3 Color |
 |
Pixel SDK Gray 4 Color |
 |
Pixel SDK Gray 5 Color |
 |
Pixel SDK White Color |
The Xcode sample project includes all available color assets with their default colors. If you do not provide color assets, the default colors will be used.
License
Make sure you generate an API key before releasing your app. The following pricing matrix applies to exports from your API key. Without an API key, image and video exports will include a watermark.