Vaprobash
Vagrant Provisioning Bash Scripts
View the site and extended docs.

Goal
The goal of this project is to create easy to use bash scripts in order to provision a Vagrant server.
- This targets Ubuntu LTS releases, currently 14.04.*
- This project will give users various popular options such as LAMP, LEMP
- This project will attempt some modularity. For example, users might choose to install a Vim setup, or not.
Some further assumptions and self-imposed restrictions. If you find yourself needing or wanting the following, then other provisioning tool would better suited (Chef, Puppet, Ansible).
- If other OSes need to be used (CentOS, Redhat, Arch, etc).
- If dependency management becomes complex. For example, installing Laravel depends on Composer. Setting a document root for a project will change depending on Nginx or Apache. Currently, these dependencies are accounted for, but more advanced dependencies will likely not be.
Dependencies
- Vagrant
1.5.0+- Use
vagrant -vto check your version
- Use
- Vitualbox or VMWare Fusion
Instructions
First, Copy the Vagrantfile from this repo. You may wish to use curl or wget to do this instead of cloning the repository.
# curl
$ curl -L http://bit.ly/vaprobash > Vagrantfile

# wget
$ wget -O Vagrantfile http://bit.ly/vaprobash
The
bit.lylink will always point to the master branch version of the Vagrantfile.
Second, edit the Vagrantfile and uncomment which scripts you'd like to run. You can uncomment them by removing the # character before the config.vm.provision line.
You can indeed have multiple provisioning scripts when provisioning Vagrant.
Third and finally, run:
$ vagrant upScreencast
Here's a quickstart screencast!

Windows Users:
By default, NFS won't work on Windows. I suggest deleting the NFS block so Vagrant defaults back to its default file sync behavior.
However, you can also try the "vagrant-winnfsd" plugin. Just run
vagrant plugin install vagrant-winnfsdto try it out!Vagrant version 1.5 will have more file sharing options to explore as well!
Docs
View the site and extended docs.
What You Can Install
- Base Packages
- Base Items (Git and more!)
- PHP (php-fpm)
- Vim
- PHP MsSQL (ability to connect to SQL Server)
- Screen
- Docker
- Web Servers
- Apache
- HHVM
- Nginx
- Databases
- Couchbase
- CouchDB
- MariaDB
- MongoDB
- MySQL
- Neo4J
- PostgreSQL
- SQLite
- In-Memory Stores
- Memcached
- Redis
- Search
- ElasticSearch and ElasticHQ
- Utility
- Beanstalkd
- Supervisord
- Kibana
- Additional Languages
- NodeJS via NVM
- Ruby via RVM
- Frameworks / Tooling
- Composer
- Laravel
- Symfony
- PHPUnit
- MailCatcher
- Ansible
- Android
The Vagrantfile
The vagrant file does three things you should take note of:
- Gives the virtual machine a static IP address of 192.168.22.10. This IP address is again hard-coded (for now) into the LAMP, LEMP and Laravel/Symfony installers. This static IP allows us to use xip.io for the virtual host setups while avoiding having to edit our computers'
hostsfile. - Uses NFS instead of the default file syncing. NFS is reportedly faster than the default syncing for large files. If, however, you experience issues with the files actually syncing between your host and virtual machine, you can change this to the default syncing by deleting the lines setting up NFS:
config.vm.synced_folder ".", "/vagrant",
          id: "core",
          :nfs => true,
:mount_options => ['nolock,vers=3,udp,noatime']- Offers an option to prevent the virtual machine from losing internet connection when running on Ubuntu. If your virtual machine can't access the internet, you can solve this problem by uncommenting the two lines below:
  #vb.customize ["modifyvm", :id, "--natdnshostresolver1", "on"]
  #vb.customize ["modifyvm", :id, "--natdnsproxy1", "on"]
Don't forget to reload your Vagrantfile running vagrant reload --no-provision, in case your virtual machine already exists.
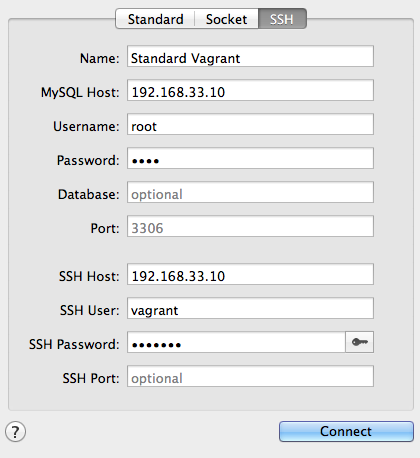
Connecting to MySQL from Sequel Pro:
Change your IP address as needed. The default IP address is now 192.168.22.10
Contribute!
Do it! Any new install or improvement on existing ones are welcome! Please see the contributing doc.