Inspiration:
The guy who hit my car and got away with it!
Backstory:
After a memorable evening with friends as we were about to leave for our home there was something that made that evening even more memorable, a huge dent in my car’s front bumper, seemed it was hit by another vehicle, but who to blame? There was no one around who would have witnessed that. And what could I do about it? I’ll tell you exactly what I did about it. I decided to use my machine learning and data skills and make an AI-based Indian License plate detector that was capable enough to keep a watch on a vehicle by detecting the number plates of vehicles around it and in this blog I’ll be taking you guys through my journey of how I did it! First things first: There is always a scope of improvising, so if you come up with some better ideas or doubts regarding this project please do use the response section below.
Approach:
We need to build a system that is capable of -
-
Taking in the image/video (series of images) from surrounding: at the hardware end, we need a pc (or raspberry pi) along with a camera and at the software end, we need a library to capture and process the data (image). I’ve used OpenCV (4.1.0) and Python (3.6.7) for this project.
-
Looking for a license plate in the image: To detect an object(license plate) from an image we need another tool that can recognize an Indian license plate so for that I’ve used Haar cascade, pre-trained on Indian license plates (will be updating soon to YOLO v3).
-
Analyzing and performing some image processing on the License plate: Using OpenCV’s grayscale, threshold, erode, dilate, contour detection and by some parameter tuning, we may easily be able to generate enough information about the plate to decide if the data is useful enough to be passed on to further processes or not (sometime if the image is very distorted or not proper, we may only get suppose 8 out of 10 characters, then there’s no point passing the data down the pipeline but to ignore it and look at the next frame for the plate), also before passing the image to the next process we need to make sure that it is noise-free and processed.
-
Segmenting the alphanumeric characters from the license plate: if everything in the above steps works fine, we should be ready to extract the characters from the plate, this can be done by thresholding, eroding, dilating and blurring the image skillfully such that at the end the image we have is almost noise-free and easy for further functions to work on. We now again use contour detection and some parameter tuning to extract the characters.
-
Considering the characters one by one, recognizing the characters, concatenating the results and giving out the plate number as a string: Now comes the fun part! Since we have all the characters, we need to pass the characters one by one into our trained model, and it should recognize the characters and voilà! We’ll be using Keras for our Convolutional Neural Network model.
Prerequisites:
-
OpenCV: OpenCV is a library of programming functions mainly aimed at real-time computer vision plus its open-source, fun to work with and my personal favorite. I have used version 4.1.0 for this project.
-
Python: aka swiss army knife of coding. I have used version 3.6.7 here.
-
IDE: I’ll be using Jupyter here.
-
Haar cascade: It is a machine learning object detection algorithm used to identify objects in an image or video and based on the concept of features proposed by Paul Viola and Michael Jones in their paper “Rapid Object Detection using a Boosted Cascade of Simple Features” in 2001. More info
-
Keras: Easy to use and widely supported, Keras makes deep learning about as simple as deep learning can be.
-
Scikit-Learn: It is a free software machine learning library for the Python programming language.
-
And of course, do not forget the coffee!
Step 1
Creating a workspace.
I recommend making a conda environment because it makes project management much easier. Please follow the instructions in this link for installing miniconda. Once installed open cmd/terminal and create an environment using-
{% highlight bash linenos %}
conda create -n 'name_of_the_environment' python=3.6.7 {% endhighlight %}
Now let’s activate the environment:
{% highlight bash linenos %}
conda activate 'name_of_the_environment' {% endhighlight %}
This should set us inside our virtual environment. Time to install some libraries-
{% highlight bash linenos %}
# installing OpenCV
pip install opencv-python==4.1.0

# Installing Keras
pip install keras

# Installing Jupyter
pip install jupyter

#Installing Scikit-Learn
pip install scikit-learn {% endhighlight %}
Step 2
Setting up the environment!
We’ll start with running jupyter notebook and then importing necessary libraries in our case OpenCV, Keras and sklearn.
# in your conda environment run
{% highlight bash linenos %}
jupyter notebook {% endhighlight %}
This should open Jupyter notebook in the default web browser. Once open, let’s import the libraries
{% highlight bash linenos %}
#importing openCV
import cv2

#importing numpy
import numpy as np

#importing pandas to read the CSV file containing our data
import pandas as pd

#importing keras and sub-libraries
from keras.models import Sequential
from keras.layers import Dense
from keras.layers import Dropout
from keras.layers import Flatten, MaxPool2D
from keras.layers.convolutional import Conv2D
from keras.layers.convolutional import MaxPooling2D
from keras import backend as K
from keras.utils import np_utils
from sklearn.model_selection import train_test_split {% endhighlight %}
Step 3
Number plate detection:
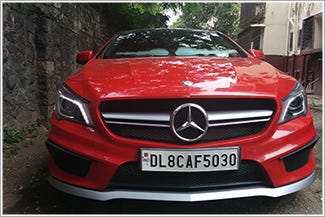
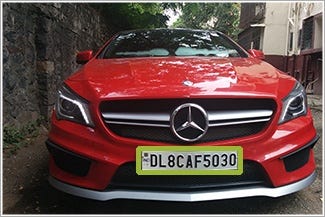
Let’s start simple by importing a sample image of a car with a license plate and define some functions:
{% highlight python linenos %} def extract_plate(img): # the function detects and perfors blurring on the number plate. plate_img = img.copy()
#Loads the data required for detecting the license plates from cascade classifier.
plate_cascade = cv2.CascadeClassifier('./indian_license_plate.xml')

# detects numberplates and returns the coordinates and dimensions of detected license plate's contours.
plate_rect = plate_cascade.detectMultiScale(plate_img, scaleFactor = 1.3, minNeighbors = 7)

for (x,y,w,h) in plate_rect:
	a,b = (int(0.02*img.shape[0]), int(0.025*img.shape[1])) #parameter tuning
	plate = plate_img[y+a:y+h-a, x+b:x+w-b, :]
	# finally representing the detected contours by drawing rectangles around the edges.
	cv2.rectangle(plate_img, (x,y), (x+w, y+h), (51,51,255), 3)

return plate_img, plate # returning the processed image
{% endhighlight %}
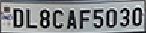
The above function works by taking image as input, then applying ‘haar cascade’ that is pre-trained to detect Indian license plates, here the parameter scaleFactor stands for a value by which input image can be scaled for better detection of license plate (know more). minNeighbors is just a parameter to reduce false positives, if this value is low, the algorithm may be more prone to giving a misrecognized outputs. (you can download the haar cascade file as ‘indian_license_plate.xml’ file from my github profile.)
Step 4
Performing some image processing on the License plate.
Now let’s process this image further to make the character extraction process easy. We’ll start by defining some more functions for that.
{% highlight python linenos %}
Find characters in the resulting images
def segment_characters(image) :
# Preprocess cropped license plate image
img = cv2.resize(image, (333, 75))
img_gray = cv2.cvtColor(img, cv2.COLOR_BGR2GRAY)
_, img_binary = cv2.threshold(img_gray, 200, 255, cv2.THRESH_BINARY+cv2.THRESH_OTSU)
img_erode = cv2.erode(img_binary, (3,3))
img_dilate = cv2.dilate(img_erode, (3,3))

LP_WIDTH = img_dilate.shape[0]
LP_HEIGHT = img_dilate.shape[1]

# Make borders white
img_dilate[0:3,:] = 255
img_dilate[:,0:3] = 255
img_dilate[72:75,:] = 255
img_dilate[:,330:333] = 255

# Estimations of character contours sizes of cropped license plates
dimensions = [LP_WIDTH/6, LP_WIDTH/2, LP_HEIGHT/10, 2*LP_HEIGHT/3]

# Get contours within cropped license plate
char_list = find_contours(dimensions, img_dilate)

return char_list
{% endhighlight %}
The above function takes in the image as input and performs the following operation on it-
-
resizes it to a dimension such that all characters seem distinct and clear
-
convert the colored image to a grey scaled image i.e instead of 3 channels (BGR), the image only has a single 8-bit channel with values ranging from 0–255 where 0 corresponds to black and 255 corresponds to white. We do this to prepare the image for the next process.
-
now the threshold function converts the grey scaled image to a binary image i.e each pixel will now have a value of 0 or 1 where 0 corresponds to black and 1 corresponds to white. It is done by applying a threshold that has a value between 0 and 255, here the value is 200 which means in the grayscaled image for pixels having a value above 200, in the new binary image that pixel will be given a value of 1. And for pixels having value below 200, in the new binary image that pixel will be given a value of 0.
-
The image is now in binary form and ready for the next process Eroding. Eroding is a simple process used for removing unwanted pixels from the object’s boundary meaning pixels that should have a value of 0 but are having a value of 1. It works by considering each pixel in the image one by one and then considering the pixel’s neighbor (the number of neighbors depends on the kernel size), the pixel is given a value 1 only if all its neighboring pixels are 1, otherwise it is given a value of 0.
-
The image is now clean and free of boundary noise, we will now dilate the image to fill up the absent pixels meaning pixels that should have a value of 1 but are having value 0. The function works similar to eroding but with a little catch, it works by considering each pixel in the image one by one and then considering the pixel’s neighbor (the number of neighbors depends on the kernel size), the pixel is given a value 1 if at least one of its neighboring pixels is 1.
-
The next step now is to make the boundaries of the image white. This is to remove any out of the frame pixel in case it is present.
-
Next, we define a list of dimensions that contains 4 values with which we’ll be comparing the character’s dimensions for filtering out the required characters.
-
Through the above processes, we have reduced our image to a processed binary image and we are ready to pass this image for character extraction.
Step 5
Segmenting the alphanumeric characters from the license plate.
{% highlight python linenos %} import numpy as np import cv2
Match contours to license plate or character template
def find_contours(dimensions, img) :
# Find all contours in the image
cntrs, _ = cv2.findContours(img.copy(), cv2.RETR_TREE, cv2.CHAIN_APPROX_SIMPLE)

# Retrieve potential dimensions
lower_width = dimensions[0]
upper_width = dimensions[1]
lower_height = dimensions[2]
upper_height = dimensions[3]


# Check largest 5 or  15 contours for license plate or character respectively
cntrs = sorted(cntrs, key=cv2.contourArea, reverse=True)[:15]

x_cntr_list = []
target_contours = []
img_res = []
for cntr in cntrs :
    #detects contour in binary image and returns the coordinates of rectangle enclosing it
    intX, intY, intWidth, intHeight = cv2.boundingRect(cntr)

    #checking the dimensions of the contour to filter out the characters by contour's size
    if intWidth > lower_width and intWidth < upper_width and intHeight > lower_height and intHeight < upper_height :
        x_cntr_list.append(intX) #stores the x coordinate of the character's contour, to used later for indexing the contours

        char_copy = np.zeros((44,24))
        #extracting each character using the enclosing rectangle's coordinates.
        char = img[intY:intY+intHeight, intX:intX+intWidth]
        char = cv2.resize(char, (20, 40))

        # Make result formatted for classification: invert colors
        char = cv2.subtract(255, char)

        # Resize the image to 24x44 with black border
        char_copy[2:42, 2:22] = char
        char_copy[0:2, :] = 0
        char_copy[:, 0:2] = 0
        char_copy[42:44, :] = 0
        char_copy[:, 22:24] = 0

        img_res.append(char_copy) #List that stores the character's binary image (unsorted)

#Return characters on ascending order with respect to the x-coordinate (most-left character first)

#arbitrary function that stores sorted list of character indeces
indices = sorted(range(len(x_cntr_list)), key=lambda k: x_cntr_list[k])
img_res_copy = []
for idx in indices:
    img_res_copy.append(img_res[idx])# stores character images according to their index
img_res = np.array(img_res_copy)

return img_res
view rawcharacter_detection.py hosted with
After step 4 we should have a clean binary image to work on. In this step, we will be applying some more image processing to extract the individual characters from the license plate. The steps involved will be-
- Finding all the contours in the input image. The function cv2.findContours returns all the contours it finds in the image. Contours can be explained simply as a curve joining all the continuous points (along the boundary), having the same color or intensity.
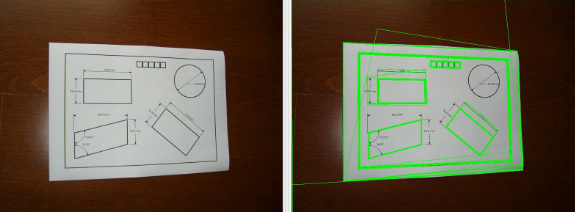

- After finding all the contours we consider them one by one and calculate the dimension of their respective bounding rectangle. Now consider bounding rectangle is the smallest rectangle possible that contains the contour. Let me illustrate the bounding rectangle by drawing them for each character here.

- Since we have the dimensions of these bounding rectangle, all we need to do is do some parameter tuning and filter out the required rectangle containing required characters. For this, we will be performing some dimension comparison by accepting only those rectangle that have:
- Width in the range 0, (length of the pic)/(number of characters) and,
- Length in a range of (width of the pic)/2, 4*(width of the pic)/5. After this step, we should have all the characters extracted as binary images.

- The characters may be unsorted but don’t worry, the last few lines of the code take care of that. It sorts the character according to the position of their bounding rectangle from the left boundary of the plate.
Step 6
Creating a Machine Learning model and training it for the characters.
- The data is all clean and ready, now it’s time do create a Neural Network that will be intelligent enough to recognize the characters after training.
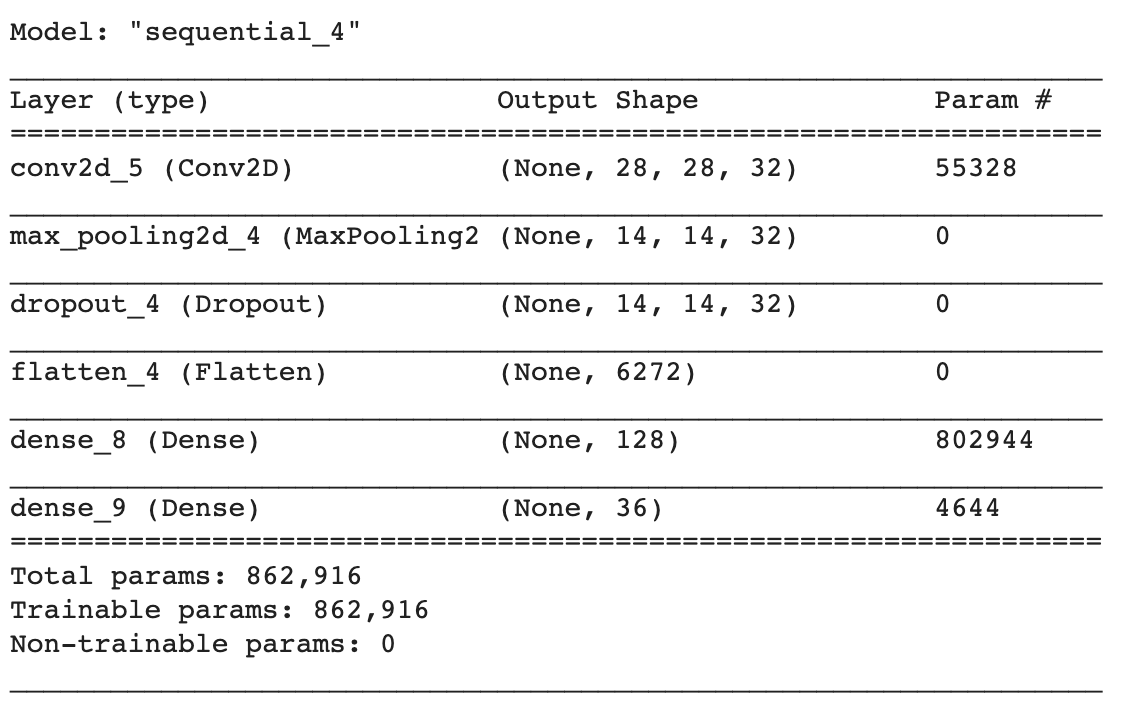
- For modeling, we will be using a Convolutional Neural Network with 3 layers.
{% highlight bash linenos %}
create model
model = Sequential() model.add(Conv2D(filters=32, kernel_size=(5,5), input_shape=(28, 28, 1), activation='relu')) model.add(MaxPooling2D(pool_size=(2, 2))) model.add(Dropout(rate=0.4)) model.add(Flatten()) model.add(Dense(units=128, activation='relu')) model.add(Dense(units=36, activation='softmax')){% endhighlight %}
-
To keep the model simple, we’ll start by creating a sequential object.
-
The first layer will be a convolutional layer with 32 output filters, a convolution window of size (5,5), and ‘Relu’ as activation function.


- Next, we’ll be adding a max-pooling layer with a window size of (2,2). Max pooling is a sample-based discretization process. The objective is to down-sample an input representation (image, hidden-layer output matrix, etc.), reducing its dimensionality and allowing for assumptions to be made about features contained in the sub-regions binned.

-
Now, we will be adding some dropout rate to take care of overfitting. Dropout is a regularization hyperparameter initialized to prevent Neural Networks from Overfitting. Dropout is a technique where randomly selected neurons are ignored during training. They are “dropped-out” randomly. We have chosen a dropout rate of 0.4 meaning 60% of the node will be retained.
-
Now it’s time to flatten the node data so we add a flatten layer for that. The flatten layer takes data from the previous layer and represents it in a single dimension.
- Finally, we will be adding 2 dense layers, one with the dimensionality of the output space as 128, activation function='ReLU' and other, our final layer with 36 outputs for categorizing the 26 alphabets (A-Z) + 10 digits (0–9) and activation function= 'softmax'

Step 7
Training our CNN model.
-
The data we will be using contains images of alphabets (A-Z) and digits (0–9) of size 28x28, also the data is balanced so we won’t have to do any kind of data tuning here.
-
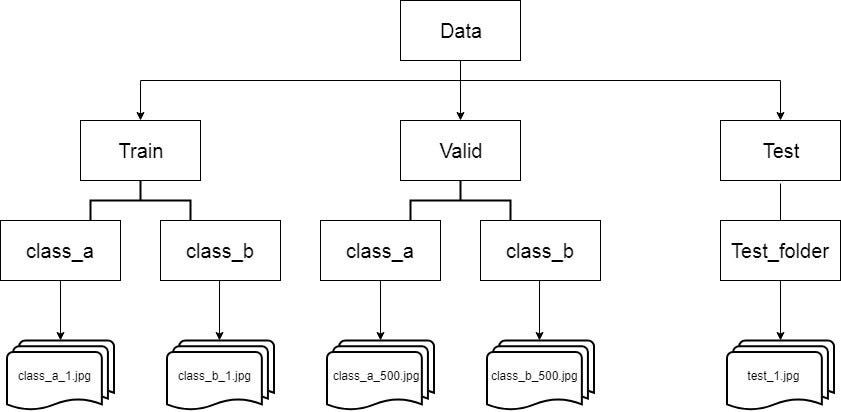
I’ve created a zip file that contains data as per the directory structure below, with a train test split of 80:20
-
We’ll be using ImageDataGenerator class available in keras to generate some more data using image augmentation techniques like width shift, height shift. To know more about ImageDataGenerator, please check out this nice blog.
-
Width shift: Accepts a float value denoting by what fraction the image will be shifted left and right. Height shift: Accepts a float value denoting by what fraction the image will be shifted up and down.
{% highlight python linenos %} from tensorflow.keras.preprocessing.image import ImageDataGenerator train_datagen = ImageDataGenerator(rescale=1./255, width_shift_range=0.05, height_shift_range=0.05)
train_generator = train_datagen.flow_from_directory( 'data/train', # this is the target directory target_size=(28,28), # all images will be resized to 28x28 batch_size=1, class_mode='categorical')
validation_generator = train_datagen.flow_from_directory( 'data/val', # this is the target directory target_size=(28,28), # all images will be resized to 28x28 batch_size=1, class_mode='categorical') {% endhighlight %}
- It’s time to train our model now! we will use ‘categorical_crossentropy’ as loss function, ‘Adam’ as optimization function and ‘Accuracy’ as our error matrix.
{% highlight python linenos %} import datetime class stop_training_callback(tf.keras.callbacks.Callback): def on_epoch_end(self, epoch, logs={}): if(logs.get('val_acc') > 0.992): self.model.stop_training = True
log_dir="logs/fit/" + datetime.datetime.now().strftime("%Y%m%d-%H%M%S") tensorboard_callback = tf.keras.callbacks.TensorBoard(log_dir=log_dir, histogram_freq=1)
batch_size = 1 callbacks = [tensorboard_callback, stop_training_callback()] model.fit_generator(train_generator, steps_per_epoch = train_generator.samples // batch_size, validation_data = validation_generator, validation_steps = validation_generator.samples // batch_size, epochs = 80, callbacks=callbacks) {% endhighlight %}
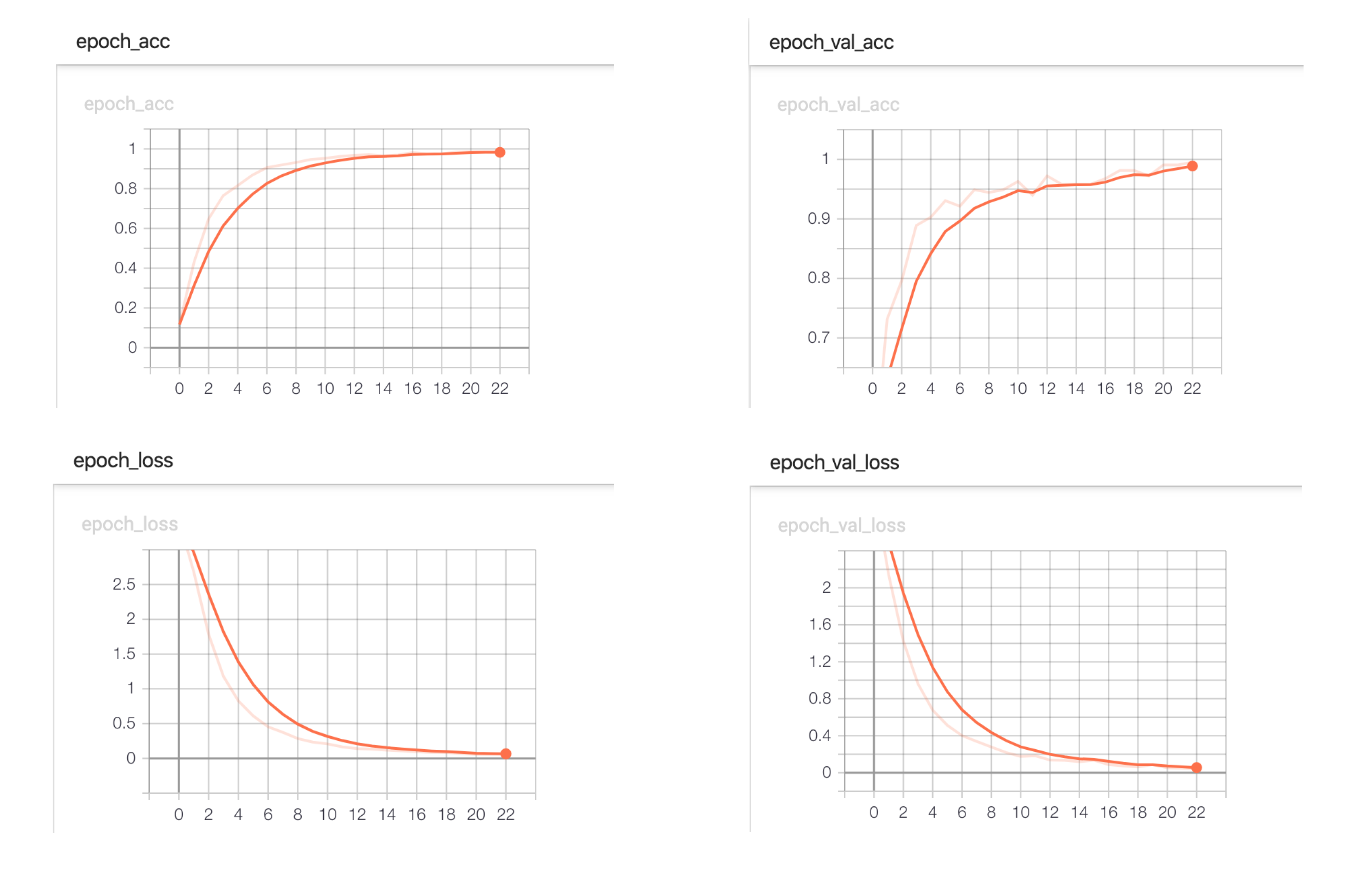
- After training for 23 epochs, the model achieved an accuracy of 99.54%.

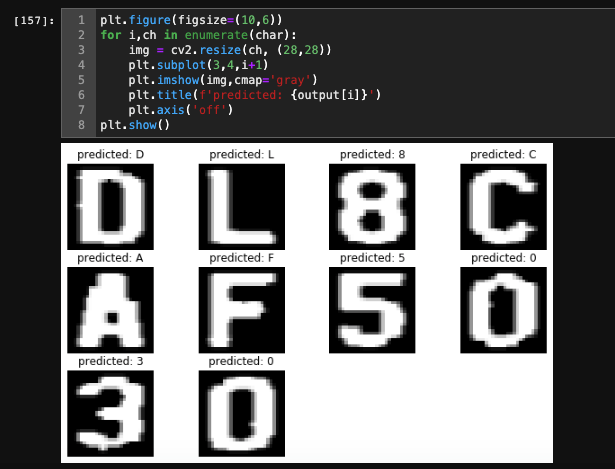
Step 8
The output.
Finally, its time to test our model, remember the binary images of extracted characters from number plate? Let’s feed the images to our model!
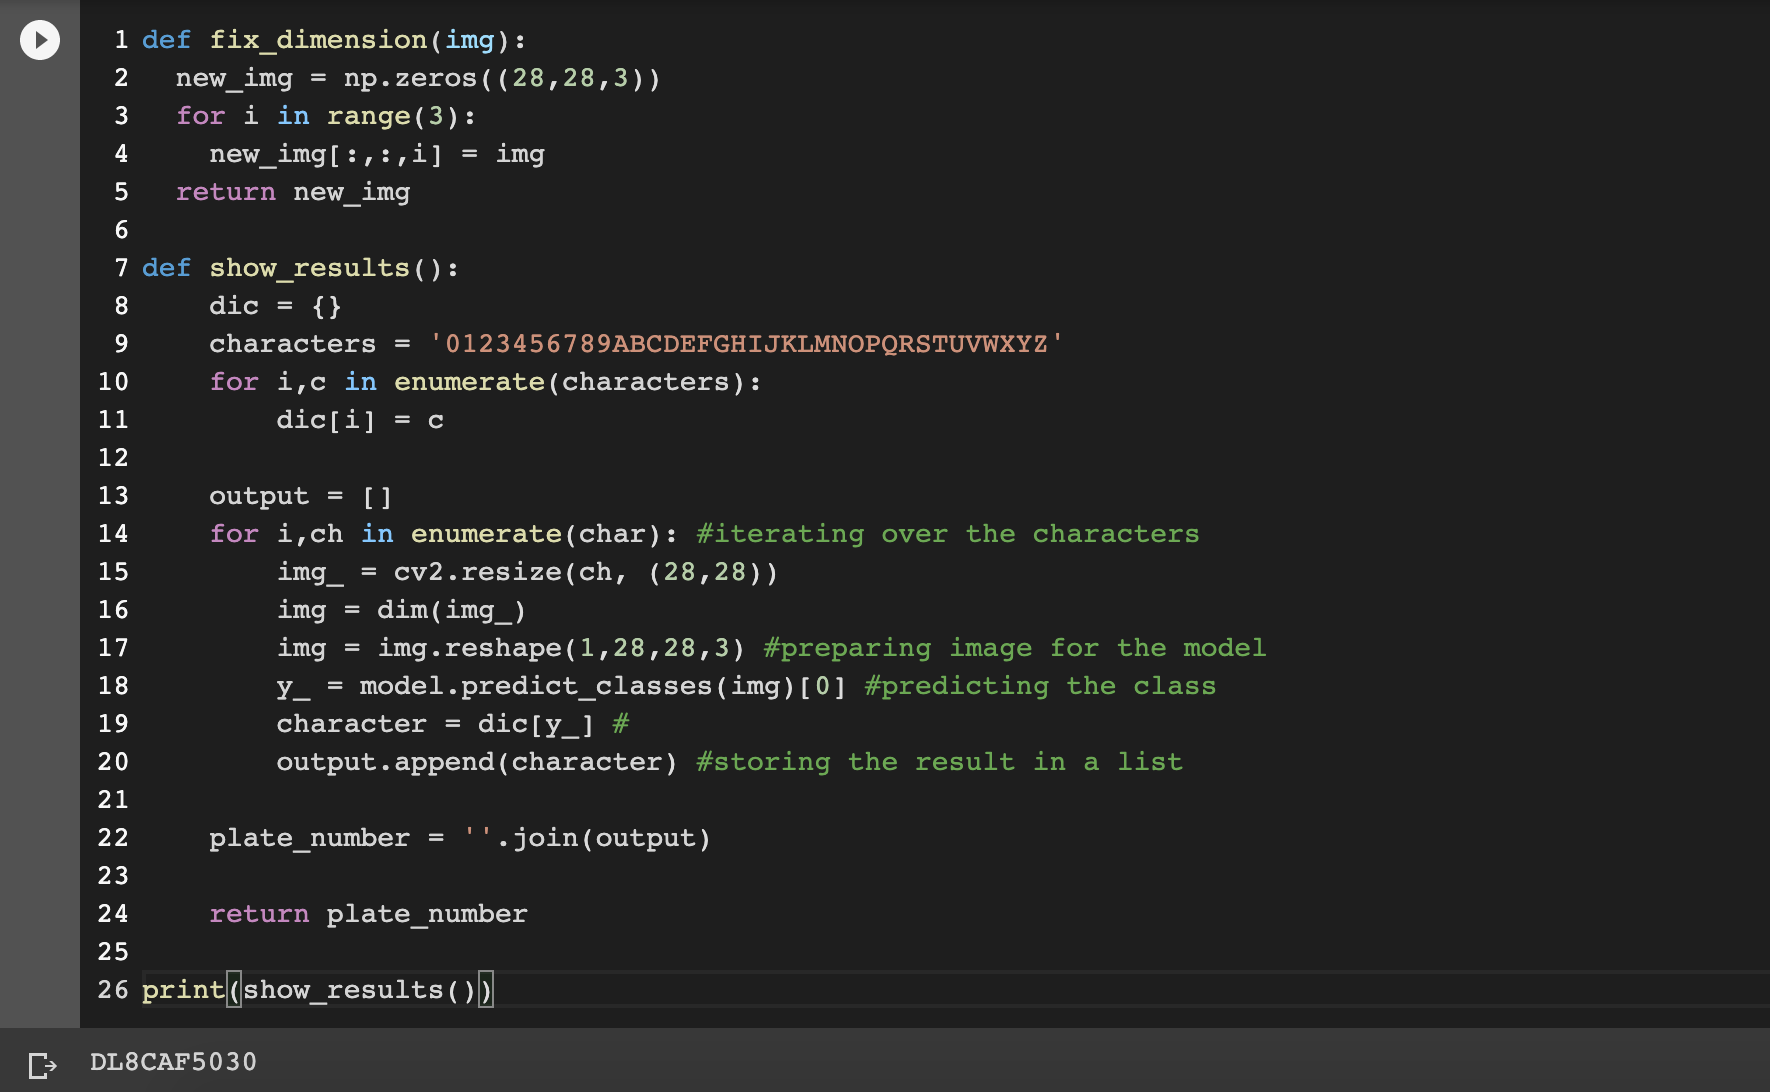
The output-
Final comment
Thank you guys for reading the blog, hope this project is useful for some of you aspiring to do projects on OCR, image processing, Machine Learning, IoT.
And if you have any doubts regarding this project, please leave a comment in the response section.
The full project is available on my Github: https://github.com/SarthakV7/AI-based-indian-license-plate-detection
Find me on LinkedIn: www.linkedin.com/in/sarthak-vajpayee