homebysix / Auto Update Magic
Programming Languages
Auto Update Magic

Auto Update Magic: Keeping Mac apps up to date automatically with Casper and AutoPkgr
Originally presented by Elliot Jordan, Senior Consultant, Linde Group
JAMF Nation User Conference - October 22, 2014 - Minneapolis, MN
Table of Contents
- Overview
- Requirements
- Standardized software distribution
- Further enhancement and advanced workflows
- Operational workflow
- Rollback plan
- Troubleshooting
- Getting help
Overview
Keeping Mac apps up to date with Casper is anything but trivial, and yet it's one of the most critical tasks of any management system. Outdated apps can expose security vulnerabilities, cause file format incompatibilities, and prevent people from taking advantage of the latest and greatest app features.
Auto Update Magic is my attempt to make updating apps easier for Casper administrators. In this newly rewritten guide, I have provided instructions, example workflows, scripts, recipes, and a LaunchDaemon that will help you keep your Mac apps updated with your Casper JSS.
Yes, JAMF will probably be incorporating "patch management" features into Casper soon. However, Auto Update Magic lets you automate your Mac app patching today, and gives you total control over how apps are packaged, imported, and deployed.
Requirements
Before we start, you'll probably want to download this repo to your local computer, for easy reference to the included files. Click here to download a zip file.
I'll assume that the path to the downloaded repository is ~/Downloads/auto-update-magic-master. If you move the repo elsewhere, be sure to update the paths referenced below.
Also, you'll want each of the following:
- Admin access to your JSS, including the ability to create user accounts.
- A Mac that is always on and has OS X 10.8 or higher, for running AutoPkgr.
- If the above Mac is not also suitable for testing new software releases (e.g. if it's a distribution point), then you'll also need another Mac for testing.
- At least one full workday. Allow at least 4 hours to step through the example exercises with Firefox, and another 2-4 hours to add additional apps and customized workflows. Add another 2-4 hours to write decent documentation once you've got things working.
Standardized software distribution
Starting with a very big-picture view, consider the following illustration of the standard software distribution cycle. This is the cycle upon which Auto Update Magic is built.

- New software is released by the developer.
- The software is downloaded and basic dev testing is performed by the IT team. (i.e. "Does it install? Will it launch?")
- The software is installed and tested on "trusted testers," which represent a fraction of the company's total Macs.
- Feedback is collected from the trusted testers about whether the new version of the software works well.
- Upon receiving positive feedback, the IT team makes the software available to the rest of the company, either by Self Service or automatically.
This process may vary slightly depending on the software you're deploying and your organizational needs, but you'll find that most software deployments follow this path.
We will be automating some of these steps, but not all. To adapt a popular mantra:

Let's walk through each step in the above process using Firefox as an example and focus on how we can automate and standardize things to make our lives easier, shall we?
1. New Release

Let's start from the beginning. It's no fun to manually check for new software. Instead, the combination of AutoPkgr and AutoPkg can do this for you. You can configure new software checks to happen on a scheduled basis, and you can even receive notifications when new software is found.
Exercise 1: Automate checking for new software with AutoPkgr
-
Download the latest release of AutoPkgr.
-
Copy the app to your Applications folder, then launch it from there.
-
If AutoPkg is not already installed, click the Install AutoPkg button and enter your password when prompted.
-
If Git is not already installed, click the Install Git button and enter your password when prompted.
-
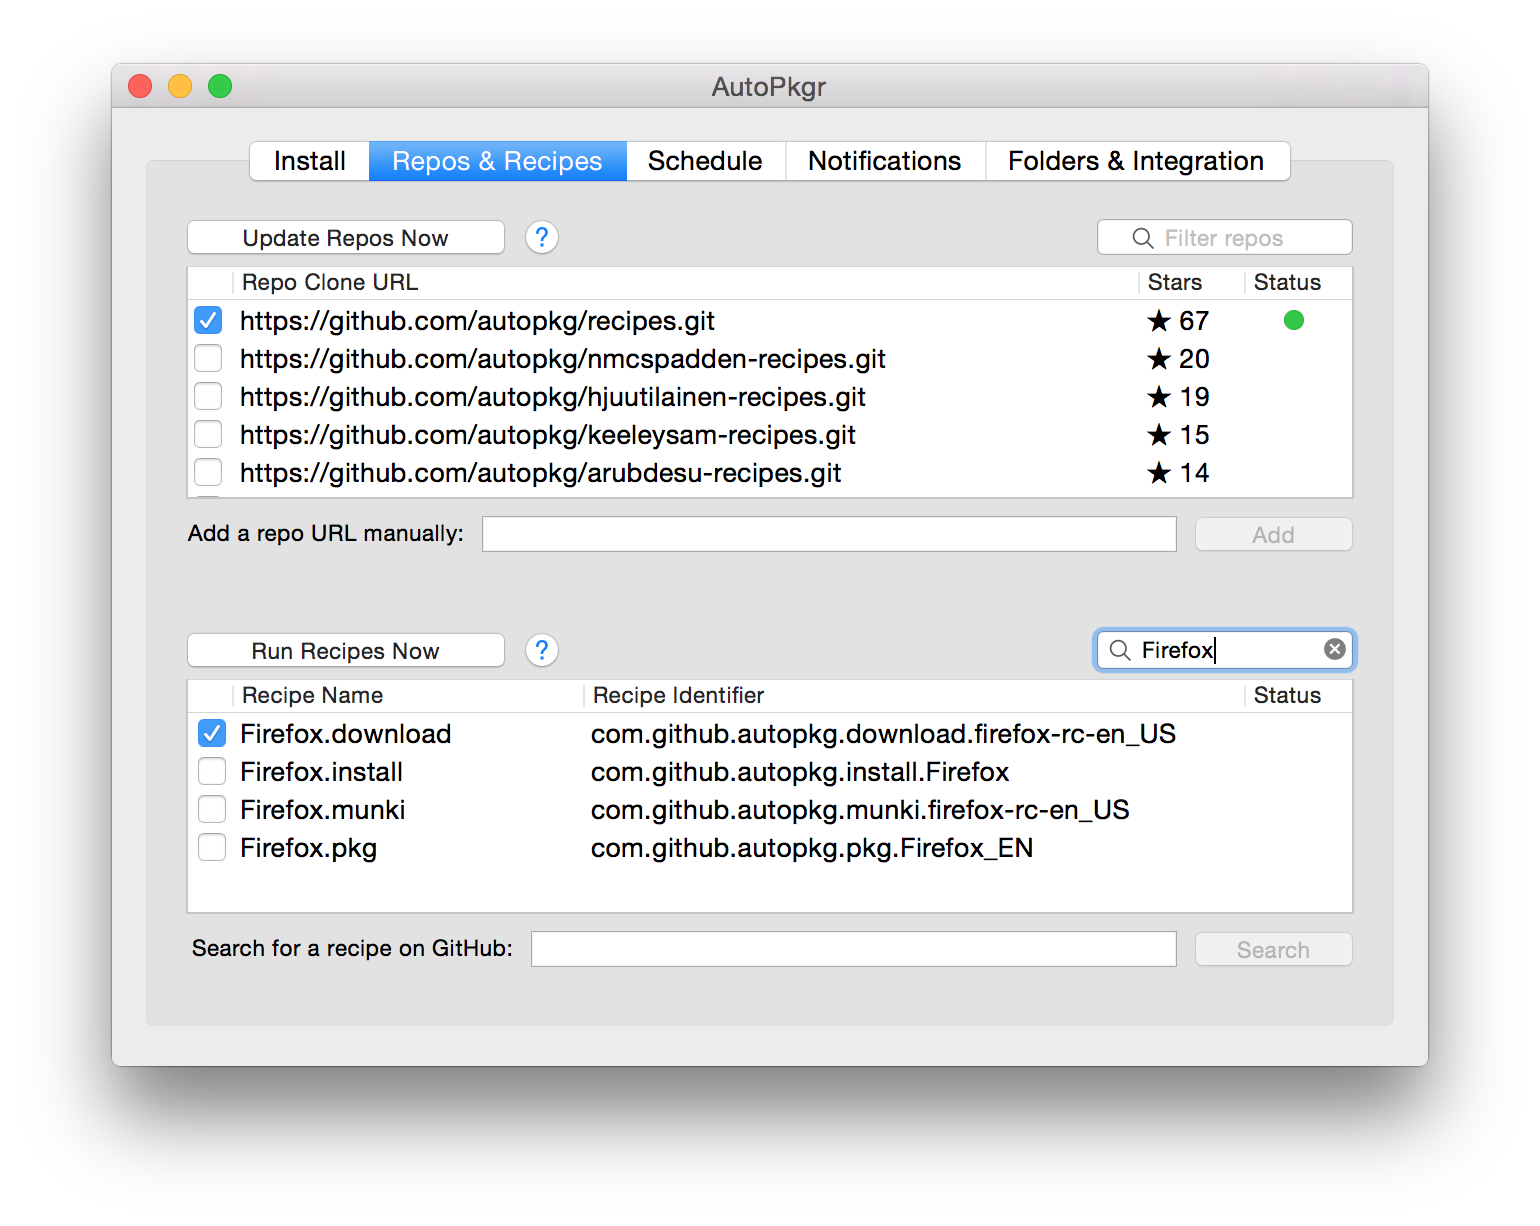
On the Repos & Recipes tab, check the box to add the topmost repository,
https://github.com/autopkg/recipes.git. -
In the list of recipes at the bottom of the window, check the box to add Firefox.download. (You can use the "Filter recipes" box to narrow down the list.)
-
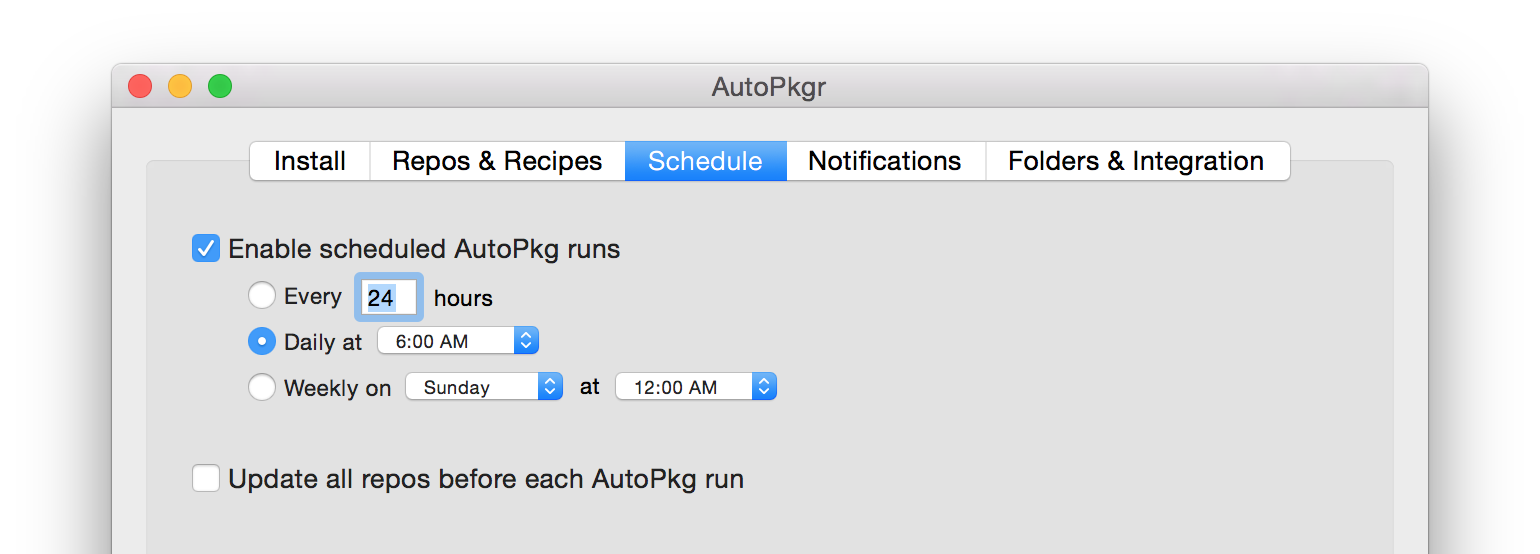
Switch to the Schedule tab, and configure the schedule to run as desired. Check the Enable scheduled AutoPkg runs box.
-
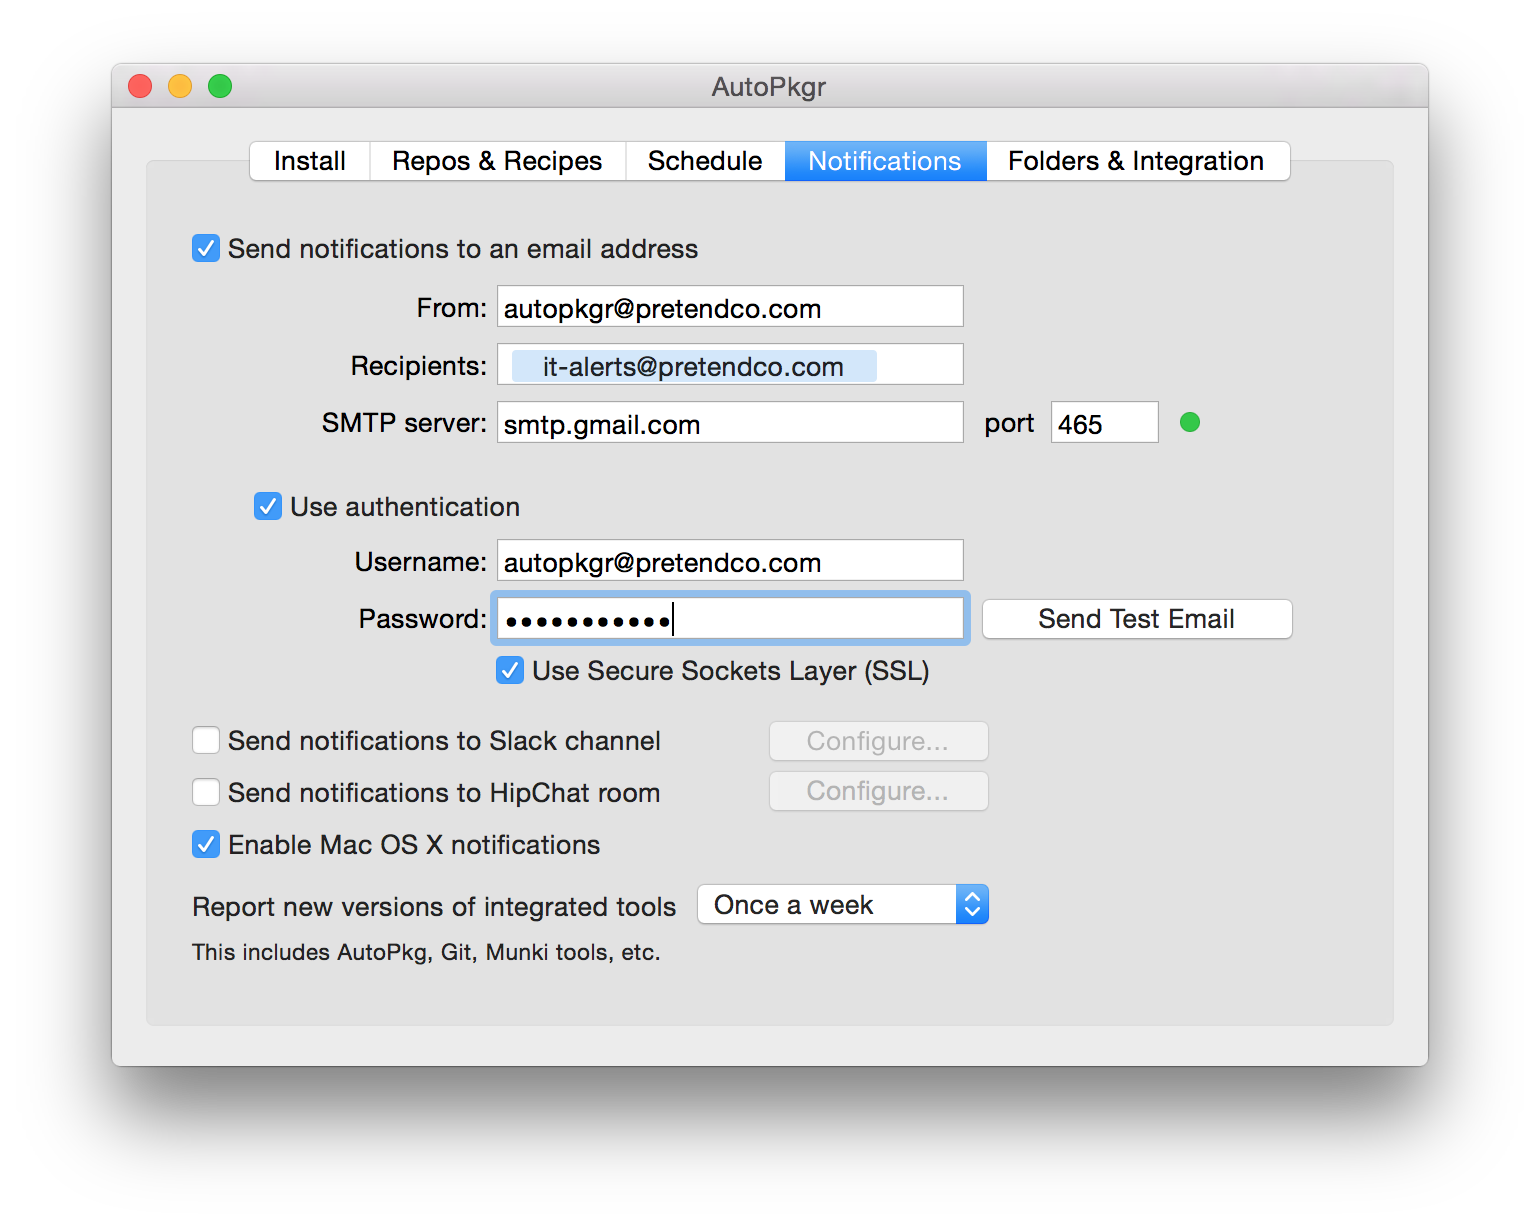
Switch to the Notifications tab, and configure the notifications as desired.
-
Switch back to the Repos & Recipes tab, and click Run Recipes Now. After a minute or so, assuming you haven't run this recipe before, you should receive notification that a new version of Firefox is available.


Congratulations! You've just configured AutoPkgr to check for updates regularly, and to tell you when a new version is released. For Firefox in your organization, Phase 1 of the software distribution cycle is now fully automated. Let's move on to Phase 2.
2. Development

Now that we know there's a new release, we've got to make sure it passes some basic "lemon tests." There's a type of recipe called an install recipe that will actually install the app on the Mac running AutoPkg. Let's schedule that recipe to run regularly, so that our IT lab test Mac is always up to date for local testing.
Exercise 2a: Install new software for local testing
-
Open AutoPkgr and navigate to the Repos & Recipes tab.
-
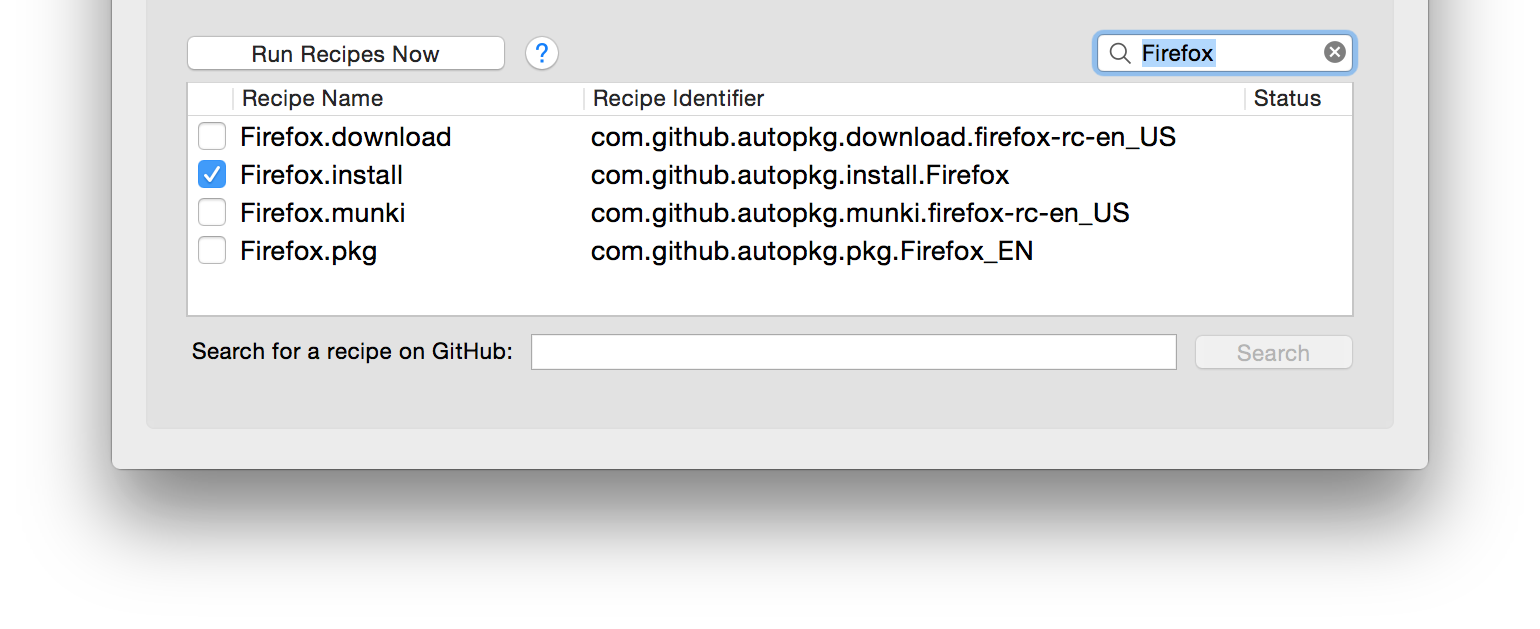
Uncheck the Firefox.download recipe, and check the Firefox.install recipe instead.
-
Click Run Recipes Now.
-
After a minute, you should receive notification that Firefox was installed. Check the Applications folder on your AutoPkgr Mac and verify that this is true.
-
Does it launch? Open Firefox and see. Does it work as expected? Browse to a few websites.

Great! You've just configured AutoPkgr to automatically update Firefox on your AutoPkgr Mac. This makes it easy for you to test apps to make sure there are no major flaws before you dive in further.
Next, we need to prepare the software for mass distribution, which often includes creating a package that can be used by Casper. Of course, this is what AutoPkg was born to do! Let's run the Firefox.pkg recipe, and see the nice tidy pkg file that results:
Exercise 2b: Create a deployable pkg file using AutoPkg
-
Open AutoPkgr and navigate to the Repos & Recipes tab.
-
Check the box to enable the Firefox.pkg recipe.
-
Click Run Recipes Now. After a minute, you should receive notification that a new Firefox package was built.
-
Switch to the Folders & Integration tab, then click the Open in Finder button next for the AutoPkg Cache folder. Open the com.github.autopkg.pkg.Firefox_EN folder. (Note: This matches the identifier of the recipe, which you can see in AutoPkgr's recipe list.)
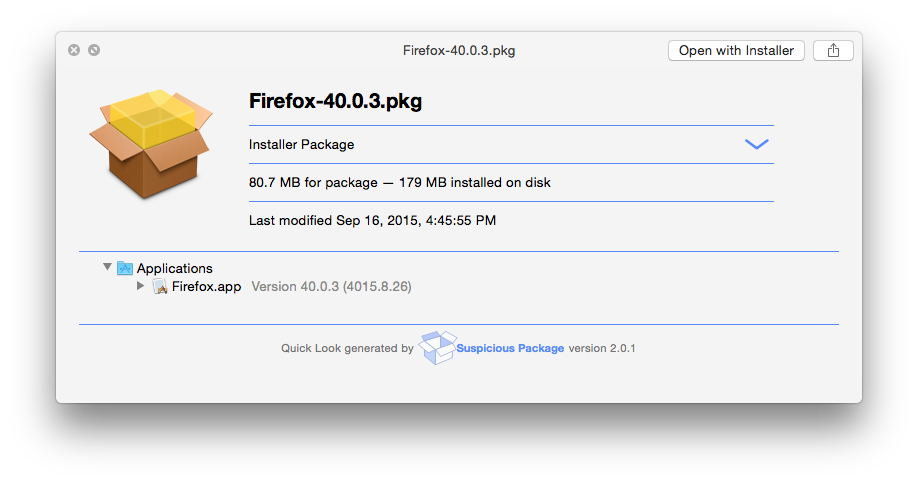
-
Verify that a Firefox package was created. You may also want to use a tool like Pacifist or Suspicious Package to inspect its contents. As you can see below, the app installs at the expected location, and with the expected version. Looks good.
-
Copy the package to a test Mac or VM and try installing it. Verify that it produces a working copy of Firefox.
It may also be worth launching the app as a non-admin user after installing the package in your test Mac or VM. Occasionally this will reveal permissions issues that need to be corrected upstream (e.g. in the pkg recipe).

Great, now we have a deployable package that installs what we expect it to install. Now we're ready to start testing the app on a larger scale.
3. Testing

Small batch testing (or "staging") allows us to catch small problems in the wild before they become large problems in the wild.
In order to do proper testing, I recommend that you reach out to your organization and designate/ask for volunteers to help the IT department test new software. They should understand that they'll have first access to new features and the ability to help guide deployment strategy, but they will also have the responsibility to submit feedback to IT in a timely manner.
Once you've got a group of "trusted testers," we can use JSSImporter to automate the process of sending them new software. Specifically, we'll create Self Service policies for testers that are automatically updated whenever new software is released. This is the default behavior for recipes in the official jss-recipes repo, and is a good, safe way to get started integrating AutoPkg with Casper.
Exercise 3a: Automatically create Self Service policies for testing new software
-
Create a (static or smart) computer group on your JSS called Testing. Add the testers' computers to the group.
-
Create an account on your JSS with Create, Read, and Update access to the following objects:
- Categories
- Computer Extension Attributes
- File Share Distribution Points (only needs Read access)
- Packages
- Policies
- Scripts
- Smart Computer Groups
- Static Computer Groups
-
Open AutoPkgr and click on the Folders & Integration tab, then click Install JSSImporter. Enter your admin password when prompted.
⚠️ Note: On Macs with a fresh copy of Sierra, you may additionally need to run the following Terminal command to install the necessary components for JSSImporter:
sudo easy_install pip && pip install -I --user pyopenssl -
Click the button that now says Configure JSSImporter.
-
Enter the JSS URL, API username, and API password (for the account you created in step 2 above). Then click Connect.
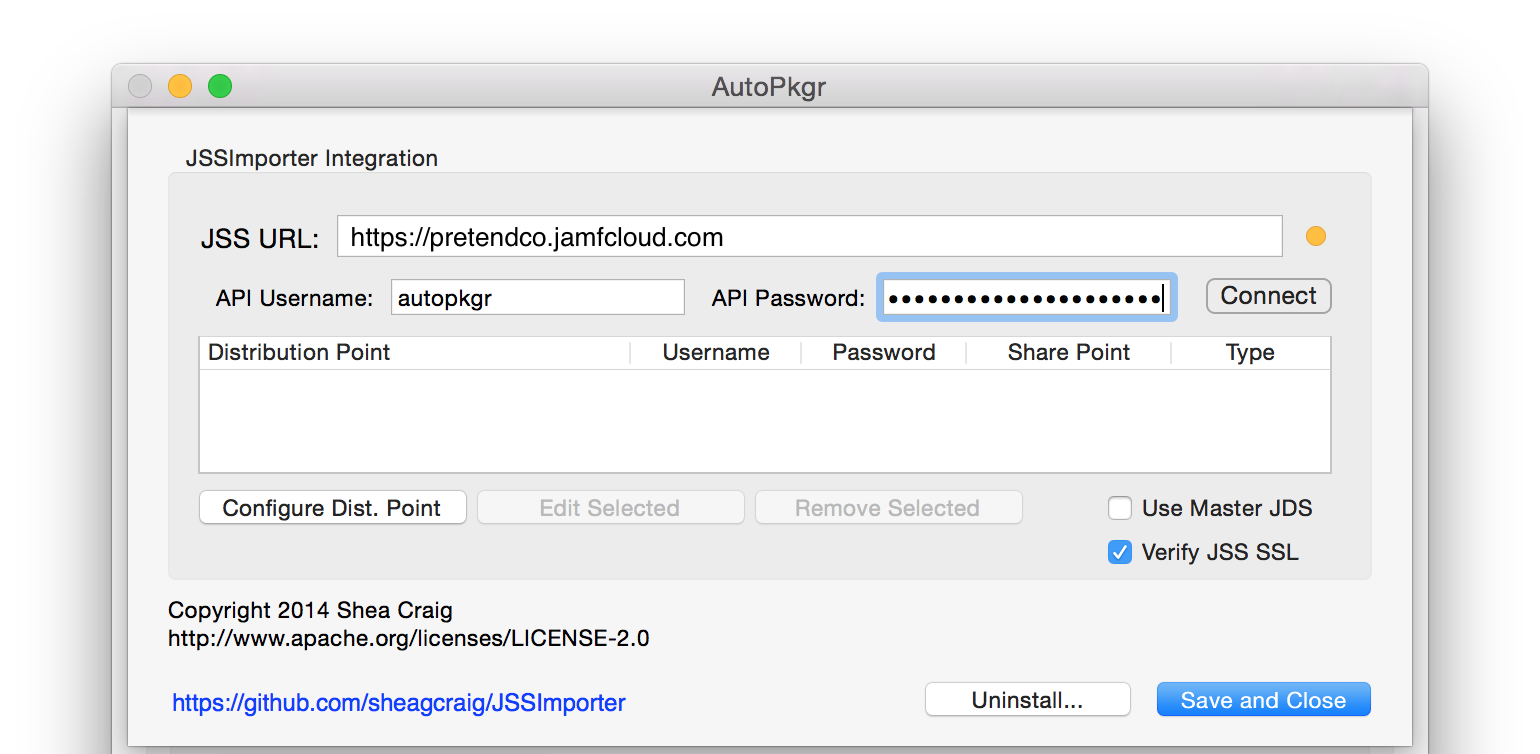
-
If you use file share distribution points, you'll be prompted to enter their passwords. If you use a cloud distribution point or JDS as your master, check the Use Master JDS checkbox. Click Save and Close.
-
Return to the Recipe & Repos tab, and find (but don't check the box for) Firefox.jss in the recipe list.
-
Right-click on Firefox.jss and choose Create Override.
-
Name the override Firefox-testing.jss.
-
The new recipe should appear in AutoPkgr's recipe list. Right-click on Firefox-testing.jss and choose Set Recipe Editor. Select your preferred text editor. (If you don't have one, I suggest TextWrangler to get you started. Don't use TextEdit, Pages, or Word.)
-
Right-click on Firefox-testing.jss again, and choose Open Recipe Override.
Does this look familiar? If you've seen Apple preference files before, you'll recognize this as a plist (property list) file.
-
Change the CATEGORY to Web Browsers, but leave the POLICY_CATEGORY and everything else as-is. The CATEGORY key/value pair will look like this:
<key>CATEGORY</key>
<string>Web Browsers</string>
This is just an example; you can change the category to whatever you want. The point I'm illustrating is that a recipe "override" allows you to override specific keys in pre-fabricated recipes. Overrides also allow you to name your recipes in a consistent manner, as with the -testing suffix we're using here. This makes it easier to find in the AutoPkgr recipe list later.
-
Save, then quit your text editor. I have provided an example Firefox-testing.jss.recipe file in the Exercise3a folder in this repo. Compare your finished override to that file to make sure it looks the same.
If so, congratulations! You just created a recipe override.
⚠️ Note: Now we're ready to run our Firefox-testing.jss recipe override. Although you could easily run this recipe in AutoPkgr, I want you to use the Terminal for two reasons:
- It's important to know what's happening behind the scenes.
- Knowing basic
autopkgcommands in Terminal will make things much easier to troubleshoot later.
-
Open Terminal, type
autopkg run -v Firefox-testing.jssand press Enter. Observe the messages that appear on screen. The first word of each line indicates which "processor" AutoPkg is currently running.

If everything goes according to plan, you'll see the following processors make an appearance: MozillaURLProvider, URLDownloader, EndOfCheckPhase, AppDmgVersioner, PkgRootCreator, Copier, PkgCreator, and JSSImporter.
The output in Terminal will also reflect the changes made to your JSS:
The following changes were made to the JSS:
Package             Categories  Groups                Scripts  Extension Attributes  Policy                  Icon
-------             ----------  ------                -------  --------------------  ------                  ----
Firefox-40.0.3.pkg              Firefox-update-smart                                 Install Latest Firefox  Firefox.png
If any errors occur, read through the last few lines of output (including any "traceback" messages), and you may be able to tell what went wrong.
It's not uncommon for a 404 error to occur the first time you run each recipe, because Casper's API doesn't reliably handle uploading icons for Self Service policies. If this happens, try running the recipe again a second time.
Once your autopkg run is error-free, navigate to your JSS web app and log in. You should see the following new items:
- A package with the latest version of Firefox.
- A smart group called "Firefox-update-smart" that contains Macs in the Testing group which don't have the latest version of Firefox.
- A policy called "Install Latest Firefox" that allows your testers to install Firefox via Self Service.

Once the Self Service policy is created in Casper, you should email your testers to let them know there's new software to install. Ask them to install the app, kick the tires thoroughly, and let you know within a specific time whether they have anything to report.
Finally, be sure to return to AutoPkgr and check the box to enable the Firefox-testing.jss recipe and uncheck the Firefox.pkg recipe.
4. Feedback

It's important not to skip this step! Collecting feedback from your testers ensures that you'll have the best chance possible of finding show-stopping bugs before you deploy the software to the rest of your company. It also makes people within your company more aware of an important IT process.
The process of collecting feedback from your testers can be made easier by creating a Self Service plugin that points to a Google Form. I won't provide specific instructions for doing that, because you and I both know that this article is already going to be way too long.
Once you've collected feedback, your IT department will need to make a decision about whether to proceed with deployment or hold back. In case you need to hold back, I've provided a Rollback Plan below.
5. Deployment

Here comes the really fun part! Once you've decided to proceed with deployment, you'll probably want to consider two deployment methods, depending on the specific software and how important it is to your organization.
-
Self Service policy for delivering the newly tested and approved version of Firefox to your company Macs on an opt-in basis. The Self Service policies are easy to set up and maintain, and we'll do that in Exercise 5a.
-
Auto Update policy for silently updating Firefox on all the Macs that have an outdated version of it. The Auto Update policies are admittedly complex to set up, but are relatively painless to maintain after that. We'll tackle that in Exercise 5b.
Historical note: The previous version of this workflow used a Casper "trigger" policy instead of a local LaunchDaemon. There are some pros and cons to the two different approaches:
| Script runs in Casper policy | Script runs via local LaunchDaemon | |
|---|---|---|
|
Pros 👍 |
- Easy to update the script centrally. | - Much cleaner log output. - More granular adjustment of checking schedule. |
|
Cons 👎 |
- The Casper policy logs fill with output, even if no updates were installed. | - Must repackage and reinstall LaunchDaemon/script pair when making changes to schedule or updated apps. |
I now prefer the LaunchDaemon method, which is detailed in Exercise 5b below. If you prefer the old Casper policy method, version 1.0 of this document still contains those instructions.
⚠️ Note: The following script, recipe, and template customizations require an administrator (that's you!) who is comfortable with editing plist files and shell scripts. Also, be sure to proceed with a sleeves-rolled-up attitude, since troubleshooting and tweaking will more than likely be necessary. Be sure you test these methods on a non-production JSS before making changes to your production environment.
Exercise 5a: Promote Self Service policies to use new packages
-
If you don't already have one, manually create a Self Service policy on the JSS that installs Firefox for anybody who wants it. Here's an example:
-
General
- Name: Firefox
- Category: Productivity
- Enabled: Yes
- Trigger: None
- Execution Frequency: Ongoing
-
Packages
- Firefox-39.0.5.pkg (or any old version of Firefox, as long as the package name is in the format "Firefox-x.x.x.pkg")
-
Scope
- Targets: All Computers
-
Self Service
- Make this policy available in Self Service: Yes
- Description: Popular web browser.
- Icon: Upload a 128x128 Firefox icon in png format.
-
General
-
Install the jss_helper command line tool. You can do that with the following command in Terminal. (Substitute
~/Developerfor the directory you'd like to store jss_helper in. Create the directory first, if needed.)cd ~/Developer /usr/local/git/bin/git clone https://github.com/sheagcraig/jss_helper(Using Git to install jss_helper makes it trivial to keep the tool up to date as new versions are released, using
git pull -C ~/Developer/jss_helper. You may want to make a note to run this command every so often.) -
Run the following commands to copy your JSS credentials into the jss_helper configuration plist:
defaults write com.github.sheagcraig.python-jss jss_url "$(defaults read com.github.autopkg JSS_URL)"
defaults write com.github.sheagcraig.python-jss jss_user "$(defaults read com.github.autopkg API_USERNAME)"
defaults write com.github.sheagcraig.python-jss jss_pass "$(defaults read com.github.autopkg API_PASSWORD)"
⚠️ Note: If you have characters or symbols in your password, you may want to use a text editor to verify that the ~/Library/Preferences/com.github.sheagcraig.python-jss.plist file contains the correct password after you run the above commands. Certain characters don't parse as expected in Terminal and may require you to enter them directly into the plist.
-
Now, use jss_helper to "promote" your Self Service policy to the latest version of Firefox:
cd ~/Developer/jss_helper
./jss_helper promote
⚠️ Note: If your JSS uses a self-signed certificate, you'll get errors that say
InsecureRequestWarning: Unverified HTTPS request is being made.This is normal, but you should really invest in a proper SSL cert if this is your production JSS. -
All the policies for which there is a newer package available will be listed. Type the number corresponding to your "Firefox" policy.
-
Confirm that the
(CURRENT)package is your previously-approved package, and the(DEFAULT)package is the one you just finished testing and is now approved. If so, press Enter. (To cancel, press Control-C.)
Cool! Your Self Service policy has just been updated to use the new Firefox package.
Exercise 5b: Automatically create Auto Update policies
Now strap yourselves in and get ready. We're going to enter the wormhole... Installing newly tested and approved updates on all managed Macs using some "Auto Update Magic." Here's what we'll be configuring in order to make that happen:
-
Recipe override and JSSImporter templates - A set of AutoPkg recipe overrides will be run manually in order to create/update policies that automatically update Firefox on all managed Macs when a custom trigger is called.
-
Script - The auto_update_magic.sh script on all managed Macs checks to see whether Firefox is running, and if not, it uses the custom trigger to execute the "auto update Firefox" policy.
-
LaunchDaemon - A LaunchDaemon on all managed Macs runs the auto_update_magic.sh script on a regular basis.
Now you can start to see how this is all going to fit together. The LaunchDaemon basically serves as a recurring "do I need updates?" check, the script makes sure the installation won't stomp on any running apps, and the policy (created by our recipe override) actually does the work of updating.
Here we go! Let's start with the recipe override and JSSImporter templates:
-
Copy the provided Firefox-autoupdate.jss, PolicyTemplate-autoupdate.xml, and SmartGroupTemplate-autoupdate.xml files from the Exercise5b folder of this repo into your
~/Library/AutoPkg/RecipeOverridesfolder.Here is how the files differ from the standard recipes and templates included in jss-recipes:
- Firefox-autoupdate.jss has the policy category set to "Auto Update," so that all the policies created by -autoupdate.jss recipes will be listed together in the Policies page on the JSS.
- PolicyTemplate-autoupdate.xml uses "Auto Update Firefox" as the policy name, the policy frequency is set to Ongoing, and the policy is triggered by a custom trigger "autoupdate-Firefox". (The reason for this will become clear in Exercise 5b
- SmartGroupTemplate-autoupdate.xml includes computers from the entire organization which have an obsolete version of Firefox, rather than being limited to the Testing group only.
-
Open Terminal and run your Firefox-autoupdate.jss recipe override:
autopkg run -v Firefox-autoupdate.jss -
After a moment, you should see the summary of changes made to your JSS. Log in to your JSS and check out the newly created items:
- A smart group called "Firefox-autoupdate" that includes all Macs with old versions of Firefox.
- A policy called "Auto Update Firefox" that installs Firefox on Macs in the above smart group, but only when the "autoupdate-Firefox" custom trigger is used.
You can test this policy by running
sudo jamf policy -event "autoupdate-Firefox"on a test Mac, if you like.
Exercise 5c: Configure Macs to check for updates periodically
-
Open the Exercise5c folder.
-
Edit the auto_update_magic.sh script with a text editor. Make the following three changes:
- Un-comment line 26, where Firefox's recipe name is specified.
- Un-comment line 46, where Firefox's blocking applications are specified.
-
Open Terminal and run the script (since
DEBUG_MODEis on by default, nothing will actually be updated):cd ~/Downloads/auto-update-magic-master/Exercise5c/ sudo ./auto_update_magic.sh -
You should see the script check whether Firefox is running. If Firefox isn't running, it will say
No apps are blocking the Firefox update.If the script doesn't behave as described above, stop here and troubleshoot before proceeding.
-
Open the auto_update_magic.sh script in a text editor again, and change
DEBUG_MODEtofalseon line 65. The script is now ready to deploy.⚠️ Note: Keep in mind that you'll need to edit this script again if you add more "auto updated" apps in the future. You'll find instructions for doing that in the Adding More Apps section.
-
Edit the com.jamfsoftware.jamfnation.auto_update_magic.plist file with a text editor. Set the
StartIntervalas desired. (Default is 3600, which is one hour.) -
Create a package that you can use to deploy the script and LaunchDaemon. I've made this easy by including a script that does the work for you. Simply open Terminal and type the following:
sudo ./create_pkg.shOnce the package is created, upload it to your JSS using Casper Admin or your JSS web interface.
-
Create a policy on Casper that will deploy the Auto Update Magic script and LaunchDaemon to all managed computers. Here's an example:
-
General
- Name: Auto Update Magic
- Category: Auto Update
- Enabled: Yes
- Trigger: Recurring check-in
- Execution Frequency: Once per week
-
Packages
- auto_update_magic-YYYYMMDD.pkg (the one you generated in the previous step)
-
Scope
- Targets: All Computers
-
General
-
Monitor the logs to ensure that the package is successfully installed on your org's Macs. Soon after their next check-in, they should automatically update Firefox if it isn't running. Hip hip hooray!
Further enhancement and advanced workflows
There are some additional things you can consider doing, if they fit well with your organization's needs.
Exercise 6a: Adding More Apps
Once you're confident the Firefox recipes are working well, you'll most likely want to add more apps to the Auto Update Magic workflow.
If a jss recipe already exists for the app you want to add, this process is super simple.
-
Create a -testing.jss recipe override. Use the existing Firefox-testing.jss recipe override as a template for this.
-
Create a -autoupdate.jss recipe override. Use the existing Firefox-autoupdate.jss recipe override as a template for this.
In most cases, simply changing the recipe Identifier and ParentIdentifier are sufficient, but more complex apps may require a custom smart group template or extension attribute template.
I've included some examples in the Exercise6a folder for Flash, Chrome, and Java.
-
Modify the auto_update_magic.sh script to include the trigger and blocking applications. Make sure that the list of triggers and list of blocking applications are in the same relative order.
-
Use create_pkg.sh to create a new script/LaunchDaemon package for deployment, as you did in Exercise 5c.
-
Swap the new package into the "Auto Update Magic" policy. If you need it to be deployed immediately, flush the "Auto Update Magic" policy logs.
Exercise 6b: Organizing and customizing the testing recipes
Once you get more familiar with the relationship between recipe overrides and JSSImporter templates, I'd recommend returning to the -testing.jss recipes you created in Exercise 3a and making some subtle changes:
- Creation of a policy template called PolicyTemplate-testing.xml with these customizations:
- Policy name is "Test Latest %PROD_NAME%" This makes it clear to your trusted testers that this is a test policy, as opposed to a normal Self Service policy.
- Policy has a custom trigger called "test-%PROD_NAME%" This makes it really easy to differentiate policies that are created by AutoPkg from policies that you created manually, when viewing the Policies page on the JSS.
- Policy scope is set to a specific group, using the group's
idandname. This means that you only need a single "Testing" group, rather than separate AppName-testing smart groups for each app. Greatly reduces smart group bloat.
- Adjusting the
POLICY_TEMPLATEkey in each -testing.jss recipe to point to the new PolicyTemplate-testing.xml file you created. - Removing keys from the -testing.jss overrides that are not different than the parent recipe. (Only those keys that are different are necessary to include in overrides.)
I have provided an example PolicyTemplate-testing.xml file as well as modified -testing.jss recipes in the Exercise6b folder in this repo.
Exercise 6c: Sending software directly to Self Service policies
⚠️ This is the workflow that's most likely to bite you later, because it's deploying directly to production. Proceed with caution.
For certain software, you may want to have updates available immediately in Self Service. This workflow is good for software which meets the following criteria:
- The software is not mission-critical for your organization.
- You do not want to test the software prior to making it available in Self Service, and you understand the risks this introduces.
I have included a policy template and two recipes that you can use as an example for this, in the Exercise6c folder. They all contain -selfservice.
Exercise 6d: Create installation policies for site-licensed software
If you have a site license for software you'd like to automatically update, you might wonder what the best way to deploy both the app and the license. Here's what I've done:
- AutoPkg recipes create a policy that installs the latest version of the app, just like the -autoupdate.jss recipes we created earlier. However, this policy also calls a custom trigger "license-AppName."
- A manually created policy installs the license, and is only triggered by the "license-AppName" trigger.
In the Exercise6d folder of this repo, I have included an example of an -selfservice.jss recipe override and policy template for 1Password which illustrates this method.
Exercise 6e: Store your -autoupdate.jss recipes outside the search path
For added safety, store your -autoupdate.jss recipes outside of the AutoPkg search path. For example, you could create new folder at ~/Library/AutoPkg/AutoUpdateRecipes and keep them inside. Then when you run the recipe in Terminal, you'll need to refer to the full path, like this:
autopkg run -v "~/Library/AutoPkg/AutoUpdateRecipes/Firefox-autoupdate.jss.recipe"
The benefit of this adjustment is that the -autoupdate.jss recipes won't appear in AutoPkgr, and are therefore less likely to be executed accidentally or incorrectly included in scheduled AutoPkg runs.
Operational workflow
Once you have finished tweaking Auto Update Magic and are using it to deploy new updates, your standard everyday workflow will look something like the below. Feel free to copy/paste this into your corporate wiki or knowledge base so your IT department can refer to it as they step through the software deployment cycle.
-
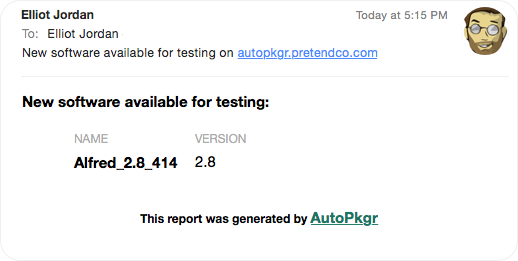
When new updates are issued by the developer, you will receive an email notification similar to the one below. This serves as your indication that new software is now available for testing.
-
As soon as possible after receiving the email, log into your designated software testing Mac (on which you configured AutoPkgr to run "install" recipes in Exercise 2a). Launch the app and verify that it basically works.
- If it does not work, follow the Rollback Plan below.
- If it does work, proceed to step 3.
-
Send an email to your "testers" group, letting them know that a new version of the software is available. Ask them to open Self Service and click on the Testing category, then install it and run it. Give them a deadline by which they should report the results of their testing to the IT department.
-
Based on the feedback from the testers, determine whether or not you want to proceed and deploy the app to the rest of the company.
-
If the decision is made to deploy, log into the Mac running AutoPkgr, open Terminal, and do three things:
-
autopkg run -v "_____-testing.jss"(substituting the app name) This allows you to verify that the latest version of the software matches the one you just finished testing, and should prevent you from deploying last-minute surprise updates. -
jss_helper promoteThis steps you through the process of promoting the existing Self Service policy to use the new package. -
autopkg run -v "_____-autoupdate.jss"(substituting the app name) Makes the necessary changes to the Auto Update policy and smart group. After this, all Macs in your organization that have older versions of the app will update to the newest version upon their next check-in.
-

And that's all there is to it.
Rollback plan
Sometimes your testing reveals show-stopping bugs, or sometimes you simply need to put everything on pause to give you a chance to test further. Here's how to roll back to the last stable version in an orderly manner:
-
Disable the app's -testing.jss recipe in AutoPkgr. This will prevent new versions from showing up in Self Service for your testers.
-
Also disable the app's -selfservice.jss recipe, if it exists. This will prevent new versions from automatically being placed into Self Service for everybody else.
(Something to consider: If this app is the kind that produces show-stopping errors, you may want to include it in the -testing.jss workflow rather than using a -selfservice.jss recipe at all.)
-
Manually adjust the policies and smart groups as necessary to deploy the old, stable version of the app to the people who need it.
-
Enable the app's pkg recipe. This ensures you'll receive notification when a new (and hopefully more stable) version of the app is released, so that you can choose whether to resume testing.
Once the crisis has passed and a newer version of the app is available:
- Re-enable the -testing.jss recipe and disable the pkg recipe. This will allow you to resume testing the app according to the Operational Workflow above.
Troubleshooting
No doubt you realize by now that this is a complex workflow with many moving parts. It's important to know what parts are involved, because it will make troubleshooting easier for everybody involved:
-
AutoPkg The command-line tool that uses recipes to check for app updates and automatically package them for distribution.
-
AutoPkgr The Mac app that schedules AutoPkg recipe runs to occur periodically and notifies you of their results. It also allows you to easily manage the recipes, overrides, and repos.
-
Recipes and overrides The instructions that AutoPkg follows in order to download new software, create packages, and trigger JSSImporter.
-
JSSImporter The AutoPkg processor that uploads packages to your JSS and creates policies and groups based on XML templates.
-
Casper API The API for which JSSImporter templates are created. Pointing a browser at https://yourjss.pretendco.com:8443/api is a good idea when you're modifying JSSImporter template XML files.
Here are some general tips for troubleshooting common issues:
Remove one layer and try again
Getting an error while running a recipe in AutoPkgr? Run the recipe in Terminal instead, and see if the error persists. If it does, then it's not an AutoPkgr problem.
If you're having trouble running a jss recipe, try running its parent pkg recipe once. If the pkg recipe still fails, try running its parent download recipe.
It's not uncommon for recipes to produce errors as a result of upstream changes — for example, the software developer could have redesigned their website and therefore the direct download URL referenced in the download recipe is no longer correct. Alerting the recipe author by opening an issue on their repository's GitHub page is an excellent idea. Their repository is probably listed on this page.
Check for bad recipe overrides
Whenever you finish editing a recipe or a recipe override, I recommend running a simple plist "linting" command to make sure that the recipe doesn't contain any major syntax errors. Here is the command you can use to lint all your overrides at once:
find ~/Library/AutoPkg/RecipeOverrides/ -type f -iname "*.recipe" -exec plutil -lint "{}" \;
Check for missing parent recipes
For recipes that have parent recipes (which all jss recipes do), you must also make sure that the repo that contains the parent recipe is present on disk. AutoPkgr attempts to warn you about recipes with missing parents by showing you a ⚠️ icon next to the recipe in the list.
However, the parent recipes sometimes also have parent recipes. You may need to trace the chain backwards to ensure that all necessary repos are added.
If you get an EOF error during recipe runs, the likelihood is high that you're missing a parent recipe somewhere.
Test the LaunchDaemon and script pair
If your AutoPkg recipes are working as expected but Macs still aren't automatically updating, dig into the client-side components to see what could be going on. This is pretty simple, since there are only two client-side components: the LaunchDaemon and the auto_update_magic.sh script.
On a managed Mac, open Terminal and run the following command to determine whether the LaunchDaemon is running:
sudo launchctl list | grep auto_update_magic
If everything is working normally, you'll see something like this:
- 0 com.jamfsoftware.jamfnation.auto_update_magic
If not, try these two commands to unload and reload the LaunchDaemon:
sudo launchctl unload -w /Library/LaunchDaemons/com.jamfsoftware.jamfnation.auto_update_magic.plist
sudo launchctl load -w /Library/LaunchDaemons/com.jamfsoftware.jamfnation.auto_update_magic.plist
If you've confirmed that the LaunchDaemon is running, but the updates still aren't happening, try running the following on a managed Mac:
sudo time /Library/Scripts/auto_update_magic.sh
This will force the script to run immediately and check for updates, and install any it finds. It will also show you how long the process takes, for benchmarking against other Macs in your organization.
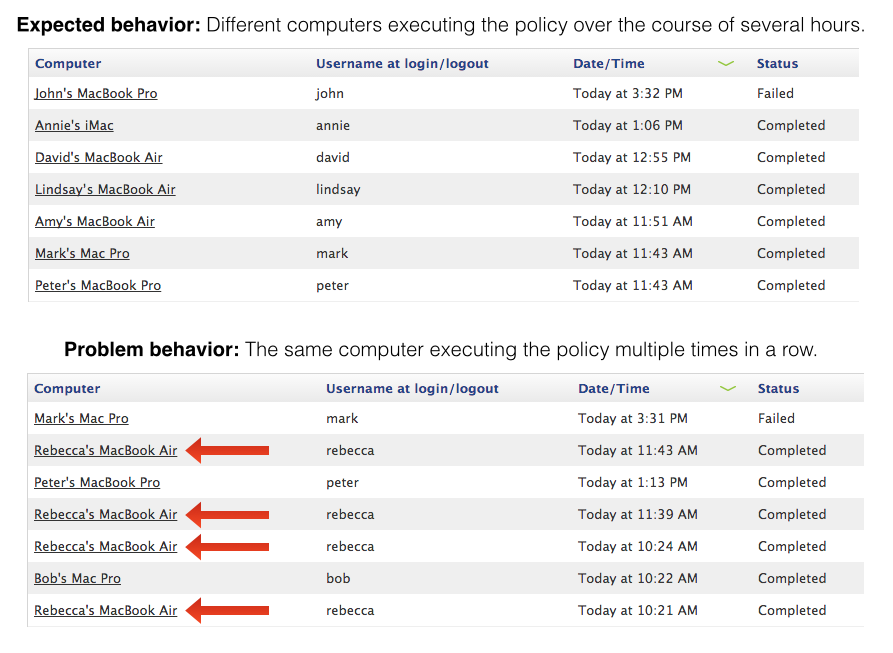
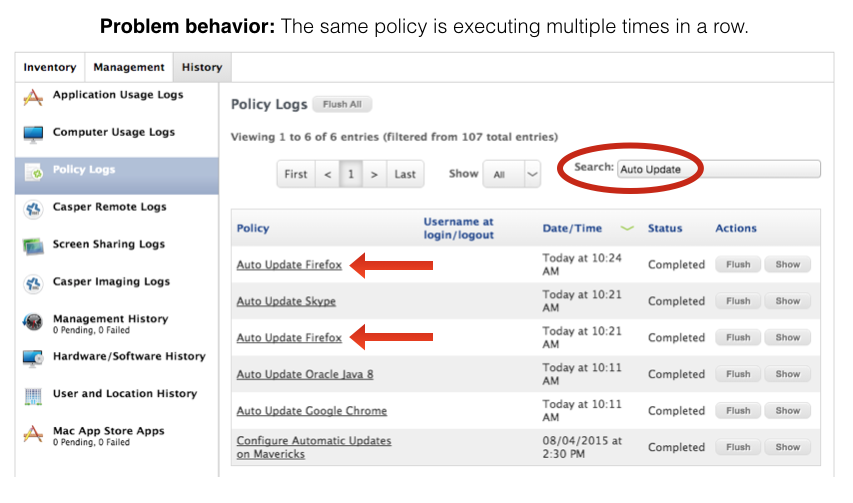
Find and fix loopers
Under certain circumstances, computers will repeatedly execute the Auto Update policies every hour. This is because the computer still meets the smart group criteria associated with the policy. This is fixable.
Here's how to find loopers:
-
Allow your Auto Update policies to run for at least 2-3 hours, to build up policy logs that can be used for investigation.
-
Open the policy log for each of your Auto Update policies.
-
Check to see whether the same computer is executing the policy multiple times in a row, as shown below:

If you have a large fleet of Macs and it's difficult to see whether the same computer appears multiple times in the policy logs, try this instead:
-
From one of the Auto Update policy logs, select a random sample of 10-20 Macs and open their individual policy histories. (Hold Command while you click on each computer to open them in new background tabs.)
-
Filter for Auto Update to see whether they've executed the same Auto Update policy repeatedly, as shown below:

If you see looping happening, here's how to fix it:
-
Force an inventory on the problem computers. Sometimes it's as simple as a failed recon run.
-
Check the application's path. If an old version of an application lives somewhere other than in the Applications folder, the installer won't overwrite it with the new version of the app. There are two solutions:
-
If the old version of the app that lives outside the Applications folder is no longer needed, delete it and run inventory again.
-
If the old version of the app is necessary, rename the app. For example, if a web developer needs to keep Firefox 34 for testing, simply have them rename the old app from
Firefox.apptoFirefox 34.app.
-
-
Check your smart group logic. If you've tried both of the above and the policy is still looping, check the smart group template that the -autoupdate.jss recipe override is using. You might need to add another criterion.
Check for policy failures
In addition to checking for policy looping, the Casper policy logs are also useful for detecting other problems.
One example: newly-uploaded software packages may not yet be synchronized with your Cloud Distribution Point. The policy logs from such an error would look like this:

The solution to this specific problem could be one of two things:
- Force the CDP to sync. Once the new package is present on the CDP, the error should stop.
- Manually modify* the Auto Update policy's package settings to use a specific distribution point that you know will always be up to date (as shown below).

* This is one of the very rare cases where it's OK to modify a policy created by an AutoPkg recipe, because the Distribution point to download the package(s) from setting will not be overwritten during subsequent recipe runs. I'd like to tell you a definitive list of other settings that are manually editable, but I can't. Inspecting the Casper API and using trial-and-error may be your best bet.
Getting help
Community support
If you need help setting up "Auto Update Magic" in your organization, or if you're encountering a problem which the Troubleshooting steps above don't resolve, you'll find many knowledgeable people in the following locations:
- In the #jamfnation and #autopkg rooms within the MacAdmins Slack team
- On the JAMF Nation discussion boards
Consulting services
If you're in the San Francisco Bay Area and you'd rather just pay somebody to set this up properly, document it, and leave you instructions for maintaining it, give the Linde Group a call. We've done that sort of thing for many companies.
Found a problem?
If you've found a reproducible problem with the scripts or templates I've provided here, or if you have ideas for improving them, feel free to submit a GitHub issue on this repo, and I'll do my best to reply in a timely manner.

P.S. Thanks for reading all the way to the end! You get a 🌇.