flannelhead / Blackstar
Programming Languages
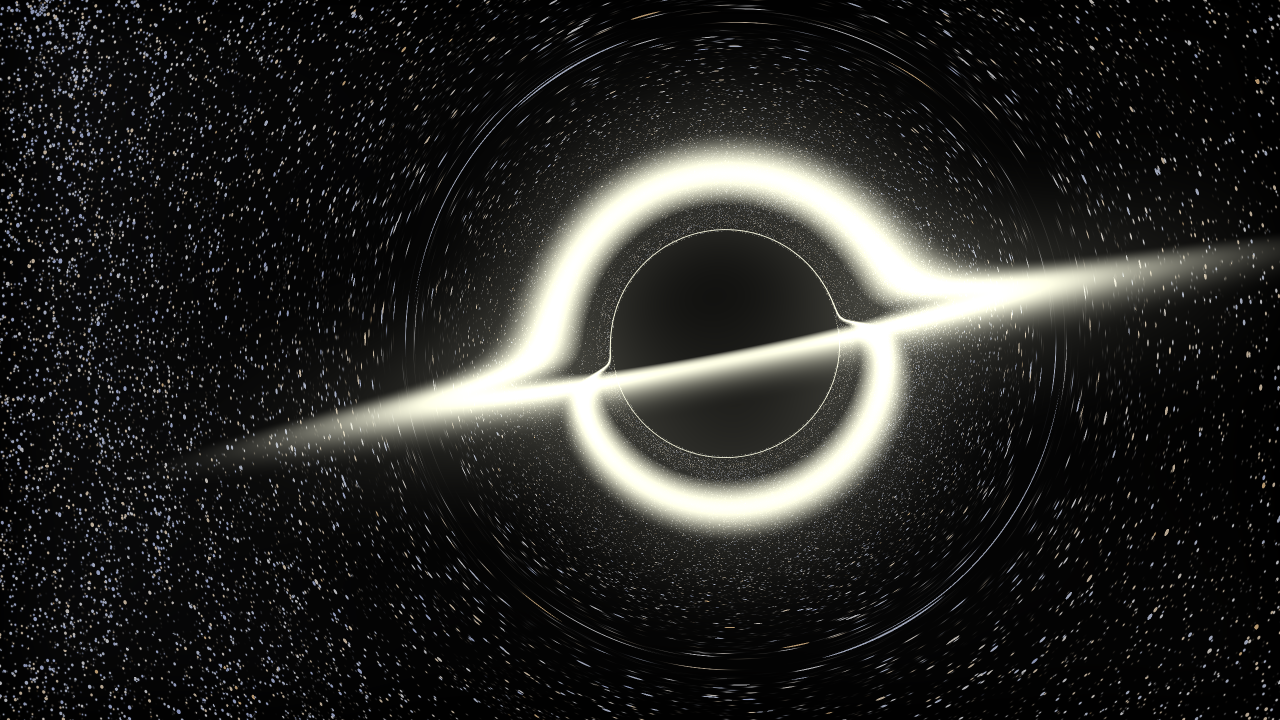
Blackstar
A black hole ray tracer written in Haskell. There's an article about this on my homepage. I've also written a theoretical writeup on Schwarzschild geodesics.
Features
- Fast, parallel ray tracing
- Rendering Schwarzschild black holes
- Rendering accretion disks
- Drawing the celestial sphere using a star catalogue
- Bloom effect
- Antialiasing by 4x supersampling for smoother images
- Easy, YAML based configuration
- A simple CLI
- Batch mode and sequence generator for creating animations
What about the name?
It is a tribute to David Bowie, referring to his last album.
Building
Use stack to build this. First clone the repo, then run stack build and follow the instructions given by stack. You should be able to build blackstar on any platform where you can install stack.
You will have to build the star lookup tree first. Download the PPM star catalog this archive and extract the file PPM to the root folder of this project. Then run stack exec generate-tree PPM stars.kdt and the tree will be generated and saved to the file stars.kdt.
Speeding it up with LLVM
When doing large or batch renders, it is recommended to build blackstar using GHC's LLVM backend. GHC produces LLVM bytecode and LLVM produces fast native code from GHC's output. In my tests I've noticed ~1.5x speedups.
The LLVM backend isn't used by default since one needs to install (and usually build) a specific version of LLVM separately. Moreover, the build time is significantly higher with LLVM, so one doesn't definitely want to use it while hacking on the code.
To successfully build with LLVM, you need to:
- Download and build LLVM 6.0.1. You can skip the Clang parts. After the build, you should make sure the tools
llcandoptare found in yourPATH. Notice that these aren't included in the prebuilt LLVM binaries, that's why you'll need to build it. - Build
blackstarwithstack build --ghc-options -fllvm. (If you've just built it, runstack cleanfirst to ensure it really gets rebuilt with LLVM.) - Wait patiently
- Enjoy the result!
You don't necessarily have to use LLVM at all. However, if you can acquire binaries of the right LLVM version, that will give you some speedups.
Usage
When blackstar has been built with stack, you can run it with
stack exec blackstar -- [-p|--preview] [-f|--force] [-o|--output=PATH] [-s|--starmap=PATH] SCENENAME
Notice the two dashes (--) which are required to terminate stack's argument list.
cabal users can run blackstar by executing
cabal run -- [OPTIONS] SCENENAME
in the root folder of the project.
Scenes are defined using YAML config files. Look in the scenes folder for examples. To render the default scene to the directory output, run
stack exec blackstar -- scenes/default.yaml --output output
in the root directory of the project. The --output flag specifies the output directory. By default, blackstar searches for a starmap in the path ./stars.kdt, but a different path can be specified using the --starmap flag.
The rendered files are named scenename.png and scenename-bloomed.png. The --preview flag can be used to render small-sized previews of the scene while adjusting the parameters. The --force flag will cause blackstar to overwrite output images without a prompt.
If a directory is given as the input scene path, blackstar searches non-recursively for YAML files in that directory and tries to render them. The scenes are placed in the specified output directory.
There's also a help text which can be seen by running
stack exec blackstar -- --help
OR
cabal run -- --help
Better images can be achieved by rendering larger than the target size and then scaling down (some antialiasing is achieved). This is called supersampling and is implemented in blackstar. It can be enabled by setting supersampling to true in the YAML config file — see scenes/default-aa.yaml for an example.
Animation
There is a separate YAML config format for specifying animations. For example, see default-ani.yaml.
In the first pass, the animation file must be rendered into separate config files for each frame. The animate executable takes care of this. First, create a directory where the frame config files will be put.
mkdir frames
Then run animate:
stack exec animate -- animations/default-ani.yaml -o frames
Now you should find quite a bunch of .yaml files in the folder frames.
Make another folder for the output frames:
mkdir frames-out
Now you will be able to run blackstar in batch mode to render the frames:
stack exec blackstar -- frames -o frames-out
This will take quite a while.
After the frames have been rendered, generate a video from the *.png still with your utility of preference. You can also use my script scripts/ffmpeg-animate, which uses ffmpeg. You only need to give it the prefix of the numbered frames:
scripts/ffmpeg-animate frames-out/default-ani
The output video will be rendered to out.mkv.
Profiling
Thanks to stack, profiling is incredibly easy. Rebuild blackstar by running
stack build --profile
and then run it with
stack exec blackstar -- scenes/default.yaml -o output +RTS -p
The profile will be generated to blackstar.prof.
TODO
As always, there's a plenty of room for improvement. For example:
- Animation: mathematically rigorous non-stationary observer
- Arbitrary textures for accretion disk (or some cool noise generator)
- Redshifting of the accretion disk
- Preview / scene planner GUI (fltkhs)
Pull requests are welcome! If you find some cool scenes, I'd appreciate if you contributed them to this repository.
License
The PPM star catalog is provided here for the sake of completeness in the file star-catalogs/ppm.tar.gz.
For details on the PPM star catalog and the terms of its usage, please refer to the original page where it is published:
http://tdc-www.harvard.edu/software/catalogs/index.html
http://tdc-www.harvard.edu/software/catalogs/ppm.html