OGRECave / Blender2ogre
Programming Languages
blender2ogre
- License: GNU LGPL
- Ogre forum thread
Index
Installing
Copy the io_ogre folder into the $BLENDER_DIR/scripts/addons folder.
Note on Windows: you have to set the correct path to OGRETOOLS_XML_CONVERTER in io_ogre/config.py prior to the first run.
After installing the addon enable it in Blender from User Preferences > Add-Ons > Import-Export (CTRL+ALT+U). Search for ogre and check the box on the right. Remember to save as default if you want the addon to be enabled after you exit your Blender.
Integrated help docs will be shown in the upper right hand toolbar, replacing blender's normal Help menu, read them for assistance.
The following versions of blender have been tested.
- Blender 2.8x
- for Blender 2.7x: see 2.7x-support branch
For OGRE v2.1 meshes, use OgreMeshTool from Ogre 2 build for OGRETOOLS_XML_CONVERTER
Updating to new versions
If you are upgrading from a previous version of blender2ogre, and having problems, you may want to delete your old .pickle config file from
$BLENDER_DIR/config/scripts/blender2ogre.pickle and restart blender.
Video Tutorials
- General Usage
- Animations
- Meshmoon: Video and text instructions how to install and use blender2ogre addon
Additional Features
Merge Objects on export
You might have hundrets of objects, which you want to keep separate but have them in one .mesh on export.
For this create a new group (Ctrl+G) named as merge.<yourname>. The output will be a single <yourname>.mesh file. Alternatively link the group.
External OGRE Materials
You might already have some materials in OGRE that you do not want to export.
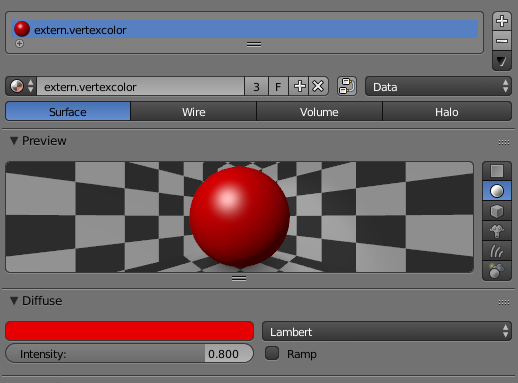
Prefix them with extern.<yourname> and the sub entity will have the material name set,
but the material is not exported. The following material 'vertexcolor' can be defined in
your OGRE project:
Console Export
You might have several blender files in your project you want to export to Ogre. Do this by hand? NO! You can do better! After all, you have build scripts to compile your source code? Why not export your files automated? Here is how you can export a scene with blender2ogre. Take a look at io_ogre/console.py. You might want to write your own script for your project to export individual objects.
$ cd blender2ogre
$ blender -b examples/vertex-colored.blend --python io_ogre/console.py -- /tmp/blender 'scene abc'
Processing Scene - abc
  Processing Materials
      - Exporting root node: Lamp.002
      - Exporting root node: Lamp.001
      - Exporting root node: cube
      - Generating: Cube.mesh.xml
      - Writing shared geometry
        Done at 0.00 seconds
      - Writing submeshes
        Done at 0.00 seconds
      - Created .mesh.xml at 0.00 seconds
INFO:root:      - Created .mesh in total time 0.53 seconds
      - Exporting root node: Lamp
      - Exporting root node: Camera
  Exported Ogre Scene: /tmp/blender/abc.scene

Blender quit
$ ls /tmp/blender
abc.scene  Cube.mesh  Cube.mesh.xml  Material.material
Exporting Custom Vertex Groups
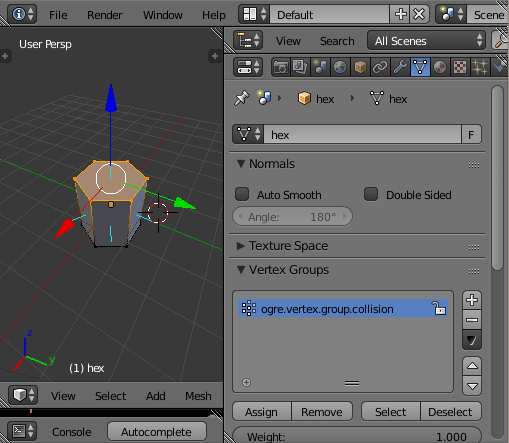
As shown in the picture below, you can now export SubEntities that contain a user defined amount of faces.
You simply call your vertex group with the
prefix ogre.vertex.group.<yourname> and access it in Ogre similar to
the following:
void example(const Ogre::Entity * entity)
{
    auto collision = entity->getSubEntity("collision");
    auto mesh = collision->getSubMesh();
    VertexData * data = nullptr;
    if (!mesh->useSharedVertices) {
        data = mesh->vertexData;
    } else {
        data = mesh->parent->sharedVertexData;
    }
    auto pos_cursor = data->vertexDeclaration->findElementBySemantic(Ogre::VES_POSITION);
    auto vbuffer = data->vertexBufferBinding->getBuffer(pos_cursor->getSource());
    auto ibuffer = mesh->indexData->indexBuffer;

    uint16_t * indices = static_cast<uint16_t*>(ibuffer->lock(Ogre::HardwareBuffer::HBL_READ_ONLY));
    float * vertices = static_cast<float*>(vbuffer->lock(Ogre::HardwareBuffer::HBL_READ_ONLY));
    float * v;
    int count = mesh->indexData->indexCount;
    int stride = vbuffer->getVertexSize() / 4;
    for (int i = 0; i < count; i+=3) {
        uint16_t a = indices[i], b = indices[i+1], c = indices[i+2];
        pos_cursor->baseVertexPointerToElement(vertices + a * stride, &v);
        Vector3 va(v);
        pos_cursor->baseVertexPointerToElement(vertices + b * stride, &v);
        Vector3 vb(v);
        pos_cursor->baseVertexPointerToElement(vertices + c * stride, &v);
        Vector3 vc(v);
        // do something with your triangle here
    }
    ibuffer->unlock();
    vbuffer->unlock();
}
The vertex group will get the material name 'none' so you might want to add the following script:
material none {
    technique {
        pass {
           // ...
        }
    }
}
Exporting Particle Systems
A common technique for laying out random objects on a scene in Blender is to use the Particle System. Check out the Particle System README to see how to create and export a scene where the trees, foliage and rocks are distributed randomly using a particle system.
Creating Shape Animations
Shape (or Pose) Animations allow animating different poses, a technique commonly used to do face animations.
Check out the Shape Animations tutorial to see how to create some poses and animate them. Then you can use blender2ogre to export the poses and animations into a .mesh file.
About
The original version of this was a single monolithic Python file. This is not maintainable, and contains a tremendous amount of bugs. There was the need to export blender model to ogre from the console, thus I rewrote the whole script and split it into several files. It has been well tested on linux 64-bit and should work with others.
Authors
This Blender addon was made possible by the following list of people. Anyone can contribute to the project by sending bug reports and feature requests here. Naturally the most welcome contribution is actual code via pull requests. If you are planning to implement something "big", it's a good practise to discuss it in the issue tracker first with other authors. So that there is no overlap with other developers or the overall roadmap.
- Brett
- S. Rombauts
- F00bar
- Waruck
- Mind Calamity
- Mr.Magne
- Jonne Nauha aka Pforce
- vax456
- Sybren Stüvel
- Richard Plangger
Additionally the following companies have supported/sponsored the development efforts.


