Bodies at Rest - v1.1
3D Human Pose and Shape Estimation from a Pressure Image using Synthetic Data
Paper:
Clever, Henry M., Zackory Erickson, Ariel Kapusta, Greg Turk, C. Karen Liu, Charles C. Kemp. "Bodies at Rest: 3D Human Pose and Shape Estimation from a Pressure Image using Synthetic Data." In IEEE Conference on Computer Vision and Pattern Recognition (CVPR), 2020 - Oral presentation. ArXiv preprint: https://arxiv.org/pdf/2004.01166.pdf
Video:
https://www.youtube.com/watch?v=0W8iLqHvZz8
Code version (v1.1) note:
This is the "camera ready" version of the code.

Getting started
Setup code:
Clone this repository to get started with inspecting PressurePose and training PressureNet.
git clone https://github.com/henryclever/bodies-at-rest.git
cd bodies-at-rest
pip install -r requirements.txt
If it's missing any requirements please create an issue and I will fix it.
Download SMPL human model, you must create a free account here https://smpl.is.tue.mpg.de/en. Copy smpl directory to bodies-at-rest/smpl.
This repository uses Python 2.7.
Download data:
cd PressurePose
PressurePose synthetic dataset: 206K labeled synthetic pressure images.
- Run
./download_synthto download all the synthetic data (10 GB). - For a quick start up, run
./download_qt_synth, which is just 3K images (500 MB). - Link to all the synthetic data: https://dataverse.harvard.edu/dataset.xhtml?persistentId=doi:10.7910/DVN/IAPI0X .
PressurePose real dataset: 20 human participants (10M/10F) with 1K labeled real pressure images.
- Run
./download_realto download all the real data (10 GB). - For a quick start up, run
./download_qt_real, which represents a single participant (500 MB). - Link to all the real data: https://dataverse.harvard.edu/dataset.xhtml?persistentId=doi:10.7910/DVN/KOA4ML .
Trained PressureNet model: the best performing PressureNet presented in the paper.
- Run
./download_modelto download Mod1 and Mod2 for the best performing PressureNet in the paper (2 GB). - To use this with the training and evaluation code, you'll have to specify the correct flags. See sections below to understand what flags to use.
- Link to the model: https://dataverse.harvard.edu/dataset.xhtml?persistentId=doi:10.7910/DVN/IOUBGS .

What code is in here?
This repository:
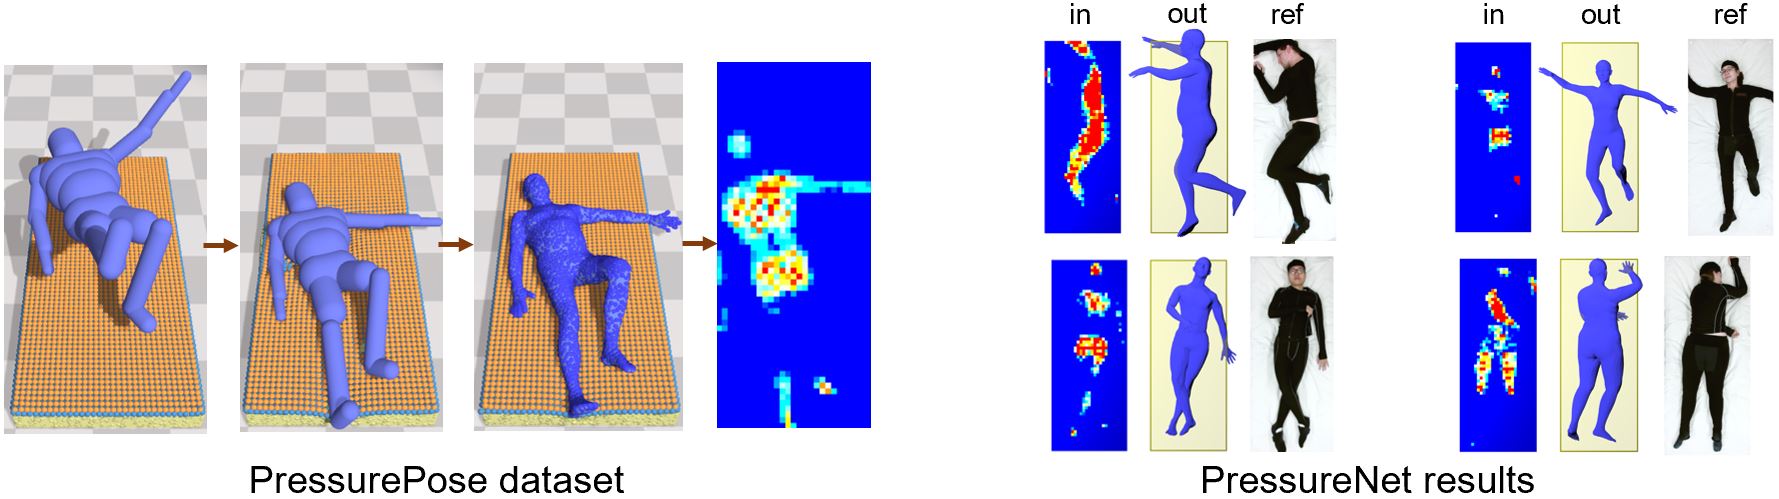
- Allows visualization of both synthetic and real data in the PressurePose dataset. The synthetic dataset includes 206,000 fully labeled pressure images, meaning that each pressure image has a corresponding SMPL human mesh parameterized by body shape (10 PCA parameters), pose (69 joint angles), posture (6 DOF global transform), gender, height, and weight. The real dataset includes 1051 pressure images with co-registered point cloud data, RGB data, gender, height, and weight.
- Has the code for PressureNet. Below we describe step-by-step how to train PressureNet.
- Has code for generating data with FleX and DartFleX.

PressurePose dataset visualization
First, install the linux packages listed further down the page.
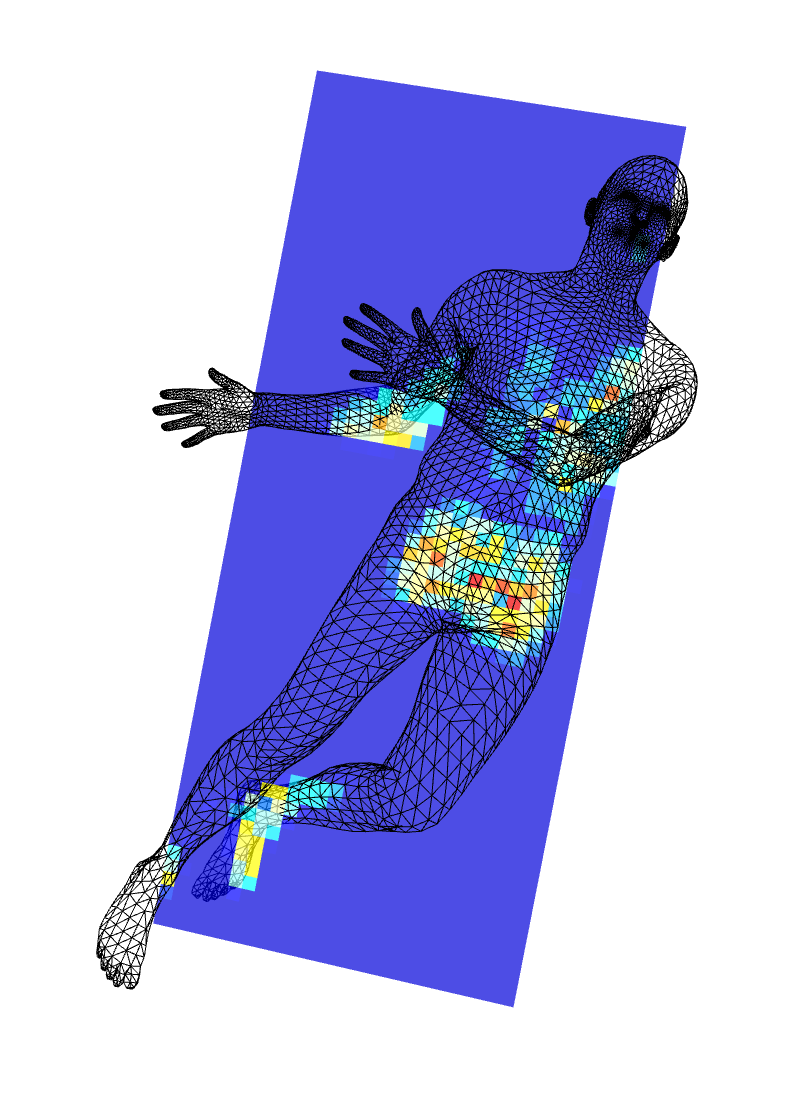
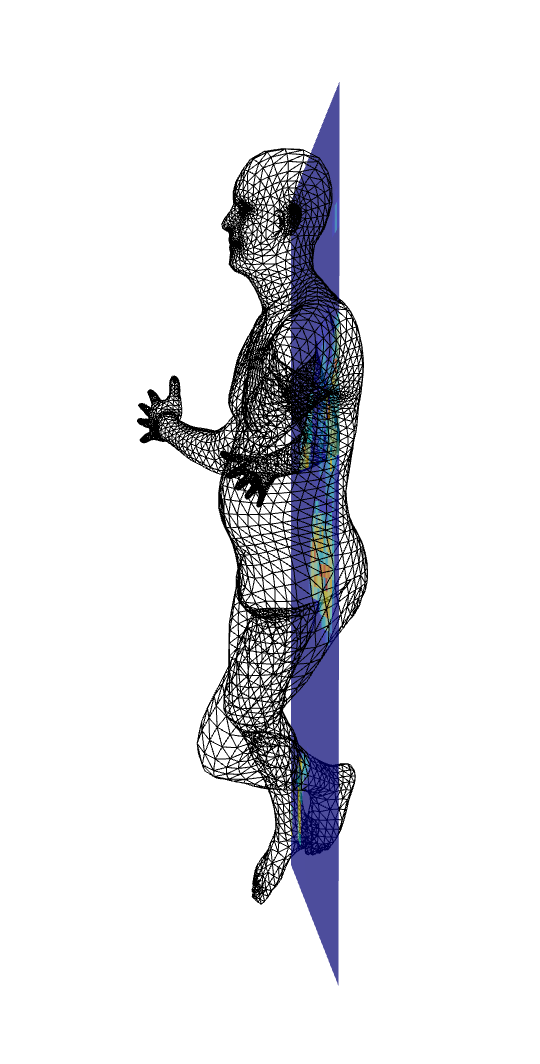
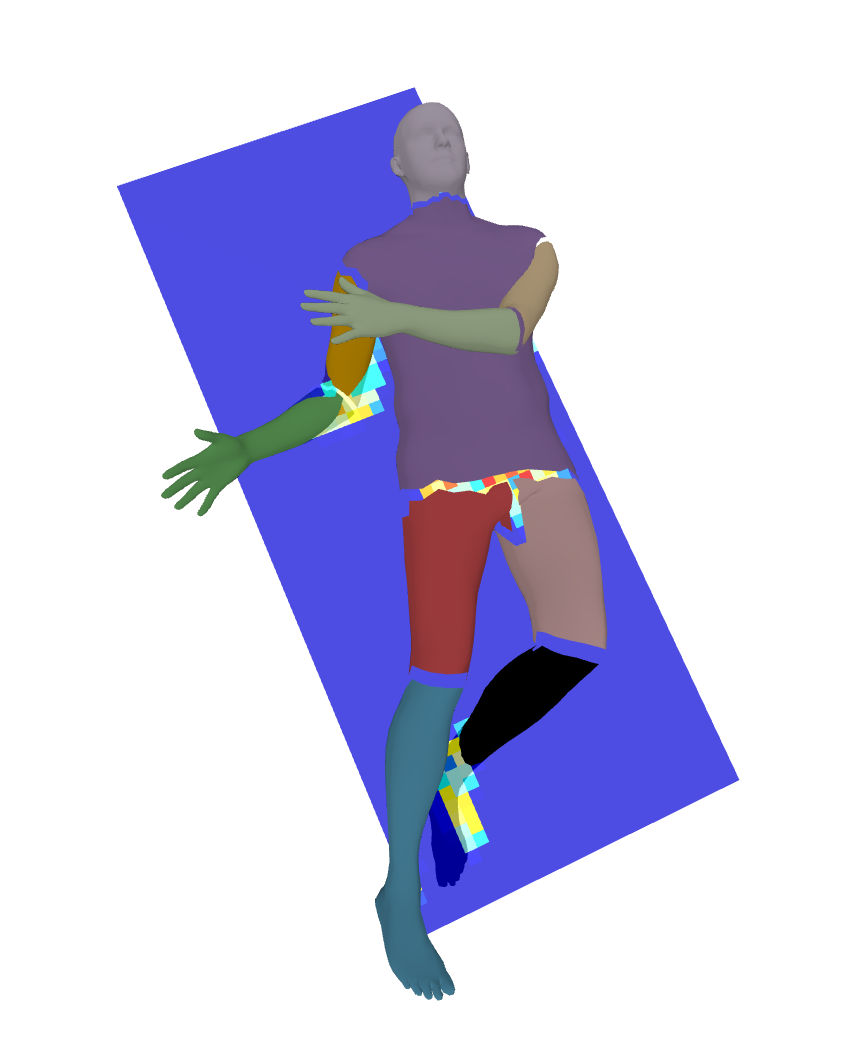
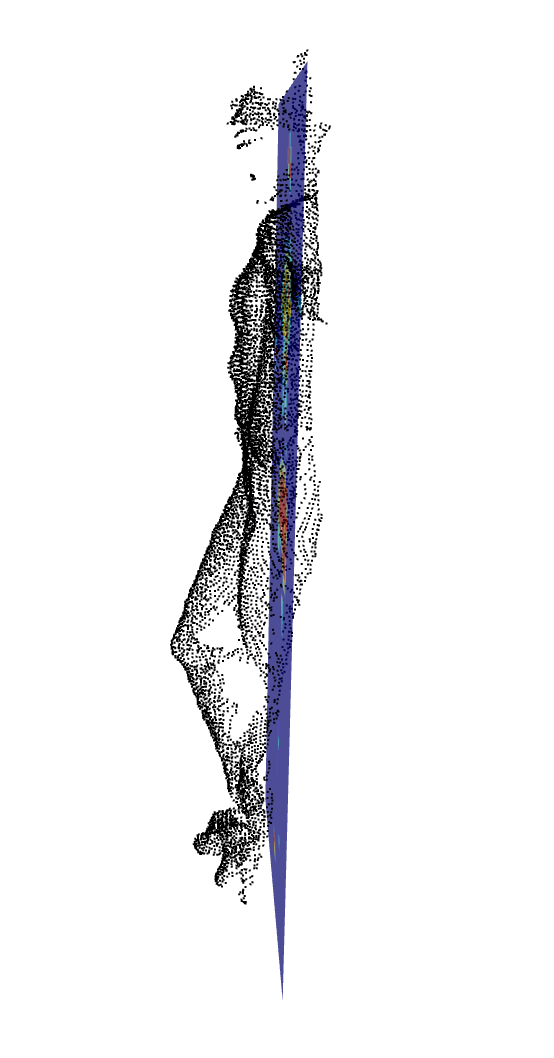
For the synthetic data, run the following code: python viz_synth_cvpr_release.py. An interactive PyRender box will pop up that visualizes the ground truth human mesh and the pressure image. It will show a mesh like the two on the left below. The second set images below show a reduced set of mesh vertices, which represent only those facing an overhead camera and which overlie the pressure mat. This reduction is useful for comparing the mesh vertices to a point cloud. Use the flag --red to reduce the vertices in this way. You can also segment the limbs (--seg), which produces an image like that on the far right below. To change the synthetic data partition you are visualizing, change the variable TESTING_FILENAME inside the python script.


For the real data, run the following code python viz_real_cvpr_release.py --p_idx 1 --pose_type 'p_select'. you will see two pop up boxes: one for 2D data that includes RGB, depth, and pressure; the other for a 3D point cloud and pressure image rendering in PyRender that you can flip around to inspect. Make sure you include flags to specify the participant number and the type of real pose dataset. For example, you might use --p_idx 3 --pose_type 'prescribed' to specify the third participant in the list and the set of 48 prescribed poses. You can use numbers 1 through 20 to specify the participant, because there are 20, and pose types of 'prescribed' and 'p_select', with the latter used to specify participant selected poses. Here is what you should see when you run this code:


The real dataset is captured with a Kinect V2 and is already calibrated, and the pressure image is spatially co-registered with RGB, depth, and point cloud. The depth image is unfiltered and noisy while the point cloud is pre-packaged as a set of 3D coordinates that has white colors filtered out - so the only points there are ones representing the person in the bed. See the paper for details.

PressureNet training
There are 3 steps to train PressureNet as implemented in the paper.
- Step 1: Train Mod1 for 100 epochs using loss function 1. Run the following:
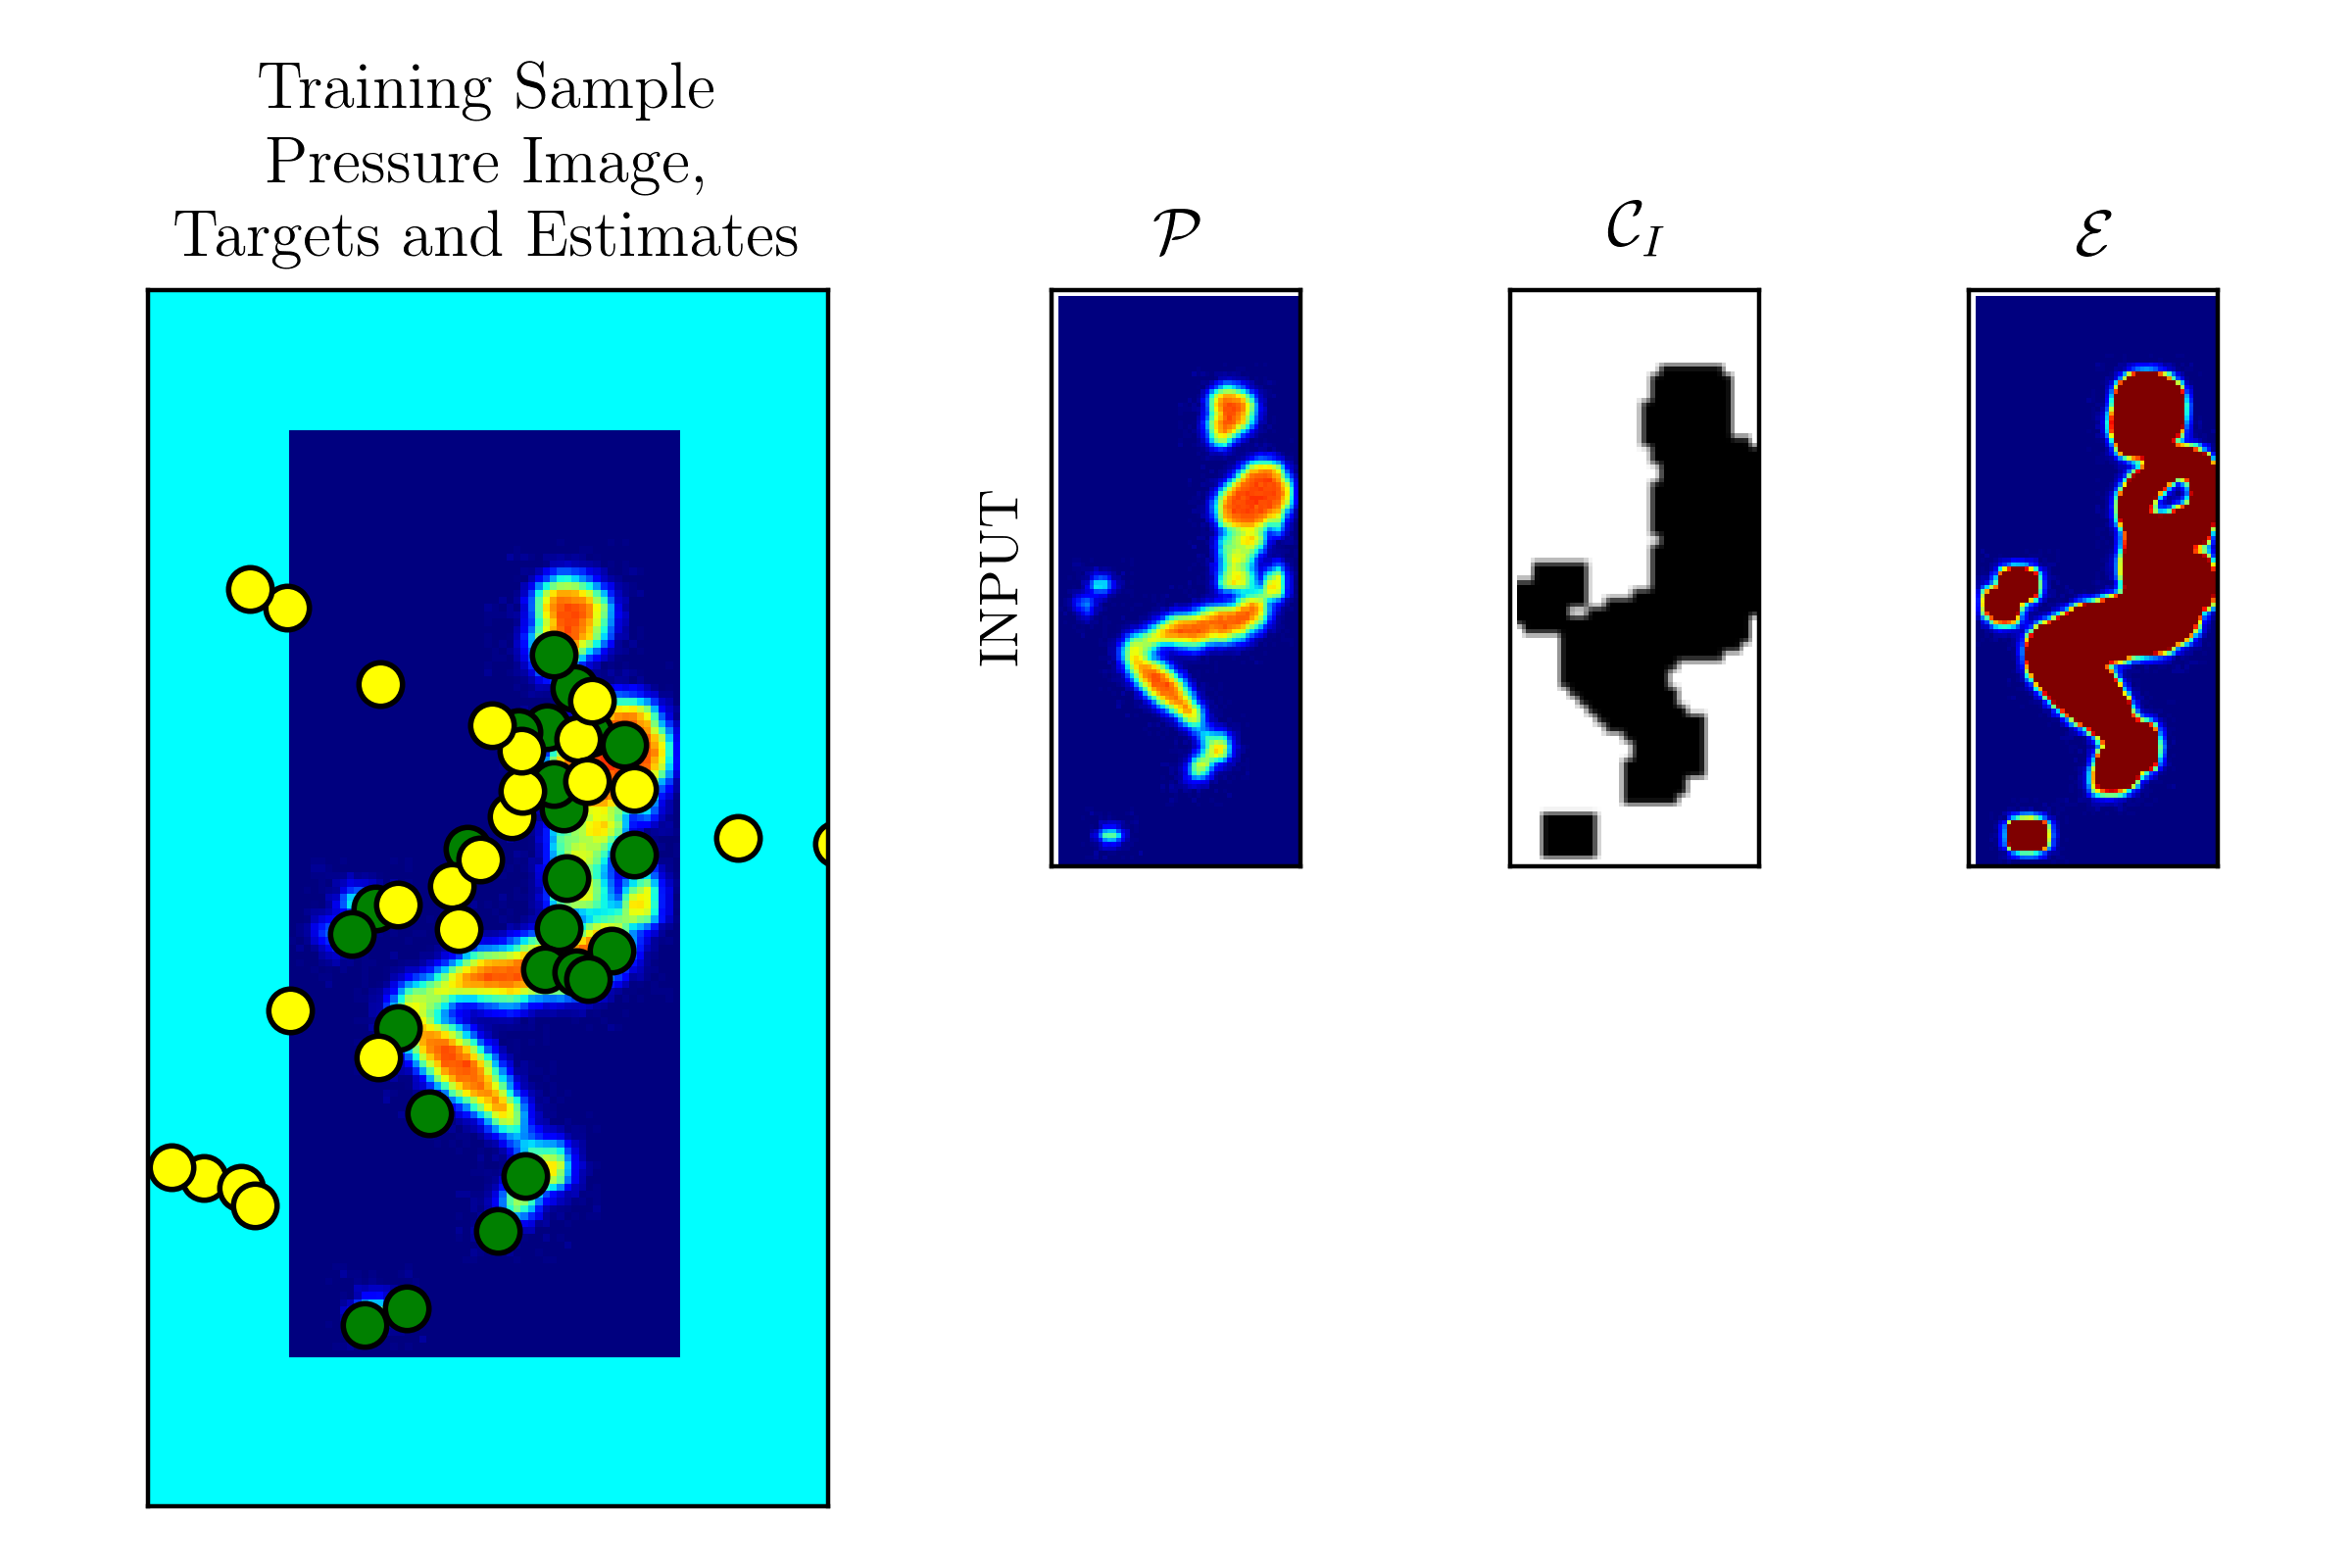
python train_pressurenet.py --mod 1. You can also use the flags--htwt,--calnoise, and--smallto include height/weight data in the network, calibration noise in the network, and train on a smaller dataset size (1/4th). Use the--qtflag to run a quick test on a small portion of the dataset to check for bugs, or if you only downloaded the two files in the~/data_BR/synth/quick_testfolder. It's important to visualize things to make sure your network is training OK. So if you use the--vizflag a set of pressure maps pops up with joint markers projected into 2D - there are 24 of them. Green - ground truth, yellow - estimated. The smaller top right images show the input channels, with the exception of height and weight. Note from the pressure image that this body is in a lateral posture, but it has just started training, so the yellow estimated joint positions are far from the ground truth.
-
Step 2: Compute a new dataset that has spatial map reconstructions from the PMR output of Mod1. Run the following:
python compute_mod1_spatialmaps.py. Make sure the flags on this match the flags you trained Mod1 on. This will create a copy of the existing dataset plus estimated depth maps in separate files with longer filename tags. Make sure you have at least 10GB free. -
Step 3: Train Mod2 for 100 epochs using loss function 2. Run the following:
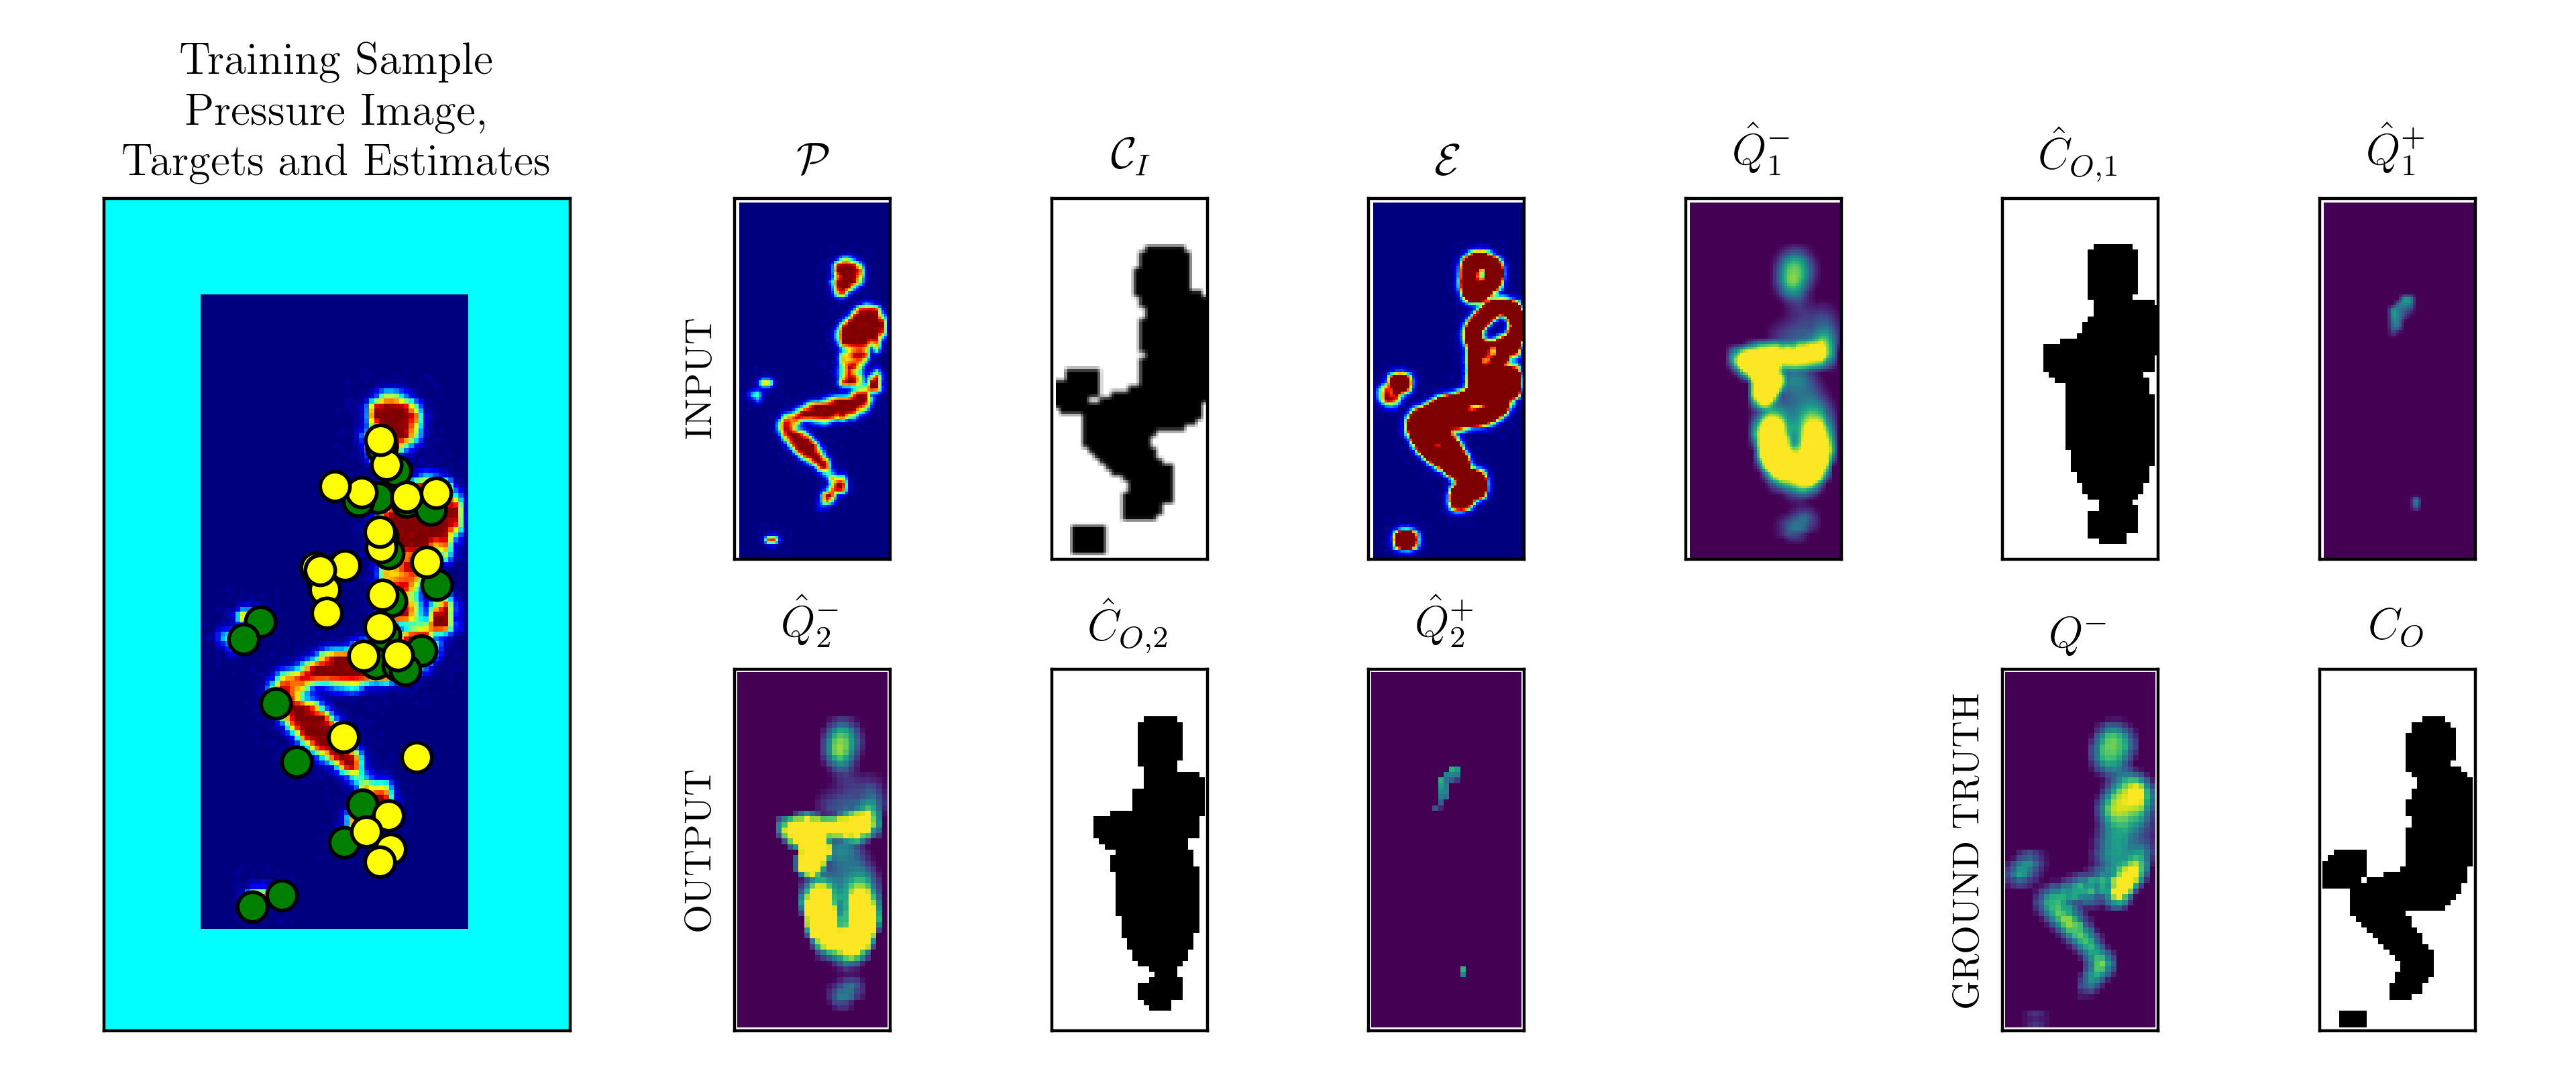
python train_pressurenet.py --mod 2 --pmr. Make sure the flags on this match the flags you trained Mod1 on (except--viz, that doesn't matter). If you do visualize, expect a box like the one below to pop up. For this example, while the ground truth is in a lateral posture, the Mod1 estimate outputs a pose in a prone posture. The smaller top right images show the input channels. The bottom right channels show the output reconstructed spatial maps, as well as ground truth on the far right. Here, Mod2 has just started training so the output Q_2 doesn't differ substantially from the input Q_1. Use the--qtflag to run a quick test on a small portion of the dataset to check for bugs, or if you only downloaded the two files in the~/data_BR/synth/quick_testfolder. For a quick test on the downloaded data use:python train_pressurenet.py --mod 2 --pmr --qt --calnoise.
The data can take a long time to load. You can use an euler angle parameterization instead of the direction cosines in the SMPL model. Use the --losstype 'anglesEU' flag for that. You might have to change some file directories so that the train_pressurenet.py knows where to find your data.

PressureNet evaluation
First, you'll generate results files for each participant. Make a new folder ~/data_BR/final_results. Then run python evaluate_real.py and specify a real data type in the PressurePose dataset with either --pose_type 'p_select' or --pose_type 'prescribed'. You should also use matching flags as before to specify inclusion of height/weight (--htwt), size of the dataset (--small), and inclusion of calibration noise (--calnoise). You can optionally select among the participants to evaluate using --p_idx followed by a number between 1 and 20. The
default setting is to evaluate all the participants in order from 1 to 20. You can also visualize the evaluation for a particular participant, pressure image, point cloud, and estimate in 2D or 3D using the option --viz '2D' or --viz '3D'. Note that if you visualize in 2D the results won't be saved because some of them are performed in the 3D rendering library. After you've created results files for each participant, run python results_summary.py specifying flags (or not) for height/weight, dataset size, and calibration noise.

Computer requirements
To train all 184K images, you'll need at least 64GB of ram on your CPU with the present implementation. You can run smaller sizes (e.g. 32K images) on a machine much smaller. If you restructured some code or converted some images to a more efficient format (e.g. float to int) it might help. You'll also need at least 8GB of ram on your GPU to fit the present implementation of PressureNet. I'm sure there are other ways to make this code more efficient, so if you can do it, make a request for me and push it back up to this repository with a tagged python filename - just make sure you have documented the changes with good comments.

Generating Data with FleX and DartFleX
The code for this is split across 3 repos; 5 if you include the simulator base code for FleX and DART. I have recently created a patchfile that you can use as an add-on to FleX, which is available through the NVIDIA GameWorks github page. First, clone that repo. Then, cd bodies-at-rest/PressurePose/data_generation and move the FleXPatch file into the same directory as the FleX repo. Run the following command: patch -p0 < FleXPatch to patch FleX. Once you do this, install FleX and the python bindings for FleX according to the instructions here: https://github.com/henryclever/FleX_PyBind11. Make sure your GPU and CUDA version and machine match what is specified in the FleX python bindings. Then, install DART from here: https://github.com/dartsim/dart. I have used DART 6.6. I don't know if the newer versions of DART will work with the python bindings for DART, so I suggest using 6.6. Once you install DART, install my modified version of DART python bindings from here: https://github.com/henryclever/pydart2. Then, clone the volumetric_pose_gen repo into the same folder as the FleX repo and the bodies-at-rest repo: https://github.com/henryclever/volumetric_pose_gen. Once it's all working, cd FleX/bindings/py_files. In there you will find scripts that run physics simulation #1 and physics simulation #2 from the paper. Run these with python pyFleX_human_mesh.py and python pyDartFleX_capsulized_skel.py, respectively. You may encounter issues while getting this all to work. So post your questions in the issues tab and I'll try to help.

Updates since last version
This version of the code is an upgrade from that submitted to CVPR 2020. Changes: improved file naming conventions, made installation easier, addition of per-image normalization to correct for blankets/sheets on the bed, other minor improvements.
