bit4woo / Burp Api Drops
Programming Languages
burp api drops
API快速索引 :
一、Burp插件介绍和编程语言选择
插件是什么?
扩展burp功能的程序,依赖burp提供的API,让使用者可以开发一些自己想要的功能。
插件可以干什么?
请求和响应包的修改:比如在每个请求包中加如自定义的header
自定义UI界面:插件可以实现一个自己的tab,方便图像化操作
自定义扫描插件:当出现了新的漏洞,我们就可以编写自己的扫描插件,来自动化发现这类漏洞
访问burp中的一些关键数据:比如proxy中的请求记录、sitemap中请求响应、扫描发现的漏洞(issue)
插件怎么使用?
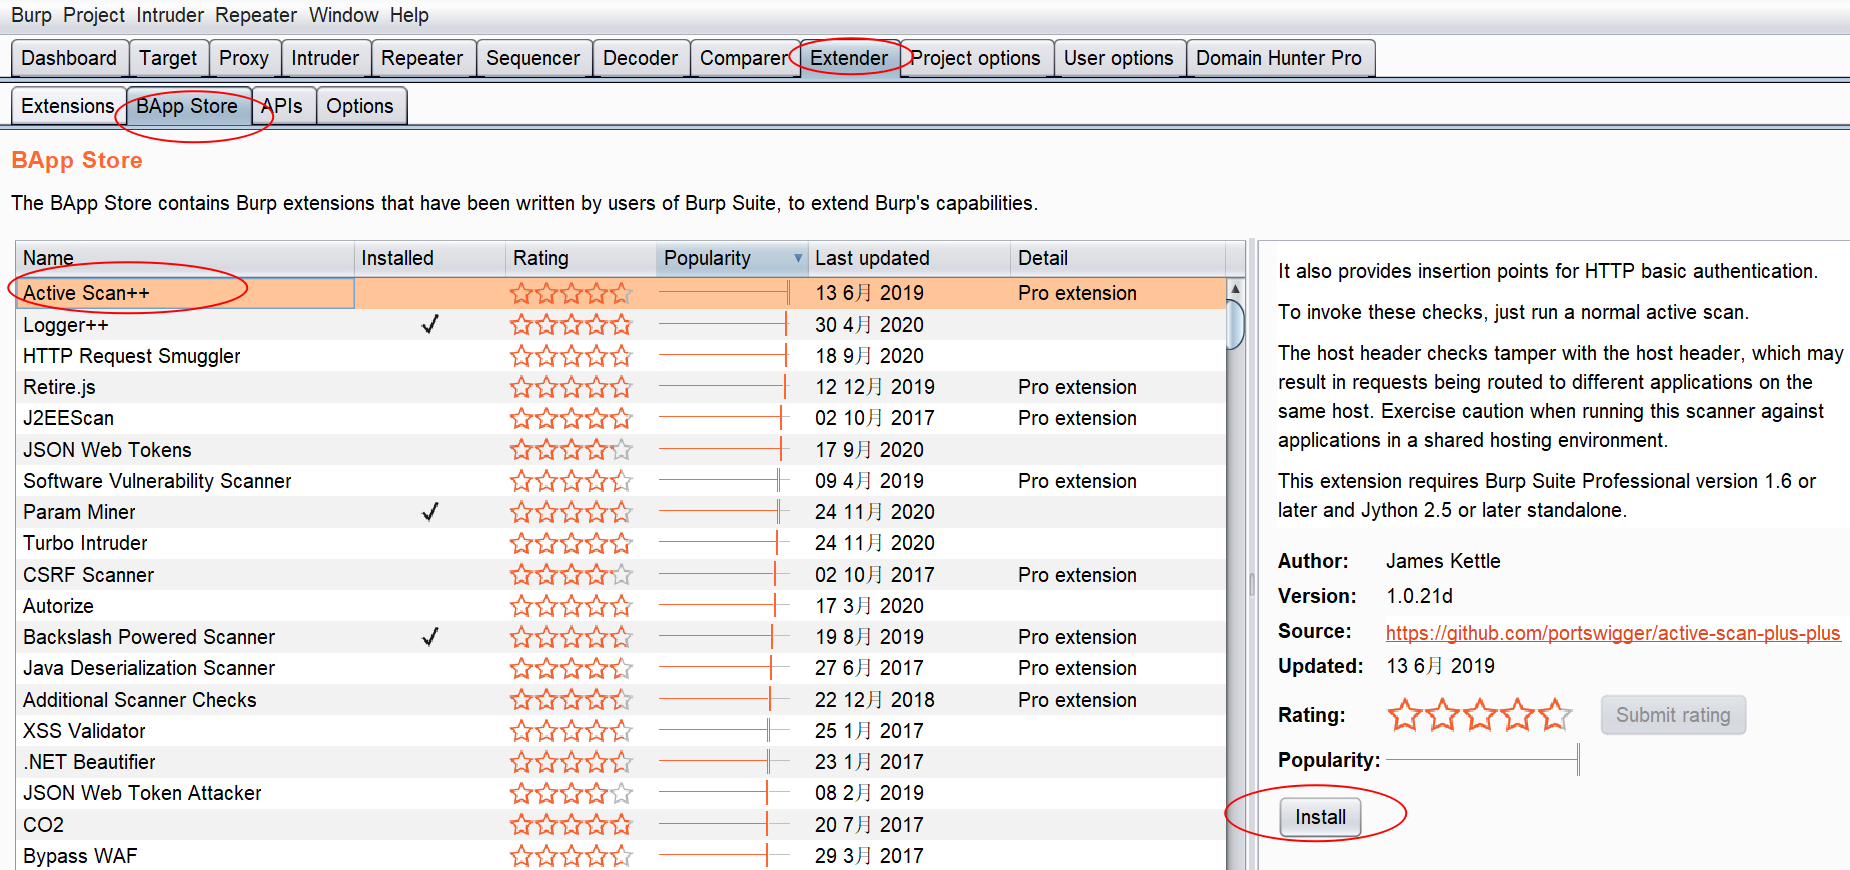
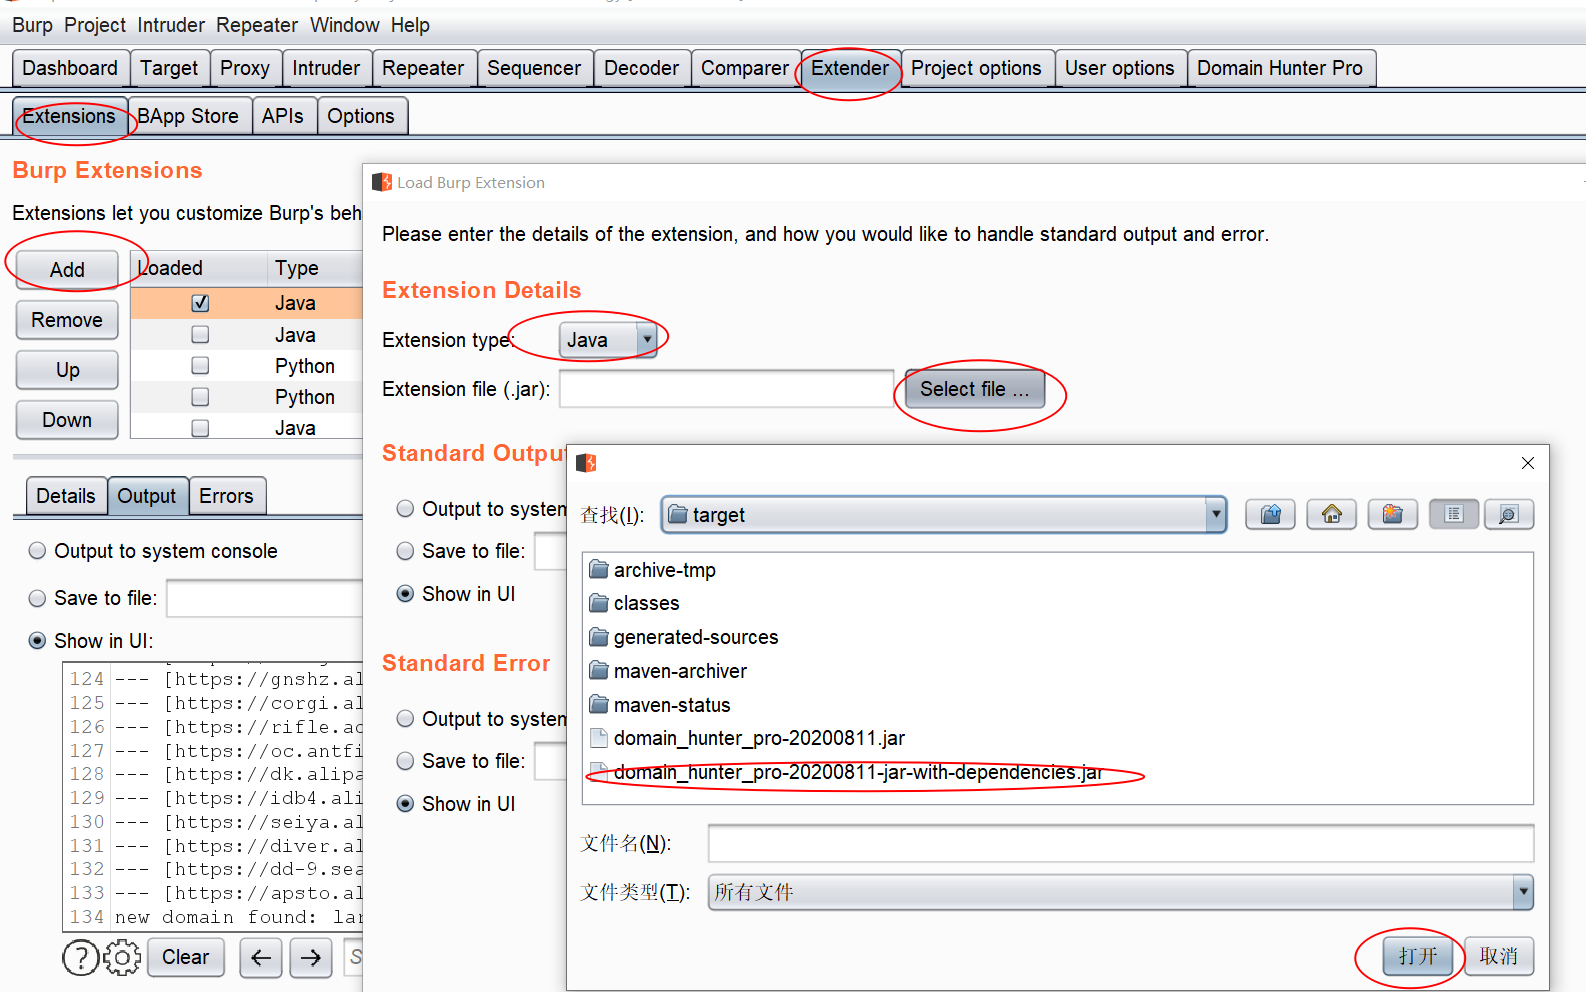
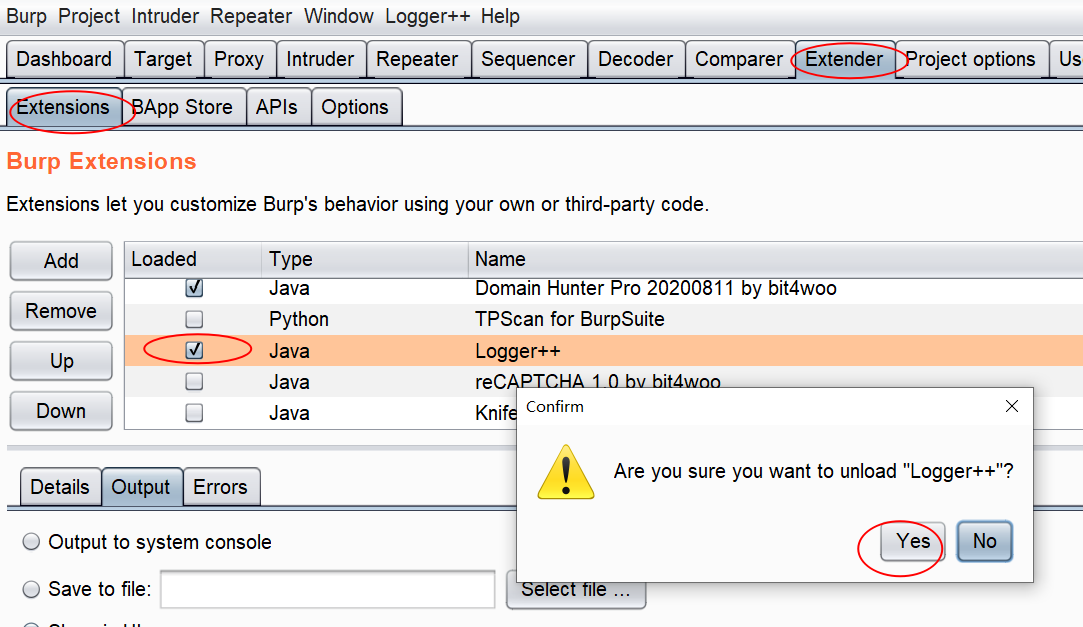
先讲burp插件的基本使用:加载安装、卸载、排序
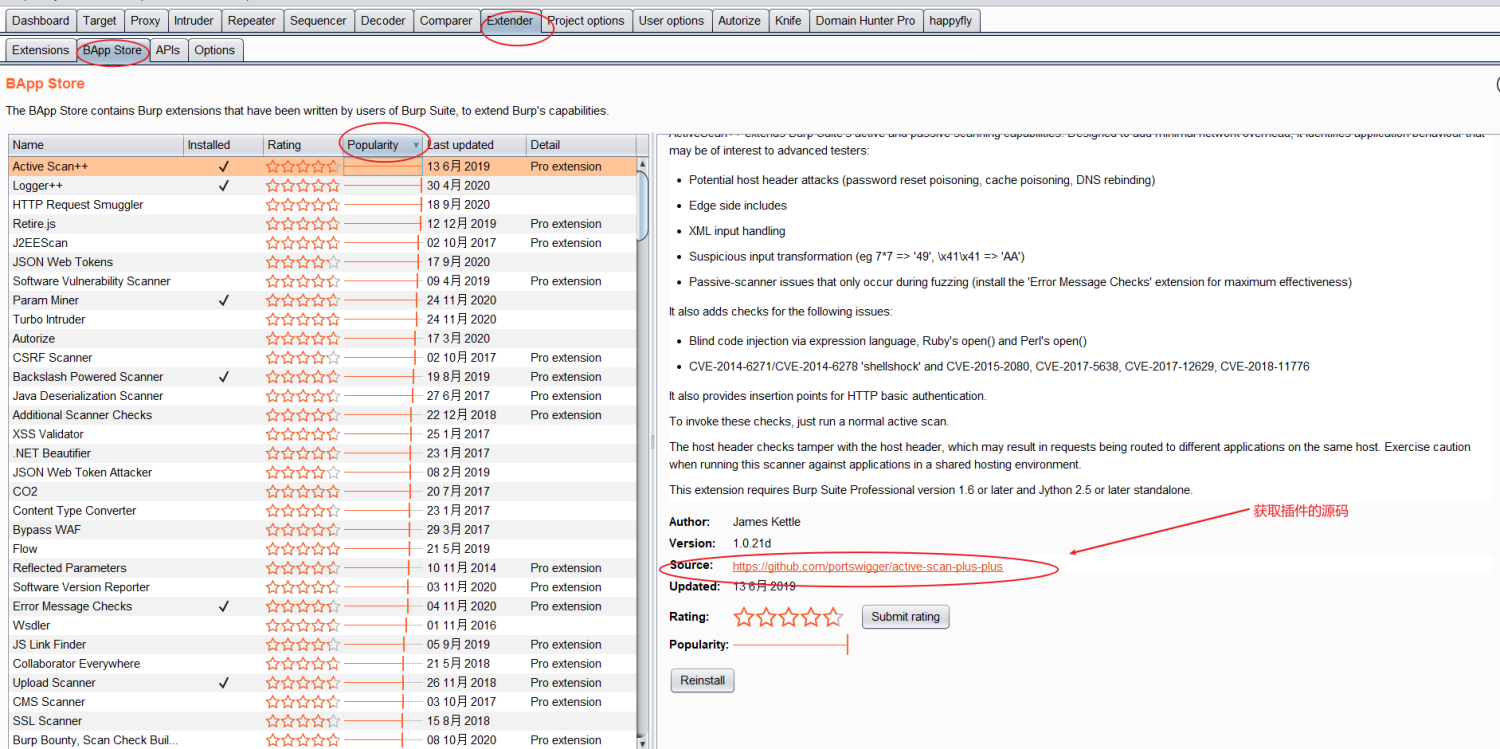
插件的加载,可以从burp官方的BApp Store中进行加载安装
也可加载一些外部插件。
加载后burp才会起作用,可以通过点击这个选择框来启用或禁用插件。
值得注意的是:图形界面中的顺序,就是插件被调用的顺序!我们可以通过 Up或Down来调整插件的顺序。
当多个插件有相同的操作时,比如修改请求数据包,插件的顺序就可能影响最后的请求数据包的内容。
插件怎么开发?
这是我们这个系列课程的核心主题,后续的章节就是围绕这个主题进行的。
编程语言的选择
burp suite支持三种编程语言开发的插件:
- Java
- python
- ruby
我们选择Java,为什么选择Java?原因有三:
1、兼容性
之前也用python写过几个简单插件。遇到过一种情况,当需要调用的外部类包含遇到pyd文件就无法进行下去了,因为pyd是C写的,Jython是无法使用C写的模块的。burp本身是Java写的,使用Java去开发插件兼容性最高,会少很多莫名其妙的错误。
下面这个链接对此有详细说明:http://stackoverflow.com/questions/16218183/using-pyd-library-in-jython
2、调试
当使用python写插件进行调试时,只能尽量通过输出去获取信息,没有好的办法进行下断点动态调试。而Java 则可以,对于复杂逻辑的插件,Java编写的更容易排查问题。
3、打包
是burp写的插件可以打包成一个独立的Jar包,方便移动和传播,环境配置也更简单。
综上,Java是写burp插件的最佳的选择。
二、开发环境准备和Hello World
环境搭建
JDK安装
在Oracle官网可以找到各种版本JDK的下载地址 ,我们选择JDK8,并且将java.exe所在目录加入系统环境变量。
IDEA 或 Eclipse
推荐使用IDEA,它的调试功能比较好用。
maven
https://maven.apache.org/download.cgi
下载后解压,然后将mvn.cmd所在目录加入环境变量即可。
国际惯例hello world
https://github.com/PortSwigger/example-hello-world/blob/master/java/BurpExtender.java
依赖包的管理
<project xmlns="http://maven.apache.org/POM/4.0.0"
    xmlns:xsi="http://www.w3.org/2001/XMLSchema-instance"
    xsi:schemaLocation="http://maven.apache.org/POM/4.0.0 http://maven.apache.org/xsd/maven-4.0.0.xsd">
    <modelVersion>4.0.0</modelVersion>
    <groupId>com.bit4woo.burp</groupId>
    <artifactId>domain_hunter</artifactId>
    <version>1.4</version>
    <build>
        <sourceDirectory>src</sourceDirectory>
        <plugins>
            <plugin>
                <artifactId>maven-compiler-plugin</artifactId>
                <version>3.7.0</version>
                <configuration>
                    <source>1.8</source>
                    <target>1.8</target>
                </configuration>
            </plugin>

            <plugin>
                <artifactId>maven-assembly-plugin</artifactId>
                <configuration>
                    <descriptorRefs>
                        <descriptorRef>jar-with-dependencies</descriptorRef>
                    </descriptorRefs>
                    <archive>
                        <manifest>
                            <addDefaultImplementationEntries>
                                true<!--to get Version from pom.xml -->
                            </addDefaultImplementationEntries>
                        </manifest>
                    </archive>
                </configuration>
                <executions>
                    <execution>
                        <id>make-assembly</id>
                        <phase>package</phase>
                        <goals>
                            <goal>single</goal>
                        </goals>
                    </execution>
                </executions>
            </plugin>

        </plugins>
    </build>
    <dependencies>
        <!-- https://mvnrepository.com/artifact/net.portswigger.burp.extender/burp-extender-api -->
        <dependency>
            <groupId>net.portswigger.burp.extender</groupId>
            <artifactId>burp-extender-api</artifactId>
            <version>1.7.22</version>
        </dependency>

        <!-- https://mvnrepository.com/artifact/com.google.code.gson/gson -->
        <dependency>
            <groupId>com.google.code.gson</groupId>
            <artifactId>gson</artifactId>
            <version>2.8.6</version>
        </dependency>

        <!-- to get root domain -->
        <dependency>
            <groupId>com.google.guava</groupId>
            <artifactId>guava</artifactId>
            <version>29.0-jre</version>
        </dependency>

        <!-- https://mvnrepository.com/artifact/org.apache.commons/commons-text -->
        <dependency>
            <groupId>org.apache.commons</groupId>
            <artifactId>commons-text</artifactId>
            <version>1.6</version>
        </dependency>

        <!-- https://mvnrepository.com/artifact/org.beanshell/bsh -->
        <dependency>
            <groupId>org.beanshell</groupId>
            <artifactId>bsh</artifactId>
            <version>2.0b5</version>
        </dependency>
    </dependencies>
</project>
插件程序的规范
package burp;

import java.io.PrintWriter;

public class BurpExtender implements IBurpExtender
{
    @Override
    public void registerExtenderCallbacks(IBurpExtenderCallbacks callbacks)
    {
        // 设置插件的名称
        callbacks.setExtensionName("Hello world extension");

        // 获取burp提供的标准输出流和错误输出流
        PrintWriter stdout = new PrintWriter(callbacks.getStdout(), true);
        PrintWriter stderr = new PrintWriter(callbacks.getStderr(), true);

        // 打印到标准输出流
        stdout.println("Hello output");

        // 答应到错误输出流
        stderr.println("Hello errors");

        // 写一个报警信息到burp的报警面板
        callbacks.issueAlert("Hello alerts");

        // 抛出一个异常,将会在错误输出流中显示
        throw new RuntimeException("Hello exceptions");
    }
}
- 所有的burp插件都必须实现IBurpExtender这个接口
- 实现类的包名称必须是burp
- 实现类的名称必须是BurpExtender
- 实现类比较是public的
- 实现类必须有默认构造函数(public,无参),如果没有定义构造函数就是默认构造函数
callbacks对象的作用
通过 callbacks 这个实例对象,传递给插件一系列burp的原生方法。我们需要实现的很多功能都需要调用这些方法。
三、动态调试方法
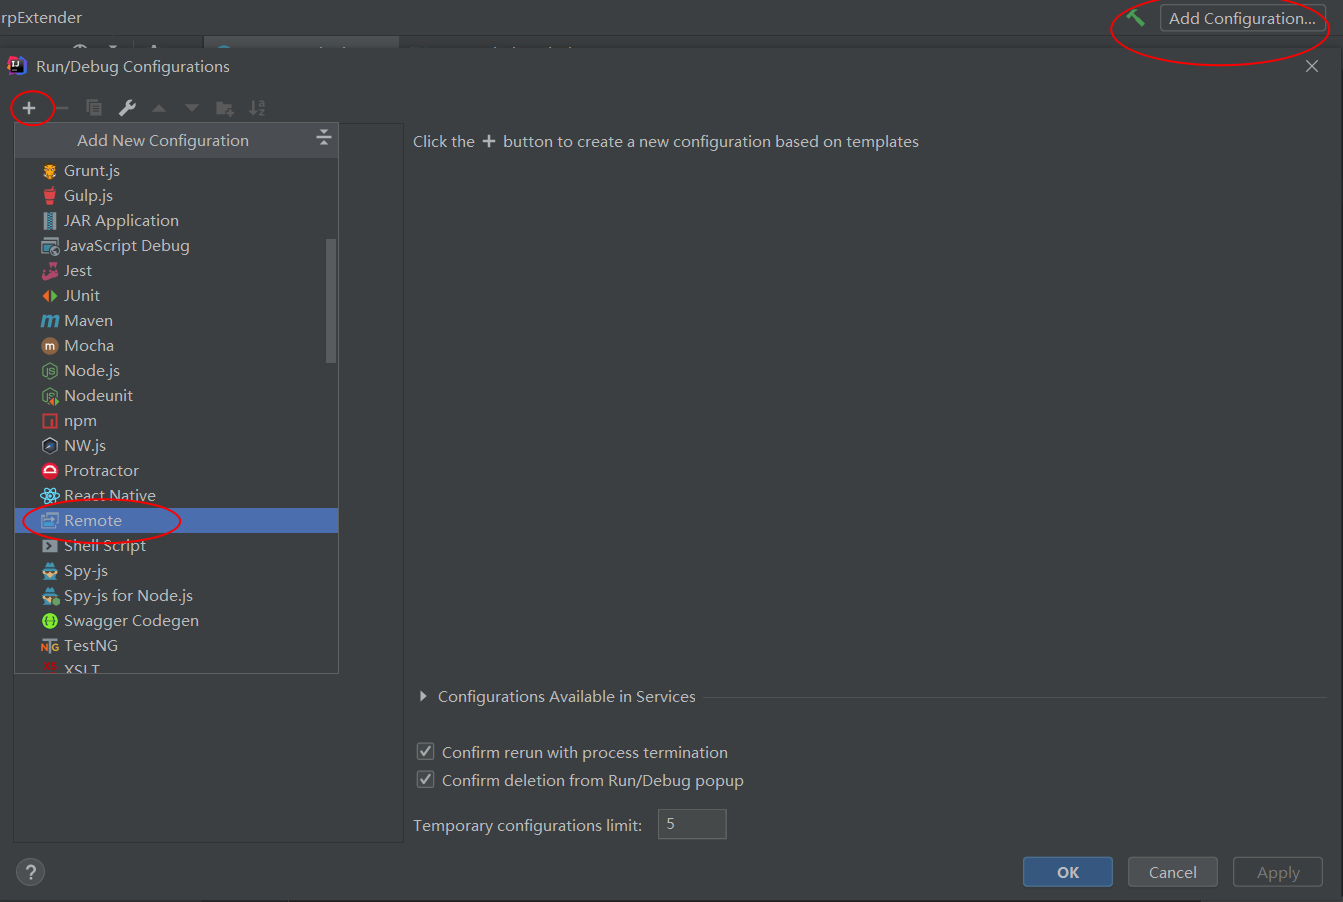
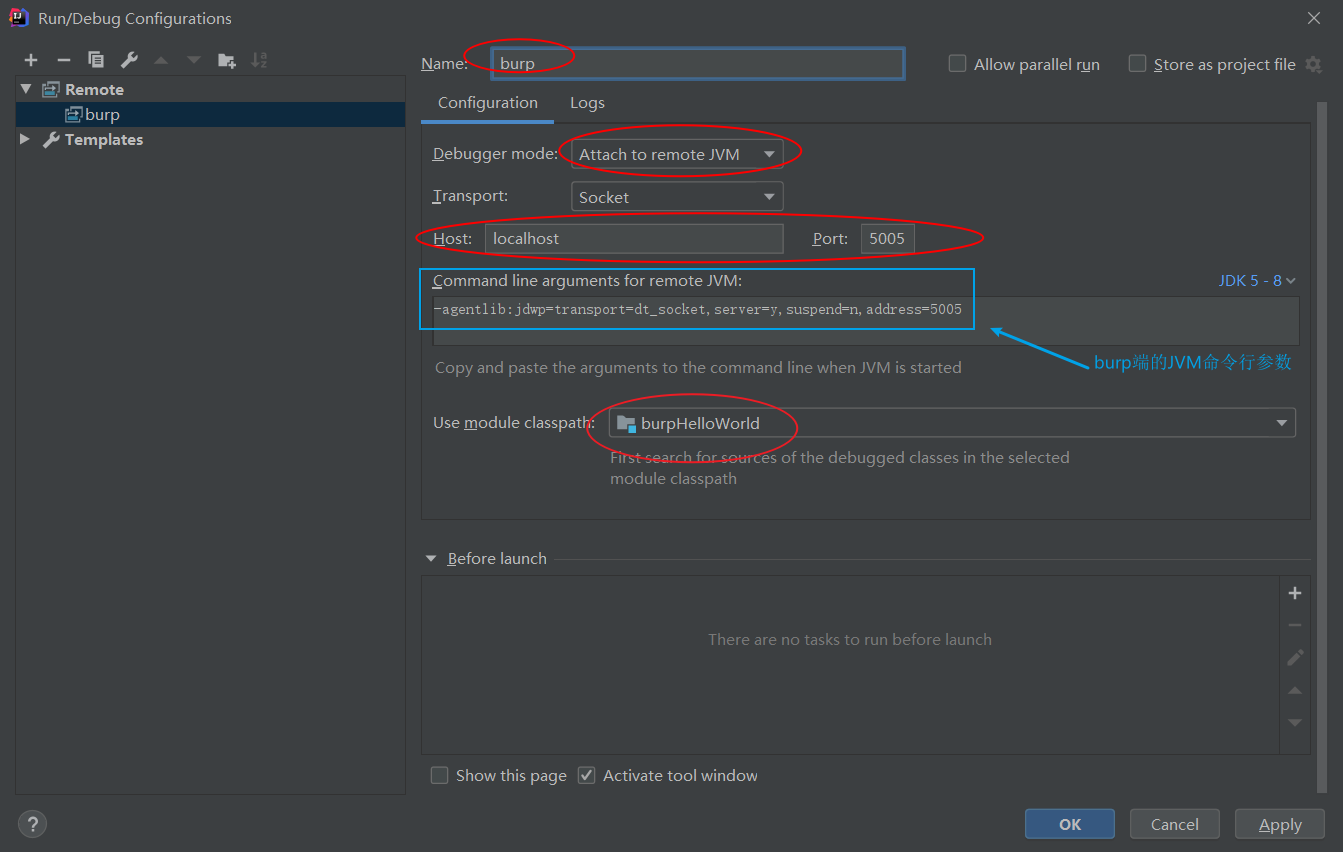
IDEA的配置
burp端的启动参数
java -agentlib:jdwp=transport=dt_socket,server=y,suspend=n,address=5005 -jar burpsuite_pro_v2020.2.1.jar
pause
破解版burp的调试方法
国内我们用的burp版本大家都懂的,一般都是破解版(使用Keygen或者helper的都有),如果要使用破解版进行调试,可以使用如下命令行参数启动burp,然后运行burp的JVM将处于监听状态,5005端口。
java -agentlib:jdwp=transport=dt_socket,server=y,suspend=n,address=5005 -Xbootclasspath/p:burp-loader-keygen-70yeartime-BurpPro.jar -jar burpsuite_pro_v1.7.37.jar

java -agentlib:jdwp=transport=dt_socket,server=y,suspend=n,address=5005 -Xbootclasspath/p:BurpHelper2019.jar -jar burpsuite_pro_v1.7.37.jar
这个命令和正版不同的地方就是需要加 Xbootclasspath/p: 这一段,可以保存个bat,方便一键启动。
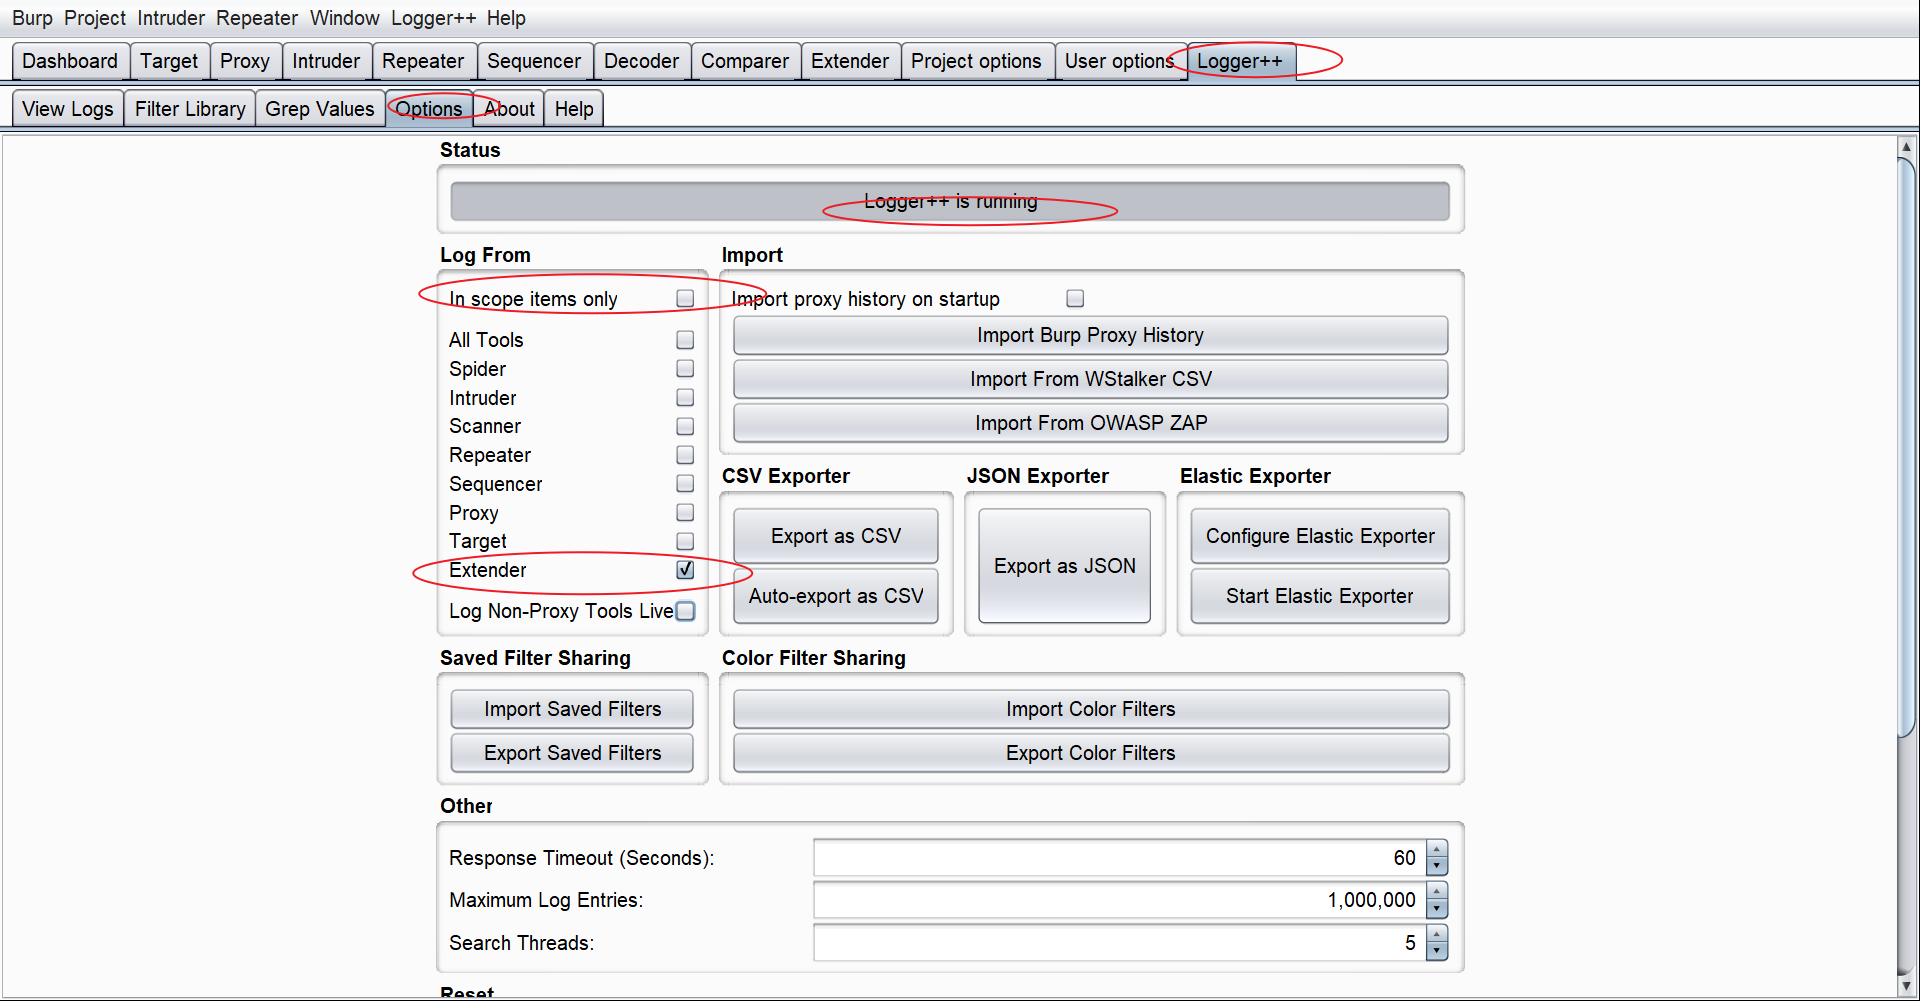
使用logger++分析数据包帮助调试
如果是写扫描插件、或者其他需要修改请求响应包的插件,我们可以使用logger++来帮助我们查看修改后的请求响应包。
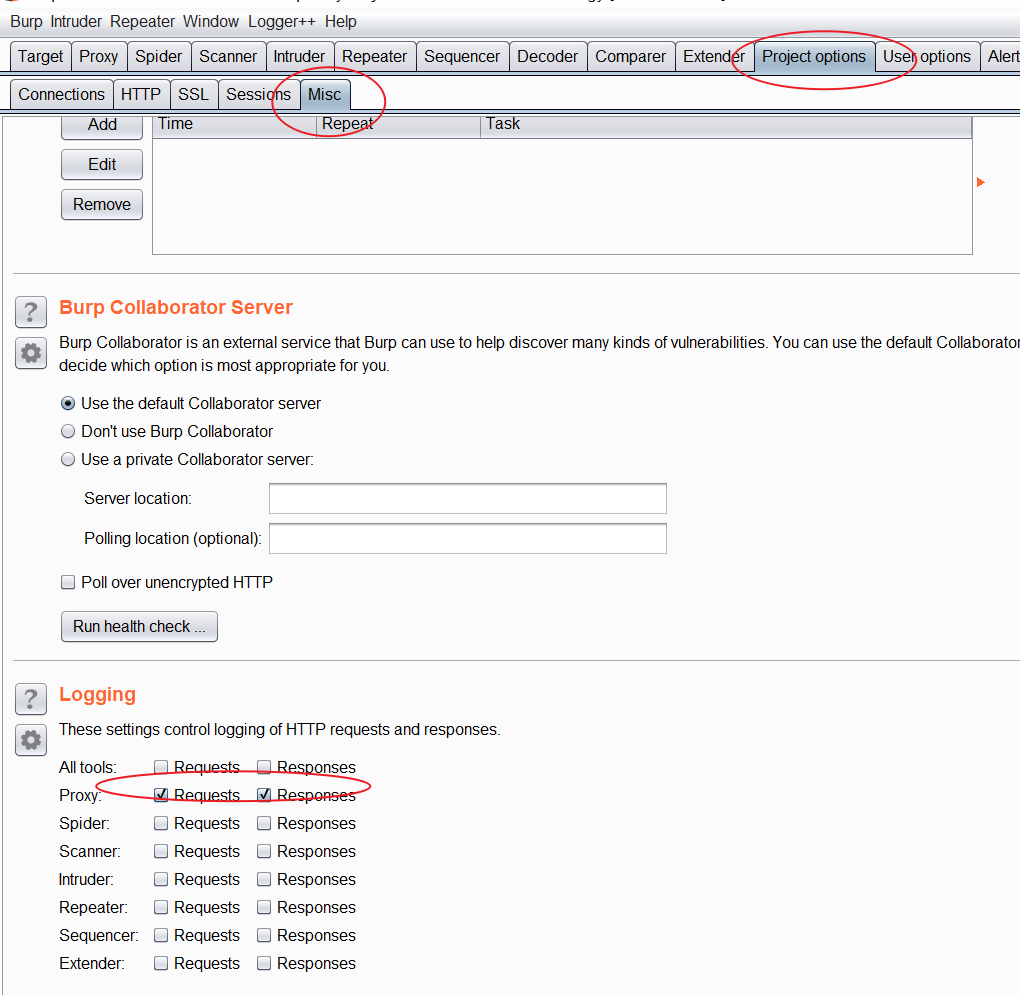
使用burp的log功能帮助分析数据包
由于logger++有时会出问题,这里再推荐一种替代方案,就是通过burp的log功能,来帮助查看数据包。
四、学习思路和核心逻辑
向官方文档和API学习
官方教学文档和API文档一定是最权威的,如果有问题,首先找官方文档。
官方各种示例代码:https://portswigger.net/burp/extender
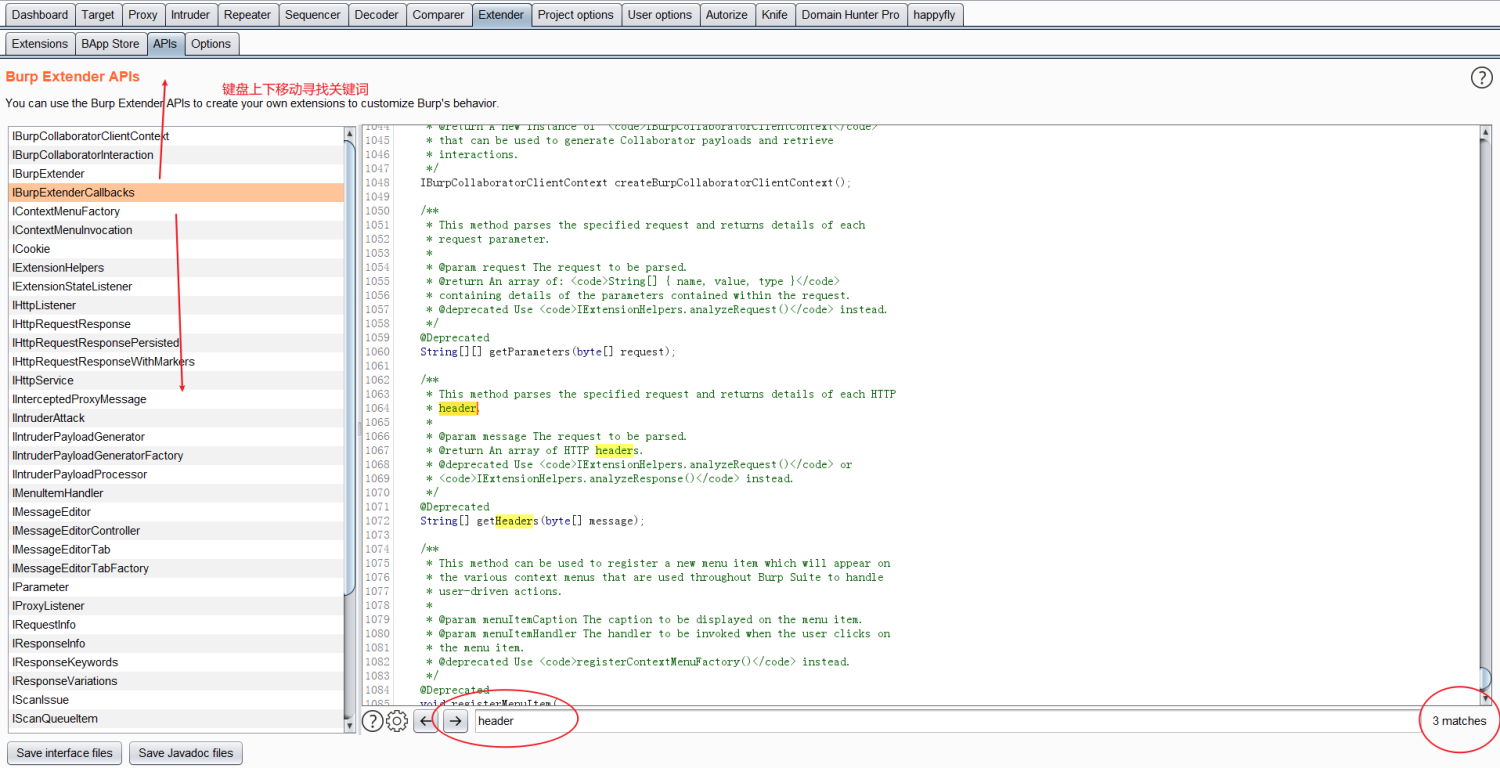
官方API文档:https://portswigger.net/burp/extender/api/
比如选择有一个需求,要获取请求包的某个header的值,但是不知道怎么做,那么我们可以尝试在API中找关键词:
向已有的优秀插件学习
可以找BApp Store上的类似功能的插件,查看他们的源码,学习作者的实现思路。
如果是非官方的BApp Store的项目,还可以直接反编译它的Jar包,查看其代码,JD-GUI了解一下
burp中的核心对象
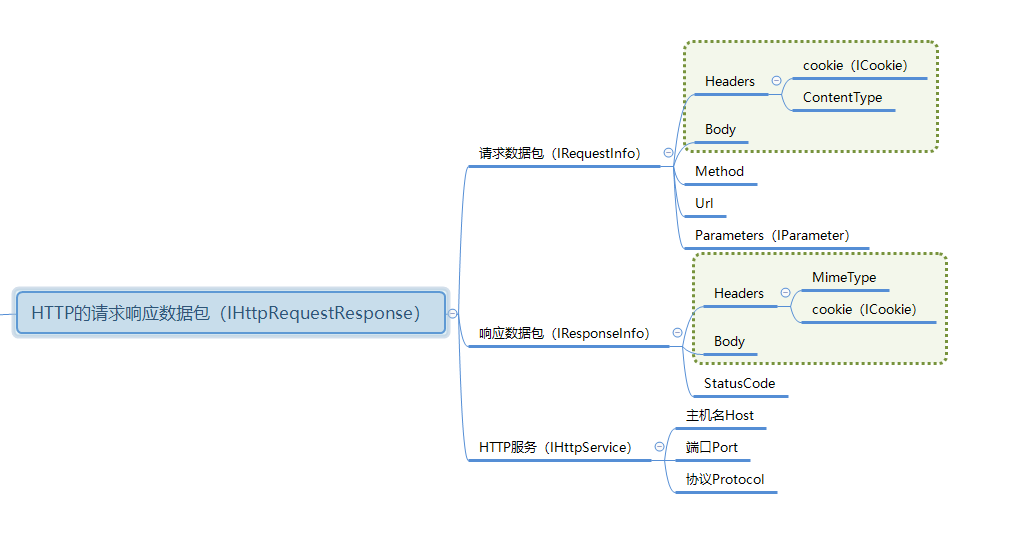
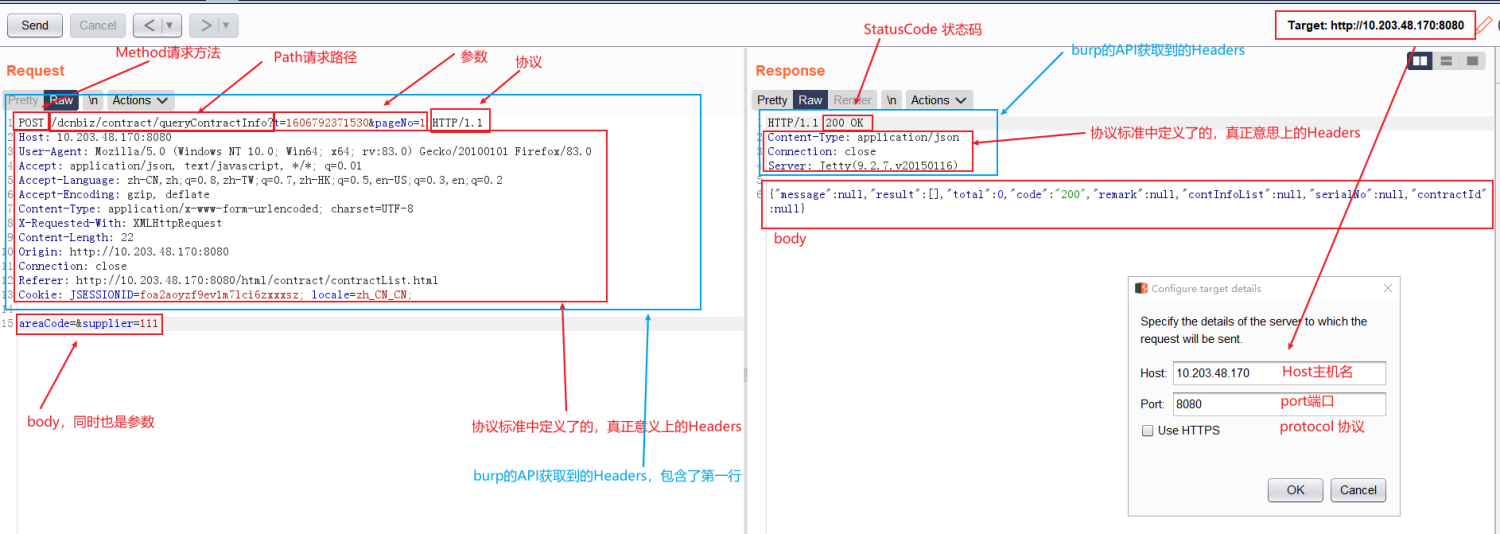
burp中最为核心的对象就是HTTP数据包,我们的所有操作、各种API接口都是围绕HTTP数据包展开的。
插件的调用逻辑
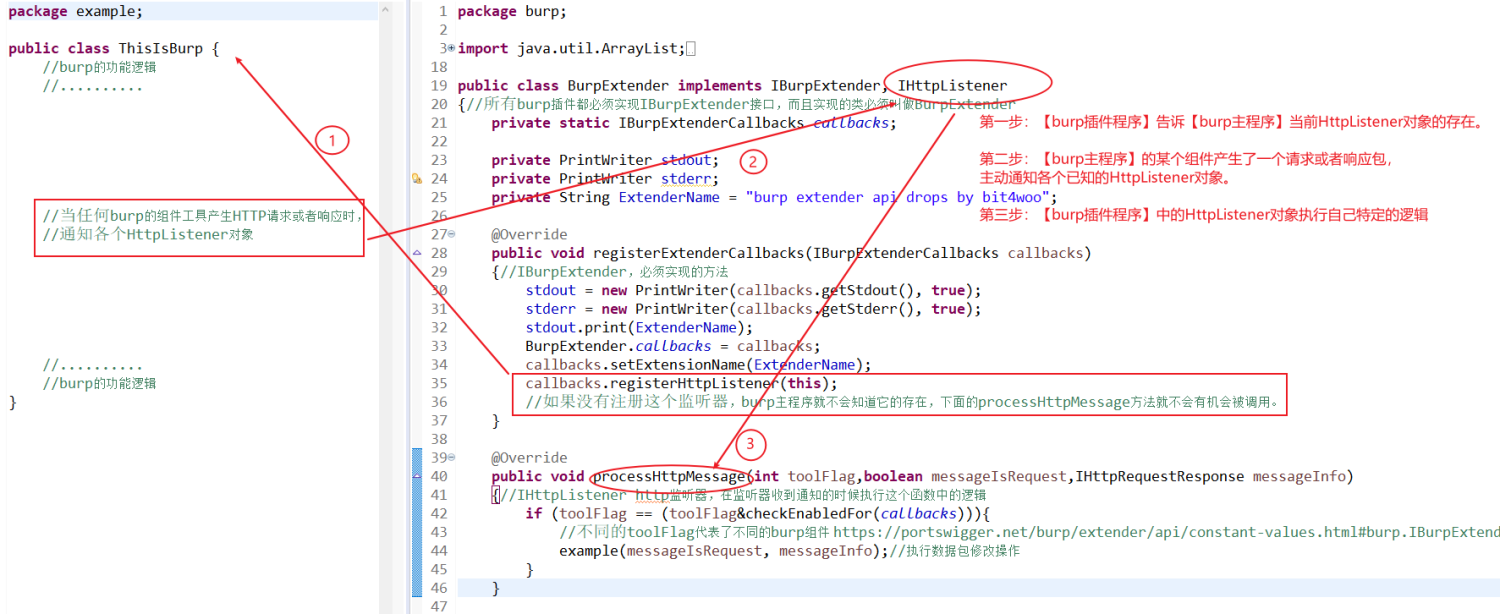
以HttpListener为例说明一下【burp主程序】和【burp插件程序】之间的调用关系。
第一步:burp插件被加载时,【burp主程序】就会去调用BurpExtender类中的registerExtenderCallbacks方法。【burp插件程序】就是通过这个方法,在其中注册HttpListener,其目的就是告诉【burp主程序】当前HttpListener对象的存在。类似地,Factory等其他需要由burp主程序主动调用或通知的对象,也需要在这个函数中完成注册。
第二步:当【burp主程序】的某个组件产生了一个请求或者响应包(比如Proxy收到了一个来自浏览的请求,Scanner主动发起了一个扫描请求,Scanner收到了扫描请求的响应包等等)都会主动通知各个已知HttpListener对象。类似地,Factory等其他对象,也会在不同的场景下被通知或者别调用,比如ExtensionStateListener,会在burp插件取消加载的时候被通知。
第三步:【burp插件程序】中的HttpListener对象在收到通知信息后,执行自己特定的逻辑(processHttpMessage函数中),进行数据包的修改或者分析。类似地,其他对象也都有实现自己逻辑的函数。
需要主动注册的对象
他们的共通特定是:会被burp主程序主动调用或者主动通知,burp主程序必须知道它们的存在,才能完成对应的功能。
各种事件监听器
ExtensionStateListener
HttpListener
ProxyListener
ScannerListener
ScopeChangeListener
各种对象构造工厂
ContextMenuFactory
MessageEditorTabFactory
IntruderPayloadGeneratorFactory
其他
ScannerInsertionPointProvider
ScannerCheck
IntruderPayloadProcessor
SessionHandlingAction
MenuItem
演示代码
https://github.com/PortSwigger/example-event-listeners/blob/master/java/BurpExtender.java
五、HTTP数据包的处理
常用HTTP信息处理方法
根据自己编写插件的需求,将常用的操作数据包的方法归集整理在了一个类当中,可以访问参考。
https://github.com/bit4woo/burp-api-common/blob/master/src/main/java/burp/HelperPlus.java
一段完整的示例代码
操作无非“增删查改”四种,下面这都代码对常用操作均进行了演示
请求包:
-
header 的获取、删除、新增、修改
-
body 的获取、修改
-
parameter 的获取、删除、新增、修改
-
发送一个新的请求
响应包:
-
header 的获取、删除、新增、修改
-
body 的获取、修改
httpService:
- host、port、protocol 的获取、修改
完整源码地址:https://github.com/bit4woo/burp-api-drops/blob/master/src/burp/Lession5.java
package burp;

import java.io.PrintWriter;
import java.util.Arrays;
import java.util.List;

public class BurpExtender implements IBurpExtender, IHttpListener
{//所有burp插件都必须实现IBurpExtender接口,而且实现的类必须叫做BurpExtender
	private IBurpExtenderCallbacks callbacks;
	private IExtensionHelpers helpers;

	private PrintWriter stdout;
	private PrintWriter stderr;
	private String ExtenderName = "burp extender api drops by bit4woo";

	@Override
	public void registerExtenderCallbacks(IBurpExtenderCallbacks callbacks)
	{//IBurpExtender必须实现的方法
		stdout = new PrintWriter(callbacks.getStdout(), true);
		stderr = new PrintWriter(callbacks.getStderr(), true);
		callbacks.printOutput(ExtenderName);
		//stdout.println(ExtenderName);
		this.callbacks = callbacks;
		helpers = callbacks.getHelpers();
		callbacks.setExtensionName(ExtenderName);
		callbacks.registerHttpListener(this); //如果没有注册,下面的processHttpMessage方法是不会生效的。处理请求和响应包的插件,这个应该是必要的
	}

	@Override
	public void processHttpMessage(int toolFlag,boolean messageIsRequest,IHttpRequestResponse messageInfo)
	{
		if (toolFlag == IBurpExtenderCallbacks.TOOL_PROXY){
			//不同的toolFlag代表了不同的burp组件 https://portswigger.net/burp/extender/api/constant-values.html#burp.IBurpExtenderCallbacks
			if (messageIsRequest){ //对请求包进行处理
				IRequestInfo analyzeRequest = helpers.analyzeRequest(messageInfo);
				//对消息体进行解析,messageInfo是整个HTTP请求和响应消息体的总和,各种HTTP相关信息的获取都来自于它,HTTP流量的修改都是围绕它进行的。

				/*****************获取参数**********************/
				List<IParameter> paraList = analyzeRequest.getParameters();
				//获取参数的方法
				//当body是json格式的时候,这个方法也可以正常获取到键值对;但是PARAM_JSON等格式不能通过updateParameter方法来更新。
				//如果在url中的参数的值是 key=json格式的字符串 这种形式的时候,getParameters应该是无法获取到最底层的键值对的。

				for (IParameter para : paraList){// 循环获取参数,判断类型,进行加密处理后,再构造新的参数,合并到新的请求包中。
					String key = para.getName(); //获取参数的名称
					String value = para.getValue(); //获取参数的值
					int type = para.getType();
					stdout.println("参数 key value type: "+key+" "+value+" "+type);
				}

				/*****************修改并更新参数**********************/
				IParameter newPara = helpers.buildParameter("testKey", "testValue", IParameter.PARAM_BODY); //构造新的参数
				byte[] new_Request = messageInfo.getRequest();
				new_Request = helpers.updateParameter(new_Request, newPara); //构造新的请求包
				messageInfo.setRequest(new_Request);//设置最终新的请求包

				/*****************删除参数**********************/
				for (IParameter para : paraList){// 循环获取参数,判断类型,进行加密处理后,再构造新的参数,合并到新的请求包中。
					String key = para.getName(); //获取参数的名称
					if (key.equals("aaa")) {
						new_Request = helpers.removeParameter(new_Request, para); //构造新的请求包
					}
				}


				/*****************获取header**********************/
				List<String> headers = analyzeRequest.getHeaders();

				for (String header : headers){// 循环获取参数,判断类型,进行加密处理后,再构造新的参数,合并到新的请求包中。
					stdout.println("header "+header);
					if (header.startsWith("referer")) {
				/*****************删除header**********************/
						headers.remove(header);
					}
				}

				/*****************新增header**********************/
				headers.add("myheader: balalbala");


				/*****************获取body 方法一**********************/
				int bodyOffset = analyzeRequest.getBodyOffset();
				byte[] byte_Request = messageInfo.getRequest();

				String request = new String(byte_Request); //byte[] to String
				String body = request.substring(bodyOffset);
				byte[] byte_body = body.getBytes();  //String to byte[]

				/*****************获取body 方法二**********************/

				int len = byte_Request.length;
				byte[] byte_body1 = Arrays.copyOfRange(byte_Request, bodyOffset, len);

				new_Request = helpers.buildHttpMessage(headers, byte_body);
				//如果修改了header或者数修改了body,不能通过updateParameter,使用这个方法。
				messageInfo.setRequest(new_Request);//设置最终新的请求包
			}
		}
		else{//处理响应包
			IResponseInfo analyzedResponse = helpers.analyzeResponse(messageInfo.getResponse()); //getResponse获得的是字节序列
			short statusCode = analyzedResponse.getStatusCode();
			List<String> headers = analyzedResponse.getHeaders();
			String resp = new String(messageInfo.getResponse());
			int bodyOffset = analyzedResponse.getBodyOffset();//响应包是没有参数的概念的,大多需要修改的内容都在body中
			String body = resp.substring(bodyOffset);

			if (statusCode==200){
				String newBody= body+"&&&&&&&&&&&&&&&&&&&&&&&&&&&&&&&&&&&&&";
				byte[] bodybyte = newBody.getBytes();
				messageInfo.setResponse(helpers.buildHttpMessage(headers, bodybyte));
			}
		}
	}
}
六、访问burp中的关键数据
主要任务:
-
鼠标右键的创建
-
从Scanner issues中收集邮箱地址
-
从Proxy history中查找最新cookie
-
发起扫描任务、发起爬行任务
-
查询和更新scope
完整源码地址:https://github.com/bit4woo/burp-api-drops/blob/master/src/burp/Lession6.java
package burp;

import java.awt.MenuItem;
import java.awt.event.ActionEvent;
import java.awt.event.ActionListener;
import java.io.PrintWriter;
import java.lang.reflect.Array;
import java.net.URL;
import java.net.URLDecoder;
import java.util.ArrayList;
import java.util.Arrays;
import java.util.List;
import java.util.regex.Matcher;
import java.util.regex.Pattern;

import javax.swing.JMenuItem;


public class BurpExtender implements IBurpExtender, IContextMenuFactory
{//所有burp插件都必须实现IBurpExtender接口,而且实现的类必须叫做BurpExtender
	private IBurpExtenderCallbacks callbacks;
	private IExtensionHelpers helpers;

	private PrintWriter stdout;
	private PrintWriter stderr;
	private String ExtenderName = "burp extender api drops by bit4woo";

	@Override
	public void registerExtenderCallbacks(IBurpExtenderCallbacks callbacks)
	{//IBurpExtender必须实现的方法
		stdout = new PrintWriter(callbacks.getStdout(), true);
		stderr = new PrintWriter(callbacks.getStderr(), true);
		callbacks.printOutput(ExtenderName);
		//stdout.println(ExtenderName);
		this.callbacks = callbacks;
		helpers = callbacks.getHelpers();
		callbacks.setExtensionName(ExtenderName);
		callbacks.registerContextMenuFactory(this);
	}

	@Override
	public List<JMenuItem> createMenuItems(IContextMenuInvocation invocation) {

		ArrayList<JMenuItem> menu_item_list = new ArrayList<JMenuItem>();

		//常用
		JMenuItem printEmails = new JMenuItem("Print Emails");
		printEmails.addActionListener(new printEmails(invocation));
		menu_item_list.add(printEmails);

		JMenuItem printCookie = new JMenuItem("find last cookie of Url");
		printCookie.addActionListener(new printCookies(invocation));
		menu_item_list.add(printCookie);

		JMenuItem scan = new JMenuItem("scan this url");
		scan.addActionListener(new printCookies(invocation));
		menu_item_list.add(scan);

		return menu_item_list;

	}

	public class printEmails implements ActionListener{
		private IContextMenuInvocation invocation;

		public printEmails(IContextMenuInvocation invocation) {
			this.invocation  = invocation;
		}

		@Override
		public void actionPerformed(ActionEvent event) {
			IScanIssue[]  issues =  callbacks.getScanIssues(null);

			final String REGEX_EMAIL = "[a-zA-Z0-9_.+-][email protected][a-zA-Z0-9-]+\\.[a-zA-Z0-9-.]+";
			Pattern pDomainNameOnly = Pattern.compile(REGEX_EMAIL);

			for (IScanIssue issue:issues) {
				if (issue.getIssueName().equalsIgnoreCase("Email addresses disclosed")) {
					String detail = issue.getIssueDetail();
					Matcher matcher = pDomainNameOnly.matcher(detail);
					while (matcher.find()) {//多次查找
						String email = matcher.group();
						System.out.println(matcher.group());
					}
				}
			}
		}
	}

	public class printCookies implements ActionListener{
		private IContextMenuInvocation invocation;

		public printCookies(IContextMenuInvocation invocation) {
			this.invocation  = invocation;
		}

		@Override
		public void actionPerformed(ActionEvent event) {
			try {
				IHttpRequestResponse[] messages = invocation.getSelectedMessages();
				byte[] req = messages[0].getRequest();
				String currentShortUrl = messages[0].getHttpService().toString();
				stdout.println(currentShortUrl);

				/*******************从Proxy history中查找最新cookie***************************/
		        IHttpRequestResponse[]  historyMessages = callbacks.getProxyHistory();
		        int len =  historyMessages.length;
		        for (int index=len; index >=0; index--) {
		        	IHttpRequestResponse item = historyMessages[index];

		            String hisShortUrl = item.getHttpService().toString();
		            if (currentShortUrl.equals(hisShortUrl)) {
			            IRequestInfo hisanalyzedRequest = helpers.analyzeRequest(item);
			            List<String> headers = hisanalyzedRequest.getHeaders();

			            for (String header:headers) {
			            	if (header.startsWith("Cookie:")) {
			            		stdout.println("找到cookie---"+header);
			            	}
			            }
		            }
		        }
			} catch (Exception e) {
				callbacks.printError(e.getMessage());
			}
		}
	}

	public class scan implements ActionListener{
		private IContextMenuInvocation invocation;

		public scan(IContextMenuInvocation invocation) {
			this.invocation  = invocation;
		}

		@Override
		public void actionPerformed(ActionEvent event) {
			try {
				IHttpRequestResponse[] messages = invocation.getSelectedMessages();
				for (IHttpRequestResponse message:messages) {
					byte[] req = message.getRequest();
					IRequestInfo analyzedRequest = helpers.analyzeRequest(req);
					URL url = analyzedRequest.getUrl();
					IHttpService service = message.getHttpService();
					boolean useHttps = service.getProtocol().equalsIgnoreCase("https");
					/******************发起扫描任务************************/
					callbacks.doActiveScan(service.getHost(), service.getPort(), useHttps, req);
					stdout.println(url.toString()+"被加入了扫描队列");
					/******************发起爬行任务************************/
					callbacks.sendToSpider(url);

					/******************查询URL是否在scope中************************/
					if (callbacks.isInScope(url)) {
						/******************从scope中移除************************/
						callbacks.excludeFromScope(url);
					}
					URL shortUrl = new URL(service.toString());
					/******************加入scope中************************/
					callbacks.includeInScope(shortUrl);
				}
			} catch (Exception e) {
				callbacks.printError(e.getMessage());
			}
		}
	}
}
七、Session Tokens 本质也是请求包的修改
https://github.com/PortSwigger/example-custom-session-tokens
八、IMessageEditorTab
九、自定义UI界面\菜单
使用windowsBuilder
十、自定义扫描插件的开发
扫描插件中更新请求的方法
String paraName = insertionPoint.getInsertionPointName(); //实在就是参数名
String paraValue = insertionPoint.getBaseValue();//实质就是原始值
byte[] modifiedRawRequest = insertionPoint.buildRequest(payload.getBytes());//用payload的值【替换】原始的值;
//insertionPoint可以是参数值、整个body、新增的URL参数、新增的body参数;但没有定义【参数名】的注入点,如果想要用payload替换参数名,就需要自己实现了(通过更改参数的方式),

long sendTime = System.currentTimeMillis();
IHttpRequestResponse checkRequestResponse = callbacks.makeHttpRequest(
baseRequestResponse.getHttpService(), modifiedRawRequest);
iscanissue
自定义扫描插入点
为什么需要自定义插入点
https://github.com/PortSwigger/example-custom-scan-insertion-points
https://github.com/PortSwigger/example-scanner-checks
如何与burp自生DNSlog进行交互
开发一个复杂的扫描插件,要注意什么?
十一、自定义Intruder Payloads
Provide custom Intruder payloads and payload processors.
https://github.com/PortSwigger/example-intruder-payloads
十二、插件配置的保存
一些小的点
-
buildRequest是在原始值后追加,还是替换原始值?
byte[] requsetbyte = insertionPoint.buildRequest((insertionPoint.getBaseValue()+payload).getBytes()); //buildRequest是在原始值后追加,还是替换原始值? 经测试是替换!!!
-
burp插件开发中,子类异常不要使用system.exit(0),否则整个burp都将退出!
-
添加issue时有2种方法(还是强烈建议使用issues.add的方法!!!避免漏报!)
1、 通过callbacks.addScanIssue ,这种方法添加的issue,中不会包含当前插入点。适合用于url级别、host级别的扫描。
    burp官网不建议使用的方法,通过它添加的漏洞,不会在scanqueue中有记录!!!【在实际的debug测试中还出现过明明调用成功,却发现连target中都没有记录的情况!!!】
2、 通过创建List<IScanIssue> issues = new ArrayList<>(); 然后在函数结尾返回这个list,然后会由burp进行issue的添加,这个适合burp是知道当前插入点的,会包含插入点名称。    这是burp建议的添加漏洞的方法,实际测试它也是有优势的!通过它上报的漏洞会在【scanqueue和 target】中都有记录。而且这个方法的整体逻辑中有自动判断去重的能力!唯一的缺点就是始终包含插入点信息!

3、值得注意的是,在我自己修改的J2EEScan中,由于通过数据组

