ESPM in Cloud Foundry
The ESPM (Enterprise Sales & Procurement Model) application is a reference application which demonstrates how to build applications on SAP Business Technology Platform (Cloud Foundry) with the Java runtime.
Description
ESPM application has 2 underlying applications
- webshop: this application is a webshopping app, which does not have any authentication.
- retailer: this application is used by a retailer to manage stocks, approve/reject sales orders. We use authentication here.
For more details about the project, please refer to https://github.com/SAP/cloud-espm-v2
Requirements
- Java8
- Maven
- CF CLI
- If you do not yet have a Cloud Foundry environment trial or enterprise account, signup for a Cloud Foundry environment trial account by following the documentation
- To deploy the MTAR we need the MTA CF CLI plugin, download the MTA CF CLI Plugin from here
- To build the multi target application, we need the Cloud MTA Build tool, download the tool from here.
- For Windows system, install 'MAKE' from here
- Simplest way to install would be by running the command
npm install -g mbt
Download and Installation
Running the application
Note: If you wish to deploy the application using MTA Build tool, then directly skip to the section Building MTAR using MBT
1. Login to Cloud Foundry
cf api <api>
cf login -o <org> -s <space>
2. Create Service
ESPM application requires 2 backing services XSUAA and HANA
- Create XSUAA service using the below command:
cf cs xsuaa application espm-uaa -c xs-security.json
Note: Make sure the application name used in the xs-security.json is unique.
- If you are using a SAP Business Technology Platform (BTP) Cloudfoundry trial account then create the HANA service following the below command
cf create-service hanatrial schema espm-hana
If you are using a productive SAP BTP Cloudfoundry account then create the required HANA services as mentioned below:
2.1 Create SAP HANA Cloud service instance with plan hana as described here : https://help.sap.com/viewer/9ae9104a46f74a6583ce5182e7fb20cb/hanacloud/en-US/784a1dbb421a4da29fb1e3bdf5f198ec.html
2.2 Create schema in SAP HANA Cloud Service instance(created in previous step) by creating an instance of the SAP HANA service broker by running the below command:
cf create-service hana schema espm-hana
If there are multiple instances of SAP HANA Cloud Service in the space where you plan to deploy this application, please modify the mta.yaml as shown below. Replace <database_guid> with the id of the databse you would like to bind the application with :
# Hana Schema
 - name: espm-hana
   parameters:
     service: hana
     service-plan: schema
     config:
       database_id: <database_guid>
   type: com.sap.xs.hana-schema
2.3 If you are using Hana, set the target database as Hana by uncommenting the same in persistence.xml file.
3. Edit Manifest
Open the manifest.yml file and edit the following:
Replace placeholders with your I/D/C numbers so that the application name and host name is unique in the CF landscape.
DATABASE_TYPE: <DB name>
Replace the <DB name> with hana for which you have created the service instance.
Replace the with the hana service instance that you have created above.
4. Build the application
Maven build the java application to package into a war file
From the root folder execute mvn clean install
Note: Its no longer required to manually setup ngdbc since the following artifact is available in maven central and also the sap_java_buildpack provides the hana jdbc driver out-of-the-box.
5. Install Dependencies
Go to web/retailer and execute npm install
Go to web/webshop and execute npm install
Make sure you have npm registry = "https://npm.sap.com/"
To setup the registry locally for each command, use the following
npm install --registry=https://npm.sap.com/ -proxy=null
6. Push the application
cf push -f manifest.yml
7. Setup Role collections
We need to setup the Role collections for the UAA, since the Retailer application needs the template role called "Retailer" assigned to the user, for the application to work.
-
In your trial account, in the left pane select Role collections under the Security tab.
-
Add a new Role collection named, "Retailer"
-
Click on the newly created "Retailer "role collection and add new Role.
-
Select the application identifier name similar to the one you have given in the xs-security.json file.
-
Select the role template and assign the Role you have created in the previous step.
8. Assign Role to the user
We need to assign the role which we have created in the previous step to the user.
-
In your trial account, in the left pane select "Trust Configuration" under the Security tab.
-
Click on the default IDP service.
-
Enter username/email and click on the add Assignment button.
-
Select the Role as "Retailer" to assign it to the user.
9. Accessing the application
To access the webshop page launch the given URL : https://<your-application-ui-route>/webshop/index.html
To access the retailer page launch the given URL : https://<your-application-ui-route>/retailer/index.html
Security Implementation
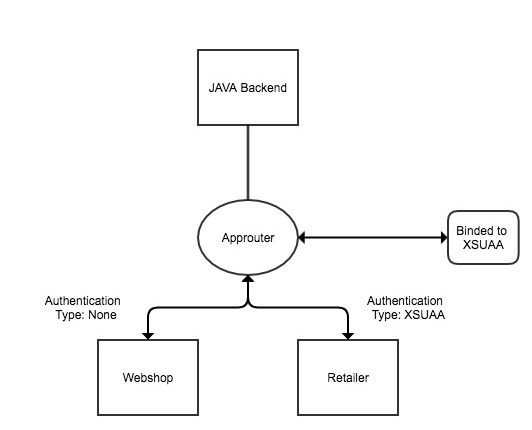
Approuter has been binded to the XSUAA service.
Authentication Method specified in the xs-app.json file with
-
Webshop - AuthenticationType: None
-
Retailer - AuthenticationType: XSUAA
Securing the Backend Application
To Secure the backend application, we need to bind the XSUAA service to the backend.

Building MTAR using MBT
The ESPM application can be packaged as a Multi Target Application which makes it easier to deploy the application. MTA application needs a MTA Development descriptor(mta.yml) which is used to define the elements and dependencies of multi-target application.
Build the application by running following command from root folder of the project: mbt build -p=cf
Deploy MTAR
If CF MTA Plugin is not installed, intall if from here
To Deploy the application navigate to mta_archives folder under your project root folder and run the below command from CLI
`cf deploy ESPM_MTA_1.0.0.mtar`
How to Obtain Support
In case you find a bug/need support please create github issues
License
Copyright (c) 2020 SAP SE or an SAP affiliate company. All rights reserved. This project is licensed under the Apache Software License, version 2.0 except as noted otherwise in the LICENSE file.