aws-samples / Ecs Canary Blue Green Deployment
Programming Languages
NOTE: Same reference architecture, but using AWS Fargate is available in fargate branch
Canary Blue/Green deployments on ECS
This reference architecture demonstrates how to execute a canary deployment for Amazon EC2 Container Service. Real world experience has show this solution to not work when the client's DNS resolver does not work as expected. If the client does not respect DNS TTL, then you must utilize another solution.
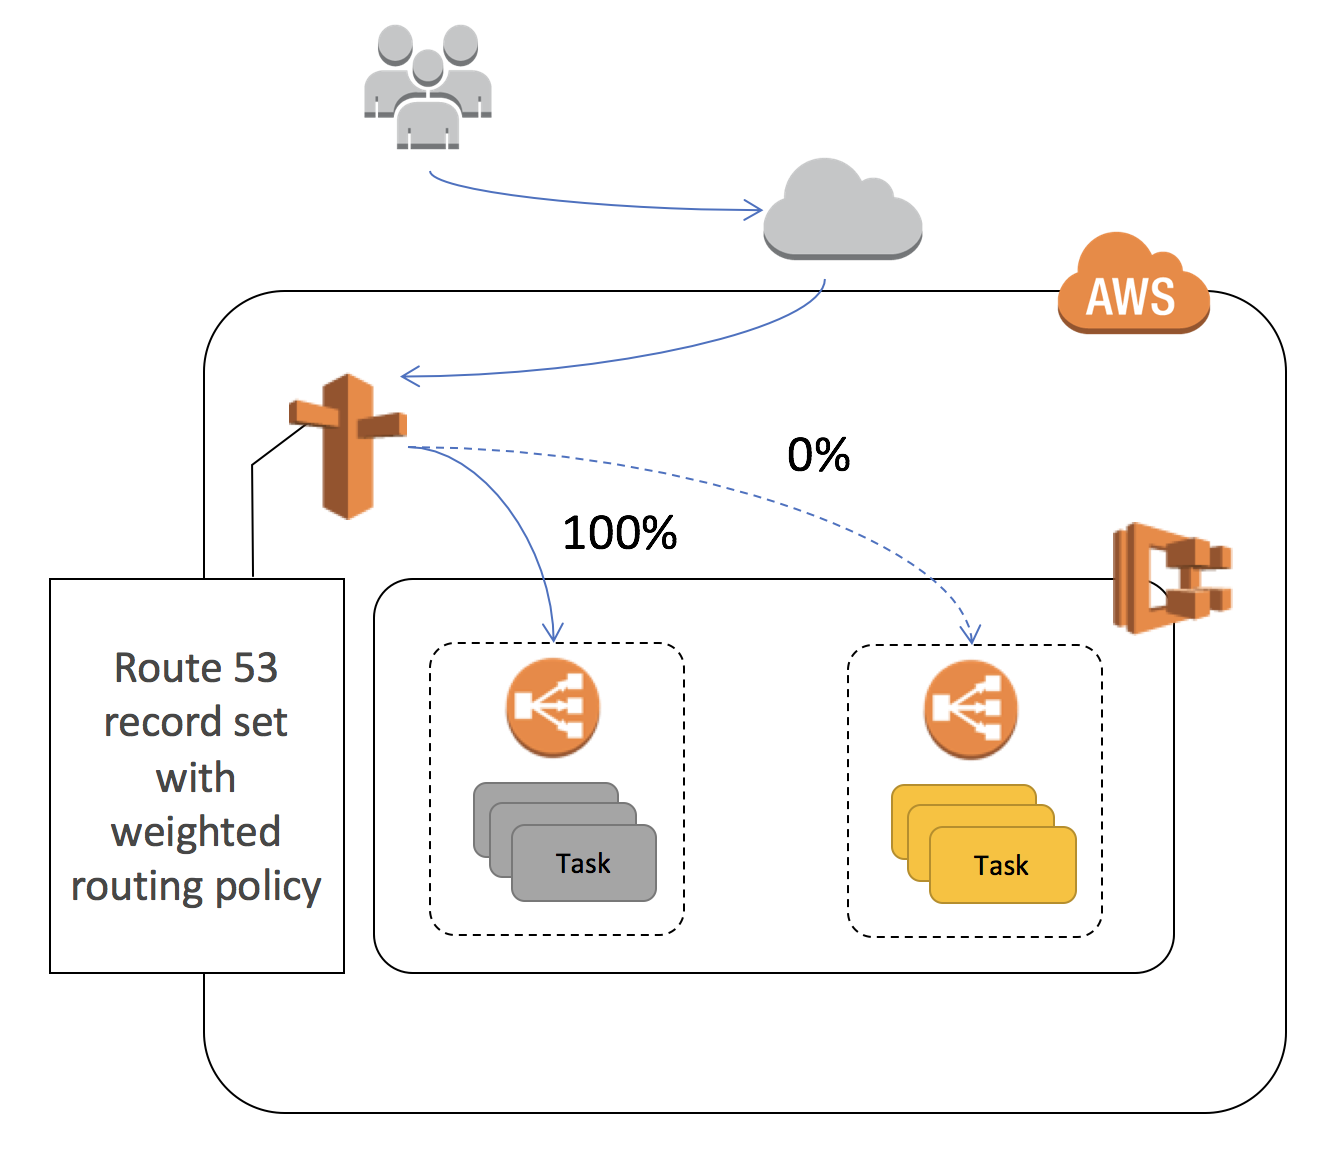
In order to provide an automated and safe method of migrating traffic from a blue deployment to a green one, this solution leverages Route53 weights to adjust the traffic flow from one ECS service to another. We associate a new service with a separate Application Load Balancer, leveraging ECS Event Streams to trigger the deployment. Once triggered, Step Functions handle the transitioning of traffic off of the blue ALB to the green one. If the Step Function detects a failure of the green service, it will automatically fail-back to the original configuration. This solution does not destroy the original service, so it does offer a safe and reliable method of transitioning traffic, including natural "connection-draining". Users will have to terminate their old blue infrastructure manually once the cut-over is complete. The one concern users may have is that DNS propogation delay of approximately 60 seconds will be introduced between migration increments.
Pre-Requisites
This example uses AWS Command Line Interface to run the steps below.
Please follow instructions if you haven't installed AWS CLI. Your CLI configuration need PowerUserAccess and IAMFullAccess IAM policies associated with your credentials.
Verify that your AWS CLI is installed and up to date.
aws --version
Get going by following these steps
1. Create a new S3 bucket from which to deploy our source code (ensure that the bucket is created in the same AWS Region as your network and services will be deployed - which should be us-east-1):
aws s3 mb s3://<MY_BUCKET_NAME>
2. Clone this repo
git clone https://github.com/awslabs/ecs-canary-blue-green-deployment.git
2a (Optional) . Switch to fargate branch , if you want to use AWS Fargate
git checkout fargate
3. Copy all templates and scripts into your bucket
aws s3 cp canary-setup.yaml s3://<MY_BUCKET_NAME>
aws s3 cp canary-deployment.yaml s3://<MY_BUCKET_NAME>
aws s3 cp --recursive templates s3://<MY_BUCKET_NAME>/templates
aws s3 cp --recursive lambdafunctions s3://<MY_BUCKET_NAME>/lambdafunctions
4. Create the CloudFormation stack for base setup
aws cloudformation deploy --stack-name <STACK_NAME. For example "canary-setup"> \
--template-file canary-setup.yaml --capabilities CAPABILITY_NAMED_IAM \
--region us-east-1 \
--parameter-overrides RecordSetName=<MY_SERVICE_NAME. For example "myservice"> \
HostedZoneName=<DOMAIN_NAME. For example "test.net."> TemplateBucket=<MY_BUCKET_NAME>
The first CloudFormation setup script will create a self-contained environment in which to test a canary blue-green deployment. It also creates a Route53 Hosted Zone and subdomain, along with a running ECS service, which we will consider the blue service.
Here are the inputs required to launch CloudFormation templates:
- S3 Bucket: Enter S3 Bucket for storing your CloudFormation templates and scripts. This bucket must be in the same region where you wish to launch all the AWS resources created by this example. For now, this region should be .
- CloudFormation Stack Name: Enter CloudFormation Stack Name to create stacks. For example "canary-setup".
- HostedNameZone: Your domain name. For example "test.net."
- RecordSetName: Enter your sub-domain name. This will point at your Application Load Balancer, where your ECS Service will be registered. For example "myservice".
It will take about 15 minutes to create all the resource, so get a cup of coffee. When you return, check out your Route53 hosted zone. You will have a new one, along with a new VPC and ECS instances plus a running task/service. If your DNS name and subdomain were valid, you can hit those addresses to see your blue container response. If not, you can simply watch things work by going to your ALB's directly and observing your StepFunction and Route53 records.
5. Create the CloudFormation stack for green service deployment
aws cloudformation deploy --stack-name <STACK_NAME. For example "canary-deployment"> \
--template-file canary-deployment.yaml --capabilities CAPABILITY_NAMED_IAM \
--region us-east-1 \
--parameter-overrides SetupStackName=<OLD_STACK_NAME. For example "canary-setup"> TemplateBucket=<MY_BUCKET_NAME>
The second CloudFormation template creates your green service. It also makes the resources that will look for your new replacement container (green-app), and react accordingly. As soon as the template completes building, it will automatically trigger the canary deployment.
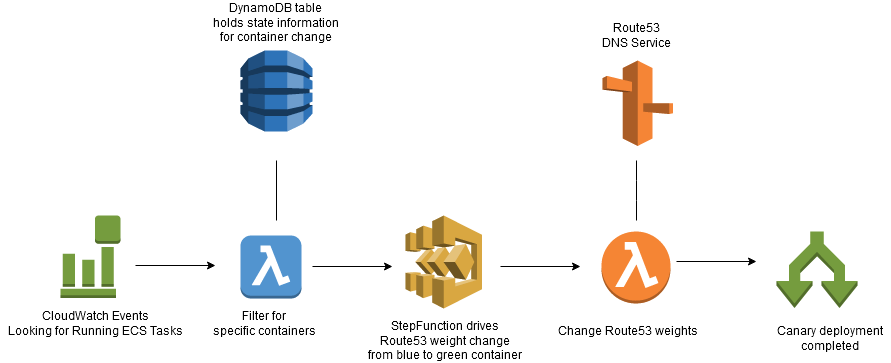
Here is the logical flow of how the solution works. We will discuss each component below.
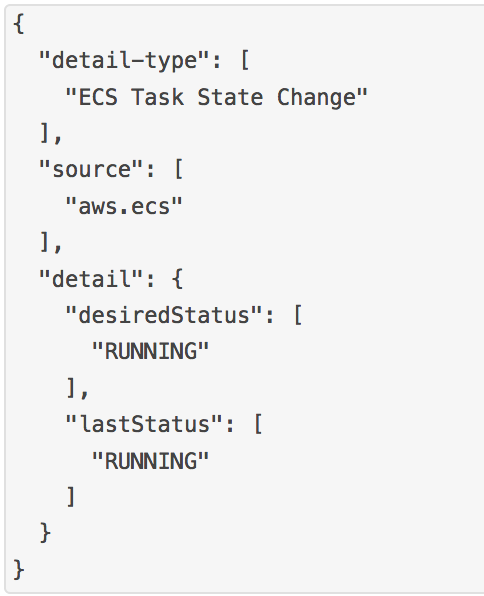
The first component is ECS Events, which tracks container or task changes. We are interested in being notified once a new task is RUNNING. We tell CloudWatch Events to send notification to a Lambda function, which will discriminate the event stream, focusing only on those relevant to our canary deployment.
This solution requires a DynamoDB table to maintain state, and to link your original blue service
with its newer green service and pertinent related information.
This is necessary since Amazon ECS Events can send events
on an "at least once" basis; this means you may receive more than a single copy of a given event.
Additionally, events may not be delivered to your event listeners in the order in which the events occurred.
We will use a small table to keep track of state, so we do not trigger the process more than once.
This DynamoDB table is called "CanaryTable".
A sample entry in the DynamoDB table looks like the above diagram. If you want to test out your own services, you will have to update the table AND update the lambda function (blue color in diagram) which filters the Event stream.
Testing
Once the second CloudFormation script completes, the new green ECS service will be started within seconds.
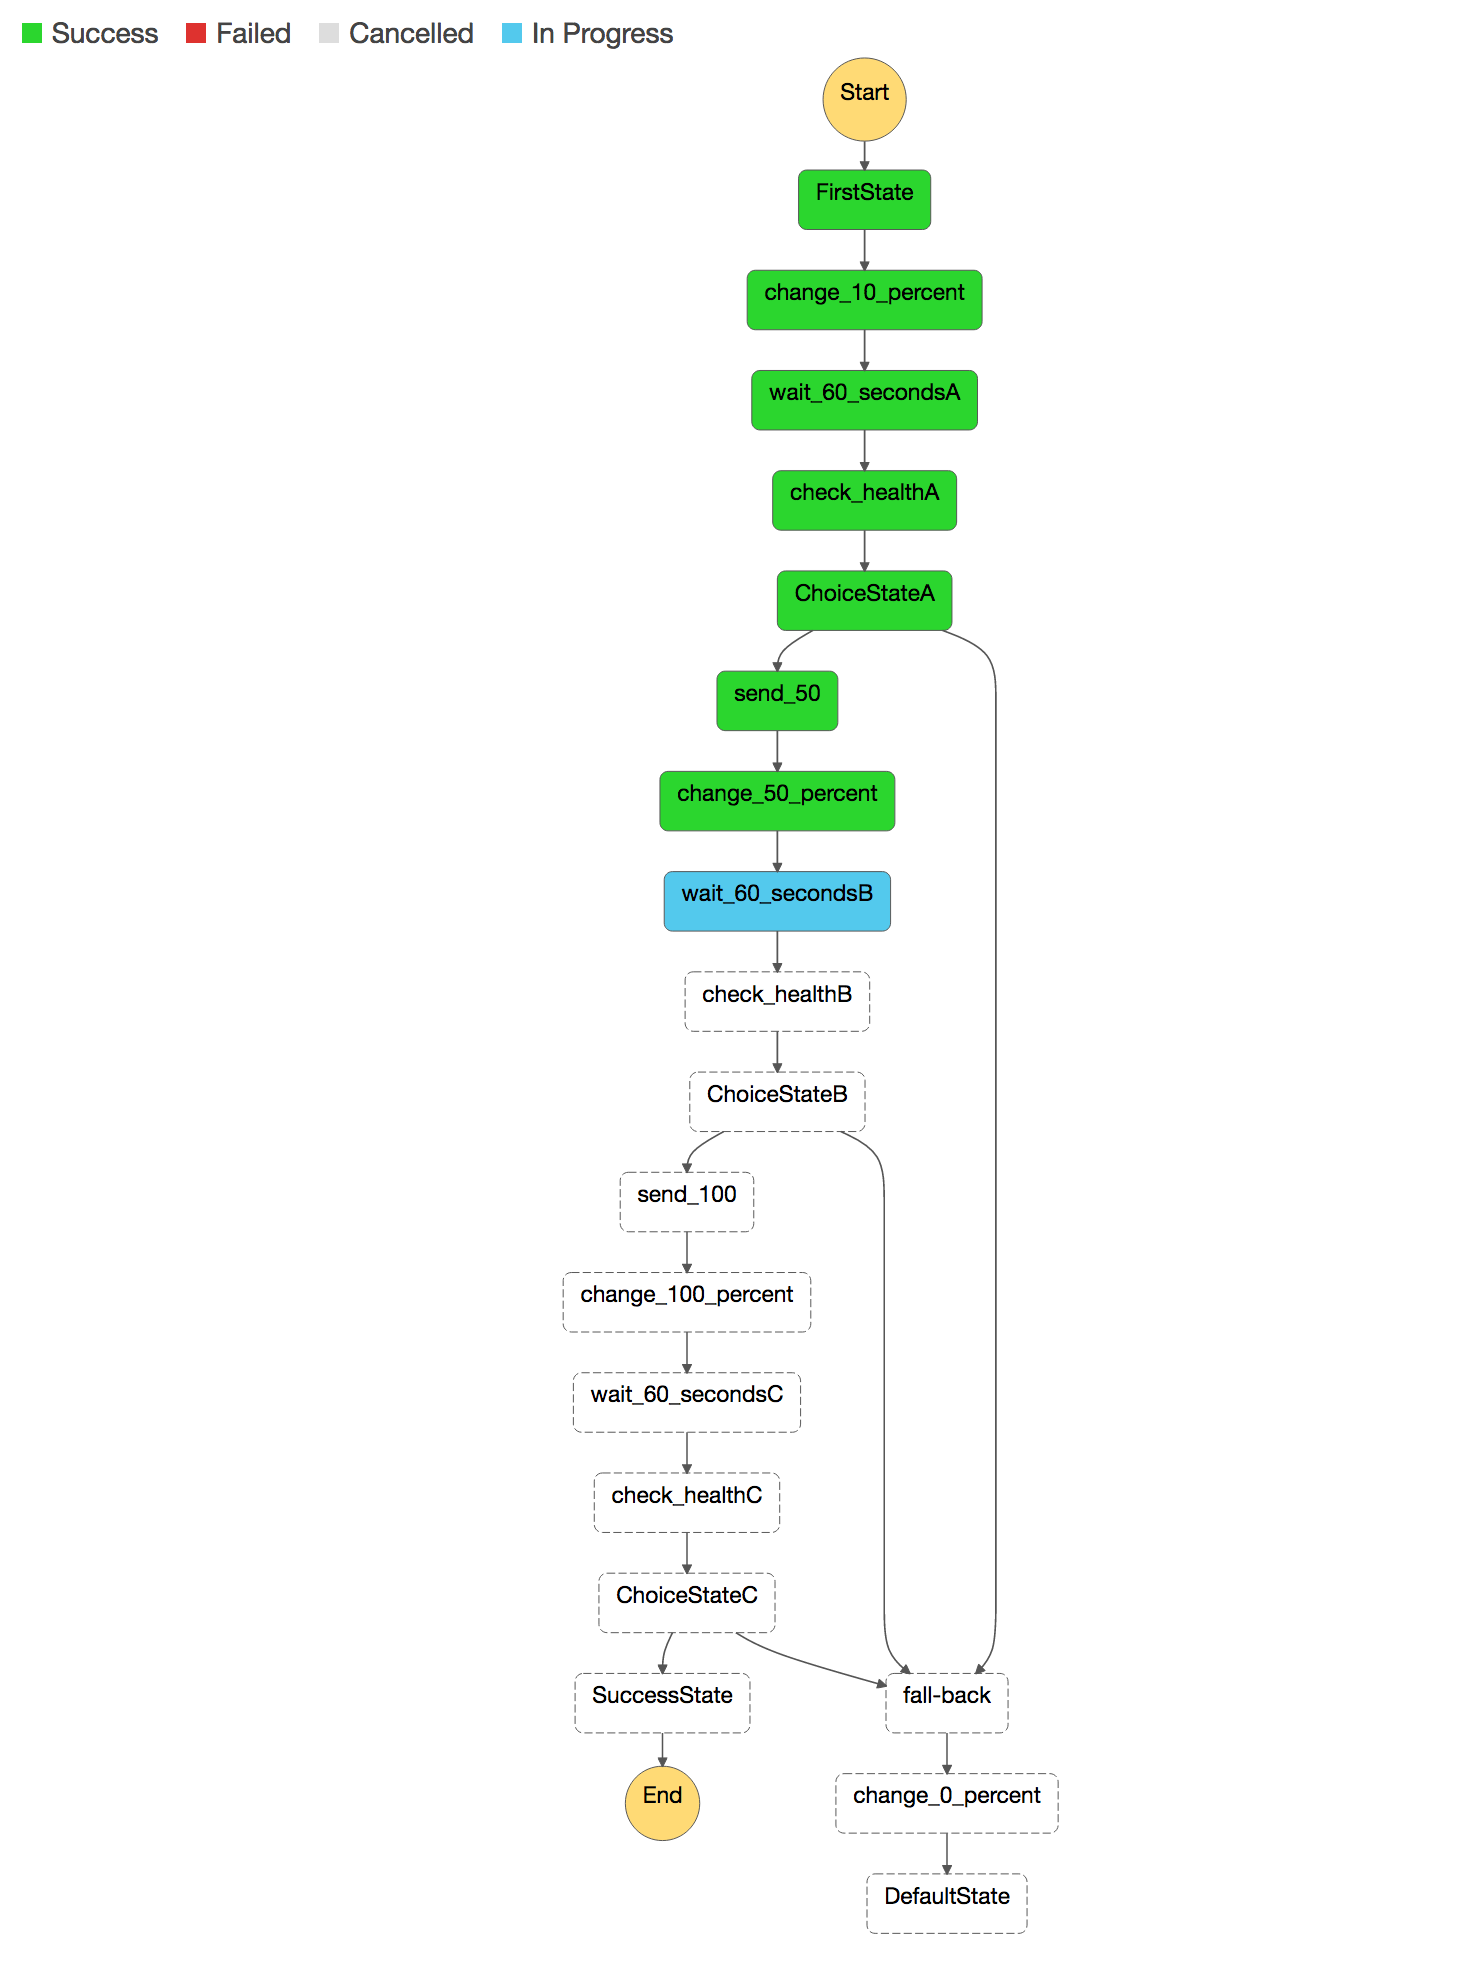
Monitor both the Route53 HostedZone screen, along with the StepFunction console. You will see the weights
change slowly at first, and then faster. The StepFunction has a GUI where you can visualize these changes.
If you want to test it again, do the following:
- Reset your Triggered item in the DynamoDB table to "false", for the "green-app" index.
- Stop your ECS task, which is associated with your green-app container. Once the ECS service notices it is dead, it will restart it. This will re-trigger the process, and you will notice the Route53 weights changing, and the StepFunction firing again.
Cleaning Up
To clean-up delete the CloudFormation scripts in reverse order. You must delete the ALB records in the Route53 HostedZone manually, or you will get a "delete-failure". Do not forget you delete your S3 bucket.
To Do or known issues
- Make sure templates can work in all regions, not just us-east-1
- There is sometimes a race condition in reading/writing the Triggered key in the DynamoDB table
- Add better error catching in the StepFunction
- Create some automation around parameters, so users do not have to fill in the DynamoDB table
Resources created in this exercise
| Count | AWS resources |
|---|---|
| 7 | AWS CloudFormation templates |
| 1 | Amazon VPC (192.168.10 and 20.0 / 24) |
| 1 | AWS Step Functions |
| 1 | Amazon S3 Bucket |
| 3 | AWS Lambda |
| 1 | Amazon ECS Cluster |
| 2 | Amazon ECS Service |
| 1 | ECS Event Stream for CloudWatch Events |
| 2 | Application Load Balancer |
| 2 | Application Load Balancer Target Groups |
| 1 | Route53 Hosted Zone |
| 1 | DynamoDB Table |
License
This reference architecture sample is licensed under Apache 2.0.


