Epidose: A privacy-preserving epidemic dosimeter based on contact tracing
This repository provides an open source software and hardware reference implementation for an epidemic dosimeter. Just as a radiation dosimeter measures dose uptake of external ionizing radiation, the epidemic dosimeter tracks potential exposure to viruses or bacteria associated with an epidemic. The dosimeter measures a person's exposure to an epidemic, such as COVID-19, based on exposure to contacts that have been tested positive. The epidemic dosimeter is designed to be widely accessible and to safeguard privacy. Specifically, it is designed to run on the $10 open-hardware Raspberry Pi Zero-W computer, with a minimal user interface, comprising LED indicators regarding operation and exposure risk and a physical interlock switch to allow the release of contact data. The software is based on the DP3T contact tracing "unlinkable" design and corresponding reference implementation code, gratefully acknowledging the team's amazing work.
Contents
- Rationale
- Overview and Use
- Technology
- Software architecture
- Hardware
- What is implemented
- What is missing
- Legal documents
- Installing the reference implementation
- Running the client code
- Running the back-end Health Authority server code
- End-to-end operation
- Development
- More information
- License
- Acknowledgements
Rationale
Contact tracing via smartphone apps has been widely touted as an important way to control and limit the spread of the COVID-19 epidemic. However, basing contact-tracing on phone apps has several limitations. According to market reports, while in higher income countries smartphone penetration is over 60%, in lower income ones it drops significantly, even to less than 20%. Even in higher income countries, smartphone penetration declines significantly with increased age and reduced income. Also, Bluetooth-based contact tracing apps may not be able to run on older smartphone models, and many fear compromised privacy when running such an app on their phone. Contact tracing app solutions benefit only those using them by flagging at an early stage one at risk. Therefore, older people who are usually less accustomed to technology (and also run greater risks) and less privileged society members are at a disadvantage.
Exposure tracking solutions can only be successful if adopted by a significant percentage of the population. In lower income regions and countries (which could be devastated by COVID-19), smartphone-based solutions are unlikely to be effective due to a lack of critical mass. The proposed epidemic dosimeter addresses the above limitations.
Given its low cost and simplicity (a single LED indicator), the epidemic dosimeter can be easily and affordably deployed to lower income countries and marginalized parts of a population serving billions. Its resemblance to existing diagnostic devices, and the ability to distribute it without exchanging documentation can also allay the fears of those who worry about the privacy implications of phone apps. By extension, its existence will also increase the acceptance of comparable phone apps.
Overview and Use


The epidemic dosimeter is a lightweight (<100g), low-cost (mass-produced <40€), self-contained device, housed in a package with a three-color LED. One simply picks it up from a distribution point without providing any personal data, charges it, and carries it around. When health authorities test people, they associate its contacts with the test results by attaching the dosimeter to a special beacon.
Dosimeter status indicator LED
- Heartbeat (double) flashing green: Normal isolated operation
- Green flashes: other exposure notification devices are being detected
- Orange flashes: other exposure notification devices are close
- Slow flashing red: User may have been exposed and should contact a health provider.
- Rapidly flashing red: User has been tested positive and needs to self quarantine. (To be used in areas lacking better means to contact people.)
Power indicator LED
- Off: Device is operating on batter
- Orange: Charging is required.
- Green: Device is being charged
Status indicator LED after pressing the WiFi button
- Constant (3 seconds) lighting green: obtained network connection
- Constant (3 seconds) lighting orange: no WPS network found in the area
- Constant (3 seconds) lighting red: failed to connect to a network
The dosimeter can last more than a full working day without charging.
As a possible extension the LED indicator can be extended to more LEDs to indicate:
- the level of exposure, and
- by tracking other encountered Bluetooth devices, the effectiveness of the user's social distancing measures.
Technology
The epidemic dosimeter works by acting as a Bluetooth Low Energy (BLE) beacon to transmit periodically-changing random identifiers, and as a corresponding beacon receiver to track individuals carrying a dosimeter located in the vicinity. By basing its code on the DP3T reference implementation it should also interoperate with the corresponding smartphone applications. The dosimeter's design calls for it to be pre-configured to obtain possibly infected contacts and software updates through a global WiFi sharing network, such as that offered by fon.
Software architecture
The dosimeter's software is designed around the following components, as depicted in the diagram at the end of this section.
beacon_tx_unlinkable_d.py: Continuously running transmitter of ephemeral identifiers. Each day a new set of identifiers are created, stored in a database, and transmitted. Every 15 minutes the transmitted identifier changes. Each day the transmitter also purges from the database ephemeral identifiers that no longer need to be retained.beacon_rx_unlinkable_d.py: Continuously running receiver of identifiers transmitted by other devices. These are again stored in a database in hashed format to allow the identification of contacts with infected persons. Each day the received also purges from the database received hashes that no longer need to be retained.create_filter.py: A program that is run on the server. It takes as input epoch identifiers and ephemeral identification hashes and produces a Cuckoo filter that can be used to check for possible contacts with infected persons.check_infection_risk.py: A program that is run on the epidemic dosimeter. It takes as input the Cuckoo filter, and calculates the number of infected contacts found in the database. The application updates the indicator LED according to the result.- SQLite database for storing the created and received ephemeral identifiers.
update_filter_d.sh: A continuously running script that downloads from the server the Cuckoo filter for the identifiers of infected contacts, and checks whether the device's user is affected or not.upload_seeds.py: Subject to an agreement between the user and the health authority, implemented through a physical interlock and a suitable protocol, this uploads to a health authority's server the seeds used for transmitting ephemeral ids of a user found to be infected, using a supplied key.upload_seeds_d.sh: Continuously waits for user authorization to upload an affected user's ephemeral id seeds to the Health Authority.watchdog_d.py: Monitors the correct operation of all components and flashes the green LED to indicate correct operation. It also resets the device in case of a failure.update_client.sh: Runs periodically to download an updated filter, check for contacts with infected persons, and perform any required software updates.ha_server.py: The health authority's server, which receives lists of infected person's contacts and provides filter updates.- A device running in testing centers acts as a user interface and source of trust. It allows health professionals, in coordination with the epidemic dosimeter's user, handle the uploading of its contacts (at that point, or when the test results are out), providing a single-use key to authorize and authenticate the upload.
shutdown_epidose: Performs a graceful shutdown and removes power from the device in order e.g. to ship it. From the command line, runsudo /opt/venvs/epidose/bin/shutdown_epidose.sh -iin order to perform this shutdown. Note that for this to work the device must be running on battery, with no external power being provided.wps_scanner_d.sh: Supports WiFi Protected Setup (WPS) to obtain a network connection by using the push button configuration (PBC). It always tries to connect to the network with the strongest signal. If a network connection is obtained, it kills the sleep process of update_filter_d.sh to force it to update the cuckoo filter.

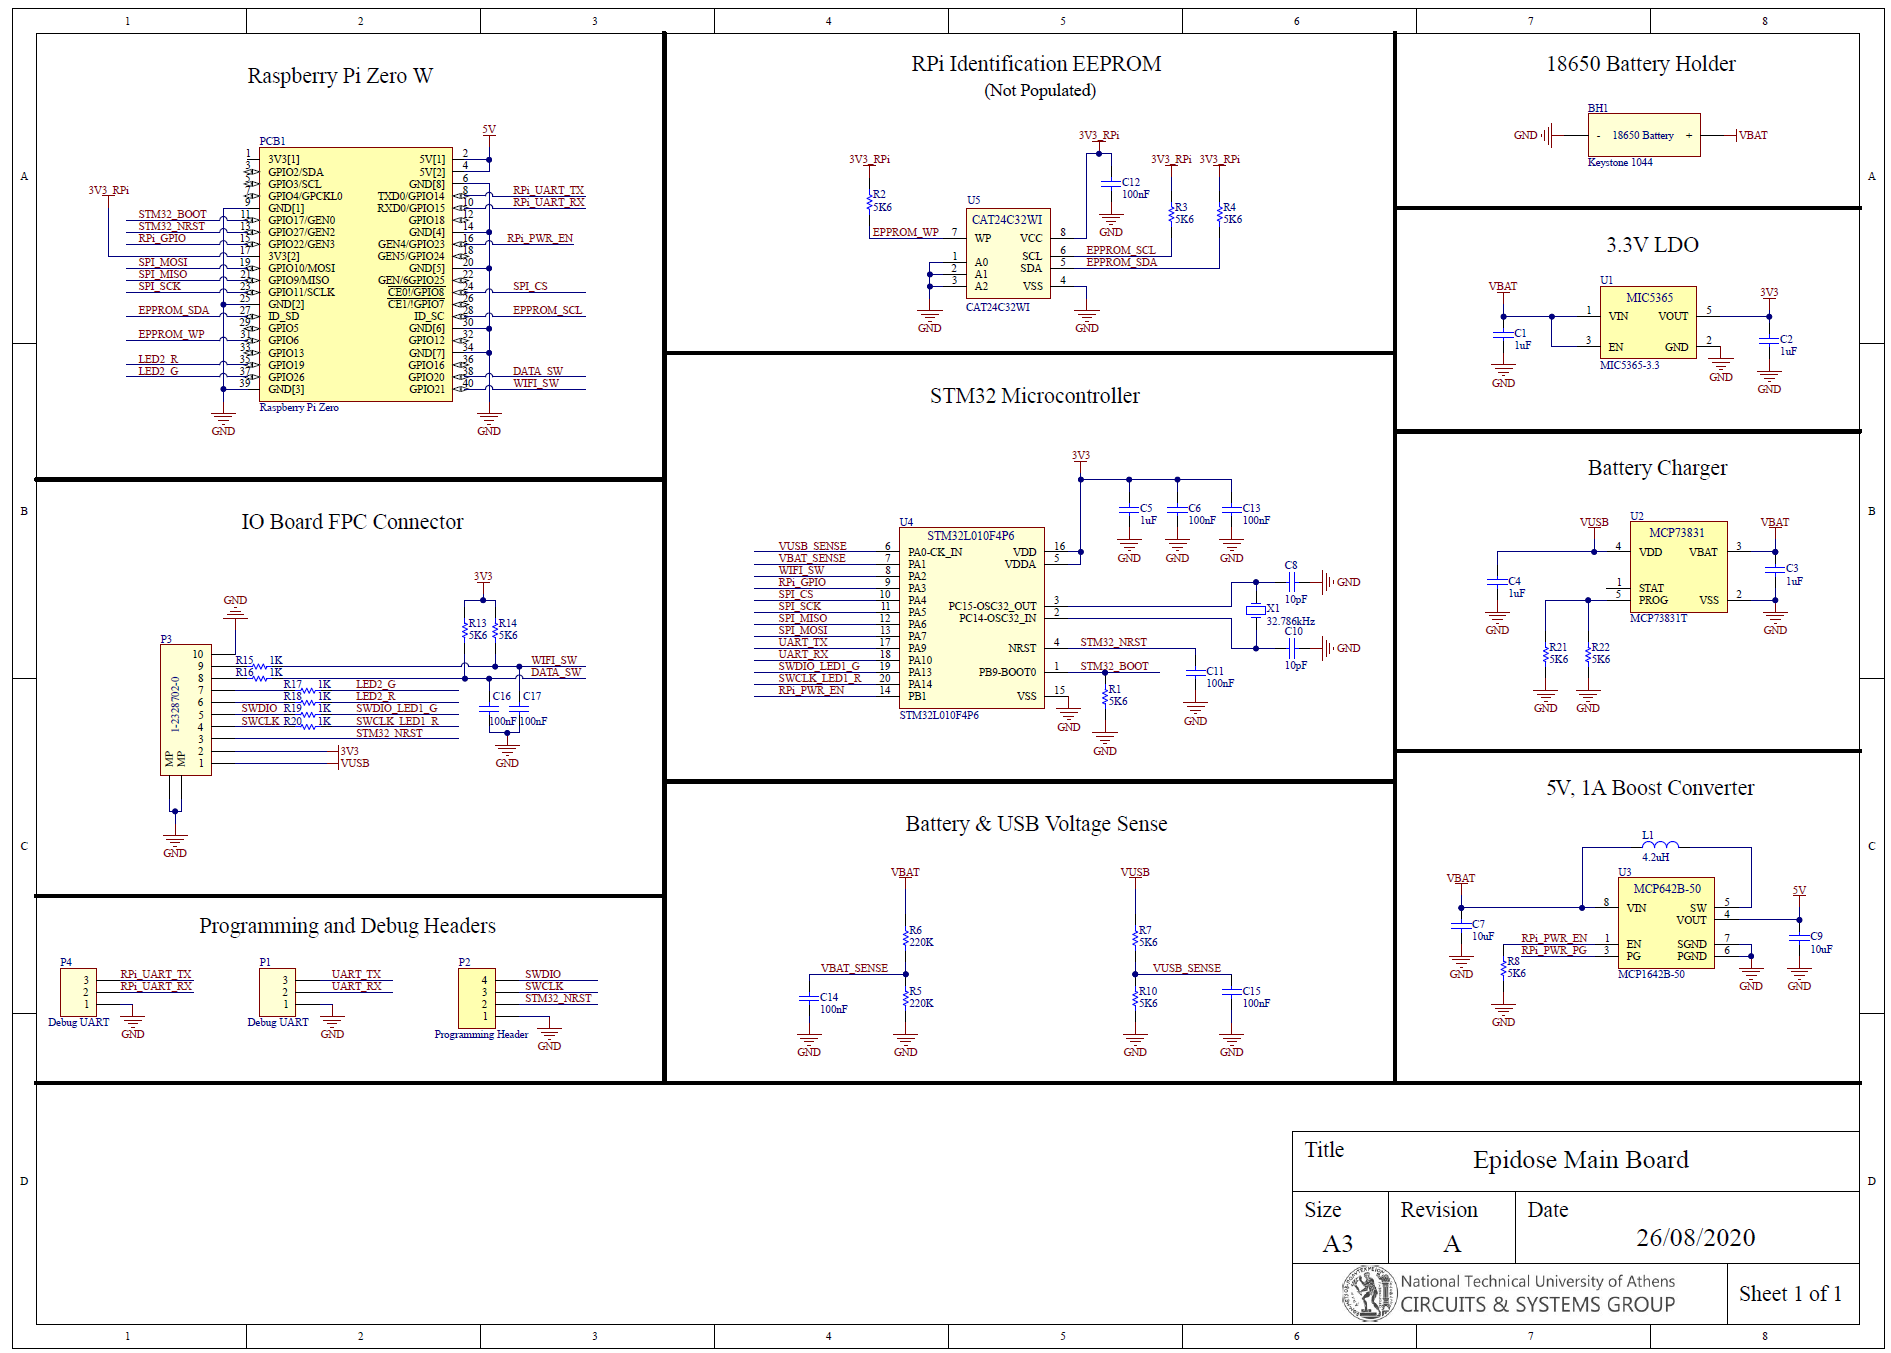
Hardware
The device consists of three boards: a Rasberry Pi Zero-W, sandwiched between a controller board that controls power and provides a real-time clock, and an interface board that provides the LEDs, switches, and the USB charging port.
The repository contains the hardware bill of materials, PCB Gerber files, compiled firmware, and firmware source code (as an STM32CubeIDE project), which can be used for mass-manufacturing the current Epidose device.
Instructions for building an earlier, prototype, device can be found here.
Controller board
Interface board

What is implemented
Currently all the device-end functionality has been implemented and tested, with a device reporting an infected status after (manually) downloading a filter constructed from identifiers actually transmitted and received over Bluetooth.
The following programs are available in the epidose directory.
device/beacon_tx_unlinkable_d.pydevice/beacon_rx_unlinkable_d.pydevice/check_infection_risk.pydevice/upload_seeds.pydevice/update_filter_d.shdevice/upload_seeds_d.shback-end/create_filter.pyback-end/ha_server.py
All programs can be run with a --help argument to obtain usage information.
What is missing
In some places the code takes shortcuts or makes simplifications (e.g.
not using the number of messages and their strength (RSSI) for estimating
the infection risk.) These are marked in the code with TODO comments.
Also missing is the health authority user interface and upload key protocol, which must be designed in cooperation with each health authority where EPIDOSE will be deployed.
Legal documents
The doc directory contains (in English and in Greek) templates
for the EPIDOSE privacy policy and the ΕPIDOSE pilot
participant’s consent information sheet.
These must be tailored according to the particular deployment scenario.
Installing the reference implementation
Currently, there are two ways of installing the reference implementation. You may install it on an existing Raspbian system or create a new image. The two alternatives are presented below.
Install on an existing system
You'll need to install the required libraries and project. Here is how you can do it under the Ubuntu GNU/Linux distribution.
sudo apt-get install git libbluetooth-dev libglib2.0-dev python3-dev python3-setuptools shellcheck sqlite3 virtualenv dh-virtualenv debhelper supervisor
git clone https://github.com/eellak/epidose
cd epidose
virtualenv venv -p /usr/bin/python3
. venv/bin/activate
pip3 install -e .
Create a new image
You'll need to download a vanilla Raspbian distribution (Lite version is suggested for this purpose) and burn it on a microSD card. Then perform the following steps on your microSD card while it is mounted on your workstation.
- Enable the SSH daemon by creating an empty file in the boot directory (of the image) named as "ssh" (without any extension)
- Allow the device to connect to your network by creating a "wpa_supplicant.conf" file in the boot directory (of the image) with the following content:
ctrl_interface=DIR=/var/run/wpa_supplicant GROUP=netdev
update_config=1
country=Initials of your country's code, e.g., GR

network={
	ssid="The name of your WiFi network"
	psk="The password of your WiFi network"
}- Move the microSD card from your workstation to the Raspberry-Pi and start the device
Then execute the following steps after obtaining an SSH connection to your Raspberry-Pi. To find the device's IP address, check your router's or access point's status or logs.
-
Create an authorized keys file to connect to the device as user
piusing a private key. This step is required so that you can be able to login later, once thepiuser is replaced by theepidoseuser. -
Update the operating system.
sudo apt-get update
sudo apt-get upgrade- Install the following packages on your Raspberry-Pi device.
sudo apt-get install git ansible- Execute the following commands.
git clone https://github.com/eellak/epidose
cd epidose/epidose/device- Execute the Ansible script by providing the relevant command-line arguments (see section)
sudo ansible-playbook install_and_configure.yml --tags "production|development" --extra-vars "eduroam_network_psk=password_of_the_epidose_eduroam_account epidose_backup_network_psk=password_of_the_epidose_backup_wifi"
cd /home/epidose/epidose/epidose/device
sudo ansible-playbook install_and_configure.yml --tags "delete"-
After executing this step, you will be able to login as user
epidosewith the private key you established previously for logging in as userpi. Moreover, after executing the delete tag of Ansible, the defaultpiuser will be deleted. Therefore, you can only login as userepidose. -
To apply the configuration changes, you will need to reboot the device. First, you need to
exitfrom the currentsshconnection, then login as userepidose, and execute the reboot command in the terminal.
exit
ssh epidose@IP_address_of_your_device
sudo reboot
Ansible Tags And Extra Variables
The delete tag remoces the default pi user and it does not require any command-line arguments. To install and prepare the environment to run the epidose, the tag production should be used. In case you are willing to help the development team of epidose, execute the Ansible script using the development tag. The tag development also runs the epidose software. In the case of production and development, all the defined extra-vars are mandatory run epidose.
extra-vars
- password_of_the_epidose_eduroam_account is the password of the Eduroam account set up for Epidose.
- password_of_the_epidose_backup_wifi is the password of the Epidose SSID network.
Running the client code
After downloading the project and setting up the development dependencies (see below), you can run the client code on a Raspberry-Pi Zero-W as follows.
make package
sudo make install
You can then monitor the device's operation with the following commands:
tail -F /var/log/beacon_tx
tail -F /var/log/beacon_rx
tail -F /var/log/upload_seeds
tail -F /var/log/update_filter
You can also obtain a report of what has been stored in the device's
database by running utils/client-db-report.sh.
Running the back-end Health Authority server code
Execute the following steps to install the ha-server through the Ansible script
on the machine you like to deploy it.
The steps below will also install and configure an Nginx server
for the ha-server.
Note that even an empty update.sh file should exist in the /var/lib/epidose path
before executing the deploy.yml script, otherwise the server will throw a not found messsage
anytime a device tries to get a new update.
sudo apt install git ansible
git clone https://github.com/eellak/epidose
sudo touch /var/lib/epidose/update.sh
cd epidose/epidose/back_end
sudo ansible-playbook deploy.yml --extra-vars "server_name=hostname_of_server"
The server_name can be the domain name you have bought (e.g., epidose.ellak.gr)
After executing the above script, the ha-server should be up and running.
You can then monitor the server's operation with
tail -F /var/log/ha_server_error_log and
tail -F /var/log/ha_server_access_log.
End-to-end operation
With the client and server running, you can run an end-to-end
contact tracing scenario between an affected user and a user who
is at risk, as follows.
The example below assumes that the Health Authority server has a DNS
record named ha-server.
On affected user's device
To upload the past half-hour ephemeral id seeds to the health authority server press the device button is pressed to signify the user's consent. Normally, this will happen after the Health Authority provides to the user's device an upload key and information regarding the period of several days over which the user was affected (rather than half-hour).
If you don't have a device with a physical button you can instead run the following command.
sudo venv/bin/python epidose/device/upload_seeds.py -d -v -s http://ha-server:5010/ $(date +'%Y-%m-%dT%H:%M:%S' --date='30 min ago') $(date +'%Y-%m-%dT%H:%M:%S')On the Health Authority server
Run the following command to create a new Cuckoo filter, which will include the contacts of the affected user.
sudo venv/bin/python epidose/back_end/create_filter.py -v -d /var/lib/epidose/filter.binOn user's at risk device
Wait for at most six hours for the Cuckoo filter to be updated. Alternatively, run the following command to download the new Cuckoo filter and check for matching contacts.
sudo epidose/device/update_filter_d.sh -l ha-server:5010The filter is updated every six hours.
To force the downloading of a new filter,
remove the downloaded filter (sudo rm /var/lib/epidose/client-filter.bin)
and rerun the update_filter_d.py script.
Database report example
Received (and retained) ephemeral id hashes

Day         Ephid Hash  Count       RSSI
----------  ----------  ----------  ----------
2020-05-07  EEF9237FCB  306         -50
2020-05-07  38EBD1F502  287         -50
2020-05-07  5B487CFBD3  131         -48
2020-05-07  EBEA03EC12  585         -48
2020-05-07  7940535B20  595         -51
2020-05-07  1C807D7D6E  1           -52
2020-05-07  43DFA3FEDB  600         -50
2020-05-07  E3618D8B33  371         -51
[...]


Stored (and retained) sent ephemeral ids

Timestamp            Epoch       Seed        Ephid
-------------------  ----------  ----------  ----------
2020-05-07 21:00:00  1765428     504AE4E8AF  F826011CC6
2020-05-07 21:15:00  1765429     8540B29ADD  F3406EBCD8
2020-05-07 21:30:00  1765430     133652DF10  CB4F3126EF
2020-05-07 21:45:00  1765431     3C3C914494  9A93E9BBFC
2020-05-07 22:00:00  1765432     D057DA48EE  71E6980B2A
2020-05-07 22:15:00  1765433     0F9133C578  F1D72EAC4A
2020-05-07 22:30:00  1765434     07A56ABD78  675C1E552A
2020-05-07 22:45:00  1765435     710ACBD99C  7FCBF944A5
[...]
Update user's device
Apart form fetching the Cuckoo filter, the device will also fetch shell scripts from the health authority server to update the device. The update scripts can update the Epidose software, the kernel, the microcontrollers' firmware, etc. By default the update script should be an empty file. An update script that updates the Epidose daemons could be as follows.
#!/bin/sh

# Go the local repository
cd /home/epidose/epidose

# Pull the latest changes from the remote production branch
git pull origin production

# Change pulled files owner and group from root to epidose
git ls-files | xargs chown epidose:epidose

cp -r epidose dp3t /opt/venvs/epidose/lib/python3.7/site-packages/
cp epidose/device/shutdown_epidose.sh \
	epidose/device/upload_seeds_d.sh \
	epidose/device/update_filter_d.sh \
	epidose/device/util.sh \
	epidose/device/wps_scanner_d.sh /opt/venvs/epidose/bin/

# Reboot to apply changes and restart all epidose daemons
reboot
In the above case the device is rebooted after obtaining the new Epidose updates in order to restart the Epidose daemons. If the update filter is not affected by an update one could restart selective daemons by running supervisorctl with appropriate arguments.
Update server's URL
To update the server's URL where the epidose device fetchs the filters and updates, modify the the URLs of the update_filter, upload_seed, and wps_scanner daemons from the epidose/device/supervisord.conf file. After commiting the changes add an update.sh file on the previous server link (not the newly add server URL), to update the devices. An update script to change the server's URL can be as follows.
#!/bin/sh

# Go the local repository
cd /home/epidose/epidose

# Pull the latest changes from the remote production branch
git pull origin production

# Change pulled files owner and group from root to epidose
git ls-files | xargs chown epidose:epidose

# Copy the supervisord configs the update daemons server URL
cp epidose/device/supervisord.conf /etc/supervisor/conf.d/epidose.conf

# Reboot to apply changes
reboot
An update script for testing installed images before deployment could be as follows. Through this, (given an appropriate WiFi setup) testing a new board involves observing the heartbeat and then observing the green steady LED. After the green LED turns off the device is also turned and is ready for shipping.
#!/bin/sh

touch /tmp/pre-update

# No updates on development boards
test -f /tmp/development && exit

# Allow watchdog to run for 5'
sleep 300

# Turn on green LED for 5'
cd /home/epidose/epidose
supervisorctl stop epidose:watchdog
venv/bin/python epidose/device/device_io.py -G
sleep 301

touch /tmp/post-update

# Turn off device
/opt/venvs/epidose/bin/shutdown_epidose.sh -i
Development
For development, you should install the development and test dependencies:
pip3 install -e ".[dev,test,deploy]"You should also install the proper pre-commit-hooks so that the files stay formatted:
pre-commit installIt's a good idea to clone and regularly integrate the DP-3T reference implementation, which is the base of this code's cryptographic protocol.
git remote add dp3t https://github.com/DP-3T/reference_implementation.git
git fetch
To login into a production device over WiFi, follow these steps.
- Press the WPS button to establish a WiFi connection
- ssh to the device as epidose with the private key provided to you
- Terminate the daemon that will turn off the WiFi connection by running
sudo supervisorctl stop epidose:update_filter - Terminate the pre-deployment update script, if this is running, to avoid having the machine turned off.
- Run
touch /tmp/developmentto sidestep remote updates (unless you want to test them).
Running the tests
To run the tests, simply call
pytestIf you just installed the test dependencies, you may need to reload the venv
(deactivate followed by source venv/bin/ativate) to ensure that the paths
are picked up correctly.
Packaging
Run make package to create a package for distribution.
Deployment
Run sudo make install to deploy the package.
Deployment refresh
After the first deployment, source code files can be deployed by
running sudo make fast-install.
Program monitoring and restarting
- Run
sudo supervisorctl statusto see the running programs - Edit
/etc/supervisor/conf.d/epidose.confto change program parameters - Run
sudo supervisorctl reloadto read changed program parameters - Run
sudo supervisorctl restartprogam name` to restart new program version.
Library documentation
More information
A comprehensive list is maintained at the crowdsourced list of projects related to COVID-19 contact tracing repository. Below are links to information directly relevant to this project.
- Apple/Google Privacy-Preserving Contact Tracing
- Decentralized Privacy-Preserving Proximity Tracing
- EU key eHealth documents for fighting COVID-19
- ACM Europe TPC Statement on Principles, Practices for COVID-19 Contact Tracing Applications
- Bluetooth-based accurate wireless ranging for automated contact tracing
License
Unless otherwise noted, this code is licensed under the Apache 2.0 license, as found in the LICENSE file.
Some files under epidose/hardware/firmware are copyrighted
by STMicroelectronics and licensed under the
BSD 3-Clause license.
Acknowledgements
EPIDOSE is partly funded through the EOSC Secretariat. EOSCsecretariat.eu has received funding from the European Union's Horizon Programme call H2020-INFRAEOSC-05-2018-2019, grant Agreement number 831644.