Face kiosk
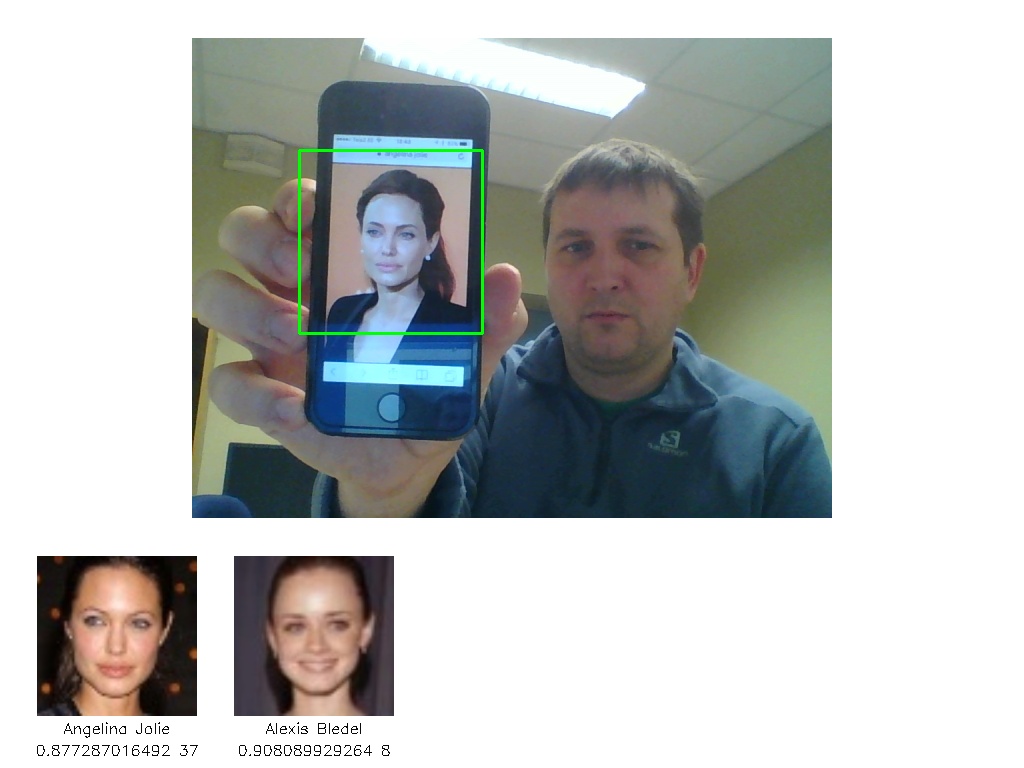
Demo app for testing face recognition neural networks. It captures data from webcam, performs face detection and shows 5 most similar faces from Labeled Faces in the Wild dataset.
Installation
Windows prerequisites
In Windows install Anaconda and then follow instructions for installing precompiled Caffe. You can use it either with or without CUDA.
You also need OpenCV, which isn't included with recent Anaconda. First download .whl file from here. Then install it with pip:
pip install opencv_python‑2.4.12‑cp27‑none‑win_amd64.whl
Ubuntu prerequisites
In Ubuntu first install Caffe:
sudo apt-get install libprotobuf-dev libleveldb-dev libsnappy-dev libopencv-dev libhdf5-serial-dev protobuf-compiler
sudo apt-get install --no-install-recommends libboost-all-dev
sudo apt-get install libatlas-base-dev
sudo apt-get install the python-dev
sudo apt-get install libgflags-dev libgoogle-glog-dev liblmdb-dev
git clone https://github.com/BVLC/caffe.git
cd caffe
cp Makefile.config.example Makefile.config
# Adjust Makefile.config (for example, enable USE_CUDNN or CPU_ONLY)
make all
make test
make runtest
# Replace ... with correct path and add to ~/.bashrc
export PYTHONPATH=/home/.../caffe/python
Then install required Python packages:
sudo apt-get install python-opencv python-numpy python-sklearn
Application itself
Just clone the repository:
git clone https://github.com/tambetm/face_kiosk.git
How to run
Before you can run the application, you have to download corresponding images, model and data files. If unsure, start with CASIA_lfw_oversample.[sh|bat], which is of reasonable size, runs fast even on CPU and has decent results.
VGG_lfw.[sh|bat]- LFW dataset using VGG face model. (images) (model) (data)VGG_lfw_oversample.sh- LFW dataset using VGG face model with oversampling. (images) (model) (data)CASIA_lfw.[sh|bat]- LFW dataset using model trained on CASIA-WebFace. (images) (model) (data)CASIA_lfw_oversample.[sh|bat]- LFW dataset using model trained on CASIA-WebFace with oversampling. (images) (model) (data)CASIA.[sh|bat]- CASIA-WebFace dataset using model trained on CASIA-WebFace. (images) (model) (data)CASIA_oversample.[sh|bat]- CASIA-WebFace dataset using model trained on CASIA-WebFace with oversampling. (images) (model) (data)lfw.[sh|bat]- LFW dataset using model trained on LFW extended with WLF. (images) (model) (data)fotis.[sh|bat]- Fotis dataset using model trained on LFW+WLF+Fotis. (model) (data)
Download the files and unzip them to respective folders - images in images, models in models and data in data. If you already have the images, make symlink in images folder that points to the correct place. Once this is done, run the script.
NB! By default Windows scripts use CPU and Linux scripts GPU. This was just my setup, you can change it with --backend parameter. VGG face model will benefit a lot from GPU.
Stability
As outputs of the networks are supposed to be semantical features of the face, I expected them to be quite stable and not change much over different video frames. But that's not the case. I had to use several hacks to make predictions more consistent and they are not yet as stable as I would like them to be. What I'm doing currently:
- For 10 consequtive frames find 5 nearest faces for each.
- Group those faces by person's name.
- Calculate average distance and number of images for each person.
- Discard persons that matched for less than half frames (number of images <= 5).
- Order remaining persons by average distance.
- For some models I also tried oversampling, i.e. features are averaged over 10 cropped subimages (4 corners + center + 2 mirrors of each).
You can see the average distance and number of images under each person's name.
You can disable all stability hacks by adding --average_window 1 and --group_by file to command line.
How to prepare a new dataset
Your dataset should be organized into folders, folder name should be person's name (first name and surname separated by underscore) and it should contain cropped face images of this person.
Once you have folder structure in place, you can extract features with following command:
python src/extract.py <images_path> <features.npz> <metadata.csv> <options>
First parameter is path to images folder (which has person subfolders), second parameter is name for features file (saved in Numpy .npz format), third parameter is text file name, that will contain file names and person names (saved in CSV format).
Depending on the model you also need to provide additional options:
--model_file- Caffe .prototxt file (deploy version)--pretrained_file- Caffe .caffemodel file--mean_file- Caffe image mean file, either in .binaryproto or .npy format--image_size- original image size before cropping, all images are resized to this size--grayscale- if input to your network is grayscale image (1 channel)--oversample- average features over 10 cropped images (4 corners + center + 2 mirrors of each)--layer- name of layer, which features to use--backend- eithergpuorcpu--filter- which files to look at, e.g.*.jpg
See extract_CASIA_lfw_oversample.sh for example. Once you have extracted the features in .npz file, you need to create index for nearest neighbor search with following command:
python src/build_index.py <features.npz> <index.pkl>
Then you need to create a script or batch file for launching the kiosk with proper options. See the example scripts above.