Spirik / Gem
Projects that are alternatives of or similar to Gem
GEM (a.k.a. Good Enough Menu) - Arduino library for creation of graphic multi-level menu with editable menu items, such as variables (supports int, byte, float, double, boolean, char[17] data types) and option selects. User-defined callback function can be specified to invoke when menu item is saved.
Supports buttons that can invoke user-defined actions and create action-specific context, which can have its own enter (setup) and exit callbacks as well as loop function.
Supports AltSerialGraphicLCD (since GEM ver. 1.0) and U8g2 (since GEM ver. 1.1) graphic libraries.
Note that both AltSerialGraphicLCD and U8g2 libraries are required by default, regardless of which one of them is actually used to drive display (although the one that is not used won't affect compiled sketch size). However, it is possible (since GEM ver. 1.2.2) to exclude support for not used one. See Configuration section for details.
For use with AltSerialGraphicLCD library (by Jon Green) LCD screen must be equipped with SparkFun Graphic LCD Serial Backpack and properly set up to operate using firmware provided with aforementioned library.
Cyrillic is partially supported in U8g2 version of GEM (since 1.1). Can be used in menu title, menu item labels (including variables, buttons, and menu page links), and select options. Editable strings with Cyrillic characters are not supported.
Optional support for editable variables of
floatanddoubledata types was added since version 1.2 of GEM. It is enabled by default, but can be disabled by editing config.h file that ships with the library. Disabling this feature may save considerable amount of program storage space. See Floating-point variables section for details.
- When to use
- Structure
- Installation
- How to use
- Reference
- Floating-point variables
- Configuration
- Examples
- License
- Wiki
When to use
If you want to equip your project with graphical LCD display and let user choose different options and settings to configure its operation. Whether it is control panel of smart home or simple configurable LED strip, GEM will provide all necessary controls for editing variables and navigating through submenus, as well as running user-defined functions.
Structure
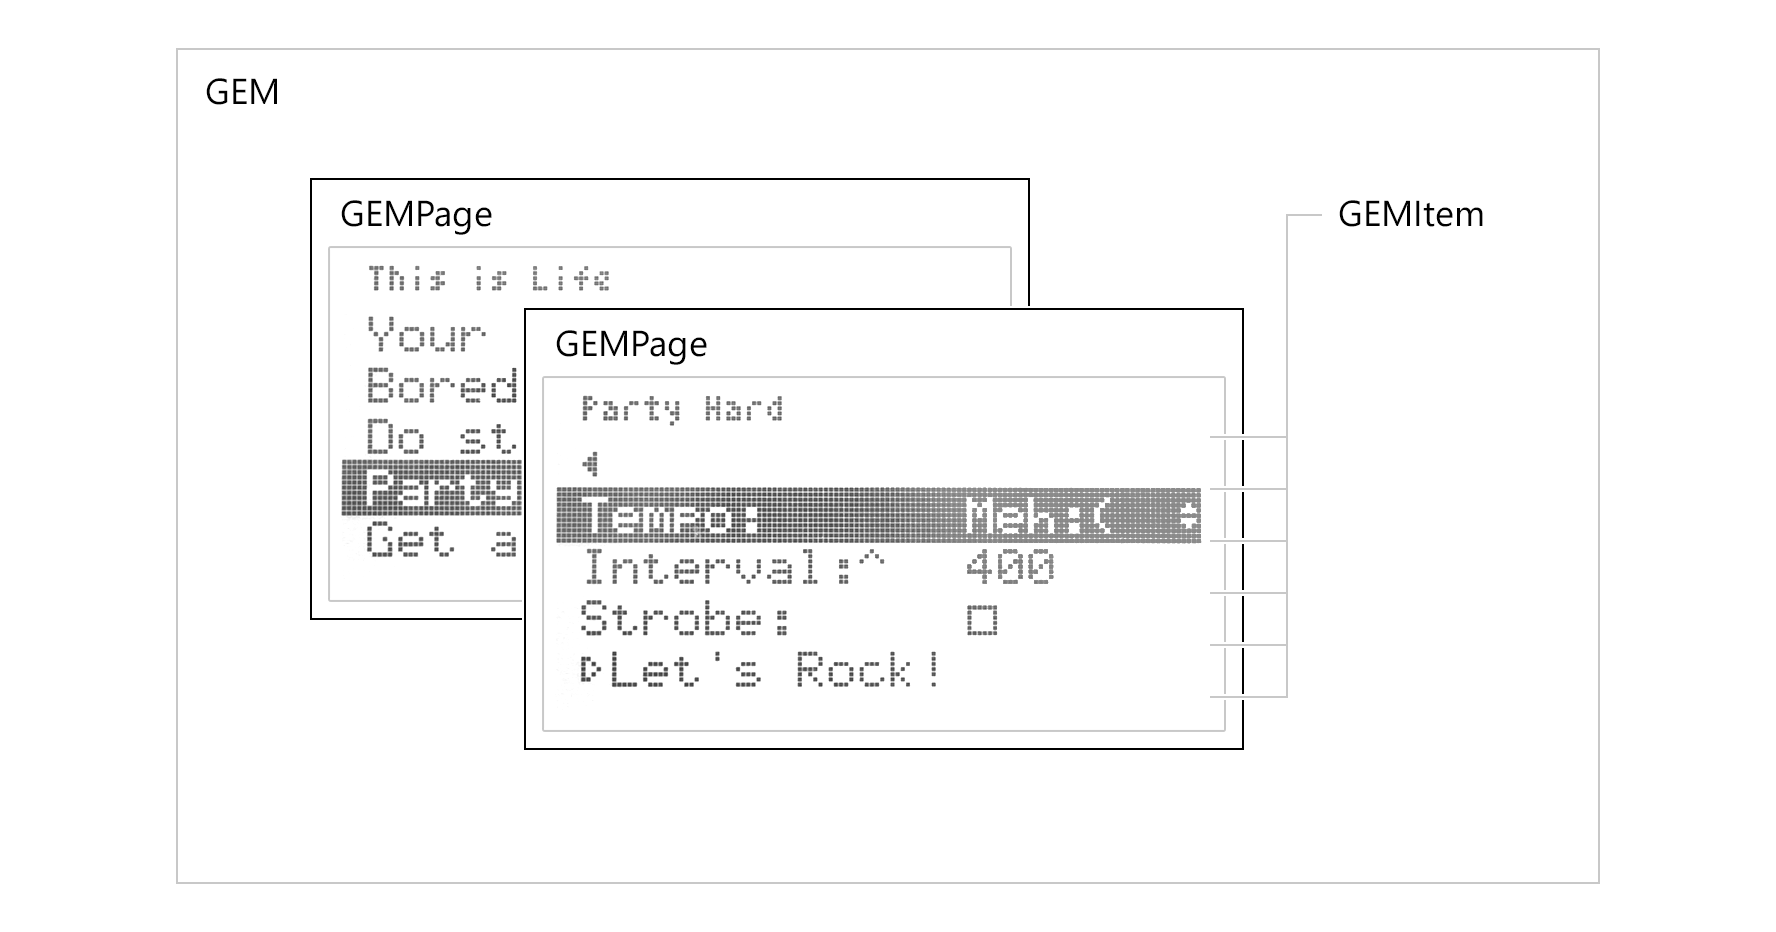
Menu created with GEM library comprises of three base elements:
- menu item (
GEMItemclass) - represents associated variable, button, or link to the next menu level (menu page); - menu page (
GEMPageclass) - consists of list of menu items and represents menu level; - menu object itself (
GEMclass) - can have multiple menu pages (linked to each other) with multiple menu items each.
Installation
Library format is compatible with Arduino IDE 1.5.x+. There are two ways to install the library:
- Download ZIP-archive directly from Releases section (or Master branch) and extract it into GEM folder inside your Library folder.
- Using Library Manager (since Arduino IDE 1.6.2): navigate to
Sketch > Include Library > Manage Librariesinside your Arduino IDE and search for GEM library, then clickInstall. (Alternatively you can add previously downloaded ZIP throughSketch > Include Library > Add .ZIP Librarymenu).
Whichever option you choose you may need to reload IDE afterwards.
Both AltSerialGraphicLCD and U8g2 libraries are required to be installed by default as well. However, it is possible (since GEM ver. 1.2.2) to exclude support fot not used one. See Configuration section for details.
How to use with AltSerialGraphicLCD
Click here to view
Requirements
GEM supports AltSerialGraphicLCD library. LCD screen must be equipped with SparkFun Graphic LCD Serial Backpack and properly set up to operate using firmware provided with AltSerialGraphicLCD. Installation and configuration of it is covered in great detail in AltSerialGraphicLCD manual.
In theory GEM is compatible with any display, that is supported by SparkFun Graphic LCD Serial Backpack. Guaranteed to work with 128x64 pixel displays. 160x128 pixel ones should work fine as well, although it wasn't tested.
Import
To include AltSerialGraphicLCD-compatible version of GEM library add the following line at the top of your sketch:
#include <GEM.h>
AltSerialGraphicLCD library will be included automatically through GEM library, so no need to include it explicitly in your sketch (although it still needs to be installed in your system, of course).
In order to communicate with your SparkFun Graphic LCD Serial Backpack, AltSerialGraphicLCD library uses SoftwareSerial (that ships with Arduino IDE). There is no need to explicitly include it in your sketch as well, because it is already included through AltSerialGraphicLCD library. So the following line is completely optional (although note that second inclusion won't affect the size of you sketch) - you may omit it and use SoftwareSerial as though it was included.
#include <SoftwareSerial.h>
Note that it is possible to use hardware serial instead (e.g. if you're planning to use it with Arduino Leonardo's
Serial1class), however some modifications of AltSerialGraphicLCD library would be required in that case.
One more additional library that may come in handy (although is not necessary) is KeyDetector - it is small and lightweight library for key press events detection. It is used in some of the supplied examples (as well as the following one) to detect button presses for navigation through menu. To include KeyDetector library, install it first and then add the following line:
#include <KeyDetector.h>
Use
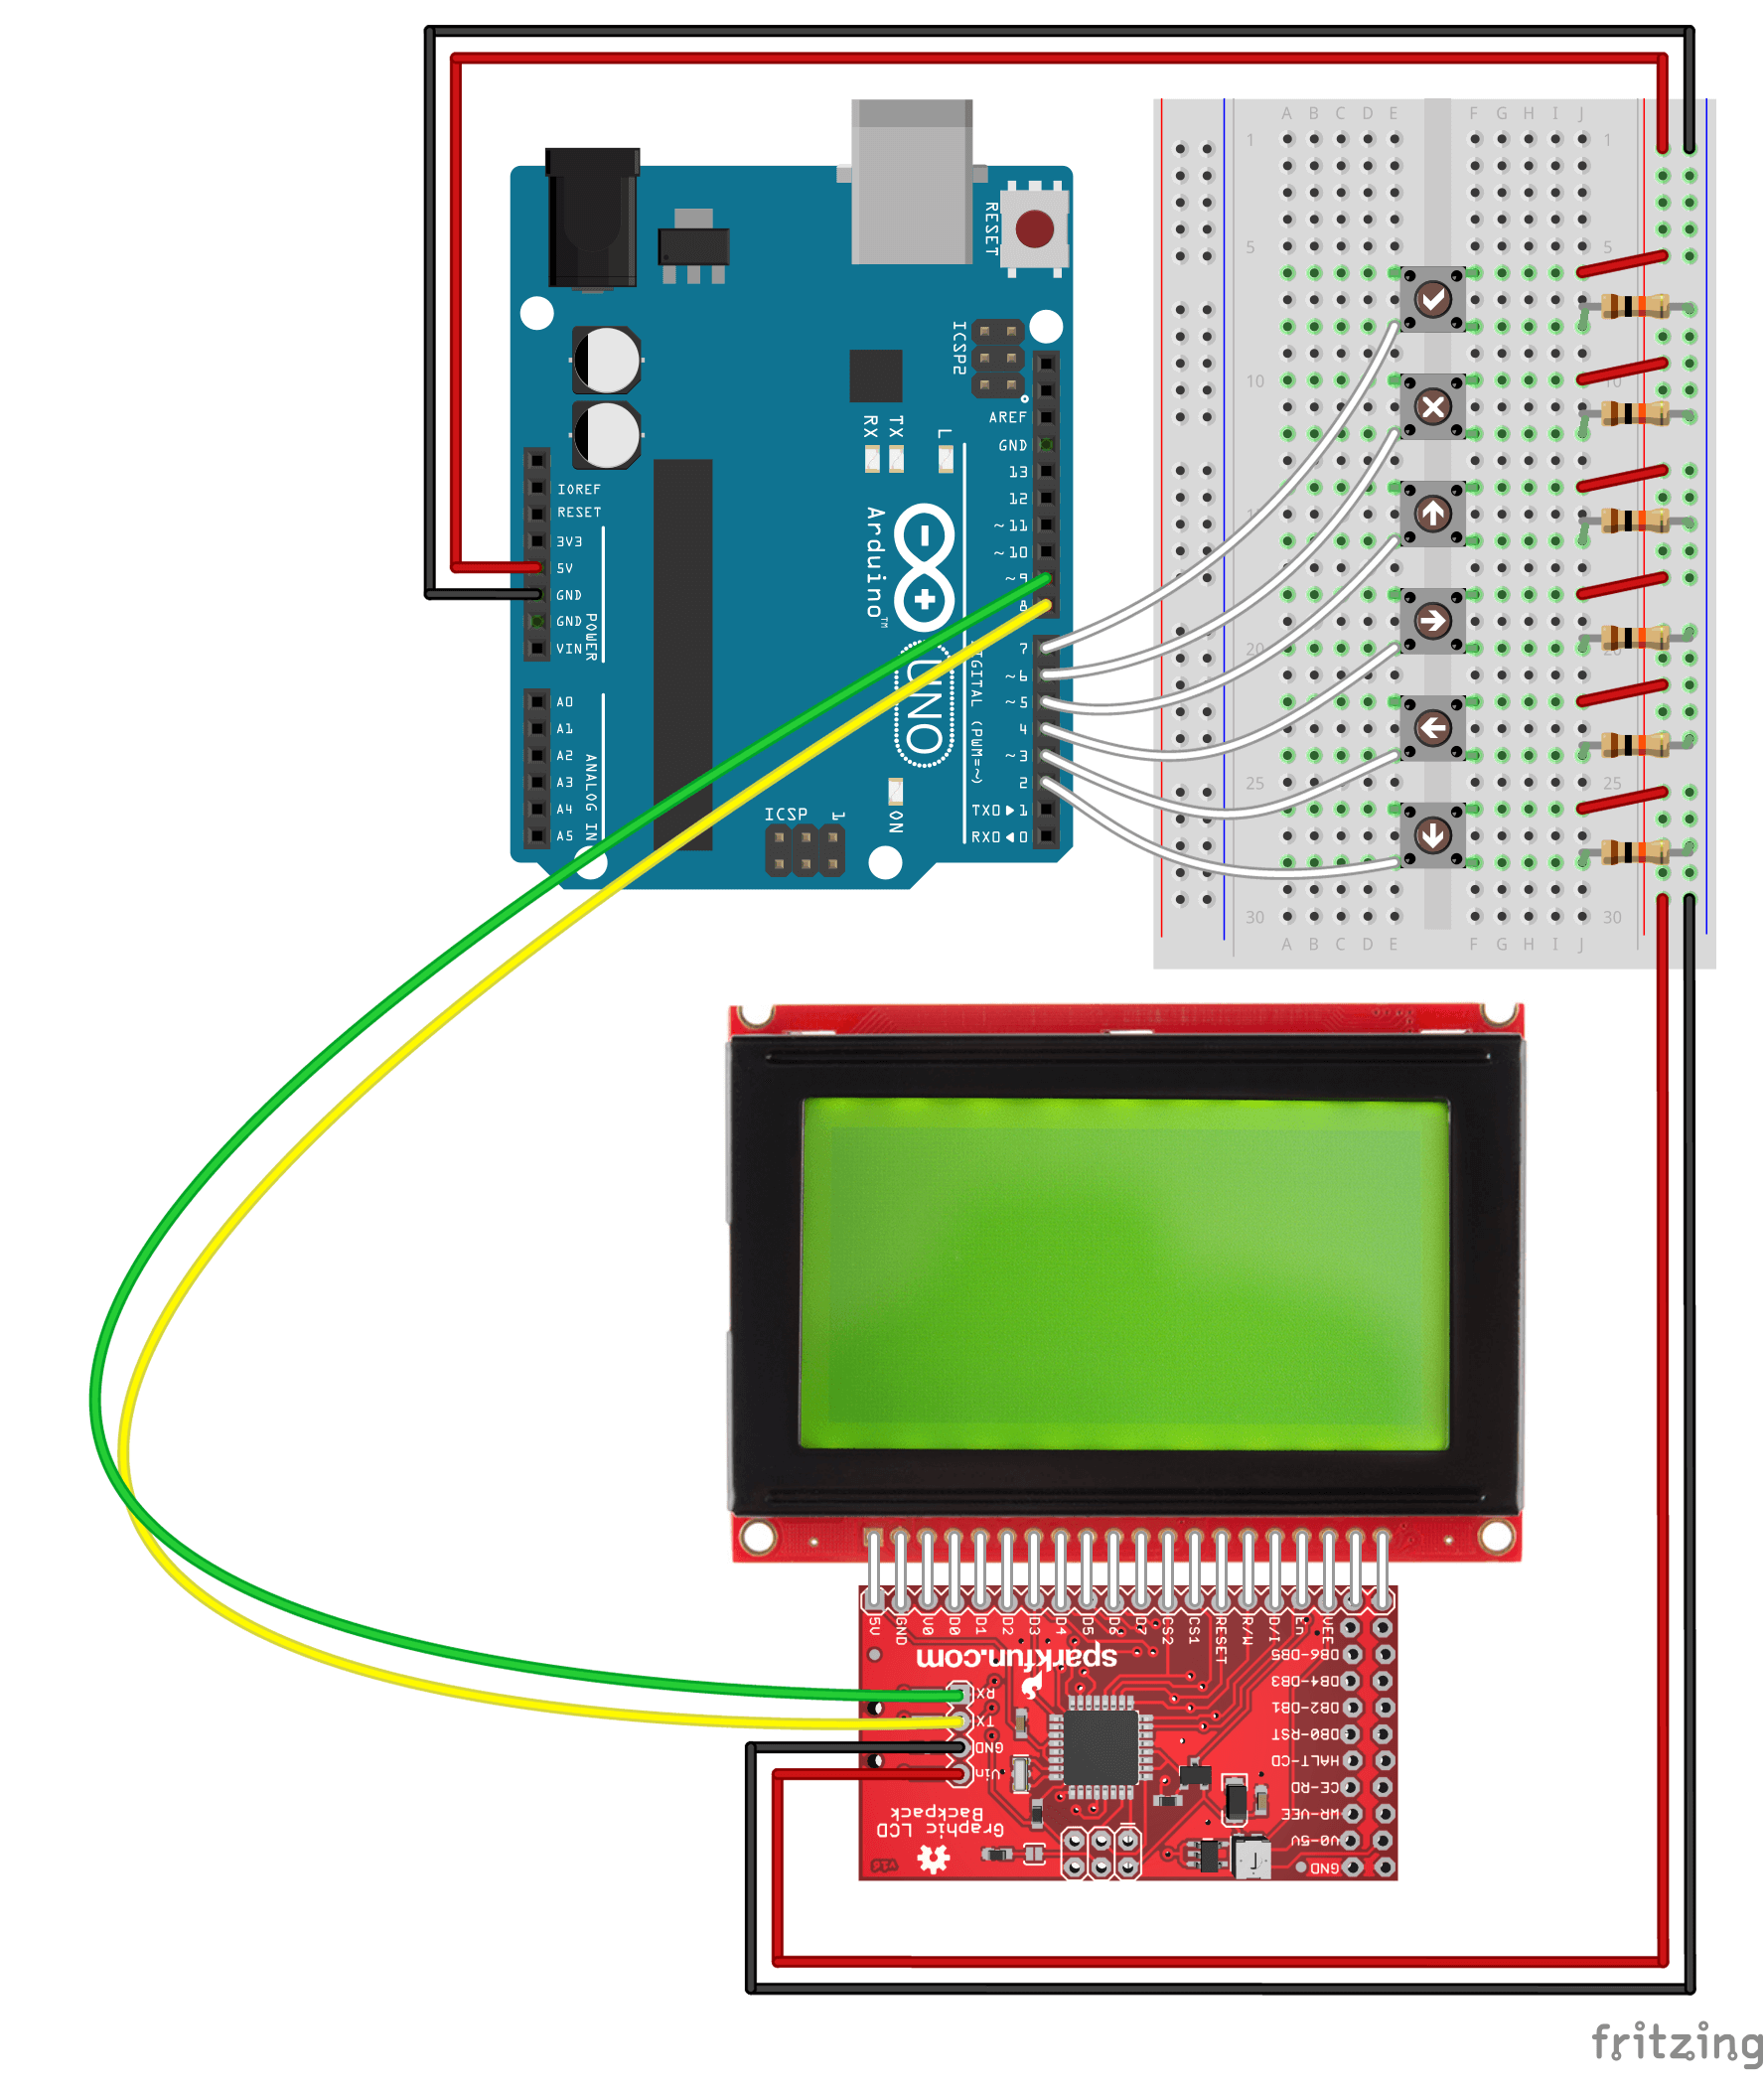
Assume you have a simple setup as follows:
- 128x64 LCD screen equipped with SparkFun Graphic LCD Serial Backpack, which is properly connected to the power source and to digital pins 8 and 9 of your Arduino for serial communication via SoftwareSerial library;
- also you have 6 push-buttons (momentary switches) connected to the digital pins 2 to 7, wired with 10kOhm pulldown resistors (so the HIGH means that the button is pressed).
Let's create a simple one page menu with one editable menu item associated with int variable, one with boolean variable, and a button, pressing of which will result in int variable value being printed to Serial monitor if boolean variable is set to true. To navigate through menu we will use 6 push-buttons connected to the Arduino (for four directional controls, one Cancel, and one Ok). For the sake of simplicity we will use KeyDetector library to detect single button presses (as we need a way to prevent continuously pressed button from triggering press event multiple times in a row).
For more detailed examples and tutorials please visit GEM wiki.
Navigation buttons initial setup (via KeyDetector library)
Create constants for the pins you want to detect signals on (these are the pins the push-buttons are connected to):
const byte downPin = 2;
const byte leftPin = 3;
const byte rightPin = 4;
const byte upPin = 5;
const byte cancelPin = 6;
const byte okPin = 7;
Create an array of Key objects. It will hold information about which button press event should be detected on which input pin:
Key keys[] = {{GEM_KEY_UP, upPin}, {GEM_KEY_RIGHT, rightPin}, {GEM_KEY_DOWN, downPin}, {GEM_KEY_LEFT, leftPin}, {GEM_KEY_CANCEL, cancelPin}, {GEM_KEY_OK, okPin}};
Note: aliases
GEM_KEY_UP,GEM_KEY_RIGHT,GEM_KEY_DOWN,GEM_KEY_LEFT,GEM_KEY_CANCEL, andGEM_KEY_OKare predefined and come with the GEM library. They represent identifiers of buttons that menu listens and responds to. E.g. sending to menuGEM_KEY_DOWNwill trigger it to move cursor down and highlight the next menu item, etc.
Create KeyDetector object called myKeyDetector and supply its constructor with keys array created at the previous step and explicitly pass the size of the array:
KeyDetector myKeyDetector(keys, sizeof(keys)/sizeof(Key));
Navigation buttons initial setup is now complete.
LCD initial setup (via SoftwareSerial and AltSerialGraphicLCD libraries)
Create constants for the pins SparkFun Graphic LCD Serial Backpack is connected to:
const byte rxPin = 8;
const byte txPin = 9;
Initialize an instance of the SoftwareSerial library called serialLCD:
SoftwareSerial serialLCD(rxPin, txPin);
Create an instance of the GLCD class named glcd. This instance is used to call all the subsequent GLCD functions (internally from GEM library, or manually in your sketch if it is required). Instance is created with a reference to the software serial object:
GLCD glcd(serialLCD);
LCD initial setup is now complete.
Menu initial setup
Create variables that you would like to be editable through the menu. Assign them initial values:
int number = -512;
boolean enablePrint = false;
Create two menu item objects of class GEMItem, linked to number and enablePrint variables. Let's name them simply "Number" and "Enable print" respectively - these names will be printed on screen:
GEMItem menuItemInt("Number:", number);
GEMItem menuItemBool("Enable print:", enablePrint);
Create menu button that will trigger printData() function. It will print value of our number variable to Serial monitor if enablePrint is true. We will write (define) this function later. However we should forward-declare it in order to pass its reference to GEMItem constructor. Let's name our button "Print":
void printData(); // Forward declaration
GEMItem menuItemButton("Print", printData);
Create menu page object of class GEMPage. Menu page holds menu items (GEMItem) and, in fact, represents menu level. Menu can have multiple menu pages (linked to each other) with multiple menu items each. Let's call our only menu page "Main Menu":
GEMPage menuPageMain("Main Menu");
And finally, create menu object of class GEM. Supply its constructor with a reference to glcd object we created earlier:
GEM menu(glcd);
Note:
GEMconstructor supports additional optional parameters that can customize look of the menu. See Reference and wiki for details.
We will link menu items to menu pages to menu in setup() function. For now, menu initial setup is complete.
setup() function
In setup() function of the sketch define modes of the pins push-buttons are connected to:
pinMode(downPin, INPUT);
pinMode(leftPin, INPUT);
pinMode(rightPin, INPUT);
pinMode(upPin, INPUT);
pinMode(cancelPin, INPUT);
pinMode(okPin, INPUT);
Init serial communications (both native Serial and software serialLCD):
Serial.begin(115200);
serialLCD.begin(115200);
Reset LCD to its initial state. Using delays here is optional, but I've found that it actually may help certain LCDs to regain their initial state more effectively after being previously unexpectedly shut down. Adjust the delays to what best works for your display.
delay(500);
glcd.reset();
delay(1000);
If you still encounter spontaneous freezing on load (especially right after sketch uploads), you may want to add the second instance of reset instructions. This (almost) bulletproof solution will ensure that screen boots and properly resets no matter what.
// Uncomment the following lines in dire situations
// (e.g. when screen becomes unresponsive after shutdown)
glcd.reset();
delay(1000);
Init menu. That will run some initialization routines (e.g. load sprites into LCD Serial Backpack's internal memory), then show splash screen (which can be customized).
menu.init();
The next step is to gather all of the previously declared menu items and pages together and assign them to our menu. It is convenient to do that in a separate function. Let's call it setupMenu(). We will define it later.
setupMenu();
And finally, draw menu to the screen:
menu.drawMenu();
setup() function of the sketch is now complete:
void setup() {
  // Push-buttons pin modes
  pinMode(downPin, INPUT);
  pinMode(leftPin, INPUT);
  pinMode(rightPin, INPUT);
  pinMode(upPin, INPUT);
  pinMode(cancelPin, INPUT);
  pinMode(okPin, INPUT);

  // Serial communications setup
  Serial.begin(115200);
  SerialLCD.begin(115200);

  // LCD reset
  delay(500);
  glcd.reset();
  delay(1000);
  // Uncomment the following lines in dire situations
  // (e.g. when screen becomes unresponsive after shutdown)
  glcd.reset();
  delay(1000);

  // Menu init, setup and draw
  menu.init();
  setupMenu();
  menu.drawMenu();
}
setupMenu() function
Let's assemble our menu. First, add menu items to menu page:
menuPageMain.addMenuItem(menuItemInt);
menuPageMain.addMenuItem(menuItemBool);
menuPageMain.addMenuItem(menuItemButton);
Because we don't have multiple menu levels, all we left to do now is to add our only menu page to menu and set it as initial menu page (loaded when menu first drawn):
menu.setMenuPageCurrent(menuPageMain);
setupMenu() is now complete:
void setupMenu() {
  // Add menu items to menu page
  menuPageMain.addMenuItem(menuItemInt);
  menuPageMain.addMenuItem(menuItemBool);
  menuPageMain.addMenuItem(menuItemButton);

  // Add menu page to menu and set it as current
  menu.setMenuPageCurrent(menuPageMain);
}
loop() function
In the loop() function of the sketch we'll be listening to push-buttons presses (using KeyDetector) and delegate pressed button to menu:
void loop() {
  // If menu is ready to accept button press...
  if (menu.readyForKey()) {
    // ...detect key press using KeyDetector library
    myKeyDetector.detect();
    // Pass pressed button to menu
    // (pressed button ID is stored in trigger property of KeyDetector object)
    menu.registerKeyPress(myKeyDetector.trigger);
  }
}
Button action
Let's define printData() function that we declared earlier. It will be invoked each time the "Print" button in our menu is pressed. It should print value of our number variable to Serial monitor if enablePrint is true.
void printData() {
  // If enablePrint flag is set to true (checkbox on screen is checked)...
  if (enablePrint) {
    // ...print the number to Serial
    Serial.print("Number is: ");
    Serial.println(number);
  } else {
    Serial.println("Printing is disabled, sorry:(");
  }
}
This is the simplest action that menu item button can have. More elaborate versions make use of custom "context" that can be created when button is pressed. In that case, button action can have its own setup and loop functions (named
context.enter()andcontext.loop()) that run similarly to how sketch operates. It allows you to initialize variables and e.g. prepare screen (if needed for the task that function performs), and then run through loop function, waiting for user input, or sensor reading, or command to terminate and exit back to the menu eventually. In the latter case additionalcontext.exit()function will be called, that can be used to clean up your context and e.g. to free some memory and draw menu back to screen.
Sketch
Full version of this basic example is shipped with the library and can be found at "examples/AltSerialGraphicLCD/Example-01_Basic/Example-01_Basic.ino".
Run
After compiling and uploading sketch to Arduino, wait while LCD screen boots and menu is being initialized and drawn to the screen. Then start pressing the push-buttons and navigate through the menu. Pressing "Ok" button (attached to pin 7) will trigger edit mode of the "Number" variable, or change state of "Enable print" option, or invoke action associated with "Print" menu button (depending on which menu item is currently selected). If "Enable print" option is checked, then pressing "Print" button will result in number variable printed to the Serial Monitor.
To learn more about GEM library, see the Reference section and visit wiki.
How to use with U8g2
Click here to view
Requirements
GEM supports U8g2 library.
In theory GEM is compatible with any display, that is supported by U8g2 library (given that it is properly set up and configured using correct constructor). Guaranteed to work with 128x64 pixel displays, based on KS0108 controller. 160x128 pixel ones should also work, as well as any other display that is supported by U8g2, although it is yet to be tested.
Import
To include U8g2-compatible version of GEM library add the following line at the top of your sketch:
#include <GEM_u8g2.h>
U8g2 library will be included automatically through GEM library, so no need to include it explicitly in your sketch (although it still needs to be installed in your system, of course).
Use
Assume you have a simple setup as follows:
- 128x64 LCD screen based on (or compatible with) KS0108 controller, connected as shown below, with 10kOhm potentiometer to adjust screen contrast;
- also you have 6 push-buttons (momentary switches) connected to the digital pins 2 to 7, wired with 10kOhm pullup resistors (so the LOW means that the button is pressed).
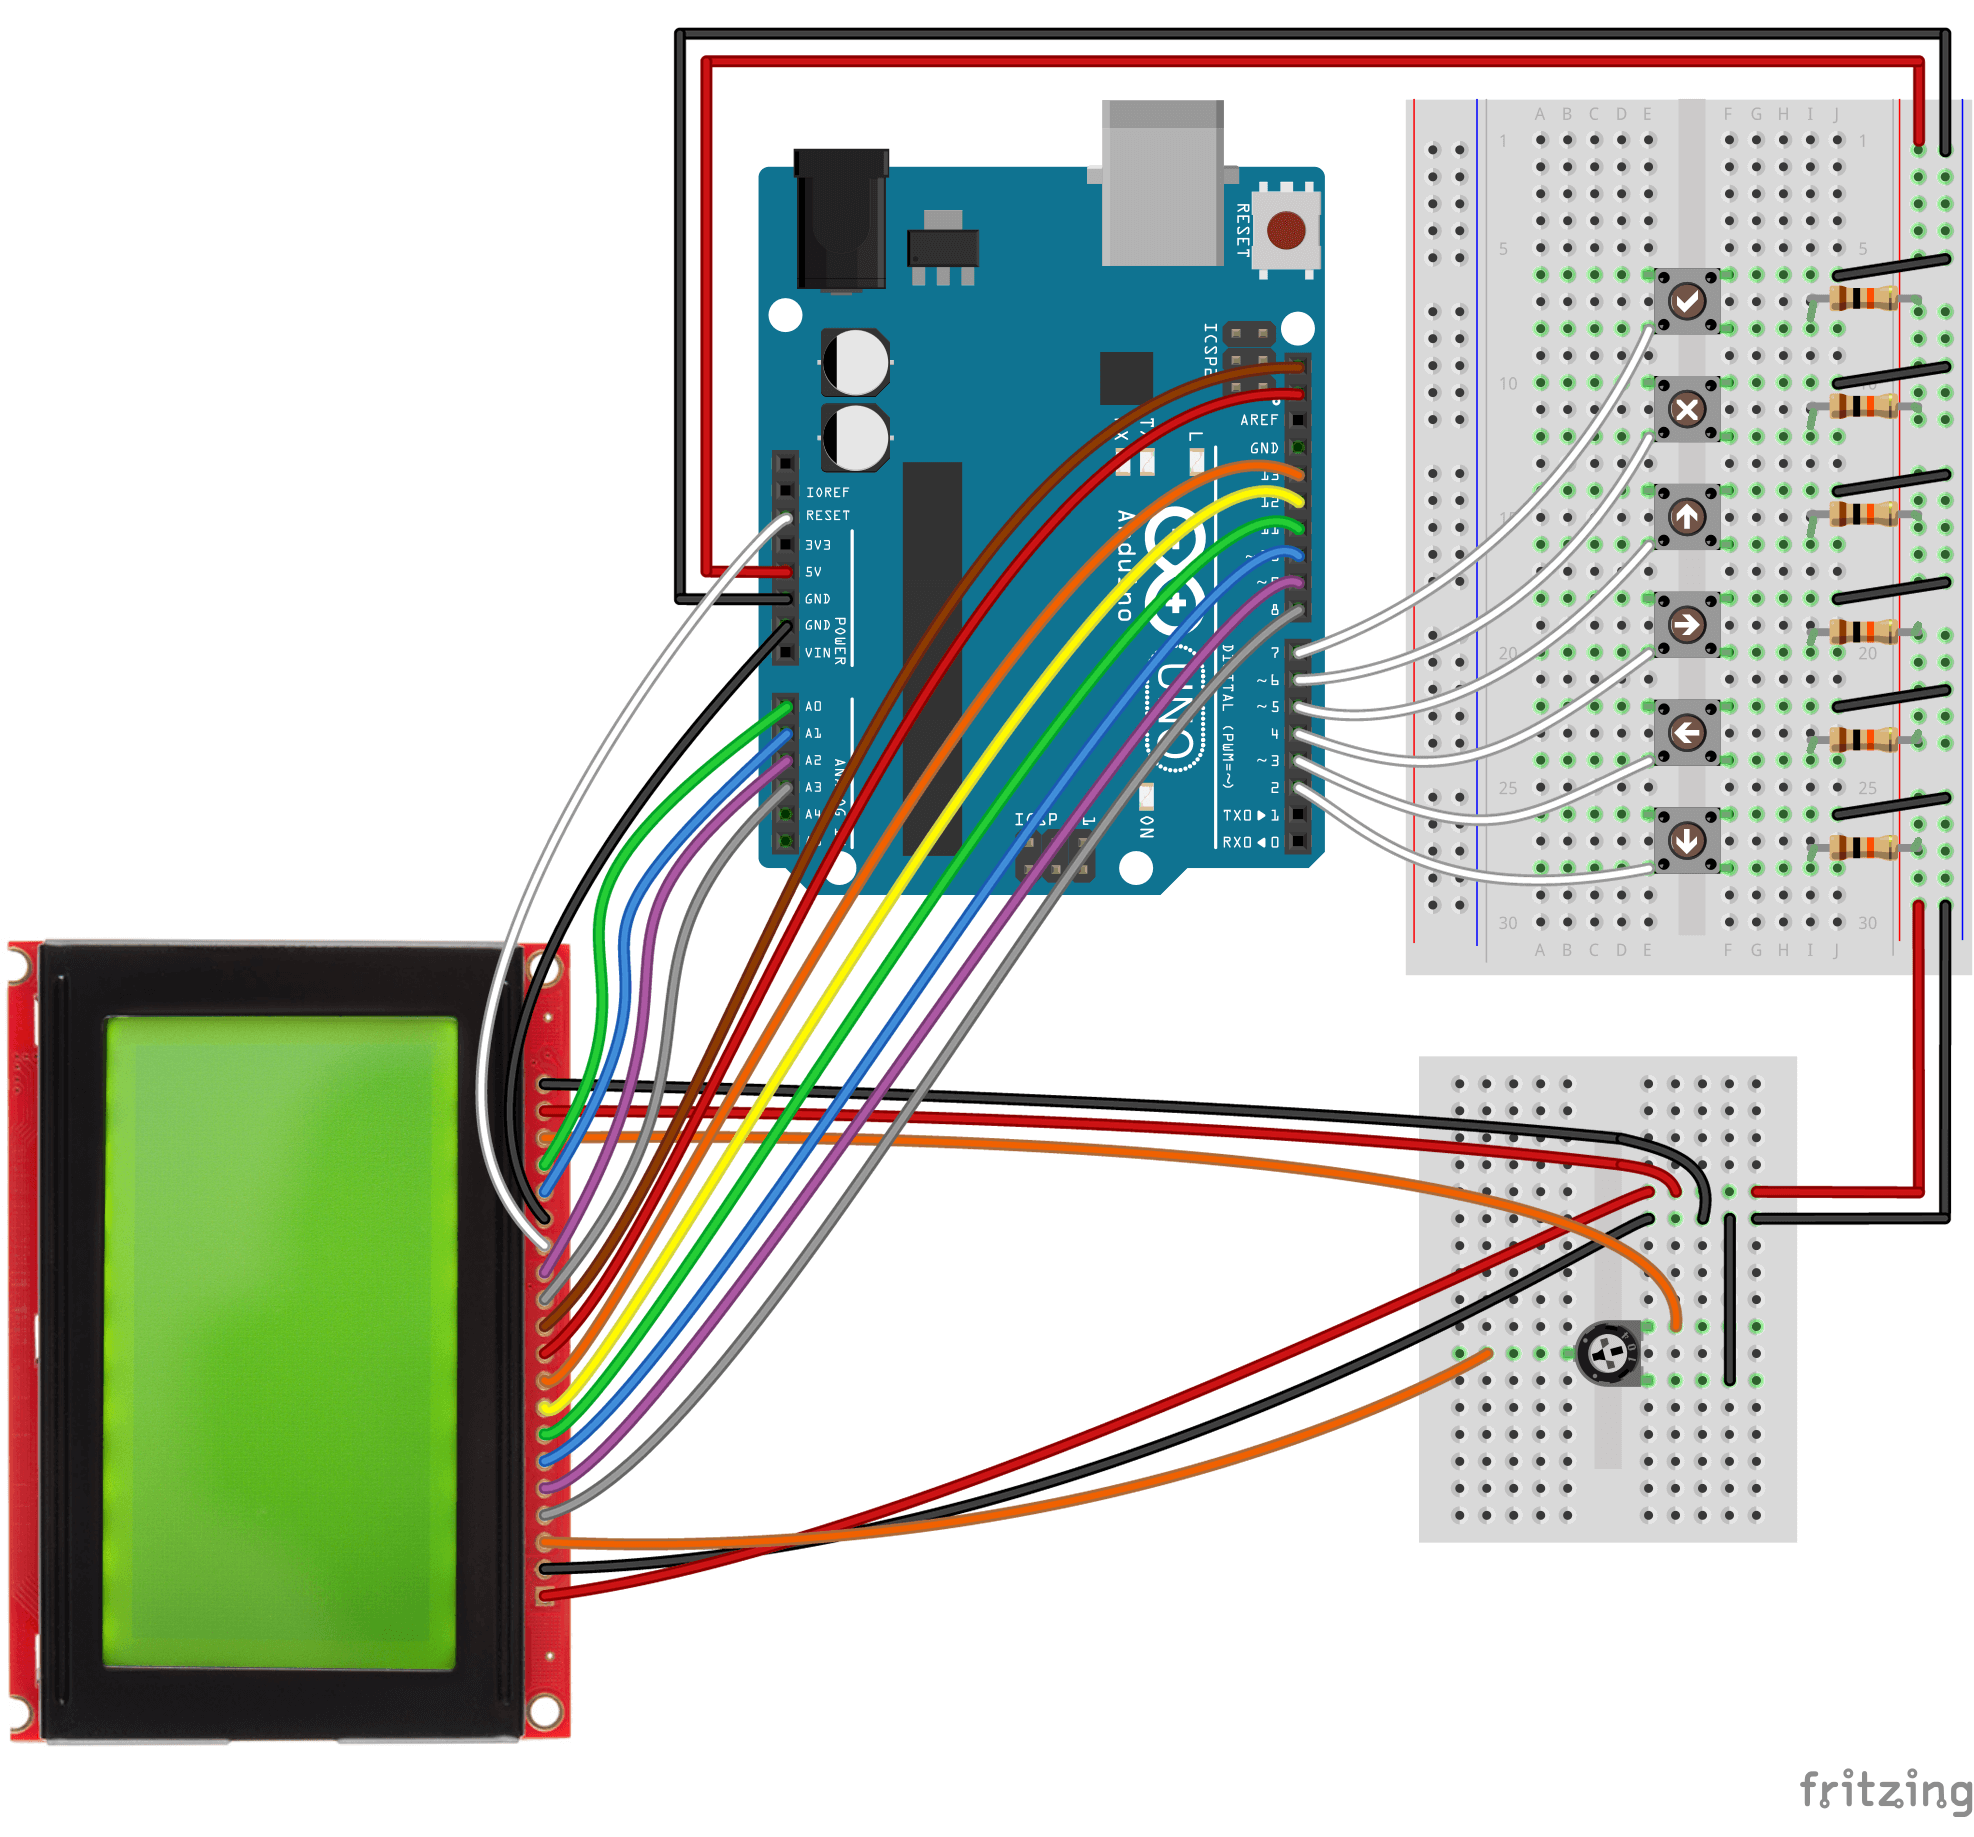
Let's create a simple one page menu with one editable menu item associated with int variable, one with boolean variable, and a button, pressing of which will result in int variable value being printed to Serial monitor if boolean variable is set to true. To navigate through menu we will use 6 push-buttons connected to the Arduino (for four directional controls, one Cancel, and one Ok). We will use U8g2 library to detect single button presses.
For more detailed examples and tutorials please visit GEM wiki.
LCD initial setup (via U8g2 library)
U8g2 library supports numerous popular display controllers. Choose a matching constructor for the correct initialization of the display. See available constructors and supported controllers in the documentation for U8g2 library.
In our case create an instance of the U8G2_KS0108_128X64_1 class named u8g2. This instance is used to call all the subsequent U8g2 functions (internally from GEM library, or manually in your sketch if it is required).
U8G2_KS0108_128X64_1 u8g2(U8G2_R0, 8, 9, 10, 11, 12, 13, 18, 19, /*enable=*/ A0, /*dc=*/ A1, /*cs0=*/ A3, /*cs1=*/ A2, /*cs2=*/ U8X8_PIN_NONE, /* reset=*/ U8X8_PIN_NONE);
Note: GEM library is compatible with all buffer size options (namely
_1,_2,_F) and screen rotation options supported by U8g2.
LCD initial setup is now complete.
Menu initial setup
Create variables that you would like to be editable through the menu. Assign them initial values:
int number = -512;
boolean enablePrint = false;
Create two menu item objects of class GEMItem, linked to number and enablePrint variables. Let's name them simply "Number" and "Enable print" respectively - these names will be printed on screen:
GEMItem menuItemInt("Number:", number);
GEMItem menuItemBool("Enable print:", enablePrint);
Create menu button that will trigger printData() function. It will print value of our number variable to Serial monitor if enablePrint is true. We will write (define) this function later. However we should forward-declare it in order to pass its reference to GEMItem constructor. Let's name our button "Print":
void printData(); // Forward declaration
GEMItem menuItemButton("Print", printData);
Create menu page object of class GEMPage. Menu page holds menu items (GEMItem) and, in fact, represents menu level. Menu can have multiple menu pages (linked to each other) with multiple menu items each. Let's call our only menu page "Main Menu":
GEMPage menuPageMain("Main Menu");
And finally, create menu object of class GEM_u8g2. Supply its constructor with a reference to u8g2 object we created earlier:
GEM_u8g2 menu(u8g2);
Note:
GEM_u8g2constructor supports additional optional parameters that can customize look of the menu. See Reference and wiki for details.
We will link menu items to menu pages to menu in setup() function. For now, menu initial setup is complete.
setup() function
In setup() function of the sketch init serial communication:
Serial.begin(115200);
Init u8g2 instance of U8g2 library by calling begin() method and supplying it with pin numbers push-buttons are attached to:
u8g2.begin(/*Select/OK=*/ 7, /*Right/Next=*/ 4, /*Left/Prev=*/ 3, /*Up=*/ 5, /*Down=*/ 2, /*Home/Cancel=*/ 6);
Init menu. That will run some initialization routines (e.g. clear display and apply some GEM specific settings), then show splash screen (which can be customized).
menu.init();
The next step is to gather all of the previously declared menu items and pages together and assign them to our menu. It is convenient to do that in a separate function. Let's call it setupMenu(). We will define it later.
setupMenu();
And finally, draw menu to the screen:
menu.drawMenu();
setup() function of the sketch is now complete:
void setup() {
  // Serial communication setup
  Serial.begin(115200);

  // U8g2 library init. Pass pin numbers the buttons are connected to.
  // The push-buttons should be wired with pullup resistors (so the LOW means that the button is pressed)
  u8g2.begin(/*Select/OK=*/ 7, /*Right/Next=*/ 4, /*Left/Prev=*/ 3, /*Up=*/ 5, /*Down=*/ 2, /*Home/Cancel=*/ 6);

  // Menu init, setup and draw
  menu.init();
  setupMenu();
  menu.drawMenu();
}
setupMenu() function
Let's assemble our menu. First, add menu items to menu page:
menuPageMain.addMenuItem(menuItemInt);
menuPageMain.addMenuItem(menuItemBool);
menuPageMain.addMenuItem(menuItemButton);
Because we don't have multiple menu levels, all we left to do now is to add our only menu page to menu and set it as initial menu page (loaded when menu first drawn):
menu.setMenuPageCurrent(menuPageMain);
setupMenu() is now complete:
void setupMenu() {
  // Add menu items to menu page
  menuPageMain.addMenuItem(menuItemInt);
  menuPageMain.addMenuItem(menuItemBool);
  menuPageMain.addMenuItem(menuItemButton);

  // Add menu page to menu and set it as current
  menu.setMenuPageCurrent(menuPageMain);
}
loop() function
In the loop() function of the sketch we'll be listening to push-buttons presses (using U8g2) and delegate pressed button to menu:
void loop() {
  // If menu is ready to accept button press...
  if (menu.readyForKey()) {
    // ...detect key press using U8g2 library
    // and pass pressed button to menu
    menu.registerKeyPress(u8g2.getMenuEvent());
  }
}
Button action
Let's define printData() function that we declared earlier. It will be invoked each time the "Print" button in our menu is pressed. It should print value of our number variable to Serial monitor if enablePrint is true.
void printData() {
  // If enablePrint flag is set to true (checkbox on screen is checked)...
  if (enablePrint) {
    // ...print the number to Serial
    Serial.print("Number is: ");
    Serial.println(number);
  } else {
    Serial.println("Printing is disabled, sorry:(");
  }
}
This is the simplest action that menu item button can have. More elaborate versions make use of custom "context" that can be created when button is pressed. In that case, button action can have its own setup and loop functions (named
context.enter()andcontext.loop()) that run similarly to how sketch operates. It allows you to initialize variables and e.g. prepare screen (if needed for the task that function performs), and then run through loop function, waiting for user input, or sensor reading, or command to terminate and exit back to the menu eventually. In the latter case additionalcontext.exit()function will be called, that can be used to clean up your context and e.g. to free some memory and draw menu back to screen.
Sketch
Full version of this basic example is shipped with the library and can be found at "examples/U8g2/Example-01_Basic/Example-01_Basic.ino".
Run
After compiling and uploading sketch to Arduino, wait while LCD screen boots and menu is being initialized and drawn to the screen. Then start pressing the push-buttons and navigate through the menu. Pressing "Ok" button (attached to pin 7) will trigger edit mode of the "Number" variable, or change state of "Enable print" option, or invoke action associated with "Print" menu button (depending on which menu item is currently selected). If "Enable print" option is checked, then pressing "Print" button will result in number variable printed to the Serial Monitor.
To learn more about GEM library, see the Reference section and visit wiki.
Reference
GEM, GEM_u8g2
Primary class of library. Responsible for appearance of the menu, communication with LCD screen (via supplied GLCD or U8g2 object), integration of all menu items GEMItem and pages GEMPage into one menu. Object of class GEM defines as follows.
AltSerialGraphicLCD version:
GEM menu(glcd[, menuPointerType[, menuItemsPerScreen[, menuItemHeight[, menuPageScreenTopOffset[, menuValuesLeftOffset]]]]]);
U8g2 version:
GEM_u8g2 menu(u8g2[, menuPointerType[, menuItemsPerScreen[, menuItemHeight[, menuPageScreenTopOffset[, menuValuesLeftOffset]]]]]);
-
glcd
AltSerialGraphicLCD version
Type:GLCD
Holds the reference to aGLCDobject created with AltSerialGraphicLCD library and used for communication with SparkFun Graphic LCD Serial Backpack. -
u8g2
U8g2 version
Type:U8g2
Holds the reference to an object created with U8g2 library and used for communication with LCD. Choose a matching constructor for the correct initialization of the display. See available constructors and supported controllers in the documentation for U8g2 library.Note: GEM library is compatible with all buffer size options (namely
_1,_2,_F) and screen rotation options supported by U8g2. -
menuPointerType [optional]
Type:byte
Values:GEM_POINTER_ROW,GEM_POINTER_DASH
Default:GEM_POINTER_ROW
Type of menu pointer visual appearance: either highlighted row or pointer to the left of the row. -
menuItemsPerScreen [optional]
Type:byte
Default:5
Count of the menu items per screen. Suitable for 128x64 screen with other variables at their default values. -
menuItemHeight [optional]
Type:byte
Units: dots
Default:10
Height of the menu item. Suitable for 128x64 screen with other variables at their default values. -
menuPageScreenTopOffset [optional]
Type:byte
Units: dots
Default:10
Offset from the top of the screen to accommodate title of the menu page. Suitable for 128x64 screen with other variables at their default values. -
menuValuesLeftOffset [optional]
Type:byte
Units: dots
Default:86
Offset from the left of the screen to the value of the associated with menu item variable (effectively the space left for the title of the menu item to be printed on screen). Suitable for 128x64 screen with other variables at their default values; 86 - recommended value for 128x64 screen.

Note: carefully choose values of
menuItemsPerScreen,menuItemHeight,menuPageScreenTopOffset,menuValuesLeftOffsetin accordance to the actual size of your LCD screen. Default values of these options are suitable for 128x64 screens. But that is not the only possible option: the other combination of values you set may also be suitable - just calculate them correctly and see what works best for you.
Note: long title of the menu page
GEMPagewon't overflow to the new line in U8g2 version and will be truncated at the edge of the screen.
For more details on customization see corresponding section of the wiki.
Constants
-
GEM_POINTER_DASH
Type: macro#define GEM_POINTER_DASH 0
Value:0
Alias for the type of menu pointer visual appearance (submitted as menuPointerType setting toGEMandGEM_u8g2constructors): pointer to the left of the row. -
GEM_POINTER_ROW
Type: macro#define GEM_POINTER_ROW 1
Value:1
Alias for the type of menu pointer visual appearance (submitted as menuPointerType setting toGEMandGEM_u8g2constructors): highlighted row. -
GEM_KEY_NONE
Type: macro#define GEM_KEY_NONE 0
Value:0
Alias for the keys (buttons) used to navigate and interact with menu. Submitted toGEM::registerKeyPress()andGEM_u8g2::registerKeyPress()methods. Indicates that no key presses were detected. -
GEM_KEY_UP
-
GEM:
Type: macro#define GEM_KEY_UP 1
Value:1 -
GEM_u8g2:
Type: macro#define GEM_KEY_UP U8X8_MSG_GPIO_MENU_UP
Value:U8X8_MSG_GPIO_MENU_UP
Alias for the keys (buttons) used to navigate and interact with menu. Submitted to
GEM::registerKeyPress()andGEM_u8g2::registerKeyPress()methods. Indicates that Up key is pressed (navigate up through the menu items list, select next value of the digit/char of editable variable, or previous option in select). -
-
GEM_KEY_RIGHT
-
GEM:
Type: macro#define GEM_KEY_RIGHT 2
Value:2 -
GEM_u8g2:
Type: macro#define GEM_KEY_RIGHT U8X8_MSG_GPIO_MENU_NEXT
Value:U8X8_MSG_GPIO_MENU_NEXT
Alias for the keys (buttons) used to navigate and interact with menu. Submitted to
GEM::registerKeyPress()andGEM_u8g2::registerKeyPress()methods. Indicates that Right key is pressed (navigate through the link to another (child) menu page, select next digit/char of editable variable, execute code associated with button). -
-
GEM_KEY_DOWN
-
GEM:
Type: macro#define GEM_KEY_DOWN 3
Value:3 -
GEM_u8g2:
Type: macro#define GEM_KEY_DOWN U8X8_MSG_GPIO_MENU_DOWN
Value:U8X8_MSG_GPIO_MENU_DOWN
Alias for the keys (buttons) used to navigate and interact with menu. Submitted to
GEM::registerKeyPress()andGEM_u8g2::registerKeyPress()methods. Indicates that Down key is pressed (navigate down through the menu items list, select previous value of the digit/char of editable variable, or next option in select). -
-
GEM_KEY_LEFT
-
GEM:
Type: macro#define GEM_KEY_LEFT 4
Value:4 -
GEM_u8g2:
Type: macro#define GEM_KEY_LEFT U8X8_MSG_GPIO_MENU_PREV
Value:U8X8_MSG_GPIO_MENU_PREV
Alias for the keys (buttons) used to navigate and interact with menu. Submitted to
GEM::registerKeyPress()andGEM_u8g2::registerKeyPress()methods. Indicates that Left key is pressed (navigate through the Back button to the previous menu page, select previous digit/char of editable variable). -
-
GEM_KEY_CANCEL
-
GEM:
Type: macro#define GEM_KEY_CANCEL 5
Value:5 -
GEM_u8g2:
Type: macro#define GEM_KEY_CANCEL U8X8_MSG_GPIO_MENU_HOME
Value:U8X8_MSG_GPIO_MENU_HOME
Alias for the keys (buttons) used to navigate and interact with menu. Submitted to
GEM::registerKeyPress()andGEM_u8g2::registerKeyPress()methods. Indicates that Cancel key is pressed (navigate to the previous (parent) menu page, exit edit mode without saving the variable, exit context loop if allowed within context's settings). -
-
GEM_KEY_OK
-
GEM:
Type: macro#define GEM_KEY_OK 6
Value:6 -
GEM_u8g2:
Type: macro#define GEM_KEY_OK U8X8_MSG_GPIO_MENU_SELECT
Value:U8X8_MSG_GPIO_MENU_SELECT
Alias for the keys (buttons) used to navigate and interact with menu. Submitted to
GEM::registerKeyPress()andGEM_u8g2::registerKeyPress()methods. Indicates that Ok/Apply key is pressed (toggle boolean menu item, enter edit mode of the associated non-boolean variable, exit edit mode with saving the variable, execute code associated with button). -
Methods
-
setSplash( const uint8_t PROGMEM *sprite )
AltSerialGraphicLCD version
Accepts:_const uint8_t PROGMEM_ *
Returns: nothing
Set custom sprite displayed as the splash screen when GEM is being initialized. Should be called beforeGEM::init(). The following is the format of the sprite as described in AltSerialGraphicLCD library documentation:The sprite commences with two bytes which are the width and height of the image in pixels. The pixel data is organised as rows of 8 vertical pixels per byte where the least significant bit (LSB) is the top-left pixel and the most significant bit (MSB) tends towards the bottom-left pixel. A complete row of 8 vertical pixels across the image width comprises the first row, this is then followed by the next row of 8 vertical pixels and so on. Where the image height is not an exact multiple of 8 bits then any unused bits are typically set to zero (although this does not matter).
For more details on splash customization see corresponding section of the wiki.
-
setSplash( byte width, byte height, const unsigned char U8X8_PROGMEM *image )
U8g2 version
Accepts:byte,byte,_const unsigned char U8X8_PROGMEM_ *
Returns: nothing
Set custom XBM image displayed as the splash screen when GEM is being initialized. Should be called beforeGEM_u8g2::init(). For more details on splash customization and example refer to corresponding section of the wiki. -
setSplashDelay( uint16_t value )
Accepts:uint16_t
Returns: nothing
Set splash screen delay (in ms). By default splash screen will be visible for 1000ms. Maximum supported value is 65535ms. Setting to 0 will disable splash screen. Should be called beforeGEM::init()andGEM_u8g2::init().Note: internally splash screen delay is implemented via
delay()function. This is the only place in library wheredelay()is utilized (aside of example sketches). -
hideVersion( boolean flag = true )
Accepts:boolean
Returns: nothing
Turn printing of the current GEM library version on splash screen off (hideVersion()) or back on (hideVersion(false)). By default the version is printed. Should be called beforeGEM::init()andGEM_u8g2::init(). -
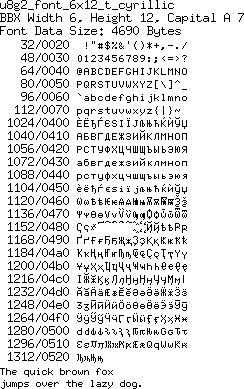
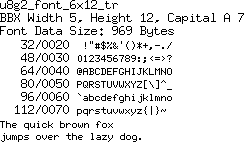
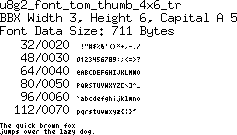
enableCyrillic( boolean flag = true )
U8g2 version only
Accepts:boolean
Returns: nothing
Turn Cyrillic typeset on (enableCyrillic()) or off (enableCyrillic(false)).u8g2_font_6x12_t_cyrillicandu8g2_font_4x6_t_cyrillicfonts from U8g2 will be used when Cyrillic typeset is enabled, and default fontsu8g2_font_6x12_trandu8g2_font_tom_thumb_4x6_trwill be used otherwise. You may use Cyrillic in menu title, menu item labels (GEMItem, including buttons and menu page links), and select options (SelectOptionInt,SelectOptionByte,SelectOptionChardata structures). Editable strings with Cyrillic characters are not supported (edit mode of such strings may lead to unpredictable results due to incompatibility with 2-byte characters). Increases required program storage space, use cautiously. By default Cyrillic typeset is off. Should be called beforeGEM_u8g2::init(). -
init()
Returns: nothing
Init the menu: load necessary sprites into RAM of the SparkFun Graphic LCD Serial Backpack (for AltSerialGraphicLCD version), display GEM splash screen, etc.The following
GLCDobject settings will be applied duringinit():-
glcd.drawMode(GLCD_MODE_NORMAL); -
glcd.fontMode(GLCD_MODE_NORMAL); -
glcd.set(GLCD_ID_CRLF, 0); -
glcd.set(GLCD_ID_SCROLL, 0).
Keep this in mind if you are planning to use the same object in your own routines.
The following
U8g2object settings will be applied duringinit():-
u8g2.setDrawColor(1); -
u8g2.setFontPosTop().
Keep this in mind if you are planning to use the same object in your own routines.
-
-
reInit()
Returns: nothing
Set GEM specific settings to their values, set initially ininit()method. If you were working with AltSerialGraphicLCD or U8g2 graphics in your own user-defined button action, it may be a good idea to callreInit()before drawing menu back to screen (generally in customcontext.exit()routine). See context for more details. -
setMenuPageCurrent( GEMPage& menuPageCurrent )
Accepts:GEMPage
Returns: nothing
Set supplied menu page as current. AcceptsGEMPageobject. -
drawMenu()
Returns: nothing
Draw menu on screen, with menu page set earlier inGEM::setMenuPageCurrent()orGEM_u8g2::setMenuPageCurrent(). -
boolean readyForKey()
Returns:boolean
Check that menu is waiting for the key press. -
registerKeyPress( byte keyCode )
Accepts:byte(Values:GEM_KEY_NONE,GEM_KEY_UP,GEM_KEY_RIGHT,GEM_KEY_DOWN,GEM_KEY_LEFT,GEM_KEY_CANCEL,GEM_KEY_OK)
Returns: nothing
Register the key press and trigger corresponding action (navigation through the menu, editing values, pressing menu buttons). -
clearContext()
Returns: nothing
Clear context. Assignsnullptrvalues to function pointers of thecontextproperty and setsallowExitflag of thecontexttotrue.
Properties
-
context
Type:AppContext
Currently set context.
GEMPage
Menu page holds menu items GEMItem and represents menu level. Menu can have multiple menu pages (linked to each other) with multiple menu items each. Object of class GEMPage defines as follows:
GEMPage menuPage(title[, exitAction]);
-
title
Type:char*
Title of the menu page displayed at top of the screen.Note: there is no explicit restriction on the length of the title. However, AltSerialGraphicLCD and U8g2 vesrions handle long titles differently. If title won't fit on a single line, it will overflow to the next line in AltSerialGraphicLCD version, but will be cropped at the edge of the screen in U8g2 version. In case of AltSerialGraphicLCD it is possible to accommodate multiline menu titles by enlarging
menuPageScreenTopOffsetwhen initializingGEMobject. -
exitAction [optional]
Type:pointer to function
Pointer to function that will be executed whenGEM_KEY_CANCELkey is pressed while being on top level menu page (i.e. page that has no parent menu page) and not in edit mode. Action-specific context can be created, which can have its own enter (setup) and exit callbacks as well as loop function.
Methods
-
addMenuItem( GEMItem& menuItem )
Accepts:GEMItem
Returns: nothing
Add menu item to menu page. AcceptsGEMItemobject. -
setParentMenuPage( GEMPage& parentMenuPage )
Accepts:GEMPage
Returns: nothing
Specify parent level menu page (to know where to go back to when pressing Back button, that will be added automatically). AcceptsGEMPageobject. -
setTitle( char* title )
Returns: nothing
Set title of the menu page. Can be used to update menu page title dynamically. -
char* getTitle()
Returns:char*
Get title of the menu page.
GEMItem
Menu item of the menu. Can represent editable or read-only variable of type int, byte, float, double, boolean, char[17] (or char[GEM_STR_LEN], to be exact); option select of type int, byte, float, double, char[n]; link to another menu page; or button that can invoke user-defined actions and create action-specific context, which can have its own enter (setup) and exit callbacks as well as loop function. User-defined callback function can be specified to invoke when editable menu item is saved or option is selected. Exact definition of GEMItem object depends on its type.
Note: support for editable variables of types
floatanddoubleis optional. It is enabled by default, but can be disabled by editing config.h file that ships with the library. Disabling this feature may save considerable amount of program storage space (up to 10% on Arduino UNO). See Floating-point variables for more details.
Variable
GEMItem menuItemVar(title, linkedVariable[, readonly]);
or
GEMItem menuItemVar(title, linkedVariable[, saveCallback]);
-
title
Type:char*
Title of the menu item displayed on the screen. -
linkedVariable
Type:int,byte,float,double,boolean,char[17](orchar[GEM_STR_LEN], to be exact)
Reference to variable that menu item is associated with. -
readonly [optional]
Type:boolean
Values:GEM_READONLY(alias fortrue),false
Default:false
Sets readonly mode for variable that menu item is associated with. -
saveCallback [optional]
Type:pointer to function
Pointer to callback function executed when associated variable is successfully saved.
Note: you cannot specify both readonly mode and callback in the same constructor. However, you can set readonly mode for menu item with callback explicitly later using
GEMItem::setReadonly()method.
Option select
GEMItem menuItemSelect(title, linkedVariable, select[, readonly]);
or
GEMItem menuItemSelect(title, linkedVariable, select[, saveCallback]);
-
title
Type:char*
Title of the menu item displayed on the screen. -
linkedVariable
Type:int,byte,float,double,char[n]
Reference to variable that menu item is associated with. Note that in case ofchar[n]variable, character array should be big enough to hold select option with the longest value to avoid overflows. It can be greater thanGEM_STR_LENlimit (i.e. it is possible to haven> 17) set for non-select menu item variable. -
select
Type:GEMSelect
Reference toGEMSelectoption select object that represents a list of available values. -
readonly [optional]
Type:boolean
Values:GEM_READONLY(alias fortrue),false
Default:false
Sets readonly mode for variable that menu item is associated with. -
saveCallback [optional]
Type:pointer to function
Pointer to callback function executed when associated variable is successfully saved.
Note: you cannot specify both readonly mode and callback in the same constructor. However, you can set readonly mode for menu item with callback explicitly later using
GEMItem::setReadonly()method.
Link to menu page
GEMItem menuItemLink(title, linkedPage[, readonly]);
-
title
Type:char*
Title of the menu item displayed on the screen. -
linkedPage
Type:GEMPage
Menu pageGEMPagethat menu item is associated with. -
readonly [optional]
Type:boolean
Values:GEM_READONLY(alias fortrue),false
Default:false
Sets readonly mode for the link (user won't be able to navigate to linked page).
Button
GEMItem menuItemButton(title, buttonAction[, readonly]);
-
title
Type:char*
Title of the menu item displayed on the screen (in this case - name of the button). -
buttonAction
Type:pointer to function
Pointer to function that will be executed when menu item is activated. Action-specific context can be created, which can have its own enter (setup) and exit callbacks as well as loop function. -
readonly [optional]
Type:boolean
Values:GEM_READONLY(alias fortrue),false
Default:false
Sets readonly mode for the button (user won't be able to call action associated with it).
Constants
-
GEM_READONLY
Type: macro#define GEM_READONLY true
Value:true
Alias for readonly modifier of associated with menu item variable. Submitted as readonly setting toGEMItemconstructor of variable menu items and option select. -
GEM_HIDDEN
Type: macro#define GEM_HIDDEN true
Value:true
Alias for hidden state of the menu item. Submitted as hide option toGEMItem::hide()method. -
GEM_STR_LEN
Type: macro#define GEM_STR_LEN 17
Value:17
Alias for supported length of the string (character sequence) variable of typechar[GEM_STR_LEN]. Note that this limits the length of the string that can be used with editable character menu item variable, but option select variable doesn't have this restriction. But you still have to make sure that in the latter case character array should be big enough to hold select option with the longest value to avoid overflows.
Methods
-
setTitle( char* title )
Returns: nothing
Set title of the menu item. Can be used to update menu item title dynamically. -
char* getTitle()
Returns:char*
Get title of the menu item. -
setPrecision()
Returns: nothing
Explicitly set precision forfloatordoublevariable as required bydtostrf()conversion used internally, i.e. the number of digits after the decimal sign. -
setReadonly( boolean mode = true )
Accepts:boolean
Returns: nothing
Explicitly set (setReadonly(true), orsetReadonly(GEM_READONLY), orsetReadonly()) or unset (setReadonly(false)) readonly mode for variable that menu item is associated with (relevant forGEM_VAL_INTEGER,GEM_VAL_BYTE,GEM_VAL_FLOAT,GEM_VAL_DOUBLE,GEM_VAL_CHAR,GEM_VAL_BOOLEANvariable menu items andGEM_VAL_SELECToption select), or menu buttonGEM_ITEM_BUTTONand menu linkGEM_ITEM_LINK, pressing of which won't result in any action, associated with them. -
boolean getReadonly()
Returns:boolean
Get readonly state of the variable that menu item is associated with (as well as menu link or button):truefor readonly state,falseotherwise. -
hide( boolean hide = true )
Accepts:boolean
Returns: nothing
Hide (hide(true), orhide(GEM_HIDDEN), orhide()) or show (hide(false)) menu item. Hidden menu items won't be printed to the screen the next time menu is drawn. -
show()
Returns: nothing
Show previously hidden menu item. -
boolean getHidden()
Returns:boolean
Get hidden state of the menu item:truewhen menu item is hidden,falseotherwise.
GEMSelect
List of values available for option select. Supplied to GEMItem constructor. Object of class GEMSelect defines as follows:
GEMSelect mySelect(length, optionsArray);
-
length
Type:byte
Length ofoptionsArray. Should be explicitly supplied because array is passed as a pointer. Easy way to provide array length is to calculate it using the following expression:sizeof(optionsArray)/sizeof(SelectOptionInt), orsizeof(optionsArray)/sizeof(SelectOptionByte), orsizeof(optionsArray)/sizeof(SelectOptionFloat), orsizeof(optionsArray)/sizeof(SelectOptionDouble), orsizeof(optionsArray)/sizeof(SelectOptionChar)depending on the type of the array used. -
optionsArray
Type:void*(pointer to array of type eitherSelectOptionInt, orSelectOptionByte, orSelectOptionFloat, orSelectOptionDouble, orSelectOptionChar)
Array of the available options. Type of the array is eitherSelectOptionInt, orSelectOptionByte, orSelectOptionFloat, orSelectOptionDouble, orSelectOptionChardepending on the kind of data options are selected from. See the following section for definition of these custom types.
Example of use:
// Integer option select
// 1) Create array of options:
SelectOptionInt optionsArray[] = {{"Opt 1", 10}, {"Opt 2", -12}, {"Opt 3", 13}};
// 2) Supply array of options to GEMSelect constructor:
GEMSelect mySelect(sizeof(optionsArray)/sizeof(SelectOptionInt), optionsArray);
or
// Integer option select
// GEMSelect constructor with anonymous options array (length of array (3) can't be calculated in this case and should be explicitly supplied):
GEMSelect mySelect(3, (SelectOptionInt[]){{"Opt 1", 10}, {"Opt 2", -12}, {"Opt 3", 13}});
SelectOptionInt
Data structure that represents option of the select of type int. Object of type SelectOptionInt defines as follows:
SelectOptionInt selectOption = {name, val_int};
-
name
Type:char*
Text label of the option as displayed in select. -
val_int
Type:int
Value of the option that is assigned to linked variable upon option selection.
SelectOptionByte
Data structure that represents option of the select of type byte. Object of type SelectOptionByte defines as follows:
SelectOptionByte selectOption = {name, val_byte};
-
name
Type:char*
Text label of the option as displayed in select. -
val_byte
Type:byte
Value of the option that is assigned to linked variable upon option selection.
SelectOptionFloat
Data structure that represents option of the select of type float. Object of type SelectOptionFloat defines as follows:
SelectOptionFloat selectOption = {name, val_float};
-
name
Type:char*
Text label of the option as displayed in select. -
val_float
Type:float
Value of the option that is assigned to linked variable upon option selection.
SelectOptionDouble
Data structure that represents option of the select of type double. Object of type SelectOptionDouble defines as follows:
SelectOptionDouble selectOption = {name, val_double};
-
name
Type:char*
Text label of the option as displayed in select. -
val_double
Type:double
Value of the option that is assigned to linked variable upon option selection.
SelectOptionChar
Data structure that represents option of the select of type char*. Object of type SelectOptionChar defines as follows:
SelectOptionChar selectOption = {name, val_char};
-
name
Type:char*
Text label of the option as displayed in select. -
val_char
Type:char*
Value of the option that is assigned to linked variable upon option selection. Note that character array of associated with menu item variable (of typechar[n]) should be big enough to hold select option with the longest value to avoid overflows.
AppContext
Data structure that represents "context" of the currently executing user action, toggled by pressing menu item button. Property context of the GEM (and GEM_u8g2) object is of type AppContext.
Consists of pointers to user-supplied functions that represent setup and loop functions (named context.enter() and context.loop() respectively) of the context. It allows you to initialize variables and e.g. prepare screen (if needed for the task that function performs), and then run through loop function, waiting for user input, or sensor reading, or command to terminate and exit back to the menu eventually. In the latter case additional context.exit() function will be called, that can be used to clean up your context and e.g. to free some memory and draw menu back to screen.
Object of type AppContext defines as follows:
AppContext myContext = {loop, enter, exit, allowExit};
-
loop
Type:pointer to function
Pointer toloop()function of current context. Similar to regularloop()function; executed each regularloop()iteration. Usually contains code of user-defined action that is run when menu item button is pressed. -
enter [optional]
Type:pointer to function
Pointer toenter()function of current context. Similar to regularsetup()function, called manually, generally once before context'sloop()function; is optional. Usually contains some additional set up required by the user-defined action pointed to by context'sloop(). -
exit [optional]
Type:pointer to function
Pointer toexit()function of current context. Called automatically when user exits currently running context ifcontext.allowExit(see below) is set totrue. Should be invoked manually otherwise. Usually contains instructions to do some cleanup after context'sloop()and to draw menu on screen again (by callingdrawMenu()method ofGEMorGEM_u8g2object). If no user-defined function specified, default action will be invoked that consists of call to three methods ofGEMorGEM_u8g2object:reInit(),drawMenu(), andclearContext(). -
allowExit Type:
boolean
Default:true
Setting tofalsewill require manually exit the context'sloop()from within the loop itself: all necessary key detection should be done in context'sloop()accordingly, andcontext.exit()should be called explicitly; otherwise exit is handled automatically by pressingGEM_KEY_CANCELkey.
Basic example of use:
...

void buttonAction(); // Forward declaration
GEMItem menuItemButton("Blink!", buttonAction);

...

// Create menu object
GEM menu(glcd); // AltSerialGraphicLCD version used for example

...

void buttonAction() {
  // Declaration of context functions
  menu.context.loop = buttonContextLoop;
  menu.context.enter = buttonContextEnter; // Optional
  menu.context.exit = buttonContextExit; // Optional
  // Call of context functions
  menu.context.enter();
  //menu.context.allowExit = false; // Set to false if required to manually exit the context loop from within the loop itself (default is true)
}

void buttonContextEnter() {
  // Running some user-defined routines that usually belongs to setup()
  // Clear LCD screen
  glcd.clearScreen();
  // Initialize digital pin LED_BUILTIN as an output.
  pinMode(LED_BUILTIN, OUTPUT);
}

void buttonContextLoop() {
  // Do something in the loop() function you would normally do in the sketch, e.g. blink built in LED
  digitalWrite(LED_BUILTIN, HIGH);
  delay(500);
  digitalWrite(LED_BUILTIN, LOW);
  delay(500);
}

void buttonContextExit() {
  // Set GEM specific settings to their values
  menu.reInit();
  // Draw menu back to screen
  menu.drawMenu();
  // Clear context (assigns `nullptr` values to function pointers of the `context` property of the `GEM` object and resets `allowExit` flag to its default state)
  menu.clearContext();
}
To exit currently running context and return to menu, press button associated with GEM_KEY_CANCEL key (only if context.allowExit flag is set to its default value of true, otherwise you should handle exit from the loop manually and call context.exit() explicitly) - context.exit() callback will be called.
For more details see supplied example on context usage and read corresponding section of the wiki.
Floating-point variables
The float data type has only 6-7 decimal digits of precision ("mantissa"). For AVR based Arduino boards (like UNO) double data type has basically the same precision, being only 32 bit wide (the same as float). On some other boards (like SAMD boards, e.g. with M0 chips) double is actually a 64 bit number, so it has more precision (up to 15 digits).
Internally in GEM, dtostrf() and atof() are used to convert floating-point number to and from a string. Support for dtostrf() comes with stdlib.h for AVR, and hence available out of the box for AVR-based boards. While it is possible to use sprintf() for some other boards (like SAMD), dtostrf() is used for them instead as well, for consistency through explicit inclusion of avr/dtostrf.h. See this thread for some more details on dtostrf() support across different boards.
Default precision (the number of digits after the decimal sign, in terms of dtostrf()) is set to 6, but can be individually set for each editable menu item using GEMItem::setPrecision() method.
Note that maximum length of the number should not exceed GEM_STR_LEN (i.e. 17) - otherwise overflows and undetermined behavior may occur (that includes the value of precision specified through GEMItem::setPrecision() method or default one, which will increase length of the number with trailing zeros if necessary). This is result of using char[GEM_STR_LEN] buffer during dtostrf() conversion. It is not possible to enter number with the length exceeding this limit during edit of the variable, however, additional caution should be taken to verify that initial value of the variable (or externally changed value) in combination with specified precision does not exceed this limit.
It is possible to exclude support for editable float and double variables to save some space on your chip (up to 10% of program storage space on UNO). For that, locate file config.h that comes with the library, open it and comment out corresponding inclusion, i.e. change this line:
#include "config/support-float-edit.h"
to
// #include "config/support-float-edit.h"
Note that option selects support float and double variables regardless of this setting.
Configuration
It is possible to configure GEM library by excluding some features not needed in your project. That may help to save some additional program storage space. E.g., you can disable support for editable floating-point variables (see previous section).
You can also choose which version of GEM library (AltSerialGraphicLCD or U8g2 based) should be compiled. That way, there won't be requirement to have both of the supported graphics libraries installed in the system at the same time (regardless of which one is actually used).
For that, locate file config.h that comes with the library, open it and comment out corresponding inclusion.
To disable AltSerialGraphicLCD support comment out the following line:
#include "config/enable-glcd.h"
To disable U8g2 support comment out the following line:
#include "config/enable-u8g2.h"
More configuration options may be be added in the future.
Keep in mind that contents of the
config.hfile most likely will be reset to its default state after installing library update.
Examples
GEM library comes with several annotated examples that will help you get familiar with it. More detailed info on the examples (including schematic and breadboard view where necessary) available in wiki.
License
This library is free software; you can redistribute it and/or modify it under the terms of the GNU Lesser General Public License as published by the Free Software Foundation; either version 3 of the License, or (at your option) any later version.
This library is distributed in the hope that it will be useful, but WITHOUT ANY WARRANTY; without even the implied warranty of MERCHANTABILITY or FITNESS FOR A PARTICULAR PURPOSE. See the GNU Lesser General Public License for more details.
You should have received a copy of the GNU Lesser General Public License along with this library. If not, see http://www.gnu.org/licenses/.