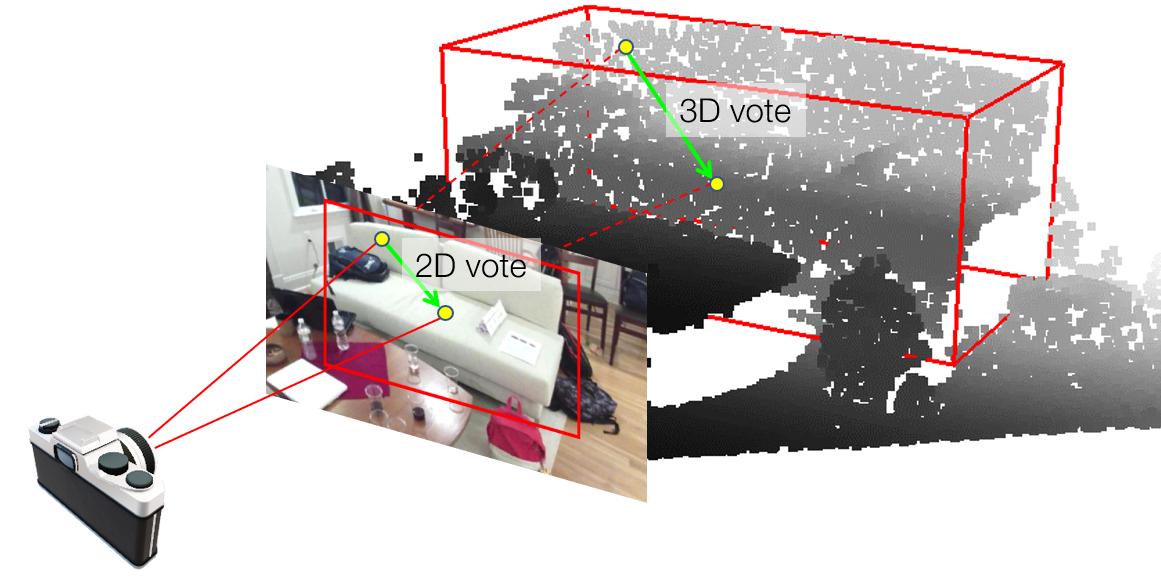
ImVoteNet
Boosting 3D Object Detection in Point Clouds with Image Votes
This repository contains the code release of the paper:
@inproceedings{qi2020imvotenet,
  title={Imvotenet: Boosting 3d object detection in point clouds with image votes},
  author={Qi, Charles R and Chen, Xinlei and Litany, Or and Guibas, Leonidas J},
  booktitle={IEEE Conference on Computer Vision and Pattern Recognition (CVPR)},
  year={2020}
}
Installation
Overall, the installation is similar to VoteNet. GPU is required. The code is tested with Ubuntu 18.04, Python 3.7.7, PyTorch 1.4.0, CUDA 10.0 and cuDNN v7.4.
First install PyTorch, for example through Anaconda:
conda install pytorch torchvision cudatoolkit=10.0 -c pytorchNext, install Python dependencies via pip (tensorboardX is used for for visualizations):
pip install matplotlib opencv-python plyfile tqdm networkx==2.2 trimesh==2.35.39
pip install tensorboardX --no-deps
Now we are ready to clone this repository:
git clone [email protected]:facebookresearch/imvotenet.git
cd imvotenet
The code depends on PointNet++ as a backbone, which needs compilation:
cd pointnet2
python setup.py install
cd ..
Data
Please follow the steps listed here to set up the SUN RGB-D dataset in the sunrgbd folder. The expected dataset structure under sunrgbd is:
sunrgbd/
  sunrgbd_pc_bbox_votes_50k_{v1,v2}_{train,val}/
  sunrgbd_trainval/
    # raw image data and camera used by ImVoteNet
    calib/*.txt
    image/*.jpg
For ImVoteNet, we provide 2D detection results from a pre-trained Faster R-CNN detector here. Please download the file, uncompress it, and place the resulting folders (sunrgbd_2d_bbox_50k_v1_{train,val}) under sunrgbd as well.
Training and Evaluation
Once the code and data are set up, one can train ImVoteNet by the following command:
CUDA_VISIBLE_DEVICES=0 python train.py --use_imvotenet --log_dir log_imvotenetThe setting CUDA_VISIBLE_DEVICES=0 forces the model to be trained on a single GPU (GPU 0 in this case). With the default batch size of 8, it takes about 7G memory during training.
To reproduce the experimental results in the paper and in general have faster development cycles, one can use a shorter learning schedule:
CUDA_VISIBLE_DEVICES=1 python train.py --use_imvotenet --log_dir log_140ep --max_epoch 140 --lr_decay_steps 80,120 --lr_decay_rates 0.1,0.1As a baseline, this code also supports training of the original VoteNet, which is launched by:
CUDA_VISIBLE_DEVICES=2 python train.py --log_dir log_votenetIn fact, the code is based on the VoteNet repository at commit 2f6d6d3, as a reference, it gives around 58 [email protected].
For other training options, one can use python train.py -h for assistance.
After the model is trained, the checkpoint can be tested and evaluated on the val set via:
python eval.py --use_imvotenet --checkpoint_path log_imvotenet/checkpoint.tar --dump_dir eval_imvotenet --cluster_sampling seed_fps --use_3d_nms --use_cls_nms --per_class_proposalFor reference, ImVoteNet gives around 63 [email protected].
TODO
- Add docs for some functions
- Investigate the 0.5 [email protected] gap after moving to PyTorch 1.4.0. (Originally the code is based on PyTorch 1.0.)
LICENSE
The code is released under the MIT license.