influxdata / Influxdb Client Python
Programming Languages
Projects that are alternatives of or similar to Influxdb Client Python
influxdb-client-python
.. marker-index-start
.. image:: https://circleci.com/gh/influxdata/influxdb-client-python.svg?style=svg :target: https://circleci.com/gh/influxdata/influxdb-client-python :alt: CircleCI
.. image:: https://codecov.io/gh/influxdata/influxdb-client-python/branch/master/graph/badge.svg :target: https://codecov.io/gh/influxdata/influxdb-client-python :alt: codecov
.. image:: https://img.shields.io/circleci/project/github/influxdata/influxdb-client-python/master.svg :target: https://circleci.com/gh/influxdata/influxdb-client-python :alt: CI status
.. image:: https://img.shields.io/pypi/v/influxdb-client.svg :target: https://pypi.org/project/influxdb-client/ :alt: PyPI package
.. image:: https://img.shields.io/pypi/pyversions/influxdb-client.svg :target: https://pypi.python.org/pypi/influxdb-client :alt: Supported Python versions
.. image:: https://readthedocs.org/projects/influxdb-client/badge/?version=latest :target: https://influxdb-client.readthedocs.io/en/latest/?badge=latest :alt: Documentation status
.. image:: https://img.shields.io/badge/slack-join_chat-white.svg?logo=slack&style=social :target: https://www.influxdata.com/slack :alt: Slack Status
.. _documentation: https://influxdb-client.readthedocs.io
InfluxDB 2.0 python client library.
Note: Use this client library with InfluxDB 2.x and InfluxDB 1.8+. For connecting to InfluxDB 1.7 or earlier instances, use the influxdb-python <https://github.com/influxdata/influxdb-python>_ client library.
InfluxDB 2.0 client features
- Querying data
- using the Flux language
- into csv, raw data,
flux_table <https://github.com/influxdata/influxdb-client-python/blob/master/influxdb_client/client/flux_table.py#L5>_ structure,Pandas DataFrame <https://pandas.pydata.org/pandas-docs/stable/reference/api/pandas.DataFrame.html>_ -
How to queries <#queries>_
- Writing data using
-
Line Protocol <https://docs.influxdata.com/influxdb/latest/reference/syntax/line-protocol>_ -
Data Point <https://github.com/influxdata/influxdb-client-python/blob/master/influxdb_client/client/write/point.py#L16>__ -
RxPY <https://rxpy.readthedocs.io/en/latest/>__ Observable -
Pandas DataFrame <https://pandas.pydata.org/pandas-docs/stable/reference/api/pandas.DataFrame.html>_ -
How to writes <#writes>_
-
-
InfluxDB 2.0 API <https://github.com/influxdata/influxdb/blob/master/http/swagger.yml>_ client for management- the client is generated from the
swagger <https://github.com/influxdata/influxdb/blob/master/http/swagger.yml>_ by using theopenapi-generator <https://github.com/OpenAPITools/openapi-generator>_ - organizations & users management
- buckets management
- tasks management
- authorizations
- health check
- ...
- the client is generated from the
-
InfluxDB 1.8 API compatibility_ - Examples
-
Connect to InfluxDB Cloud_ -
How to efficiently import large dataset_ -
Efficiency write data from IOT sensor_ -
How to use Jupyter + Pandas + InfluxDB 2_
-
- Advanced Usage
-
Gzip support_ -
Delete data_
-
Installation
.. marker-install-start
InfluxDB python library uses RxPY <https://github.com/ReactiveX/RxPY>__ - The Reactive Extensions for Python (RxPY).
Python 3.6 or later is required.
.. note::
It is recommended to use ``ciso8601`` with client for parsing dates. ``ciso8601`` is much faster than built-in Python datetime. Since it's written as a ``C`` module the best way is build it from sources:

**Windows**:

You have to install `Visual C++ Build Tools 2015 <http://go.microsoft.com/fwlink/?LinkId=691126&fixForIE=.exe>`_ to build ``ciso8601`` by ``pip``.

**conda**:

Install from sources: ``conda install -c conda-forge/label/cf202003 ciso8601``.
pip install ^^^^^^^^^^^
The python package is hosted on PyPI <https://pypi.org/project/influxdb-client/>_, you can install latest version directly:
.. code-block:: sh
pip install influxdb-client[ciso]
Then import the package:
.. code-block:: python
import influxdb_client
Setuptools ^^^^^^^^^^
Install via Setuptools <http://pypi.python.org/pypi/setuptools>_.
.. code-block:: sh
python setup.py install --user
(or sudo python setup.py install to install the package for all users)
.. marker-install-end
Getting Started
Please follow the Installation_ and then run the following:
.. marker-query-start
.. code-block:: python
from influxdb_client import InfluxDBClient, Point from influxdb_client.client.write_api import SYNCHRONOUS
bucket = "my-bucket"
client = InfluxDBClient(url="http://localhost:8086", token="my-token", org="my-org")
write_api = client.write_api(write_options=SYNCHRONOUS) query_api = client.query_api()
p = Point("my_measurement").tag("location", "Prague").field("temperature", 25.3)
write_api.write(bucket=bucket, record=p)
using Table structure
tables = query_api.query('from(bucket:"my-bucket") |> range(start: -10m)')
for table in tables: print(table) for row in table.records: print (row.values)
using csv library
csv_result = query_api.query_csv('from(bucket:"my-bucket") |> range(start: -10m)') val_count = 0 for row in csv_result: for cell in row: val_count += 1
.. marker-query-end
Client configuration
Via File
^^^^^^^^
A client can be configured via *.ini file in segment influx2.
The following options are supported:
-
url- the url to connect to InfluxDB -
org- default destination organization for writes and queries -
token- the token to use for the authorization -
timeout- socket timeout in ms (default value is 10000) -
verify_ssl- set this to false to skip verifying SSL certificate when calling API from https server -
ssl_ca_cert- set this to customize the certificate file to verify the peer
.. code-block:: python
self.client = InfluxDBClient.from_config_file("config.ini")
.. code-block::
[influx2]
url=http://localhost:8086
org=my-org
token=my-token
timeout=6000
verify_ssl=False
Via Environment Properties ^^^^^^^^^^^^^^^^^^^^^^^^^^ A client can be configured via environment properties.
Supported properties are:
-
INFLUXDB_V2_URL- the url to connect to InfluxDB -
INFLUXDB_V2_ORG- default destination organization for writes and queries -
INFLUXDB_V2_TOKEN- the token to use for the authorization -
INFLUXDB_V2_TIMEOUT- socket timeout in ms (default value is 10000) -
INFLUXDB_V2_VERIFY_SSL- set this to false to skip verifying SSL certificate when calling API from https server -
INFLUXDB_V2_SSL_CA_CERT- set this to customize the certificate file to verify the peer
.. code-block:: python
self.client = InfluxDBClient.from_env_properties()
.. marker-index-end
How to use
Writes ^^^^^^ .. marker-writes-start
The WriteApi <https://github.com/influxdata/influxdb-client-python/blob/master/influxdb_client/client/write_api.py>_ supports synchronous, asynchronous and batching writes into InfluxDB 2.0.
The data should be passed as a InfluxDB Line Protocol <https://docs.influxdata.com/influxdb/latest/write_protocols/line_protocol_tutorial/>\ , Data Point <https://github.com/influxdata/influxdb-client-python/blob/master/influxdb_client/client/write/point.py> or Observable stream.
Important: The WriteApi in batching mode (default mode) is suppose to run as a singleton. To flush all your data you should call _write_client.close() at the end of your script.
The default instance of WriteApi use batching.
The data could be written as """"""""""""""""""""""""""""
-
stringorbytesthat is formatted as a InfluxDB's line protocol -
Data Point <https://github.com/influxdata/influxdb-client-python/blob/master/influxdb_client/client/write/point.py#L16>__ structure - Dictionary style mapping with keys:
measurement,tags,fieldsandtime - List of above items
- A
batchingtype of write also supports anObservablethat produce one of an above item -
Pandas DataFrame <https://pandas.pydata.org/pandas-docs/stable/reference/api/pandas.DataFrame.html>_
Batching """"""""
The batching is configurable by write_options\ :
.. list-table:: :header-rows: 1
-
- Property
- Description
- Default Value
-
- batch_size
- the number of data pointx to collect in a batch
1000
-
- flush_interval
- the number of milliseconds before the batch is written
1000
-
- jitter_interval
- the number of milliseconds to increase the batch flush interval by a random amount
0
-
- retry_interval
- the number of milliseconds to retry unsuccessful write. The retry interval is used when the InfluxDB server does not specify "Retry-After" header.
5000
-
- max_retries
- the number of max retries when write fails
3
-
- max_retry_delay
- the maximum delay between each retry attempt in milliseconds
180_000
-
- exponential_base
- the base for the exponential retry delay, the next delay is computed as
retry_interval * exponential_base^(attempts-1) + random(jitter_interval) 5
.. code-block:: python
from datetime import datetime, timedelta

import pandas as pd
import rx
from pytz import UTC
from rx import operators as ops

from influxdb_client import InfluxDBClient, Point, WriteOptions

_client = InfluxDBClient(url="http://localhost:8086", token="my-token", org="my-org")
_write_client = _client.write_api(write_options=WriteOptions(batch_size=500,
                                                             flush_interval=10_000,
                                                             jitter_interval=2_000,
                                                             retry_interval=5_000,
                                                             max_retries=5,
                                                             max_retry_delay=30_000,
                                                             exponential_base=2))

"""
Write Line Protocol formatted as string
"""
_write_client.write("my-bucket", "my-org", "h2o_feet,location=coyote_creek water_level=1.0 1")
_write_client.write("my-bucket", "my-org", ["h2o_feet,location=coyote_creek water_level=2.0 2",
                                            "h2o_feet,location=coyote_creek water_level=3.0 3"])

"""
Write Line Protocol formatted as byte array
"""
_write_client.write("my-bucket", "my-org", "h2o_feet,location=coyote_creek water_level=1.0 1".encode())
_write_client.write("my-bucket", "my-org", ["h2o_feet,location=coyote_creek water_level=2.0 2".encode(),
                                            "h2o_feet,location=coyote_creek water_level=3.0 3".encode()])

"""
Write Dictionary-style object
"""
_write_client.write("my-bucket", "my-org", {"measurement": "h2o_feet", "tags": {"location": "coyote_creek"},
                                            "fields": {"water_level": 1.0}, "time": 1})
_write_client.write("my-bucket", "my-org", [{"measurement": "h2o_feet", "tags": {"location": "coyote_creek"},
                                             "fields": {"water_level": 2.0}, "time": 2},
                                            {"measurement": "h2o_feet", "tags": {"location": "coyote_creek"},
                                             "fields": {"water_level": 3.0}, "time": 3}])

"""
Write Data Point
"""
_write_client.write("my-bucket", "my-org",
                    Point("h2o_feet").tag("location", "coyote_creek").field("water_level", 4.0).time(4))
_write_client.write("my-bucket", "my-org",
                    [Point("h2o_feet").tag("location", "coyote_creek").field("water_level", 5.0).time(5),
                     Point("h2o_feet").tag("location", "coyote_creek").field("water_level", 6.0).time(6)])

"""
Write Observable stream
"""
_data = rx \
    .range(7, 11) \
    .pipe(ops.map(lambda i: "h2o_feet,location=coyote_creek water_level={0}.0 {0}".format(i)))

_write_client.write("my-bucket", "my-org", _data)

"""
Write Pandas DataFrame
"""
_now = datetime.now(UTC)
_data_frame = pd.DataFrame(data=[["coyote_creek", 1.0], ["coyote_creek", 2.0]],
                           index=[_now, _now + timedelta(hours=1)],
                           columns=["location", "water_level"])

_write_client.write("my-bucket", "my-org", record=_data_frame, data_frame_measurement_name='h2o_feet',
                    data_frame_tag_columns=['location'])

"""
Close client
"""
_write_client.close()
_client.close()
Default Tags """"""""""""
Sometimes is useful to store same information in every measurement e.g. hostname, location, customer.
The client is able to use static value or env property as a tag value.
The expressions:
-
California Miner- static value -
${env.hostname}- environment property
Via API
.. code-block:: python
point_settings = PointSettings()
point_settings.add_default_tag("id", "132-987-655")
point_settings.add_default_tag("customer", "California Miner")
point_settings.add_default_tag("data_center", "${env.data_center}")

self.write_client = self.client.write_api(write_options=SYNCHRONOUS, point_settings=point_settings)
.. code-block:: python
self.write_client = self.client.write_api(write_options=SYNCHRONOUS,
                                              point_settings=PointSettings(**{"id": "132-987-655",
                                                                              "customer": "California Miner"}))
Via Configuration file
In a init <https://docs.python.org/3/library/configparser.html>_ configuration file you are able to specify default tags by tags segment.
.. code-block:: python
self.client = InfluxDBClient.from_config_file("config.ini")
.. code-block::
[influx2]
url=http://localhost:8086
org=my-org
token=my-token
timeout=6000

[tags]
id = 132-987-655
customer = California Miner
data_center = ${env.data_center}
You could also use a TOML <https://toml.io/en/>_ format for the configuration file.
Via Environment Properties
You are able to specify default tags by environment properties with prefix INFLUXDB_V2_TAG_.
Examples:
INFLUXDB_V2_TAG_IDINFLUXDB_V2_TAG_HOSTNAME
.. code-block:: python
self.client = InfluxDBClient.from_env_properties()
Asynchronous client """""""""""""""""""
Data are writes in an asynchronous HTTP request.
.. code-block:: python
from influxdb_client import InfluxDBClient, Point from influxdb_client.client.write_api import ASYNCHRONOUS
client = InfluxDBClient(url="http://localhost:8086", token="my-token", org="my-org") write_api = client.write_api(write_options=ASYNCHRONOUS)
_point1 = Point("my_measurement").tag("location", "Prague").field("temperature", 25.3) _point2 = Point("my_measurement").tag("location", "New York").field("temperature", 24.3)
async_result = write_api.write(bucket="my-bucket", record=[_point1, _point2]) async_result.get()
client.close()
Synchronous client """"""""""""""""""
Data are writes in a synchronous HTTP request.
.. code-block:: python
from influxdb_client import InfluxDBClient, Point from influxdb_client .client.write_api import SYNCHRONOUS
client = InfluxDBClient(url="http://localhost:8086", token="my-token", org="my-org") write_api = client.write_api(write_options=SYNCHRONOUS)
_point1 = Point("my_measurement").tag("location", "Prague").field("temperature", 25.3) _point2 = Point("my_measurement").tag("location", "New York").field("temperature", 24.3)
write_api.write(bucket="my-bucket", record=[_point1, _point2])
client.close()
.. marker-writes-end
Queries ^^^^^^^
The result retrieved by QueryApi <https://github.com/influxdata/influxdb-client-python/blob/master/influxdb_client/client/query_api.py>_ could be formatted as a:
- Flux data structure:
FluxTable <https://github.com/influxdata/influxdb-client-python/blob/master/influxdb_client/client/flux_table.py#L5>,FluxColumn <https://github.com/influxdata/influxdb-client-python/blob/master/influxdb_client/client/flux_table.py#L22>andFluxRecord <https://github.com/influxdata/influxdb-client-python/blob/master/influxdb_client/client/flux_table.py#L31>_ -
csv.reader <https://docs.python.org/3.4/library/csv.html#reader-objects>__ which will iterate over CSV lines - Raw unprocessed results as a
striterator -
Pandas DataFrame <https://pandas.pydata.org/pandas-docs/stable/reference/api/pandas.DataFrame.html>_
The API also support streaming FluxRecord via query_stream <https://github.com/influxdata/influxdb-client-python/blob/master/influxdb_client/client/query_api.py#L77>_, see example below:
.. code-block:: python
from influxdb_client import InfluxDBClient, Point, Dialect
from influxdb_client.client.write_api import SYNCHRONOUS

client = InfluxDBClient(url="http://localhost:8086", token="my-token", org="my-org")

write_api = client.write_api(write_options=SYNCHRONOUS)
query_api = client.query_api()

"""
Prepare data
"""

_point1 = Point("my_measurement").tag("location", "Prague").field("temperature", 25.3)
_point2 = Point("my_measurement").tag("location", "New York").field("temperature", 24.3)

write_api.write(bucket="my-bucket", record=[_point1, _point2])

"""
Query: using Table structure
"""
tables = query_api.query('from(bucket:"my-bucket") |> range(start: -10m)')

for table in tables:
    print(table)
    for record in table.records:
        print(record.values)

print()
print()

"""
Query: using Stream
"""
records = query_api.query_stream('from(bucket:"my-bucket") |> range(start: -10m)')

for record in records:
    print(f'Temperature in {record["location"]} is {record["_value"]}')

"""
Interrupt a stream after retrieve a required data
"""
large_stream = query_api.query_stream('from(bucket:"my-bucket") |> range(start: -100d)')
for record in large_stream:
    if record["location"] == "New York":
        print(f'New York temperature: {record["_value"]}')
        break

large_stream.close()

print()
print()

"""
Query: using csv library
"""
csv_result = query_api.query_csv('from(bucket:"my-bucket") |> range(start: -10m)',
                                 dialect=Dialect(header=False, delimiter=",", comment_prefix="#", annotations=[],
                                                 date_time_format="RFC3339"))
for csv_line in csv_result:
    if not len(csv_line) == 0:
        print(f'Temperature in {csv_line[9]} is {csv_line[6]}')

"""
Close client
"""
client.close()
Pandas DataFrame """""""""""""""" .. marker-pandas-start
.. note:: For DataFrame querying you should install Pandas dependency via pip install influxdb-client[extra].
.. note:: Note that if a query returns more then one table then the client generates a DataFrame for each of them.
The client is able to retrieve data in Pandas DataFrame <https://pandas.pydata.org/pandas-docs/stable/reference/api/pandas.DataFrame.html>_ format thought query_data_frame:
.. code-block:: python
from influxdb_client import InfluxDBClient, Point, Dialect
from influxdb_client.client.write_api import SYNCHRONOUS

client = InfluxDBClient(url="http://localhost:8086", token="my-token", org="my-org")

write_api = client.write_api(write_options=SYNCHRONOUS)
query_api = client.query_api()

"""
Prepare data
"""

_point1 = Point("my_measurement").tag("location", "Prague").field("temperature", 25.3)
_point2 = Point("my_measurement").tag("location", "New York").field("temperature", 24.3)

write_api.write(bucket="my-bucket", record=[_point1, _point2])

"""
Query: using Pandas DataFrame
"""
data_frame = query_api.query_data_frame('from(bucket:"my-bucket") '
                                        '|> range(start: -10m) '
                                        '|> pivot(rowKey:["_time"], columnKey: ["_field"], valueColumn: "_value") '
                                        '|> keep(columns: ["location", "temperature"])')
print(data_frame.to_string())

"""
Close client
"""
client.close()
Output:
.. code-block::
    result table  location  temperature
0  _result     0  New York         24.3
1  _result     1    Prague         25.3
.. marker-pandas-end
Examples ^^^^^^^^
.. marker-examples-start
How to efficiently import large dataset """""""""""""""""""""""""""""""""""""""
The following example shows how to import dataset with dozen megabytes.
If you would like to import gigabytes of data then use our multiprocessing example: import_data_set_multiprocessing.py <https://github.com/influxdata/influxdb-client-python/blob/master/examples/import_data_set_multiprocessing.py>_ for use a full capability of your hardware.
- sources -
import_data_set.py <https://github.com/influxdata/influxdb-client-python/blob/master/examples/import_data_set.py>_
.. code-block:: python
""" Import VIX - CBOE Volatility Index - from "vix-daily.csv" file into InfluxDB 2.0
https://datahub.io/core/finance-vix#data """
from collections import OrderedDict from csv import DictReader
import rx from rx import operators as ops
from influxdb_client import InfluxDBClient, Point, WriteOptions
def parse_row(row: OrderedDict): """Parse row of CSV file into Point with structure:
       financial-analysis,type=ily close=18.47,high=19.82,low=18.28,open=19.82 1198195200000000000

   CSV format:
       Date,VIX Open,VIX High,VIX Low,VIX Close\n
       2004-01-02,17.96,18.68,17.54,18.22\n
       2004-01-05,18.45,18.49,17.44,17.49\n
       2004-01-06,17.66,17.67,16.19,16.73\n
       2004-01-07,16.72,16.75,15.5,15.5\n
       2004-01-08,15.42,15.68,15.32,15.61\n
       2004-01-09,16.15,16.88,15.57,16.75\n
       ...

   :param row: the row of CSV file
   :return: Parsed csv row to [Point]
   """

   """
    For better performance is sometimes useful directly create a LineProtocol to avoid unnecessary escaping overhead:
    """
    # from pytz import UTC
    # import ciso8601
    # from influxdb_client.client.write.point import EPOCH
    #
    # time = (UTC.localize(ciso8601.parse_datetime(row["Date"])) - EPOCH).total_seconds() * 1e9
    # return f"financial-analysis,type=vix-daily" \
    #        f" close={float(row['VIX Close'])},high={float(row['VIX High'])},low={float(row['VIX Low'])},open={float(row['VIX Open'])} " \
    #        f" {int(time)}"

   return Point("financial-analysis") \
       .tag("type", "vix-daily") \
       .field("open", float(row['VIX Open'])) \
       .field("high", float(row['VIX High'])) \
       .field("low", float(row['VIX Low'])) \
       .field("close", float(row['VIX Close'])) \
       .time(row['Date'])
"""
Converts vix-daily.csv into sequence of datad point
"""
data = rx
.from_iterable(DictReader(open('vix-daily.csv', 'r')))
.pipe(ops.map(lambda row: parse_row(row)))
client = InfluxDBClient(url="http://localhost:8086", token="my-token", org="my-org", debug=True)
""" Create client that writes data in batches with 50_000 items. """ write_api = client.write_api(write_options=WriteOptions(batch_size=50_000, flush_interval=10_000))
""" Write data into InfluxDB """ write_api.write(bucket="my-bucket", record=data) write_api.close()
"""
Querying max value of CBOE Volatility Index
"""
query = 'from(bucket:"my-bucket")'
' |> range(start: 0, stop: now())'
' |> filter(fn: (r) => r._measurement == "financial-analysis")'
' |> max()'
result = client.query_api().query(query=query)
""" Processing results """ print() print("=== results ===") print() for table in result: for record in table.records: print('max {0:5} = {1}'.format(record.get_field(), record.get_value()))
""" Close client """ client.close()
Efficiency write data from IOT sensor """""""""""""""""""""""""""""""""""""
- sources -
iot_sensor.py <https://github.com/influxdata/influxdb-client-python/blob/master/examples/iot_sensor.py>_
.. code-block:: python
""" Efficiency write data from IOT sensor - write changed temperature every minute """ import atexit import platform from datetime import timedelta
import psutil as psutil import rx from rx import operators as ops
from influxdb_client import InfluxDBClient, WriteApi, WriteOptions
def on_exit(db_client: InfluxDBClient, write_api: WriteApi): """Close clients after terminate a script.
   :param db_client: InfluxDB client
   :param write_api: WriteApi
   :return: nothing
   """
   write_api.close()
   db_client.close()
def sensor_temperature(): """Read a CPU temperature. The [psutil] doesn't support MacOS so we use [sysctl].
   :return: actual CPU temperature
   """
   os_name = platform.system()
   if os_name == 'Darwin':
       from subprocess import check_output
       output = check_output(["sysctl", "machdep.xcpm.cpu_thermal_level"])
       import re
       return re.findall(r'\d+', str(output))[0]
   else:
       return psutil.sensors_temperatures()["coretemp"][0]
def line_protocol(temperature): """Create a InfluxDB line protocol with structure:
       iot_sensor,hostname=mine_sensor_12,type=temperature value=68

   :param temperature: the sensor temperature
   :return: Line protocol to write into InfluxDB
   """

   import socket
   return 'iot_sensor,hostname={},type=temperature value={}'.format(socket.gethostname(), temperature)
"""
Read temperature every minute; distinct_until_changed - produce only if temperature change
"""
data = rx
.interval(period=timedelta(seconds=60))
.pipe(ops.map(lambda t: sensor_temperature()),
ops.distinct_until_changed(),
ops.map(lambda temperature: line_protocol(temperature)))
_db_client = InfluxDBClient(url="http://localhost:8086", token="my-token", org="my-org", debug=True)
""" Create client that writes data into InfluxDB """ _write_api = _db_client.write_api(write_options=WriteOptions(batch_size=1)) _write_api.write(bucket="my-bucket", record=data)
""" Call after terminate a script """ atexit.register(on_exit, _db_client, _write_api)
input()
Connect to InfluxDB Cloud """"""""""""""""""""""""" The following example demonstrate a simplest way how to write and query date with the InfluxDB Cloud.
At first point you should create an authentication token as is described here <https://v2.docs.influxdata.com/v2.0/security/tokens/create-token/>_.
After that you should configure properties: influx_cloud_url, influx_cloud_token, bucket and org in a influx_cloud.py example.
The last step is run a python script via: python3 influx_cloud.py.
- sources -
influx_cloud.py <https://github.com/influxdata/influxdb-client-python/blob/master/examples/influx_cloud.py>_
.. code-block:: python
"""
Connect to InfluxDB 2.0 - write data and query them
"""

from datetime import datetime

from influxdb_client import Point, InfluxDBClient
from influxdb_client.client.write_api import SYNCHRONOUS

"""
Configure credentials
"""
influx_cloud_url = 'https://us-west-2-1.aws.cloud2.influxdata.com'
influx_cloud_token = '...'
bucket = '...'
org = '...'

client = InfluxDBClient(url=influx_cloud_url, token=influx_cloud_token)
try:
    kind = 'temperature'
    host = 'host1'
    device = 'opt-123'

    """
    Write data by Point structure
    """
    point = Point(kind).tag('host', host).tag('device', device).field('value', 25.3).time(time=datetime.utcnow())

    print(f'Writing to InfluxDB cloud: {point.to_line_protocol()} ...')

    write_api = client.write_api(write_options=SYNCHRONOUS)
    write_api.write(bucket=bucket, org=org, record=point)

    print()
    print('success')
    print()
    print()

    """
    Query written data
    """
    query = f'from(bucket: "{bucket}") |> range(start: -1d) |> filter(fn: (r) => r._measurement == "{kind}")'
    print(f'Querying from InfluxDB cloud: "{query}" ...')
    print()

    query_api = client.query_api()
    tables = query_api.query(query=query, org=org)

    for table in tables:
        for row in table.records:
            print(f'{row.values["_time"]}: host={row.values["host"]},device={row.values["device"]} '
                  f'{row.values["_value"]} °C')

    print()
    print('success')

except Exception as e:
    print(e)
finally:
    client.close()
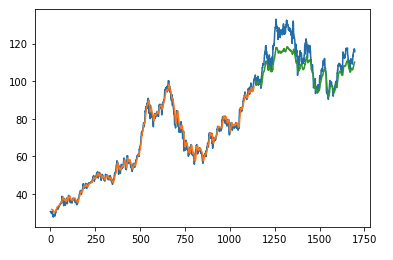
How to use Jupyter + Pandas + InfluxDB 2
""""""""""""""""""""""""""""""""""""""""
The first example shows how to use client capabilities to predict stock price via Keras <https://keras.io>, TensorFlow <https://www.tensorflow.org>, sklearn <https://scikit-learn.org/stable/>_:
The example is taken from Kaggle <https://www.kaggle.com/chaitanyacc4/predicting-stock-prices-of-apple-inc>_.
- sources -
stock-predictions.ipynb <notebooks/stock-predictions.ipynb>_
Result:
The second example shows how to use client capabilities to realtime visualization via hvPlot <https://hvplot.pyviz.org>, Streamz <https://streamz.readthedocs.io/en/latest/>, RxPY <https://rxpy.readthedocs.io/en/latest/>_:
- sources -
realtime-stream.ipynb <notebooks/realtime-stream.ipynb>_
Other examples """"""""""""""
You could find all examples at GitHub: influxdb-client-python/examples <https://github.com/influxdata/influxdb-client-python/tree/master/examples#examples>_.
.. marker-examples-end
Advanced Usage
Gzip support ^^^^^^^^^^^^ .. marker-gzip-start
InfluxDBClient does not enable gzip compression for http requests by default. If you want to enable gzip to reduce transfer data's size, you can call:
.. code-block:: python
from influxdb_client import InfluxDBClient
_db_client = InfluxDBClient(url="http://localhost:8086", token="my-token", org="my-org", enable_gzip=True)
.. marker-gzip-end
Delete data ^^^^^^^^^^^ .. marker-delete-start
The delete_api.py <influxdb_client/client/delete_api.py>_ supports deletes points <https://v2.docs.influxdata.com/v2.0/reference/glossary/#point>_ from an InfluxDB bucket.
.. code-block:: python
from influxdb_client import InfluxDBClient

client = InfluxDBClient(url="http://localhost:8086", token="my-token")

delete_api = client.delete_api()

"""
Delete Data
"""
start = "1970-01-01T00:00:00Z"
stop = "2021-02-01T00:00:00Z"
delete_api.delete(start, stop, '_measurement="my_measurement"', bucket='my-bucket', org='my-org')

"""
Close client
"""
client.close()
.. marker-delete-end
InfluxDB 1.8 API compatibility ^^^^^^^^^^^^^^^^^^^^^^^^^^^^^^
InfluxDB 1.8.0 introduced forward compatibility APIs <https://docs.influxdata.com/influxdb/v1.8/tools/api/#influxdb-2-0-api-compatibility-endpoints>_ for InfluxDB 2.0. This allow you to easily move from InfluxDB 1.x to InfluxDB 2.0 Cloud or open source.
The following forward compatible APIs are available:
======================================================= ==================================================================================================== =======
API Endpoint Description
======================================================= ==================================================================================================== =======
query_api.py <influxdb_client/client/query_api.py>_ /api/v2/query <https://docs.influxdata.com/influxdb/latest/tools/api/#api-v2-query-http-endpoint>_ Query data in InfluxDB 1.8.0+ using the InfluxDB 2.0 API and Flux <https://docs.influxdata.com/flux/latest/>_ (endpoint should be enabled by flux-enabled option <https://docs.influxdata.com/influxdb/v1.8/administration/config/#flux-enabled-false>)
write_api.py <influxdb_client/client/write_api.py> /api/v2/write <https://docs.influxdata.com/influxdb/latest/tools/api/#api-v2-write-http-endpoint>_ Write data to InfluxDB 1.8.0+ using the InfluxDB 2.0 API
health() <influxdb_client/client/influxdb_client.py>_ /health <https://docs.influxdata.com/influxdb/latest/tools/api/#health-http-endpointt>_ Check the health of your InfluxDB instance
======================================================= ==================================================================================================== =======
For detail info see InfluxDB 1.8 example <examples/influxdb_18_example.py>_.
HTTP Retry Strategy
^^^^^^^^^^^^^^^^^^^
By default the client uses a retry strategy only for batching writes (for more info see Batching_).
For other HTTP requests there is no one retry strategy, but it could be configured by retries
parameter of InfluxDBClient.
For more info about how configure HTTP retry see details in urllib3 documentation <https://urllib3.readthedocs.io/en/latest/reference/index.html?highlight=retry#urllib3.Retry>_.
.. code-block:: python
from urllib3 import Retry

from influxdb_client import InfluxDBClient

retries = Retry(connect=5, read=2, redirect=5)
client = InfluxDBClient(url="http://localhost:8086", token="my-token", org="my-org", retries=retries)
Nanosecond precision ^^^^^^^^^^^^^^^^^^^^
The Python's datetime <https://docs.python.org/3/library/datetime.html>_ doesn't support precision with nanoseconds
so the library during writes and queries ignores everything after microseconds.
If you would like to use datetime with nanosecond precision you should use
pandas.Timestamp <https://pandas.pydata.org/pandas-docs/stable/reference/api/pandas.Timestamp.html#pandas.Timestamp>_
that is replacement for python datetime.datetime object and also you should set a proper DateTimeHelper to the client.
- sources -
nanosecond_precision.py <https://github.com/influxdata/influxdb-client-python/blob/master/examples/nanosecond_precision.py>_
.. code-block:: python
from influxdb_client import Point, InfluxDBClient
from influxdb_client.client.util.date_utils_pandas import PandasDateTimeHelper
from influxdb_client.client.write_api import SYNCHRONOUS

"""
Set PandasDate helper which supports nanoseconds.
"""
import influxdb_client.client.util.date_utils as date_utils

date_utils.date_helper = PandasDateTimeHelper()

"""
Prepare client.
"""
client = InfluxDBClient(url="http://localhost:8086", token="my-token", org="my-org")

write_api = client.write_api(write_options=SYNCHRONOUS)
query_api = client.query_api()

"""
Prepare data
"""

point = Point("h2o_feet") \
    .field("water_level", 10) \
    .tag("location", "pacific") \
    .time('1996-02-25T21:20:00.001001231Z')

print(f'Time serialized with nanosecond precision: {point.to_line_protocol()}')
print()

write_api.write(bucket="my-bucket", record=point)

"""
Query: using Stream
"""
query = '''
from(bucket:"my-bucket")
        |> range(start: 0, stop: now())
        |> filter(fn: (r) => r._measurement == "h2o_feet")
'''
records = query_api.query_stream(query)

for record in records:
    print(f'Temperature in {record["location"]} is {record["_value"]} at time: {record["_time"]}')

"""
Close client
"""
client.close()
Local tests
.. code-block:: console
# start/restart InfluxDB2 on local machine using docker
./scripts/influxdb-restart.sh

# install requirements
pip install -r requirements.txt --user
pip install -r extra-requirements.txt --user
pip install -r test-requirements.txt --user

# run unit & integration tests
pytest tests
Contributing
Bug reports and pull requests are welcome on GitHub at https://github.com/influxdata/influxdb-client-python <https://github.com/influxdata/influxdb-client-python>_.
License
The gem is available as open source under the terms of the MIT License <https://opensource.org/licenses/MIT>_.