Interpolation reference examples
Frustrated by a lack of a clear way to communicate the intended effects of mpv's interpolation, as well as a lack of good ways to figure out if it's working correctly or not, I decided to create 60 fps “simulated interpolation” clips to demonstrate the effects.
This repo contains the results of my simulations, alongside some explanations. For a general primer on the theoretical background of the techniques demonstrated here, see this article on the mpv wiki
IMPORTANT!
Before viewing any of these files, confirm that you get frame-perfect 60 fps playback. A good test clip for that is this file: 60.000.mkv
If it's working correctly, there should be no visible (horizontal) tearing, discontinuities, stuttering or other forms of negative artifacts. Note that if you're tracking the bars with your eyes, due to small movements in the eyes, it's possible for the movement speed to appear to change - almost as if the bars got “stuck” and jolted forwards again. To prevent confusing this effect with actual dropped frames, it could help to try and look at a fixed point on the screen instead (such as your mouse cursor).
In mpv, to ensure optimal playback of these clips, I would recommend using --video-sync=display-resample --vo=opengl. (In particular, make sure you don't have interpolation of your own obscuring the results - although recent versions of mpv will automatically turn interpolation off for video clips that match your display rate)
If necessary, make sure your display is set to a multiple of 60 Hz (such as 60 or 120 Hz), and NOT to an odd number like 72 Hz. Even if 72 Hz works better for playback of 24 Hz content, these test clips were designed to be viewed as-is on a 60 Hz display. If you have the choice between 59 (or 59.94) and 60 Hz, pick exactly 60 Hz.
60 Hz reference clip
This is the original, reference 60 FPS source clip we will be comparing the other methods against. Make sure this also plays smoothly in your environment - the pans should not be stuttering or jumping.
Nearest-neighbour resampling
This method, simple frame repeating, matches the default behavior of pretty much every video player out there (including mpv). Every frame is just repeated as necessary to keep video in sync with the reference clock.
For 30 Hz clips, the result is not too different from 60 Hz, since the playback is still relatively smooth. A slight stutter begins to be noticeable. Every source frame is exactly 2 output frames.
If we go down to 20 Hz (every source frame = 3 output frames), the motion is still even (pans are at a consistent speed) but the stutter has gotten noticeably worse. Viewing this gives me a headache. This is the phenomenon I like to call “stutter”.
For 24 Hz, the result of nearest interpolation is very different from the other two framerates. Instead of each frame being displayed for an even amount of time, frames alternate between being displayed for 2 and 3 vsyncs. This gives the motion an overall “discontinuous” motion, almost as if the camera is being shaken back and forth 10 times per second. This, combined with the inherently headache-inducing low framerate that the clip has to begin with, makes it absolutely unwatchable for me. The pan makes me feel dizzy and I have to look away from the screen, but YMMV. This clip demonstrates the effect that I like to call “judder”.
Note: The 24 fps version of the source movie was released much earlier than the 30 and 60 fps versions, and therefore has some slight differences both in the content material (e.g. texture of the grass in some places) and its presentation (e.g. one of the scene transitions turns from a cut into a blend). These differences are not the end of the world, but I wanted to point them out nonetheless.
Oversample (“smoothmotion”)
This technique is a slight improvement over the 24 Hz nearest neighbour result in that, instead of alternating between 2 and 3 vsyncs, the frames in between are linear blends (50%/50%) of the two frames surrounding it. (See this section for a better explanation)
The result is a clip with less of the “judder” (jerking back and forth) of the “24 fps nearest” sample, but which still roughly preserves the overall frame rate. (Notably, the image still “stutters”, similar to the “20 fps nearest” but not quite as bad since 24 > 20)
Linear blending (tscale=linear)
I picked this tscale to demonstrate interpolation since it's the easiest to implement a simple simulation of. (I may revisit more sophisticated samplers like mitchell and catmull_rom in the future, but for now this will have to do)
Since the algorithm is quite primitive, the result is somewhat blurry (it has affectionately been called “blurmotion”) and the sharpness seems to fade in and out (temporal aliasing, similar to bilinear), but it's still quite visibly smoother than the “24 fps nearest” version, and also does not give me nearly as much of a headache to watch.
The difference to nearest is not quite as great for the 30 Hz clip, since it only affects every other frame (frames alternate between showing an original image and showing two of them blended evenly), and the bad tscale algorithm used here also does not react quite as violently to the 30 fps clip since the only mixing ratio 50%/50%.
Motion interpolation (MVTools)
Motion interpolation was done using MVTools and this script.
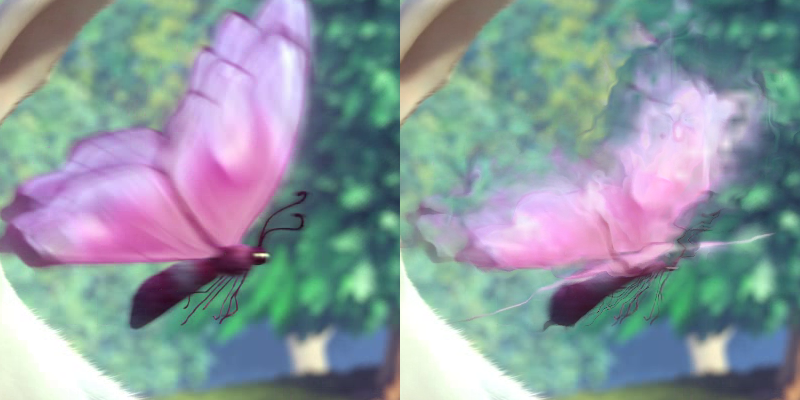
Since MVTools actually blends along local motion vectors instead of just overlaying the images, the pans are much smoother and crisper (less blurry). A downside not demonstrated in this clip is just how slow it is. (It ran at about 40 fps on my machine, which is below realtime)
Notice that due to imperfections in the motion estimation algorithm, it visibly distorts quickly moving features such as this butterfly:
Reference clips / more information
If you want to test playback in your environment, you can find the source clips at their native framerate here:
60 fps native
30 fps native
24 fps native
20 fps native
All of the clips I produced are encoded with x264 with CRF 24. The clips produced by my algorithms were left as 4:4:4 to prevent masking per-pixel effects. Unfortunately, since these are lossily compressed the result is only an approximation of what it would look like on a real system, but I tested it and found the overall impact to be pretty close on my end.
If I can find a way to upload the lossless source clips without murdering my bandwidth and my quota, I will consider it. (Feel free to contact me)
All of the clips used are excerpts of the Big Buck Bunny open movie project and are copyright 2008 by the Blender Foundation / bigbuckbunny.org. Specifically, the clips I used are available here:
bbb_sunflower_1080p_60fps_normal.mp4
bbb_sunflower_1080p_30fps_normal.mp4
big_buck_bunny_1080p_surround.avi
(The 20 fps version was obtained from the 60 fps version by taking every third frame)