![]()


Chinese guide is here!(https://dingguanglei.com/jdit/)
Jdit is a research processing oriented framework based on pytorch. Only care about your ideas. You don't need to build a long boring code to run a deep learning project to verify your ideas.
You only need to implement you ideas and don't do anything with training framework, multiply-gpus, checkpoint, process visualization, performance evaluation and so on.
Guide: https://dingguanglei.com/tag/jdit
Docs: https://jdit.readthedocs.io/en/latest/index.html
If you have any problems, or you find bugs you can contact the author.
E-mail: [email protected]
Install
Requires:
tensorboard >= 1.14.0
pytorch >= 1.1.0
Install requirement.
pip install -r requirements.txt
From pip
pip install jdit
From source
This method is recommended, because you can keep the newest version.
-
Clone from github
git clone https://github.com/dingguanglei/jdit -
Setup By using
setup.pyto install the package.python setup.py bdist_wheel -
Install You will find packages in
jdit/dist/. Use pip to install.pip install dist/jdit-x.y.z-py3-none-any.whl
Quick start
After building and installing jdit package, you can make a new directory for a quick test. Assuming that you get a new directory example. run this code in ipython cmd.(Create a main.py file is also acceptable.)
from jdit.trainer.instances.fashionClassification import start_fashionClassTrainer
if __name__ == '__main__':
    start_fashionClassTrainer()
The following is the accomplishment of start_fashionClassTrainer()
# coding=utf-8
import torch
import torch.nn as nn
import torch.nn.functional as F
from jdit.trainer.single.classification import ClassificationTrainer
from jdit import Model
from jdit.optimizer import Optimizer
from jdit.dataset import FashionMNIST

class SimpleModel(nn.Module):
    def __init__(self, depth=64, num_class=10):
        super(SimpleModel, self).__init__()
        self.num_class = num_class
        self.layer1 = nn.Conv2d(1, depth, 3, 1, 1)
        self.layer2 = nn.Conv2d(depth, depth * 2, 4, 2, 1)
        self.layer3 = nn.Conv2d(depth * 2, depth * 4, 4, 2, 1)
        self.layer4 = nn.Conv2d(depth * 4, depth * 8, 4, 2, 1)
        self.layer5 = nn.Conv2d(depth * 8, num_class, 4, 1, 0)

    def forward(self, input):
        out = F.relu(self.layer1(input))
        out = F.relu(self.layer2(out))
        out = F.relu(self.layer3(out))
        out = F.relu(self.layer4(out))
        out = self.layer5(out)
        out = out.view(-1, self.num_class)
        return out


class FashionClassTrainer(ClassificationTrainer):
    def __init__(self, logdir, nepochs, gpu_ids, net, opt, datasets, num_class):
        super(FashionClassTrainer, self).__init__(logdir, nepochs, gpu_ids, net, opt, datasets, num_class)
        data, label = self.datasets.samples_train
        self.watcher.embedding(data, data, label, 1)

    def compute_loss(self):
        var_dic = {}
        labels = self.ground_truth.squeeze().long()
        var_dic["CEP"] = loss = nn.CrossEntropyLoss()(self.output, labels)
        return loss, var_dic

    def compute_valid(self):
        _, var_dic = self.compute_loss()
        labels = self.ground_truth.squeeze().long()
        _, predict = torch.max(self.output.detach(), 1)  # 0100=>1  0010=>2
        total = predict.size(0)
        correct = predict.eq(labels).cpu().sum().float()
        acc = correct / total
        var_dic["ACC"] = acc
        return var_dic

def start_fashionClassTrainer(gpus=(), nepochs=10, run_type="train"):
    """" An example of fashing-mnist classification

    """
    num_class = 10
    depth = 32
    gpus = gpus
    batch_size = 4
    nepochs = nepochs
    opt_hpm = {"optimizer": "Adam",
               "lr_decay": 0.94,
               "decay_position": 10,
               "position_type": "epoch",
               "lr_reset": {2: 5e-4, 3: 1e-3},
               "lr": 1e-4,
               "weight_decay": 2e-5,
               "betas": (0.9, 0.99)}

    print('===> Build dataset')
    mnist = FashionMNIST(batch_size=batch_size)
    # mnist.dataset_train = mnist.dataset_test
    torch.backends.cudnn.benchmark = True
    print('===> Building model')
    net = Model(SimpleModel(depth=depth), gpu_ids_abs=gpus, init_method="kaiming", check_point_pos=1)
    print('===> Building optimizer')
    opt = Optimizer(net.parameters(), **opt_hpm)
    print('===> Training')
    print("using `tensorboard --logdir=log` to see learning curves and net structure."
          "training and valid_epoch data, configures info and checkpoint were save in `log` directory.")
    Trainer = FashionClassTrainer("log/fashion_classify", nepochs, gpus, net, opt, mnist, num_class)
    if run_type == "train":
        Trainer.train()
    elif run_type == "debug":
        Trainer.debug()

if __name__ == '__main__':
    start_fashionClassTrainer()
Then you will see something like this as following.
===> Build dataset
use 8 thread
Downloading http://fashion-mnist.s3-website.eu-central-1.amazonaws.com/train-images-idx3-ubyte.gz
Downloading http://fashion-mnist.s3-website.eu-central-1.amazonaws.com/train-labels-idx1-ubyte.gz
Downloading http://fashion-mnist.s3-website.eu-central-1.amazonaws.com/t10k-images-idx3-ubyte.gz
Downloading http://fashion-mnist.s3-website.eu-central-1.amazonaws.com/t10k-labels-idx1-ubyte.gz
Processing...
Done
===> Building model
ResNet Total number of parameters: 2776522
ResNet model use CPU
apply kaiming weight init
===> Building optimizer
===> Training
using `tensorboard --logdir=log` to see learning curves and net structure.
training and valid_epoch data, configures info and checkpoint were save in `log` directory.
  0%|            | 0/10 [00:00<?, ?epoch/s]
0step [00:00, step?/s]
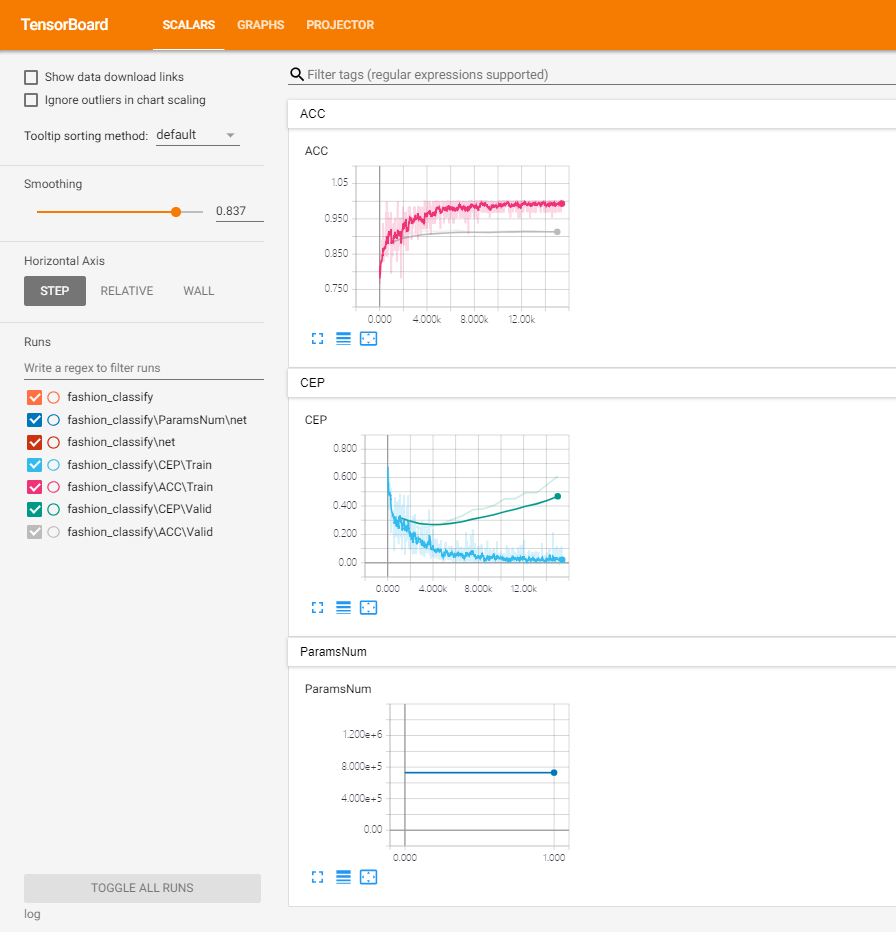
To see learning curves in tensorboard. Pay attention to your code about var_dic["ACC"], var_dic["CEP"].
This will be shown in the tensorboard.
Learning curves
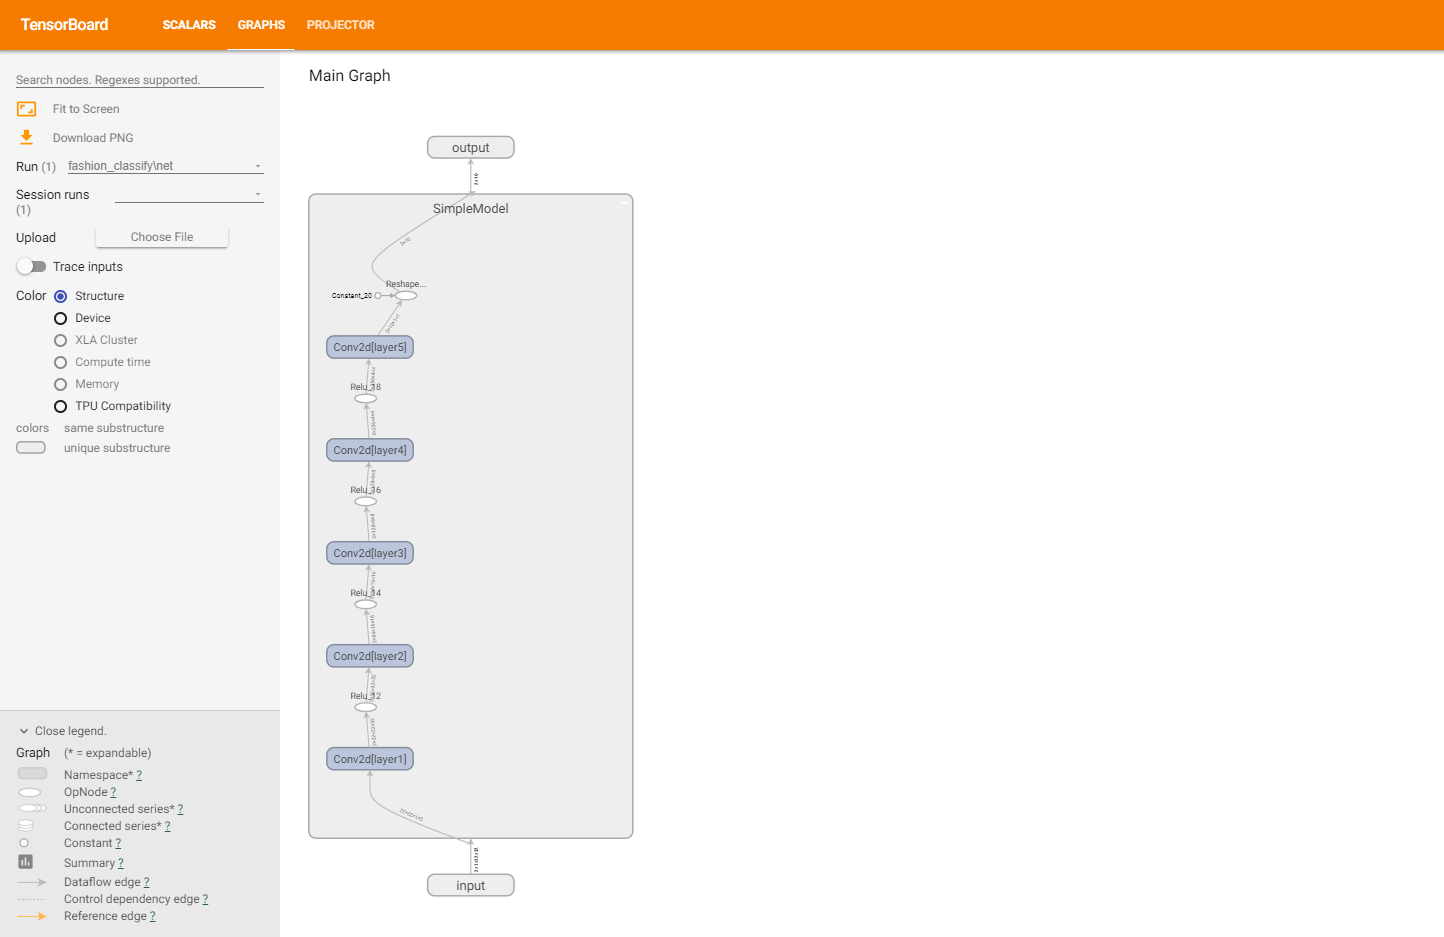
Model structure
Dataset
You need to apply self.watcher.embedding(data, data, label))

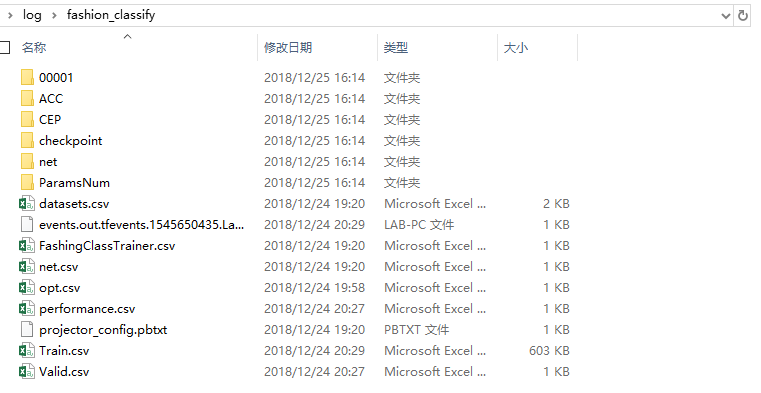
Log
All of these will be saved in log/fashion_classify, because of parameter logdir = "log/fashion_classify".
Process data
For the most thing that we care about are training process and valid process data.
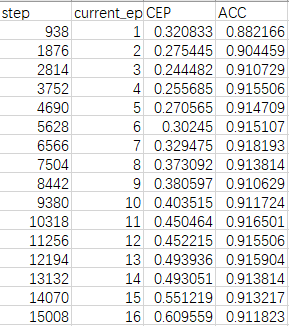
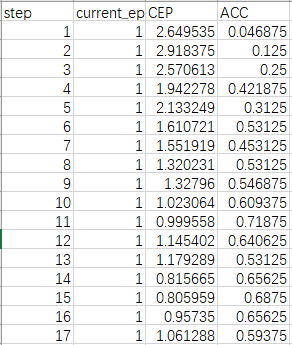
They are saved in Train.csv and Valid.csv. The following are the content.
Train.csv
Valid.csv
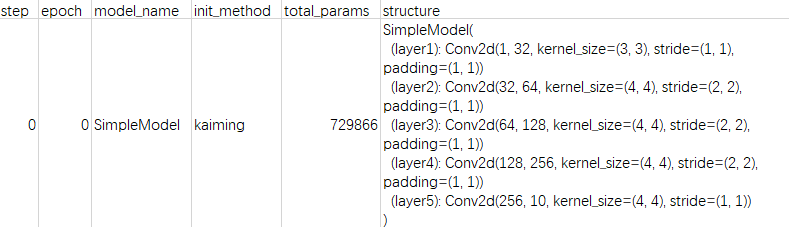
Model
The info of model will be saved in net.csv. (The file name is given by your variable name(net).)
If your model changes during the process, it will be recorded in this file.
Learning rate trace
From file opt.csv you can see the learning rate variation. It will be saved only feature changed.

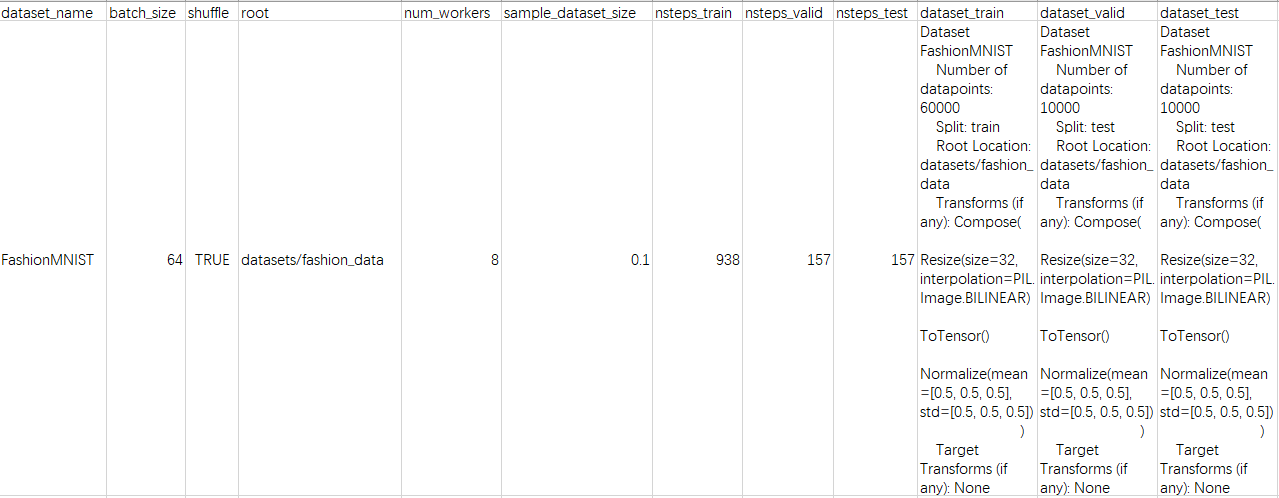
Dataset info
From file datasets.csv you can see the information of your dataset.
Others
- For file
performance.csv, it saves the memory cost during the training. - For file
FashingClassTrainer.csv, it saves some parameters, such as the amount of epochs. - Model checkpoint in the
checkpointdirectory.
Conclusion
Due to this simple classification example, there are many interesting features not showed here. But you can get a intuitive feeling from this simple example. It seems that your code doesn't have these functions. So, this is what Jdit did.
Although it is just an example, you still can build your own project easily by using jdit framework. Jdit framework can deal with
- Data visualization. (learning curves, images in pilot process)
- CPU, GPU or GPUs. (Training your model on specify devices)
- Intermediate data storage. (Saving training data into a csv file)
- Model checkpoint automatically.
- Flexible templates can be used to integrate and custom overrides.
- ...
More
For other templates, you can see and learn form here.
Guide List: