fossasia / Knitweb
Programming Languages
Knitweb
1. What is Knitweb
Knitweb is an app frontend and backend that works together with Knitlib server and uses the Knitpat format.
2. How to install Knitapps
2.1. How to install the Knitlib server and Knitlib
To install the Knitlib server please follow the instructions here: https://github.com/fashiontec/knitserver
2.2. How to install the webapp
- Requirements
- Step by Step Installation on Linux and Windows
3. Knitapps Online/Offline
3.1 How to use the Knit web app - Offline Pattern Generation (when it is not connected to the server/machine)
On Linux
- Initial setup(first time after cloning the project):
- Go to /knitweb/bin/linux directory.
- run the setup.sh file by typing sh setup.sh (this step is needed to download required binaries)
- Execute application:
- Go to /knitweb/bin/linux directory.
- run the run.sh file typing sh run.sh
On Windows
- Initial setup(first time after cloning the project):
- Go to /knitweb/bin/windows directory.
- run the setup.bat file (this step is needed to download required binaries).
- Execute application:
- Go to /knitweb/bin/windows directory.
- run the run.bat file.
If powershell is missing in your environment variables;
Add this to your Path environment variable
%SYSTEMROOT%\System32\WindowsPowerShell\v1.0\
3.2 How to use the Knit web app - Online (when it is connected to the knitting server/machine)
- It is same procedure as the using offline mode. Only difference is in online mode server will be available for configure knitting. In offline mode app will indicate server is not available when trying to configure knitting. In this mode user can download generated pattern and use it later in a machine where server is available.
On Linux
- Initial setup(first time after cloning the project):
- Go to /knitweb/bin/linux directory.
- run the setup.sh file by typing sh setup.sh (this step is needed to download required binaries)
- Execute application:
- Go to /knitweb/bin/linux directory.
- run the run.sh file typing sh run.sh
On Windows
- Go to /knitweb/bin directory.
- run the run.bat
4 Working with Knitapps
4.1 Knitting pattern editor
Pattern Generator Usage:
- Load a pattern using 'Browse'.
- Then tick 'crop' if the pattern wants to be cropped and then click 'Draw'.
- Then select available yarn colours from the pallette.
- Then Click 'Generate Patteren'.
4.2 User Interface and Drawing Tools
There are two kinds of drawing tools included inside the pattern grid.
- Square/Rectangular pattern drawing.
- Free hand pattern drawing.
-
Under Square/Rectangular pattern drawing user will be able to draw rectangular shapes and add colours to the shape using colour pallette.
-
Under Free hand pattern drawing user will be able to draw using free hand and add colour values to the shape drawn.
Note: These drawing tools are now used to edit the patterns that are loaded from a file. This can be improved such that user can draw a pattern from scratch using these tools that can be used for knitting.
4.2.1 Navigation bar options
The navigation bar offers the following functions:
- Open
- Download Pattern
- Import Pattern
The User is able to download the pattern after editing without going for a knit job configuration.

4.2.2 Loading of a pattern / image
Step 1: Choose image/pattern file from choose file dialog. It will load a image file to the image loader [left side] and it will load the preview of the pattern to the window at the right side.

4.2.3 Crop/Rotate of a pattern
Step 1:Enable crop function by checking “Enable Cropping” check box. Step 2: Select cropping area from the pattern and the click crop button at the bottom-right of the image loader. It will load the cropped pattern in the preview window. You can also rotate the pattern from the preview window before editing.

4.2.4 Add available yarn color
Step 1:User can add available yarn colors before pattern generation by clicking add yarn color button. Colour palette is shown to the user after clicking the button.

4.2.5 Generate pattern
Step 1: Click generate pattern icon after selecting yarn colors. Then pattern will be generated for a 100 by 100 grid as the default parameters. User can regenerate the pattern by entering row and column values and regenerate the pattern.

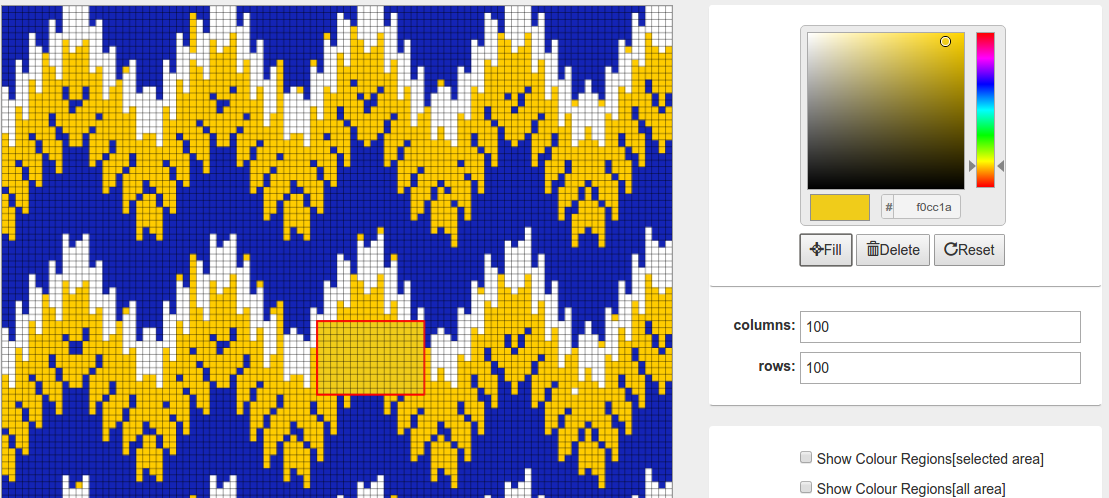
4.2.6 Square/ Free Hand tool
Step 1: Select Square or free hand tools from the radio panel. By default it is square tool.

Step2: Select a color from colour palette and select fill if you want to add the colour for the selected area.
4.2.7 Show Color Regions function
Step1:Select area from the square selection if you want a color regions for selected area. Otherwise
generate color regions for all area by selecting “Show Colour Regions[all area]”. Black coloured border
will be shown around the region

Step2: Add a colour selected in colour palette by clicking on the relevant area you want to edit by changing
colour. In the example bottom region is recolored.

4.2.7 Available Ports/Machine type
Step1: User is shown available ports and machine types available for knitting. If it is not shown click
refresh button. Here knit web client is communicates with the knit lib server to get data.

Step2: After editing is done click “Proceed Knitting” button to create a knit job for the pattern.
4.2.8 Knitting Simulator
Knitting simulator window will show the edited pattern. Column and row will show current stitch's knitting
row and column number. Colors field show number of colour values used in the pattern. Also there are
inputs taken such as Start Line, Infinite repeat, Start Needle, Stop Needle used for configuration of a knit
job.

After configuration options are available to start knit job, pause and stop knit job.

####Translate application page
 This feature enables translation of application fields text into several languages such as English, German,
Sinhala. Solution is added such that any language can be added to the application just by editing a language
data file. Therefore it is a scalable solution. German translation is shown below.
This feature enables translation of application fields text into several languages such as English, German,
Sinhala. Solution is added such that any language can be added to the application just by editing a language
data file. Therefore it is a scalable solution. German translation is shown below.

4.3 Configure and Run a Knit Job
4.3.1 Select communication Port for knit job

Step1:select "port" at the pattern editor interface. If port is not updating click refresh button.
4.3.2 Select Machine type for knit job

Step1:select "Machine Type" at the pattern editor interface to select the machine type(single/double).
4.3.3 Create knit job

Step1:Click "proceed to knitting". Along with that knitweb is creating a knitjob by sending port id and plugin details to the knitlib server.
4.3.4 Configure knit job

Step1:In knitting simulator window click "configure" and it will init and configure knit job by sending num of colors,fileurl and imagedata to the knitlib server.
4.3.4 Start knit job

Step1:clicking start it will start knitting process for the edited pattern. Knitting progress is shown to the user after clicking start.