LibreCO2
LibreCO2: CO2 meter using Arduino UNO and a commercial CO2 sensor (SenseAir S8, Sensirion SCD30, Winsen MH-Z14 or MHZ-19 or Cubic CM1106).
This is a simple and low cost sensor version of a CO2 meter built with the most common materials on the market: an Arduino UNO and the three most popular low cost REAL CO2 sensors: SenseAir S8, Sensirion SCD30, Winsen MH-Z14 or 19 and Cubic CM1106. LibreCO2 uses an Arduino UNO but can be extended to MEGA or nano, that are very popular in schools and frequently used in technology and the electronics classes. Also, the majority of schools have many of them.
The code is the most basic and the .hex file is published for the programming of the Arduino with the software Xloader. You don't have to install Arduino software to compile and program the code. If you are searching for Wi-Fi or Bluetooth connectivity , you can find many open source alternatives on a list at the end of the guide, for example CanAirIO. The CO2 meter uses the most popular components on the market, not the most advanced, and the simplest building without the need of an iron solder.
All the sensors used are NDIR , which is the actual standard for real CO2 measurements:
https://www.co2meter.com/blogs/news/6010192-how-does-an-ndir-co2-sensor-work
In addition, the compensation for the altitude above sea level at which we take the measurement has been added. It is very important to activate this setting above 1000 meters as the margin of error would be greater than 11%:
| Altitude | Error(%) |
|---|---|
| 0 | 0 |
| 500 | 6 |
| 1000 | 11 |
| 1500 | 16 |
| 2000 | 21 |
| 2500 | 26 |
| 3000 | 30 |
| 3500 | 34 |
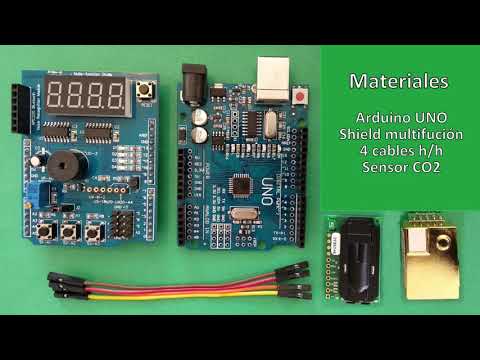
1. Materials:
There are two options for the sensor assembly: the easiest is using an Arduino Multifunction Shield (Shield), which already includes a 4-digit display, buzzer and buttons, making the assembly much easier. The second is assembling the parts individually.
1.1. Option with multifunction Shield:

- Multifunction Shield (Arduino Shield multifunction).
The Shield has a bug or bug that can short-circuit it to the USB connector, cut the pins shown in the photo and add a piece of tape to the USB connector (also shown in the how-to video:

Link buys Aliexpress, Link buys Colombia, Buy Latin America: Mercadolibre or electronics stores.
- Arduino UNO, the original or Chinese version. The difference is the driver installation. Both are very easy to find in any country and work well. The original (right) and clone (left):

Link buy Aliexpress, Link buy Colombia, Buy Latin America: Mercadolibre or electronics stores.
- 4 female jumper cables (any size will work, but 10 or 15cm is preferable).
Link buy Aliexpress, Link buy Colombia, Buy Latin America: Mercadolibre or electronics stores.
-
Sensor, options:
a. SenseAir S8, the best in cost / benefit ratio. Brought from China by Aliexpress costs 28 dollars and from the USA 44 dollars, it is the most recommended and its cost is low. It also has the benchmark of being the same sensor brand that uses the popular Aranet 4 meters of 200 euros in price (https://kaspars.net/blog/aranet4-teardown).

Link from Aliexpress China: https://es.aliexpress.com/item/4000884582128.html
Link from Digikey USA: https://www.digikey.com/es/products/detail/senseair-north-america-inc/004-0-0053/10416532
Pros: excellent price, very good performance (acceptable speed and faithful), fast shipping from USA and free shipping from China.
Cons: You need soldering to connect the pins or wires.
b. Sensirion SCD30, the most expensive ($ 52) but the best performing in our tests. Sensirion has distributors in the USA and Europe that ship to Latin America. Example: https://www.mouser.com/ProductDetail/Sensirion/SCD30/?qs=rrS6PyfT74fdywu4FxpYjQ%3D%3D

In favor: excellent performance (fast and faithful), fast shipping in the USA and Europe and shipments to Latin America.
Cons: you need solder to connect the pins or wires, high price ($ 52).
The Modbus protocol is used for the connection between the Arduino and the sensor which allows the direct connection between the Arduino and the sensor without the use of a hardware data driver. You must connect the SEL pin with the VIN pin of the sensor using a 100 kΩ (kilo ohms) resistance as seen in the pictures and video to activate the Modbus protocol.
c. Winsen MH-Z14 or 19, the cheapest and most popular, good performance, somewhat slow. You can use any version of sensor: MH-Z14, MH-Z14A, MH-Z19B or MH-Z19C.b Be careful with false copies of the sensor !!!

Pros: acceptable performance (slow compared to Sensirion, medium reliability), low cost ($ 18 including shipping from China by Aliexpress).
Cons: variable shipping time with Aliexpress from China (20 days to a month and a half), counterfeits (be careful, only buy from the Official Aliexpress store).
AGAIN: just buy the MH-Z19B or MH-Z19C from the Winsen distribution store on Aliexpress, the market is overrun with fake copies, more information at: https://emariete.com/sensores-co2-mh-z19b-falsos/ or in English at: https://youtu.be/5_QQe75-SZI

Sale of original versions on the manufacturer's page on Aliexpress: https://es.aliexpress.com/item/1005001865093513.html
d. Cubic CM1106, the last option because the China distributor sells only second-hand recovered units and from time to time they are out of stock, they are very cheap and their performance is acceptable. https://www.aliexpress.com/item/4001082699057.html


Connections for each sensor:
SenseAir S8 sensor
GND ---> G0 Pin 2 of the 4-pin strip
+5 & nbsp; ---> G + Pin 1 of the 4-pin strip
5 & nbsp; & nbsp; ---> Pin 2 of the 5-pin strip
6 & nbsp; & nbsp; ---> Pin 3 of the 5-pin strip

Sensirion SCD30 sensor
Shield PIN ---> Sensor
GND ---> GND
+5 & nbsp; ---> VIN
5 & nbsp; & nbsp; ---> RX / SDA
6 & nbsp; & nbsp; ---> TX / SCL

Winsen MH-Z19B or 19C sensor
GND ---> GND
+5 & nbsp; ---> VIN
5 & nbsp; & nbsp; ---> RX
6 & nbsp; & nbsp; ---> TX

Winsen MH-Z14 or MH-Z14A sensor
GND ---> Pin 5 or 16 of the connector
+5 & nbsp; ---> Pin 4 or 17 of the connector
5 & nbsp; & nbsp; ---> Pin 3 or 18 of the connector
6 & nbsp; & nbsp; ---> Pin 2 or 19 of the connector

Cubic CM1106 Sensor
GND ---> G Pin 2 of the 4-pin strip
+5 & nbsp; ---> V1 Pin 1 of the 4-pin strip
5 & nbsp; & nbsp; ---> R Pin 2 of the 5-pin strip
6 & nbsp; & nbsp; ---> T Pin 3 of the 5-pin strip

Explanatory video:
1.2. Option for individual parts:
- Original Arduino UNO or Chinese version.
- Display TM1687.
- Female - male jumper.
- One or two Push Buttons or cables (one for calibration, one for Beep level).
- Optional: Buzzer.

- Sensor, same options as the Multifunction Shield option.
Connections for all sensors:
Electronic component ---> Arduino PIN
Display ---> Arduino PIN
CLK ---> 9
DIO ---> 8
VCC ---> IOREF in the original version or 5V in the Chinese copy
GND ---> GND
Buzzer
"+" ---> 11
other ---> GND
Calibration button
Any ---> A0
Any ---> A2
Beep level button
Any ---> A3
Any ---> A5
Elevation button above sea level
Any ---> 2
Any ---> 4
SenseAir S8
VIN Pin 1 of 4-pin strip ---> 5V
GND Pin 2 of 4-pin strip ---> GND
RX Pin 2 of 5-pin strip ---> 6
TX Pin 3 of 5-pin strip ---> 7

Sensirion SCD30 sensor
VIN ---> 3.3V
GND ---> GND
TX / SCL ---> 7
RX / SDA ---> 6
SEL ---> 3.3V

Winsen MH-Z19B sensor
VIN Pin 1 of 4-pin strip ---> 5V
GND Pin 2 of 4-pin strip ---> GND
RX Pin 2 of 5-pin strip ---> 6
TX Pin 3 of 5-pin strip ---> 7

Winsen MH-Z14A sensor
Connector pin 2 or 19 ---> 6
Connector pin 3 or 18 ---> 7
Connector pin 4 or 17 ---> 5V
Connector pin 5 or 16 ---> GND

Cubic CM1106 sensor
V1 Pin 1 of the 4-pin strip ---> 5V
G Pin 2 of the 4-pin strip ---> GND
R Pin 2 of the 5-pin strip ---> 6
T Pin 3 of the 5-pin strip ---> 7

2. Program the Firmware (code in the Arduino)
There are 3 options for programming the Arduino: the simplest is to use an Android phone and a USB OTG cable, the next is to use a PC with the Xloader software and the last one is to install the Arduino on a PC.
1. Android phone.

- Connect the USB OTG cable to the phone.
- Install the Android app "Arduino Hex Uploader-Firmware Bin Upload".
- Download the .hex file from this "Google drive directory" based on your sensor version (Shield and sensor brand). Find the .hex file that you are going to load into the Arduino, each sensor version (SenseAir, Sensirion, Winsen or Cubic) is available in the "hex files" directory. Example: "LibreCO2_Shield_Sensirion.hex" is the file for the Sensirion sensor with the Multifunction Shield. Note: Do not download the .hex file directly from the page with the "Save as" option, which corrupts the file. Only use the Google Drive link.
- Find the .hex file on your phone.
- Upload the code to your Arduino board.
- END.
Firmware programming video:
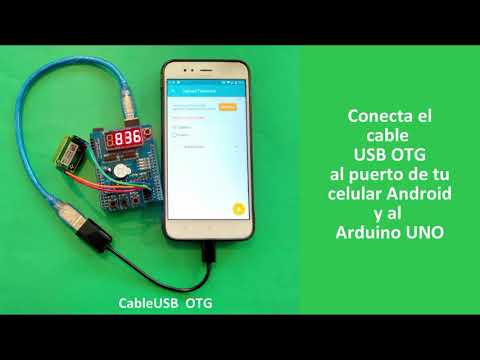
Link buys OTG USB Cable Aliexpress, Link buys Colombia, Buy Latin America: Mercadolibre or electronics stores.
2. Using your PC with Xloader software (Windows only):
- Connect the Arduino to your computer and wait for the driver to install automatically. If the driver does not install automatically you must identify if your Arduino is original or a copy:
1.1. If the Arduino is original, install the Arduino package with drivers: https://www.arduino.cc/en/Guide/ArduinoUno
1.2. If the Arduino is a Chinese copy, follow the instructions on this website: https://learn.sparkfun.com/tutorials/how-to-install-ch340-drivers
- After installing the driver, you have 2 options:
2.1. If all you want is to program the Arduino from Windows without having to see the code and compile it, use the Xloader software found in the folder of the same name:

On the left is the Xloader window when it starts up.
2.1.1. Explore until you find the .hex file that you are going to load into the Arduino. Each sensor version (SenseAir, Sensirion, Winsen or Cubic) is available in the "hex files" directory. Example: "shield_scd30.hex" is the file for the Sensirion SCD30 sensor with the use of the Multifunction Shield (Shield). Don't download it directly from the page with the "Save As" option, that ruins the file. Use the following Google Drive link to download the .hex file looking for your Sensor version (SCD30, MHZ14_9 or CM1106) and build (with Shield or by Parts):
https://drive.google.com/drive/folders/1FxXLVhaGF6UCVObQlh8cVLddyWyQqUT0
2.1.2. Select the Arduino board you are using (Uno / ATmega328).
2.1.3. Select the COM communications port to which the Arduino is connected, if you don't know it, look for it in the Device Manager "COM and LPT ports".
2.1.4. Set the Baud rate to 115200.
2.1.5. Press the "Upload" button.
2.1.6. When the .hex file is uploaded to the Arduino, photo on the right, the message "xxxxx bytes uploaded" appears, if it fails, the message "upload fails" will appear.
3. If you want to edit and compile the code, install the Arduino software on Windows, Mac or Linux:
https://www.arduino.cc/en/software
The following guide explains how to install Arduino on Windows, Mac or Linux and is very complete: https://learn.sparkfun.com/tutorials/installing-arduino-ide/all
On YouTube there are hundreds of tutorials to install Arduino on different operating systems and learn their programming, you can also collaborate by improving this code or create your own version.
3. Box for the sensor.
Options starting with the simplest and most economical:
3.1. Low cost commercial box.
Find a plastic box with a width similar to that of the Arduino and a greater length so that in the excess space you can locate the sensor. In the excess space, drill several holes through which air enters for it, in my case I made them with a 4mm screwdriver. Make another hole for the Buzzer, for the USB cable and the adapter and that's it. Example:

When you want to use the keyboard for BEEP calibration or programming, open the box and access the keyboard and then close it again. You can accommodate plastic boxes of different sizes, in the following case a foam is used underneath because the box is taller, in addition 3 holes of a medium size (7mm) are made for the 3 buttons and so you can access the buttons from the outside without need to open the box:

3.2. MDF wooden box using laser cutting. Developing.
3.3. PLA box with 3D printer. Developing.
4. Sensor operation.
When the Arduino programming has been done, we have several sensor operating modes and options:
-
Normal mode: When the sensor is turned on, the BEEP warning appears and a number between 700 and 1300 shows the level of the alarm that we have programmed. In number 3 it will be explained how to modify it. After that the meter verifies the connection to the low cost sensor. If the "good" message appears, the connection is well made and the sensor heating process ("heat") will continue, which lasts 30 seconds for the Sensirion and Cubic sensors, and 3 minutes for the Winsen sensors. If the message is "fail" the connection has failed and we must verify the connection between the Arduino and the sensor. After heating the CO2 value in parts per million ppm appears on the screen. When the value is higher than the Beep level, the alarm sounds and the shield LEDs flash.
-
CALI Calibration Mode: Explained in the attached video. Calibration of the sensor is recommended after the sensor is armed and when there are measurements that are very different outdoors from the estimated range of 400 ppm. All these low-cost sensors are calibrated outdoors, placing them in an outdoor space for a few minutes without receiving strong wind as this affects the measurement, therefore it is recommended to place them inside a box that avoids direct wind. After fulfilling these conditions, you must press the S1-A1 (CALI) button in the version with shield, or the "switch" in the version by parts, for more than 5 seconds, and the message "cal-" will appear on the screen. and starting a countdown of 5 minutes for the Sensirion and Cubic and 20 minutes for the Winsen. At the end of this time, the sensor receives the calibration order and is ready to be used again. If you want to interrupt the calibration process, press the S2-A2 (BEEP) button.
-
BEEP Alarm threshold level change mode: Explained in the attached video. To change the alarm level from 1000 ppm, by default, to another value between 700 and 1400 ppm or to turn it OFF you must press the S2-A2 (BEEP) button in the version with shield, or place an additional cable or switch of the pin A3 to A5 in the version by parts, for more than 5 seconds and the message "BEEP" will appear and then the value to which it is programmed. Then you must press the button again to modify the value, when you find it press the S3-A3 (ALTI) button to program this new BEEP level value. The message "done" will appear confirming the correct entry of the value.
-
ALTI Change value of the altitude value above the sea level: To change the value of the altitude above sea level of the place where we are, you must press the S3-A3 (ALTI) button in the version with shield, or place an additional cable or switch from pin A0 to A2 in the version for parts, for more than 5 seconds and the message "ALTI" will appear and then the value that has been programmed. Then you must press again or keep the button pressed to increase the value or press the S2 - A2 (BEEP) button to decrease, when you find the correct value press the S1-A1 (CALI) button to program this new ALTI level value. The message "done" will appear confirming the correct entry of the value.
Contact
If you have any doubt, bug, contribution or commentrio write me to the email [email protected] or the twitter account @danielbernalb More information on the website: "Aire Ciudadadano"