ZhouYanzhao / Orn
Projects that are alternatives of or similar to Orn
Oriented Response Networks
[Home] [Project] [Paper] [Supp] [Poster]
Torch Implementation
The torch branch contains:
- the official torch implementation of ORN.
- the MNIST-Variants demo.
Please follow the instruction below to install it and run the experiment demo.
Prerequisites
- Linux (tested on ubuntu 14.04LTS)
- NVIDIA GPU + CUDA CuDNN (CPU mode and CUDA without CuDNN mode are also available but significantly slower)
- Torch7
Getting started
You can setup everything via a single command wget -O - https://git.io/vHCMI | bash or do it manually in case something goes wrong:
-
install the dependencies (required by the demo code):
-
clone the torch branch:
# git version must be greater than 1.9.10
git clone https://github.com/ZhouYanzhao/ORN.git -b torch --single-branch ORN.torch
cd ORN.torch
export DIR=$(pwd)
-
install ORN:
cd $DIR/install
# install the CPU/GPU/CuDNN version ORN.
bash install.sh
-
unzip the MNIST dataset:
cd $DIR/demo/datasets
unzip MNIST
-
run the MNIST-Variants demo:
cd $DIR/demo
# you can modify the script to test different hyper-parameters
bash ./scripts/Train_MNIST.sh
Trouble shooting
If you run into 'cudnn.find' not found, update Torch7 to the latest version via cd <TORCH_DIR> && bash ./update.sh then re-install everything.
More experiments
CIFAR 10/100
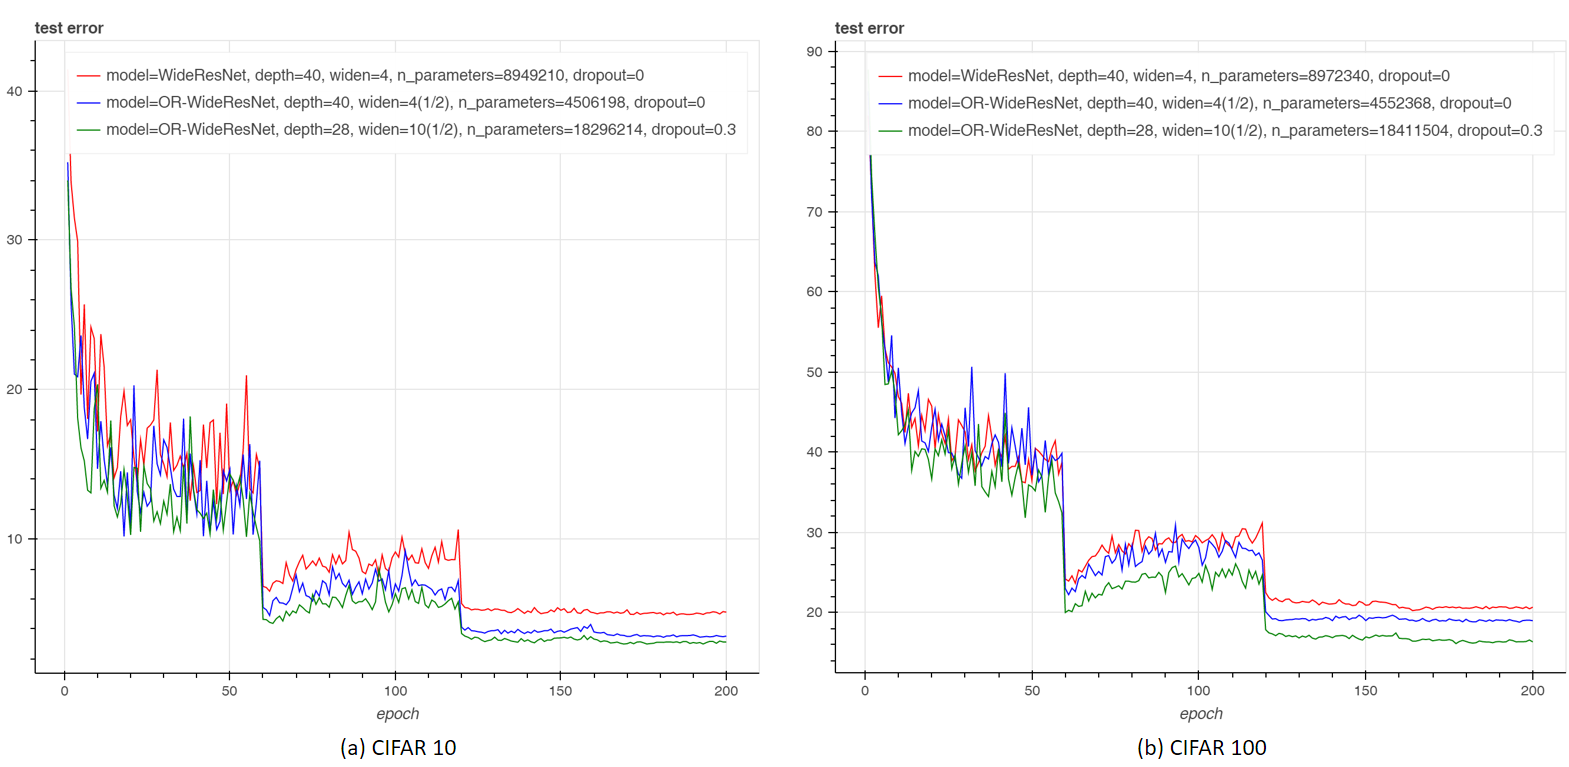
You can train the OR-WideResNet model (converted from WideResNet by simply replacing Conv layers with ORConv layers) on CIFAR dataset with WRN.
dataset=cifar10_original.t7 model=or-wrn widen_factor=4 depth=40 ./scripts/train_cifar.sh
With exactly the same settings, ORN-augmented WideResNet achieves state-of-the-art result while using significantly fewer parameters.
| Network | Params | CIFAR-10 (ZCA) | CIFAR-10 (mean/std) | CIFAR-100 (ZCA) | CIFAR-100 (mean/std) |
|---|---|---|---|---|---|
| DenseNet-100-12-dropout | 7.0M | - | 4.10 | - | 20.20 |
| DenseNet-190-40-dropout | 25.6M | - | 3.46 | - | 17.18 |
| WRN-40-4 | 8.9M | 4.97 | 4.53 | 22.89 | 21.18 |
| WRN-28-10-dropout | 36.5M | 4.17 | 3.89 | 20.50 | 18.85 |
| WRN-40-10-dropout | 55.8M | - | 3.80 | - | 18.3 |
| ORN-40-4(1/2) | 4.5M | 4.13 | 3.43 | 21.24 | 18.82 |
| ORN-28-10(1/2)-dropout | 18.2M | 3.52 | 2.98 | 19.22 | 16.15 |
Table.1 Test error (%) on CIFAR10/100 dataset with flip/translation augmentation)
ImageNet
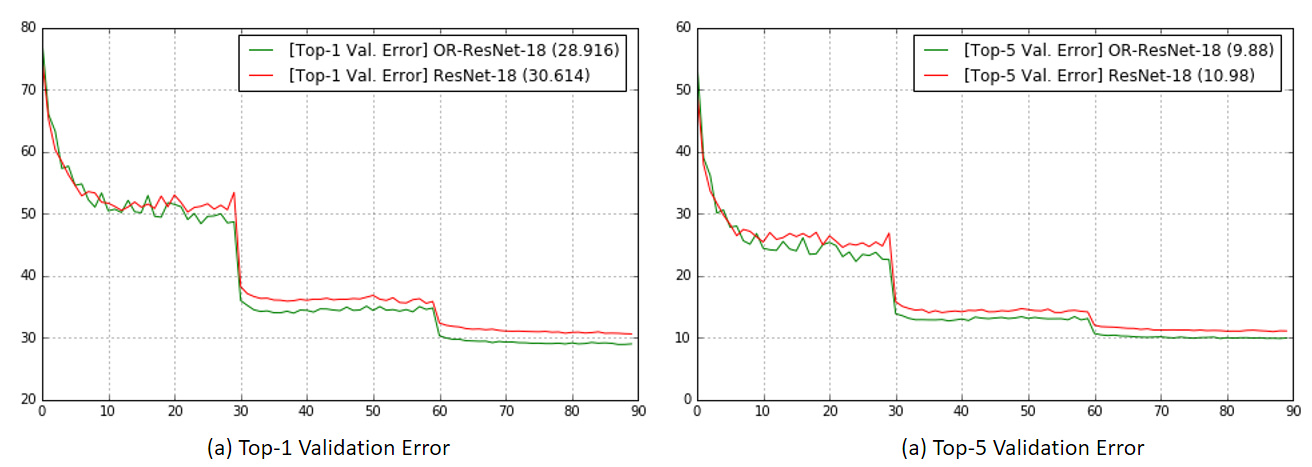
The effectiveness of ORN is further verified on large scale data. The OR-ResNet-18 model upgraded from ResNet-18 yields significant better performance when using similar parameters.
| Network | Params | Top1-Error | Top5-Error |
|---|---|---|---|
| ResNet-18 | 11.7M | 30.614 | 10.98 |
| OR-ResNet-18 | 11.4M | 28.916 | 9.88 |
Table.2 Validation error (%) on ILSVRC-2012 dataset.
You can use facebook.resnet.torch to train the OR-ResNet-18 model from scratch or finetune it on your data by using the pre-trained weights.
-- To fill the model with the pre-trained weights:
model = require('or-resnet.lua')({tensorType='torch.CudaTensor', pretrained='or-resnet18_weights.t7'})
A more specific demo notebook of using the pre-trained OR-ResNet to classify images can be found here.
PyTorch Implementation
The pytorch branch contains:
- the official pytorch implementation of ORN (alpha version supports 1x1/3x3 ARFs with 4/8 orientation channels only).
- the MNIST-Variants demo.
Please follow the instruction below to install it and run the experiment demo.
Prerequisites
- Linux (tested on ubuntu 14.04LTS)
- NVIDIA GPU + CUDA CuDNN (CPU mode and CUDA without CuDNN mode are also available but significantly slower)
- PyTorch
Getting started
-
install the dependencies (required by the demo code):
-
clone the pytorch branch:
# git version must be greater than 1.9.10
git clone https://github.com/ZhouYanzhao/ORN.git -b pytorch --single-branch ORN.pytorch
cd ORN.pytorch
export DIR=$(pwd)
-
install ORN:
cd $DIR/install
bash install.sh
-
run the MNIST-Variants demo:
cd $DIR/demo
# train ORN on MNIST-rot
python main.py --use-arf
# train baseline CNN
python main.py
Caffe Implementation
The caffe branch contains:
- the official caffe implementation of ORN (alpha version supports 1x1/3x3 ARFs with 4/8 orientation channels only).
- the MNIST-Variants demo.
Please follow the instruction below to install it and run the experiment demo.
Prerequisites
- Linux (tested on ubuntu 14.04LTS)
- NVIDIA GPU + CUDA CuDNN (CPU mode and CUDA without CuDNN mode are also available but significantly slower)
- Caffe
Getting started
-
install the dependency (required by the demo code):
-
idx2numpy:
pip install idx2numpy
-
idx2numpy:
-
clone the caffe branch:
# git version must be greater than 1.9.10
git clone https://github.com/ZhouYanzhao/ORN.git -b caffe --single-branch ORN.caffe
cd ORN.caffe
export DIR=$(pwd)
-
install ORN:
# modify Makefile.config first
# compile ORN.caffe
make clean && make -j"$(nproc)" all
-
run the MNIST-Variants demo:
cd $DIR/examples/mnist
bash get_mnist.sh
# train ORN & CNN on MNIST-rot
bash train.sh
Note
Due to implementation differences,
- upgrading Conv layers to ORConv layers can be done by adding an
orn_param - num_output of ORConv layers should be multipied by nOrientation of ARFs
Example:
layer {
  type: "Convolution"
  name: "ORConv" bottom: "Data" top: "ORConv"
  # add this line to replace regular filters with ARFs
  orn_param {orientations: 8}
  param { lr_mult: 1 decay_mult: 2}
  convolution_param {
    # this means 10 ARF feature maps
    num_output: 80
    kernel_size: 3
    stride: 1
    pad: 0
    weight_filler { type: "msra"}
    bias_filler { type: "constant" value: 0}
  }
}
Check the MNIST demo prototxt (and its visualization) for more details.
Citation
If you use the code in your research, please cite:
@INPROCEEDINGS{Zhou2017ORN,
    author = {Zhou, Yanzhao and Ye, Qixiang and Qiu, Qiang and Jiao, Jianbin},
    title = {Oriented Response Networks},
    booktitle = {CVPR},
    year = {2017}
}


