pichi-router / Pichi
Projects that are alternatives of or similar to Pichi
Pichi 
Pichi is a flexible rule-based proxy.
Build Status
Unix-like
| OS | macOS 10.15 | macOS 10.14 | Alpine 3.11 |
|---|---|---|---|
| Toolchain | Xcode 11.3 | Xcode 11.1 | GCC 8.3 |
| Status |
Windows
| OS | Windows Server 2019 | Windows Server 2016 |
|---|---|---|
| Toolchain | Visual Studio 2019 | Visual Studio 2017 |
| Status |
Mobile
| OS | iOS/tvOS | Android |
|---|---|---|
| Toolchain | Xcode 11.3 | NDK r20b |
| Status |
Overview
Pichi is designed
- to support common proxy protocols: HTTP(S)/Socks5(s)/Shadowsocks;
- to dynamically and flexibly control the proxy route: just use RESTful APIs;
- developer oriented: NO GUI, but can be easily integrated into other GUIs;
- for personal usage: performance is important, but not the first priority;
- for multiple platforms: at least Windows, POSIX-compatible, Android and iOS.
Motivation
Proxy is widely applied to traverse through the firewall, hide or change the original address, expose internal service port, etc. But if we iterate some famous proxy tools, it's easily recognized that each of them has at least one of these cons list below:
- Not support all of HTTP, Socks5, Shadowsocks
- Not support multiple ingresses or egresses
- No rule-based routing
As a result, the motivation of pichi is to provide a tool, which can
- support sufficient proxy protocols,
- be easily integrated with GUIs/APPs/scripts, which might have their own rule database,
- control rule-based routing at runtime.
Use cases
Alternative to PAC
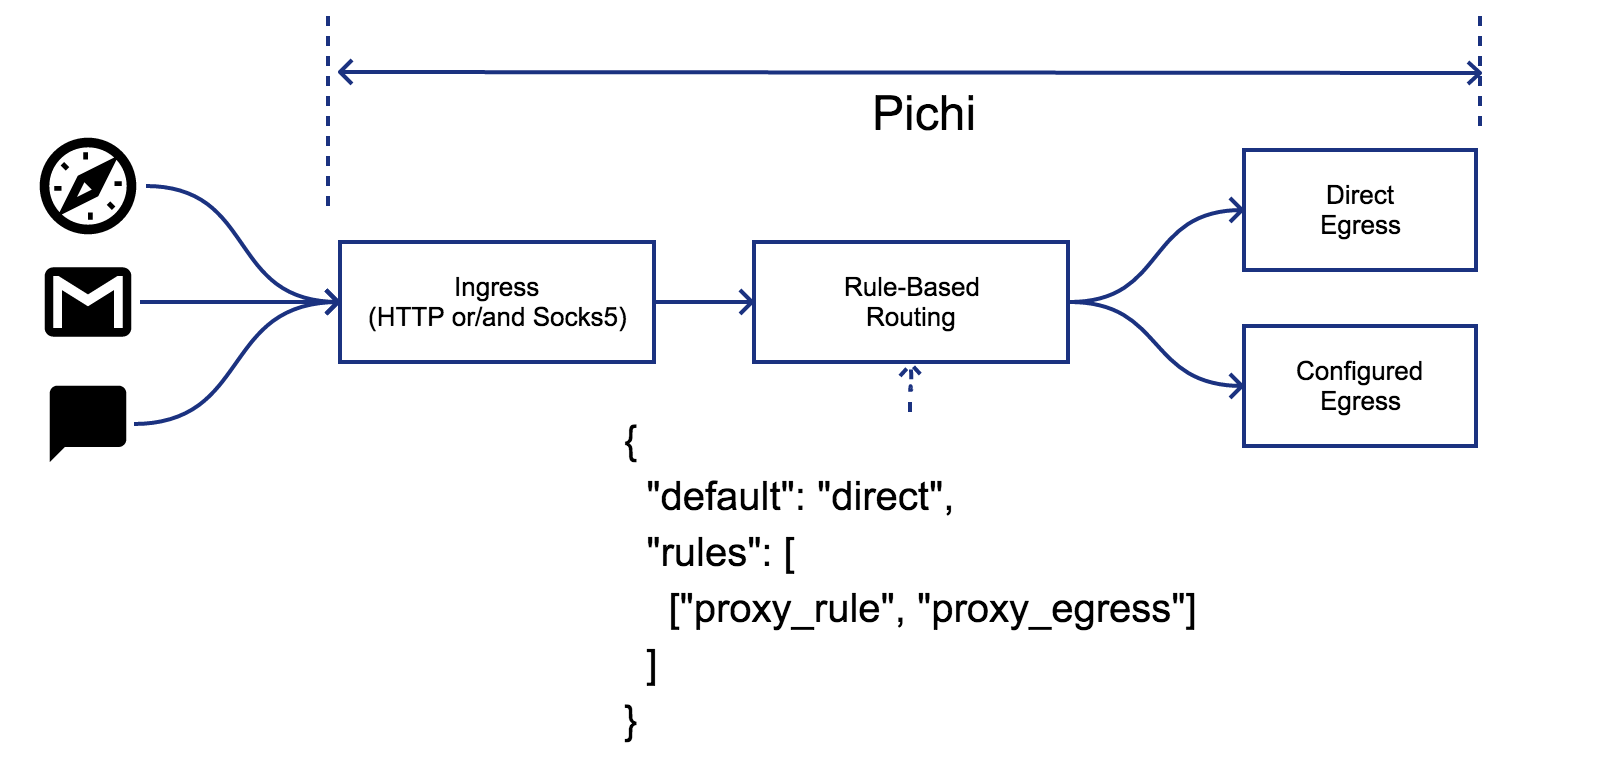
If an individual user is using a proxy, it's very common that the network traffic is probably split into 2 pieces of flow, one going through the proxy and another going directly. PAC is a good choice if web browsing is heavily used. But unfortunately, not all applications support PAC, such as most of MUA, IM, and so on.
Pichi is an alternative choice for this situation. It separates routing rules from every application.
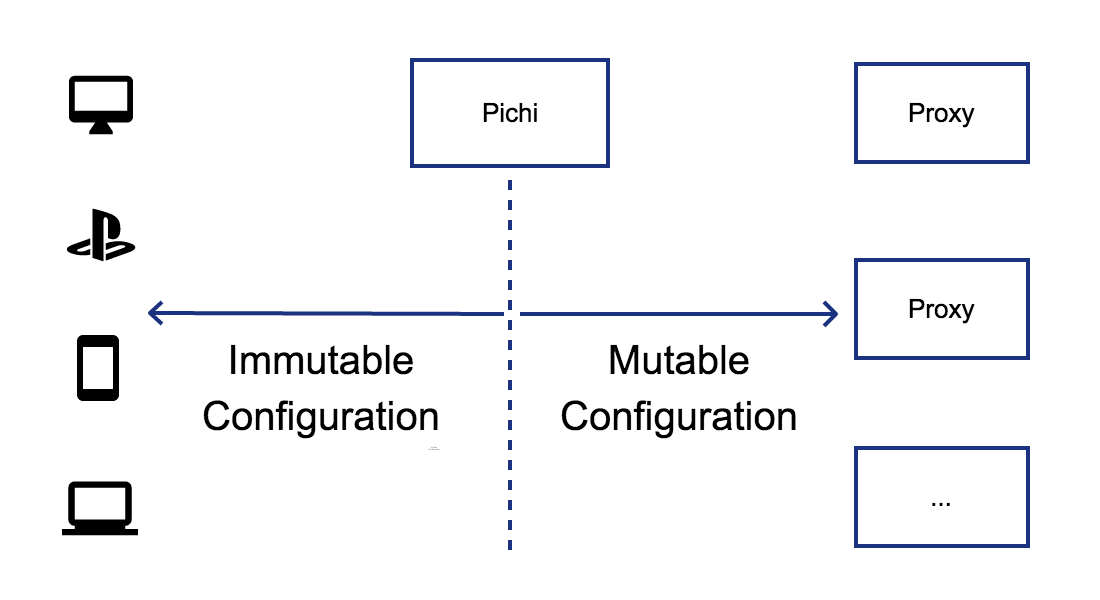
Unify proxy configuration
If the configuration for remote proxies is volatile, such as changing IP/Port periodically, it's a nightmare that lots of clients are using it. Pichi can centralize the varies, rather than editing the configuration client by client.
Trasparent proxy for DNS
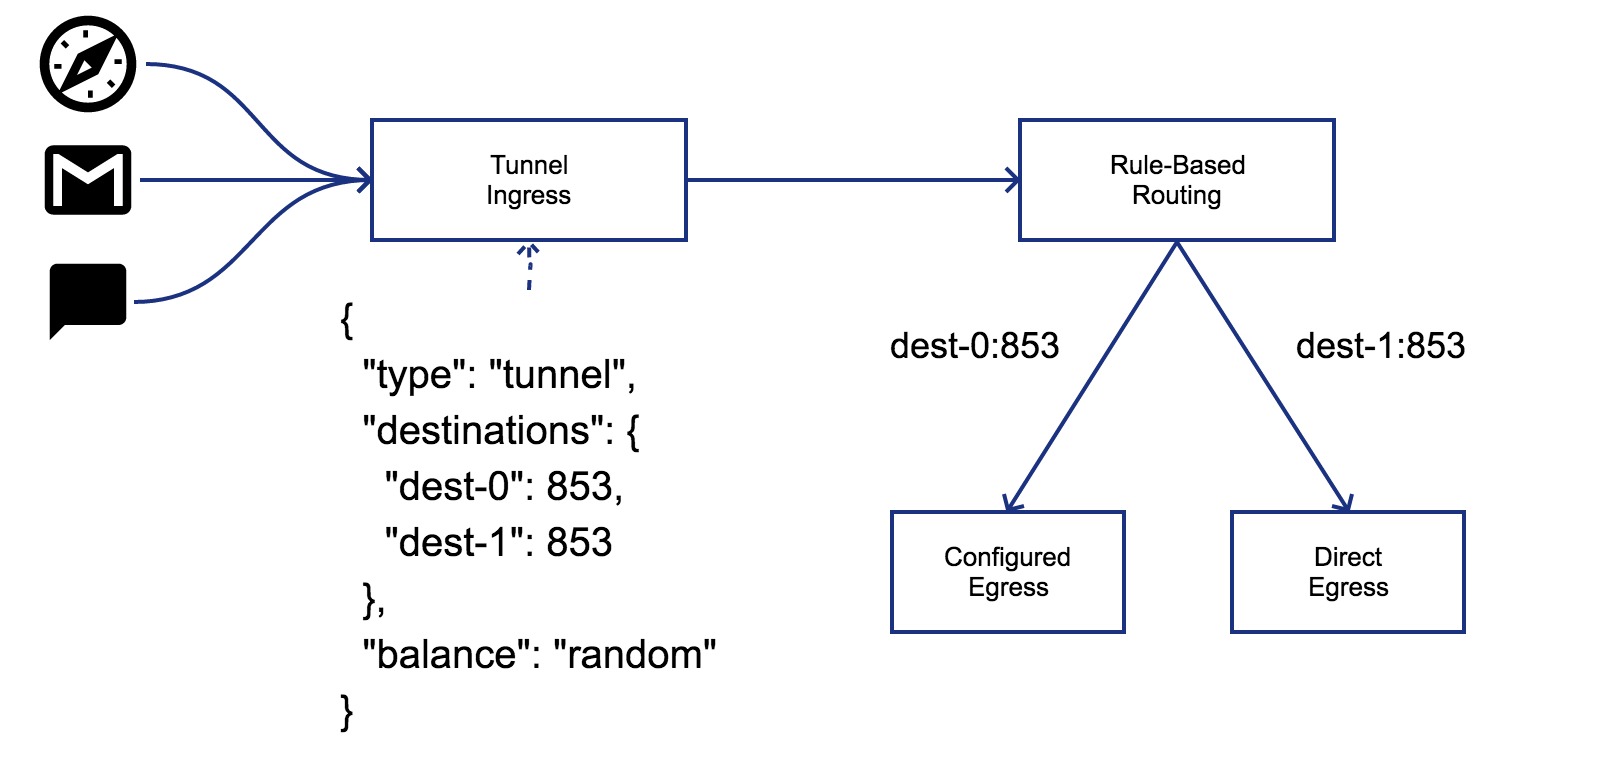
Transparent proxy is very useful if you want to use some DNS servers which might be already poisoned or blocked. Pichi provides tunnel ingress to act as a transparent proxy. Furthermore, the outgoing egress for each destination will be chosen by following the user-defined rules.
Supported protocols
Ingress protocols
- Tunnel: TCP tunnel to multiple destinations to be chosen by pre-defined load balance algorithms
- HTTP Proxy: defined by RFC 2068
- HTTP Tunnel: defined by RFC 2616
- SOCKS5: defined by RFC 1928
- Shadowsocks: defined by shadowsocks.org
- Trojan: defined by trojan-gfw and its websocket extension defined by trojan-go
- VMess: defined by V2Ray
Egress protocols
- Direct: connecting to destination directly
- Reject: rejecting request immediately or after a fixed/random delay
- HTTP Proxy: defined by RFC 2068
- HTTP Tunnel: defined by RFC 2616
- SOCKS5: defined by RFC 1928
- Shadowsocks: defined by shadowsocks.org
- Trojan: defined by trojan-gfw and its websocket extension defined by trojan-go
- VMess: defined by V2Ray
NOTE: HTTP egress would like to try HTTP CONNECT first. HTTP proxy will be chosen if the previous handshake is failed.
Get started
Installation
Linux
Please use Docker:
$ docker pull pichi/pichi:latest
$ docker run --rm pichi/pichi:latest pichi <options>
macOS
Please use Homebrew:
$ brew tap pichi-router/pichi
$ brew install pichi
$ pichi <options>
FreeBSD
Please use FreeBSD ports.
$ pkg install pichi
Windows or others
Please refer to Build section.
Run
$ pichi -h
Allow options:
  -h [ --help ]              produce help message
  -l [ --listen ] arg (=::1) API server address
  -p [ --port ] arg          API server port
  -g [ --geo ] arg           GEO file
  --json arg                 Initail configration(JSON format)
  -d [ --daemon ]            daemonize
  -u [ --user ] arg          run as user
  --group arg                run as group
--port and --geo are mandatory. --json option can take a JSON file as an Initial configuration to specify ingresses/egresses/rules/route. The initial configuration format looks like:
{
  "ingresses": {
    "ingress-0": {/* ingress configuration */},
    "ingress-1": {/* ingress configuration */}
  },
  "egresses": {
    "egress-0": {/* egress configuration */},
    "egress-1": {/* egress configuration */}
  },
  "rules": {
    "rule-0": {/* rule configuration */},
    "rule-1": {/* rule configuration */}
  },
  "route": {/* route configuration */}
}
Please refer to Using Pichi API section for the details of configurations of ingress/egress/rule/route.
Furthermore, Pichi server reloads JSON configuration on SIGHUP received if OS supports.
Using Pichi API
Resources
- Ingress: defines an incoming network adapter, containing protocol type, listening address/port, and protocol-specific configurations.
- Egress: defines an outgoing network adapter, containing protocol type, next hop address/port, and protocol-specific configurations.
- Rule: contains a group of conditions, such as IP ranges, domain regular expressions, the countries of the destination IP, and so on, that the incoming connection matching ANY conditions means the one matching this rule.
- Route: indicates a priority ordered sequence of [rule, egress] pairs, and a default egress which would be forwarded to if none of the rules matched.
API Specification
Examples
Proxy like ss-local(shadowsocks-libev)
$ curl -i -X PUT -d '{ \
>       "type":"socks5", \
>       "bind":[ \
>         {"host":"127.0.0.1","port":1080} \
>       ] \
>     }' http://pichi-router:port/ingresses/socks5
HTTP/1.1 204 No Content

$ curl -i -X PUT -d '{ \
>       "type":"ss", \
>       "server":{"host":"my-ss-server","port":8388}, \
>       "ss":{"method":"rc4-md5","password":"my-password"} \
>     }' http://pichi-router:port/egresses/shadowsocks
HTTP/1.1 204 No Content

$ curl -i -X PUT -d '{"default":"shadowsocks"}' http://pichi-router:port/route
HTTP/1.1 204 No Content
HTTP proxy except intranet
$ curl -i -X PUT -d '{ \
>       "type":"http", \
>       "bind":[ \
>         {"host":"::","port":8080}
>       ] \
>     }' http://pichi-router:port/ingresses/http
HTTP/1.1 204 No Content

$ curl -i -X PUT -d '{ \
>       "type":"http", \
>       "server":{"host":"http-proxy","port":8080} \
>     }' http://pichi-router:port/egresses/http
HTTP/1.1 204 No Content

$ curl -i -X PUT -d '{ \
>       "range":[ \
>         "::1/128", \
>         "127.0.0.1/32", \
>         "10.0.0.0/8", \
>         "172.16.0.0/12", \
>         "192.168.0.0/16", \
>         "fc00::/7" \
>       ], \
>       "domain":["local"], \
>       "pattern":["^localhost$"] \
>     }' http://pichi-router:port/rules/intranet
HTTP/1.1 204 No Content

$ curl -i -X PUT -d '{ \
>       "default":"http", \
>       "rules":[ \
>         ["intranet","direct"] \
>       ] \
>     }' http://pichi-router:port/route
HTTP/1.1 204 No Content
100 shadowsocks servers
$ for((i=20000;i<20100;++i)); do \
>   curl -X PUT \
>   -d "{ \
>         \"type\":\"ss\", \
>         \"bind\":[ \
>           {\"host\":\"::\",\"port\":$i} \
>         ], \
>         \"ss\":{ \
>           \"method\":\"rc4-md5\", \
>           \"password\":\"pw-$i\" \
>         } \
>       }" \
>   "http://pichi-router:port/ingresses/$i"; \
> done
dark web
$ curl -i -X PUT -d '{ \
>       "type":"socks5", \
>       "server":{"host":"localhost","port":9050} \
>     }' http://pichi-router:port/egresses/tor
HTTP/1.1 204 No Content

$ curl -i -X PUT -d '{ \
>       "type":"http", \
>       "server":{"host":"localhost","port":4444} \
>     }' http://pichi-router:port/egresses/i2p
HTTP/1.1 204 No Content

$ curl -i -X PUT -d '{"domain":["onion"]}' http://pichi-router:port/rules/onion
HTTP/1.1 204 No Content

$ curl -i -X PUT -d '{"domain":["i2p"]}' http://pichi-router:port/rules/i2p
HTTP/1.1 204 No Content

$ curl -i -X PUT -d '{ \
>       "rules":[ \
>         ["onion","tor"], \
>         ["i2p","i2p"] \
>       ] \
>     }' http://pichi-router:port/route
HTTP/1.1 204 No Content
socks5 server with TLS certificate issued by Let's encrypt CA
$ curl -i -X PUT -d '{ \
>       "type":"socks5", \
>       "bind":[ \
>         {"host":"::1","port":1080} \
>       ], \
>       "tls": { \
>         "key_file": "/etc/letsencrypt/live/example.com/privkey.pem", \
>         "cert_file": "/etc/letsencrypt/live/example.com/fullchain.pem" \
>       } \
>     }' http://pichi-router:port/ingresses/socks5s
HTTP/1.1 204 No Content
DNS proxy
$ curl -i -X PUT -d '{ \
>       "type":"tunnel", \
>       "bind":[ \
>         {"host":"::1","port":53} \
>       ], \
>       "tunnel":{ \
>         "destinations": [ \
>           { "host": "1.1.1.1", "port": 53 }, \
>           { "host": "1.0.0.1", "port": 53 } \
>         ], \
>         "balance":"random" \
>       } \
>     }' http://pichi-router:port/ingresses/cloudflare
HTTP/1.1 204 No Content
More examples
Please refer to the folder to find more examples.
Build
Requirements
- C++17
- Boost 1.72.0
- MbedTLS 2.7.0
- libsodium 1.0.12
- RapidJSON 1.1.0
- libmaxminddb 1.3.0
- OpenSSL or LibreSSL
CMake options
-
BUILD_SERVER: Build pichi application, the default is ON. -
BUILD_TEST: Build unit test cases, the default is ON. -
STATIC_LINK: Generate static library, the default is ON. -
INSTALL_DEVEL: Install development files, the default is OFF.
Build and run tests
Build and run on Unix-like:
$ cmake -B /path/to/build /path/to/pichi
$ cmake --build /path/to/build
$ cmake --build /path/to/build --target test
Build and run on Windows with Vcpkg:
PS C:\pichi> cmake -D CMAKE_TOOLCHAIN_FILE=C:/vcpkg/scripts/buildsystems/vcpkg.cmake `
>> -D VCPKG_TARGET_TRIPLET="x64-windows-static" -D CMAKE_BUILD_TYPE=MinSizeRel -B build .
PS C:\pichi> cmake --build build --config Release
PS C:\pichi> cmake --build build --config Release --target test
Docker
The pre-built docker image can be found on Docker Hub,
which is automatically generated according to docker/pichi.dockerfile.
Furthermore, docker/builder.dockerfile is intended to provide a docker environment
for development.
$ docker pull pichi/pichi
$ docker run -d --name pichi --net host --restart always pichi/pichi \
>   pichi -g /usr/share/pichi/geo.mmdb -p 1024 -l 127.0.0.1
c51b832bd29dd0333b0d32b0b0563ddc72821f7301c36c7635ae47d00a3bb902
$ docker ps -n 1
CONTAINER ID        IMAGE               COMMAND                  CREATED             STATUS              PORTS               NAMES
c51b832bd29d        pichi/pichi         "pichi -g /usr/share…"   1 seconds ago       Up 1 seconds                            pichi
Build library for iOS/Android
Pichi is designed to run or be embedded into some APPs on iOS/Android. deps-build directory gives some helping scripts to build Pichi's dependencies for iOS/Android.
iOS
CMake provides the detailed documents for iOS/tvOS/watchOS cross compiling. Let's follow it.
$ cmake -G Xcode -D CMAKE_SYSTEM_NAME=iOS -D CMAKE_OSX_DEPLOYMENT_TARGET=8.0 \
>   -D CMAKE_INSTALL_PREFIX=/path/to/sysroot [other options] \
>   -B /path/to/build /path/to/pichi
$ cmake --build /path/to/build --config Release -- -sdk iphoneos            # Build for iPhone
$ cmake --build /path/to/build --config Release -- -sdk iphonesimulator     # Build for iPhone simulator
On the other hand, deps-build/boost.sh can generate libraries for iOS/tvOS if below environment variables are set:
- PLATFORM: to specify target OS(iOS, tvOS);
- ARCH: to specify the target CPU architecture(it has to be corresponding to PLATFORM);
- SYSROOT: to specify root install directory of headers/libraries.
For example:
$ # Build for iOS simulator
$ export PLATFORM=iOS
$ export ARCH=x86_64
$ export SYSROOT=/path/to/ios/sysroot
$ bash deps-build/boost.sh /path/to/boost/source
...
Android
The usage of deps-build/boost.sh is very similar to iOS one, except environment variables:
- PLATFORM: android-<API>s are available;
- ARCH: to specify target CPU architecture(arm, arm64, i386, x86_64);
- SYSROOT: to specify root install directory of headers/libraries.
Android NDK kindly provides build/tools/make_standalone_toolchain.py script to generate a cross-compiling toolchain for any version of Android.
$ # Generate standalone toolchain
$ export NDK_ROOT=/path/to/android/ndk
$ export TOOLCHAIN_ROOT=/path/to/standalone/toolchain
$
$ # Create cross toolchain
$ python ${NDK_ROOT}/build/tools/make_standalone_toolchain.py --arch arm64 --api 29 \
>   --install-dir ${TOOLCHAIN_ROOT}
$
$ # Build for android-29/arm64
$ export PLATFORM=android-29
$ export ARCH=64
$ export SYSROOT=${TOOLCHAIN_ROOT}/sysroot
$
$ # Build boost
$ bash deps-build/boost.sh /path/to/boost/source
$
$ # Build other dependent libraries
$ cmake -D CMAKE_SYSROOT=${SYSROOT} -D CMAKE_INSTALL_PREFIX=${SYSROOT} \
>   -D CMAKE_C_COMPILER=${TOOLCHAIN_ROOT}/bin/clang \
>   -D CMAKE_CXX_COMPILER=${TOOLCHAIN_ROOT}/bin/clang++ \
>   [other options] -B /path/to/build/library /path/to/other/library
$ cmake --build /path/to/build/libraries --target install
$
$ # Build pichi
$ cmake -D CMAKE_SYSROOT=${SYSROOT} -D CMAKE_INSTALL_PREFIX=${SYSROOT} \
>   -D CMAKE_C_COMPILER=${TOOLCHAIN_ROOT}/bin/clang \
>   -D CMAKE_CXX_COMPILER=${TOOLCHAIN_ROOT}/bin/clang++ \
>   [other options] -B /path/to/build /path/to/pichi
$ cmake --build /path/to/build --target install
Cross-Compiling for other architecture
deps-build/boost.sh doesn't provide any cross-compiling steps except iOS/Android,
but it's not very complicated to cross-compile Boost libraries.
There's only one thing important. Boost.Context requires that target-os, abi, binary-format, architecture and address-model must be explicitly specified correctly while cross-compiling.
On the contrary, other libraries can be cross-complied very easily by using CMake. For example:
$ # Cross-Compiling for aarch64-freebsd12.0
$ export AARCH64_SYSROOT=/path/to/aarch64/base/system
$ export CROSS_FLAGS="-target aarch64-unknown-freebsd12.0 --sysroot=${AARCH64_SYSROOT}"
$
$ # Build Boost
$ cd /path/to/boost
$ ./bootstrap.sh
$ cat > project-config.jam <<EOF
> using clang :
> : /usr/bin/clang++ -std=c++17 ${CROSS_FLAGS}
> ;
> EOF
$ ./b2 --with-context --with-filesystem --with-program_options --with-system \
    --prefix=${AARCH64_SYSROOT} target-os=freebsd abi=aapcs binary-format=elf \
    architecture=arm address-model=64 variant=release link=static install
$
$ # Build other libraries
$ cmake -D CMAKE_C_COMPILER=clang -D CMAKE_C_FLAGS="${CROSS_FLAGS}" \
    -D CMAKE_INSTALL_PREFIX=${AARCH64_SYSROOT} \
    -B /path/to/build/library /path/to/library
$ cmake --build /path/to/build --target install
$
$ # Build pichi
$ cmake -D CMAKE_CXX_COMPILER=clang++ -D CMAKE_CXX_FLAGS="${CROSS_FLAGS}" \
    -D CMAKE_INSTALL_PREFIX=${AARCH64_SYSROOT} -B /path/to/build /path/to/pichi
$ cmake --build /path/to/build
$ file /path/to/build/server/pichi
build/server/pichi: ELF 64-bit LSB executable, ARM aarch64, version 1 (FreeBSD),
dynamically linked, interpreter /libexec/ld-elf.so.1, for FreeBSD 12.0 (1200086),
FreeBSD-style, with debug_info, not stripped
Integration with pichi
There are 2 ways to integrate with pichi:
- Standalone: pichi runs in its own process,
- In-Process: pichi runs in its supervisor process.
Regardless of any mode, the supervisor must communicate with pichi via RESTful APIs.
Standalone
Standalone mode requires BUILD_SERVER CMake option, which builds code in server directory. For example:
$ cmake -D CMAKE_INSTALL_PREFIX=/usr -D CMAKE_BUILD_TYPE=MinSizeRel -D BUILD_SERVER=ON -B build .
$ cmake --build build --target install/strip
In-Process
In-Process mode is suitable for the scenarios that the standalone process is prohibited or unnecessary, such as iOS/Android, or the supervisor prefers to run pichi in its own process. There are 2 types of interface to run pichi.
C function
C function can be invoked by lots of program languages. It's defined in include/pichi.h:
/*
 * Start PICHI server according to
 *   - bind: server listening address, NOT NULL,
 *   - port: server listening port,
 *   - mmdb: IP GEO database, MMDB format, NOT NULL.
 * The function doesn't return if no error occurs, otherwise -1.
 */
extern int pichi_run_server(char const* bind, uint16_t port, char const* mmdb);
pichi_run_server will block the caller thread if no error occurs.
C++ class
C++ class might sometimes be friendly while the supervisor is written in C++. It's defined in include/pichi/api/server.hpp:
class Server {
public:
  Server(boost::asio::io_context&, char const* mmdb);
  void listen(std::string_view bind, uint16_t port);
};
pichi::api::Server accepts a boost::asio::io_context object reference, which is shared by the supervisor. Furthermore, Server::listen doesn't block the caller thread. It means that the supervisor can invoke io_context::run() right where it wants to do. Here's a simple code snippet:
#include <pichi/api/server.hpp>

auto io = boost::asio::io_context{};

auto server = pichi::api::Server{io, mmdb};
server.listen(bind, port);

// Setup other ASIO services

io.run();  // Thread blocked
Donation
Please offer me a cup of coffee if you like pichi.


