当图片显示异常时,可以尝试访问这里
近期公告
近期GitHub官方对action签到使用趋向严格,本项目有毙命的风险。但是国内云函数均不支持python3.8(原项目需要python3.8实现),国外则需要信用卡验证等繁琐验证。请有相关搬迁建议的移步到issues区讨论一下。
🌀 简介
PTsignin 是一个基于上游项目flexget_qbittorrent_mod 和GitHub Action 实现的对PT站点的自动签到和数据统计。
项目地址:lhllhx/PT_signin
如果觉得本项目对你有帮助,请顺手点个Star吧
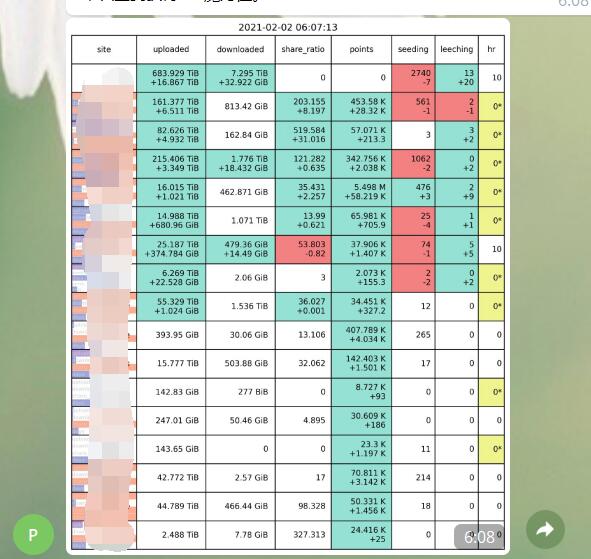
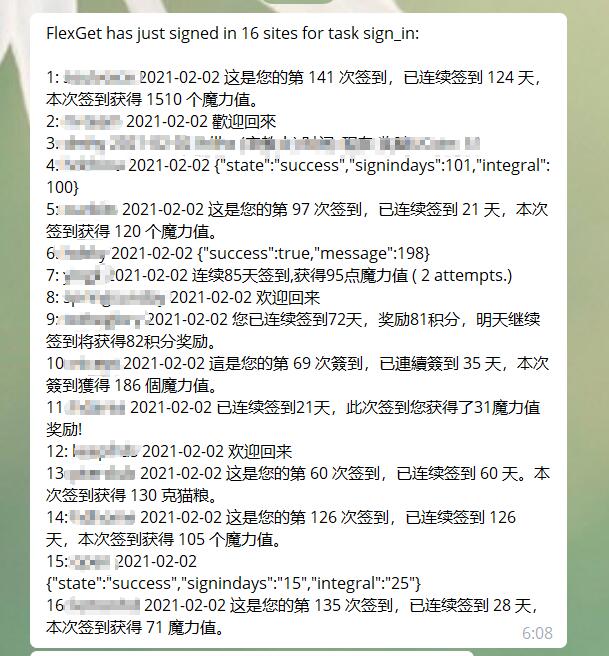
🎪 预览
💡 特性
- 自动签到 程序会在每天早上自动执行签到流程,也可以随时通过对自己的项目重新star来触发 具体时间参照此处
- 支持同步 自动同步上游仓库,默认开启
- 多种推送渠道 支持通过telegram和微信来推送信息
- 多站点覆盖 覆盖大部分内站站点和部分外站站点
- 安全性 多种加密手段确保安全
- 隐私性 运行日志隐藏保证隐私
❗️ 用前须知
使用 PTsignin 即表明,您知情并同意:
-
此代码通过模拟浏览器使用 Cookies 登录pt站点页面,实现自动签到和数据统计。使用时请确保遵守站点相关规定。
-
您使用PTsignin造成的一切损失,与PTsignin无关。PTsignin不会对您的任何损失负责,包括但不限于奖励回收、账号异常
📐 部署
部署流程比较繁琐,请耐心看完
流程框架:
1. Fork 仓库
2. 获取百度ORC_Api_token
3. 配置telegram_bot或企业微信推送
4. 填写配置文件
5. 加密打包并上传至私人仓库
6. 获取github_api_token并填写secret
7. 启用Actions
详细教程:
1.Fork仓库
- 项目地址:lhllhx/PT_signin
- 点击右上角
Fork到自己的账号下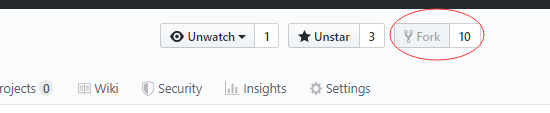
2.获取百度ORC_Api_Token
打开 https://cloud.baidu.com/doc/OCR/s/dk3iqnq51 根据教程获取app_id api_key secret_key 完成教程里面的Step1即可
3.配置telegram_bot或企业微信推送
企业微信推送:
企业微信消息发送插件,微信可关注微工作台接收消息,不必安装企业微信
企业微信获取参数:https://work.weixin.qq.com/api/doc/90000/90135/90665
telegram_bot:
官方教程:https://core.telegram.org/bots#3-how-do-i-create-a-bot
具体教程百度很多 这里不再详述
需要注意 运行项目前,必须要发一条消息(任意内容皆可)到bot里面去激活bot
4.填写配置文件
新建文本文件并重命名为 config.yml
请根据注释填写以下配置文件,注意整体格式,不要随意删减空格
tasks:
  #自动签到
  sign_in:
    auto_sign_in:
      user-agent: 'Mozilla/5.0 (Windows NT 10.0; Win64; x64) AppleWebKit/537.36 (KHTML, like Gecko) Chrome/86.0.4240.111 Safari/537.36'
      max_workers: 1
      get_messages: no #设为no跳过获取未读信息。默认no
      get_details: yes #设为no跳过获取统计。默认yes
      aipocr:  #baidu ocr参数
        app_id: ''
        api_key: ''
        secret_key: ''
      sites:
      #以下为具体站点设置
      #https://github.com/lhllhx/flexget_qbittorrent_mod/tree/master/ptsites 下存在需要的站点 只需配置相应的 主域名: cookie
        1ptba: xxxxxxxx
      #部分cookie过期太快,而改用模拟登陆的站点,如以下站点 无此站点的请删除,请删除
        filelist:
          login:
            username: xxxxxxxx
            password: xxxxxxxx
        hdpost:
          login:
            usernameOrEmail: xxxxxxxx
            password: xxxxxxxx
        ourbits:
          # ourbits 在同时配置了cookie 和 login 时,会忽略login 使用cookie签到
          cookie: xxxxxxxx
          login:
            username: xxxxxxxx
            password: xxxxxxxx
        skyey2:
          login:
            username: xxxxxxxx
            password: xxxxxxxx
        m-team:
          login:
            username: 'xxxxxxxx'
            password: 'xxxxxxxx'
            #二次验证, 扫描二维码得到文本 otpauth://totp/*****:****?secret=[secret_key]&issuer=***** (只取[secret_key]部分)
            secret_key: <secret_key>
        #u2特殊设置 无此站点的请删除
        dmhy:
          username: <username>
          cookie: 'xxxxxxx'
          # 五个字符以上签到留言
          comment: <comment>
          ocr_config:
            # 重试次数
            retry: 3
            # 最低识别字符数
            char_count: 3
            # 最低匹配分数
            score: 50
    accept_all: yes
    seen:
      fields:
        - title
    notify:
      task:
        always_send: true
        message: |+
          {%- if task.accepted -%}
          {%- for group in task.accepted|groupby('task') -%}
          FlexGet has just signed in {{ group.list|length }} sites for task {{ group.grouper }}:
          {% for entry in group.list %}
          {{ loop.index }}: {{ entry.title }} {{ entry.result }}
          {%- if entry.messages|d('') %}
          Messages: {{ entry.messages }}
          {% endif %}
          {%- endfor -%}
          {%- endfor -%}
          {%- endif -%}
          {%- if task.failed %}
          {% for group in task.failed|groupby('task') %}
          The following sites have failed for task {{ group.grouper }}:
          {% for entry in group.list %}
          {{ loop.index }}: {{ entry.title }} Reason: {{ entry.reason|d('unknown') }}
          {%- if entry.messages|d('') %}
          Messages: {{ entry.messages }}
          {% endif %}
          {%- endfor -%}
          {%- endfor -%}
          {%- endif -%}
        via: #推送渠道选择 选择你需要的推送渠道 将不需要的删掉
          - wecom:  #微信
              corp_id: ''
              corp_secret: ''
              agent_id: ''
              to_user: ''
              image: 'details_report.png'
          - telegram_mod: #tg
              bot_token: ''
              image: 'details_report.png'
              recipients:
                - username: '' #注意这里是用户名,不是昵称,不带@
5.加密打包并上传至私人仓库
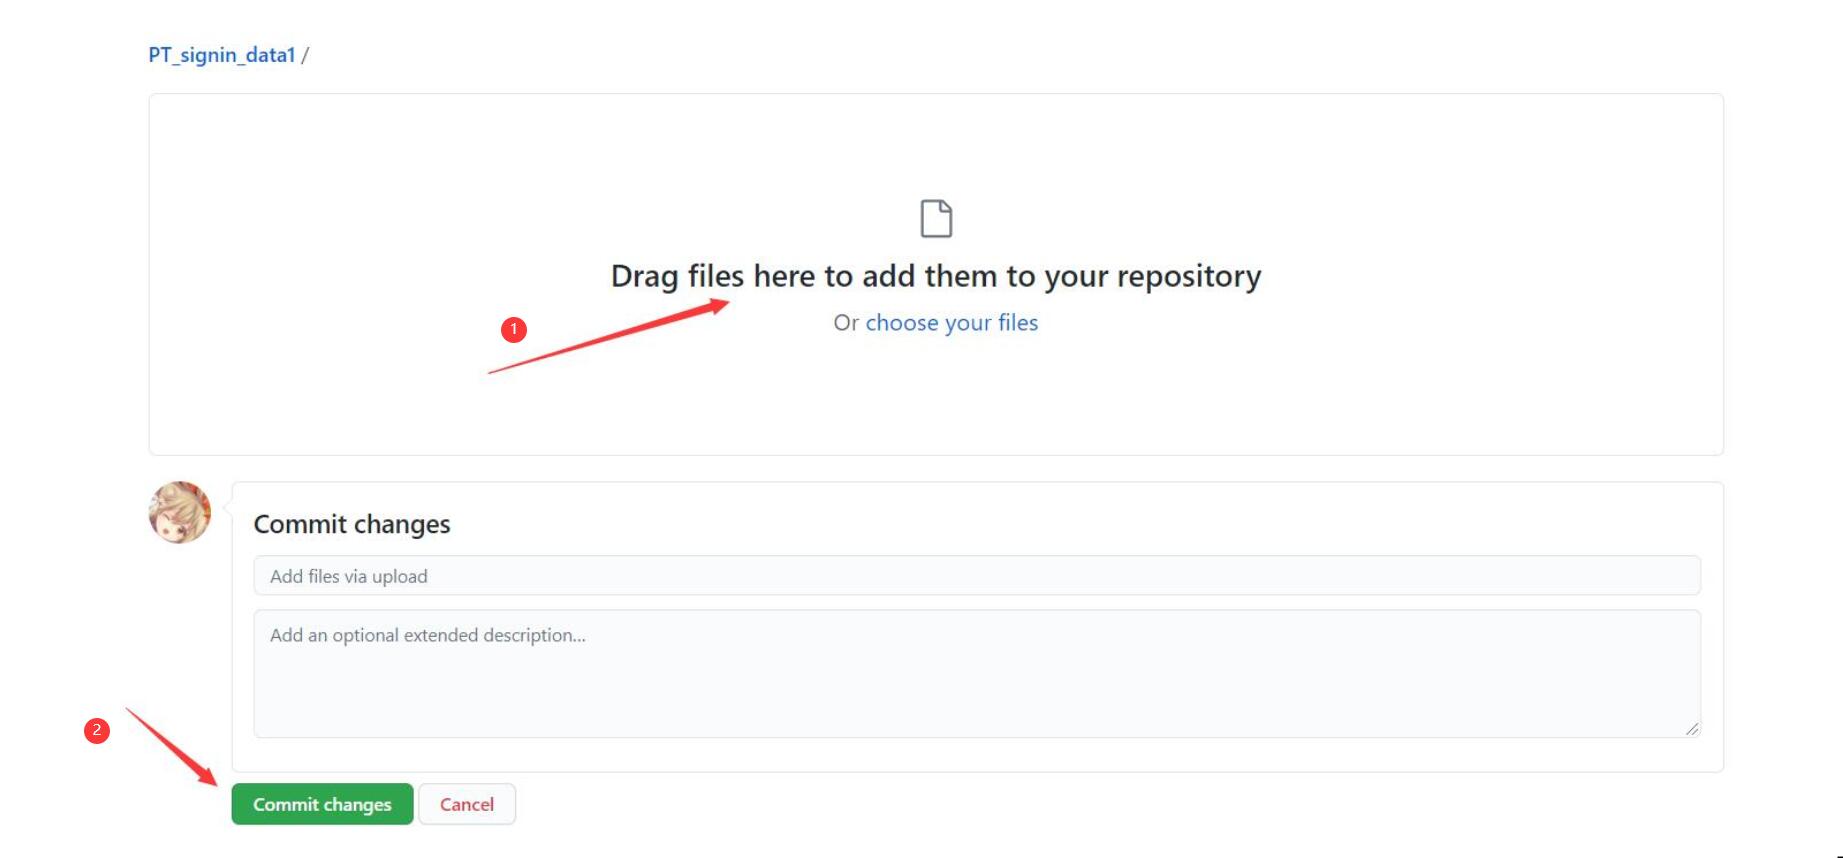
5.1 将其配置文件压缩成为 .zip 压缩文件,并添加不少于15位数的数字字母混合密码 压缩文件命名为config.zip
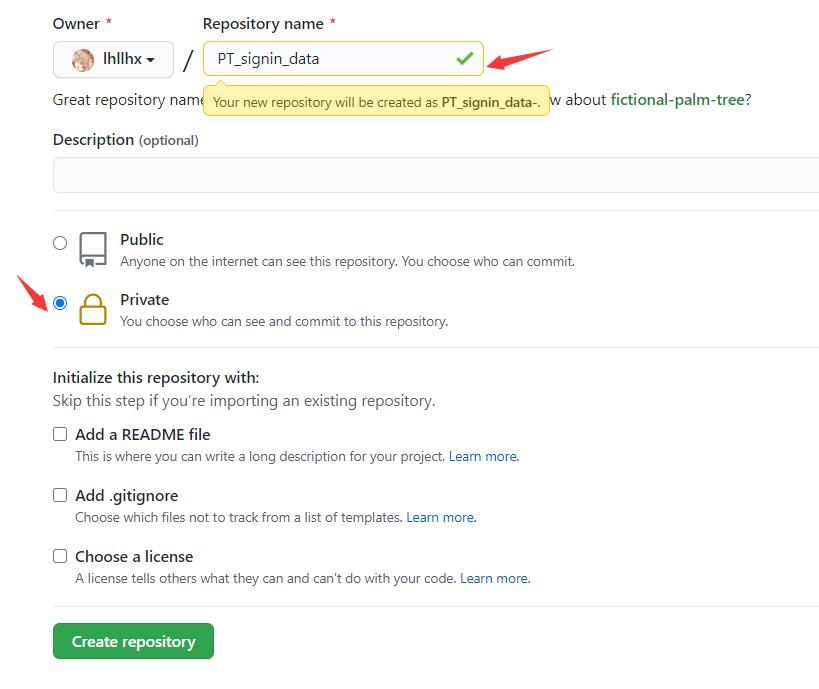
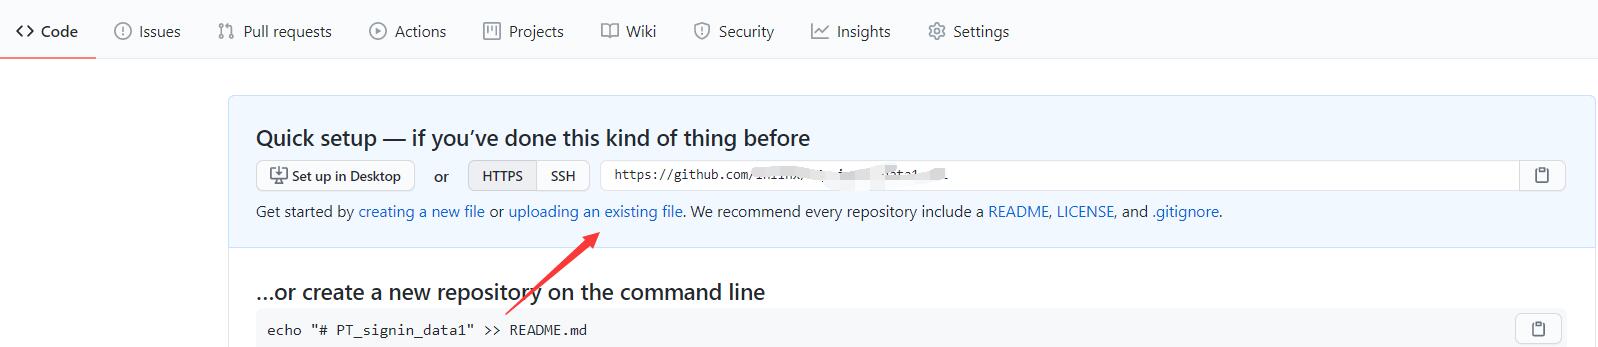
5.2 新建私人仓库,并将其命名为PT_signin_data 上传压缩文件
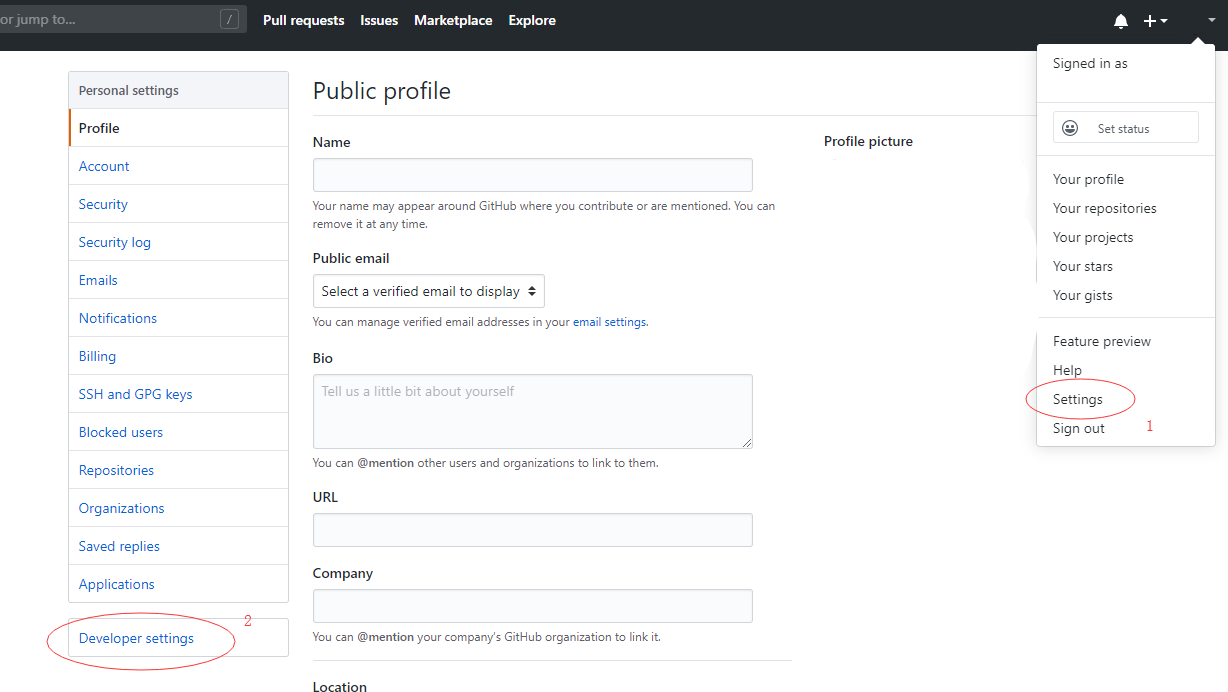
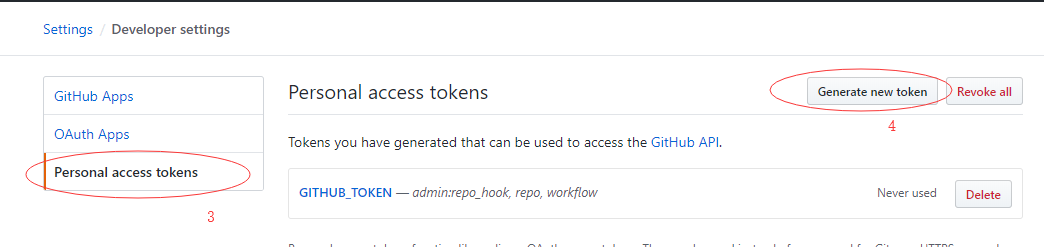
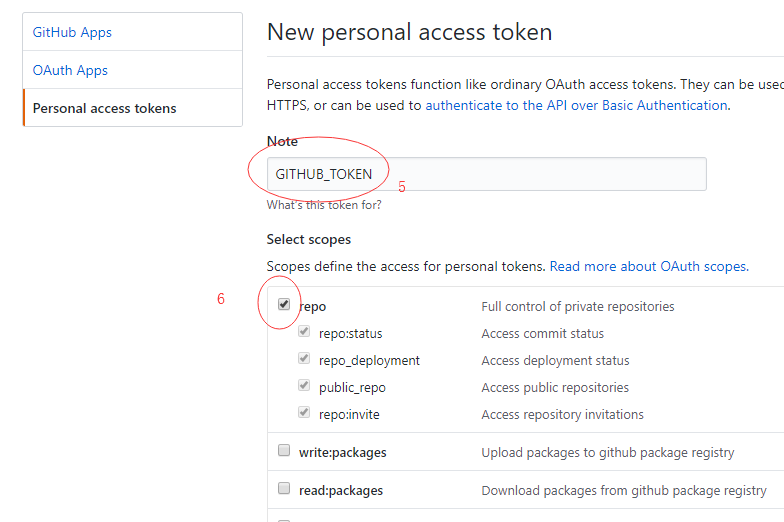
6.获取github_api_token并填写secret
6.1 获取github api密匙 见下图
6.2填写secret
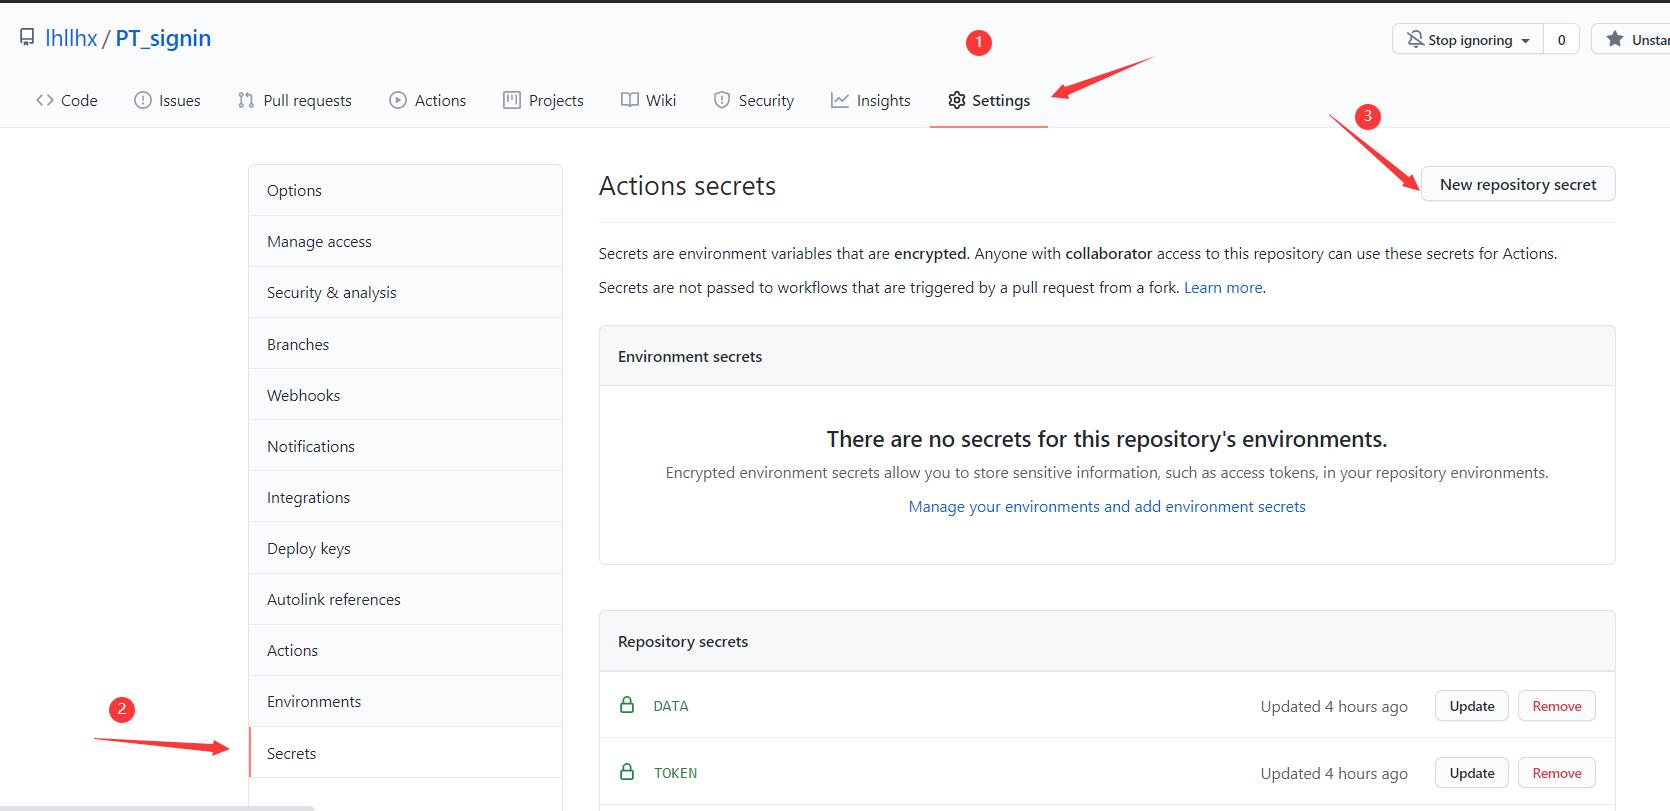
需要填写的项目:
DATA:你存储zip的私人仓库全名 格式为你的用户名/仓库名 如:abc/PT_signin_data
TOKEN:github api token
ZIP: 你设置压缩包的密码
7.启用Actions
Actions 默认为关闭状态,Fork 之后需要手动执行一次,若成功运行其才会激活。
进入Actions页面,启用action,然后点击右上方的Star,刷新页面
至此,部署完毕,项目会每天早上六点去签到。
🔍 结果
当你完成上述流程,可以在Actions页面点击signin-->build查看部分运行日志
为保证隐私,项目不会在github action页面输出关键部分的运行结果,详情请下载私人仓库里的压缩包进行查看,关键部分运行结果会输出到压缩包里的log文件。
注意:运行通过并不代表配置完全没有问题,请以最终结果和日志为准。
🔄 同步
因为接口请求上可能发生一些变化,所以上游源代码需要作出更改来适配这些变化,如果你没有及时同步项目源代码,可能会导致签到失败。 本项目默认开启自动同步.
项目默认使用分支 lhllhx/flexget_qbittorrent_mod ,该分支会自动每隔数小时同步上游项目flexget_qbittorrent_mod
开发者账号泄露后,用户会被供应链攻击的风险。用户在使用本软件时应该默认进行代码审查,然后手动在自己的Repo里PR进行更新。现在的则跳过了这一用户授权更新的动作。
若你不想承担自动同步带来的可能的风险,请参照以下教程修改,并自行审查和更新上游项目
- 如果你看不懂上面是什么意思,不用理会即可
点击查看修改教程
打开自己的github action配置文件,修改第27行 将repository的值更换为你自己fork的项目📌 其他事项和常见问题
1.本项目基于flexget_qbittorrent_mod制作,对其使用有相关疑问可以在原项目提出
2.原项目相关wiki:auto_sign_in wecom遇到相关问题可以自行查阅
3.使用tg机器人发送消息时,第一次运行项目前,必须由你发送一条消息到bot,从发送消息到运行程序不能间隔过久(仅首次运行需要)
4.使用tg机器人发送消息时,请注意不是所有人都有用户名(username),请自行了解你是否有用户名
5.因原项目限制,一天只能推送一次,如果想重复测试,请删除私人仓库里的压缩文件并重新上传
6.极少数情况会在解压(unzip)阶段卡住,原因是您压缩时出现了兼容性问题,出现这种情况请调整压缩参数或更换压缩软件 已修复 还有问题请提交issue
📑 协议
使用 PTsignin 即表明,您知情并同意:
- 此代码通过模拟浏览器使用 Cookies 登录pt站点页面,实现自动签到和数据统计。使用时确保遵守站点相关规定。
- 您使用PTsignin造成的一切损失,与PTsignin无关。
- 用户之 Cookie 被储存于 Github 服务器。若 Github 服务器被攻破,则您的 Cookie 有遭到泄露的风险。禁用自动同步的情况下,开发者无权获取您的 Cookie
❤️ 感谢
本项目基于项目flexget_qbittorrent_mod建立,感谢其所作出的贡献。