ntamvl / Rails_5_api_tutorial
Programming Languages
Projects that are alternatives of or similar to Rails 5 api tutorial
Building the Perfect Rails 5 API Only App
Thanks to the new rails-api gem that ships as part of the Rails 5 core, Rails is now an ideal candidate for building streamlined APIs quickly and easily.
Until now, arguably the best option for creating APIs in Ruby has been Grape, and while Grape is still a brilliant option (especially if you like to DIY), there are some great advantages to using Rails 5 in API mode, such as; ActiveRecord by default, a strong developer community, and having the asset pipeline and front end features available should you need them as your project evolves.
This how-to guide aims to help you get started the right way using Rails 5 to build the perfect API, and it comprises of the following sections:
- Setting up Rails 5
- Using RSpec for Testing
- Bulding Your API
- Serializing API Output
- Enabling CORS
- Versioning Your API
- Rate Limiting and Throttling
- Authenticating Your API
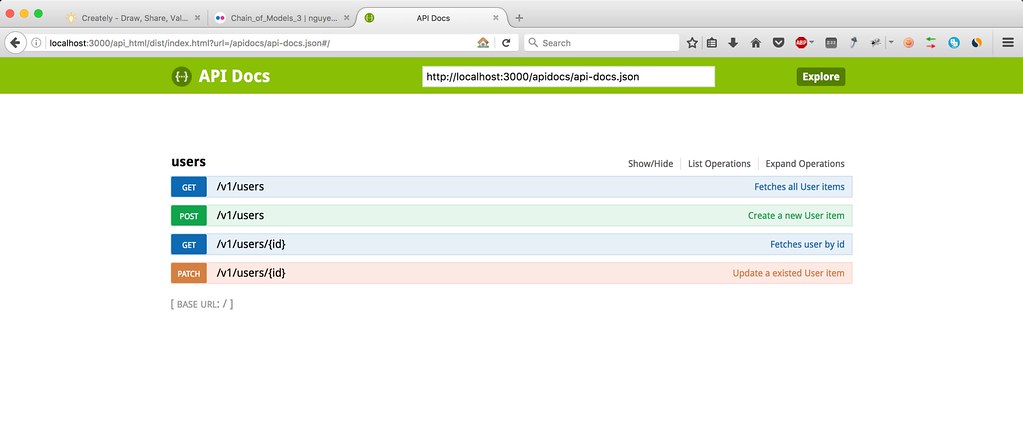
- API documentation use Swagger UI
Screenshot
Setting up Rails 5
First, make sure you are running Ruby 2.2.2+ or newer as it’s required by Rails 5.
Now we generate new Rails API application by passing the --api directive to the rails new command:
rails __5.0.2__ api_app_name --api
The next thing is to run bundle inside our app directory to install the default gems and setup the database:
cd api_app_name
bundle install
and edit config/database.yml then run:
rails db:create
Nice! Now we have a shiny new API only Rails app without any of the incumbent front end bloat, and all of the inherent Railsy goodness.
Using RSpec for Testing
Before going any further let’s setup RSpec for spec testing our application. The reason why it’s good to setup RSpec first is that we can save a bit of time using the built-in RSpec generators to auto generate default model and controller specs for us each time we use rails generate scaffold to generate resources later on. To install RSpec, go ahead and add the rspec-rails gem to your Gemfile in the :development, :test group:
group :development, :test do

    # Use RSpec for specs
    gem 'rspec-rails', '3.1.0'

    # Use Factory Girl for generating random test data
    gem 'factory_girl_rails'
end
Update your bundle:
bundle
Run the RSpec installer:
bin/rails g rspec:install
Finally, you can get rid of the test directory in Rails, since we won’t be writing unit tests, but writing specifications instead.
Bulding Your API
Lets start building out our API controllers.
When an app is created with the --api flag you can use the default scaffold generators to generate your API resources as normal, without the need for any special arguments.
bin/rails g scaffold user name email
This will generate the following file structure:
          invoke  active_record
       identical    db/migrate/20151222022044_create_users.rb
       identical    app/models/user.rb
          invoke    rspec
          create      spec/models/user_spec.rb
          invoke      factory_girl
          create        spec/factories/users.rb
          invoke  resource_route
           route    resources :users
          invoke  scaffold_controller
       identical    app/controllers/users_controller.rb
          invoke    rspec
          create      spec/controllers/users_controller_spec.rb
          create      spec/routing/users_routing_spec.rb
          invoke      rspec
          create        spec/requests/users_spec.rb
Note that no views are created since we are running in API mode.
Go ahead and repeat the process with as many resources as you like, and once you’re done you can migrate and run the app:
bin/rails db:migrate

# run the default server on port 3000
bin/rails s
Your new API is now up and running on http://localhost:3000. Sweet!
You’re not done yet though, there are still a bunch of important points for consideration…
Serializing API Output
In it’s current state our app will just spit out a JSON representation of every column in the database so we need a way to control what data gets served through the API.
Normally we would use a front end templating engine such as jbuilder for this purpose, but since we’re not using views in our super streamlined API app, that’s not going to be an option.
Fortunately AMS (Active Model Serializers) is here to save the day. AMS provides a clean layer between the model and the controller that lets us to call to_json or as_json on the ActiveRecord object or collection as normal, while outputing our desired API format.
Go ahead and add the active_model_serializers gem to your Gemfile:
gem 'active_model_serializers'
Update your bundle:
bundle
Now lets create a default serializer for our User model:
rails g serializer user
In app/serializers/user_serializer.rb, we find this code:
class UserSerializer < ActiveModel::Serializer
    attributes :id
end
Note that only the :id attribute is added by default. That’s not going to be much use to us, so go ahead and add the :name and :email attributes to the serializer:
class UserSerializer < ActiveModel::Serializer
    attributes :id, :name, :email
end
If your model has relationships just declare them on the serializer as you would any other attributes to be serialized in the output.
You may also need to include the ActionController::Serialization dependency in your controller like so:
class ApplicationController < ActionController::API
    include ActionController::Serialization

    # ...
end
Now when you hit and User related API endpoint only the attributes in the UserSerializer will be rendered. Nice!
Check the active_model_serializers gem homepage for more detailed configuration options.
Enabling CORS
If you’re building a public API you’ll probably want to enable Cross-Origin Resource Sharing (CORS), in order to make cross-origin AJAX requests possible.
This is made very simple by the rack-cors gem. Just stick it in your Gemfile like so:
gem 'rack-cors'
Update your bundle:
bundle
And put something like the code below in config/application.rb of your Rails application. For example, this will allow GET, POST or OPTIONS requests from any origin on any resource.
module YourApp
    class Application < Rails::Application

    # ...

    config.middleware.insert_before 0, "Rack::Cors" do
        allow do
        origins '*'
        resource '*', :headers => :any, :methods => [:get, :post, :options]
        end
    end

    end
end
For more detailed configuration options please see the gem documentation: https://github.com/cyu/rack-cors
Versioning Your API
Before releasing your public API into the wild, you should consider implementing some form of versioning. Versioning breaks your API up into multiple version namespaces, such as v1 and v2, so that you can maintain backwards compatibility for existing clients whenever you introduce breaking changes into your API, simply by incrementing your API version.
This guide will show you how to setup versioning with the following URL format:
GET http://api.mysite.com/v1/users/
Using a subdomain instead of something like /api/v1/users/ is just a preference, although both are easy to accomplish in Rails.
We can use a directory structure like this to keep our controller code clean by defining all our v1 controllers within the Api::V1 namespace:
app/controllers/
.
|-- api
|   |-- v1
|       |-- api_controller.rb
|       |-- users_controller.rb
|-- application_controller.rb
Here’s what the controllers look like:
# app/controllers/api/v1/api_controller.rb

module Api::V1
    class ApiController < ApplicationController
    # Generic API stuff here
    end
end

# app/controllers/api/v1/users_controller.rb

module Api::V1
    class UsersController < ApiController

    # GET /v1/users
    def index
        render json: User.all
    end

    end
end
Now let’s setup our config/routes.rb to tie everything together:
constraints subdomain: 'api' do
    scope module: 'api' do
    namespace :v1 do
        resources :users
    end
    end
end
The scope module: 'api' bit lets us route to controllers in the API module without explicitly including it in the URL. However, the version v1/ is part of the URL, and we also want to route to the V1 module, so we use namespace.
Now you’re API routes are looking pretty sharp!
Rate Limiting and Throttling
To protect our API from DDoS, brute force attacks, hammering, or even to monetize with paid usage limits, we can use a Rake middleware called Rack::Attack. The rack-attack gem was released by Kickstarter, and it allows us to:
- whitelist: Allowing it to process normally if certain conditions are true
- blacklist: Sending a denied message instantly for certain requests
- throttle: Checking if the user is within their allowed usage
- track: Tracking this request to be able to log certain information about our requests
Get started by adding the dependency to your Gemfile:
gem 'rack-attack'
Update your bundle:
bundle
Now update your config/application.rb file to include it into your middleware stack:
module YourApp
    class Application < Rails::Application

    # ...

    config.middleware.use Rack::Attack

    end
end
Create a new initializer file in config/initializers/rack_attack.rb to configure your Rack::Attack rules. The example below is very basic, and it should give a good starting point although you may have different requirements altogether.
class Rack::Attack

    # `Rack::Attack` is configured to use the `Rails.cache` value by default,
    # but you can override that by setting the `Rack::Attack.cache.store` value
    Rack::Attack.cache.store = ActiveSupport::Cache::MemoryStore.new

    # Allow all local traffic
    whitelist('allow-localhost') do |req|
    '127.0.0.1' == req.ip || '::1' == req.ip
    end

    # Allow an IP address to make 5 requests every 5 seconds
    throttle('req/ip', limit: 5, period: 5) do |req|
    req.ip
    end

    # Send the following response to throttled clients
    self.throttled_response = ->(env) {
    retry_after = (env['rack.attack.match_data'] || {})[:period]
    [
        429,
        {'Content-Type' => 'application/json', 'Retry-After' => retry_after.to_s},
        [{error: "Throttle limit reached. Retry later."}.to_json]
    ]
    }
end
For a full list of configuration options check the Rack::Attack gem homepage.
Now that your API is safe from brute force attacks and bad client code you can sleep a little better at night!
Authenticating Your API
Let’s lock our API down with some authentication.
As a rule API’s should be stateless, and therefore should not have any knowledge of cookies or sessions.
If you require sessions then you should be looking at implementing some form of OAuth based authentication, but that won’t be covered in this guide.
A good way of authenticating API requests is using HTTP token based authentication, which involves clients including a API key of some sort in the HTTP Authorization header of each request, like so:
Authorization: Token token="WCZZYjnOQFUYfJIN2ShH1iD24UHo58A6TI"
First let’s update create a migration to add the api_key attribute to our User model:
rails g migration AddApiKeyToUsers api_key:string
Now update the User model to include the following methods:
class User < ActiveRecord::Base

    # Assign an API key on create
    before_create do |user|
    user.api_key = user.generate_api_key
    end

    # Generate a unique API key
    def generate_api_key
    loop do
        token = SecureRandom.base64.tr('+/=', 'Qrt')
        break token unless User.exists?(api_key: token)
    end
    end
end
On the controller side we can implement the authentication using the built in authenticate_or_request_with_http_token Rails method.
class ApplicationController < ActionController::Base
    include ActionController::HttpAuthentication::Token::ControllerMethods

    # Add a before_action to authenticate all requests.
    # Move this to subclassed controllers if you only
    # want to authenticate certain methods.
    before_action :authenticate

    protected

    # Authenticate the user with token based authentication
    def authenticate
        authenticate_token || render_unauthorized
    end

    def authenticate_token
        authenticate_with_http_token do |token, options|
            @current_user = User.find_by(api_key: token)
        end
    end

    def render_unauthorized(realm = "Application")
    self.headers["WWW-Authenticate"] = %(Token realm="#{realm.gsub(/"/, "")}")
    render json: 'Bad credentials', status: :unauthorized
    end
end
Now we can test our authenticated API using curl:
curl -H "Authorization: Token token=PsmmvKBqQDOaWwEsPpOCYMsy" http://localhost:3000/users
Documenting Rails-based REST API using Swagger UI
Problem
You built a REST API server using Rails and you need to document and test the endpoints.
The Setup
Let's assume the following:
REST endpoint:
/api/v1/posts
Rails controller:
app/controllers/api/v1/posts_controller.rb
Steps
1 - Add the following to the Gemfile and run bundle afterwards.
Swagger
Add this line to Gemfile
gem 'swagger-docs'
then run command
bundle
2 - Say you decide to structure your REST path in the following format: /api/v1/{method}. Edit app/controllers/api/v1/posts_controller.rb and add the following:
# app/controllers/api/v1/posts_controller.rb

module Api
  module V1
    class PostsController < ApplicationController

      respond_to :json

      swagger_controller :posts, 'Posts'

      swagger_api :index do
        summary 'Returns all posts'
        notes 'Notes...'
      end

      def index
        @posts = Post.all

        render json: @posts, status: :ok
      end
    end
  end
end
The swagger_api block represents the documentation for posts#index. When we run the command "rails swagger:docs" later, the info will be used to generate the posts.json file that Swagger UI uses to render the REST documentation.
3 - Generate config/initializers/swagger.rb
# config/initializers/swagger.rb

class Swagger::Docs::Config
  def self.transform_path(path, api_version)
    # Make a distinction between the APIs and API documentation paths.
    "apidocs/#{path}"
  end
end

Swagger::Docs::Config.base_api_controller = Api::V1::ApiController

Swagger::Docs::Config.register_apis({
  '1.0' => {
    controller_base_path: '',
    api_file_path: 'public/apidocs',
    base_path: 'http://127.0.0.1:3000',
    parent_controller: Api::V1::ApiController,
    clean_directory: true
  }
})
When we run the command rails swagger:docs later, the info entered here will generate the api-docs.json file that is read by Swagger UI to generate the HTML page to display the documentation of the API.
Note that we override the transformpath method in Swagger::Docs::Config to place the documentation files (which are located in api-docs.json and a *.json for each of the controllers) in a directory that is different from the actual API endpoints. This prevents any possible conflicts of URL since the path of documentation file generated from rails swagger:docs likely conflicts with the #index route. For example, if we don't override #transformpath both the documentation path for PostsController and the hosted API endpoint for posts#index will share the same URI path (/api/v1/posts.json), leading to a conflict.
4 - Also it a good practice not to check the generated Swagger documentation files into git. So we include the generated json files in .gitigore. Because all the generated files are saved under public/apidocs, it becomes easy to include those files in .gitignore.
Ignore Swagger JSON files.
/public/apidocs/
5 - Generate the API docs. You must run the following command to generate new documentation json files everytime you change the API endpoints.
$ rails swagger:docs
The API documentation will be generated in the public/apidocs directory.
Read this doc for more info on Swagger Docs.
6 - So far, we have configure our project to generate Swagger documentation files. We now need Swagger UI installed in our project. This isn't the final solution, but we can clone Swagger UI by creating a submodule in the public directory. This way Swagger UI can be served via the rails server.
$ cd public
$ git submodule add [email protected]:wordnik/swagger-ui.git swagger
OR
cd public
git submodule add [email protected]:swagger-api/swagger-ui.git swagger
Read this doc for more info on Swagger UI.
7 - As a convenience, we can add the following redirection in the routes.rb. This way, path /api will redirect us to the Swagger UI home page located in public/swagger/dist/index.html.
By default, the Swagger UI home page retrieves the api-docs.json documentation file from http://petstore.swagger.wordnik.com/. We can override this behavior by appending a URI parameter url to the URL ie. /swagger/dist/index.html?url=/apidocs/api-docs.json.
edit config/routes.rb
get '/docs' => redirect('/swagger/dist/index.html?url=/apidocs/api-docs.json')
8 - Run the Rails server.
$ rails s
9 - Launch a web browser and go to http://localhost:3000/docs.
10 - Should include SwaggerDoc into controller
# app/controllers/api/v1/api_controller.rb

module Api::V1
  class ApiController < ApplicationController
    Swagger::Docs::Generator::set_real_methods
    include Swagger::Docs::ImpotentMethods

    class << self
      Swagger::Docs::Generator::set_real_methods

      def inherited(subclass)
        super
        subclass.class_eval do
          setup_basic_api_documentation
        end
      end

      private
      def setup_basic_api_documentation
        [:index, :show, :create, :update, :delete].each do |api_action|
          swagger_api api_action do
            param :header, 'Authorization', :string, :required, 'Authentication token'
          end
        end
      end
    end
  end
end
and in app/controllers/api/v1/users_controller.rb
# app/controllers/api/v1/users_controller.rb

module Api::V1
  class UsersController < ApiController
    swagger_controller :users, "User Management"

    def self.add_common_params(api)
      api.param :form, "user[name]", :string, :optional, "Name"
      api.param :form, "user[email]", :string, :optional, "Email"
    end

    swagger_api :index do
      summary "Fetches all User items"
      notes "This lists all the active users"
    end

    swagger_api :show do
      summary "Fetches user by id"
      notes "Find user by id"
      param :path, :id, :integer, :optional, "User Id"
      response :unauthorized
      response :not_acceptable, "The request you made is not acceptable"
      response :requested_range_not_satisfiable
    end

    swagger_api :create do |api|
      summary "Create a new User item"
      notes "Notes for creating a new User item"
      Api::V1::UsersController::add_common_params(api)
      response :unauthorized
      response :not_acceptable
      response :unprocessable_entity
    end

    # GET /v1/users
    def index
      render json: User.all
    end

    def show
      user = User.find(params[:id])
      if user.present?
        render json: user
      else
        render json: { message: "User can't be found!" }
      end
    end

    # POST /users
    def create
      @user = User.new(user_params)

      if @user.save
        render json: @user, status: :created, location: @user
      else
        render json: @user.errors, status: :unprocessable_entity
      end
    end

    private
    # Use callbacks to share common setup or constraints between actions.
    def set_user
      @user = User.find(params[:id])
    end

    # Only allow a trusted parameter "white list" through.
    def user_params
      params.require(:user).permit(:name, :email)
    end

  end
end
Rate Limiting per token
Create file config/initializers/throttle.rb
# config/initializers/throttle.rb

require "redis"

redis_conf  = YAML.load(File.join(Rails.root, "config", "redis.yml"))
REDIS = Redis.new(:host => redis_conf["host"], :port => redis_conf["port"])

# We will allow a client a maximum of 60 requests in 15 minutes. The following constants need to be defined in throttle.rb
THROTTLE_TIME_WINDOW = 15 * 60
THROTTLE_MAX_REQUESTS = 60
The filter needs to be changed to respond with error messages when the rate limit is exceeded.
class ApplicationController < ActionController::API
  include ActionController::Serialization
  include ActionController::HttpAuthentication::Token::ControllerMethods

  before_action :authenticate
  before_filter :throttle_token

  protected

  def authenticate
    authenticate_token || render_unauthorized
  end

  def authenticate_token
    authenticate_with_http_token do |token, options|
      @current_user = User.find_by(api_key: token)
      @token = token
    end
  end

  def render_unauthorized(realm = "Application")
    self.headers["WWW-Authenticate"] = %(Token realm="#{realm.gsub(/"/, "")}")
    render json: {message: 'Bad credentials'}, status: :unauthorized
  end

  def throttle_ip
    client_ip = request.env["REMOTE_ADDR"]
    key = "count:#{client_ip}"
    count = REDIS.get(key)

    unless count
      REDIS.set(key, 0)
      REDIS.expire(key, THROTTLE_TIME_WINDOW)
      return true
    end

    if count.to_i >= THROTTLE_MAX_REQUESTS
      render :json => {:message => "You have fired too many requests. Please wait for some time."}, :status => 429
      return
    end
    REDIS.incr(key)
    true
  end

  def throttle_token
    if @token.present?
      key = "count:#{@token}"
      count = REDIS.get(key)

      unless count
        REDIS.set(key, 0)
        REDIS.expire(key, THROTTLE_TIME_WINDOW)
        return true
      end

      if count.to_i >= THROTTLE_MAX_REQUESTS
        render :json => {:message => "You have fired too many requests. Please wait for some time."}, :status => 429
        return
      end
      REDIS.incr(key)
      true
    else
      false
    end
  end
end
Let’s go ahead and test this test_throttle.sh.
for i in {1..300}
do
printf "\n------------------\n"
echo "Welcome $i times"
printf "\n"
# curl -i -H "Authorization: Token token=3Hu9orST5sKDHUPJBwjbogtt" http://localhost:3000/v1/users >> /dev/null
# curl -i -H "Authorization: Token token=3Hu9orST5sKDHUPJBwjbogtt" http://10.1.0.201:3000/v1/users
curl -i -H "Authorization: Token token=3Hu9orST5sKDHUPJBwjbogtt" http://localhost:3000/v1/users
done
How to run
Clone source from github: [email protected]:ntamvl/rails_5_api_tutorial.git
cd
git clone [email protected]:ntamvl/rails_5_api_tutorial.git && cd rails_5_api_tutorial
bundle install
Edit config/database.yml
default: &default
  adapter: postgresql
  encoding: unicode
  template: template0
  pool: <%= ENV.fetch("RAILS_MAX_THREADS") { 5 } %>
  host: localhost
  port: 5432
  username: postgres
  password: password

development:
  <<: *default
  database: filter_api_development
Create a new user to get token, type command rails c
u = User.create({name: "Tam Nguyen", email: "[email protected]"})
ap u
next typing
rails s
then run in Terminal
# with [token] that taken on rails console
curl -H "Authorization: Token token=[token]" http://localhost:3000/v1/users
example
curl -H "Authorization: Token token=3Hu9orST5sKDHUPJBwjbogtt" http://localhost:3000/v1/users
Conclusion
Now you have the keys to the castle, and all the basics for building an API the Rails way.
Hopefully then guide was helpful for you, and if you want any points clarified or just want to say thanks then feel free to use the comments below.
Cheers, and happy coding!
Redis documentation for INCR command. [return]
redis - A Ruby client that tries to match Redis’ API one-to-one, while still providing an idiomatic interface. It features thread-safety, client-side sharding, pipelining, and an obsession for performance. [return]
Rails’ before filter. [return]
IETF: Additional HTTP Status Codes - 429 Too Many Requests. [return]
If you have questions or comments about this blog post, you can get in touch with me on Twitter @nguyentamvn