birkir / React Native Carplay
Programming Languages
Projects that are alternatives of or similar to React Native Carplay
CarPlay with React Native
What if you could create CarPlay with React Native. Well, now you can.
Support
This version of react-native-carplay supports iOS 14. If you need support for versions before this please refer to version 1.3.1 of this package.
CarPlay Entitlement and XCode Project Setup
Read this section if you are new to CarPlay!
One of the most useful resources for undertanding the requirements, constraints and capabilities of CarPlay apps is the official App Programming Guidelines from Apple. It's a 50-page document that clearly lays out steps required and you are strongly encouraged to read it if you are new to CarPlay. Further to the above guide, when developing a CarPlay app or if contributing to this package; you'll find the CarPlay Documentation invaluable.
You can develop CarPlay capabilities with this project without waiting for Apple to send you back an entitlement, through the simulator.
If you want to build and run your app on an iPhone or share it with others through the App Store Connect or TestFlight, you will need to request a CarPlay entitlement from Apple first. The process will take anywhere from a few days to weeks - your mileage will vary. This depends on the type of Entitlement you are requesting. If you are part of the MFi program, this may help speed things up too. You then need to add the entitlement to your provisioning profile or signing certificate that you use for signing your app in XCode.
You can go to this Apple CarPlay entitlement request page to request a CarPlay Entitlement. You need to be logged in with an Apple Developer account.
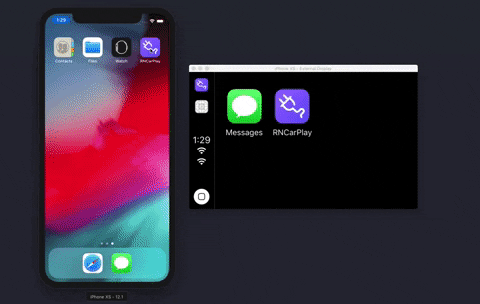
To start a CarPlay simulator in XCode, within the Simulator window, go to the menu option IO, click on External Displays, then select CarPlay.
NB:
Whether you are running through a simulator or building the app for distribution, you need to ensure that the correct entitlement key is added in your Entitlements.plist file. If you don't have an Entitlements.plist file, create one in your iOS/ directory.
Installing
- Install the library
yarn add react-native-carplay --save
- Link using normal or cocoapods method
react-native link react-native-carplay
# in ios/Podfile:

pod 'react-native-carplay', path: '../node_modules/react-native-carplay'
- Edit your AppDelegate
// AppDelegate.h

// [step 1] add this line to the top
#import <CarPlay/CarPlay.h>

// [step 2] add the "CPApplicationDelegate" to the end, before ">":
@interface AppDelegate : UIResponder <UIApplicationDelegate, CPApplicationDelegate>
// AppDelegate.m

// [step 1] add this line to the top
#import <RNCarPlay.h>

// ...

// [step 2] add the following two methods before @end

- (void)application:(UIApplication *)application didConnectCarInterfaceController:(CPInterfaceController *)interfaceController toWindow:(CPWindow *)window {
  [RNCarPlay connectWithInterfaceController:interfaceController window:window];
}

- (void)application:(nonnull UIApplication *)application didDisconnectCarInterfaceController:(nonnull CPInterfaceController *)interfaceController fromWindow:(nonnull CPWindow *)window {
  [RNCarPlay disconnect];
}

@end
Basic Usage
The exported CarPlay class gives you the API needed to add / remove templates from the CarPlay view hierarchy.
import { CarPlay, GridTemplate } from 'react-native-carplay';

const template = new GridTemplate({
  title: 'Hello, World',
  buttons: [],
});

CarPlay.setRootTemplate(template);
Connect / Disconnect
When working with CarPlay it is important to detect and respond to the connect / disconnect events. The CarPlay class provides both a connected boolean and an on connect / disconnect event you can register a callback to.
When you are creating and displaying a template within your existing app screens you may want to ensure CarPlay is connected before calling any carplay apis. This can be done within a useEffect.
useEffect(() => {
  function onConnect() {
    // Do things now that carplay is connected
  }

  function onDisconnect() {
    // Do things now that carplay is disconnected
  }

  CarPlay.registerOnConnect(onConnect);
  CarPlay.registerOnDisconnect(onDisconnect);

  return () => {
    CarPlay.unregisterOnConnect(onConnect);
    CarPlay.unregisterOnDisconnect(onDisconnect);
  };
});
CarPlay API
CarPlay.setRootTemplate
Sets the root template of CarPlay. This must be called before running any other CarPlay commands. Can be called multiple times.
CarPlay.setRootTemplate(template, /* animated */ false);
CarPlay.pushTemplate
Pushes a new template to the navigation stack. Note you cannot push the same template twice.
CarPlay.pushTemplate(template, /* animated */ true);
CarPlay.popTemplate
Pop currently presented template from the stack.
CarPlay.popTemplate(/* animated */ false);
CarPlay.popToTemplate
Pop currently presented template from the stack to a specific template. The template must be in the stack.
CarPlay.popToTemplate(template, /* animated */ false);
CarPlay.popToRoot
Pop the stack to root template.
CarPlay.popToRoot(/* animated */ false);
Templates
Templates are used to render contents on the CarPlay screen from your app. Details of the templates supported by apple can be found in the developer guide
MapTemplate


import { CarPlay } from 'react-native-carplay';

const mapTemplate = new MapTemplate({
  component: /* react native view */ MapView,
  onAlertActionPressed(e) {
    console.log(e);
  },
  onStartedTrip({ tripId, routeIndex }) {
    // start your navigation code
    onStartNavigation(routeIndex);
  },
});

CarPlay.setRootTemplate(mapTemplate);
ListTemplate

import { CarPlay } from 'react-native-carplay';

const listTemplate = new ListTemplate({
  sections: [],
  title: 'List Template',
  async onItemSelect({ index }) {
    // use the selected index
    setSelected(index);
  },
});

CarPlay.pushTemplate(listTemplate, true);
InformationTemplate

import { CarPlay } from 'react-native-carplay';

const informationTemplate = new InformationTemplate({
  title: 'Information',
  items: [],
  actions: [{ id: 'x', title: 'demo' }],
  onActionButtonPressed({ id }) {
    // id of button pressed
    console.log('pressed', id);
  },
});

CarPlay.pushTemplate(informationTemplate);
GridTemplate

import { CarPlay } from 'react-native-carplay';

const gridTemplate = new GridTemplate({
  trailingNavigationBarButtons: [],
  buttons: [
    {
      id: 'List',
      titleVariants: ['List'],
      image: listImage,
    },
    {
      id: 'Grid',
      titleVariants: ['Grid'],
      image: gridImage,
    },
  ],
  title: 'Grid Template',
  onButtonPressed({ id }) {
    // id of button pressed
    setSelected(id);
  },
  onBarButtonPressed({ id }) {
    // id of bar button pressed
    setSelected(id);
  },
});

CarPlay.pushTemplate(gridTemplate, true);
SearchTemplate

const searchTemplate = new SearchTemplate({
  async onSearch(query) {
    // use the query to search
    // and return item array
    return performSearch(query);
  },
  async onItemSelect({ index }) {
    // index of the selected item
    setSelected(index);
  },
  onSearchButtonPressed() {
    // on search button pressed, should display
    // list template with results
    navigation.navigate('List');
  },
});

CarPlay.pushTemplate(searchTemplate, true);
VoiceTemplate

This template is presented via CarPlay.presentTemplate. In order to implement voice recognition, take a look at the @react-native-voice/voice package.
const voiceControlTemplate = new VoiceControlTemplate({
  // pass the control states
  voiceControlStates: [
    {
      identifier: 'TEST',
      image: require('../images/cat.jpg'),
      repeats: true,
      titleVariants: ['Searching...'],
    },
  ],
});

CarPlay.presentTemplate(voiceControlTemplate, true);
AlertTemplate

This template is presented via CarPlay.presentTemplate.
const alertTemplate = new AlertTemplate({
  titleVariants: ['Hello world'],
  actions: [
    {
      id: 'ok',
      title: 'Ok',
    },
    {
      id: 'remove',
      title: 'Remove',
      style: 'destructive',
    },
  ],
  onActionButtonPressed({ id }) {
    // id of the pressed button
    if (id === 'remove') {
      // presentable templates can be
      // dismissed
      CarPlay.dismissTemplate();
    }
  },
});

CarPlay.presentTemplate(alertTemplate);
ActionSheetTemplate

This template is presented via CarPlay.presentTemplate.
const actionSheetTemplate = new ActionSheetTemplate({
  title: 'Example',
  message: 'This is an message for you',
  actions: [
    {
      id: 'ok',
      title: 'Ok',
    },
    {
      id: 'remove',
      title: 'Remove',
      style: 'destructive',
    },
  ],
  onActionButtonPressed({ id }) {
    // the id of the button pressed
  },
});

CarPlay.presentTemplate(actionSheetTemplate);
TabTemplate

This template must be set as the root template and cannot be pushed on top of other templates.
const template1 = new ListTemplate({
  sections: [
    {
      header: 'Test 1',
      items: [{ text: 'Hello world 1' }],
    },
  ],
  title: 'AA',
});
const template2 = new ListTemplate({
  sections: [
    {
      header: 'Test 2',
      items: [{ text: 'Hello world 3' }],
    },
  ],
  title: 'BB',
});

const tabBarTemplate = new TabBarTemplate({
  templates: [template1, template2],
  onTemplateSelect(e: any) {
    console.log('selected', e);
  },
});

CarPlay.setRootTemplate(tabBarTemplate);
Example App
A working example app can be found here.
To run it you must first install dependencies and pods.
- install dependencies and build
react-native-carplay
yarn install
- move to example dir and install dependencies
cd example
yarn install
- run build dev in root dir, this will copy the output to the examples node modules.
cd ..
yarn build:dev
- install pods in example app and start the metro bundler
cd example/ios
pod install
yarn start
- start xcode and run the project on your simulator or device
Not working / In progress
UI Elements
- [ ] Contact Template
- [ ] Now Playing Template
- [ ] Point of Interest Template
Getters
- [ ] topTemplate
- [ ] rootTemplate