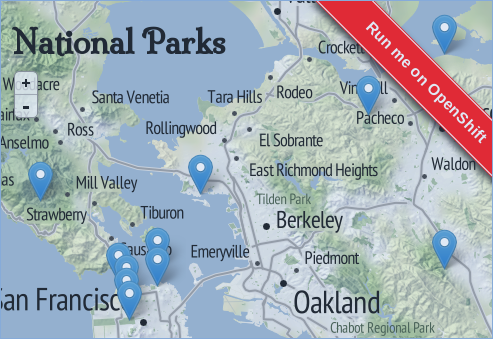
Map of National Parks and Historic Sites
powered by Restify, MongoDB, and Leaflet maps


A basic instant mapping demo using MongoDB, node-restify, LeafLet Maps and map tiles from Stamen, to visualize the locations of major National Parks and Historic Sites.
Related post on OpenShift.com: https://www.openshift.com/blogs/instant-mapping-applications-with-postgis-and-nodejs
Deploying on OpenShift V3
You'll need the oc command line tool to install this project in a Docker-based OpenShift environment. The cli tool binary is available via the openshift/origin releases page.
Use vagrant or ansible to setup your own deployment of OpenShift, then use oc login to authenticate. This project expects the standard builder images and db services to be installed as a pre-requisite.
To get started, we will need to create a new project to house the application:
oc new-project parks
Launch the application from the command line using the provided kubernetes template:
oc new-app -f https://raw.githubusercontent.com/ryanj/restify-mongodb-parks/master/restify-mongodb-parks-template.json
Or, optionally install the template to make it easier to launch via the web:
oc create -f https://raw.githubusercontent.com/ryanj/restify-mongodb-parks/master/restify-mongodb-parks-template.json
Then, view your new project in the openshift web console, clicking on "Add to Project" to find the template. Finally, confirm the application configuration details to launch the app using your browser.
Deploy to OpenShift Online
To deploy a clone of this application using the rhc command line tool, type:
rhc app create parks nodejs-0.10 mongodb-2.4 --from-code=https://github.com/ryanj/restify-mongodb-parks.git
Or, link to a web-based clone+deploy on OpenShift Online or your own open cloud:
https://openshift.redhat.com/app/console/application_type/custom?name=parks&cartridges%5B%5D=nodejs-0.10&cartridges%5B%5D=mongodb-2.4&initial_git_url=https%3A%2F%2Fgithub.com%2Fryanj%2Frestify-mongodb-parks.git
A live demo is available at: http://mongoparks-shifter.rhcloud.com/
Local Development
Before you spin up a local server, you'll need a copy of the source code, and an installation of nodejs.
If you created a clone of the application using the rhc command (above), then you should already have a local copy of the source code available. If not, you can try cloning the repo using git, or taking advantage of the rhc git-clone command to fetch a local clone of any of your existing OpenShift applications:
rhc git-clone parks
OpenShift will automatically resolve package.json dependencies for hosted applications as a normal part of it's automated build process. In your local development environment, you'll need to run npm install in order to ensure that your application's package dependencies are available:
npm install
port-forwarding for local access to your remote db
You can set up your own MongoDB database for local development. But, OpenShift provides a great way to get connected to your fully hosted and configured DB in mere seconds
The rhc port-forward command establishes a local connection to your hosted database, where your DB permissions, table schema, and map data have already been initialized.
The command output will provides your local connection details:
Service    Local               OpenShift
---------- -------------- ---- ----------------
node       127.0.0.1:8080  =>  127.5.199.1:8080
mongodb    127.0.0.1:27017 =>  127.5.199.2:27017

Press CTRL-C to terminate port forwarding
Make a note of the local MongoDB IP address and port number, and leave the command running (in order to keep the connection open). We will need to use these values in the next step.
Basic Configuration
This app uses the config npm module, which loads it's configuration details from the config/defaults.json file. This configuration takes advantage of several environment variables whenever they are available. On OpenShift, many of these values are automatically provided for your application by their associated cartridge add-on service:
module.exports = {
  port: process.env.PORT || process.env.OPENSHIFT_NODEJS_PORT || 3000,
  ip: process.env.OPENSHIFT_NODEJS_IP || '127.0.0.1',
  db_config: process.env.OPENSHIFT_MONGODB_DB_URL || 'mongodb://127.0.0.1:27017',
  table_name: process.env.OPENSHIFT_APP_NAME || 'parks'
}
Sensible defaults allow us to run the same code in multiple environments.
If you plan on using the port-forwarded DB connection from the previous step in your local development stage, then you will need to supply some additional DB authentication credentials to your application via the OPENSHIFT_POSTGRESQL_DB_URL environment variable.
You can find this information by running env while connected to your OpenShift-hosted application over ssh, or by running the rhc app show command from your local machine.
rhc app show parks
Environment Variables
Now, set your OPENSHIFT_POSTGRESQL_DB_URL environment variable, substituting your own DB_USERNAME, DB_PASSWORD, LOCAL_DB_IP, and LOCAL_DB_PORT:
export OPENSHIFT_MONGODB_DB_URL="mongodb://DB_USERNAME:DB_PASSWORD@LOCAL_DB_IP:LOCAL_DB_PORT"
My application's command ended up looking like this:
export OPENSHIFT_MONGODB_DB_URL="mongodb://admin:[email protected]:27017"
This app also expects to use a MongoDB collection name (table_name) that matches your application's name (as defined within OpenShift). When running this application on OpenShift, the OPENSHIFT_APP_NAME environment variable will be automatically populated. If you didn't name your application "parks" (the default value for this option), then you will likely need to set an extra environment variable containing your table name in your local dev environment:
export OPENSHIFT_APP_NAME=parks
Testing your connection
You can verify that your port-forwarding tunnel is active, and that your environment variables are configured correctly by using them to make a DB connection using the mongo command-line client:
mongo $OPENSHIFT_MONGODB_DB_URL/$OPENSHIFT_APP_NAME
This should provide a direct connection to your OpenShift-hosted database instance.
Here you can verify that your application's automatic database import procedures have successfully completed, by checking the number of records in our DB table:
db.parks.count;
The result should be 547. As usual, if you named your application something other than parks, you'll need to modify above the command to match your particular configuration.
Starting your Local Webserver
With your dependencies installed, your port-forwarding tunnel established, and your environment variables set, firing up a local server should be as simple as typing:
npm start
Your dev server should be available at the default address: localhost:3000
Deploying updates to OpenShift
When you're ready, you can push changes to your OpenShift-hosted application environment using the standard git workflow:
-
Add your changes to a changeset:
git add filename1 filename2 -
Mark the changeset as a Commit:
git commit -m 'describe your changes here' -
Push the Commit to OpenShift
git push
License
MIT License