RonenNess / Rpgui
Programming Languages
Projects that are alternatives of or similar to Rpgui
RPGUI
Lightweight framework for old-school RPG GUI in web!
Table of Contents
What is it?
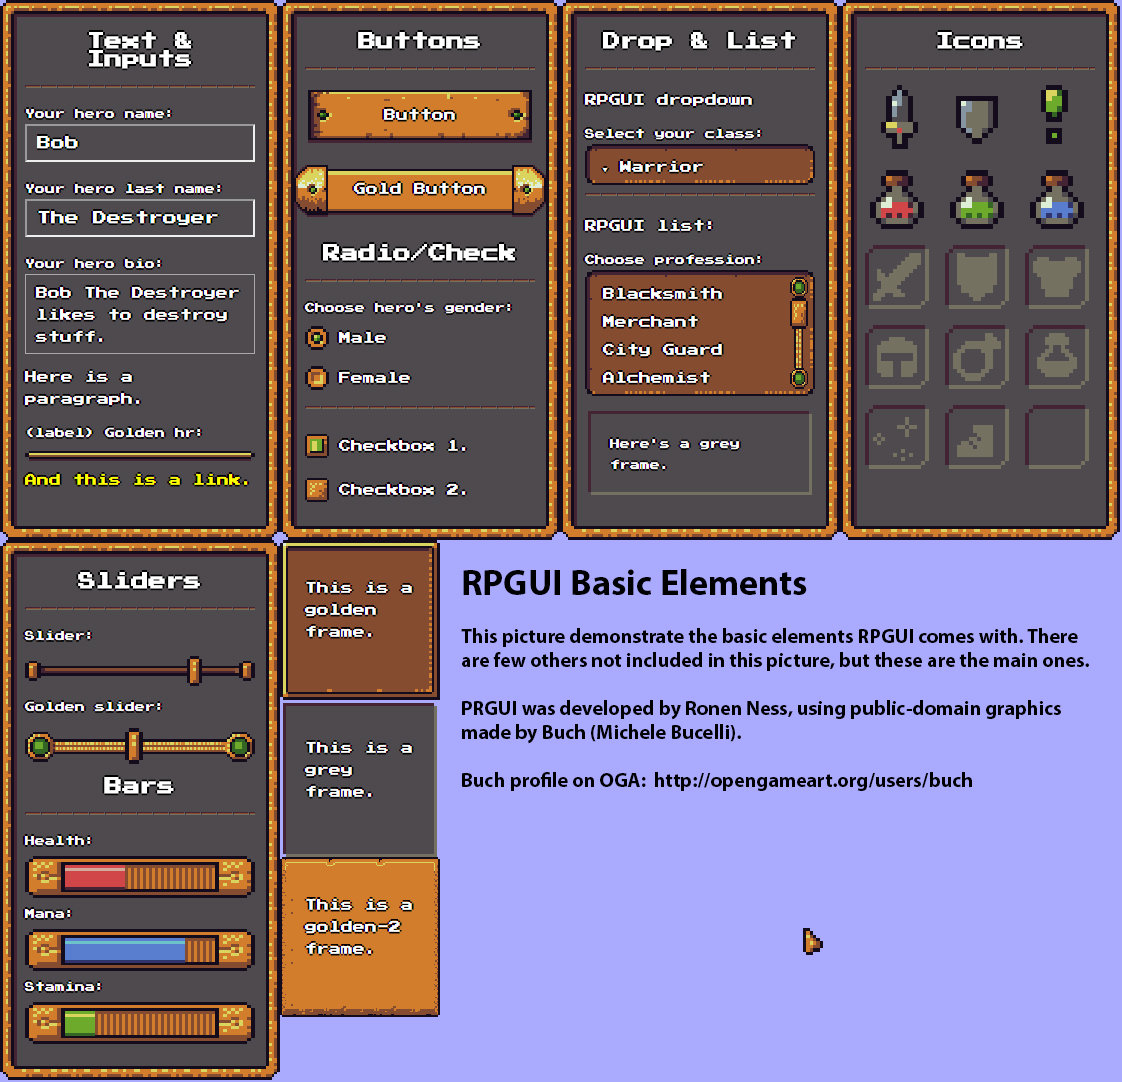
This framework provide out-of-the-box GUI for web games with old-school RPG style. Once including this lib all you need to do is start adding regular html elements with RPGUI classes, and RPGUI will do all the rest!
 (Image is slightly outdated.)
Key Features
The following are the key features of RPGUI:
- Using RPGUI don't require coding at all! Just using css classes.
- A complete and whole CSS system that will cover most HTML elements.
- Containers with several type of frames.
- Dragging functionality.
- Beautiful sliders and progress bars.
- Customized cursors with 8-bit style.
- A collection of build-in icons for rpgs.
- Neat checkboxes and Radio buttons.
- Styled buttons.
- Sophisticated dropdown widget (based on <select>).
- Pretty listbox (based on <select>).
- Very easy to use. Create game GUI in seconds with only plain html code.
- No dependencies, works right out of the box!
- Very lightweight - just 25kb of css/js, + 1.35Mb of resources (images).
RPGUI should work on all modern browsers, and its tested and confirmed on Chrome, FireFox, Opera, and Internet Explorer edge*.
A word about IE
On IE Edge some minor things don't work properly, like cursors (IE demand full path instead of relative path), blurry instead of pixelated pictures (IE don't let you choose pictures magnifier filter) and other minor things. I guess some of it can be fixed with some extra css rules (and maybe extra set of high-res textures for IE), but I chose not to go that extra mile just for IE.
Anyway if you develop a web game and want full IE support, these things will be the least of your problems...
How to use
To use RPGUI you only need to include the css and js files from the dist/ folder (make sure you include the 'img' dir as well). Include the files from the html header, like this:
<link href="dist/rpgui.css" rel="stylesheet" type="text/css" >
<script src="dist/rpgui.js"></script>
The best way to understand PRGUI is to look at the included example and just copy their HTML. But if you prefer reading material, here's a tutorial that explains about the basic elements of RPGUI and how to use them.
Angular users
If you are using Angular you may want to include following snippet to your angular.json.
"assets": [
  "src/favicon.ico",
  "src/assets"
],
"styles": [
  "src/styles.css",
  "dist/rpgui.css"
],
"scripts": []
RPGUI Tutorial
RPGUI is mainly CSS rules with some background JavaScript code to support some extra functionality.
Most of the RPGUI elements are just plain HTML elements with RPGUI classes, but some elements are more complicated and are generated at runtime by the RPGUI JavaScript.
Weather its a simple element or a complex one, all RPGUI elements are created by adding css class to base elements and you shouldn't use any code to create elements (unless you need to create them dynamically after page load). All JavaScript events should work normally on RPGUI elements, and you should get / set elements value in the same way you would with normal HTML elements.
Helper functions
The following are few helper functions you can use with RPGUI. They are not mandatory, but useful.
RPGUI.create
This function is used to create RPGUI elements dynamically, after page is loaded. It takes a single base html element, and the RPGUI element you want to make out of it. For example:
// will create a dropdown RPGUI element from a <select> tag with id some_id
var select = document.getElementById("some_id");
RPGUI.create(select, "dropdown");
RPGUI.set_value
This is the most sure way to set the value of any RPGUI element. As mentioned before, RPGUI elements act like regular HTML elements, but even with plain HTML not every element is set in the same way. For example, a checkbox value is set with "elem.checked = true;", while other input fields are set with "elem.value = 'something';".
This function gets the HTML element you want to set and a new value, and set it accordingly to its type. In addition it fires the "onchange" event which is not always triggered when setting values in JavaScript.
In short, whenever you want to set the value of an RPGUI element, use this function. For example:
// will set the value of "some_id" to "option1"
var select = document.getElementById("some_id");
RPGUI.set_value(select, "option1");
RPGUI.get_value
Just like RPGUI.set_value(), this function is used to get the value of any RPGUI element. For example:
// will alert the value of "some_id" (a select tag)
var select = document.getElementById("some_id");
alert(RPGUI.get_value(select));
RPGUI elements
Now its time to go over all the RPGUI elements and how to use them.
rpgui-content
This class is for a div element and set global RPGUI rules. Everything RPGUI-related must be inside a div with this class. For example:
<div class="rpgui-content">
		<!-- rpgui goes here -->
</div>
Even if not specified, all the html snippets in this tutorial from this point are assumed to be inside rpgui-content.
Note that this class already change some element styling and change the cursor, so if you want parts of your page to be without RPGUI style don't put them in the content div.
rpgui-container
Container is like a form or a "window" with gui elements. Even though everything is inside the rpgui-content div, you should put all your RPGUI elements inside rpgui-containers.
A basic rpgui-container without any style or background is defined like this:
<div class="rpgui-container">
	<!-- rpgui elements goes here -->
</div>
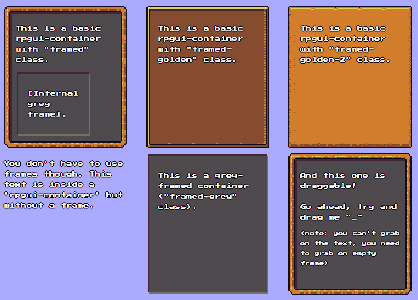
Frames (framed, framed-golden, framed-golden-2, framed-grey)
rpgui-containers come with graphical frames, as seen in the example picture. Below is the different frames you can use for containers:
<!-- all rpgui elements must be inside the rpgui-content -->
<div class="rpgui-content">
	<!-- default frame, grey with orange borders -->
	<div class="rpgui-container framed">
	</div>

	<!-- golden frame, with brown background -->
	<div class="rpgui-container framed-golden">
	</div>

	<!-- brighter golden frame, with smoother borders -->
	<div class="rpgui-container framed-golden-2">
	</div>

	<!-- grey frame. this is mostly fitting as internal container inside a "rpgui-container framed" div -->
	<div class="rpgui-container framed-grey">
	</div>
</div>
To see all the frames take a look at the containers example, or play with them yourself in an html file.
rpgui-draggable
Add this class to any containers you want the user to be able to drag and drop. Once a container has this class it will be moveable like a window form inside the page.
Note that to drag you need to grab on the div itself and not elements on it.
To make a container draggable:
<div class="rpgui-container rpgui-draggable">
	<!-- rpgui elements goes here -->
</div>
(rpgui-draggable is not just for containers, it can work on any element)
paragraphs, links, headers, labels and span
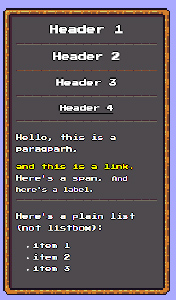
All paragraphs and header elements are automatically styled when inside the rpgui-content. The default font is imported from google fonts (check out imports.css for more info), and all text is white with black outline.
You don't need to do anything special to use these elements, just put them inside the rpgui-content div:
<div class="rpgui-content">
		<p>This text will have the RPGUI style!</p>
</div>
input & textarea
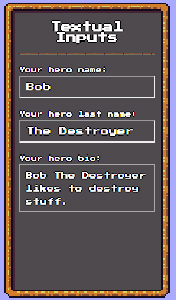
Similar to paragraphs, these elements are styled automatically when inside the rpgui-content. Use them as you would with normal HTML input and textarea elements.
rpgui-slider
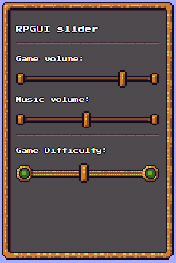
A rpgui-slider is like an HTML range input but with RPGUI style. To create an rpgui-slider just create an input element with type="range" and class="rpgui-slider":
<input class="rpgui-slider" type="range" min="0" max="10" value="8">
If you try and look at the HTML you'd see RPGUI hide the original input element and replaced it with couple of elements that were created at runtime. This should not bother you when using the slider. You can set/get its value regulary and register to any events that interest you.
rpgui-slider golden
There's another variation of the slider with a more fancy style. To use it add the 'golden' class:
<input class="rpgui-slider golden" type="range" min="0" max="10" value="8">
rpgui-progress
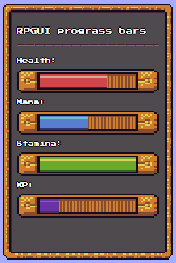
A rpgui-progress is like a progress bar that can fills up. Or more useful for games, an health/mana bar. To create a progress bar just create a div with the class "rpgui-progress":
<div class="rpgui-progress"></div>
By default it will have purple color, but you have 3 other colors to use - red, green and blue:
<label>Red bar:</label>
<div class="rpgui-progress red"></div>

<label>Blue bar:</label>
<div class="rpgui-progress blue"></div>

<label>Green bar:</label>
<div class="rpgui-progress green"></div>
When the progress bar is created, it starts as full. To set its value you should use the RPGUI.set_value() function and give values that range from 0.0 to 1.0. For example:
<div id="red-bar" class="rpgui-progress red"></div>

<script>
	// set the red bar into 50% full
	var progress = document.getElementById("red-bar");
	RPGUI.set_value(progress, 0.5);
</script>
rpgui-icon
![]()
This class will create a simple square icon. There are 15 built-in icons in RPGUI, but its really easy to create new ones (check out icon.css file for more info). Here's how to use the icons:
	<div class="rpgui-icon sword"></div>
	<div class="rpgui-icon shield"></div>
	<div class="rpgui-icon exclamation"></div>
	<div class="rpgui-icon potion-red"></div>
	<div class="rpgui-icon potion-green"></div>
	<div class="rpgui-icon potion-blue"></div>
	<div class="rpgui-icon weapon-slot"></div>
	<div class="rpgui-icon shield-slot"></div>
	<div class="rpgui-icon armor-slot"></div>
	<div class="rpgui-icon helmet-slot"></div>
	<div class="rpgui-icon ring-slot"></div>
	<div class="rpgui-icon potion-slot"></div>
	<div class="rpgui-icon magic-slot"></div>
	<div class="rpgui-icon shoes-slot"></div>
	<div class="rpgui-icon empty-slot"></div>
rpgui-dropdown
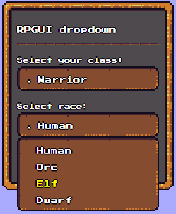
This class is used for <select> with <option> tags, and it creates a dropdown select widget with the RPGUI design. To use it create a <select> tag with <option>s inside, and add the "rpgui-dropdown" class to the <select> parent tag.
For example:
<select class="rpgui-dropdown">
	<option value="option1">option1</option>
	<option value="option2">option2</option>
	...
</select>
Note that once the page is fully loaded and the rpgui dropdown is created, you can no longer add new options to it. To use the dropdown just use the <select> tag as you would normally do, but remember you can also use the RPGUI.set_value() and RPGUI.get_value() if you are uncertain.
rpgui-list
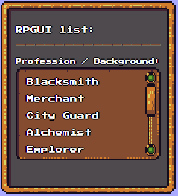
This class is used for <select> with <option> tags, and it creates a list select widget with the RPGUI design. To use it create a <select> tag with <option>s inside, and add the "rpgui-list" class to the <select> parent tag.
For example:
<select class="rpgui-list" size="5">
	<option value="option1">option1</option>
	<option value="option2">option2</option>
	...
</select>
Note that once the page is fully loaded and the rpgui list is created, you can no longer add new options to it. To use the dropdown just use the <select> tag as you would normally do, but remember you can also use the RPGUI.set_value() and RPGUI.get_value() if you are uncertain.
rpgui-button
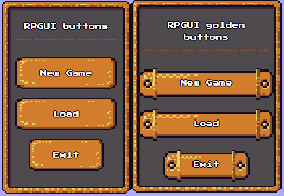
rpgui-button is a styled Button with text on it. To use it, create a button with paragraph inside and give the button the "rpgui-button" class. For example:
<button class="rpgui-button" type="button"><p>Click me!</p></button>
golden button
There's an alternative fancier button style you can use with the golden class:
<button class="rpgui-button golden" type="button"><p>Click me golden!</p></button>
This behaves like a regular rpgui-button but with a different graphics.
hr
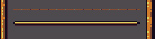
RPGUI gives automatic style to any <hr> tag inside the rpgui-content. You can use <hr> tags as a nice method to separate parts of a container.
In addition, there's a fancier version of an <hr> you can use with the "golden" class:
<hr class="golden">
rpgui-checkbox
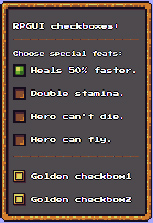
rpgui-checkbox are Checkboxes with a nice RPGUI design. To use them create a checkbox input tag with a label after it (it won't work without the label!) and give it the "rpgui-checkbox" class. For example:
<input class="rpgui-checkbox" type="checkbox"><label>This is checkbox.</label>
That the RPGUI implement the checkbox by hiding the original checkbox input and link the <label> style to its state. Using JavaScript events, clicking the label will change the checkbox state.
You can use the checkbox just as you would with a regular checkbox element (don't worry about the label thing), or use RPGUI.set_value() and RPGUI.get_value() if you are unsure.
rpgui-checkbox golden
There's a golden variation to the checkbox you can use for fancier graphics:
<input class="rpgui-checkbox golden" type="checkbox"><label>This is golden checkbox.</label>
rpgui-radio
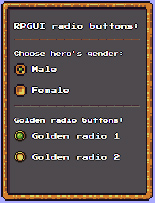
rpgui-radio are radio buttons with a nice RPGUI design. To use them create a radio input tag with a label after it (it won't work without the label!) and give it the "rpgui-radio" class. For example:
<input class="rpgui-radio" type="radio" value="some val"><label>This is radio button!</label>
That the RPGUI implement the radio by hiding the original radio input and link the <label> style to its state. Using JavaScript events, clicking the label will change the radio state.
You can use the radio just as you would with a regular radio element (don't worry about the label thing), or use RPGUI.set_value() and RPGUI.get_value() if you are unsure.
rpgui-radio golden
There's a golden variation to the radio you can use for fancier graphics:
<input class="rpgui-radio golden" type="radio" value="some val"><label>This is a golden radio button!</label>
Cursors
RPGUI comes with few built-in cursors you can use. To set an alternative cursor for an element, add one of the following css classes to it:
- rpgui-cursor-default
- rpgui-cursor-point
- rpgui-cursor-select
- rpgui-cursor-grab-open
- rpgui-cursor-grab-close
Disabled elements
RPGUI supports the "disabled" attribute. You can set any element to be disabled just as you would with plain html elements, and it will be greyed out and impossible to set.
How to Tweak
To change RPGUI into your own theme the easiest thing to do is to replace the images in dist/img/ folder. The name of the files should be pretty easy to understand and change.
To change the css rules / JavaScript itself you will need to edit the source files. RPGUI wasn't originally planned to be a distributed lib (it was taken out of a hobby project) and as such its not written in the most flexible / generic way.
Feel free to create alternatives of RPGUI and publish them as different themes.
How to build
First install npm modules:
npm install
Then use gulp:
gulp dist
Or on windows:
node_modules\.bin\gulp dist
Changelog
1.03
- Added full support in "disabled" attribute.
- New grabbing cursor.
- Fixed some font size problems.
- Improved buttons css.
1.02
- Switched to gulp and scss.
- Some sizing modification.
- Fixed dropdown when nothing is selected.
- Improved containers border slice.
- Fixed bug in sliders min val.
- Added "disabled" css.
- Added "rotated" css.
1.01
- Updated checkbox and buttons images.
- Code refactoring - init queue and global anonymous function for namespace.
- Added option to register to RPGUI.on_load()
- Bug fix when trying to create empty list.
Credits
- PRGUI default theme uses the public-domain graphics made by Buch, aka Michele Bucelli ()http://opengameart.org/users/buch).
- Special thanks to titoasty (https://github.com/titoasty) that contributed a lot to this lib.
License
RPGUI is distributed under the zlib-license, and is absolutely free for use in any purpose (personal, educational, commercial, etc..). See LICENSE.txt for more info.
Contact Me
For issues / bugs use the Report Issue button. For anything else, feel free to contact me: [email protected].