zehfernandes / Rpi Webapplication
Programming Languages
Projects that are alternatives of or similar to Rpi Webapplication
How to run a 60fps web application in RaspberryPI
Raspberry is an amazing single-board computer, compact, powerful and low-cost. With 25 dollars you have a quad-core Cortex-A7 CPU running at 900 MHz and 1 GB RAM, HDMI output, and such.
Mostly used with Java, C and processing applications, which works at a low-level and are capable of controlling hardware resources, but to run a web application, you depend on an OS that abstracts these resources from you. To achieve something more performatic and take advantage of some other resources, such as the GPU, you must build a custom distro.

Hardware Acceleration and GPU.
Usually, people install Raspbian and just use the available browser that is bundled with the OS, be Epiphany or Midori. On those browsers running on this OS, you will be able to navigate without much hassle, but just forget about animations and performance. The problems we will find are basically two:
- The memory is shared between the system and the GPU. You have 1GB, but it is split between those two components.
- Browsers cannot natively use GPU's hardware acceleration to process animations.
A known hack is to use QT to force the use of GPU. Compiling WebKit inside QT gives access to this resource, but to achieve this, we will build a clean Linux distribution, and ditch all unessential stuff to keep RAM available to your web application.
Buildroot and Linux distro
Cross-compile, kernel configuration are examples of common keywords you will find in the Linux world; really low-level stuff when compared to the web environment. But there are some tools to help us amidst this havoc, Buildroot is one of them: a simple, efficient and easy-to-use tool that generates embedded Linux systems through cross-compilation.
Tip: ctrl + / : search
Even with Buildroot, it is important to understand and know the dependencies required by each library you want to compile. Methorogical did an excellent job, started by @albertd: A repository with the best performance configurations for Buildroot to run the QT library and WebKit engine in Raspberry.
You just need clone the repository:
git clone https://github.com/Metrological/buildroot
cd buildroot
Then, apply the basic configuration for RPI Model 2:
make rpi2_qt5webkit_defconfig
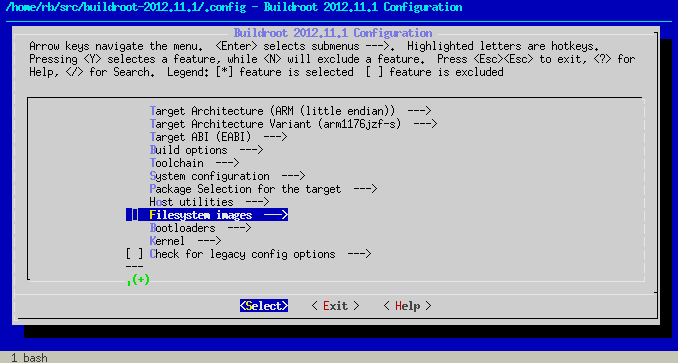
In case of you want to access the Buildroot menu and see other libraries available, use:
make menuconfig
ProTip: In this repository, you can find a basic .config file with all libraries we considered essential to run a web application, such as git, fbv, websocket, and python.
Now, copy the mentioned file to your Buildroot directory and run:
make
The process takes a while. Running Ubuntu on a Macbook Air took about 3 hours.
Inside the Raspberry
Now you have an image ready to be cloned into your SDCard. You can follow instructions to copy the image by using the Terminal application here.
When your card is ready, you can boot your RPI and login into the system through SSH (Login: root, Password: root).
ssh [email protected] # Replace with RPI's IP Address!
Then, run your application:
qtbrowser --url=http://url
Qtbrowser
QTBrowser is not Chrome or Safari, even by using WebKit to render the page. It has some details and different ways of dealing with HTML, and it is important to develop your front-end code while testing directly on the RPI. Even then, we would able to make this interface:

You can see a video with a slightly better resolution here
Below you can find some notes about QTBrowser rendering process:
- During the page load, classes with CSS animations won't work. You must programatically add the class after the page is loaded.
- Only use properties that use CSS Composite Layer, such as
transitionandopacity. - Images with size greater than 1000px affects negatively the frame rate.
- Ditch jQuery. You don't need it.
- Avoid gradients and images with opacity.
- Multiple images being presented on the screen performs better than multiple canvas.
- Cloning DOM elements is preferred over programatically creating them through JavaScript.
Note: We used Tornado to serve our pages, but you can use PHP or Grunt as well.
Shell tools
The resulting distribution is really clean. You probably won't find regular Debian stuff, like apt-get. Some features you might need must be installed manually.
RPI Configurations
In the boot partition, you will find the config.txt file. It sets default values for the RPI. Below you can find some properties this project uses:
gpu_mem_1024=512 # memory video set
hdmi_group=1
hdmi_mode=16 # Full HD 60p
hdmi_force_hotplug=1 # force HDMI output
Automatic boot
An interesting point on using the RPI is to build a system in which human interaction is rarely needed. It can start and update itself without any interaction. We came up with some scripts to help in this process.
In /etc/init.d you will find some files named S01*, S02*. The number represents the order in which the file will be executed during the boot process:
Splash screen? Why not?
@felipesanches developed a system that allows you to implement a splash screen in just 3 simple steps:
- Create a PNG sequence named
frame*.pngand put in some diretory inside RPI.- Replace the asterisk by the number of the frame. Ordering matters
- We placed our frames into
/home/default/bootanimations, remember to edit the snippet provided on the next step in case you use another path.
- Edit
/etc/init.d/S01loggingand include the following code in the first line:
# Initial splash!
cat /dev/zero 1> /dev/fb0 2>/dev/null
fbv -i -c /home/default/bootanimations/frame*.png --delay 1
- Place the contents of cmdline.txt into
/boot/cmdline.txt. It will prevent the boot log from appearing. We recommend you to do this in the last step of your development process, since those logs may help you to diagnose if something went awry.
End
Thanks to @netoarmando and @felipesanches for helping me in the process to run a web application in 60FPs on a Raspberry.
Doubts? Feedbacks? Comments? Please do open an Issue!