dathlin / Sharpnodesettings
SharpNodeSettings
![]()


![]()
![]()
![]()
![]()
一个设备及节点配置类库,基于 HslCommunication.dll 深度整合创建,用来实现对PLC配置信息的存储和加载解析,同时支持可配置化的PLC数据读取,支持数据显示,其中服务器示例如下:
- SampleServer 简单的演示了如何启动一个服务器程序,虽然示例是基于 Console 的应用程序,你也可以实现 Winform 或是 Wpf 应用程序,
- RedisServer 演示了如果创建一个服务器,并且将读取到数据存入Redis的服务器,详细参照下文的说明。
- OpcUaServer 由于OPC UA在工控界相当火爆,所以此处也集成了这个示例,采用最新的1.4.354.0版本的库实现,主要麻烦的地方在于数据解析,并创建节点,具体参照下文的说明。
Install-Package SharpNodeSettings
How to use
包括服务器和客户端都是围绕配置的Xml文件创建的,示例的Xml文件内容如下:
<?xml version="1.0" encoding="utf-8"?>
<Settings>
  <NodeClass Name="Devices" Description="所有的设备的集合对象">
    <NodeClass Name="分厂一" Description="">
      <NodeClass Name="车间一" Description="">
        <DeviceNode Name="测试空设备" Description="此设备安装在角落,编号0001" DeviceType="0" ConnectTimeOut="2000" CreateTime="2018/8/12 9:26:27" InstallationDate="2018/8/12 9:26:27">
          <DeviceRequest Name="数据请求" Description="一次完整的数据请求" Address="0" Length="10" CaptureInterval="1000" PraseRegularCode="B" />
        </DeviceNode>
      </NodeClass>
      <NodeClass Name="车间二" Description="">
        <DeviceNode Name="ModbusTcp客户端" Description="这是描述" DeviceType="10" ConnectTimeOut="1000" CreateTime="2018/8/9 19:58:49" InstallationDate="2018/8/9 19:58:49" IpAddress="127.0.0.1" Port="502" Station="1" IsAddressStartWithZero="true" IsWordReverse="false" IsStringReverse="false">
          <DeviceRequest Name="数据请求" Description="一次完整的数据请求" Address="0" Length="30" CaptureInterval="1000" PraseRegularCode="ABCD" />
        </DeviceNode>
      </NodeClass>
    </NodeClass>
    <NodeClass Name="分厂二" Description="位于西南方">
      <NodeClass Name="车间三" Description="">
        <DeviceNode Name="测试设备二" Description="这是测试设备二的描述" DeviceType="10" ConnectTimeOut="1000" CreateTime="2018/8/10 23:01:28" InstallationDate="2018/8/10 23:01:28" IpAddress="127.0.0.1" Port="502" Station="1" IsAddressStartWithZero="true" IsWordReverse="false" IsStringReverse="false">
          <DeviceRequest Name="数据请求" Description="一次完整的数据请求" Address="100" Length="10" CaptureInterval="500" PraseRegularCode="B" />
        </DeviceNode>
      </NodeClass>
    </NodeClass>
  </NodeClass>
  <NodeClass Name="Server" Description="所有挂载的服务器">
    <ServerNode Name="异形服务器" Description="这是一个异形服务器" CreateTime="2018/8/8 13:29:30" Port="1234" ServerType="2" Password="" />
  </NodeClass>
  <NodeClass Name="Regular" Description="所有的解析规则的信息">
    <RegularNode Name="ABCD" Description="">
      <RegularItemNode Name="温度" Description="" Index="0" TypeCode="3" TypeLength="1" />
      <RegularItemNode Name="风俗" Description="" Index="2" TypeCode="9" TypeLength="1" />
      <RegularItemNode Name="转速" Description="" Index="14" TypeCode="9" TypeLength="1" />
      <RegularItemNode Name="机器人关节" Description="" Index="18" TypeCode="9" TypeLength="6" />
      <RegularItemNode Name="cvsdf" Description="" Index="42" TypeCode="9" TypeLength="1" />
      <RegularItemNode Name="条码" Description="条码信息" Index="6" TypeCode="11" TypeLength="8" />
      <RegularItemNode Name="开关量" Description="设备的开关量信息" Index="368" TypeCode="1" TypeLength="8" />
    </RegularNode>
    <RegularNode Name="B" Description="">
      <RegularItemNode Name="温度" Description="" Index="0" TypeCode="3" TypeLength="1" />
      <RegularItemNode Name="压力" Description="" Index="2" TypeCode="3" TypeLength="1" />
    </RegularNode>
  </NodeClass>
</Settings>
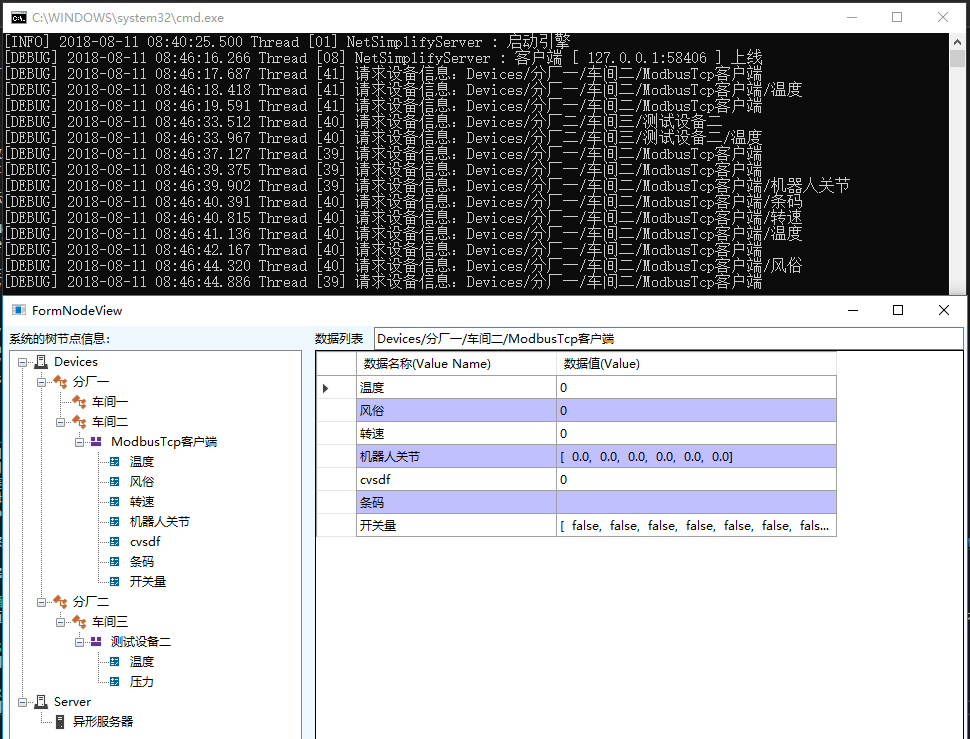
只要创建好这个xml文件,就可以调用 SharpNodeServer 来创建服务器应用了,可以生成相应的节点信息,并且根据配置信息来请求设备,更新对应的数据。创建服务器的代码如下:
SharpNodeServer sharpNodeServer = new SharpNodeServer( );
sharpNodeServer.LoadByXmlFile( "settings.xml" );
sharpNodeServer.ServerStart( 12345 );
这样就启动了一个最简单的服务器,主要包含实例化,加载配置,启动服务器,注意:加载配置必须放置到服务器启动之前。
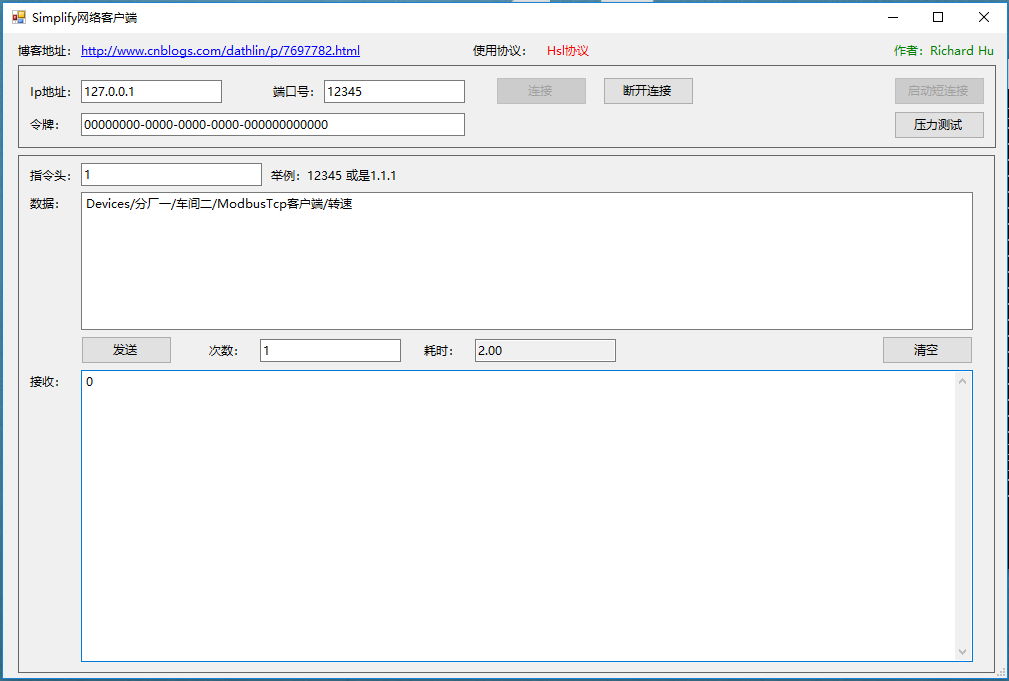
怎样查看服务器的数据呢?内置了一个默认的 SimplifyNet 服务器,想要知道更多的这个服务器的内容,可以参照下面的博客:https://www.cnblogs.com/dathlin/p/7697782.html
基于 NetSimplifyClient 实现了一个通用的数据节点查看器,需要指定服务器的Ip地址和端口号:
 SharpNodeSettings.View.FormNodeView form = new SharpNodeSettings.View.FormNodeView( "127.0.0.1",12345 )
 form.ShowDialog();
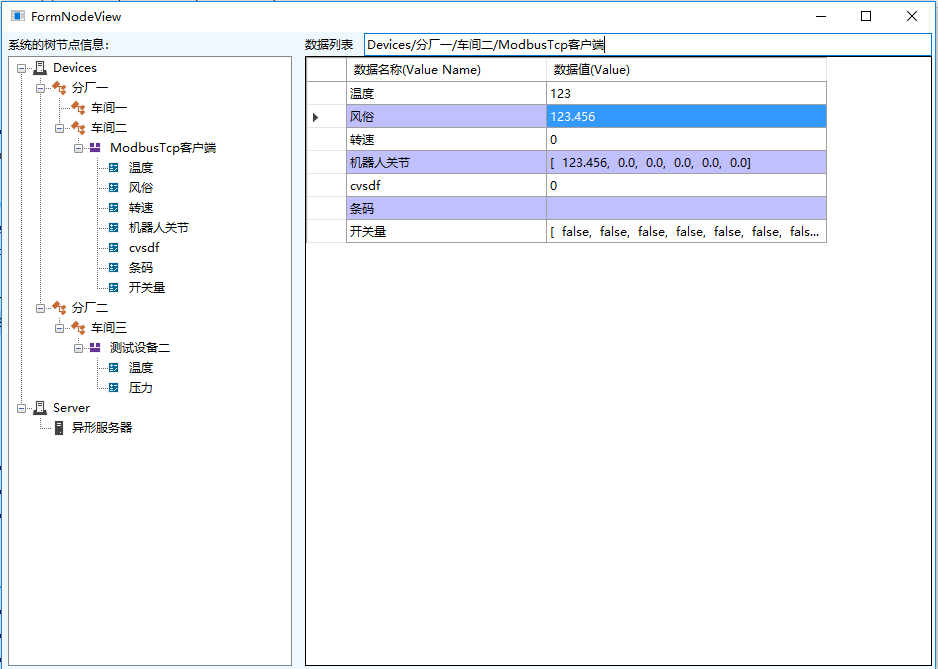
如果你想实现访问单个的数据,可以使用 NetSimplifyClient 创建的Demo来访问,需要注意的是,此处请求的数据都是序列化的JSON字符串。
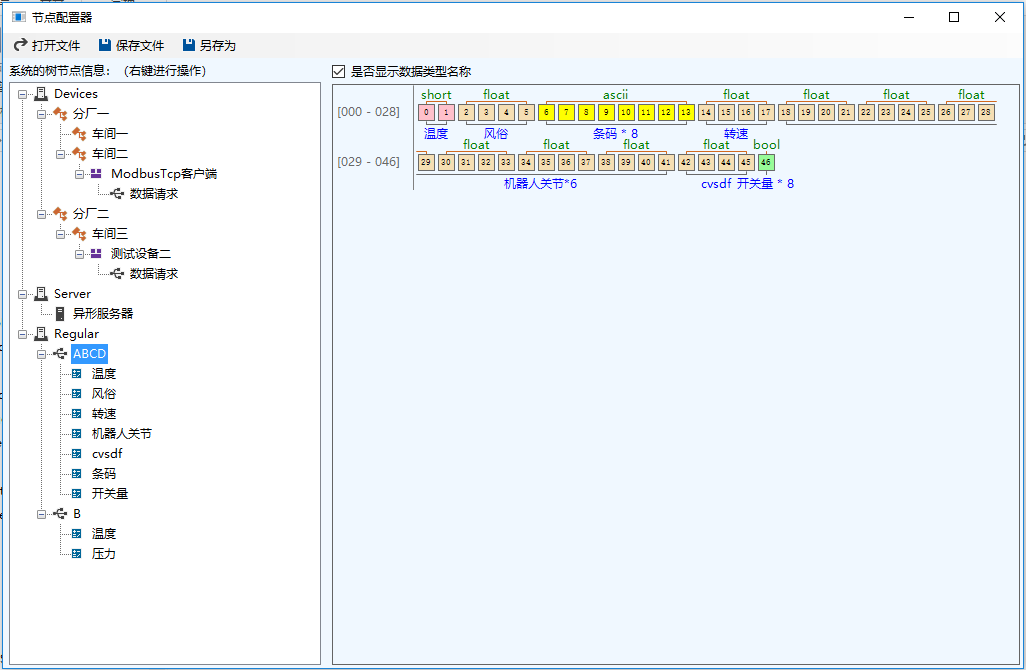
手动配置这样一张表的内容将是灾难性的,所以本库提供了一个可视化的界面配置,代码如下:
Form nodeSettings = new SharpNodeSettings.View.FormNodeSetting( "settings.xml" )
nodeSettings.ShowDialog();
上面的代码的意思是显示一个配置创建,配置文件的路径是当前目录下的 settings.xml 文件。
您也可以这么写,手动获取用户配置过的数据信息,这样可以实现远程的配置信息:
using(SharpNodeSettings.View.FormNodeSetting form = new SharpNodeSettings.View.FormNodeSetting( XElement.Load( "settings.xml" ) ))
{
    if (form.ShowDialog( ) == DialogResult.OK)
    {
        // 配置好的数据信息,在这种方式下可以实现远程配置的操作。
        XElement xElement = form.XmlSettings;
        MessageBox.Show( "success" );
    }
    else
    {
        MessageBox.Show( "failed" );
    }
}
界面效果如下:
在实际开发中,可能你不需要上述的配置功能,你就想实现某个PLC的设备信息是可配置的,那么也可以通过本组件实现:
SharpNodeSettings.View.FormSelectDevice selectDevice = new View.FormSelectDevice( );
if (selectDevice.ShowDialog( ) == DialogResult.OK)
{
    XElement xmlDevice = selectDevice.DeviceXml;
    // 设备的配置对象可用于存储,网络传输等等操作


    // 如果想要通过xml信息创建设备
    SharpNodeSettings.Device.DeviceCore deviceCore = SharpNodeSettings.Util.CreateFromXElement( xmlDevice );
    // 演示读取数据,此处有个问题在于如果是相同种类的PLC,应用还是很方便的,如果是不同种类的,地址模型就比较麻烦。
    HslCommunication.OperateResult<short> read = deviceCore.ReadWriteDevice.ReadInt16( "D100" );
}
Quick Start
按照如下的步骤走,就可以急速体验本项目所传达的核心功能价值,就可以明白本项目是否符合您的需求。启动测试之前,你需要准备个真实的设备:
- 西门子PLC
- 三菱PLC
- 欧姆龙PLC
- ModbusTcp设备
如果您没有真实的设备,也可以从网上下载个Modbus服务器软件,这里也提供一个下载地址:ModbusTcpServer.zip
下载完成后启动服务器即可。
配置Xml信息
去本项目的目录下配置设备的信息: \SharpNodeSettings\XmlFile 运行 SharpNodeSettings.Tools.exe 进行配置,已经配置了一部分,如果想要快速开始,忽略本步骤也可以。
SampleServer
本示例直接重新生成 SampleServer 项目,启动程序即可。如果想要看实际的数据信息,启动 SharpNodeSettings.NodeView 项目查看
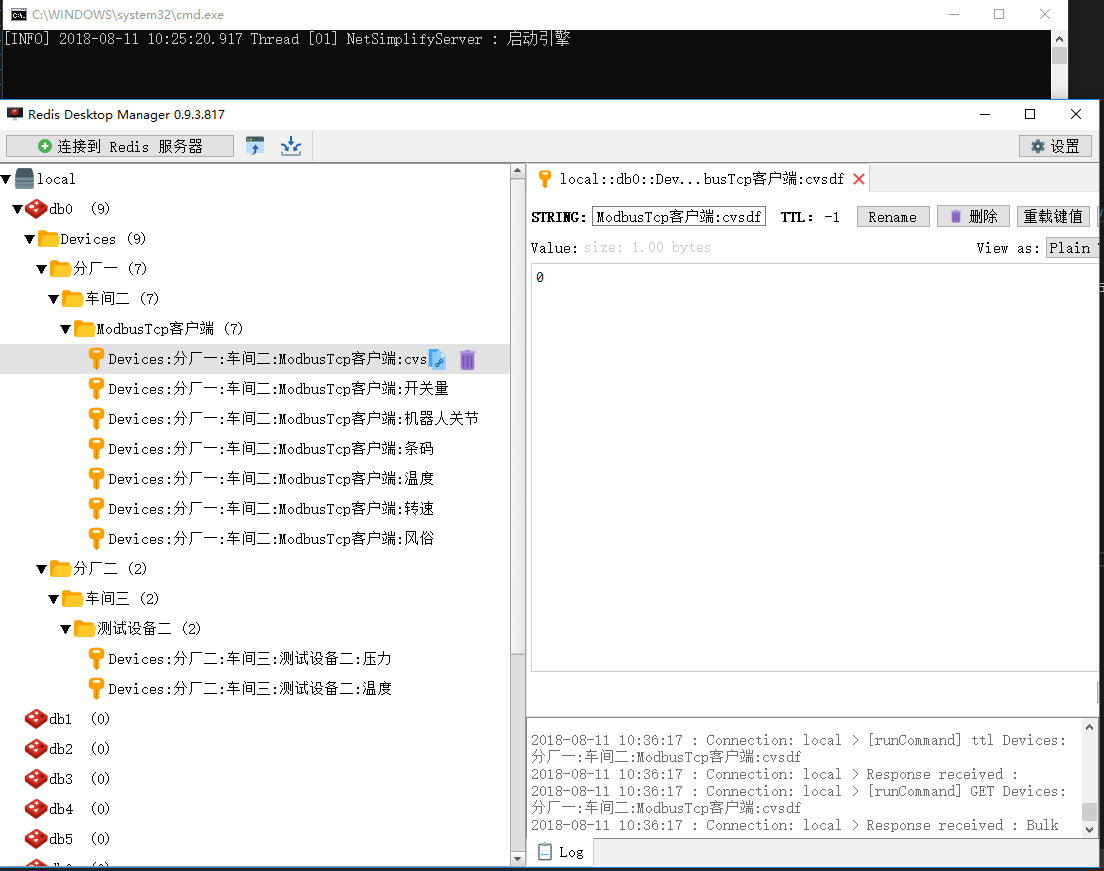
RedisServer
本示例是在 SampleServer 的基础上添加了Redis服务器,所以需要先安装好Redis服务器,windows版本下载地址: https://github.com/MicrosoftArchive/redis/releases
当然,最好再下载安装一个redis服务器的可视化工具,此处推荐 RedisDesktopManager https://github.com/uglide/RedisDesktopManager/releases
然后基于本项目,重新生成 SharpNodeSettings.RedisServer 项目,启动服务器
上述的 SharpNodeSettings.NodeView 项目依然可以查看,然后下图演示Redis
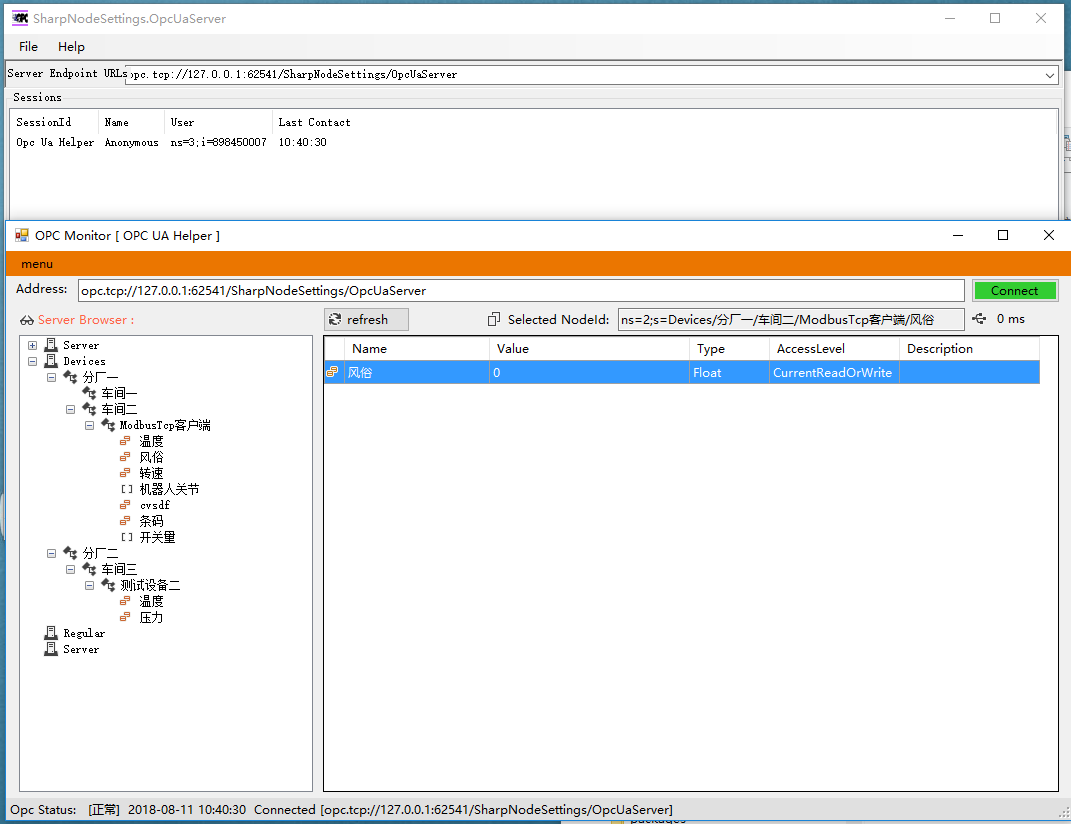
OpcUaServer
本示例是演示从PLC采集数据并且写入到OPC UA服务器中的示例,重新生成 SharpNodeSettings.OpcUaServer 项目,启动它,如果显示是否增加信任证书时,选择是即可。
然后再启动一个 OPC UA Client的示例项目
License
- OpcUa相关的组件的版权归 OPC 基金会所有,使用请遵循相关的协议
- SharpNodeSettings 组件协议 LGPL3.0 商用需要向作者打赏,金额需要 50 RMB - 100 RMB
- 示例项目(SampleServer,RedisServer,OpcUaServer,Tools)协议为MIT协议
Support