Shuttle Tracker 


Tracks and maps RPI's shuttles with Go, Postgres, Vue.js, TypeScript, and Leaflet. Check it out in action at shuttles.rpi.edu.
Looking to contribute? Please review our Contribution Guidelines.
More project documentation can be found on the Repository Wiki.
If you encounter issues setting up, check the Common Installation Problems for potential solutions.
Setting up (Linux / WSL)
- Install Go. Shuttle Tracker requires Go 1.11 or newer, and we recommend using the latest stable Go release.
- Other instructions found here
- Clone the repository to your computer. This can be done with
git clone https://github.com/wtg/shuttletracker. - Ensure you have Postgres downloaded, installed.
- This can be done with
sudo apt-get install postgresql
- This can be done with
- Create a postgres databased titled "shuttletracker". (WE HIGHLY RECOMMEND USING PGADMIN)
- This can be done by running
createdb shuttletracker. If there is an errorcreatedb: could not connect to database postgres: FATAL: role "<username>" does not exist, it is due that adminstrator has not created a PostgreSQL user account for you. It can be fixed bypsql -U postgresin terminal,CREATE USER <username>;,ALTER USER <username> SUPERUSER CREATEDB;inpostgres=#. And you can confirm the success by running\duinpostgres=#. - Alternatively, download the Postgres management software pgAdmin. Click on the Servers drop down, then the Databases drop down, and add a database titled "shuttletracker" by right-clicking on Databases and selecting create.
- This can be done by running
- Switch to the Shuttle Tracker directory (
cd shuttletracker) - Rename
conf.json.sampletoconf.json - Edit
conf.jsonwith the following, if necessary:Postgres.URL: URL where Postgres is located. This will generally look likepostgres://user:password@localhost/shuttletracker?sslmode=disablewhereuserandpasswordare replaced
- Install Node.js and npm
- This can be done with
sudo apt-get install nodejs. - Make sure you are on version 10.16.0 or higher by running
node -v. - If your version of node is old, install n by running
npm install -g n. - Type
apt-get remove nodejsto remove all versions of node installed through apt-get. - Type
n stableto install the latest version of nodejs. Typenode -vafter to verify.
- This can be done with
- Switch to the
./frontenddirectory. - Run
npm install - Build the frontend using
npx vue-cli-service build --mode development- Note: if you are working on the frontend, you may instead use
npx vue-cli-service build --mode development --watchin another terminal to continuously watch for changes and rebuild.
- Note: if you are working on the frontend, you may instead use
- Go back up to the project root directory and build Shuttle Tracker by running
go build -o shuttletracker ./cmd/shuttletracker - Start the app by running
./shuttletracker - Add yourself as an administrator by using
./shuttletracker admins --add RCS_ID, replacingRCS_IDwith your RCS ID. See the "Administrators" section below for more information. - Visit http://localhost:8080/ to view the tracking application and http://localhost:8080/admin to view the administration panel.
- (Optional) Import live data from /routes, /stops, and /vehicles.
Setting up (macOS)
- Install Go. Shuttle Tracker requires Go 1.11 or newer, and we recommend using the latest stable Go release.
- Clone the repository to your computer. This can be done with
git clone [email protected]:wtg/shuttletracker.git. If you receive a "permission denied" error, ensure you have added your SSH key to your GitHub account. - Download Postgres.app and Postico. Postgres.app allows a Postgres server to be started using a graphical interface, while Postico allows a PostgreSQL database to be managed using a graphical interface.
- Open Postgres.app and create a new Postgres server by pressing the + in the sidebar. Name the server "shuttletracker" and specify its port as 5432. Then press start to run the server.
- Open Postico and create a new database named "shuttletracker" by pressing "+ Database".
- Switch to the Shuttle Tracker directory (
cd shuttletracker) - Rename
conf.json.sampletoconf.json - Edit
conf.jsonwith the following, if necessary:Postgres.URL: URL where Postgres is located. This will generally look likepostgres://user:password@localhost/shuttletracker?sslmode=disablewhereuserandpasswordare replaced
- Install Node.js and npm. Be sure to download the latest LTS version. Do not download the current version or errors will occur when building the project
- Switch to the
./frontenddirectory. - Run
npm install - Build the frontend using
npx vue-cli-service build --mode development- Note: if you are working on the frontend, you may instead use
npx vue-cli-service build --mode development --watchin another terminal to continuously watch for changes and rebuild.
- Note: if you are working on the frontend, you may instead use
- Go back up to the project root directory and build Shuttle Tracker by running
go build -o shuttletracker ./cmd/shuttletracker - Start the app by running
./shuttletracker - Add yourself as an administrator by using
./shuttletracker admins --add RCS_ID, replacingRCS_IDwith your RCS ID. See the "Administrators" section below for more information. - Visit http://localhost:8080/ to view the tracking application and http://localhost:8080/admin to view the administration panel.
- (Optional) Import live data from /routes, /stops, and /vehicles.
Configuration
Shuttle Tracker needs configuration to run properly. The preferred method during development is to create a conf.json file. See conf.json.sample for an example of what it should contain.
Updater.DataFeed: API with tracking information from iTrak. For RPI, this is a unique API URL that we can get data from. It's private, and a Shuttle Tracker developer can provide it to you if necessary. However, by default, Shuttle Tracker will reach out to the instance running at shuttles.rpi.edu to piggyback off of its data feed. This means that most developers will not have to configure this key.
Environment variables
Most keys can be overridden with environment variables. The variables names usually take the format PACKAGE_KEY. For example, overriding the iTRAK updater's update interval could be done with a variable named UPDATER_UPDATEINTERVAL.
Database URL
The database URL is a special case. Following the above convention, it can be set with POSTGRES_URL. However, for ease of deployment on Dokku, it can also be set with DATABASE_URL.
Administrators
The admin interface (at /admin) is only accessible to users who have been added as administrators. There is a command-line utility to do this: shuttletracker admins. It has two flags: --add RCS_ID and --remove RCS_ID. Replace RCS_ID with a valid RCS ID.
Example usage
> ./shuttletracker admins
No Shuttle Tracker administrators.
> ./shuttletracker admins --add naraya5
Added naraya5.
> ./shuttletracker admins --add lazare2
Added lazare2.
> ./shuttletracker admins
naraya5
lazare2
> ./shuttletracker admins --remove lazare2
Removed lazare2.
> ./shuttletracker admins
naraya5
Setting up (Windows)
- Download Go. Shuttle Tracker targets Go version 1.11 and newer, but we recommend using the latest stable release of Go.
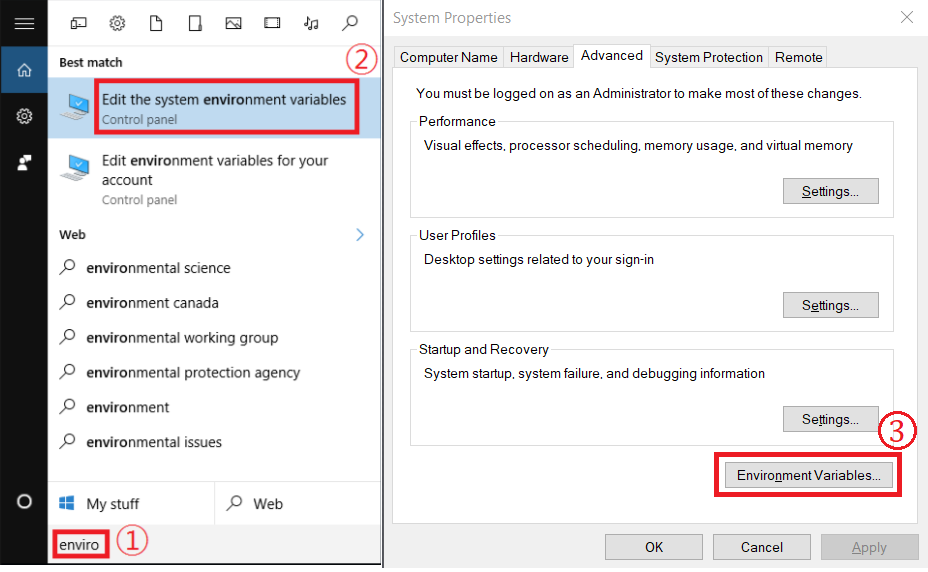
- Open your System Properties by searching
Edit the system environment variablesthen pressEnvironment Variables....
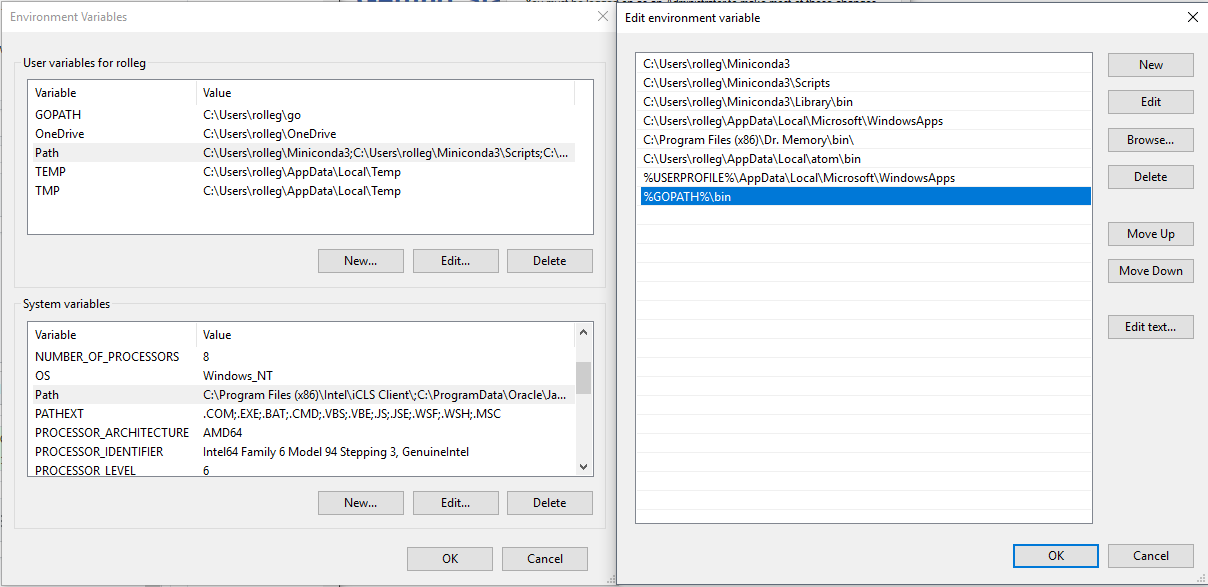
- Ensure your
GOPATHvariable is set correctly in theUser variables for (Username). - Select
PathunderUser variables for (Username)and make sure%GOPATH%\binis on the list. - Make sure
GOROOTis set correctly underSystem variables. - Select
PathunderSystem variablesMake sureGOROOT\binis on the list.
This step should be done for you already.

- Open a command prompt by pressing windows + r, then type
cmdand hit ok, or search for command prompt. - Run
go get github.com/wtg/shuttletracker. - Switch to the Shuttle Tracker directory (
$GOPATH/src/github.com/wtg/shuttletracker). - Download and run the installer PostgreSQL from here. Select the latest version. When prompted to set a password, make it something simple, as you will be using this later, for example
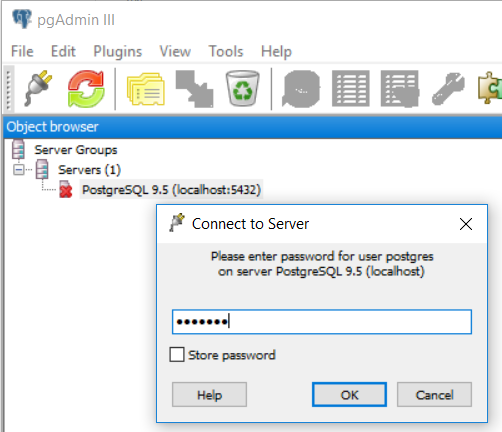
shuttle. Use default options for everything else. Remember your password. - When complete, open pgAdmin from your search bar. If you do not see pgAdmin restart your computer. In the Object Browser, open Servers, then open your PostgreSQL server. You will need to enter your password from step 8. Once this is done, right click on Databases and select New Database. Name it
shuttletrackerand hit Ok.

- Navigate to your shuttle tracker directory (
$GOPATH/src/github.com/wtg/shuttletracker) and renameconf.json.sampletoconf.json - Edit
conf.jsonwith the following, if necessary:Postgres.URL: URL where Postgres is located which will be the default with postgres:password@localhost added before the database name, where password is your password from step 8. For example:"URL": "postgres://postgres:shuttle@localhost/shuttletracker?sslmode=disable".

- Install Node.js and npm. Download the recommended version and install. Restart your command prompt.
- Navigate to the frontend directory within the shuttle tracker directory (
$GOPATH/src/github.com/wtg/shuttletracker/frontend). - Run
npm install - Build the frontend using
npx vue-cli-service build --mode development- Note: if you are working on the frontend, you may instead use
npx vue-cli-service build --mode development --watchin another terminal to continuously watch for changes and rebuild.
- Note: if you are working on the frontend, you may instead use

- Go back up to the project root directory (using
cd ..) and build Shuttle Tracker by runninggo build -o shuttletracker.exe cmd/shuttletracker/main.go - Start the app by running
shuttletracker.exein the project root directory. - Add yourself as an administrator by using
shuttletracker.exe admins --add RCS_ID, replacingRCS_IDwith your RCS ID. See the "Administrators" section above for more information. - Visit http://localhost:8080/ to view the tracking application and http://localhost:8080/admin to view the administration panel.
- Copy the information from vehicles, routes, and stops into the admin panel if you want to mimic the current shuttle tracker site.