Test Driven Development in Java
Table of Contents
- Introduction
- What is TDD?
- Writing a Test
- Try It For Yourself
- Mocks & Stubs
- Mockito
- Why TDD & Dependency Injection
- TDD Patterns
- TDD Anti-Patterns
- Advice
- Further Reading
Introduction
These lessons will teach you the basics of Test Driven Development (TDD) in Java, using JUnit, Mockito, and IntelliJ.
We’re assuming that we don’t need to convince you why you want to do TDD and we’ll only touch lightly on the principles of TDD. Instead we’ll be focusing on the what and how.
What is TDD?
TDD is the practice of writing a small amount of code (a unit test) that describes the new behavior you wish to add to your program before you implement the behavior itself.
Unit Tests
You can think of unit tests as tiny programs we write to verify that the methods in our classes do what we expect them to do.
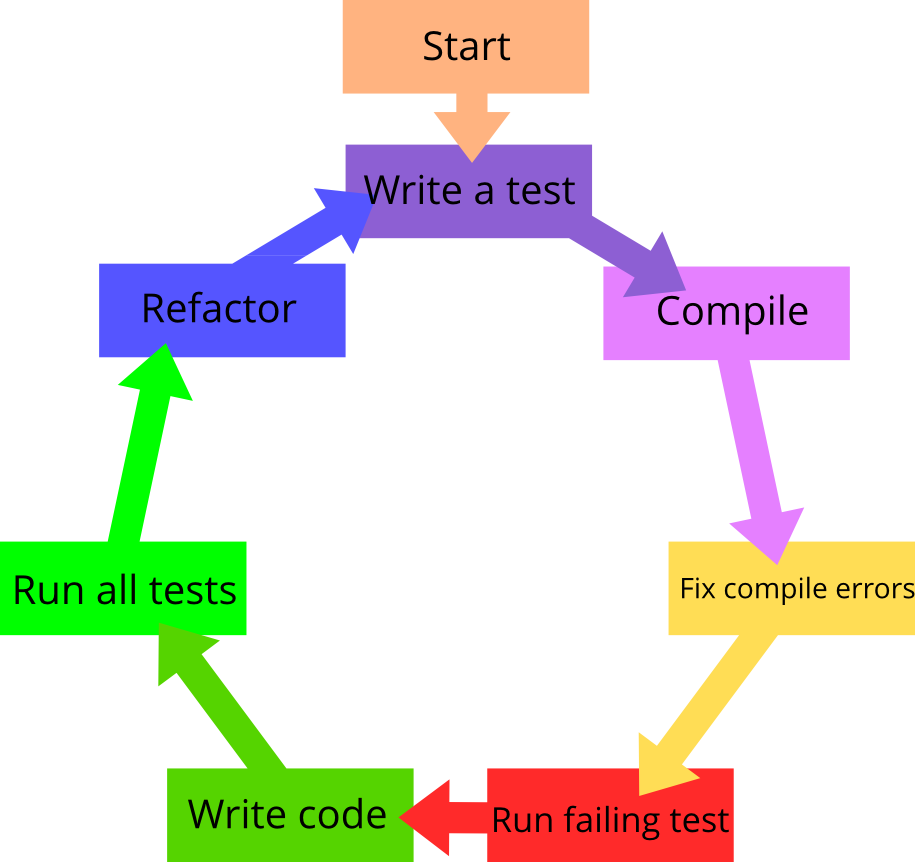
The TDD Cycle
The following sequence is based on the book Test-Driven Development by Example.
The basics steps for this process look like this:
-
Write a small failing unit test
-
Make this new test pass in the simplest way possible
-
Clean up any messes we created
Add a test
In test-driven development, each new feature begins with writing a test. This test must inevitably fail because it is written before the feature has been implemented. (If it does not fail, then either the proposed "new" feature already exists or the test is defective.) To write a test, the developer must clearly understand the feature's specification and requirements. The developer can accomplish this through use cases and user stories to cover the requirements and exception conditions, and can write the test in whatever testing framework is appropriate to the software environment. This could also be a modification of an existing test. This is a differentiating feature of test-driven development versus writing unit tests after the code is written: it makes the developer focus on the requirements before writing the code, a subtle but important difference.
Run all tests and see if the new one fails
This validates that the test harness is working correctly and that the new test does not mistakenly pass without requiring any new code. This step also tests the test itself; it rules out the possibility that the new test always passes, and therefore is worthless. The new test should also fail for the expected reason. This increases confidence (though does not guarantee) that it is testing the right thing, and passes only in intended cases.
Write some code
The next step is to write code that causes the test to pass. The new code written at this stage is not perfect, and may, for example, pass the test in an inelegant way. That is acceptable because later steps improve and hone it.
At this point, the only purpose of the written code is to pass the test; no further (and therefore untested) functionality should be predicted and 'allowed for' at any stage. This prevents unnecessary and unspecified code from being written, helping avoid YAGNI functionality.
Run tests
If all test cases now pass, the programmer can be confident that the code meets all the tested requirements. This is a good point from which to begin the final step of the cycle.
Refactor code
Now the code should be cleaned up. Move code to where it logically belongs. Remove duplication. Make sure variable and method names represent their current use. Clarify constructs that might be misinterpreted. Use the Four Rules of Simple Design to guide you, as well as anything else you know about writing clean code. By re-running test cases, you can be confident that refactoring is not damaging any existing functionality.
The concept of removing duplication is an important aspect of any software design. In this case it also applies to removing duplication between test code and production code—for example magic numbers or strings repeated in both to make the test pass in the "Write some code" step.
Four Rules of Simple Design
- Passes all the tests.
- Expresses every idea that we need to express.
- Says everything OnceAndOnlyOnce.
- Has no superfluous parts.
Repeat
Starting with another new test, repeat the cycle to push forward the functionality. The size of the steps should always be small, with as few as 1 to 10 edits between each test run. If new code does not rapidly satisfy a new test, or other tests fail unexpectedly, the programmer should undo or revert in preference to excessive debugging. Continuous integration helps by providing revertible checkpoints. When using external libraries do not make increments so small that they merely testing the library itself, unless there is some reason to believe that the library is buggy or not sufficiently feature-complete to serve all the needs of the main program being written.
Unit Tests
As we mentioned above, unit tests are small programs that we use to verify the correctness of our "production" code. The word unit refers to a subdivision of the overall program. While others might consider unit to mean a class or package, we will only be unit testing at the method level.
Before you start writing a unit test you should know what behavior you want to verify. For instance, you might have a method that returns the plural version of a word. In English, the way we pluralize most words is by adding the letter ‘s’ to the end of the word. That sounds like a great first test case.
Once you know what behavior you want to verify you can name your test. A great format for test names is,
should<expected behavior>When<situation that behavior depends on>. In our pluralizing example, the expected
behavior is ‘add an s’ and the situation is ‘normal word’. That means that we could name our test
shouldAddSWhenWordIsNormal. Since it’s not necessarily clear what it means for a word to be ‘normal’, we could also
name the test shouldAddS or shouldAddSToWord.
Once you know the behavior you want to verify and the method where you expect add that behavior, you can start writing your test. We’ll show you how to do this in JUnit.
JUnit
JUnit is a popular Java unit testing framework. We’re going to use JUnit to create our TDD unit tests.
JUnit example:
public class PluralizerTests {
    ...

    @Test
    public void shouldAddSWhenWordIsNormal() {
    // Arrange our objects
    Pluralizer pluralizer = new Pluralizer();

    // Action we are testing
    String result = pluralizer.pluralize("Cat");

    // Assert that the action caused the expected result
    assertThat(result, is("Cats"));
    }
    ...
}
Test Classes
We call the class that we are testing the class under test. In the example above, the class under test is
Pluralizer. All of the unit tests for the class under test will live inside a test class named:
<class under test>Tests.java.
Anatomy of a Unit Test
There are three sections to every unit test. One set of names for these sections is: Arrange, Action, Assert. Another is: Given, When, Then.
Arrange/Given
This is where we set the stage for our scenario. That means that we create all of the objects we need for the test in this section. While arranging happens at the top of our test, we often make changes here after working on the other two sections.
Action/When
The Action/When section is where we call the method that we are testing (the Action). This should usually be a single method call.
Assert/Then
We verify that the method under test caused the right thing to happen in Assert/Then section of our tests. If you feel like you need more than one assert you should probably split your test.
Writing a test
If you have a good idea of the behavior you want to test then you should just do this:
-
Create the test method with a name that describe what you are testing
-
Write the test in whatever way makes sense to you
If you don’t have a good sense of what your test to look like when you start writing it, try using this process:
-
Write an empty test with an meaningless name
-
Create an instance of the class you want to test
-
Call the method you want to test
-
Setup the case that will cause the result
-
Assert some result you expect
-
Name your test
Here’s an example of Test Driving a StringJoiner class whose job is to Join strings.
Join - Joining a list of strings means creating a single new string by concatenating the string in list together with a delimiter between them. For instance, joining the strings {"a", "b”, "c”} on the delimiter ",” would result in the string "a,b,c”. Note that there is not a leading or trailing comma.
- Create all of the test scaffolding and get it to compile (name your test something ugly).
public class StringJoinerTests {
    @Test
    public void shouldFooWhenBar() {
    }
}
2 & 3) Next, create an instance of the class you are testing and call the method. You should type out the name of the
class and method even if they don’t exist yet. In the example below, assume that the class StringJoiner doesn’t
exist yet.
public class StringJoinerTests {
    @Test
    public void shouldFooWhenBar() {
        String result = new StringJoiner().join();
    }
}
Right now the class StringJoiner doesn't exist. This means we need to create it. You can create it manually or
use your IDE to create it for you.
IntelliJ will highlight
StringJoinerin red. We can click on the class name, press Alt-Enter and choose the optionCreate Class ‘StringJoiner’. This will automatically create the class for you.
After the class is created our test will look like this...
public class StringJoinerTests {
    @Test
    public void shouldFooWhenBar() {
        String result = new StringJoiner().join();
    }
}
Now the join method doesn't exist. Create it yourself of use your IDE to create it for you.
In IntelliJ
joinwill be red because it’s not implemented. Click on the method name, hit Alt-Enter, and chooseCreate Method ’join’.
Now we’re calling the method we want to test. Here are some useful questions we can ask:
-
What is the smallest piece of new behavior that we can add?
-
What change would it cause?
These questions should lead us to add an assert that verifies that we got the correct result from joining some strings.
Right now the join method returns null. Let’s add the behavior that causes join to return the empty string when
the list that is passed in is empty.
Wait a minute, we aren’t passing a list of strings into the join method yet. We also suddenly have enough
information to name our test. And we want to add an assert too. When you have more than one thing that could be your
next change, write down the options and do them one at at time. Here’s our current ToDo list:
-
Pass list of strings to join
-
Add assert to test
-
Rename this test to ???
- Let’s pass an empty list into
joinfirst.
public class StringJoinerTests {
    @Test
    public void shouldFooWhenBar() {
        List<String> strings = new ArrayList<String>();
        String result = new StringJoiner().join(strings);
    }
}- Now we can add our assert that verifies that we got an empty string back.
public class StringJoinerTests {
    @Test
    public void shouldFooWhenBar() {
        List<String> strings = new ArrayList<String>();
        String result = new StringJoiner().join(strings);
        assertThat(result, is(""));
    }
}- Now that we really understand what we are testing we can rename our test. Normally you will name your test before you start writing it. You should only name it later when you have trouble understanding what you want to test. Let’s rename the test based on what we know about the purpose of our test.
public class StringJoinerTests {
    @Test
    public void shouldJoinIntoAnEmptyStringWhenListIsEmpty() {
        List<String> strings = new ArrayList<String>();
        String result = new StringJoiner().join(strings);
        assertThat(result, is(""));
    }
}
This is a complete unit test. Let’s split it up to clarify what the three sections of the test are.
public class StringJoinerTests {
    @Test
    public void shouldJoinIntoAnEmptyStringWhenListIsEmpty() {
        // Arrange
        StringJoiner joiner = new StringJoiner();
        List<String> strings = new ArrayList<String>();

        // Action
        String result = joiner.join(strings);

        // Assert
        assertThat(result, is(""));
    }
}
We can run the test and watch it fail by clicking anywhere in the test file and hitting Ctrl-Shift-F10.
Now we want to make it pass by writing the simplest code possible. This is how we can make the test pass:
public class StringJoiner {
    public String join(List<String> strings) {
        return "";
    }
}
This is our first passing test! If there was anything for us to refactor we would do so now. Now let’s write more tests. We’ll move a little faster now.
    @Test
    public void shouldJoinIntoTheStringWhenListIsOneString(){
        List<String> strings = new ArrayList<String>();
        String aString = "A String";
        strings.add(aString);
        StringJoiner joiner = new StringJoiner();

        String result = joiner.join(strings);

        assertThat(result, is(aString));
    }
This is a much more interesting test than the first one. There’s a lot going on in the Arrange section, although most of it is just adding a string to the list. Other than the change to how we arrange the objects this test is mostly the same as the first one. The test fails as expect and this is a simple way to make it pass.
public class StringJoiner {
    public String join(List<String> strings) {
        if (strings.size() > 0){
            return strings.get(0);
        }
        return "";
    }
}
Now we want to run both of our tests. A simple way to do this is to click anywhere in the test file that is not inside
of a method and hit Ctrl-Shift-F10. Now both tests pass and it’s time to think about refactoring. There’s nothing
obvious to refactor in StringJoiner, but there’s a lot of duplication in our test class. After removing comments
and blank lines, it looks like this:
public class StringJoinerTests {
    @Test
    public void shouldJoinIntoAnEmptyStringWhenListIsEmpty(){
        List<String> strings = new ArrayList<String>();
        StringJoiner joiner = new StringJoiner();
        String result = joiner.join(strings);
        assertThat(result, is(""));
    }
    @Test
    public void shouldJoinIntoTheStringWhenListIsOneString(){
        List<String> strings = new ArrayList<String>();
        String aString = "A String";
        strings.add(aString);
        StringJoiner joiner = new StringJoiner();
        String result = joiner.join(strings);
        assertThat(result, is(aString));
    }
}
The new ArrayList<String>() and new StringJoiner() lines are exactly the same in both tests. Let’s fix this while our tests are passing so we can have
confidence that we didn’t break anything. We can move change these local variables into instance variables which we
initialize in setup method like this:
public class StringJoinerTests {
    private List<String> strings;
    private StringJoiner joiner;
    @Before
    public void setUp() throws Exception {
        strings = new ArrayList<String>();
        joiner = new StringJoiner();
    }
    @Test
    public void shouldJoinIntoAnEmptyStringWhenListIsEmpty(){
        assertThat(joiner.join(strings), is(""));
    }
    @Test
    public void shouldJoinIntoTheStringWhenListIsOneString(){
        String aString = "A String";
        strings.add(aString);
        assertThat(joiner.join(strings), is(aString));
    }
}
Note that we removed the result variable to improve readability.
There’s also a new method call setUp which has the @Before annotation. Any method that is marked with
@Before will be executed before each test in that same class. This allows us to reset the strings and joiner
instance variables so that they don’t allow the actions of one test to affect another.
So far we have taken such small steps that our StringJoiner class doesn’t do much. This is normal for TDD, we’re
implementing the behavior we want in very small slices but they will quickly add up to everything we need. Here’s our
next test.
    @Test
    public void shouldContainBothStringsWhenListIsTwoStrings(){
        strings.add("A");
        strings.add("B");
        assertThat(joiner.join(strings),
            both(containsString("A")).
            and(containsString("B")));
    }
The assert in this test is more complex than in previous tests. ContainsString verifies that the result of join
contains a certain string (in this case "A" or "B”). The both/and construct means that both containsString
verifications must be true for the assert to pass.
When we run all of our tests, we’re happy to see that this new test fails and all of our old tests pass. Now we need to make the new test pass.
public class StringJoiner {
    public String join(List<String> strings) {
        String result = "";
        for (String string : strings) {
            result += string;
        }
        return result;
    }
}
This makes all of our tests pass. Great! So far our StringJoiner joins all of the strings together, but it doesn’t
even know what a delimiter is, much less how to put it between the strings in the list. Our new test should fix that…
    @Test
    public void shouldPutDelimiterBetweenStrings(){
        StringJoiner joinerWithDelimiter = new StringJoiner(",");
        strings.add("A");
        strings.add("B");
        assertThat(joinerWithDelimiter.join(strings), is("A,B"));
    }
Our StringJoiner now knows about delimiters and it’s constructor takes one as a parameter. Because our constructor
changed we have to update all of the places that we create a new StringJoiner. Fortunately, there is only one
other new StringJoiner in our tests because we removed duplication early on and moved creation of our
StringJoiner into the setUp method. Now we need to figure out the simplest way to make all of our tests pass.
public class StringJoiner {
    private String delimiter;

    public StringJoiner(String delimiter) {
        this.delimiter = delimiter;
    }

    public String join(List<String> strings) {
        String result = "";
        if (strings.size() > 0){
            List<String> allExceptFirstString =
                new ArrayList<String>(strings);
            result += allExceptFirstString.remove(0);
            for (String string : allExceptFirstString) {
                result += delimiter + string;
            }
        }
        return result;
    }
}
This sure doesn’t look simple, but it was easy to implement and is a small incremental change to our previous code. We know that our code does the right thing because all of our tests pass now and our most recent test didn’t pass before we wrote this code.
This is the first time that we’ve had code that we might want to refactor. It’s safe to refactor because all of our code is covered by tests and all of those tests are passing. Here’s a slightly cleaner version of the code.
public class StringJoiner {
    private String delimiter;

    public StringJoiner(String delimiter) {
        this.delimiter = delimiter;
    }

    public String join(List<String> strings) {
        if (!strings.isEmpty()){
            String firstString = strings.get(0);
            List<String> remainingStrings =
                strings.subList(1, strings.size());
            return firstString +
                   concatenateWithDelimiter(otherStrings);
        }
        return "";
    }

    private String concatenateWithDelimiter(List<String> strings) {
        String result = "";
        for (String string : strings) {
            result += delimiter + string;
        }
        return result;
    }
}
Try It For Yourself
As a result of our disciplined practice of TDD, we have evidence that our code is correct and we were able to safely refactor it into code that is easier to read, extend, and test. Now you can try your hand at TDD!
Get the code for this tutorial
- Clone the git repo
- Go to the repository page for this tutorial
- Click the
Copy to clipboardbutton next to theHTTPS clone URLlabel - At the command line, go to your projects directory (you may need to create one) and type
git cloneand past the URL of the repo (this is in your clipboard from the previous step). Then hit enter. This should create a new directory named TDDIntro in your projects directory and copy a bunch of files into it. - Open TDDIntro in IntelliJ
- Open IntelliJ
- Choose
Import Projectand select the root directory of the TDDIntro project. - Make sure that
Import project from external modelandGradleare selected and hitNext. - If the
Use default Gradle wrapperradio button is selected then hitFinishand you are ready to go. - Otherwise, click the
Use local Gradle installationradio button and browse to the gradle directory inside this project. Then hitFinishand you are ready to go.
Factorial Exercise
Open the class com.thoughtworks.tddintro.exercises.factorial.FactorialTests. You'll find five unit tests there. Your goal is to make
changes to the class Factorial so that one more test passes than the last time you made a change. Essentially,
you're doing the Make the failing test pass step of TDD. This should help you get used to the rhythm of TDD before
you have to write your own tests. Here's the cycle you should go through once for each test.
- Run all of the tests by clicking anywhere inside the test class between the test methods and then hit Control-Shift-F10.
- Look at the assert line of the test you are trying to make pass (do them in order) and change the
computemethod so that the assert will pass. - Run all of the tests. The only new test that should pass is the one you are currently trying to make pass. If more than one new test passes, you are adding too much functionality. Revert back to the last time you made a new test pass and try again. You should also try again if one of the previously passing tests now fails.
- Now that you have one more test passing, you should commit you change so you can revert back to a good state later if you need to.
Write your own tests
Now you're going to write your own test.
Look in the class com.thoughtworks.tddintro.exercises.accountbalance.AccountTests. You'll see three commented out empty unit tests
(one for each of the test cases listed below).
For each of the test cases:
- Implement the test for that test case. Uncomment it and add a test code inside it.
- Fix compile errors.
- Watch the test fail.
- Write now code that you expect to make the test pass.
- Watch the test pass. If any of your tests fail, you should repeat step #4.
- Commit your changes and go back to Step #1 for the next test case.
| Given | When | Then |
|---|---|---|
| I have $100 in my account | I deposit $50 | I see that my account contains $150 |
| I have $100 in my account | I withdraw $50 | I see that my account contains $50 |
| I have $50 in my account | I withdraw $100 | I see that my account contains $50 |
Mocks & Stubs
Test Doubles
Up to this point, we’ve test driven situations where the class we are testing does not depend on any other class and we only care that we get the right return value from a method. In real life we often have:
voidmethods which have no return value for us to assert against- methods that don't take any parameters
- code that calls methods with behavior that we don't want to happen when we run our tests (e.g. current time,
System.outor database)
These are all situations where we want our tests to behave differently than our production code without having to modify our production code in order to test it.
How can we change the behavior of our code without changing our code?
What if println(String string) did something different when we call it while testing? In our tests we could have it
record the string that it was passed to print (without actually printing anything) and in our production code we could
have it print normally. This makes it safe to use println() in our tests and yet still behave properly in real life.
Exercise Create a HelloWorld program (or open an existing one) in IntelliJ. Click on the
outinSystem.out.printlnand hit Command-B(Go to implementation). This takes you to the classSystemwhere you'll see the line:public final static PrintStream out = null;This tells us that the variable
outis of typePrintStreamwhich is really nice to know. That means that if we want to callprintlnall we need is a reference that is aPrintStreamobject.Another way to look at this is to select
System.outand hit Alt-Command-V(Introduce Variable). You'll get something that looks like this:PrintStream printStream = System.out; printStream.println();
Now we'll use this information to write a some testable code that prints a greeting for us. Here's an untestable
(and untested) version of GreetingPrinter:
public class GreetingPrinter {
    public static void main(String[] args) {
        System.out.println("Greetings!");
    }
}
The main method isn't testable because we have no mechanism to avoid using a real PrintStream and if we call main the
program will print to the console, which we don't want to happen when we're running a large test suite.
We'll extract out the PrintStream just like we did in our last example and the code looks like this:
public static void main(String[] args) {
        PrintStream printStream = System.out;
        printStream.println("Greetings!");
    }
}
This still isn't testable, but it showed us that we can create our PrintStream in one place and use it in another. We
can declare the PrintStream variable in the main method and use it in another method. When we do this we need to
make the PrintStream variable available in the calling method so we can use it. A great way to do that is by passing
printStream into the constructor of the class that uses it.
public class com.thoughtworks.tddintro.exercises.library.Main {
    public static void main(String[] args) {
        GreetingPrinter greetingPrinter = new GreetingPrinter(System.out);
        greetingPrinter.printGreeting();
    }
}

public class GreetingPrinter {
    private PrintStream printStream;

    public GreetingPrinter(PrintStream printStream) {
        this.printStream = printStream;
    }

    public void printGreeting(){
        printStream.println("Greetings!");
    }
}
This is a key refactoring because it lets the printGreetings method use whatever kind of PrintStream we want.
For example, we could make a new class called FakePrintStream that extends PrintStream, but doesn't print anything when
we call println(String string) and instead records the string that is passed to it.
public class FakePrintStream extends PrintStream {
    private String printedString;

    public FakePrintStream() {
        super(new FakeOutputStream());
    }

    @Override
    public void println(String string) {
        printedString = string;
    }

    public String printedString() {
        return printedString;
    }
}
This would let us a write a test that looks like this:
public class GreetingPrinterTest {

    @Test
    public void shouldPrintGreeting() {
        FakePrintStream printStream = new FakePrintStream();
        GreetingPrinter greetingPrinter = new GreetingPrinter(printStream);

        greetingPrinter.printGreeting();

        assertThat(printStream.printedString(), is("Greetings!"));
    }

}
Stubs
Stubs are modules of code that simulate the behaviors of software components that a module under test depends on.
In our code example FakePrintStream is a stub class and GreetingPrinter is the module under test.
Dependency Injection
GreetingPrinter is said to be dependent on PrintStream, because it depends on PrintStream to do some work for it. One pattern for managing your dependencies is to create them in the constructor of the class that needs them. For instance:
    public Foo() {
        this.bufferedReader = new BufferedReader(new InputStreamReader(System.in));
    }
The problem with this pattern is that whenever we create a new instance of Foo, it will have to use the BufferedReader
that reads from System.in even if we want it to behave differently (like we do in our tests). This pattern is
inflexible and you should generally avoid it.
An alternative is to pass dependencies into the constructor of the class the needs those dependencies. This pattern is called dependency injection because we inject a class' dependencies instead of having the class create them itself. This pattern increases the flexibility of our code by allowing us to create different instances of the same class that behave differently because they use different versions of their dependencies.
Mocks
Wikipedia: Mock object In object-oriented programming, mock objects are simulated objects that mimic the behavior of real objects in controlled ways. A programmer typically creates a mock object to test the behavior of some other object, in much the same way that a car designer uses a crash test dummy to simulate the dynamic behavior of a human in vehicle impacts.
We're primarily going to use mock objects to:
- verify object interactions
- provide return values from dependencies
Mockito
Mockito is a Java library that lets you mock and stub objects with impunity. It provides two extraordinarily useful methods:
when/thenReturn(for stubbing)verify(for mocking)
The Mockito homepage is a great reference resource.
Verify example
In our previous example where we used a FakePrintStream, we had to create two new classes just to verify a single interaction. This adds a lot of overhead even for simple tests. Mocking frameworks, like Mockito, allow for much simpler mocking. If we used Mockito in our previous example it would look something like this:
@Test
public void shouldPrintGreeting() {
    PrintStream printStream = mock(PrintStream.class);
    GreetingPrinter greetingPrinter = new GreetingPrinter(printStream);

    greetingPrinter.printGreeting();

    verify(printStream).println("Greetings!");
}
The important parts of this version of the test are mock(PrintStream.class) and verify. The mock statement tells
Mockito to create a new mock object that honors the PrintStream interface (but has none of the behavior of PrintStream).
Verify asks Mockito to assert that the println method was call on the printStream object with the parameter "Greetings!".
When/thenReturn
Sometimes our tests need specific return values from the objects they depend upon. Mockito provides the when/thenReturn functionality to support this.
In the example below, we want to make sure that our TimePrinter object prints out the time that is provided by the
DateTime object that we inject into it. It's much easier for us to use a mock DateTime and instruct that mock to
return a specific value (in this case "2013-04-08 16:33:17") that to create a real DateTime object and force it to
have a specific value. Mocking this object is especially valuable in this case because it insulates our tests from
changes in the behavior of DateTime formatting.
@Test
public void shouldPrintTime() {
    PrintStream printStream = mock(PrintStream.class);
    DateTime dateTime = mock(DateTime.class);
    when(dateTime.toString()).thenReturn("2013-04-08 16:33:17");
    TimePrinter timePrinter = new TimePrinter(printStream, dateTime);

    timePrinter.print();

    verify(printStream).println("2013-04-08 16:33:17");
}
Write some tests using Mockito
In this exercise we're going to implement some test for an existing class, Library, that prints a list of books to a
PrintStream. Since we're implementing the tests after the code under test is already written we are NOT doing TDD. Most
programmers call this development approach Test Last (instead of Test First). You should generally avoid Test
Last development, but it's a smart thing to do if you inherit untested code.
Using Verify
Find the class com.thoughtworks.tddintro.exercises.library.Main and run it. This shows you the existing behavior of the program; which is
to print out the three books that are added in the Main class. Note that we are passing the list of books and the
PrintStream into the constructor of Library. This lets us use a real PrintStream in our main method and a mock
PrintStream in our tests.
When we run main books print to the console, but when we finish writing our Library tests
nothing will print to the console except the test results. This is important because in real projects we might have tens
of thousands of tests and if many of them printed to the console we wouldn't be able to find the test results in all of
spam from our program printing so much.
Now go to the class com.thoughtworks.tddintro.exercises.library.LibraryTest (it's located in the test/java directory). This class has three
unit tests in it. The first one is mostly implemented. You should add a verify statement to make sure that the correct
string is being printed to the mock PrintStream.
Once you get the first test completed, you should implement the next two tests one at a time. They should mostly be similar to the
first one. This is a good time to introduce a setup method using the @Before annotation. A good way to ensure that your
tests are testing the right thing is to change the code that you are testing and make sure the test fail the way you
expect them to. For instance, you could change the listBooks method to always print "Book Title" exactly one time. This
should make some tests fail and still allow others to pass. Try it and see if your tests do what you think they do. Then
put the listBooks method back to it's original state.
Using when/thenReturn
Work through the remaining tests in LibraryTest the same way you did the first three. This time we're testing the
listBooks method and using when/thenReturn to make our mock DateTimeFormatter return some specific values when it is asked
to print the time.
Why TDD & Dependency Injection
Breaking Dependencies
TDD helps expose our dependencies and dependency injection is a tool for breaking dependencies.
Sensing & Separation
We break dependencies:
- so we can sense when we can't access values our code computes
- to separate when we can't even get a piece of code into a test harness to run.
Sensing
Mocks let us sense interactions that are important to the tests we're writing but are not easy to verify without mocks.
Mockito.verify allows us to easily sense these interactions.
Separation
We often have code that is called in production that we would never want to call in our tests. Some reasons we might not want to call this code is that it:
- is slow and we always want our tests to run fast
- interacts with a real resources that we don't want to interact with in tests
- allows us to avoid using real resources
- helps us write maintainable tests
TDD Patterns
These concepts/strategies lead us to write tests that lead to testable and flexible code. Think of them as recipes for cooking successful tests and code. They are guidelines to help you succeed when you first start writing tests. Over time you will learn when and where to improvise on these recipes.
One Constructor Per Class
If we have more than one constructor in each class then it's possible that a test could pass if we used one constructor and fail if we used a different one. That would lead us to want to create a duplicate of each test case for each different constructor. It's simpler to limit ourselves to one constructor.
public class Product {
    private int numberOfItems;
    private double totalPrice;
    public Product() {
        numberOfItems = 0;
        totalPrice = 0.0;
    }
    public Product(int numberOfItems, double totalPrice) {
        this.numberOfItems = numberOfItems;
        this.totalPrice = totalPrice;
    }
    public double pricePerItem(){
        return totalPrice/numberOfItems;
    }
    public void setTotalPrice(double totalPrice) {
        this.totalPrice = totalPrice;
    }
}

public class ProductTest {
    @Test
    public void pricePerItemShouldBeSameAsTotalPriceWhenThereIsOneItem() {
        Product product = new Product(1, 14.0);

        assertThat(product.pricePerItem(), is(14.0));
    }
    @Test
    @Ignore // This test fails due to price per item being Infinity
    public void pricePerItemShouldBeSameAsTotalPriceWhenThereIsOneItemWithDefaultConstructor() {
        Product product = new Product();
        product.setTotalPrice(14.0);
        assertThat(product.pricePerItem(), is(14.0));
    }
}
Avoid Behavior in the Constructor by Keeping Complex Object Creation Behavior in Factories
Since we are going to be creating a new instance of our class in each test, we will end up executing any behavior that lives in the constructor in every one of our tests. That means that every test for our class could fail if the behavior in the constructor stops working. It's simpler to let this behavior live in other methods. Limit yourself to assignments in your constructors. Do something like this:
public class Shape {
    private String name;
    private final double area;
    private final double perimeter;

    public Shape(String name, double area, double perimeter) {
        this.name = name;
        this.area = area;
        this.perimeter = perimeter;
    }
}
We can also run into the problem where we want our constructor to create different types of objects that are instances
of the same class. For instance, we might have constructors in our Shape class that create instances of squares and
circles. Both squares and circles only need one value (probably a double) in order to describe them (length for square
and radius for circle). How do we distinguish between those constructors since they both want a signature that looks like
public Shape(double size)? Sometimes people will use a flag to indicate which type of object they want (an enum or
boolean). This results in a complex constructor that we will have to write a lot of tests for. In the example below we
use double to indicate that we want a square and float to indicate a circle. Imagine how easy it would be to call the
wrong constructor. Avoid code that looks like this:
public class Shape {
    private String name;
    private final double area;
    private final double perimeter;

    // Square Constructor
    public Shape(double length){
        name = "Square";
        area = length * length;
        perimeter = length * 4;
    }

    // Circle Constructor
    public Shape(float radius){
        name = "Circle";
        area = PI * radius * radius;
        perimeter = 2 * PI * radius;
    }
}
Sometimes we need to do something complex in order to create an instance of our object. If we can't do that work in the constructor, we need to put it somewhere. Factories are a design pattern where we use a different class to encapsulate the complexity of creating a new instance of another class. This is an example of a static factory method:
public class Shape {
    private String name;
    private final double area;
    private final double perimeter;

    public Shape(String name, double area, double perimeter) {
        this.name = name;
        this.area = area;
        this.perimeter = perimeter;
    }

    public static Shape createSquareWithSidesOfLength(int length) {
        String name = "Square";
        double area = length * length;
        double perimeter = length * 4;
        return new Shape(name, area, perimeter);
    }
}
When we use this static factory we do something like:
Shape square = Shape.createSquareWithSidesOfLength(5);An abstract factory looks like this (note that the abstract factory either implements a factory interface or extends an abstract factory class):
public class CircleFactory implements ShapeFactory {
    @Override
    public Shape create(int diameter) {
        double radius = 1.0 * diameter/2.0;
        return new Shape("Circle", PI * radius * radius, 2 * PI * radius);
    }
}

// Usage looks like:
Shape circle = new CircleFactory().create(5);
Use Only Required Arguments Constructors
It's generally good practice to not have partially initialized objects. That means that we need to initialize all of our class' required fields during construction. The simplest way to do this is to pass in values for all of these fields as constructor arguments.
Use Dependency Injection
Mock Everything Except the Class under Test
No Static Variables or Methods
TDD Anti-patterns
Chained mocks and the Law of Demeter
Excessive Setup
A test that requires a lot of work setting up in order to even begin testing. Sometimes several hundred lines of code is used to setup the environment for one test, with several objects involved, which can make it difficult to really ascertain what is tested due to the "noise" of all of the setup going on.
The Giant
A unit test that, although it is validly testing the object under test, can span thousands of lines and contain many many test cases. This can be an indicator that the system under tests is a God Object
Generous Leftovers
An instance where one unit test creates data that is persisted somewhere, and another test reuses the data for its own devious purposes. If the "generator" is run afterwards, or not at all, the test using that data will fail.
The Dodger
A unit test which has lots of tests for minor (and presumably easy to test) side effects, but never tests the core desired behavior. Sometimes you may find this in database access related tests, where a method is called, then the test selects from the database and runs assertions against the result.
Advice
- Initially, go slow. Do it right.
- Minimize untested code
- Don’t unit test main()
- Minimize the complexity of your main method by only calling one method in main. You could write something like
new Foo().run();for example - Work on one thing at a time. Seriously.
- Only work on one feature at a time
- Change one behavior at a time
- Red/Green/Refactor. Know where you are.
- Always know where you are in the process. You should be able to say, "We are working on the first acceptance criteria of the 'List Books' story, we have two passing tests, and are about to refactor our tests to use a setup method".
- Focus on what the code should do, not how you want to implement it. Call a method before you implement it.
- Code from the outside in (or top to bottom). All of your new code should be executed when you run
main(). - Only add test to methods that already exist. The test will drive you to implement the new behavior that you want the method to have.
- Move/duplicate tests before you move code to a new class
- Don’t refactor code without new tests already in place
Further reading:
- Martin Fowler’s essay exploring differences between mocks and stubs.
- Test Double provides a concise overview of different types of test doubles:
- Test stub (used for providing the tested code with "indirect input")
- Mock object (used for verifying "indirect output" of the tested code, by first defining the expectations before the tested code is executed)
- Test spy (used for verifying "indirect output" of the tested code, by asserting the expectations afterwards, without having defined the expectations before the tested code is executed)
- Fake object (used as a simpler implementation, e.g. using an in-memory database in the tests instead of doing real database access)
- Dummy object (used when a parameter is needed for the tested method but without actually needing to use the parameter)
- TDD Anti-Patterns by James Carr