ServiceStackApps / Typescript Redux
Programming Languages
TypeScript Redux
This guide goes through setting up, running and exploring the ultimate JavaScript Stack du jour:
- TypeScript - Superset of JavaScript with optional typing, advanced language features and down-level ES5 support
- JSPM - JavaScript Package Manager supporting SystemJS modules and multiple npm and GitHub repositories
- typings - Package manager to search and install TypeScript definition files
- React - Simple, high-performance JavaScript UI Framework utilizing a Virtual DOM and Reactive Data flows
- Redux - Predictable state manager for JavaScript Apps
Providing a great base for the development of large-scale, JavaScript Apps that's further enhanced by a great development experience within Visual Studio.
Install TypeScript
If you haven't already download and install the latest version from typescriptlang.org. Visual Studio users can use these direct links:
This guide assumes you've installed TypeScript v1.8 or higher
VS.NET 2015 Install Package
Visual Studio 2015 also has a Package Installer add-on providing an Integrated UI for installing npm and JSPM packages as well as typings Type Definitions:
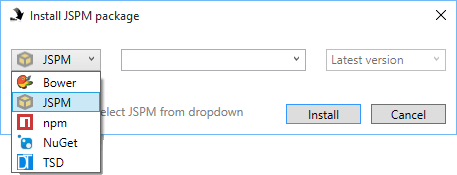
It's autocomplete feature is particularly useful for quickly finding packages you don't know the exact name of:

Although for this guide we'll install JavaScript packages using the command-line which offers better visibility of how external packages integrates with your project and all fits together.
Create an Empty ASP.NET Web Project
Whilst installing the TypeScript VS.NET Extension provides a new HTML Application with TypeScript project template, you're better off starting from an Empty ASP.NET Web Application project then configuring it with TypeScript - saving the time to convert it into an ASP.NET Web Application later.
![]()
Choose the Empty template for a clean Web Application free of unnecessary bloat:
![]()
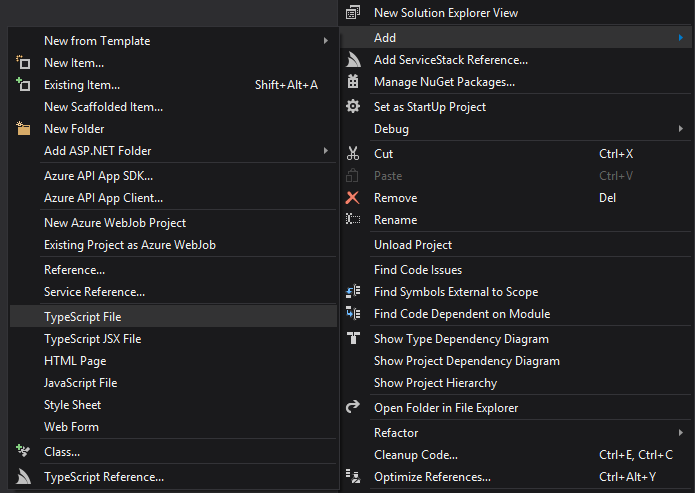
Enable TypeScript
Adding a TypeScript File from the Add > TypeScript File context menu will automatically configure your
Web Application Project .csproj with the necessary imports to enable TypeScript support:
As confirmed by the subsequent prompt:
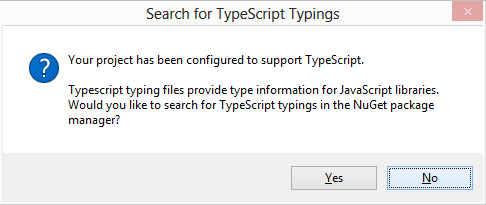
Click No to skip opening a NuGet dialog as you'll instead be sourcing your TypeScript definitions from the typings Package Manager we'll install later.
Configure TypeScript
Once TypeScript is enabled you want to configure it within your project. Prior to TypeScript 1.8 on VS.NET 2015 the configuration properties for the TypeScript Compiler was embedded in the VS .csproj file which you could manage from the TypeScript Properties Page in Project Properties.
However our preference is to instead manage the TypeScript options in a plain-text tsconfig.json file
which offers more flexibility and matches how every other IDE/text-editor maintains TypeScript configuration
leading to greater knowledge sharing and less issues.
To add tsconfig.json to your project go to Add > New Item and search for typescript in the search
dialog, then select TypeScript JSON Configuration File item template:
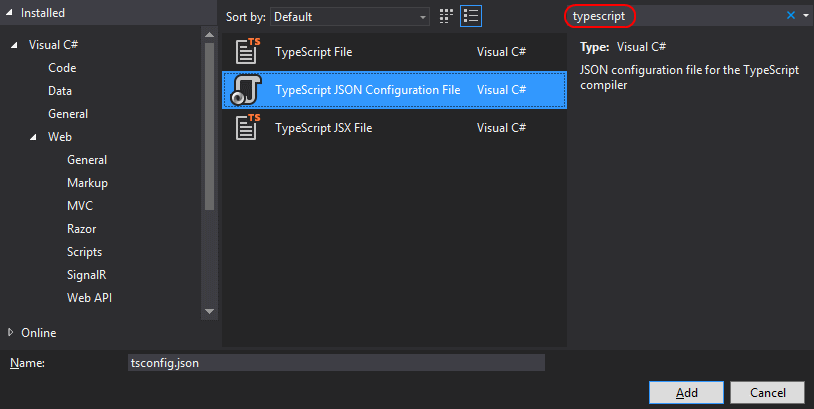
This will add a basic tsconfig.json configuration file to your project which VS.NET will use instead of
.csproj Project variables.
tsconfig for JSPM, React and JSX
To get started quickly copy + replace the contents of tsconfig.json with the configuration below:
{
  "compileOnSave":  true,
  "compilerOptions": {
    "noImplicitAny": false,
    "noEmitOnError": true,
    "removeComments": false,
    "sourceMap": true,
    "target": "es5",
    "module": "system",
    "jsx": "react",
    "experimentalDecorators": true
  },
  "exclude": [
    "typings",
    "node_modules",
    "jspm_packages",
    "wwwroot"
  ]
}
Changes from the default basic tsconfig.json template include:
-
compileOnSave:true- to generate TypeScript files on save -
target:es5- to target ES5 JavaScript -
module:system- so TypeScript modules are converted into SystemJS Modules -
jsx:react- so JSX in.tsxfiles are transpiled into React's JavaScript syntax -
experimentalDecorators:true- to enable proposed ES7 decorators support (used later) -
exclude:jspm_packages- to ignore any TypeScript source files in JSPM packages folder
VS 2013 doesn't support tsconfig.json so you'll need to use .csproj configuration managed from TypeScript Project properties page
Install JSPM
To take full advantage of the modularity functionality available in ES6 and TypeScript we'll also want to use a client JavaScript package manager which is able to integrate with TypeScript's module support. Currently the preferred option for this is JSPM whose SystemJS module format is natively supported by TypeScript.
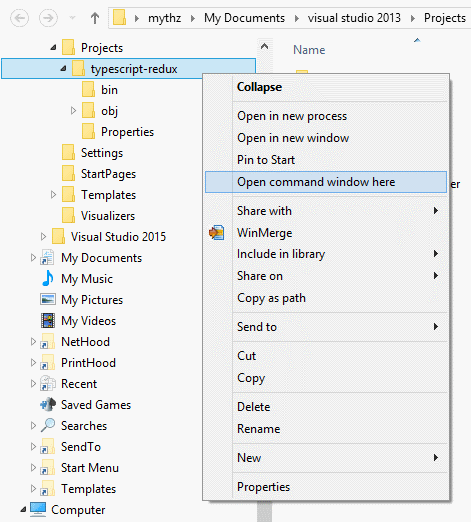
To install JSPM we need to head over to the command line, the easiest way is to hold down Shift whilst
right-clicking on your project folder and clicking Open command window here
With the raw power of the command-line at our finger tips, use npm to install JSPM:
C:\proj> npm install jspm -g
Once installed you'll want to initialize JSPM and create a config file by running:
C:\proj> jspm init
and run through a few questions that will be used to create JSPM config.js file with:
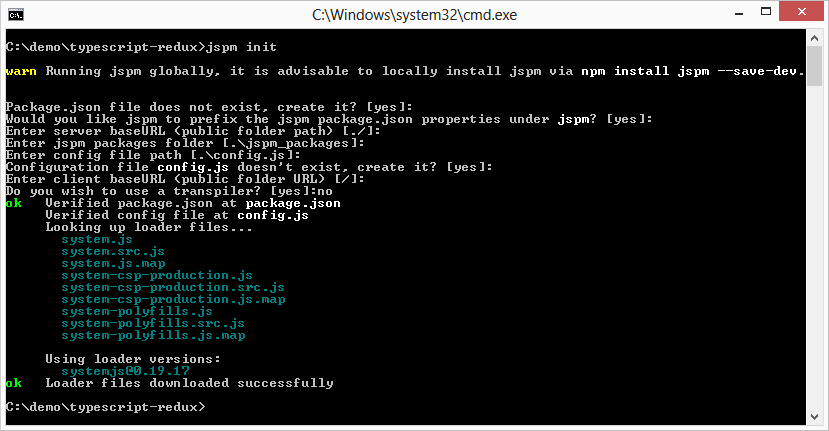
The only question you won't want to go with the defaults on and enter no for is:
Do you wish to use a transpiler? [yes]:no
As we'll instead be using the TypeScript support in Visual Studio to do our transpiling for us.
Install React
With JSPM all setup we can go shopping for JS packages - the first one we'll need is React:
C:\proj> jspm install react
Since v0.14 the React support for the DOM is split into a separate package which we'll need as well:
C:\proj> jspm install react-dom
Install typings - Manager for TypeScript definitions
To enable auto-completion and type-checking support in TypeScript we'll also want to pull down the Type Definitions for our 3rd Party JavaScript libraries. The best way to do this is to install typings which we also install from npm:
C:\proj> npm install typings -g
We can now use typings to fetch the TypeScript Type Definitions we need.
Install React Type Definitions
C:\proj> typings install react --ambient --save
Install React DOM Type Definitions
C:\proj> typings install react-dom --ambient --save
The --ambient flag instructs typings to look in ambient .d.ts TypeScript definitions in
DefinitelyTyped repository whilst the
--save flag adds a reference to the common typings/browser.d.ts file:
/// <reference path="main\ambient\react-dom\react-dom.d.ts" />
/// <reference path="main\ambient\react\react.d.ts" />
This is convenient as it means we only need to reference the one file in our source code to import the Type Definitions for all our dependencies:
/// <reference path='../typings/browser.d.ts'/>
Start TypeScript'ing
Eureka! if you've reached this far we finally have a working development environment and can start putting
TypeScript and React to work for us. Let's start by creating a src/ folder where we'll keep all our
TypeScript source code. We'll start with the simplest of React examples:
Example 1 - HelloWorld
In this first example we're aiming to create the simplest working App.
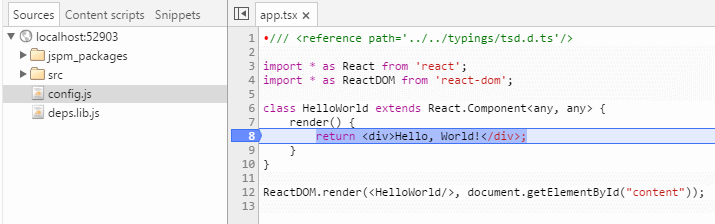
Create an example01/ folder and add our first TypeScript file:
app.tsx
/// <reference path='../../typings/browser.d.ts'/>

import * as React from 'react';
import * as ReactDOM from 'react-dom';

class HelloWorld extends React.Component<any, any> {
    render() {
        return <div>Hello, World!</div>;
    }
}

ReactDOM.render(<HelloWorld/>, document.getElementById("content"));
I'll walk through this as there's a few things going on here, the first line:
/// <reference path='../../typings/browser.d.ts'/>
Uses a Reference Tag to reference all the Definitely Typed Type Definitions installed by typings.
The import statements:
import * as React from 'react';
import * as ReactDOM from 'react-dom';
Imports the JavaScript modules installed by jspm. The * wildcard above imports the entire module,
an alternative syntax is to import only what you need:
import { render } from 'react-dom';
The exception to this is inside .tsx where it requires React to be imported with a wildcard import
otherwise JSX fragments will result in build errors:
return <div>Hello, World!</div>; //compile error: Cannot find name React
To create a React component we inherit from React's Component<TProps,TState> base class:
class HelloWorld extends React.Component<any, any> {
When Components doesn't have any properties or state they can use any to ignore specifying types.
As we've enabled JSX support in our TypeScript configuration we can use JSX inside our .tsx files:
    render() {
        return <div>Hello, World!</div>;
    }
The last line is standard React, instructing it to render an instance of our HelloWorld component into the
#content DOM element:
ReactDOM.render(<HelloWorld/>, document.getElementById("content"));
Now all that's left is to build a HTML page to house our newly minted React Component:
index.html
<html>
<head>
    <title>TypeScript + JSPM + React</title>
    <script src="/jspm_packages/system.js"></script>
    <script src="/config.js"></script>
    <script>
        System.import("./app");
    </script>
</head>
<body>

    <h1>Example 1</h1>
    <div id="content"></div>

</body>
</html>
index.html is a pre-defined default document in ASP.NET which lets us view our app by visiting the directory, e.g
/example01/
Since we're using JSPM we need to import the system.js module loader and our JSPM config.js:
    <script src="/jspm_packages/system.js"></script>
    <script src="/config.js"></script>
But from then on we only need a single import for our app.tsx:
    <script>
        System.import("./app");
    </script>
Since we didn't configure JSPM to use a transpiler JSPM is only loading our pre-generated *.js files which
thanks to VS.NET's TypeScript integration is generated every time we hit save. This is ideal as it's
typically generated in-between the time we flip over to the browser to view our App, doesn't require any
manual post build steps or a separate external process monitoring our source files for changes.
The nice thing about using a module loader like JSPM is that we no longer need to manage static imports of 3rd party dependencies ourselves since JSPM does all this for us behind the scenes.
The final key element is an empty <div/> tag which is where we've instructed React to render our Component:
<div id="content"></div>
And with that we can hit F5 and head over to /example01/ to see the fruits of our labor -
a working React App!

Preloading Dependencies
Although the excitement only lasts a short while until you witness a noticeable delay in rendering Hello World? Checking the network requests tab shows the root cause: 170 requests to render the simplest React App!
Since we don't have the luxury of HTTP 2's multiplexed requests in VS.NET's WebDev server, we need to find a
way to get the network requests countdown. The common solution for this is to create an interim bundle with
your 3rd party dependencies which change infrequently. We can do this by creating a simple .tsx file
that just references all the 3rd party dependencies you want in the bundle, e.g:
deps.tsx
import * as React from 'react';
import { render } from 'react-dom';

class Deps extends React.Component<any, any> {
    render() {
        return <div>Hello, World!</div>;
    }
}

const ignore = () => render(<Deps/>, document.body);
We can then use jspm to create a bundle with all the dependencies used into a single .js library, e.g:
C:\proj> jspm bundle src/deps deps.lib.js
That we then include in our index.html
    <script src="/jspm_packages/system.js"></script>
    <script src="/config.js"></script>
    <script src="/deps.lib.js"></script>
    <script>
        System.import("./app");
    </script>
This has the nice effect of preloading all referenced 3rd party modules in a single HTTP Request so by the time our App requests use of a 3rd party module, it's already loaded.
Enable debugging in Browsers
Another nice feature of TypeScript we've yet to explore is its generation of source maps which lets us debug
our original TypeScript sources directly from within Chrome. However to enable this we need to first register
our TypeScript file extensions with Web.config so they're downloadable. It just so happens that .ts is
already pre-registered with the video/vnd.dlna.mpeg-tts mime-type that as a matter of good taste we'd want
to replace whilst adding a new mimeType mapping for .tsx files:
<system.webServer>
    <staticContent>
        <remove fileExtension=".ts"/>
        <mimeMap fileExtension=".ts" mimeType="application/x-typescript" />
        <mimeMap fileExtension=".tsx" mimeType="application/x-typescript" />
    </staticContent>
</system.webServer>
With our website now configured to serve static TypeScript files we can now debug TypeScript directly within Chrome!
Example 2 - Modularizing HelloWorld
For our 2nd example we'll look at how we can modularize our App by moving the <HelloWorld /> implementation
into its own file:
HelloWorld.tsx
import * as React from 'react';

export default class HelloWorld extends React.Component<any, any> {
    render() {
        return <div>Hello, World!</div>;
    }
}
To make the HelloWorld component available we need to use the export keyword. We can also use the default
keyword to define a default export which makes it a little nicer to import as consumers can assign it to
their preferred name when importing it.
Then remove the existing HelloWorld implementation from app.tsx and import the exported component instead:
app.tsx
import * as React from 'react';
import * as ReactDOM from 'react-dom';

import HelloWorld from './HelloWorld';

ReactDOM.render(<HelloWorld/>, document.getElementById("content"));
If we didn't use a default export we'd need to import it with:
import { HelloWorld } from './HelloWorld';
With this simple change lets check that our App still works:

Example 3 - Creating a stateful Component
Now that we've mastered HelloWorld we'll up our game and create a more advanced component with some state.
About the simplest example we could do for this is a Counter. For this rename HelloWorld to Counter and
add the following Component:
Counter.tsx
import * as React from 'react';

export default class Counter extends React.Component<any, any> {
    constructor(props, context) {
        super(props, context);
        this.state = { counter: 0 };
    }
    render() {
        return (
            <div>
                <p>
                    <label>Counter: </label><b>#{this.state.counter}</b>
                </p>
                <button onClick={e => this.incr(1) }>INCREMENT</button>
                <span style={{ padding: "0 5px" }} />
                <button onClick={e => this.incr(-1) }>DECREMENT</button>
            </div>
        );
    }
    incr(by:number) {
        this.setState({ counter: this.state.counter + by });
    }
}
Nothing surprising here, we're displaying a Counter in a HTML label with buttons to increment / decrement the
counter using React's built-in setState():

Convert Counter to use Redux
Using setState() is the old-school way of modifying state in Components, the new hawtness is to use
Redux. For this we need to fetch it from JSPM:
C:\proj> jspm install redux
as well as its Type Definitions:
C:\proj> typings install redux --ambient --save
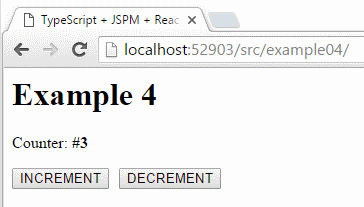
Example 4 - Change Counter to use Redux
If you're not familiar with Redux it's a good time to head over to the Redux docs and read the overview. The 30 short videos from Redux creator @dan_abramov provides a great way to get up to speed quickly.
Redux is just a small library to manage your App's state which should be maintained in a single Redux store
that's accessible at anytime with store.getState(). The Redux store allows for multiple subscribers to
subscribe to state changes which must be initiated by dispatching an action. An action being just a plain
JavaScript object with a type string property identifying the action. To change state you implement a
reducer function that takes the current state and
an action and whose sole purpose is to return the next state. The one caveat is for states to be
immutable so your reducer will need to return a new object instead of modifying any existing state.
Now we know what Redux is, let's update our Counter to use it:
Counter.tsx
import * as React from 'react';

import { createStore } from 'redux';

let store = createStore(
    (state, action) => {
        switch (action.type) {
            case 'INCR':
                return { counter: state.counter + action.by };
            default:
                return state;
        }
    },
    { counter: 0 });

export default class Counter extends React.Component<any, any> {
    private unsubscribe: Function;
    componentDidMount() {
        this.unsubscribe = store.subscribe(() => this.forceUpdate());
    }
    componentWillUnmount() {
        this.unsubscribe();
    }
    render() {
        return (
            <div>
                <p>
                    <label>Counter: </label><b>#{store.getState().counter}</b>
                </p>
                <button onClick={e => store.dispatch({ type:'INCR', by: 1 }) }>INCREMENT</button>
                <span style={{ padding: "0 5px" }} />
                <button onClick={e => store.dispatch({ type:'INCR', by: -1 }) }>DECREMENT</button>
            </div>
        );
    }
}
Creating a Redux Store
Creating a Redux store is done by calling createStore from the redux module passing in our Apps reducer
function and the default state:
import { createStore } from 'redux';

let store = createStore(
    (state, action) => {
        switch (action.type) {
            case 'INCR':
                return { counter: state.counter + action.by };
            default:
                return state;
        }
    },
    { counter: 0 });
Since our Counter only has 1 action our reducer implementation becomes trivial - returning a new object with an updated Counter.
Another thing to know about Redux is that it's completely independent from React which unlike the built-in
setState() React doesn't know when the state in your Redux store has changed - needed in order to
know when to re-render your Component. For this we need to register a listener so we can force the Component
to re-render itself when the store's state changes:
    private unsubscribe: Function;

    componentDidMount() {
        this.unsubscribe = store.subscribe(() => this.forceUpdate());
    }
    componentWillUnmount() {
        this.unsubscribe();
    }
We also need to change the component to read its state from store.getState() and instead of modifying the
Components internal state with setState() we dispatch an action and get our reducer to update the App's state:
    render() {
        return (
            <div>
                <p>
                    <label>Counter: </label><b>#{store.getState().counter}</b>
                </p>
                <button onClick={e => store.dispatch({ type:'INCR', by: 1 }) }>INCREMENT</button>
                <span style={{ padding: "0 5px" }} />
                <button onClick={e => store.dispatch({ type:'INCR', by: -1 }) }>DECREMENT</button>
            </div>
        );
    }
With our Counter now reduxified, running it again retains the same behavior as before:
Install React Redux
Something that stands out in the previous example is creating the Redux store in the Counter module.
Since your App should only have 1 store, this isn't the right place for it. We can remedy this situation
with a bit of help from Redux's React helper library.
The Redux bindings for React are maintained in a separate react-redux package that we can call upon JSPM
to fetch for us:
C:\proj> jspm install react-redux
Like most popular libraries, there's also a Type Definition for it:
C:\proj> typings install react-redux --ambient --save
Example 5 - Use Provider to inject store in child Context
For this example, we'll move the Redux store into the top-level app.tsx file like so:
app.tsx
import * as React from 'react';
import * as ReactDOM from 'react-dom';
import { createStore } from 'redux';
import { Provider } from 'react-redux';

import Counter from './Counter';

let store = createStore(
    (state, action) => {
        switch (action.type) {
            case 'INCR':
                return { counter: state.counter + action.by };
            default:
                return state;
        }
    },
    { counter: 0 });

ReactDOM.render(
    <Provider store={store}>
        <Counter />
    </Provider>,
    document.getElementById("content"));
To pass the store down to our components we're going to use
React's child context feature which is nicely packaged
for us with react-redux <Provider/> Component.
To let React know we want the store injected into our Counter Component we also need to define a static
contextTypes property specifying the context it needs:
Counter.tsx
import * as React from 'react';

export default class Counter extends React.Component<any, any> {
    context: any;
    static contextTypes = {
        store: React.PropTypes.object
    }
    private unsubscribe: Function;
    componentDidMount() {
        this.unsubscribe = this.context.store.subscribe(() => this.forceUpdate());
    }
    componentWillUnmount() {
        this.unsubscribe();
    }
    render() {
        return (
            <div>
                <p>
                    <label>Counter: </label><b>#{this.context.store.getState().counter}</b>
                </p>
                <button onClick={e => this.context.store.dispatch({ type:'INCR', by: 1 }) }>INCREMENT</button>
                <span style={{ padding: "0 5px" }} />
                <button onClick={e => this.context.store.dispatch({ type:'INCR', by: -1 }) }>DECREMENT</button>
            </div>
        );
    }
}
This is another transparent change so our App should continue working:

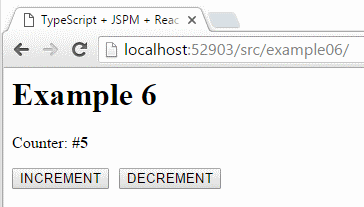
Example 6 - Use connect() to make Components stateless
We've added a bit of boilerplate to get to where we are but it's now time to pull some of it back. The above
example shows how we can use the Provider Component to pass state down into our child components,
react-redux also has another utility that can abstract the rest away.
Redux's connect() function returns a higher-level Component which can make Components stateless, decoupling
it from the Redux store by mapping its state and callbacks to a Component's properties:
Counter.tsx
import * as React from 'react';
import { connect } from 'react-redux';

class Counter extends React.Component<any, any> {
    render() {
        return (
            <div>
                <p>
                    <label>Counter: </label>
                    <b>#{this.props.counter}</b>
                </p>
                <button onClick={e => this.props.incr() }>INCREMENT</button>
                <span style={{ padding: "0 5px" }} />
                <button onClick={e => this.props.decr() }>DECREMENT</button>
            </div>
        );
    }
}

const mapStateToProps = (state) => state;

const mapDispatchToProps = (dispatch) => ({
    incr: () => {
        dispatch({ type: 'INCR', by: 1 });
    },
    decr: () => {
        dispatch({ type: 'INCR', by: -1 });
    }
});

export default connect(mapStateToProps, mapDispatchToProps)(Counter);
To enable this we pass in a mapStateToProps function that returns an object containing all the state our component needs. As our Component also makes state changes we'll need a mapDispatchToProps function as well, returning an object with all its callouts translated into dispatching the appropriate Redux action.
Redux connect() then combines these functions into a new higher-level Component that subscribes to the Redux
store changes, re-rendering its (now child) Counter component with updated state via Component properties.
This change is also transparent so re-running the App retains the existing behavior:
Install es6-shim
Now that we've worked ourselves towards the ideal way to build a Redux-connected component, it's time to kick it into high gear and build something more useful. Ultimately we're going to want to expand our reducer function to handle more state, actions and their state transitions.
Since we're going to be supporting more actions we're going to quickly want better tools for creating immutable objects. TypeScript already supports ES6's spread operator which helps with creating new arrays but it doesn't yet support the object spread operator proposal - something we're going to be doing a lot of.
Instead we'll enlist the help of ES6's Object.assign(). As TypeScript was configured to target ES5, this isn't automatically available but we can still make it appear with our good friend JSPM:
C:\proj> jspm install es6-shim
Then use typings to fetch ES6's Type Definitions:
C:\proj> typings install es6-shim --ambient --save
Since it's been awhile since our last interim build, now's a good time to cut another. First we'll expand deps.tsx to reference a bit from every dependency:
deps.tsx
import * as React from 'react';
import { render } from 'react-dom';
import { createStore } from 'redux';
import { connect } from 'react-redux';
import * as ES6 from 'es6-shim';

var a = ES6.Object.assign({});
var store = createStore((state, action) => state, {});

class Deps extends React.Component<any, any> {
    render() {
        return <div>Hello, World!</div>;
    }
}

var DepsRedux = connect((state) => ({}), (dispatch) => ({}))(Deps);

const ignore = () => render(<Deps/>, document.body);
Then instruct JSPM to cut a new bundle:
C:\proj> jspm bundle src/deps deps.lib.js
Example 7 - Shape Creator
For our next example we'll look at scaling Redux to a larger, more advanced real-world application, exploring some of its benefits along the way. The world doesn't need another TodoMVC App so I've opted to go with something more visual to provide a better illustration of state changes and create a Shape Creator App instead.
Counter.tsx
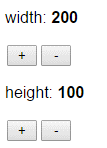
We'll start by creating controls for specifying Width and Height, to do this we need to refactor our Counter
into a reusable Component starting with a custom field property to specify the state it should manage.
We'll also add a step property enabling further customization to be able to increment by a custom value.
Since we're going to be sending multiple actions I'll also adopt a semantic naming convention for action types
going forward using the format {Type}_{Event}, which for a Counter update becomes COUNTER_CHANGE:
import * as React from 'react';
import { connect } from 'react-redux';

class Counter extends React.Component<any, any> {
    render() {
        var field = this.props.field, step = this.props.step || 1;
        return (
            <div>
                <p>
                    <label>{field}: </label>
                    <b>{this.props.counter}</b>
                </p>
                <button style={{width:30, margin:2}} onClick={e => this.props.decr(field, step)}>-</button>
                <button style={{width:30, margin:2}} onClick={e => this.props.incr(field, step)}>+</button>
            </div>
        );
    }
}

const mapStateToProps = (state, props) => ({ counter: state[props.field] || 0 });

const mapDispatchToProps = (dispatch) => ({
    incr: (field, step) => {
        dispatch({ type: 'COUNTER_CHANGE', field, by: step });
    },
    decr: (field, step) => {
        dispatch({ type: 'COUNTER_CHANGE', field, by: -1 * step });
    }
});

export default connect(mapStateToProps, mapDispatchToProps)(Counter);
Now that it's reusable we can create multiple instances to control the Width and Height of our Shape:
<Counter field="width" step={10} />
<Counter field="height" step={10} />
Which gets rendered as:
ColorPicker.tsx
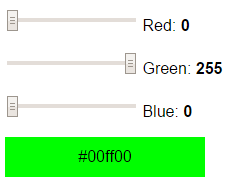
The next Component our Shape Creator needs are controls to pick a color. The range INPUT control is ideal for this as it lets us quickly change the intensity of each color using a slider. We'll need a slider for each basic color as well as a preview area displaying the color. The only unusual thing is a function to calculate the colors luminance, used to determine whether to show black or white contrasting text.
Otherwise <ColorPicker /> is a pure React component without any dependencies on Redux, for that we'll
wrap it within another higher-level Component later on:
import * as React from 'react';

export class NumberPicker extends React.Component<any, any> {
    render() {
        return (
            <p>
                <input type="range" value={this.props.value.toString() } min="0" max="255"
                    onChange={e => this.handleChange(e) } />
                <label> {this.props.name}: </label>
                <b>{ this.props.value }</b>
            </p>
        );
    }
    handleChange(event) {
        const e = event.target as HTMLInputElement;
        this.props.onChange(parseInt(e.value));
    }
}

export class ColorPicker extends React.Component<any, any> {
    render() {
        const color = this.props.color;
        const rgb = hexToRgb(color);
        const textColor = isDark(color) ? '#fff' : '#000';

        return (
            <div>
                <NumberPicker name="Red" value={rgb.r} onChange={n => this.updateRed(n)} />
                <NumberPicker name="Green" value={rgb.g} onChange={n => this.updateGreen(n) } />
                <NumberPicker name="Blue" value={rgb.b} onChange={n => this.updateBlue(n) } />
                <div style={{
                    background: color, width: "100%", height: 40, lineHeight: "40px",
                    textAlign: "center", color: textColor
                }}>
                    {color}
                </div>
            </div>
        );
    }
    updateRed(n: number) {
        const rgb = hexToRgb(this.props.color);
        this.changeColor(rgbToHex(n, rgb.g, rgb.b));
    }
    updateGreen(n: number) {
        const rgb = hexToRgb(this.props.color);
        this.changeColor(rgbToHex(rgb.r, n, rgb.b));
    }
    updateBlue(n: number) {
        const rgb = hexToRgb(this.props.color);
        this.changeColor(rgbToHex(rgb.r, rgb.g, n));
    }
    changeColor(color: string) {
        this.props.onChange(color);
    }
}

const componentToHex = (c) => {
    const hex = c.toString(16);
    return hex.length == 1 ? "0" + hex : hex;
};

const rgbToHex = (r, g, b) => "#" + componentToHex(r) + componentToHex(g) + componentToHex(b);

const hexToRgb = (hex: string): { r: number; g: number; b: number; } => {
    const result = /^#?([a-f\d]{2})([a-f\d]{2})([a-f\d]{2})$/i.exec(hex);
    return result ? {
        r: parseInt(result[1], 16),
        g: parseInt(result[2], 16),
        b: parseInt(result[3], 16)
    } : null;
};

const luminance = (color: string) => {
    const rgb = hexToRgb(color);
    return 0.2126 * rgb.r + 0.7152 * rgb.g + 0.0722 * rgb.b;
};

export const isDark = (color: string) => luminance(color) < 100;
Which gets rendered as:
ShapeMaker.tsx
Our Shape Creator is nearly there, to introduce some more state we'll also capture the top and left positions indicating where to place it as well as a preview area showing the color and size of the shape, embedding the coordinates of where it will be placed. We'll also need to add the all important Add Shape button to add the Shape to our App:
import * as React from 'react';
import { connect } from 'react-redux';
import { isDark } from './ColorPicker';

class ShapeMaker extends React.Component<any, any> {
    constructor(props?, context?) {
        super(props, context);
        this.state = { top: props.top, left: props.left };
    }
    render() {
        var width = this.props.width, height = this.props.height, background = this.props.color;
        const color = isDark(background) ? '#fff' : '#000';
        return (
            <div>
                <p>
                    <label>size: </label>
                    <b>{height}x{width}</b>
                </p>
                <div style={{ height, width, background, color, lineHeight: height + "px", margin: "auto" }}>
                    ({this.state.top},{this.state.left})
                </div>
                <div>
                    <p>
                        <label>position: </label>
                        <input style={{width:30}} defaultValue={this.props.top} onChange={e => this.handleTop(e)} />
                        <span>,</span>
                        <input style={{width:30}} defaultValue={this.props.left} onChange={e => this.handleLeft(e)} />
                    </p>

                    <button onClick={e => this.props.addShape(background,height,width,this.state.top,this.state.left) }>
                        Add Shape
                    </button>
                </div>
            </div>
        );
    }
    handleTop(e) {
        var top = parseInt(e.target.value);
        if (!isNaN(top))
            this.setState({ top });
    }
    handleLeft(e) {
        var left = parseInt(e.target.value);
        if (!isNaN(left))
            this.setState({ left });
    }
}

export default connect(
    (state) => ({
        width: state.width, height: state.height, color: state.color,
        top: state.nextShapeId * 10, left: state.nextShapeId * 10
    }),
    (dispatch) => ({
        addShape: (color, height, width, top, left) => {
            dispatch({ type: 'SHAPE_ADD', height, width, color, top, left });
        }
    })
)(ShapeMaker);
Which gets generated as:
Message-based Actions
Interestingly despite the number of moving parts of this Component it only emits a single SHAPE_ADD Action.
We're starting to see some of the benefits of Redux's approach as it forces us to expose our functionality
behind coarse-grained API's disconnected from the DOM so now anyone with access to the Store automatically has
access to the Apps functionality which thanks to its message-based design
offers a number of advantages
over opaque function calls, e.g. since they're just plain JavaScript objects we could easily create and
serialize 100 SHAPE_ADD actions and save them into localStorage for ourselves to restore later or even send
to someone else who could generically apply them locally with minimal effort.
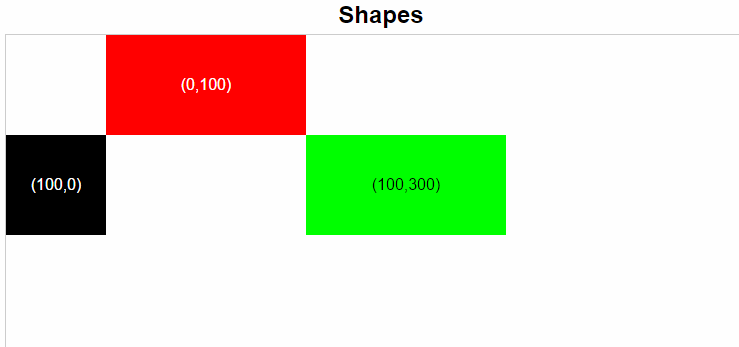
ShapeViewer.tsx
Now that we've got everything we need to create shapes, we'll also need a Component to view them.
ShapeViewer does this by rendering a DIV in the size, color and position of each Shape added:
import * as React from 'react';
import { connect } from 'react-redux';
import { isDark } from './ColorPicker';

class ShapeViewer extends React.Component<any, any> {
    constructor(props?, context?) {
        super(props, context);
        this.state = { isDragging: false};
    }
    render() {
        return (
            <div className="noselect"
                style={{position:"relative",border:"solid 1px #ccc",width:860,height:500}}>
            { this.props.shapes.map(s => (
                <div key={s.id} style={{
                    position:"absolute",top:s.top,left:s.left,color:isDark(s.color)?'#fff':'#000',
                    background:s.color,width:s.width,height:s.height,
                    lineHeight:s.height+'px',textAlign:"center",cursor:'move'}}
                    onMouseDown={e => this.handleDragInit(e) }
                    onMouseUp={e => this.setState({ isDragging: false }) }
                    onMouseOut={e => this.setState({ isDragging: false }) }
                    onMouseMove={e => this.handleDrag(s.id, s.height, s.width, e) }>
                    ({s.top},{s.left})
                </div>)
            )}
            </div>
        );
    }
    handleDragInit(e) {
        var el = e.target as HTMLElement;
        while (el.nodeName !== 'DIV')
            el = el.parentNode as HTMLElement; //don't select text SPAN node
        var top = parseInt(el.style.top) || 0;
        var left = parseInt(el.style.left) || 0;
        this.setState({ isDragging: true, orig: { x: e.pageX - left, y: e.pageY - top} });
    }
    handleDrag(id, height, width, e) {
        if (this.state.isDragging) {
            this.props.updateShape(id, e.pageY - this.state.orig.y, e.pageX - this.state.orig.x);
        }
    }
}

export default connect(
    (state) => ({ shapes: state.shapes }),
    (dispatch) => ({
        updateShape: (id, top, left) => dispatch({ type:'SHAPE_CHANGE', id, top, left})
    })
)(ShapeViewer);
When Shapes have been added, ShapeViewer renders them into an empty div container:
Dragging shapes to generate actions
In addition to viewing all shapes ShapeViewer also includes support for moving and updating a shape's position as it's a fast way to generate a lot of Actions quickly that ends up being a great way to visualize and replay a series of state transitions.
For simplicity we're using mouseover events instead of the proper drag and drop API's for this so you'll need to start off dragging slowly, making the shape bigger also helps increases the target area.
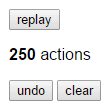
ActionPlayer.tsx
Now that we've effectively covered all our Apps functionality we can start flexing some Redux muscles.
replayActions
If we've built our App correctly we should in theory be able to replay our entire App session by resetting our
Redux store back to its default state and replaying each action sent, which is exactly what replayActions
does, albeit slowly, with each action replayed 10ms apart to give the illusion of time:
import * as React from 'react';

export default class ActionPlayer extends React.Component<any, any> {
    private unsubscribe: Function;
    componentDidMount() {
        this.unsubscribe = this.props.store.subscribe(() => this.forceUpdate());
    }
    componentWillUnmount() {
        this.unsubscribe();
    }
    render() {
        return (
            <div>
                <button onClick={e => this.replayActions()}>replay</button>
                <p>
                    <b>{this.props.actions.length}</b> actions
                </p>
                <button onClick={e => this.undoAction()}>undo</button> <span></span>
                <button onClick={e => this.resetState()}>clear</button>
            </div>
        );
    }
    resetState() {
        this.props.store.dispatch({ type: 'LOAD', state: this.props.defaultState });
        this.props.actions.length = 0;
    }
    replayActions() {
        var snapshot = this.props.actions.slice(0);
        this.resetState();

        snapshot.forEach((action, i) =>
            setTimeout(() => this.props.store.dispatch(action), 10 * i));
    }
    undoAction() {
        var snapshot = this.props.actions.slice(0, this.props.actions.length - 1);
        this.resetState();
        snapshot.forEach(action => this.props.store.dispatch(action));
    }
}
ActionPlayer also displays the number of Actions sent:
resetState
Clearing our App back to its original state doesn't get much easier, just load the apps defaultState and
clear the saved actions.
undoAction
If the only thing our App captured were actions sent then we'll need to resort to an inefficient poor man's Undo of just replaying back every action except the last one. Fortunately thanks to the JavaScript VM performance wars this work is usually instant - making it look like we've implemented it properly :)
app.tsx
After having implemented all the modules that make up our App, the only things left is the parent Container glue hosting all parts together and our Redux reducer function, implementing all action state transitions.
Application Reducers
The implementation of the reducer function is typical for that of a Redux app with a switch statement to
handle each action type. Without Babel's spread object operator, ES6's Object.assign() is the next best
thing, merging properties from multiple objects together into the first argument with properties on the right
taking highest precedence. By using a new {} object for our merge target we avoid mutating existing objects
and maintain Redux's immutability contract. Although it's worth pointing out that we don't need immutability
at this stage, our App would still function the same (including Action replay) if our reducer mutated
existing state provided that we reset with a new defaultState object. Although there are performance,
utility and predictability benefits for retaining immutability so it's still something you'll want to adhere to.
A benefit of Redux single App state model is visible from the trivial implementation required to LOAD our application to a given state:
case 'LOAD':
    return action.state;
Showing we don't need a special Redux function to do this, we can simply have our reducer return our desired state that we can pass as a normal argument in our action message.
import * as React from 'react';
import * as ReactDOM from 'react-dom';
import { createStore } from 'redux';
import { Provider, connect } from 'react-redux';

import Counter from './Counter';
import ActionPlayer from './ActionPlayer';
import ShapeMaker from './ShapeMaker';
import ShapeViewer from './ShapeViewer';
import { ColorPicker } from './ColorPicker';

var actions = [];
var defaultState = { nextShapeId:0, width: 100, height: 100, color:"#000000", shapes:[] };

let store = createStore(
    (state, action) => {
        actions.push(action);
        switch (action.type) {
            case 'COUNTER_CHANGE':
                return Object.assign({}, state, { [action.field]: state[action.field] + action.by });
            case 'COLOR_CHANGE':
                return Object.assign({}, state, { color: action.color });
            case 'SHAPE_ADD':
                var id = state.nextShapeId;
                var shape = Object.assign({}, { id: id }, action);
                delete shape['type'];
                return Object.assign({}, state, { nextShapeId: id + 1, shapes: [...state.shapes, shape] });
            case 'SHAPE_CHANGE':
                var shape = Object.assign({}, state.shapes.filter(x => x.id === action.id)[0],
                    { top: action.top, left: action.left });
                return Object.assign({}, state,
                    { shapes: [...state.shapes.filter(x => x.id !== action.id), shape] });
            case 'LOAD':
                return action.state;
            default:
                return state;
        }
    },
    defaultState);

class ColorWrapperBase extends React.Component<any,any> {
    render() {
        return <ColorPicker color={this.props.color} onChange={this.props.setColor} />;
    }
}

const ColorWrapper = connect(
    (state) => ({ color: state.color }),
    (dispatch) => ({ setColor: (color) => dispatch({ type:'COLOR_CHANGE', color })})
)(ColorWrapperBase);

ReactDOM.render(
    <Provider store={store}>
        <table>
            <tbody>
            <tr>
                <td style={{ width: 220 }}>
                    <Counter field="width" step={10} />
                    <Counter field="height" step={10} />
                    <ColorWrapper />
                </td>
                <td style={{verticalAlign:"top", textAlign:"center", width:500}}>
                    <h2>Preview</h2>
                    <ShapeMaker />
                </td>
                <td style={{ verticalAlign: 'bottom' }}>
                    <ActionPlayer store={store} actions={actions} defaultState={defaultState} />
                </td>
            </tr>
            <tr>
                <td colSpan={3}>
                    <h2 style={{margin:5,textAlign:'center'}}>Shapes</h2>
                    <ShapeViewer />
                </td>
            </tr>
            </tbody>
        </table>
    </Provider>,
    document.getElementById("content"));
And with that we have a working Shape Creator in its entirety:

One point worth highlighting is that our top-level App is only ever rendered once as it's not contained
within a parent component using setState() to modify state and trigger re-rendering. As a result we need
to wrap our ColorPicker into a Redux-aware ColorWrapper which also maps our Redux state to its Component
properties as well as translating the onChange callback into dispatching the appropriate Redux action.
Refactoring Reducers
There are a few areas in the classic Redux implementation above I believe we can improve upon with some
light refactoring and use of TypeScript's advanced language features. First thing on the refactor list is the
large switch statement whose tight coupling and multiple exit points need eliminating:
let store = createStore(
    (state, action) => {
        actions.push(action);
        switch (action.type) {
            case 'COUNTER_CHANGE':
                return Object.assign({}, state, { [action.field]: state[action.field] + action.by });
            case 'COLOR_CHANGE':
                return Object.assign({}, state, { color: action.color });
            case 'SHAPE_ADD':
                var id = state.nextShapeId;
                var shape = Object.assign({}, { id: id }, action);
                delete shape['type'];
                return Object.assign({}, state, { nextShapeId: id + 1, shapes: [...state.shapes, shape] });
            case 'SHAPE_CHANGE':
                var shape = Object.assign({}, state.shapes.filter(x => x.id === action.id)[0],
                    { top: action.top, left: action.left });
                return Object.assign({}, state,
                    { shapes: [...state.shapes.filter(x => x.id !== action.id), shape] });
            case 'LOAD':
                return action.state;
            default:
                return state;
        }
    },
    defaultState);
Instead of using Redux built-in combineReducers for helping with modularity, my preference is to instead use a dictionary of action functions which I believe is the more readable and flexible option. In the refactor I've also extracted reducers into a separate module, decoupling it from app.tsx:
import reducers from './reducers';
...

let store = createStore(
    (state, action) => {
        var reducer = reducers[action.type];
        var nextState = reducer != null
            ? reducer(state, action)
            : state;

        if (action.type !== 'LOAD')
            history.add(action, nextState);

        return nextState;
    },
    defaultState);
reducers.ts
The reducers module then just returns an object dictionary of action types and their respective implementations:
import { addShape, changeShape } from './reducers/shapeReducers';

const changeCounter = (state, action) =>
    Object.assign({}, state, { [action.field]: state[action.field] + action.by });

const changeColor = (state, action) =>
    Object.assign({}, state, { color: action.color });

export default {
    COUNTER_CHANGE: changeCounter,
    COLOR_CHANGE: changeColor,
    SHAPE_ADD: addShape,
    SHAPE_CHANGE: changeShape,
    LOAD: (state, action) => action.state
};
Named functions improves readability and lets you develop and test each reducer implementation in isolation. This approach also scales well as we can further modularize related reducers into cohesive modules as done in:
shapeReducers.ts
export const addShape = (state, action) => {
    var id = state.nextShapeId;
    var shape = Object.assign({}, { id: id }, action);
    delete shape['type'];
    return Object.assign({}, state, { nextShapeId: id + 1, shapes: [...state.shapes, shape] });
};

export const changeShape = (state, action) => {
    var shape = Object.assign({}, state.shapes.filter(x => x.id === action.id)[0],
        { top: action.top, left: action.left });
    return Object.assign({}, state, { shapes: [...state.shapes.filter(x => x.id !== action.id), shape] });
};
Refactoring Redux Components
There's also a few things we can do to improve on the Redux-connected Components which currently uses an
imperative connect() method to create our higher-level Redux-connected Components:
class ColorWrapperBase extends React.Component<any,any> {
    render() {
        return <ColorPicker color={this.props.color} onChange={this.props.setColor} />;
    }
}

const ColorWrapper = connect(
    (state) => ({ color: state.color }),
    (dispatch) => ({ setColor: (color) => dispatch({ type:'COLOR_CHANGE', color })})
)(ColorWrapperBase);
I dislike how implementations are disconnected from the Component's class declaration it applies to, how it needs to be defined after the class declaration instead of above to match how it conceptually works.
If we instead extracted the implementations into separate mapStateToProps and mapDispatchToProps named
functions it adds readability but then creates even more moving parts and naming clashes making it harder
to reuse the same recipe for creating other Redux Components in the same file.
The connect() method is also an imperatively unnatural way to define a new Component which otherwise uses
class declarations. It's also less readable where the source code reads as:
Use connect() to return a Factory constructor function that needs to be immediately invoked with your base Component to return a new Component that replaces your existing Component which is now an interim artifact to be disregarded.
TypeScript Decorators
Whilst it's still workable, there's a better way to create Redux Components by leveraging the
Decorators proposal that's an
available feature that can be enabled with the experimentalDecorators TypeScript compiler option.
Currently there's no UI for this option in Visual Studio, so to enable it you'll need to edit your .csproj
and add the option manually:
<TypeScriptExperimentalDecorators>true</TypeScriptExperimentalDecorators>
When enabled this lets you create and use decorators that despite being simple functions provide an easy way
to compose behavior, dramatically reduce repetitive boilerplate and improve readability where we're able to
get the ideal declarative API we want for defining Redux-connected Components in a single cohesive unit,
with property mapping functions declared above the class declaration and all interim artifacts abstracted away
by using Redux's connect() as a decorator instead:
@connect(
    (state) => ({ color: state.color }),
    (dispatch) => ({ setColor: (color) => dispatch({ type: 'COLOR_CHANGE', color }) })
)
class ColorWrapper extends React.Component<any,any> {
    render() {
        return <ColorPicker color={this.props.color} onChange={this.props.setColor} />;
    }
}
Methods with Lexical bindings
Something that can have a dramatic performance improvement in React Apps is the
PureRenderMixin which prevents unnecessary
re-rendering of a Component by checking to see if the props or state of a pure Component has changed.
Incidentally this is something that Redux connect() provides automatically that thanks to immutability is
able to do a shallow and faster object reference comparison to determine if state has changed and a Component
needs updating.
Something that can break identity comparisons are function callbacks in ES6 classes as in order to retain
lexical this binding, we'd need to use the
fat arrow syntax
at the call-site:
export class NumberPicker extends React.Component<any, any> {
    render() {
        return (
            <p>
                <input type="range" value={this.props.value.toString()} min="0" max="255"
                    onChange={e => this.handleChange(e)} /> //new function created
                <label> {this.props.name}: </label>
                <b>{ this.props.value }</b>
            </p>
        );
    }
    handleChange(event) {
        const e = event.target as HTMLInputElement;
        this.props.onChange(parseInt(e.value));
    }
}
The problem with this is that a new function identity is created each time invalidating property comparisons and potential Pure Render optimizations.
An easy workaround is to use the fat arrow syntax when defining your methods:
export class NumberPicker extends React.Component<INumberProps, any> {
    render() {
        return (
            <p>
                <input type="range" value={this.props.value.toString()} min="0" max="255"
                    onChange={this.handleChange} /> //uses same function
                <label> {this.props.name}: </label>
                <b>{this.props.value}</b>
            </p>
        );
    }
    handleChange = (event) => { //fat arrow syntax
        const e = event.target as HTMLInputElement;
        this.props.onChange(parseInt(e.value));
    }
}
handleChange now retains lexical this references allowing the same instance to be safely used.
Example 8 - Time Travelling using State Snapshots
In this example we'll replace ActionPlayer with a more complete implementation using App state snapshots.
By using state we can implement richer History functionality complete with back, forward and any point in time
navigation that we can fluently control with a slider enabling a "Time Travelling" experience to simulate
going back and forward throughout an App's users session.
To make it more reusable the history state management is encapsulated behind a formal API with basic operations to navigate, reset and push the current state that gets added to by our reducer:
app.tsx
var history = {
    states: [],
    stateIndex: 0,
    reset() {
        this.states = [];
        this.stateIndex = -1;
    },
    prev() { return this.states[--this.stateIndex]; },
    next() { return this.states[++this.stateIndex]; },
    goTo(index) { return this.states[this.stateIndex=index]; },
    canPrev() { return this.stateIndex <= 0; },
    canNext() { return this.stateIndex >= this.states.length - 1; },
    pushState(nextState) {
        this.states.push(nextState);
        this.stateIndex = this.states.length - 1;
    }
};

let store = createStore(
    (state, action) => {
        var reducer = reducers[action.type];
        var nextState = reducer != null
            ? reducer(state, action)
            : state;

        if (action.type !== 'LOAD')
            history.pushState(nextState);

        return nextState;
    },
    defaultState);
History.tsx
By saving and restoring entire state snapshots the implementation for our History control becomes surprisingly straight-forward, essentially it comes down to dispatching a LOAD action with the desired state:
@subscribeToStore()
export default class History extends React.Component<any, any> {
    render() {
        return (
            <div>
                <button onClick={this.replayStates}>replay</button>
                <span> </span>
                <button onClick={this.resetState}>clear</button>
                <p>
                    <b>{this.props.history.states.length}</b> states
                </p>
                <button onClick={this.prevState} disabled={this.props.history.canPrev()}>prev</button>
                <span> </span>
                <button onClick={this.nextState} disabled={this.props.history.canNext()}>next</button>
                <p>
                    <b>{this.props.history.stateIndex + 1}</b> position
                </p>
                <input type="range" min="0" max={this.props.history.states.length - 1}
                    disabled={this.props.history.states.length === 0}
                    value={this.props.history.stateIndex} onChange={this.goToState} />
            </div>
        );
    }
    resetState = () => {
        this.props.store.dispatch({ type: 'LOAD', state: this.props.defaultState });
        this.props.history.reset();
    }
    replayStates = () => {
        this.props.history.states.forEach((state, i) =>
            setTimeout(() => this.props.store.dispatch({ type: 'LOAD', state }), 10 * i));
    }
    prevState = () => {
        this.props.store.dispatch({ type: 'LOAD', state: this.props.history.prev() });
    }
    nextState = () => {
        this.props.store.dispatch({ type: 'LOAD', state: this.props.history.next() });
    }
    goToState = (event) => {
        const e = event.target as HTMLInputElement;
        this.props.store.dispatch({ type: 'LOAD', state: this.props.history.goTo(parseInt(e.value)) });
    }
}
Our Example now sports richer History capabilities complete with a fun "Time Travelling" slider :)

Implementing Undo History
If you're adding undo/redo functionality to your Redux applications you're more likely going to want to apply it to independent parts of your application rather than rolling back your entire App's state, luckily the redux docs have you covered with an example inspired by Elm's undo-redo package.
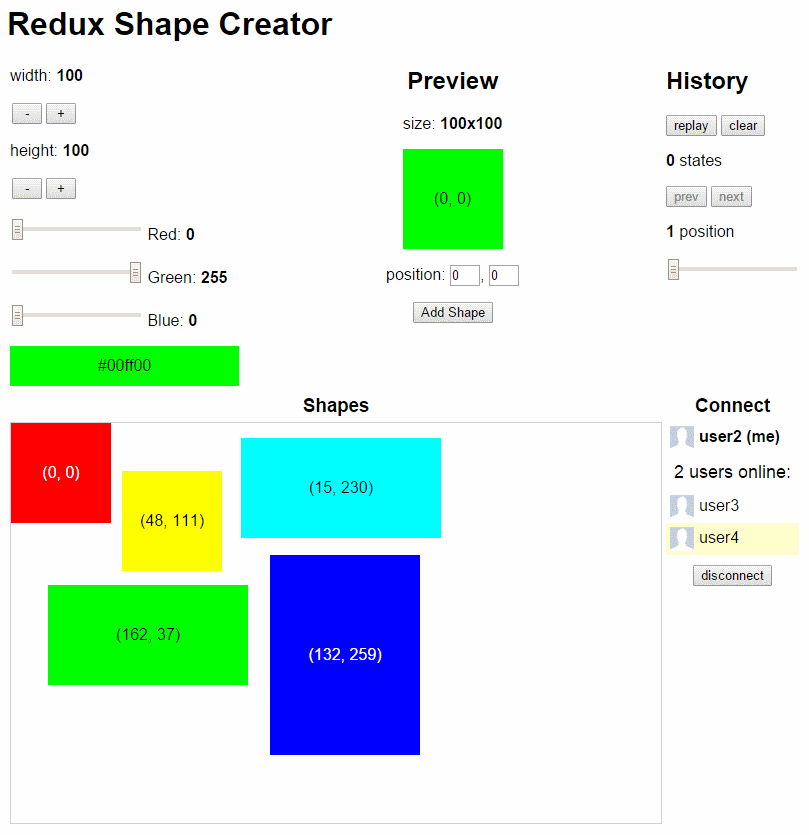
Example 9 - Real-time Networked Time Traveller
Loading Redux Snapshots as seen in the previous example illustrates some of the natural capabilities available when adopting a data-flow architecture like Redux - utilizing simple actions for transitioning between immutable states.
Saving and Restoring App State
A major benefit of maintaining both state and actions in plain JavaScript objects we've yet to explore is how they're naturally serializable. The obvious benefit is that the entire Application state can be trivially saved and restored from localStorage, maintaining a user's session across multiple browser restarts:
//Save App State
localStorage.setItem("appState", JSON.stringify(store.getState()));

//Restore App State
let store = createStore(rootReducer,
    JSON.parse(localStorage.getItem("appState")) || defaultState);
Transferring State over a Network
Another example of the benefits is how easy it would be to transfer your application state to other users over a network. Actions are similar to diffs, i.e. minimal instructions capturing change between different states. So in theory we could just stream the actions to users over a network and they will be able to see changes we make in real-time.
Adding support for this ends up being fairly trivial, the main architectural hurdle is how can we communicate between users over HTTP in real-time. In desktop apps we can establish a direct network connection, but on a website, communications need to go via a central server. There are a few ways to enable real-time communications over a website: polling, web sockets and server sent events. Of these options Server Sent Events offers a simple, efficient and natural fit for HTTP which we'll utilize here.
Example Objectives
Our objectives for this example is to provide a list of active users currently viewing the website that we want to enable other users to be able to Connect to and be able to watch what they're doing, i.e. similar to Remote Desktop into another computer's screen. Conceptually for this to work we just need to load a user's initial state then listen to a stream of their actions (generated as they're using the app). We also want to allow users to disconnect from a user's session and take over from where they left off.
Implementation utilizing Server Events
To enable this we'll have every user listen to a common home channel that we can query to find active users and get notified as new users come and go. We'll then have each user re-publish a stream of their actions on their own user channel which multiple users can listen on to receive a stream of their actions. To disconnect they can just unsubscribe from the users channel. Finally since the user's state is maintained in a Redux store (in their browser and not on the server) we also need to facilitate communication between users which we enable by sending a direct message to a user who can reply via a direct message back, with their current state.
Surprisingly most of the code to make this happen is encapsulated within the React <Connect /> component below:
/// <reference path='../../typings/browser.d.ts'/>

import * as React from 'react';
import 'jquery';
import 'ss-utils';

declare var EventSource:ssutils.IEventSourceStatic;

export default class Connect extends React.Component<any, any> {

    constructor(props?, context?) {
        super(props, context);
        this.state = {
            channels: ["home"], currentUser: null, users: [],
            connectedToUserId: null, connectedUserActions: [], connectedStateIndex: -1
        };
        var source = new EventSource("/event-stream?channels=home");
        $(source).handleServerEvents({
            handlers: {
                onConnect: (currentUser) => {
                    currentUser.usersChannel = userChannel(currentUser.userId);
                    this.setState({ currentUser, users: filterUsers(this.state.users, currentUser.userId) });
                    this.props.onConnect(currentUser);
                },
                onJoin: () => this.refreshUsers(),
                onLeave: () => this.refreshUsers(),
                onUpdate: (user) => this.setState({
                     users: this.state.users.map(x => x.userId === user.userId ? user : x)
                }),
                getState: (json, e) => {
                    var o = JSON.parse(json);
                    var index = o.stateIndex || this.props.history.stateIndex;
                    var state = this.props.history.states[index];
                    $.ss.postJSON(`/send-user/${o.replyTo}?selector=cmd.onState`, state);
                },
                onState: (json, e) => {
                    this.props.store.dispatch({
                         type: 'LOAD', state: json ? JSON.parse(json) : this.props.defaultState
                    });
                },
                publishAction: (json, e) => {
                    var action = JSON.parse(json);
                    this.props.store.dispatch(action);
                }
            }
        });
    }

    render() {
        if (this.state.currentUser == null) return null;
        return (
            <div>
                <div style={{fontWeight:"bold"}}>
                    {this.renderUser(this.state.currentUser)}
                </div>
                <div style={{padding:"8px 0", textAlign:"center", fontSize:"18px"}}>
                    {this.state.users.length} users online:
                </div>

                { this.state.users.map(u => this.renderUser(u)) }

                <div style={{textAlign:"center", padding:"10px 0"}}>
                    { this.state.connectedToUserId ? <button onClick={e => this.disconnect()}>disconnect</button> : null}
                </div>
            </div>
        );
    }

    renderUser(u) {
        return (
            <div key={u.userId} onClick={e => this.connectToUser(u.userId)} style={{
                cursor:"pointer", padding:"4px",
                background:u.userId === this.state.connectedToUserId ? "#ffc" :  ""
            }}>
                <img src={u.profileUrl} style={{height:24,verticalAlign:"middle"}} />
                <span style={{padding:"2px 5px" }}>
                    {u.displayName} {u.userId === this.state.currentUser.userId ? " (me)" : ""}
                </span>
            </div>
        );
    }

    connectToUser(userId) {
        if (userId === this.state.currentUser.userId) return;

        this.requestUsersState(userId);
        var connectedChannels = this.state.channels.filter(x => x !== "home");
        $.ss.updateSubscriber({
            SubscribeChannels: userChannel(userId),
            UnsubscribeChannels: connectedChannels.join(',')
        }, r => {
            this.setState({
                channels:r.channels,
                connectedToUserId: userId
            });
        });
    }

    disconnect() {
        $.ss.unsubscribeFromChannels([userChannel(this.state.connectedToUserId)]);
        this.setState({ connectedToUserId: null });
    }

    requestUsersState(userId) {
        return $.ss.postJSON(`/send-user/${userId}?selector=cmd.getState`,
            { replyTo: this.state.currentUser.userId });
    }

    refreshUsers() {
        $.getJSON("/event-subscribers?channels=home", users => {
            this.setState({ users:filterUsers(users, this.state.currentUser.userId) });
        });
    }
}

const userChannel = (userId) => "u_" + userId;

const filterUsers = (users, userId) =>
    users.filter(x => x.userId !== userId).sort((x,y) => x.userId.localeCompare(y.userId));
We'll go through some of the core parts to explain how this works. For the Server implementation we'll use ServiceStack's Server Events which includes an easy to use JavaScript Client that simplifies the effort required to process Server Events.
ServiceStack Server Events doesn't expose any APIs for publishing messages to users out-of-the-box, instead access needs to be controlled by explicit Services. For this example we need a back-end Service that lets users publish their actions to a channel and another Service to send a direct message to a User. The entire implementation for both these services are below:
//Services Contract
[Route("/publish-channel/{Channel}")]
public class PublishToChannel : IReturnVoid, IRequiresRequestStream
{
    public string Channel { get; set; }
    public string Selector { get; set; }
    public Stream RequestStream { get; set; }
}

[Route("/send-user/{To}")]
public class SendUser : IReturnVoid, IRequiresRequestStream
{
    public string To { get; set; }
    public string Selector { get; set; }
    public Stream RequestStream { get; set; }
}

//Services Implementation
public class ReduxServices : Service
{
    public IServerEvents ServerEvents { get; set; }

    public void Any(PublishToChannel request)
    {
        var msg = request.RequestStream.ReadFully().FromUtf8Bytes();
        ServerEvents.NotifyChannel(request.Channel, request.Selector, msg);
    }

    public void Any(SendUser request)
    {
        var msg = request.RequestStream.ReadFully().FromUtf8Bytes();
        ServerEvents.NotifyUserId(request.To, request.Selector, msg);
    }
}
Essentially just using the IServerEvents dependency to forward the JSON Request Body to the specified
channel or user.
Connecting to Server Events
The JavaScript client to connect to Server Events is in the ss-utils npm package which we can install with:
C:\proj> jspm install ss-utils
Then import the type definitions with:
C:\proj> typings install ss-utils --ambient --save
As there are no built-in type definitions for HTML 5's EventSource the easiest way to make use of it in TypeScript is to use the definition in ss-utils which we declare with:
declare var EventSource:ssutils.IEventSourceStatic;
To make a server connection we configure the EventSource object with the url of the server events stream.
ServiceStack also lets you specify any initial channels you want to connect to with a queryString:
var source = new EventSource("/event-stream?channels=home");
Then we use ss-utils handleServerEvents() jQuery function to connect to the event stream and handle any events.
The first 4 events are automatically available by ServiceStack, for notifying when:
- onConnect - you've connected to the server event stream
- onJoin - a user has joined a channel you're subscribed to
- onLeave - a user has left a channel you're subscribed to
- onUpdate - an existing user has changed the channels they've subscribed to
The remaining handlers are for application events used in this example to handle when:
- getState - we're requested for our current state
- onState - the user we're connected to responds with their state
- publishAction - the user we're connected to publishes an action
$(source).handleServerEvents({
    handlers: {
        //Built-in subscription Life-cycle events
        onConnect: (currentUser) => {
            currentUser.usersChannel = userChannel(currentUser.userId);
            this.setState({currentUser, users: filterUsers(this.state.users,currentUser.userId)});
            this.props.onConnect(currentUser);
        },
        onJoin: () => this.refreshUsers(),
        onLeave: () => this.refreshUsers(),
        onUpdate: (user) => this.setState({
            users: this.state.users.map(x => x.userId === user.userId ? user : x)
        }),

        //If we receive a request for our state, send a reply with our current state
        getState: (json, e) => {
            var o = JSON.parse(json);
            var index = o.stateIndex || this.props.history.stateIndex;
            var state = this.props.history.states[index];
            $.ss.postJSON(`/send-user/${o.replyTo}?selector=cmd.onState`, state);
        },

        //When we receive state reply from our connected user, load it
        onState: (json, e) => {
            this.props.store.dispatch({
                type:'LOAD', state:json ? JSON.parse(json) : this.props.defaultState });
        },

        //When we receive an action from the connected user, forward it to the redux store
        publishAction: (json, e) => {
            var action = JSON.parse(json);
            this.props.store.dispatch(action);
        }
    }
});
To maintain an active users list, we query the event subscribers that are connected to the home channel (that everyone is initially connected to) with:
refreshUsers() {
    $.getJSON("/event-subscribers?channels=home", users => {
        this.setState({ users: filterUsers(users, this.state.currentUser.userId) });
    });
}

//Exclude ourselves from the returned list and order the users by their id
const filterUsers = (users, userId) =>
    users.filter(x => x.userId !== userId).sort((x,y) => x.userId.localeCompare(y.userId));
To connect to a user, we first request their initial state then update our current server events subscription to join the new users channel. If we we're connected to an existing user we also want to unsubscribe from their users channel at the same time:
connectToUser(userId) {
    if (userId === this.state.currentUser.userId) return;

    this.requestUsersState(userId);
    var connectedChannels = this.state.channels.filter(x => x !== "home");
    $.ss.updateSubscriber({
        SubscribeChannels: userChannel(userId),
        UnsubscribeChannels: connectedChannels.join(',')
    }, r => {
        this.setState({
            channels:r.channels,
            connectedToUserId: userId
        });
    });
}

const userChannel = (userId) => "u_" + userId;
To request a user's state we call the SendUser back-end service with the userId we want to send to,
the getState handler we want to invoke and add pass our userId in the replyTo property of the message
request body:
requestUsersState(userId) {
    return $.ss.postJSON(`/send-user/${userId}?selector=cmd.getState`,
        { replyTo: this.state.currentUser.userId });
}
The last feature to implement is disconnecting from a user which just involves unsubscribing from their users channel and updating our state:
disconnect() {
    $.ss.unsubscribeFromChannels([userChannel(this.state.connectedToUserId)]);
    this.setState({ connectedToUserId: null });
}
That's it for the core functionality! The only other change needed is to refactor our Redux store to publish each action we create to our users channel so it applies the action to all our connected users.
Using middleware for side-effects
As this is a network side-effect we want to keep it out of our reducer implementation and make it a pure function. The recommended way to do this is to use Redux middleware which lets you generically handle updates to the Redux store:
var currentUser;
const onConnect = (user) => currentUser = user;

const updateHistory = store => next => action => {
    var result = next(action);

    if (action.type !== 'LOAD') {
        history.pushState(store.getState());
    }

    $.ss.postJSON(`/publish-channel/${currentUser.usersChannel}?selector=cmd.publishAction`, action);

    return result;
};

let store = createStore(
    (state, action) => {
        var reducer = reducers[action.type];
        var nextState = reducer != null
            ? reducer(state, action)
            : state;

        return nextState;
    },
    defaultState,
    applyMiddleware(updateHistory));
There's currently an outstanding issue with redux TypeScript definition
that makes the method signature of applyMiddleware incompatible with what createStore accepts. Until
a new TypeScript definition is released you'll need to manually edit typings/browser/ambient/redux/redux.d.ts
and replace the applyMiddleware definition from:
function applyMiddleware(...middlewares: Middleware[]): Function;
to:
function applyMiddleware(...middlewares: Middleware[]): () => any;
And with that we're done, we've now converted Shape Creator into a networked time traveller letting us connect to active users and watch their live session in real-time - the Time Slider is now x Connected Users more fun :)
JSPM Bundling for Production
One of the nice features of using JSPM is that it's also able to bundle your entire applicaton using your declared module dependencies, saving having to repeat and manage this information in an external bundler tool.
To package your App for production run jspm bundle on your main app with the -m flag to minify your
application, e.g we can package our last example with:
C:\proj> jspm bundle -m src/example09/app app.js
JSPM still requires the system.js module loader and your local JSPM config.js which maintains your
installed npm dependencies. The resulting index.html then becomes a container for our compiled application:
<html>
<head>
    <title>TypeScript + JSPM + React + Redux</title>
    <script src="jspm_packages/system.js"></script>
    <script src="config.js"></script>
    <script src="app.js"></script>
</head>
<body>
    <h1>Redux Shape Creator</h1>
    <div id="content"></div>

    <script>
        System.import("./src/example09/app");
    </script>
</body>
</html>
ServiceStack TypeScript React VS.NET Template
As the technologies used in this guide represent today's best-in-class choices for developing rich, complex JavaScript Apps within VS.NET, we've encapsulated them together into ServiceStack's new TypeScript React VS.NET Template providing an instant integrated client and .NET server solution so you're immediately productive out-of-the-box. It's also provides an optimal iterative development experience with the pre-configured Gulp tasks taking care of effortlessly packaging, bundling and deploying your production-optimized App directly from VS.NET's Task Runner Explorer.
Fixes for Internet Explorer and Microsoft Edge
See the typescript-redux-iefix fork by @riesvriend for fixes required to support IE and MS Edge browsers buggy behavior of es6-shim and non-existing support for W3C Server Sent Events. You can also vote here to have SSE natively implemented in Microsoft Browsers.
Feedback
We hope you've found this guide useful and it helps spur some ideas of what you can create with these simple and powerful technologies in your next App. We welcome any enhancements via pull-requests, otherwise feel free to drop feedback to @demisbellot.