Video Automation for Frappé
Setup Instructions
-
Minimum NodeJS v7 required
-
Install Node.JS
-
Clone this repository (Ensure that
gitis installed) :git clone https://github.com/frappe/video.git frappe-video -
cdinto frappe-video directory and runnpm install
How to use
-
Create a new
.jsfile for your video (for example:naming_series.js) in thevideosdirectory. -
Write your code with the help of Function Reference. You can also refer to examples. (see videos/getting_started.js)
-
Start your favourite video recorder and set it to capture audio from your output device.
-
Run the following command from your directory:
npm run run-video -- [your-video-filename]
Or if you have yarn
yarn run-video videos/:video-file-name
- After completion: stop the video recorder, edit the video, and publish!
Frappe Video Functions
Welcome to the Frappe Video. This is the API list used for creating scripted videos. Using these functions, you can create a video for any application based on Frappe Framework.
Template
You can use the following starter template to get started. This template will launch the url http://example.erpnext.com and login using the username and password. After that, it sets the speak voice to 'Samantha' (Only in macOS) and runs a few functions.
import { Selector } from 'testcafe';
import f from '../lib';


fixture("Test Video")
    .page ("http://example.erpnext.com/login");

test('Template for test video on Frappe', async t => {

	await f.login('[email protected]', 'your-password')
	await f.setTestSpeed(0.75).wait(500)
	await f.use_voice("samantha")

//add video functions here, example.

await f.speak(`Hello World`)
await f.click_icon("Accounts")
await f.click_module_item("Sales Invoice")

})
Speak
Speak will generate a voice using text-to-voice functionality of your OS.
await f.speak(`Hello World`)
Ensure that you have defined the voice correctly in the use_voice function in the template section.
Go to Desk
Clicking on the home (E) Icon will navigate you to Desk.
await f.goto_desk()
Desk Icon
If you are on the Desk (with icons) and wants to click on the specific desk icon, you can use this function.
await f.click_icon("Accounts")
Desk Notification
The top bar of Desk has an icon for Notifications (on the right). Use this function to click on the notification icon.
await f.click_notification()
Desk - User Details Section
The top bar of Desk has the option to access your Profile and other particular about your Frappe instance. To click on User button, use:
await f.click_user_button()
Desk - Help Section
The top bar of Desk has the option to access help content. To click on this option, use:
await f.click_help_button()
Search
To make a search from the search bar, use:
await f.search("write text","Exact Value")
For example, if I want to open New Sales Order from search, then values will be as follows.
await f.search("new sales or","New Sales Order")
Based on this, the system will just type the text "new sales or". Based on the typed text, it will select value "New Sales Order" from auto-suggest. With theses steps, new Sales Order will open.
Click List Item
If you are on the list view (like Quotation Item) and wish to open specific record, then use this function.
await f.click_list_item("Document Title")
If a document title is generated based on Customer Name, then enter exact Customer Name in place of Document Title.
await f.click_list_item("Apple Co.")
If you are on the Employee list, then for opening specific Employee, use:
await f.click_list_item("John Doe")()
Click Module Item
If you are on the module page and want to click on the specific link, use:
await f.click_module_item("module item name")
For example, if I am on the Buying module's page, and want to open Purchase Order List.
await f.click_module_item("Purchase Order")
Click Element
Use this function to click on any generic element.
await f.click_element('a', 'Show tax break-up')
The first parameter will be the HTML element (like a, button, div etc.)
The second parameter will be the text in the element.
Click Primary Button
In a document, buttons like Save, Submit, Amend, Yes (to confirm submit and cancellation) has HTML class of Primary Button. A primary button has a blue color. To click a primary button, you can use the following function.
await f.click_primary_button("Save")
Scroll
To scroll in a current document, use the following function. Value for scroll (100 below) will be entered in pixels.
await f.scroll(100)
Upload File
Many documents like Item, Employee, Contact has an image folder. If you want to upload an image in that image, holder, you can use the following function.
await f.upload_file('./images/Hermione Granger.png')
Ensure that you have added an image with the exact same name in the images folder.
Add/Remove Slide
You can add slides in between the help videos to provide brief on the subject, or when switching the context. Following is the example of the slides covering all the options (title, subtitle, bullet point and HTML) was can be used in the Slide function.
await f.add_slide({ title: 'ERPNext Tutorial', subtitle: 'Bill of Materials', bullet_points: [ 'Introduction', 'How to navigate', 'How to make an Order' ], add_html:
This is test. Lorem ipsum dolor
});
The slide doesn't have an end time. After slide, you can also add other functions like speak and pause. To end the slide, use the following function.
await f.remove_slide()
Form
Fill Field
To add value in any type of field, you can use this function. Let's check an example based on field types.
To select a value in the link field, function will be
await f.fill_field("field_name", "exact value to be selected","value system will type")
To enter value in the data or date field, just write
await f.fill_field("field_name", "your value")
To click on a checkbox field, you just need to provide a field name.
await f.fill_field("field_name")
Click Form Menu
In the list view and form has a Menu button with options as Email, Print, Duplicate, Rename etc. To click on the menu button, use following function.
await f.click_form_menu()
Click Toolbar Button
Once a document is created, it shows couple of options in the Toolbar, like Make, View etc. If you wish to click on one such button, use the following function. Example, if you want to make a Sales Invoice from Sales Order, then use:
await f.click_toolbar_button("Make") and then await f.click_dropdown_item("Invoice")
Click Dropdown Item
Use this function to select an option from an already open drop-down menu.
await f.click_dropdown_item("Invoice")
Example, if you want to make a Sales Invoice from Sales Order, then use:
await f.click_toolbar_button("Make") and then
await f.click_dropdown_item("Invoice")
Click Print Icon
Use this function to click on the Print Icon (next to Menu button).
await f.click_print_icon()
Close Modal
If modal open on the form which doesn't have (blue) primary button, but grey one, then use this function to close it.
await f.close_modal()
Form Child Table
Open Row
ERPNext has many documents with a child table in it. For example item table in the transactions like Quotation, Sales Order, Purchase Order and invoices. If you want to open specific row of the child table, then this function will be helpful. Say we on the Purchase Order form, which already has one row added in the Purchase Order Item table, then write function as following.
await f.open_row("items",1)
Where items is a name of the table and 1 is the no. of a row in the item table which will be clicked.
Add Row
If a child table doesn't have any row added in it, then use add_row to add a row in the table.
await f.add_row("items")
Insert Above
If a window from the child table is already open, and if you want to add a new row on top of it, here is how to achieve it.
await f.insert_above("items")
Insert Below
To add a new row below the row open in a modal view, use:
await f.insert_below("items")
Close Row
If a table's row is open in a form of a modal, to close it, use:
await f.close_row("items")
Scroll to Section
A document is divided among many sections to increase its readability. If you wish to scroll to a specific section of the form, use:
await f.scroll_to_section("Currency and Price List)"
Where Currency and Price List is a name of the section.
Scroll to Element
Just like a document, other types of forms like module's home and pages also sections. If you wish to scroll to specific sections of these forms, other than the section break, you can use the following function.
await f.scroll_to_element("html_element("Element Heading")")
For example, following is a function to scroll to GST section in the Account module's home page.
await f.scroll_to_element('.section-head:contains("Goods and Services Tax (GST India)")')
Following is one more example of how to scroll to tax section in a document, which is actually not a section break, but an HTML element.
await f.scroll_to_element("'.tax-break-up")
Click Tree Node and Tree Node Option
To navigate in a master rendered in a tree structure, you can use following functions.
To click on the specific group or child node of the tree, write function a
await f.click_tree_node('Sources of Funds (Liabilities) - Abbr')
Where "Sources of Funds (Liabilities) - ABBR" is a name of the account.
Each node has various options like View, Edit, Add Child etc. To click on one of these options, use following function.
await f.click_tree_node_option('Edit')
Scroll to field
If you are on a document and wish to scroll to a specific field, use:
await f.scroll_to_field("fieldname")
To scroll to a specific field, you can enter both Field Name or Field Label.
Click Form Button
Some document types has buttons within a form. You can check Production Planning Tool for the reference. To click on a button within a form, use:
await f.click_form_button('Button Label')
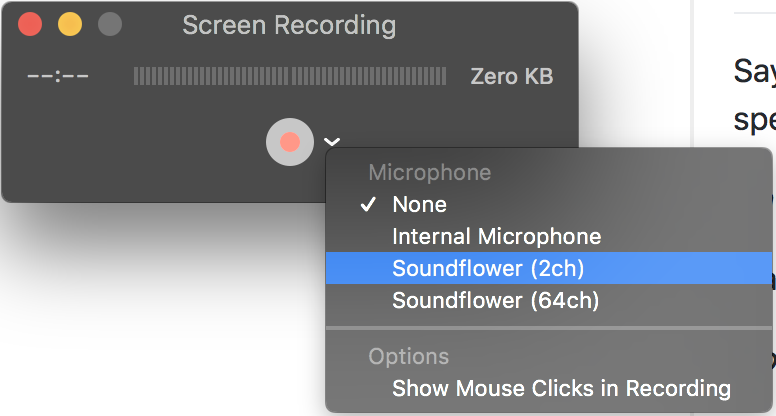
Multi Output setup for MacOS
- Install Soundflower from https://github.com/mattingalls/Soundflower/releases/
- Open Audio MIDI Setup from system preferences.
- Create the '+' button and select 'Create Multi-Output Device'.
- Right click on 'Multi-Output Device' and select 'Use this device for sound output'.

- Check Soundflower (2ch) list item
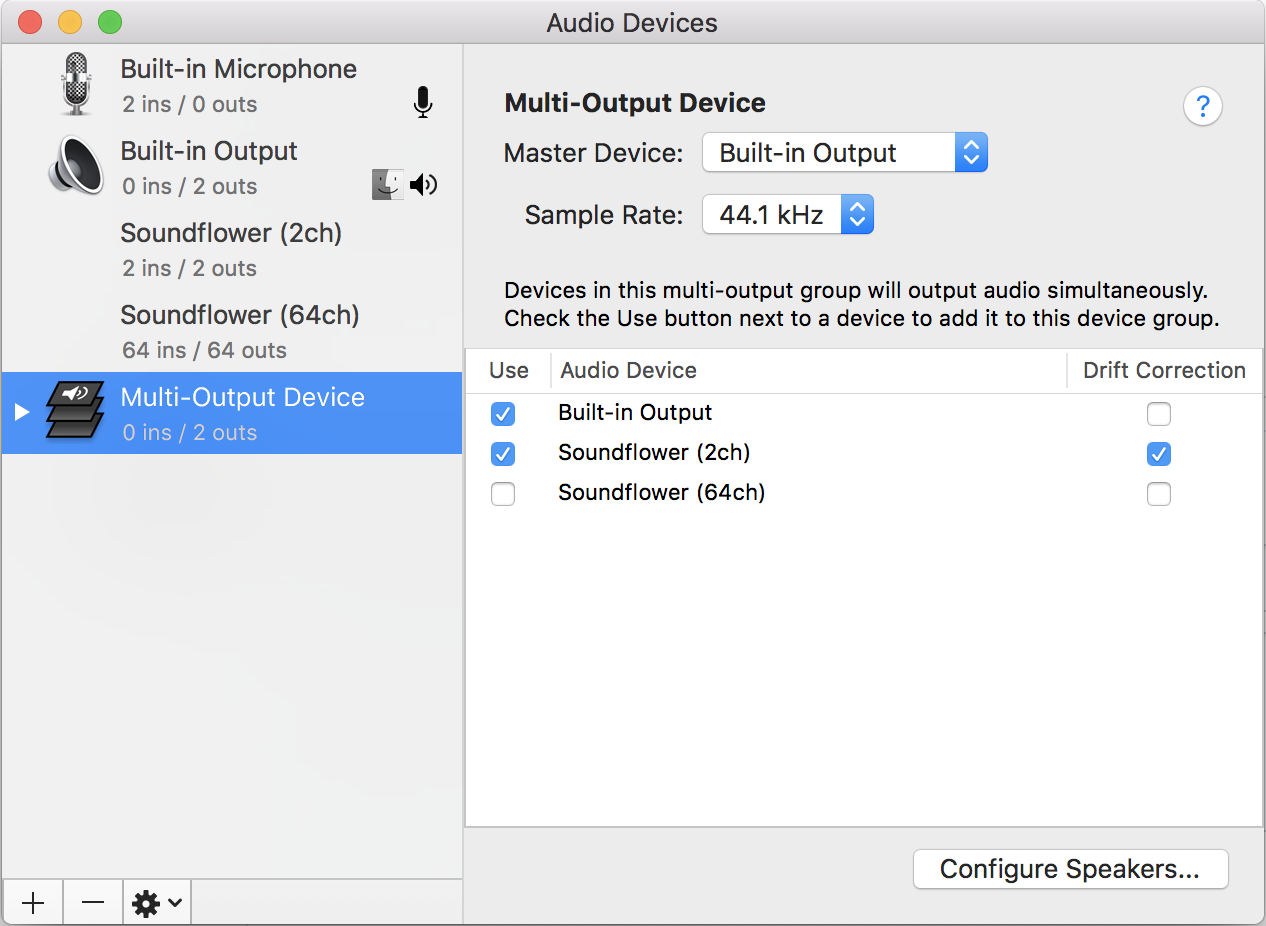
- Now, while recording videos in Quicktime Player set the audio channel to Soundflower