X-Ray data source
X-Ray datasource plugin provides a support for AWS X-Ray. Add it as a data source, then you are ready to build dashboards or use Explore with X-Ray to look at traces, analytics, or insights.
Add the data source
- In the side menu under the Configuration link, click on Data Sources.
- Click the Add data source button.
- Select X-Ray in the Distributed tracing section.
Note: If you have issues getting this data source to work and Grafana is giving you undescriptive errors, then check your log file (try looking in /var/log/grafana/grafana.log).
| Name | Description |
|---|---|
| Name | The data source name. This is how you refer to the data source in panels and queries. |
| Default | Default data source means that it will be pre-selected for new panels. |
| Default Region | Used in query editor to set region. (can be changed on per query basis) |
| Auth Provider | Specify the provider to get credentials. |
| Credentials profile name | Specify the name of the profile to use (if you use ~/.aws/credentials file), leave blank for default. |
| Assume Role Arn | Specify the ARN of the role to assume. |
| External ID | If you are assuming a role in another account, that has been created with an external ID, specify the external ID here. |
Authentication
In this section we will go through the different type of authentication you can use for X-Ray data source.
IAM Roles
Currently all access to X-Ray is done server side by the Grafana backend using the official AWS SDK. If your Grafana server is running on AWS you can use IAM Roles and authentication will be handled automatically.
See the AWS documentation on IAM Roles
Note: AWS Role Switching is not supported at the moment.
IAM Policies
Grafana needs permissions granted via IAM to be able to read X-Ray data and EC2 tags/instances/regions. You can attach these permissions to IAM roles and utilize Grafana's built-in support for assuming roles.
Here is a minimal policy example:
{
  "Version": "2012-10-17",
  "Statement": [
    {
      "Effect": "Allow",
      "Action": [
        "xray:BatchGetTraces",
        "xray:GetTraceSummaries",
        "xray:GetTraceGraph",
        "xray:GetGroups",
        "xray:GetTimeSeriesServiceStatistics",
        "xray:GetInsightSummaries",
        "xray:GetInsight",
        "xray:GetServiceGraph",
        "ec2:DescribeRegions"
      ],
      "Resource": "*"
    }
  ]
}
Example AWS credentials
If the Auth Provider is Credentials file, then Grafana tries to get credentials in the following order:
- Hard-code credentials
- Environment variables (
AWS_ACCESS_KEY_IDandAWS_SECRET_ACCESS_KEY) - Existing default config files
- ~/.aws/credentials
- IAM role for Amazon EC2
Refer to Configuring the AWS SDK for Go in the AWS documentation for more information.
AWS credentials file
Create a file at ~/.aws/credentials. That is the HOME path for user running grafana-server.
Note: If the credentials file in the right place, but it is not working, then try moving your .aws file to '/usr/share/grafana/'. Make sure your credentials file has at most 0644 permissions.
Example credential file:
[default]
aws_access_key_id = <your access key>
aws_secret_access_key = <your access key>
region = us-west-2
Query editor
The most important field in the editor is the query type. There are four query types:
- Trace List (Traces in AWS)
- Trace Statistics
- Trace Analytics (Analytics in AWS)
- Insights
- Service map

Trace List
The Trace List type allows you to search for traces which will be shown in a table. Clicking on the trace id in the first column opens the trace on the right side. Notice the query field in the editor. You can write queries, filter expressions, or you can insert a single trace ID there that will be shown in a trace view. You can find more details about filter expressions in AWS X-Ray documentation.

Note: The Trace List will only show the first 1000 traces.
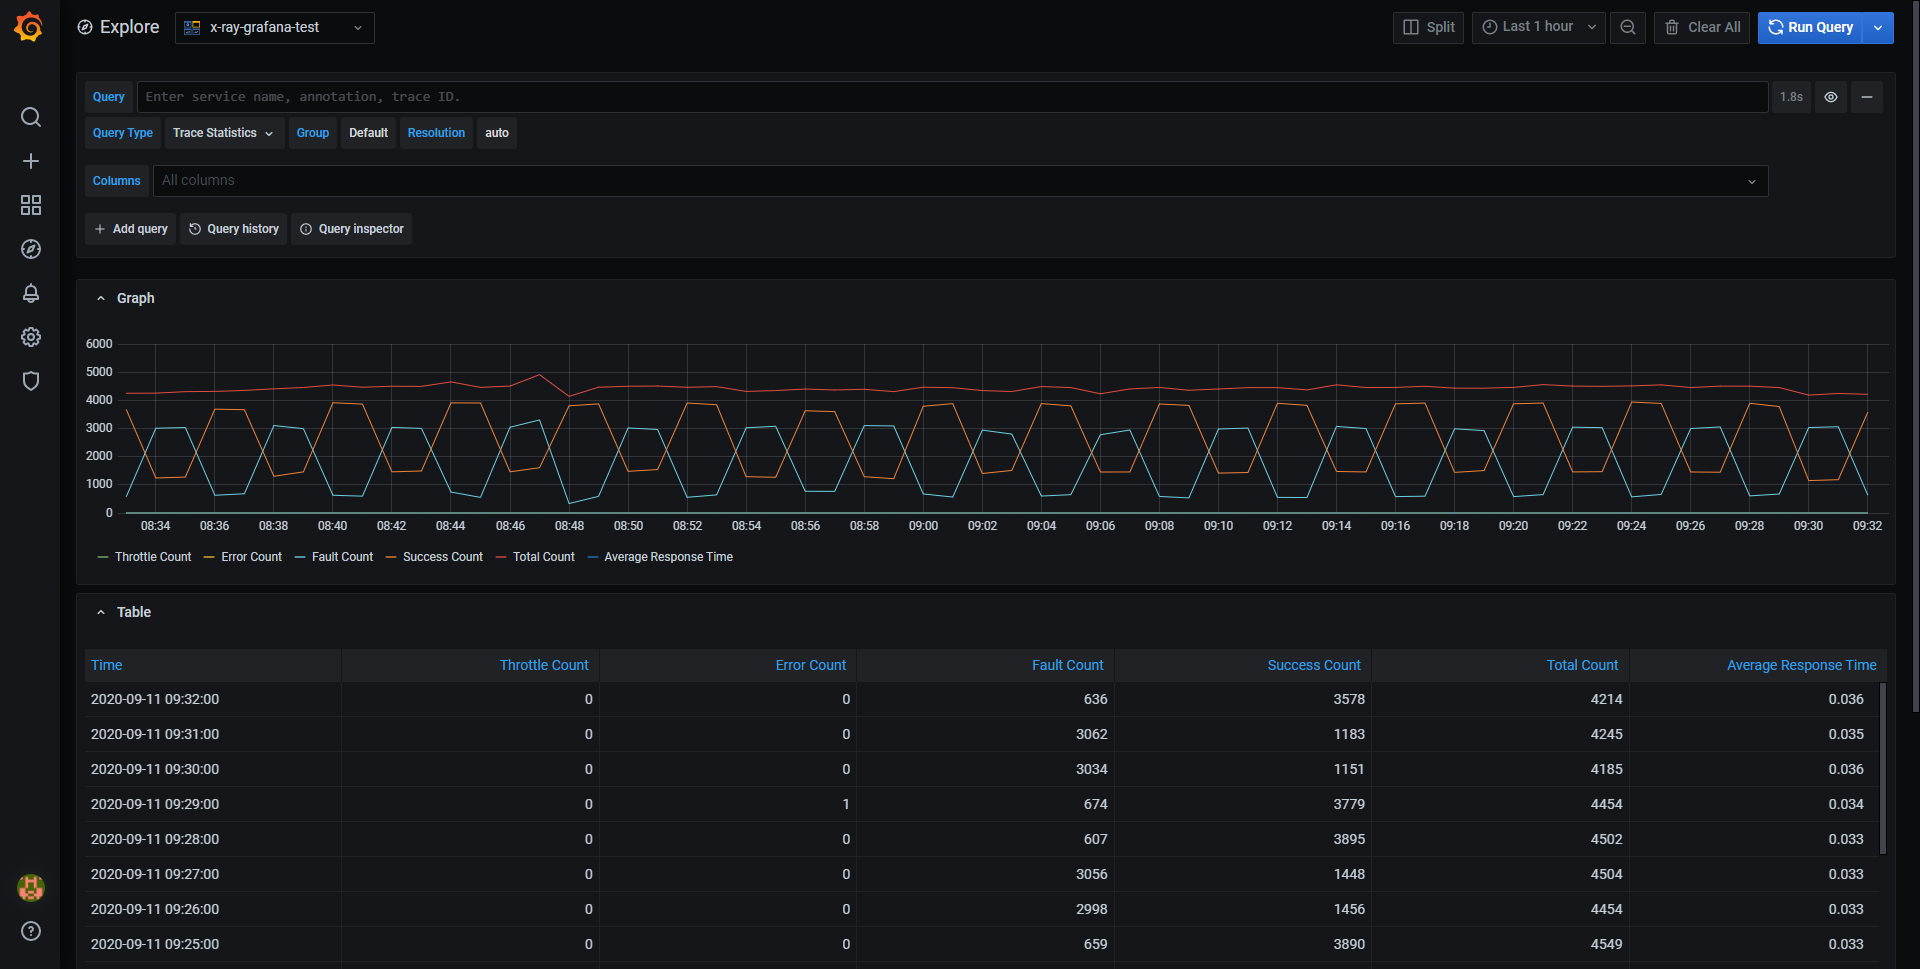
Trace Statistics
In Trace Statistics you can see a graph and a table showing information about error, fault, throttle, success, and total count. You can use the columns field in the query editor to only see specified columns.
Trace Analytics
In Trace Analytics you can visualize the following tables.
- Root Cause
- Response Time
- Root Cause Service (Last service in path)
- Path (multiple paths)
- Error
- Root Cause Service (Last service in path)
- Path
- Error Message
- Fault
- Root Cause Service (Last service in path)
- Path
- Error Message
- Response Time
- End user Impact
- URL
- HTTP Status Code
Insights
In Insights you can see the summary table for Insights. Clicking the InsightId will take you to AWS console.
Service map
Service map in Grafana enables customers to view the map of their applications built using microservices architecture. Each node on the map represents a service such as an AWS Lambda function or API running on API Gateway or a DynamoDB table. With this map, customers can easily detect performance issues, or increase in error, fault or throttle rates in any of their services and dive deep into corresponding traces and root cause.

Service Map query type shows the same data as a service map inside X-ray console.
To display the service map:
- Use the Node graph panel visualization in Grafana 7.4 plus.
- Use Explore in Grafana 7.4 plus.
- Show the data in a simple table. This is the only option if the Node graph panel is unavailable.
You can pan and zoom the view with buttons or you mouse. For details about the visualization, refer to Node graph panel.

Similar to X-ray root nodes, nodes in the service map representing the client application are on the left side of the map.
Each service in the map is represented as a circle. Numbers on the inside shows average time per transaction and transactions per minute.
A colored circle around the service also matches colors and meaning from X-ray console representing percentage of requests.
- green = success
- red = fault
- yellow = errors
- purple = throttled responses
Click on the service or the edge to see a context menu with links additional links for quick navigation to other relevant information from X-ray. You can use the links to quickly navigate to a list of all error traces for a particular service and then continue to specific trace.
For more information about the Service map, refer to the official AWS X-ray documentation.
Alerting
Since X-Ray queries can return numeric data, alerts are supported. See the Alerting documentation for more on Grafana alerts.
Pricing
With AWS X-Ray, there are no upfront fees or commitments. You pay only for what you use, based on the number of traces recorded, retrieved, and scanned. The first 1,000,000 traces retrieved or scanned each month are free. Beyond the free tier, traces scanned cost $0.50 per 1 million traces scanned ($0.0000005 per trace). Please see the X-Ray pricing page for more details.
Configure the data source with provisioning
You can configure data sources using config files with Grafana's provisioning system. You can read more about how it works and all the settings you can set for data sources on the provisioning docs page.
Here are some provisioning examples for this data source.
Using a credentials file
If you are using Credentials file authentication type, then you should use a credentials file with a config like this.
apiVersion: 1

datasources:
  - name: X-Ray
    type: grafana-x-ray-datasource
    jsonData:
      authType: credentials
      defaultRegion: eu-west-2
Using accessKey and secretKey
apiVersion: 1

datasources:
  - name: X-Ray
    type: grafana-x-ray-datasource
    jsonData:
      authType: keys
      defaultRegion: eu-west-2
    secureJsonData:
      accessKey: '<your access key>'
      secretKey: '<your secret key>'
Cross-Account Observability
The X-Ray plugin allows you to monitor traces across multiple AWS accounts within a region with a feature called Cross-Account Observability. Using cross-account observability, you can seamlessly search, visualize and analyze AWS traces without worrying about account boundaries.
Getting started
To enable cross-account observability, first enable the feature in AWS using the official CloudWatch docs, then add [two new API actions]({{< relref "../Metrics_and_Logs" >}}) to the IAM policy attached to the role/user running the plugin.
This feature is currently behind the cloudWatchCrossAccountQuerying feature toggle.
You can enable feature toggles through configuration file or environment variables. See configuration [docs]({{< relref "../setup-grafana/configure-grafana/#feature_toggles" >}}) for details. Grafana Cloud users can access this feature by opening a support ticket in the Cloud Portal.
Filtering Traces by Account Id
Once the feature is enabled, you will be able to both display traces across multiple accounts and filter those traces by account ID. When you select the Service Map query type in Grafana, an account dropdown displays and populates with the account IDs shown in the traces returned in the selected time frame.
You can also add account ID as part of a query filter expression in the Trace List query type.