pmaillot / X32 Behringer
Programming Languages
Projects that are alternatives of or similar to X32 Behringer
X32 / OSC utilities
What is this repository for?
This is a repository for Behringer X32 OSC program files. I will try to push/commit most of the utilities I have been writing since 2014 for the X32 Standard console I bought then. The first one I committed is X32_Command, a simple yet very useful and powerful command line tool for interacting with the X32 digital audio console.
COPYRIGHT
All software, pictures & documentation Copyright (C) 2013-2018 Patrick-Gilles Maillot
All software in this repository is free software: you can redistribute it and/or modify it under the terms of the GNU General Public License as published by the Free Software Foundation, either version 3 of the License, or any later version.
This software is distributed in the hope that it will be useful, but WITHOUT ANY WARRANTY; without even the implied warranty of MERCHANTABILITY or FITNESS FOR A PARTICULAR PURPOSE. See the GNU General Public License for more details.
You should have received a copy of the GNU General Public License
Thank you Note
Thanks to all contributors who submitted issues, helping these tools to get better for the benefit of everyone. Javier Iglesias just recently provided a Makefile file for some of the tools (Initially X32_lib and X32Reaper).
Demos and documentation
The software in this repository heavily relies on OSC commands sent or received to/from an X32 digital mixer, using UDP communication protocol. The latest version of the unofficial X32 OSC Protocol documentation, and compiled/built versions of the tools, demos, examples and snapshots can be found at https://sites.google.com/site/patrickmaillot/x32.
How do I get set up?
The tools and programs proposed here are generally simple C programs, static linked applications. First build yourself a library of 'utility' functions you will find under Xlib32. Compile all files (-c flag) found in X32lib and archive them into a library you can then static-link to the other programs.
Applications and programs will work in a Linux, OS X, or Windows terminal. Some programs are Windows applications and rely on Windows MFC libraries and work in a Windows XP to Windows 10 environment.
Source code is set for 4-space tabs in Eclipse. I use Eclipse as IDE and MinGW under Windows for my C environment. Windows based programs have to be linked with their respective libraries under Windows (w2_32, gdi32, comdlg32, etc.) respective of the Windows functionality used.
The basic MinGW-32 environment and tools are sufficient for these programs as there are no high memory addressing requirements. The installation of MinGW sets up all necessary environment variables; please follow the instructions that come with the MinGW install utility.
Eclipse also sets up all necessary environment options for basic C programming; When creating projects, select the MinGW suite as compile suite. Each project will have to be edited to include link libraries as mentioned above. The compile line and options are directly managed by Eclispe using the tools and environment variables set from your PC, and are straight forward.
For example, the compile lines for X32Reaper in Debug mode are listed below (entirely managed by/from Eclipse on a single button click):
Info: Internal Builder is used for build
gcc -O0 -g3 -Wall -c -fmessage-length=0 -o X32Reaper.o "..\\X32Reaper.c"
gcc "-LC:\\...\\eclipse\\X32_lib\\Debug" -o X32Reaper.exe X32Reaper.o -lX32_lib -lws2_32
Contribution guidelines
Feel free to use :-). If you find bugs, please report them; if you fix some bugs, please propose your code so everyone can benefit.
Who do I talk to?
Utilities
Before downloading, building or using the following utilities, please read the X32 manual(s) associated with your X32 system. The X32 OSC protocol document available on my website (see above in Demos and documentation) is also quite useful, especially when using the X32_Command tool (you have to know at least a few commands, and their syntax).
The Unofficial X32 OSC Protocol document can also be found at [http://www.academia.edu/9709659/UNOFFICIAL_X32_OSC_REMOTE_PROTOCOL].
X32_Command
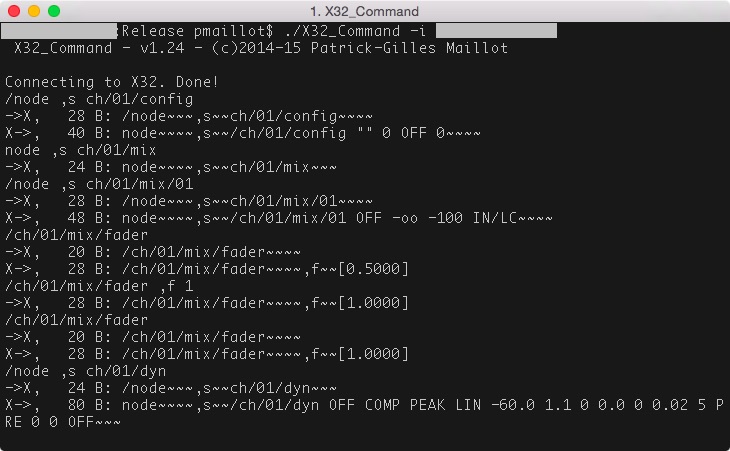
X32_Command: Sends OSC commands to X32, allows listening to X32 too...
This command line Windows tool enables sending and receiving OSC data in many ways.
usage: X32_command [-i X32 console ipv4 address]
                   [-d 0/1, [0], debug option]
                   [-v 0/1  [1], verbose option]
                   [-k 0/1  [1], keyboard mode on]
                   [-t int  [10], delay between batch commands in ms]
                   [-s file, reads X32node (scene, snippet, presets) formatted data lines from 'file']
                   [-f file, sets batch mode on, getting input data from 'file']
                     default IP is 192.168.0.64

 If option -s file is used, the program reads data from the provided file
 until EOF has been reached, and exits after that.

 If option -f file is used, the program runs in batch mode, taking data from
 the provided file until EOF has been reached, or 'exit' or 'kill' entered.

Note: make sure the batch file is respecting unix standards (i.e. use notepad++ to create
the file under Windows so EOL are made of only "\n" and not "\r\n").

 While executing, the following commands can be used (without the quotes):
   '#line of text.....': will print out the input line as a comment line
   'exit' | 'quit': will quit the current mode
   'kill': [batch mode only] will exit the program
   'time <value>': [batch mode only] will change the delay between batch commands to <value>
   'verbose <on|off>': will change the verbose mode
   'verbose': will return the current verbose mode
   'xremote <on|off>': will change the xremote mode
   'xremote': will return the current xremote mode
   '' (empty line) [standard mode only]: will repeat the last entered command

All other commands are parsed and sent to X32.
 Typical X32 OSC command structure:
   <command> <format> [<data> [<data> [...]]], where for example:
      command: /info, /status, /ch/00/mix/fader, ...
      format: ',' ',i' ',f' ',s' or a combination: ',siss' ',ffiss' ...
      data: a list of int, float or string types separated by a space char...

Note: Per OSC spec and in the format above OSC Type Tag String is "mandatory", therefore one
should always provide at least a ',' to compete the OSC Address Pattern. This is nevertheless
not necessary for X32 as the system accepts "older" notations where empty OSC Type Tag Strings
are not present (see examples below)


Examples:
/info        - "old" notation sending an info request to X32
/info ,      - "correct" (i.e. OSC compliant) notation sending an info request to X32

/ch/01/config/name ,s "My Guitar" - set name of channel 01 to My Guitar (note: space in the name)
/ch/01/config/name ,s MyGuitar    - set name of channel 01 to MyGuitar (note: no space)

/ ,s 'ch/01/config "" 1 YE 1'     - erase channel 01 name, set icon to index 1,
                                    color to Yellow and source to IN01

/ch/01/mix/fader ,f 0.5    - set mixing fader of channel 01 to mid-position
/node ,s fx/01/par         - retrieve the 64 parameters of effect at FX slot 1
X32Wav_XLive
This X32 utility aims at creating X-Live! compatible files from standard wave files; The typical use would be to enable playback using the X-Live! expansion board SD card(s) of already available multi-channel wave files such as those recorded from the X-USB interface or exported from a DAW software.
A few rules must be respected in order to merge several wave files in “one” that can be used with X-Live!:
 Files to merge must all be named ch_1 to ch_32.
 Files to merge must all have the same structure and size.
 Files to merge must all be of the same sample rate.
 Files to merge must all be 24bits
The long horizontal button labeled “Select Wav files Source Directory” is used to select a directory that contains all the ch_xx files mentioned above, that will be merged to X-Live! format.
With the directory selected, additional settings corresponding to X-Live! capabilities are requested or possible: A session name is expected by X-Live! and can be up to 20 characters long. Optionally, markers can also be passed on the interface of the utility, to be saved with the created X-Live! files. With the button on the lower right of the panel set to “List of Markers”, Markers can be given as a comma-separated list of decimal values expressed in seconds, such as “1, 2.5, 5., 30”. The button toggles between “List of Markers” and “File Path”; When set to “File Path”, the path to a file containing markers can be provided. This can be a lot more practical when a large number of markers is provided. X-Live! supports up to 100 markers per session.
With all data ready, it is time to click on the “Merge” button, which will launch the file merging process. The program tests for the different parameters and will report errors if problems are found. Assuming all data are correctly set, the program creates an X-Live! compatible directory containing at least two files: one or more wave files named 00000001.wav to 00000128.wav of up to 4GB each, all 32-bit PCM, and a binary session log file "SE_LOG.bin", which contains information such as the markers applied during merging. All these files will be created under a directory named by the 32-bit timestamp of the recording start as an 8 character hexstring, e.g. "4B728846"
Be patient! Merging large audio files takes time. The program will display the elapsed time at the end of the process. The directory created by the utility can be copied in the X-Live! directory of an SD card to be used with the expansion board, so you can enjoy your mix using the X32.
X32Wav_XLive
Split / Explode X-Live! multi-channel WAV files from a recorded session into individual, single channel WAV files.
This X32 utility takes multi-channel wave files from a recorded X-Live! session directory and extract an arbitrary amount of channels (user defined names can be assigned) to individual wave files. Audio data can be extracted as 16bit, 24bit [default], or 32 bit samples of data.
XLive! sessions are made of 8, 16 or 32 channel wave files. The user selects a Session directory and chooses a directory where single channel files will be generated (or Exploded to use REAPER's notation). One can decide to extract less than the actual number of channels from the Session, as these are sometimes containing empty files to build up to the 8, 16 or 32 channels of XLive! multi-channel session files. Each destination file can be named per user choice, and destination files can be made of 8, 16, 24, or 32 bits samples; (source files are always 24bit samples in a 32bit container). Destination file names can also be automatically filled using an X32 scene file. Once established, a name can be edited (simple modification) by getting its name, editing the name and setting the name.
Files are exploded following each 4GB session file; if there are for ex. 2 wav files in the session (on 4BG and the next one < 4GB), and the user called for 2 channels to be extracted, naming them "AA" and "BB", this will result in the following file set after extraction: AA.wav BB.wav with AA.wav and BB.wav accumulating the single wave file sections of the two section files used as source.
In case of inconsistencies or errors, messages are reported at the GUI level. Upon termination, the time needed to explode files is provided. Be patient... Exploding multi-channel wav files takes time, even with optimizations for ex ~22s for extracting 5 24bit channels out of a 5.2GB 8-channel XLive! Session
Command Line version: A command-line version of the tool can be obtained from the source file. Below the -h (help) for the utility, which offers the same options the Windows GUI version does:
$ ./X32Xlive_wav -h
X32Xlive_Wav - ver 0.35 - ©2018 - Patrick-Gilles Maillot

usage: X32Xlive_wav [-d dir [./]: Mono wave files path]
                    [-m name []: Sets or Replaces Session name read from source]
                    [-n 1..32 [0]: number of channels to explode to mono wave files]
                    [-c 8/16/24/32 [24]: sample size]
                    [-s file []: optional scene file]
                    [-w #,name, [,]: ch. number ',' followed by respective wave file name]
                    Xlive! Session

       X32Xlive_wav will take into account all command-line parameter and run its
       'magic', generating mono-wave files from the XLive! session given as input.
       Sample size conversion may take place depending on the -c option.
       Channel/Wave or file names can be set all at once if a scene file is provided
       using the -f parameter, or set one at a time or edited if parameters -1...-32
       are used with appropriate names.
       Note: option -n must appear before any -w or -s options

       Example:
       X32Xlive_wav -n 3 -d ~ -c 16 -s ~/myscene -w 3,new_name ~/4C4B5674
         will extract as 16bit samples the first 3 channels contained in XLive! session
         4C4B5674 in the home directory, into 3 separate wave files placed in the home
         directory with names taken from the X32 scene file 'myscene', and setting or overriding
         the 3rd wave file name with 'new_name'

       X32Xlive_wav -n 8 -d ~ ~/4C4B5690
         will extract as 24bit samples the first 8 channels contained in XLive! session
         4C4B5690 in the home directory, into 8 separate wave files placed in the home
         directory with names Xlive_Wav_1.wav to Xlive_Wav_8.wav
$
X32cpXliveMarkers
Reads markers from an XLive! session/SE_LOG.BIN file and send data to the clipboard.
X32cpXliveMarkers copies an XLive! Session set of makers to the clipboard. An XLive! Session can have up to 100 markers. When importing audio to a DAW (I use REAPER), there is no support for importing XLive! Session markers… until now.
With all parameters set, the user just clicks on “Copy” to load all session markers to the clipboard. It is then just a matter of using the proper REAPER function to import these markers into a REAPER project. Under REAPER, this is possible thanks to the Extensions→Marker utilities→Import marker set from clipboard menu which is part of the REAPER SWS extensions.
X32Jog4Xlive
Enabling audio Jog and Shuttle for X-Live! while using SD card audio.
This X32 utility enables a functionality not included with the X-Live! expansion board. I discovered when testing and using the board there was no audio jog/shuttle proposed by the new firmware. This didn’t occur to me at first when recording short audio sequences during my tests. I later wrote another utility (see X32Wav-Xlive) to transfer multiple wav files into an X-Live! compatible session, and realized after transferring a 1h audio session there was no easy way to navigate within the audio session I just copied onto an SD card.
OSC messages are fast and enable real-time remote controls to take place on X32; I wrote a set of transport capabilities to optimize the use of X32 with REAPER, and I’m using the same approach here in changing the destination of one of the User Assign rotary knob into an audio Jog. In the case of REAPER, the knobs control the REAPER slider, and an ingenious zoom function in REAPER enable moving precisely to very fast within the audio track(s). In the present case, there’s no zoom functionality, nor a cursor to move; as a result it was rather painful to move say 10ms at a time. I decided to use a second rotary knob to set the value of the time delta. The current version of the application enables a variation between 10ms and 2m41s
You will need to be either in “Play” or “PPause” mode on the X-Live! in order for knob #1 to enable you to navigate in your SD card audio stream; As mentioned earlier, knob #3 will make you move faster within the audio. The explanations as to why I used knobs #1 and #3 rather than other values are in the documentation, part of the .zip compiled utility on my website.
X32Tap
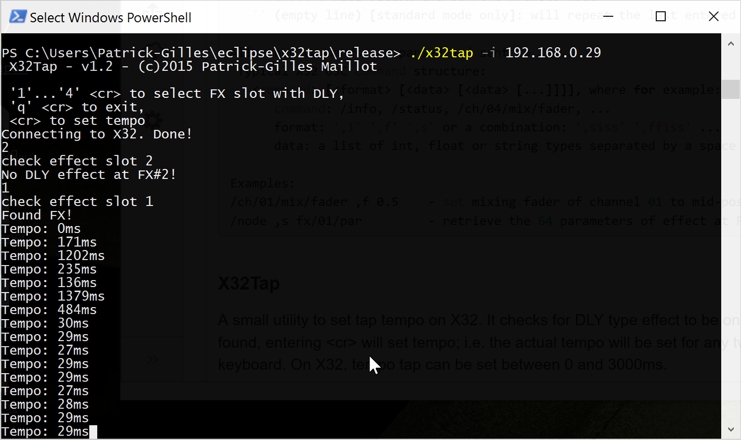
A small utility to set tap tempo on X32. It checks for DLY type effect to be on FX slots 1 to 4. If a DLY effect is found, entering will set tempo; i.e. the actual tempo will be set for any two consecutive hits on the keyboard. On X32, tempo tap can be set between 0 and 3000ms.
usage: X32Tap [-i X32 console ipv4 address]
 then:
 '1'...'4' <cr> to select FX slot with DLY,
 'q' <cr> to exit,
 <cr> to set tempo
X32Tap (Windows)
A utility similar to the non-GUI version above, but for Windows and capable of setting Tap Tempo for any delay capable X32 effect and either from tapping tempo on the GUI button, or getting the tap tempo from consecutive audio signals on a chose X32 Channel. It checks for a delay capable effect to be on FX slots 1 to 4. If an effect is found, tempo can be set by clicking on the TAP button, or (can be simultaneous) from an audio channel; In all cases, tempo tap can be set between 0 and 3000ms. Please go to my website and download the documentation on how to best use the "auto" mode enabling audio tempo setting.
X32
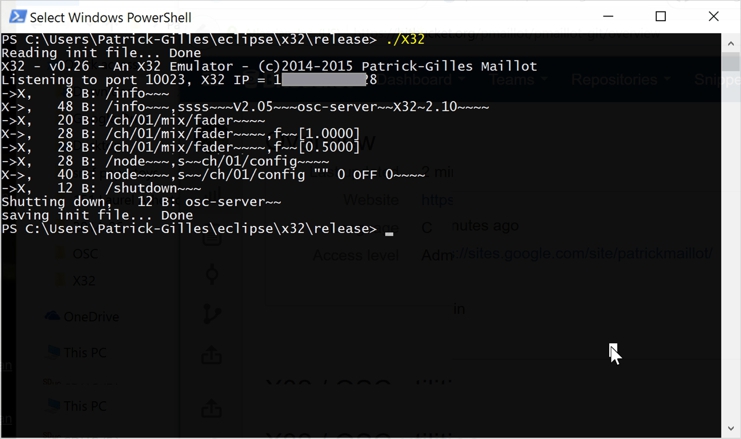
X32 is... an X32 emulator. This tool parses and manages X32 commands (as a real X32 would), keeps up to 4 xremote clients updated - Of course no sound, and even if all 32 Channels, 16 Sends, 8 FXreturns, 8 Aux, 6 Matrix, 8 DCA, Main and all FX parameters are fully implemented along with multi-client xremote update and many more, not all X32 commands are supported (and that's not the goal), but the emulator is handy for developing X32 applications.
usage: X32 [-d 0/1, debug option] -default: 0
           [-v 0/1, verbose option] -default: 1
       The options below apply in conjunction with -v 1
           [-x 0/1, echoes incoming verbose for /xremote] -default: 0
           [-b 0/1, echoes incoming verbose for /batchsubscribe] -default: 0
           [-f 0/1, echoes incoming verbose for /formatsubscribe] -default: 0
           [-r 0/1, echoes incoming verbose for /renew] -default: 0
           [-m 0/1, echoes incoming verbose for /meters] -default: 0

   The (non-Behringer) command "/shutdown" will save data and quit
In the above example of use, the following commands were sent from an X32_Command window (the -> lines show dialog data going to and from the X32 emulator):
/ch/01/mix/fader
->X,   20 B: /ch/01/mix/fader~~~~
X->,   28 B: /ch/01/mix/fader~~~~,f~~[1.0000]
/ch/01/mix/fader ,f .5
->X,   28 B: /ch/01/mix/fader~~~~,f~~[0.5000]
/node ,s ch/01/config
->X,   28 B: /node~~~,s~~ch/01/config~~~~
X->,   40 B: node~~~~,s~~/ch/01/config "" 0 OFF 0~~~~
/shutdown
->X,   12 B: /shutdown~~~
Please note: You should run the X32 a first time and issue a "/shutdown" command from a connected client; this will create a file preserving all X32 parameters, that will be read at next start. Make sure you end your client sessions with "/shutdown" to update the file with the changes made to X32.
Some X32 commands are not implemented (lack of time mostly), some are also not present as this program was developed before FW2.14 was released. You are welcome to dive in the code and add them :-)
X32UDP
This is a set of 3 functions to connect to X32, send and receive data (non-blocking IO). I use these functions to interface with Pascal (Lazarus) code I use when writing or porting my apps to Raspberry Pi. Lazarus enables writing GUI apps very easily (and quickly). The interfacing with C is quite simple too and works great.
X32TCP
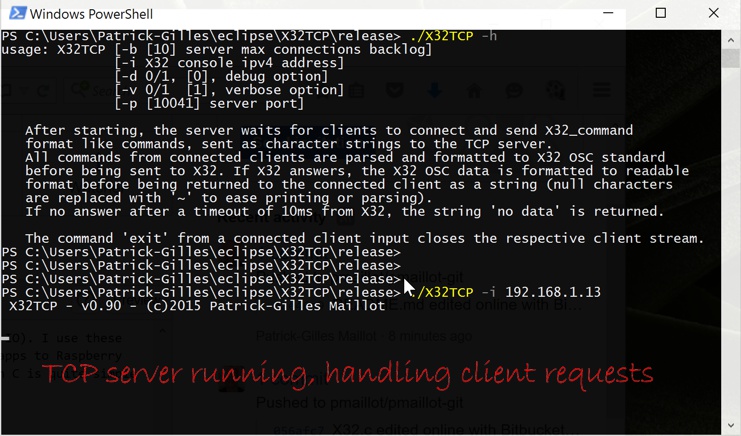
A multi threaded TCP server to serve X32 commands. This program starts a TCP server and handles requests for X32 (changing to UDP to manage dialog with X32) from multiple clients. The goal is to provide a basis for people who want to access X32 via TCP protocol, rather than UDP. It will be slower than UDP, and may suffer from data volume back from the X32, but will offer the possibility to access (with some modifications) an X32 via HTTP protocol for example.
usage: X32TCP [-b [10] server max connections backlog]
              [-i X32 console ipv4 address]
              [-d 0/1, [0], debug option]
              [-v 0/1  [1], verbose option]
              [-p [10041] server port]

   After starting, the server waits for clients to connect and send X32_command
   format like commands, sent as character strings to the TCP server.
   All commands from connected clients are parsed and formatted to X32 OSC standard
   before being sent to X32. If X32 answers, the X32 OSC data is formatted to readable
   format before being returned to the connected client as a string (null characters
   are replaced with '~' to ease printing or parsing).
   If no answer after a timeout of 10ms from X32, the string 'no data' is returned.

   The command 'exit' from a connected client input closes the respective client stream.
X32Ssaver
X32SsaverGW.c - This is the Windows GUI version; the Linux and windows command line versions are in the "Unofficial OSC Protocol" document [http://www.academia.edu/9709659/UNOFFICIAL_X32_OSC_REMOTE_PROTOCOL].
Set the X32 IP address and hit the "Connect" button to connect to X32. Set the utility to "ON"; After the number of seconds set in the "Delay before low light" box, the X32 LCD bright and LED intensity values will be lowered to their minimum, unless an / as long as no action takes place on the X32. As soon as an X32 control (fader, button, control) is changing, LCD and LED will take their initial brightness values, and will return to low after a new delay with no action on the X32 deck.]
X32Fade
X32Fade.c - A Windows GUI version of a time and #steps controlled Fade_in/Fade_out for all 80 X32 faders (all banks, Levels, Aux, FX, Bus, DCA, Mtx, L/R).
Set the X32 IP address and hit the "Connect" button to access your X32. Select which faders or levels should be controlled by the program. Set time IN, OUT, # of steps, or use CHECK IN/OUT to restore or save settings. FADE IN will raise levels and FADE OUT will bring them down, according to current settings. STOP aborts the operation if needed.
X32Automix
This X32 Utility (Windows GUI based, using MFC) is aiming at providing Automixing functionality; After connecting, Ch 01..32 meters are read to validate if data is incoming on a given channel (meter level is converted and compared to a threshold value). A timer enables setting a delay for reacting to a channel level change If above the threshold level, the fader level for that channel is activated towards its pre-recoded high value, a timer is set to remember the time at which the last high level was recorded.
If below the threshold level, and time expired (time - last_high_level time), the fader for that channel will be lowered to its pre-recorded low value. Pre-recorded values can be set at anytime, as "equivalent" to the current setting for a given channel; i.e. changing a fader while in its low position (no sound) will set the new pre-recorded low value, and same for high values.
NOM (Number Of Mixes) is a feature that will change the Overall Mix (-3dB or +3dB) each time the number of active (i.e. high value sound) inputs will double (or be divided by 2) to try to keep the Overall Mix to a reasonable value.
Similarly to channels, pre-recorded high and low values for bus (or L/R) Overall Mix can be set at anytime.
Overall Mix can be the L/R bus or an X32 selected mixBus.
Note: This is not trying to be a Duncan-like automix system, but sure can help in Studios, Theaters, or situations where several speakers will participate to a talk.
Set the X32 IP address and hit the "Connect" button to access your X32. The OFF/ON large button shows if the feature is active or not. NOM OFF or NOM ON shows if the NOM functionality has been enabled. The delay [in seconds] before faders are lowered (in case of no sound) and the delay [in milliseconds] for the channel faders to react to a high level sound can be changed, as well as the sensitivity (the sound level threshold). The Overall Mix is L/R channels or can be a selectable X32 mixBus. The tool will act on a list of contiguous channels, settable from an arbitrary channel number to a higher one. If both number are equal, only one channel will be active.
X32GEQ2Cpy

An X32 GEQ, GEQ2, TEQ, TEQ2 copy utility. This is used to copy settings of side A to side B (or vice-verse) of a GEQ2 or TEQ2 X32 equalizer, or copy the settings of an EQ slot to another one, or reset an EQ to its default "0dB" positions. In all operations, master can be included or not.
In the example in the window above, the X32 console has a GEQ2 at FX slot 1 and a TEQ2 at FX slot 2; It will receive (->X) and send (X->) the following:
->X,   20 B: /node~~~,s~~fx/1~~~~              #inquire FX type at slot 1
X->,   24 B: node~~~~,s~~/fx/1 GEQ2~~          #X32 answer
->X,   20 B: /node~~~,s~~fx/2~~~~              #inquire FX type at slot 2
X->,   24 B: node~~~~,s~~/fx/2 TEQ2~~          #X32 answer
                                               #copy request is C: copy from 1 to 2
->X,   16 B: /fx/1/par/01~~~~                  #request value of FX par 1 at FX slot 1
X->,   24 B: /fx/1/par/01~~~~,f~~[0.0000]      #X32 answer
->X,   24 B: /fx/2/par/01~~~~,f~~[0.0000]      #request value of FX par 1 at FX slot 2
->X,   16 B: /fx/1/par/02~~~~
X->,   24 B: /fx/1/par/02~~~~,f~~[0.0000]      #      ... etc.
...
->X,   24 B: /fx/2/par/62~~~~,f~~[0.0000]      #      ... etc.
->X,   16 B: /fx/1/par/63~~~~
X->,   24 B: /fx/1/par/63~~~~,f~~[0.0000]
->X,   24 B: /fx/2/par/63~~~~,f~~[0.0000]      #until paramater 63
usage: X32GEQ2cpy [-i X32 console ipv4 address] default 192.168.0.64
                  [-f FX slot#] default: 1
                  [-g FX slot#] default: 1
                  [-d A>B | B>A | R | C] default: A>B
                      A>B, B>A: copy FX# f sides
                      R: Reset FX# f
                      C: copy FX# f to FX# g
                  [-m 0/1 for copying master] default: 1/yes
                  [-v 0/1 verbose] default: 0
X32GetScene
X32GetScene: Get a Scene/Snippet file directly out of your X32 - compatible with FW 2.08, 2.10, and 2.12.
The utility connects to the X32 (default IP is 192.168.0.64 and can be changed with option -i) reads to read the elements you want to get from the X32, and saves the result to . The elements to get from the X32 are described/coded as they are in a typical .scn file. As a facility, you can provide an existing (partial or complete) scene file to get the elements from your X32. The values from the input scene file will be ignored. example:
X32GetScene -i 192.168.1.32 -s name1 -n note1 <Default.scn >myscene.scn
Will take all lines from Default.scn as requests to the X32, and generate a scene file with the current X32 values respective of the requests into a file called myscene.scn, with name and note values name1 and note1 respectively.
When not providing a file as input, one has to type in requests one line at a time. Typing "exit" will terminate the program. For example (without -s or -n, the utility will ask for a name an notes):
X32GetScene -i 192.168.1.32 -s name1 -n note1 >myscene.scn
typing in:
/ch/01/config
/ch/01/delay
exit
creates a file myscene.scn contaning (actual values will depend on the state of your X32):
#2.1# "name1" "note1" %000000000 1 X32GetScene V1.3 ©2014 Patrick-Gilles Maillot

/ch/01/config "" 1 YE 1
/ch/01/delay OFF   0.3
X32SetScene
X32SetScene: Interprets a Scene/Snippet file and set your X32 accordingly - compatible with FW 2.08, 2.10, and 2.12
The utility connects to the X32 (default IP is 192.168.0.64 and can be changed with option -i) reads to read the scene file elements and transform them into OSC commands to the X32. The elements to send to the X32 are described/coded as in typical .scn files. example:
X32SetScene -i 192.168.1.32 < myscene.scn
Will take all lines from myscene.scn, interpret them and set the X32 state accordingly.
When not providing a file as input, one has to type in requests one line at a time. Typing "exit" will terminate the program. For example:
X32SetScene -i 192.168.1.32
with typing in:
/ch/01/mix OFF   0 ON +0 OFF -oo
/ch/01/config "MyVox" 1 GN 1
exit
will set Channel 1 to: muted, fader to position 0db, pan to center, mono OFF and mono level to -infinity, channel 1 scribble screen will light in green, display "MyVox", with icon 1 selected (i.e. blank), and channel 1 will have "IN 1" as source.
X32SetPreset
X32SetPreset: Manage your Presets (Channel, Effect, Routing) on your PC and set them to X32 from there! No more limits and a lot of flexibility to change settings and values for your preset files. Connect to X32, select the channel or effect slot the preset will apply to if needed.
Browse your PC for Preset files (Channel, Effect or Routing) and chose a file to send to X32. Channel Presets features are displayed as a preview with icons showing if a preset section is present, and active. Before sending to X32, safes can be applied to prevent some preset sections to interact with the X32. Master levels can also automatically be lowered to avoid unwanted pops or larsen arising when a new preset is loading. Hit the "Set Preset" button and you are done. A status will display when your preset file is complete.
X32USB

A simple command-line tool to list and play/execute/load the contents of the USB drive. Files can be directories, wave files,snippets, scenes, presets, etc.
usage: X32USB [-i X32 console ipv4 address]
              [-d 0/1, [0], debug option]
              [-v 0/1  [1], verbose option]
              [-t <delay>, delay in ms between commands]
                   default IP: 192.168.1.62

Launch shell to accept the following commands applied to the X32 USB drive:
  help:               Displays a command reminder help
  ls:                 List directory contents (with id and type)
  cd <id> | <name>    Change directory (prompt is updated)
  load <id> | <name>  Load or Run file (scene, snippet, etc.)
  run <id> | <name>   Load or Run file (scene, snippet, etc.)
  umount              Unmount the USB drive (no longer accessible)

  play <id> | <name>  Play WAV file
  stop                Stops a currently playing wav
  pause               Pauses a wav file currently playing
  resume              Resumes playing the current wav file
  exit | quit         Exists program
X32CustomLayer
X32CustomLayer: A simple utility to create and manage custom channel layers easily. Starting from a standard or current X32 setup (that is Input channels 01 to 32 and Aux inputs 01 to 08), X32CustomLayer enables you to reorganize the way “channels” are set (or layered).
Basically this enables you to virtually move a “channel” to a different position, keeping the actual input assigned to that “channel”; For example, say you have your singer microphone set at “channel” 01 and using XLR input 01. For ease of use, you need or would prefer to have this microphone handled by fader 25, and no time to unplug everything, and change all “channel” 25 settings to values that were used for “channel” 01. You enter 01 in the box under “channel” 25, and viola! the program does the rest in copying config, eq, dyn,…, sends sections and in reassigning the input source, in a snap!
X32CustomLayer offers a full set of functions you can use to rearrange your X32 channel strips layout. Please check out the documentation for a complete list of functions.
X32Replay
X32Replay: Record and play back a show
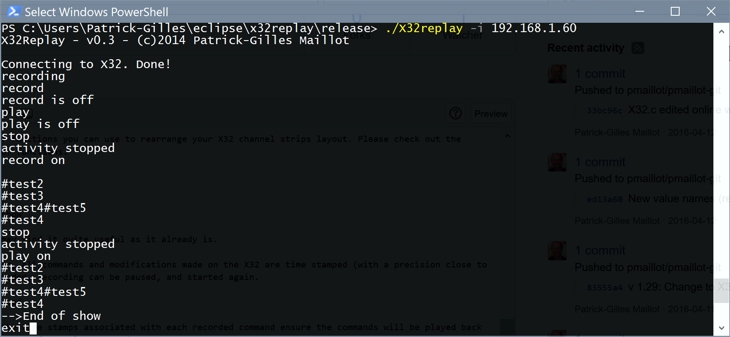
Start the utility... When record is on, all commands and modifications made on the X32 are time stamped (with a precision close to 10µs) and recorded to a file. if needed, recording can be paused, and started again.
When recoding ends, the file is closed.
The file can then be played back, time stamps associated with each recorded command ensure the commands will be played back at correct times, relative to the start of the play command.
The utility runs in a terminal window (Windows cmd); Example, assuming your X32 is at IP 192.168.1.32: X32Replay -i 192.168.1.32
Additional option is-v 0/1; Attention, this option will display a lot of additional data and this can impact the responsiveness of the tool.
Usage: X32Replay [-i X32 console ipv4 address] -default: 192.168.0.64
                 [-v 0/1, verbose option] -default: 0
                 [-f file name] -default: X32ReplayFile.txt

  known commands:
    stop:         stops recording or playing and closes file
    record:       reports recording state
    record off:   stops recording
    record on:    starts or resumes recording
    record pause: pauses recording and keeps file opened
    pause:        pauses recording and keeps file opened
    play:         reports playing state
    play off:     stops playing
    play on:      starts playing
    # typed line: during recording, records the typed line as a user tag
X32Reaper
X32 <-> REAPER controls.
The main idea is to use the X32 as a playback unit and a control surface to REAPER. Digital audio is stored and managed on a computer via REAPER. REAPER controls translate to the X32 and vice-verse, changes made at the X32 deck are reflected in REAPER. An OSC config file and a daemon program enable Reaper actions to be reflected on the X32. Simultaneously, the daemon program listens to the X32 and translates X32 actions and changes to REAPER changes on the computer.
The source code proposed here is for the Linux or command-line version, which takes the same resource file as its Windows GUI version equivalent to setup the different options used by the program. My website (https://sites.google.com/site/patrickmaillot/x32) conains executables for different versions including GUI based ones. Do read the documentation that comes with program, read REAPER documentation on setting up a control surface, this can / will be useful. Cut&paste the OSC config file provided in the X32Reaper documentation to install your config file. Be careful in selecting and matching ports and IP addresses, and you'll be just fine.
X32DeskSave / X32DeskRestore
X32DeskSave / X32DeskRestore: Save and Restore your X32 Preferences and State, Scene, Routing, Commands
Say you want to be able to save those parameters that are not handled by shows, scenes, snippets, cues, presets, routing or effects files... So when you connect to your desk, it is exactly as you want it: screen, light brightness, view, etc.
That's what the "DeskSave" option of the tool will offer... but wait! there's more: You can also save scenes, routing presets or any type of file or settings based on a pattern file (a scene, any set of commands, etc.); what the "Pattern" option does is read a file you selected by pressing on the "Pat.File" button, extract the X32 commands from this file and send the extracted commands to X32 to retrieve the values from your X32. These are saved in the file you select using the "Save As" button. Of course you don't need to select a pattern file if you choose "Scene" or "Routing" options.
Saving a full X32 Scene takes about 3 seconds (over WiFi), saving Routing or State/Preferences takes about 1.5 seconds.
The restore utility is rather similar and enables you to select a file as a source of commands and values to be restored to your X32. It can be any of the files you saved using X32DeskSave, but it can also be an actual X32 Scene or an X32 Snippet file you saved directly on your system and imported into your PC.
For both utilities, you need to connect to your X32, select the files or options you want to use. The status line under the "SaveDeskData" or "RestoreDeskData" buttons will indicate "Ready" meaning the utility has the information it needs to perform an operation. "Complete" will indicate the completion of the save or restore action. Other status lines will indicate actions you should take prior to using the utility.
Attention!, This will not save/restore your current X32 show; for this you will need to use X32GetShow/X32SetShow. This will not save/restore all X32 current libraries types; for this you will need to use X32GetLib/X32SetLib
X32PunchControl
Many DAW software offer “automation”; a way to record and play DAW changes (volume, pan, effect settings, etc.) as audio is recorded to or played from the DAW. Nevertheless, this is limited to the DAW capabilities, and does not offer the physical comfort of a control surface for managing mix changes.
Many users with an X32 will want to use the large palette of audio capabilities the X32 offers, from basic multi-track mixing, FX assignments and changes, along with their DAW software.
X32PunchControl enables the missing link between your DAW software and X32, under the DAW timing control:
X32PunchControl will record all X32 OSC commands respective of mixing, channels and FX controls, routing, etc. into a file of time-stamped records. These records can later be played again, in sync with the audio from DAW to X32, thanks to the recorded time stamp and the MIDI time code from the DAW to X32PunchControl. These records can also be modified in real time when playing DAW audio and the already recorded data, via standard punch in/out operations. This way you can incrementally enhance your mix, by applying successive modifications. When re-positioning the DAW song cursor prior or further to the current position, X32PunchControl will manage keeping up with the DAW software, replaying (catching up) OSC commands to ensure the X32 state is what it should be at the cursor position, so your mix, controls, effects are all correctly set.
In all cases the data is always recorded in real time to a file. X32PunchControl typically uses 2 files, one for reading only (if a previous recording has taken place) and one for writing only. When done, the “writing” file becomes the “reading” file for the next update or play X32PunchControl session. In order to start from a known state of settings, routing, etc., X32PunchControl enables loading an X32 scene file from the X32 scene library section.
Most transport options and commands needed during normal workflow are under the control of X32PunchControl. This can be done from the program GUI, clicking on transport buttons (REW, PLAY, PAUSE, PUNCH, RECORD, STOP, FF), or using a user selectable set of buttons, directly from the X32. X32PunchControl enables assigning transport buttons to a set of X32 Buttons of the User Assign Section.
X32Commander
X32Commander scans for a user selected subset of X32 Commands. If a matching command is found, the tool can fire a MIDI or OSC command to another device, optionally using parameters sent with the matching command.
When using the X32 Command parameters, a formula can be applied:
#
#	The reverse polish notation calculator supports the following operators, on numbers,
#	(possibly preceded with a $ to represent a MIDI parameter), or hexadecimal data:
#	(+) (-) (*) (/)  Boolean operators (~ >> << & ^ |), modulo (%) on ints, test operator (?),
#	equal comparison (=), different comparison (!), exp (e), log_n conversion (l),
#	log_10 conversion (L), and truncate to int (i).
The program can be launched directly, in that case it will attempt to open ./X32Commander.txt, a file that contains the list of commands to match and replace with user selected commands. X32Commander can also be launched from a terminal window, with a -f option, enabling you to create and keep a set of files to fit different situations.
Below is an example of user command file, used at program startup used to have a second X32 mimic what the first one does; Make sure to use with version 1.10 or later.
# X32Commander translation file ©Patrick-Gilles Maillot
# These two first lines must be kept part of the this file
#
# Describes and lists MIDI or OSC command to send, corresponding to the X32
# OSC command the program scans for, listed below.
# A line starting with M means the expected command to send will be a MIDI command
#                      O means the expected command to send will be an OSC command
# In the command to send, a '$0' string element will be replaced by the parameter value
# of the respective OSC command 0: first parameter, 1: 2nd parameter, and so on
# '$n' parameters or their calculated data must be enclosed within '[' and ']' characters
#
#    The reverse polish notation calculator supports the following operators, on numbers,
#    (possibly preceded with a $ to represent a MIDI parameter), or hexadecimal data:
#    (+) (-) (*) (/)  Boolean operators (~ >> << & ^ |), modulo (%) on ints, test operator (?),
#    equal comparison (=), different comparison (!), exp (e), log_n conversion (l),
#    log_10 conversion (L), and truncate to int (i).
#
# Once all M (for Midi) or O (for OSC) commands are detailed, a wildcard line as below can be
# set to mention that any other OSC command should just be copied to OSC output
# The line should be (without quotes) "O   *   "
#
# comment line below if only one instance of a line can match
scan all
O   *   # Just copy everything to output --- WARNING! Do not use if OSC in and
#         out IP addresses are the same or you'll end-up with infinite loops
#
# end of file
Below is an example of user selection, saved in a file used at program startup:
# X32Commander translation file ©Patrick-Gilles Maillot
# These two first lines must be kept part of the this file
#
# Describes and lists MIDI or OSC command to send, corresponding to the X32
# OSC command the program scans for, listed below.
# A line starting with M means the expected command to send will be a MIDI command
#                      O means the expected command to send will be an OSC command
# In the command to send, a '$0' string element will be replaced by the parameter value
# of the respective OSC command 0: first parameter, 1: 2nd parameter, and so on
# '$n' parameters or their calculated data must be enclosed within '[' and ']' characters
#
#    The reverse polish notation calculator supports the following operators, on numbers,
#    (possibly preceded with a $ to represent a MIDI parameter), or hexadecimal data:
#    (+) (-) (*) (/)  Boolean operators (~ >> << & ^ |), modulo (%) on ints, test operator (?),
#    equal comparison (=), different comparison (!), exp (e), log_n conversion (l),
#    log_10 conversion (L), and truncate to int (i).
#
# Once all M (for Midi) or O (for OSC) commands are detailed, a wildcard line as below can be
# set to mention that any other OSC command should just be copied to OSC output
# The line should be (without quotes) "O   *   "
#
# comment line below if only one instance of a line can match
scan all
#
M   /-stat/selidx ,i 0        | F0 7F 00 [$0] 02 F7    # first command select channel 1
#                                                 ... sends F0 7F 02 00 02 F7 for chan 1
#                                                 ... sends F0 7F 02 01 02 F7 for chan 2
# Channel Faders [0., 1.]-> [0..127] etc.
O   /ch/01/mix/fader ,f 0     | /ch/05/mix/fader ,f [1 $0 -]    # for fader moves on channel 1
O   /ch/02/mix/fader ,f 0     | /ch/06/mix/fader ,f [2 $0 *]    # for fader moves on channel 2
O   /ch/03/mix/fader ,f 0     | /ch/07/mix/fader ,f [1 $0 -]    # for fader moves on channel 3
O   /ch/03/mix/fader ,f 0     | /ch/08/mix/fader ,f [2 $0 *]    # for fader moves on channel 3
M   /ch/03/mix/fader ,f 0     | F0 7F 04 [$0 127 *] 02 F7       # for fader moves on channel 3
M   /ch/04/mix/fader ,f 0     | F0 7F 04 [1 $0 - 127 *] 02 F7   # for fader moves on channel 4
#
# end of file
Below is an example of user selection, saved in a file used at program startup:
# X32Commander translation file ©Patrick-Gilles Maillot
# These two first lines must be kept part of the this file
#
# Describes and lists MIDI or OSC command to send, corresponding to the X32
# OSC command the program scans for, listed below.
# A line starting with M means the expected command to send will be a MIDI command
#                      O means the expected command to send will be an OSC command
# In the command to send, a '$0' string element will be replaced by the parameter value
# of the respective OSC command 0: first parameter, 1: 2nd parameter, and so on
# '$n' parameters or their calculated data must be enclosed within '[' and ']' characters
#
#    The reverse polish notation calculator supports the following operators, on numbers,
#    (possibly preceded with a $ to represent a MIDI parameter), or hexadecimal data:
#    (+) (-) (*) (/)  Boolean operators (~ >> << & ^ |), modulo (%) on ints, test operator (?),
#    equal comparison (=), different comparison (!), exp (e), log_n conversion (l),
#    log_10 conversion (L), and truncate to int (i).
#
# Once all M (for Midi) or O (for OSC) commands are detailed, a wildcard line as below can be
# set to mention that any other OSC command should just be copied to OSC output
# The line should be (without quotes) "O   *   "
#
# comment line below if only one instance of a line can match
scan all
#
# This example file sets ch10 as the stereo pair of ch01
# Commands may be added or removed in order to adjust or optimize what parts of the audio path
# are actually used. Note that pan functions are always set as [1 $0 -] to move in opposite direction
#
# General settings
O   /ch/01/config/color ,i 0            | /ch/10/config/color ,i [$0]
O   /ch/01/delay/on ,i 0                | /ch/10/delay/on ,i [$0]
O   /ch/01/delay/time ,f 0              | /ch/10/delay/time ,i [$0]
# Preamp section - may adjust to adapt to uneven levels
O   /ch/01/preamp/trim ,f 0             | /ch/10/preamp/trim ,f [$0]
O   /ch/01/preamp/invert ,i 0           | /ch/10/preamp/invert ,i [$0]
O   /ch/01/preamp/hpon ,i 0             | /ch/10/preamp/hpon ,i [$0]
O   /ch/01/preamp/hpslope ,i 0          | /ch/10/preamp/hpslope ,i [$0]
O   /ch/01/preamp/hpf ,f 0              | /ch/10/preamp/hpf ,f [$0]
# Gate
O   /ch/01/gate/on ,i 0                 | /ch/10/gate/on ,i [$0]
O   /ch/01/gate/mode ,i 0               | /ch/10/gate/mode ,i [$0]
O   /ch/01/gate/thr ,f 0                | /ch/10/gate/thr ,f [$0]
O   /ch/01/gate/range ,f 0              | /ch/10/gate/range ,f [$0]
O   /ch/01/gate/attack ,f 0             | /ch/10/gate/attack ,f [$0]
O   /ch/01/gate/hold ,f 0               | /ch/10/gate/hold ,f [$0]
O   /ch/01/gate/release ,f 0            | /ch/10/gate/release ,f [$0]
O   /ch/01/gate/keysrc ,i 0             | /ch/10/gate/keysrc ,i [$0]
O   /ch/01/gate/filter/on ,i 0          | /ch/10/gate/filter/on ,i [$0]
O   /ch/01/gate/filter/type ,i 0        | /ch/10/gate/filter/type ,i [$0]
O   /ch/01/gate/filter/f ,f 0           | /ch/10/gate/filter/f ,f [$0]
# Comp
O   /ch/01/dyn/on ,i 0                  | /ch/10/dyn/on ,i [$0]
O   /ch/01/dyn/mode ,i 0                | /ch/10/dyn/mode ,i [$0]
O   /ch/01/dyn/det ,i 0                 | /ch/10/dyn/det ,i [$0]
O   /ch/01/dyn/env ,i 0                 | /ch/10/dyn/env ,i [$0]
O   /ch/01/dyn/thr ,f 0                 | /ch/10/dyn/thr ,f [$0]
O   /ch/01/dyn/ratio ,i 0               | /ch/10/dyn/ratio ,i [$0]
O   /ch/01/dyn/knee ,f 0                | /ch/10/dyn/knee ,f [$0]
O   /ch/01/dyn/mgain ,f 0               | /ch/10/dyn/mgain ,f [$0]
O   /ch/01/dyn/attack ,f 0              | /ch/10/dyn/attack ,f [$0]
O   /ch/01/dyn/hold ,f 0                | /ch/10/dyn/hold ,f [$0]
O   /ch/01/dyn/release ,f 0             | /ch/10/dyn/release ,f [$0]
O   /ch/01/dyn/pos ,i 0                 | /ch/10/dyn/pos ,i [$0]
O   /ch/01/dyn/keysrc ,i 0              | /ch/10/dyn/keysrc ,i [$0]
O   /ch/01/dyn/mix ,f 0                 | /ch/10/dyn/mix ,f [$0]
O   /ch/01/dyn/auto ,i 0                | /ch/10/dyn/auto ,i [$0]
O   /ch/01/dyn/filter/on ,i 0           | /ch/10/dyn/filter/on ,i [$0]
O   /ch/01/dyn/filter/type ,i 0         | /ch/10/dyn/filter/type ,i [$0]
O   /ch/01/dyn/filter/f ,f 0            | /ch/10/dyn/filter/f ,f [$0]
# Insert
O   /ch/01/insert/on ,i 0               | /ch/10/insert/on ,i [$0]
O   /ch/01/insert/pos ,i 0              | /ch/10/insert/pos ,i [$0]
O   /ch/01/insert/sel ,i 0              | /ch/10/insert/sel ,i [$0]
# EQ
O   /ch/01/eq/on ,i 0                   | /ch/10/eq/on ,i [$0]
O   /ch/01/eq/1/type ,i 0               | /ch/10/eq/1/type ,i [$0]
O   /ch/01/eq/1/f ,f 0                  | /ch/10/eq/1/f ,f [$0]
O   /ch/01/eq/1/g ,f 0                  | /ch/10/eq/1/f ,g [$0]
O   /ch/01/eq/1/q ,f 0                  | /ch/10/eq/1/f ,q [$0]
O   /ch/01/eq/2/type ,i 0               | /ch/10/eq/2/type ,i [$0]
O   /ch/01/eq/2/f ,f 0                  | /ch/10/eq/2/f ,f [$0]
O   /ch/01/eq/2/g ,f 0                  | /ch/10/eq/2/f ,g [$0]
O   /ch/01/eq/2/q ,f 0                  | /ch/10/eq/2/f ,q [$0]
O   /ch/01/eq/3/type ,i 0               | /ch/10/eq/3/type ,i [$0]
O   /ch/01/eq/3/f ,f 0                  | /ch/10/eq/3/f ,f [$0]
O   /ch/01/eq/3/g ,f 0                  | /ch/10/eq/3/f ,g [$0]
O   /ch/01/eq/3/q ,f 0                  | /ch/10/eq/3/f ,q [$0]
O   /ch/01/eq/4/type ,i 0               | /ch/10/eq/4/type ,i [$0]
O   /ch/01/eq/4/f ,f 0                  | /ch/10/eq/4/f ,f [$0]
O   /ch/01/eq/4/g ,f 0                  | /ch/10/eq/4/f ,g [$0]
O   /ch/01/eq/4/q ,f 0                  | /ch/10/eq/4/f ,q [$0]
# SENDS - remove unnecessary/unwanted ones if needed
O   /ch/01/mix/on ,i 0                  | /ch/10/mix/on ,i [$0]
O   /ch/01/mix/fader ,f 0               | /ch/10/mix/fader ,f [$0]
O   /ch/01/mix/st ,i 0                  | /ch/10/mix/st ,i [$0]
O   /ch/01/mix/pan ,f 0                 | /ch/10/mix/pan ,f [1 $0 -]
O   /ch/01/mix/mono ,i 0                | /ch/10/mix/mono ,i [$0]
O   /ch/01/mix/mlevel ,f 0              | /ch/10/mix/mlevel ,f [$0]
O   /ch/01/mix/01/on ,i 0               | /ch/10/mix/01/on ,i [$0]
O   /ch/01/mix/01/level ,f 0            | /ch/10/mix/01/level ,f [$0]
O   /ch/01/mix/01/pan ,f 0              | /ch/10/mix/01/pan ,f [1 $0 -]
O   /ch/01/mix/01/type ,i 0             | /ch/10/mix/01/type ,i [$0]
O   /ch/01/mix/02/on ,i 0               | /ch/10/mix/02/on ,i [$0]
O   /ch/01/mix/02/level ,f 0            | /ch/10/mix/02/level ,f [$0]
O   /ch/01/mix/03/on ,i 0               | /ch/10/mix/03/on ,i [$0]
O   /ch/01/mix/03/level ,f 0            | /ch/10/mix/03/level ,f [$0]
O   /ch/01/mix/03/pan ,f 0              | /ch/10/mix/03/pan ,f [1 $0 -]
O   /ch/01/mix/03/type ,i 0             | /ch/10/mix/03/type ,i [$0]
O   /ch/01/mix/04/on ,i 0               | /ch/10/mix/04/on ,i [$0]
O   /ch/01/mix/04/level ,f 0            | /ch/10/mix/04/level ,f [$0]
O   /ch/01/mix/05/on ,i 0               | /ch/10/mix/05/on ,i [$0]
O   /ch/01/mix/05/level ,f 0            | /ch/10/mix/05/level ,f [$0]
O   /ch/01/mix/05/pan ,f 0              | /ch/10/mix/05/pan ,f [1 $0 -]
O   /ch/01/mix/05/type ,i 0             | /ch/10/mix/05/type ,i [$0]
O   /ch/01/mix/06/on ,i 0               | /ch/10/mix/06/on ,i [$0]
O   /ch/01/mix/06/level ,f 0            | /ch/10/mix/06/level ,f [$0]
O   /ch/01/mix/07/on ,i 0               | /ch/10/mix/07/on ,i [$0]
O   /ch/01/mix/07/level ,f 0            | /ch/10/mix/07/level ,f [$0]
O   /ch/01/mix/07/pan ,f 0              | /ch/10/mix/07/pan ,f [1 $0 -]
O   /ch/01/mix/07/type ,i 0             | /ch/10/mix/07/type ,i [$0]
O   /ch/01/mix/08/on ,i 0               | /ch/10/mix/08/on ,i [$0]
O   /ch/01/mix/08/level ,f 0            | /ch/10/mix/08/level ,f [$0]
O   /ch/01/mix/09/on ,i 0               | /ch/10/mix/09/on ,i [$0]
O   /ch/01/mix/09/level ,f 0            | /ch/10/mix/09/level ,f [$0]
O   /ch/01/mix/09/pan ,f 0              | /ch/10/mix/09/pan ,f [1 $0 -]
O   /ch/01/mix/09/type ,i 0             | /ch/10/mix/09/type ,i [$0]
O   /ch/01/mix/10/on ,i 0               | /ch/10/mix/10/on ,i [$0]
O   /ch/01/mix/10/level ,f 0            | /ch/10/mix/10/level ,f [$0]
O   /ch/01/mix/11/on ,i 0               | /ch/10/mix/11/on ,i [$0]
O   /ch/01/mix/11/level ,f 0            | /ch/10/mix/11/level ,f [$0]
O   /ch/01/mix/11/pan ,f 0              | /ch/10/mix/11/pan ,f [1 $0 -]
O   /ch/01/mix/11/type ,i 0             | /ch/10/mix/11/type ,i [$0]
O   /ch/01/mix/12/on ,i 0               | /ch/10/mix/12/on ,i [$0]
O   /ch/01/mix/12/level ,f 0            | /ch/10/mix/12/level ,f [$0]
O   /ch/01/mix/13/on ,i 0               | /ch/10/mix/13/on ,i [$0]
O   /ch/01/mix/13/level ,f 0            | /ch/10/mix/13/level ,f [$0]
O   /ch/01/mix/13/pan ,f 0              | /ch/10/mix/13/pan ,f [1 $0 -]
O   /ch/01/mix/13/type ,i 0             | /ch/10/mix/13/type ,i [$0]
O   /ch/01/mix/14/on ,i 0               | /ch/10/mix/14/on ,i [$0]
O   /ch/01/mix/14/level ,f 0            | /ch/10/mix/14/level ,f [$0]
O   /ch/01/mix/15/on ,i 0               | /ch/10/mix/15/on ,i [$0]
O   /ch/01/mix/15/level ,f 0            | /ch/10/mix/15/level ,f [$0]
O   /ch/01/mix/15/pan ,f 0              | /ch/10/mix/15/pan ,f [1 $0 -]
O   /ch/01/mix/15/type ,i 0             | /ch/10/mix/15/type ,i [$0]
O   /ch/01/mix/16/on ,i 0               | /ch/10/mix/16/on ,i [$0]
O   /ch/01/mix/16/level ,f 0            | /ch/10/mix/16/level ,f [$0]
# DCA/Mute group
O   /ch/01/grp/dca ,i 0                 | /ch/10/grp/dca ,i [$0]
O   /ch/01/grp/mute ,i 0                | /ch/10/grp/mute ,i [$0]
# Automix
O   /ch/01/automix/group ,i 0           | /ch/10/automix/group ,i [$0]
O   /ch/01/automix/weight ,i 0          | /ch/10/automix/weight ,i [$0]
#
# end of file
Such tool can enable you to control for example a lighting system, certain features of a DAW connected to X32, or even another X32 family member. See it in action: https://youtu.be/W_UQt0YdnhU
X32CopyFX
X32CopyFX Reset or Copy sides or full parameters set from an effect to itself or another.
This small utility is the Windows GUI equivalent to the command line X32GEQ2cpy tool which runs as a Unix or Windows command line utility, with a few additions.
As one launches X32CopyFX, the tool displays 5 fields the user has to fill;
The first one to fill is for the X32 IP address. As soon a the IP address is entered and the user clicks on "Connect", the tool request from the X32 its set of currently loaded in the X32. The list of available effects is loaded into the two combo-boxes left of the APPLY button. The user then selects a source (FROM) and destination (TO) effect slot. A third combo-box lists the possible operations: reset, copy side A to side B, or the opposite (applies to the FROM effect), or copy the FROM effect data to the TO effect. The "Copy Master" check box enables the user to select if the selected operation also applies to the Master parameter (#32 and #64 for EQ types).
Starting with version 1.20, The tool offers two RESET types of effects settings to their respective default values. Choices are to reset only the effect in the FROM: box, or all effects from the FROM: to the TO: boxes; each effect will receive their respective default values.
Starting with ver 1.30, X32CopyFX will accept an optional "-f " argument to the main program. If such option is passed on, the provided by the user (a text file) is expected to hold pairs of lines in the form:
{
  effect name
  effect parameters values
}
This enables to set default values for effects to user preferences rather than default X32 values, for example the file below will overwrite HALL and PIT default values, all other effects will keep the X32 standard default values.
<myfx.txt>:
HALL
40 1.57 60 5k74 25 0.0 83 7k2 0.95 25 50 40
PIT
-12. 0 5.0 52 15k8 80
The APPLY button starts the selected operation. The button momentarily (1 second) displays "DONE" as the operation progresses.
NOTE: Microsoft Defender seems to inappropriately report this program as potential malware: X32CopyFX uses (arrays of) pointers and can overwrite some of these pointers (managing memory correctly) to replace X32 effects parameters default values by user sets. While a very effective way of doing this (from a memory management point of view), it can be something considered “suspicious”.
X32GetLib
Manage your Presets (Channel, Effect, Routing) on your PC from your X32. No more limits and a lot of flexibility to change settings and values for your preset files.
Connect to X32, select a destination directory on your PC for Preset files. Select the preset library you want to retrieve (Channel, Effects or Routing). Hit the "Xfer Presets" button to start the transfer. A status will display as the transfer progresses and when transfer is complete. Starting with ver. 0.20, X32GetLib enables to save ALL presets (Channel, Effects, and Routing) in a single click.
X32SetLib
Manage your Presets (Channel, Effect, Routing) on your PC and send them to X32. No more limits and a lot of flexibility to change settings and values for your preset files.
Connect to X32, browse your PC for Preset files (Channel, Effect or Routing) and select one or multiple presets to transfer to X32 Presets library.
Set the position for the first preset in the library, positions will increment automatically, as presets are saved in the X32 library. Hit the "Xfer Presets" button to start the transfer. A status will display as the transfer progresses and when transfer is complete. Important note: All your preset files should be version 2.1; You can easily check this with a text editor (file begins with a #2.1# header) if not, you can actually set the header manually, as this does the trick in most situations.
X32Midi2OSC
Have X32 receive OSC commands from a MIDI device or program.
X32Midi2OSC connects to your X32, and to a MIDI source. It intercepts MIDI specific data (user selected) messages, and can send a user selected OSC command to the X32 upon reception of the MIDI data. The program also provides MIDI thru capability to sort of act as "man in the middle" in a MIDI connection. The list of MIDI commands and their respective OSC messages are saved in a configuration file, the basic parameters for the program (such as IP address, etc.) are also kept in a separate file.
MIDI commands are typically 3 bytes (some are 2 and SYSEX data can be a lot more): Each command comes with the following data: , ,
The program can apply operations to any of the MIDI command attributes to modulate the OSC message parameters that will be sent. To this end, an RPN calculator is used to apply operations to the incoming MIDI data before applying it to OSC message parameters. Midi thru is untouched.
The "Dbg" button enables easy debugging of MIDI commands that are received by the program, Each recognized MIDI message will be displayed in hexa form. Use only when debugging specific patterns! as this blocks the program until the displayed message is acknowledged.
The following convention sand operators apply: $0, $1, $2 represent the incoming MIDI , , , respectively.
At this time, only short MIDI messages are considered. Only short SYSEX messages are considered. Long SYSEX is ignored. The list of accepted MIDI commands is listed below in the conversion file example.
The reverse polish notation calculator supports the following operators, on numbers, (possibly preceded with a $ to represent a MIDI parameter), or hexadecimal data: (+) (-) (*) (/) Boolean operators (~ >> << & ^ |), modulo (%) on ints, test operator (?), equal comparison (=), different comparison (!), exp (e), log_n conversion (l), log_10 conversion (L), and truncate to int (i).
Formulas should be saved in a file with a ".m2o" extension, as shown below:
#
#
# Translation file for Midi2OSC
#
# ©2018 Patrick-Gilles Maillot
#
#
# Expected format uses space or tab character as separator and separates
# MIDI and respective OSC command by a '|' character:
#
#    {A0..F0} ch d1 d2 | <OSC message>
#
#   - B0 means MIDI control message, where:
#        ch is the channel number [1..16]
#        d1 is the control event number [0..127]
#        d2 is the value associated to the command [0..127]
#
# OSC messages consist of an OSC Address Pattern followed by an
# OSC Type Tag String followed by zero or more OSC Arguments.
#
# Possible OSC Type Tags are i or f
#
# OSC Arguments are listed between brakets '[]' and can be a fixed value,
# such as 0, 1 or an expressionsuch as $n to make reference to data issued
# from the incoming MIDI command, where
#        $0 represents the channel number
#        $1 represents the control event number
#        $2 represents the value data (the value 0 or 127 here will
#                be replaced during execution with the actual data
#                from the MIDI command
#
# Accepted MIDI messages:
#    Message                  Type        Data 1                 Data 2
#    Note Off                  8n        Note Number            Velocity
#    Note On                   9n        Note Number            Velocity
#    Polyphonic Aftertouch     An        Note Number            Pressure
#    Control Change            Bn        Controller Number      Data
#    Program Change            Cn        Program Number         from file
#    Channel Aftertouch        Dn        Pressure               from file
#    Pitch Wheel               En        LSB                    MSB
#    System Message            Fn        depends on message     depends on message
#
#    Key
#    n is the MIDI Channel Number (0-F)
#    LSB is the Least Significant Byte
#    MSB is the Least Significant Byte
#
#
#    The reverse polish notation calculator supports the following operators, on numbers,
#    (possibly preceded with a $ to represent a MIDI parameter), or hexadecimal data:
#    (+) (-) (*) (/)  Boolean operators (~ >> << & ^ |), modulo (%) on ints, test operator (?),
#    equal comparison (=), different comparison (!), exp (e), log_n conversion (l),
#    log_10 conversion (L), and truncate to int (i).
#
# Lines starting with a # are comment lines
#
# some examples below (uncomment if you want to test)
#B0  1 10 127 | /ch/10/mix/fader ,f [3 1 & 2 < / 3]     # testing simple operations
#B0  1 11 127 | /ch/11/mix/fader ,f [$1]                # testing simple access to parameter
#B0  1 12 127 | /ch/12/mix/fader ,f [127 $2 -]          # equivalent to inversing effect
#B0  1 13 127 | /ch/12/mix/fader ,fi [127 $2 -] [$2]    # not a valid command, but for test purpose
#90  1 56 127 | /ch/26/mix/fader ,f [$2 2 * i 60 /]     # () force an int value
#
B0 3 12 127 | /fxrtn/01/mix/on ,i [$2 0 =]              # if $2 is 0 then result is 1 (true), 0 (false) otherwise
B0 4 12 127 | /ch/01/mix/fader ,f [$2 3 ! 0.7 0.5 ?]    # if $2 equals 3 then result is 0.5, 0.7 otherwise
#
GetSceneName
Returns the name of the Scene that has just been loaded to X32
The utility connects to the X32 (default IP is 192.168.0.62 and can be changed with option -i) and awaits the set of commands relative to a new scene being loaded into the X32. When this occurs, it returns the index and name of the scene that was just loaded to .
The tool can do this a single time [-o option set to 1 (default)] or indefinitely (a ctrl-C is then necessary to stop the tool).
usage: GetSceneName [-i X32 console ipv4 address]
                     default IP is 192.168.1.62

                    [-v 0|1 prints welcome and connection status messages [default: 1]]
                    [-o 0|1 exits at first occurrence [default: 1]]
       Connects to X32 and scans for new scenes being loaded; when this happens,
       the newly loaded scene name will be echoed to <stdout>
Examples:
XPS C:> ./GetSceneName
 GetSceneName - v0.2 - (c)2018 Patrick-Gilles Maillot

Connecting to X32. Done!
01 - name1
02 - name2
<ctrl-c>
PS C:> ./GetSceneName -v 0
01 - name1
02 - name2
<ctrl-c>
XPS C:> ./GetSceneName -v 0
01 - name1
XPS C:> ./GetSceneName -v 0 -o 0
02 - name2
01 - name1
<ctrl-c>
XPS C:>