Building Microsoft Dynamics 365 WebResources with Visual Studio and angular
This project demonstrates an easy track to develop Microsoft Dynamics 365 WebResource components with angular. The setup has been created on a on-premesis development solution, and you might meet several obstacles if you try to develop against an online solution. The final solution can however be deploy online or on-premesis, using the normal Dynamics 365 solution deployment method.
How to use, and where will it end up - leaving you.
This guide is a step by step guide for building a very simple Visual Studio Solution that will allow you to create a full angular application that can run inside a Dynamic 365 solution, online or on-premises.
Even though a Dynamics 365 WebResource is a web application, this project is using a simple command line tool as template. This is to make it simple to have development, build and deploy within a single project template.
For real life project, use one of the Web Templates in Visual Studio, and let angular cli put your Dynamics 365 WebResource files in a subfolder within that project. That will allow you to add external resources, ex. bootstrap CSS to the root folder of your web project, and that way get intelligence for these resources. To host the deployment tool in such project you can simply create two projects in the solution, one for the Web Resource and one for the Deployment tool.
The following topics will be covered
- Creating a solution
- Create an angular application with angular cli
- Add the angular application to your Visual Studio solution
- Deploy the application to Dynamics 365
- Make your angular cli application work inside Dynamics 365 - first in general, secondly with IE.
- Add a simple typescript xrm service that will allow data access through Dynamics 365 Web Api
- Setup a development environment that allow development and test, directly in Visual Studio, without prior deployment to Dynamics 365
Creating a solution
This project is a demo reference only, so the best starting point is proberbly not just to download this solution. But in very few steps, you can have your own solution up running.
- Open Visual Studio
- Create new project, using the template [Other Project Types > Visual Solutions > Blank Solution ], in this guide I assume you are naming i ''''MyAngularSolution''''
- Add a Command line project to the solution, name it Deploy, because that is what is eventually gonna do.
- If you wish to use Git or other source control repository, now it is the time to add your solution to source control. Use whatever process you normally use. If you don't add your solution to source control now, you might come in trouble later, because the angular cli will add git source control to your angular project, if the folder is not already under source control.
Create an angular application with angular cli
If you didn’t already install the angular cli tool, you need to do so now. Follow the guide from the link below.
Before you run too fast, just do the installation of angular cli for now. Get back here when you are ready to create a new angular app.
Now you have the angular cli tool as part of your development environment.
Open a command prompt, and navigate the the root of the Deploy project folder: (ex.)
C:\Projects\MyAngularSolution\Deploy
ng new demo
This will create a sub folder in you solution named demo (give your project whatever name corresponding to your need. It will eventually be used as the root name in your Dynamics 365 WebResources)
Now, go back to Visual Studio and add the needed folders to your Visual Studio project:
(Click the Deploy project, use the [Show all files] button in the Solution Explore, hightlight according to below and select Include in Project])

Just for the sake of confirmation, you can test run your application. This is done by opending a command prompt, navigate to
C:\Projects\MyAngularSolution\Deploy\Demo
and enter the following command
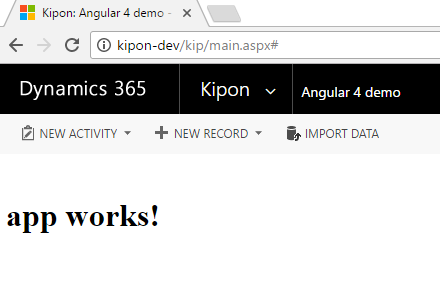
ng serve --open
This will start the ng development server and open a new browser window. You should see something like "app works!" in your browser window.
Deploy the application to your Dynamics 365
Next step is to deploy the application so it can run under Dynamics 365 as a WebResource. This is actually quite simple, because the only thing we need to do is to create a build, and then upload the files in the build as WebResources in our Dynamics 365 solution. As our project grows in size this can become a time consuming task due to the amount of files that must be uploaded and managed individually. Luckily the Dynamics 365 SDK allow us to automate the process. Below I will take you through the process – step by step, however the Deploy command line tool actually contains all the code for a fully automated process. So if you are a lucky rider, you might just dive directly into the code.
But first we need to to establish a build process
An angular project is basically just a bunch of html, css and typescript files. Alle these files need to be compiled into a workable web solution to be deployed under Dynamics 365. Dynamics 365 do understand html and css, but there is no direct support for typescript. The angular cli build process is the perfect tool to prepare files for upload. Below the manual process for creating a production ready build.
Open a command line tool and navigate to your angular page folder
C:\Projects\MyAngularSolution\Deploy\Demo
ng build --prod --output-hashing none
The --prod flag is telling angular to build an optimized version suiteable for production, and the --output-hasning is to tell the build tool not to hash the file names generated. The later flag is really convinient for the Dynamics 365 scenario, because Dynamics 365 is alrady hashing all resources before served to the browser, and new names for all files would be a nightmare to manage when uploading the files to Dynamics 365.
As a result of this process, ng build will generate a "dist" folder under the "...\demo" folder, containing all the files needed to run the application:
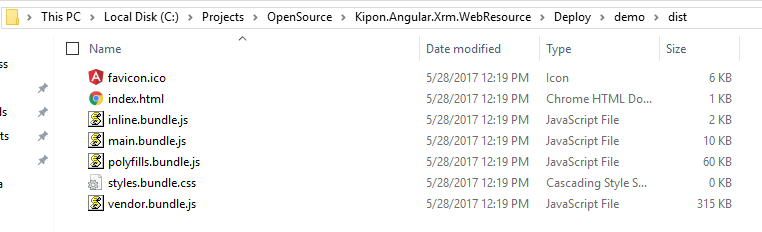
As you can see from the folder structure, ng build has create a nice simple structure with very few files. One could think that we can simply upload these to Dynamics 365 one by one. 7 files should not be a big deal. But that is not a workable solution. On each build of the application, all files need to be updated, because new modules and more might have been added and more. Secondly, as we start build the application, adding assets etc. will generate even more files. So we wish to automate that part of the process.
The (Dynamics 365 SDK) does contain a solution with a tool (SDK\Tools\WebResourceUtility) to upload a folder including all sub folders and files as web resource, so you could just go with that solution. The XrmToolBox also have a nice Web Resource manager that allow you to do the same. Personally i prefere a process where I can manage, script and automate the process, and the amount of code needed is fairly small, so that is the approach I will demonstrate here.
Creating a simple deploy tool
This sample is using the 2011 Organization Service to create and update WebResource, including solution references. The advantage of this is that the approach will also work with older versions of Dynamics CRM. I did not investigate in details if the methods used here is actually supported by the Dynamics 365 WebApi, I actually thing it is, and if that is the case, you might wanna go for that interface instead of using the 2011 OrganizationService.
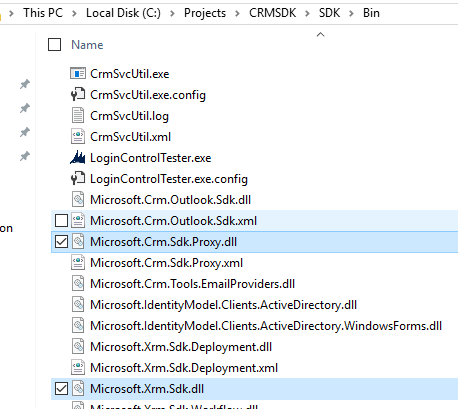
First of all, to create a command line tool with access to Dynamics 365, you need to include the SDK DLL. (Only the two files with checkmark)
Beside these libraries, my implementation is also using
System.Runtime.Serialization
System.ServiceModel
Mainly to parse the configuration file for uploading the resources to the Dynamics 365.
In a modern app, you should use NuGet, to get the needed libraries. Go-to Tools > NuGet Package Manager > Manage NuGet Package for solution, and install
"Microsoft.CrmSdk.CoreAssemblies". It will give same result with less hassel.
How does it work
Let me first explain how it works. In the angular folder (demo) i have place a simple json file named xrm.deploy.json. This file have all the connection details for uploading files to Dynamics 365
Deploy\Demo\xrm.deploy.json
[
  {
    "solution": "Angular4Demo",
    "name": "demo",
    "dist": "dist",
    "url": "http://kipon-dev/kip/XRMServices/2011/Organization.svc",
    "user": "auser",
    "password": "#aVerySecretPassword!"
    "routes": [
      "",
      "some/other/route"
    ]
  }
]
As you can see, this file contains information about the target server. What solution to hit, witch name to give the application, where to find the IOrganizationService, and how to connect.
Basically the settings is an array. This allow you to deploy the same code to several Dynamics 365 instances in one go.
Solution is the unique name of the Dynamics 365 solution to target. The solution will be used to lookup the publisher, and from there get the web resource name prefix.
name is the unique name to be used as web resource name. This allow you to deploy several angular application in the same Dynamics 365 solution. Each element deployed will be named [publicher-prefix]_/[name], in my case kipon_/demo/what-ever
dist is where to find the distribution files. The tool will simply upload all files and create a similar structure within Dynamics 365.
url, user, password should be Self-explaining.
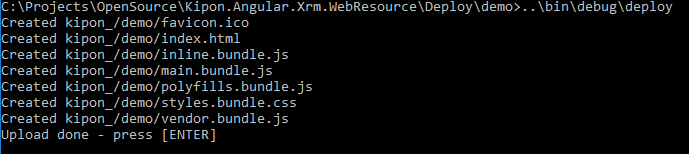
Since I have a running Dynamics 365 on my box on the "kipon-dev" domain, i am ready to go:
After i compiled the solution in Visual Studio, I can navigate to the the Deploy/Demo folder and call the deployment tool
..\bin\debug\Deploy
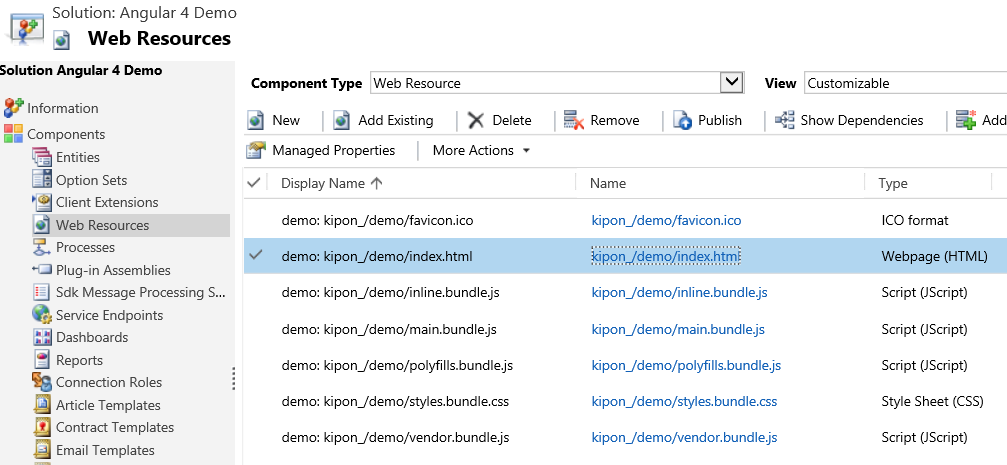
And looking within Dynamics 365 solution explore:
NEW (2019-08-23): Using angular routes in applications deployed to Dynamics 365.
In this context, routes is new. It adds the ability to deploy multiple instance of the index.html, named according the route name. This is powerfull if you wish to deploy the samme angular app in several forms, but with different starting points in the app. Angular routes allow you to define a start component for each url, and this way, you can point directly into different parts of you app, directly from you web resource, simply by letting this tool deploy several versions of the index.html file. The content of the index.html file will be manipulated for href="" and src="" to match how deep you make the path. That way these sources are loaded with correct relative urls, according to your routes. The lowest level of a route is you app name, added with a slash:
"" this route will become a url like https://yourorg.crm.microsoft.com/webresources/demo_/
"some/other/route" will become a url https://youror.crm.microsoft.com/webresources/demo_/some/other/route
There is however one hassel with working with routes. You need to define the <base> for routes to work in angular.
When you work in the "ng serve" devlopment environment, that is a none issue because you could simply keep the <base> tag that comes out of the box on an angular app, but deployed under Dynamics 365 webresources are hosted deep in the CRM solution path. This must be handled.
I am doing the following to solve this problem.
In the index.html file, I add the following javascript to "calculate the base". The script will default to "/". This is for angular running from the cli tool, but if it findes webresources in the url, it will calculate how the base should look when running inside Dynamics 365:
    document["ANG_BASE_URL"] = "/";

    var url = window.location.href;

    if (url.toLowerCase().indexOf('webresources') >= 0) {
      var spl = url.split('?')[0].split('/');
      if (spl.length > 3) {
        url = '/';
        for (var i = 3; i < (spl.length); i++) {
          if (spl[i] != null && spl[i] != '') {
            url += spl[i] + '/'
          }
        }
        document["ANG_BASE_URL"] = url;
      }
    }
Then you need to setup the base path in the angular app.module.ts
import { APP_BASE_HREF } from '@angular/common';

@NgModule({
  declarations: [
  ],
  imports: [
  ],
  providers: [
    { provide: APP_BASE_HREF, useValue: document["ANG_BASE_URL"] }
  ],
  bootstrap: [AppComponent]
})
export class AppModule { }
Now you can safely add the angular route module to your app, and link directly into specific areas of the app from Dynamics 365 web resources.
Behind the scene
The deploy tool is farily simple. It has a Setting.cs that maps 1-1 to the xrm.deploy.json, and the class has a simple static method that assumes the configuration file to be placed in current folder.
Then we have a ResourceTypeEnum.cs that simple defines the 10 different types of ressource Dynamics 365 is supporting. On top of that a simple Extensions.cs file that can map from a file name extension, ex .html to the corresponding resource type, ex. ResourceTypeEnum.Html.
The import manager have all the logic. The method used in the program is:
- Initially lookup the solution, and from there the publisher to get the CustomizationPrefix to be used on upload.
- Then for each file in the dist folder, lookup and update, or create if new a WebResource with correct name and type.
- If the file is new to the solution, also add the newly created WebResource to the solution.
The name and structure in Dynamics 365 will exactly correspond to the structure in the dist folder.
If the dist folder contains any files that cannot be mapped to one of the 10 types, the process will throw an exception.
Some details - creating a web resource, publish it, and finally attach it to a solution:
webResource = new Entity
{
    Id = Guid.NewGuid(),
    LogicalName = "webresource"
};
webResource["name"] = resourceName;
webResource["content"] = Convert.ToBase64String(File.ReadAllBytes(file));
webResource["displayname"] = name + ": " + resourceName;
webResource["description"] = "Imported as part of the " + name + " application";
webResource["webresourcetype"] = new Microsoft.Xrm.Sdk.OptionSetValue((int)filename.ToResourceType());
orgService.Create(webResource);

var publishRequest = new PublishXmlRequest
{
    ParameterXml = string.Format("<importexportxml><webresources><webresource>{0}</webresource></webresources></importexportxml>", webResource.Id)
};
orgService.Execute(publishRequest);

// attach new webResource to solution
var request = new Microsoft.Crm.Sdk.Messages.AddSolutionComponentRequest
{
    ComponentType = 61, // Web Resource,
    ComponentId = webResource.Id,
    SolutionUniqueName = solution
};
orgService.Execute(request);
If the webresource already exists, simply update it
if (new FileInfo(file).LastWriteTimeUtc > ((DateTime)webResource["modifiedon"]).ToUniversalTime())
{
    Console.WriteLine("Updating " + resourceName);

    webResource["content"] = Convert.ToBase64String(File.ReadAllBytes(file));
    orgService.Update(webResource);

    var publishRequest = new PublishXmlRequest
    {
        ParameterXml = string.Format("<importexportxml><webresources><webresource>{0}</webresource></webresources></importexportxml>", webResource.Id)
    };

    orgService.Execute(publishRequest);
}
Take a look at the ImportManager.cs file for a full view. It is less than 200 lines of code.
Make your angular cli application work - first in general, secondly with IE.
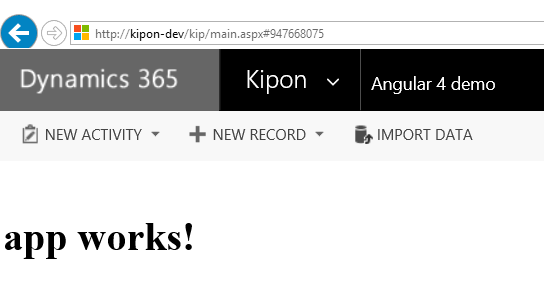
Now we have alle the components to run the angular application within Dynamics 365, you should target the [publisherprefix]_/name/index.html file whereever you choose to embed your angular page, in my case kipon_/demo/index.html
I have used the XrmToolBox site map editor to publish it on its own page directly from the Dynamics 365 main menu:
But initally the application does not work. You will get 404 on all resources. There is a simple reason for this. Angular cli is building a index.html page with a
<base href="/">Remove that tag from the index.html file, build your application again with the ng build command and finally redeploy using the Deploy tool. Now your application is working within chrome.
If you need to use routes the base is needed. Read the section above regarding angular routes. You still need to remove the base tag, but you define the base in another way.
But your application still don't run under IE10, or IE11, and of cause that is a major. Most users using Dynamics 365 is using Internet Explore. But also here there is a simple reason and solution. The problem is the default demo/src/polyfills.ts file provided by angular cli does not add support for anything in regards to older browsers. You will need to edit that file according to your need. The comments in the file is pretty much giving you all the direction you need. Remember to call npm --install xxx whenever you include a ressource that requires install.
After that - voila - now it works in IE as well:
Add a simple typescript xrm service that will allow data access through Dynamics 365 WebApi
So far, we have focused on the process of bootstrapping and deploying an angular application and make it run as a web resource within Dynamics 365. But creating such application, also indicates that we wish to access data from the Dynamics solution, otherwise what is the point of deploying it there.
This article will show how to create a webAPI service directly. If you wish to shortcut this part, you can take a look at my open source implementation for doing simple Dynamics 365 webAPI calles without to much hassel.
Take a look at kipon-xrmservice npm package
so..., I will now extend the angular application with a simple service than can use the Dynamics 365 Web Api to access data. I will not explore the full api, you can find details here:
First of all, i added a shared folder to the app dir to hold my xrm web api service. There i added shared\xrm.service.ts. Beside importing angular http, this file also defines some interfaces
import { Injectable } from '@angular/core';
import { Http, Response, Headers, RequestOptions } from '@angular/http';

import { Observable } from 'rxjs/Observable';
import 'rxjs/add/operator/catch';
import 'rxjs/add/operator/map';


interface XrmContext {
    getClientUrl(): string;
}

interface SearchResult {
    value: Entity[]
}

export interface Entity {

}

@Injectable()
export class XrmService {

    constructor(private http: Http) { }

    private apiUrl = '/api/data/v8.2/';

    getClientUrl() {
        if (window.parent != null && window.parent['Xrm'] != null) {
            var x = window.parent["Xrm"]["Page"]["context"] as XrmContext;
            if (x != null) {
                return x.getClientUrl();
            }
        }
        // fallback for development environment
        return "http://localhost:4200";
    }

    search(entityType: string, columns: string, filter: string): Observable<Entity[]> {

        let headers = new Headers({ 'Accept': 'application/json' });
        headers.append("OData-MaxVersion", "4.0");
        headers.append("OData-Version", "4.0");

        let options = new RequestOptions({ headers: headers });

        return this.http.get(this.getClientUrl() + this.apiUrl + entityType + "?$select=" + columns, options)
            .map(this.extractSearchResult)
            .catch(this.handleError);
    }

    private extractSearchResult(res: Response) {
        let body = res.json() as SearchResult;
        return body.value;
    }

    private handleError(error: Response | any) {
        // In a real world app, you might use a remote logging infrastructure
        let errMsg: string;
        if (error instanceof Response) {
            const body = error.json() || '';
            const err = body.error || JSON.stringify(body);
            errMsg = `${error.status} - ${error.statusText || ''} ${err}`;
        } else {
            errMsg = error.message ? error.message : error.toString();
        }
        console.error(errMsg);
        return Observable.throw(errMsg);
    }
}
This typescript class is defining som simple interface to map the fact that any WebResource deployed in Dynamics 365 is iframed, and the parent object holds a Xrm.Page.context from where the url for a Web Api call can be optained.
the getClientUrl() is getting the url from the parent, and the search(..) method is using this url to do a http get to the Web Api.
I have added this module to the app.module.ts file and also added it to the app.component.ts file
import { Component } from '@angular/core';
import { XrmService, Entity } from './shared/xrm.service'
@Component({
selector: 'app-root',
templateUrl: './app.component.html',
styleUrls: ['./app.component.css']
})
export class AppComponent {
errorMessage: string = null;
accounts: Entity[] = [];
constructor(private xrmService: XrmService) {
}
ngOnInit() {
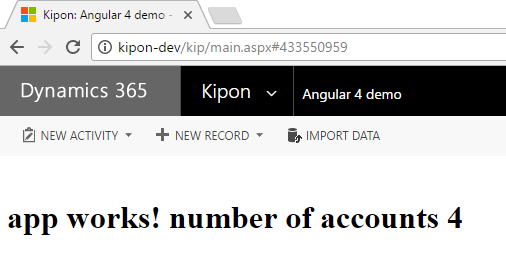
this.xrmService.search("accounts", "name", null)
.subscribe(entities => this.accounts = entities, error => this.errorMessage = <any>error);
}
title = 'app works!';
}This component is now importing the XrmService, and on ngOnInit it will call the search method to fetch all accounts. If any accounts is fetch, it will prove that the application is working.
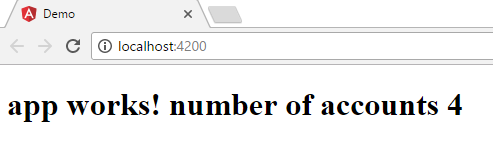
Finally to see the result, i added a bit to the html template app.component.html
<h1>
  {{title}} number of accounts {{accounts.length}}
</h1>
And voila, after build and deploy, my application is fetching and showing the count result of accounts from Dynamics 365.
Be aware, this xrm.service is way to simple to server all you needs when building WebResources for Dynaimcs 365, but at least it is a typescript based starting point.
Setup a development environment that allow development and test, directly in Visual Studio, without prior deployment to Dynamics 365
For onpremis development
Now we have an end-to-end solution for building and deploying angular based application. But when it comes to doing development, this environment is way too cumbersome. The
best solution would be if I could just use ng serve --open. For normal angular application that is trivial. We are already there, however adding the Dynamics 365 Web Api service
is adding complexity. We cannot get that service to run inside the ng serve, and using a hardcoded client const url in the xrm.service will cause cross-domain scripting issues in the browser.
If you are developing locally, and have an onpremise environemnt there is a work-around for this.
You friend is proxy support in the ng serve.
In the root folder of your angular app (Demo) add a file name proxy-config.json
{
  "/api/*": {
    "target": "http://kipon-dev/kip",
    "secure": false,
    "changeOrigin": true,
    "logLevel": "debug",
    "auth": "auser:#aVerySecretPassword!"
  }
}
This file is telling ng serve to route all /api/* requests to the target. The auth setting is adding authentication to the proxy. It is "basic" and that is a pain. If somebody would add support for Windows Authentication or Claim base authentication, this solution could work for any Dynamics 365 installation.
Because our xrm.service is falling back to a default url of the angular application, web service call to Dynamics 365 is already parsed to the ng server:
getClientUrl() {
    if (window.parent != null && window.parent['Xrm'] != null) {
        var x = window.parent["Xrm"]["Page"]["context"] as XrmContext;
        if (x != null) {
            return x.getClientUrl();
        }
    }
    // fallback for development environment
    return "http://localhost:4200";
}
When running the application with ng serve, there is no window.parent, so it will fall back to http://localhost:4200, witch is the default url for angular cli ng serve
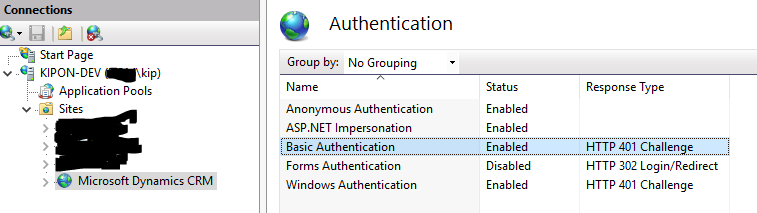
Finally, and here come the drawback, Dynamics 365 web application is deployed under IIS, but the setup does not support basic authentication. I changed that setting on my server to enabled, as shown below:
Voila - Now I can run my angular application with ng serve, having all the api requests routed through the ng serve, and parsed on to the Dynamics 365 server that will respond correctly.
Open a command prompt and navigate to your angular application folder (Demo)
ng serve --proxy-config proxy-config.json --open
Your application is running, and the Dynamics 365 requested is served by the proxy:
Thanks to Lucavice, I can also share an alternative approach, if you need to develop and test against an online environment.
These are the words from Lucavice
Locavice explains:
By starting Chrome with the shortcut '"C:\Program Files (x86)\Google\Chrome\Application\chrome.exe" --user-data-dir="C://Chrome dev session" --disable-web-security'
same origin policy gets disabled and you obtain two results:
CORS are disabled, therefore requests from localhost to Dynamics online go through If you login in Dynamics within this "special" Chrome session, the authentication Cookie is also sent when requesting a Dynamics resource from localhost. With the approach above, I can run ng serve and get full access to the Dynamics online API endpoints without plugins or any manual step. It is currently working really well for me.
Finally your can setup adal.js or msal.js
This article is explaning how to setup SPA applications that can run outside Dynamics 365:
For adal.js:
Setup external SPA application, integrating with Dynamics 365
For msal.js:
Happy angular - Dynamics 365 coding.
License
© 2019, Kipon ApS 2019. Released under MIT License.