openwisp / Ansible Openwisp2
Programming Languages
Projects that are alternatives of or similar to Ansible Openwisp2
ansible-openwisp2
![]()
![]()


Ansible role that installs the openwisp2 controller.
Tested on debian, ubuntu.
NOTE: it is highly suggested to use this procedure on clean virtual machines or linux containers.
Minimum ansible version supported: 2.5.
Help OpenWISP
Like OpenWISP? Find out how to help us!
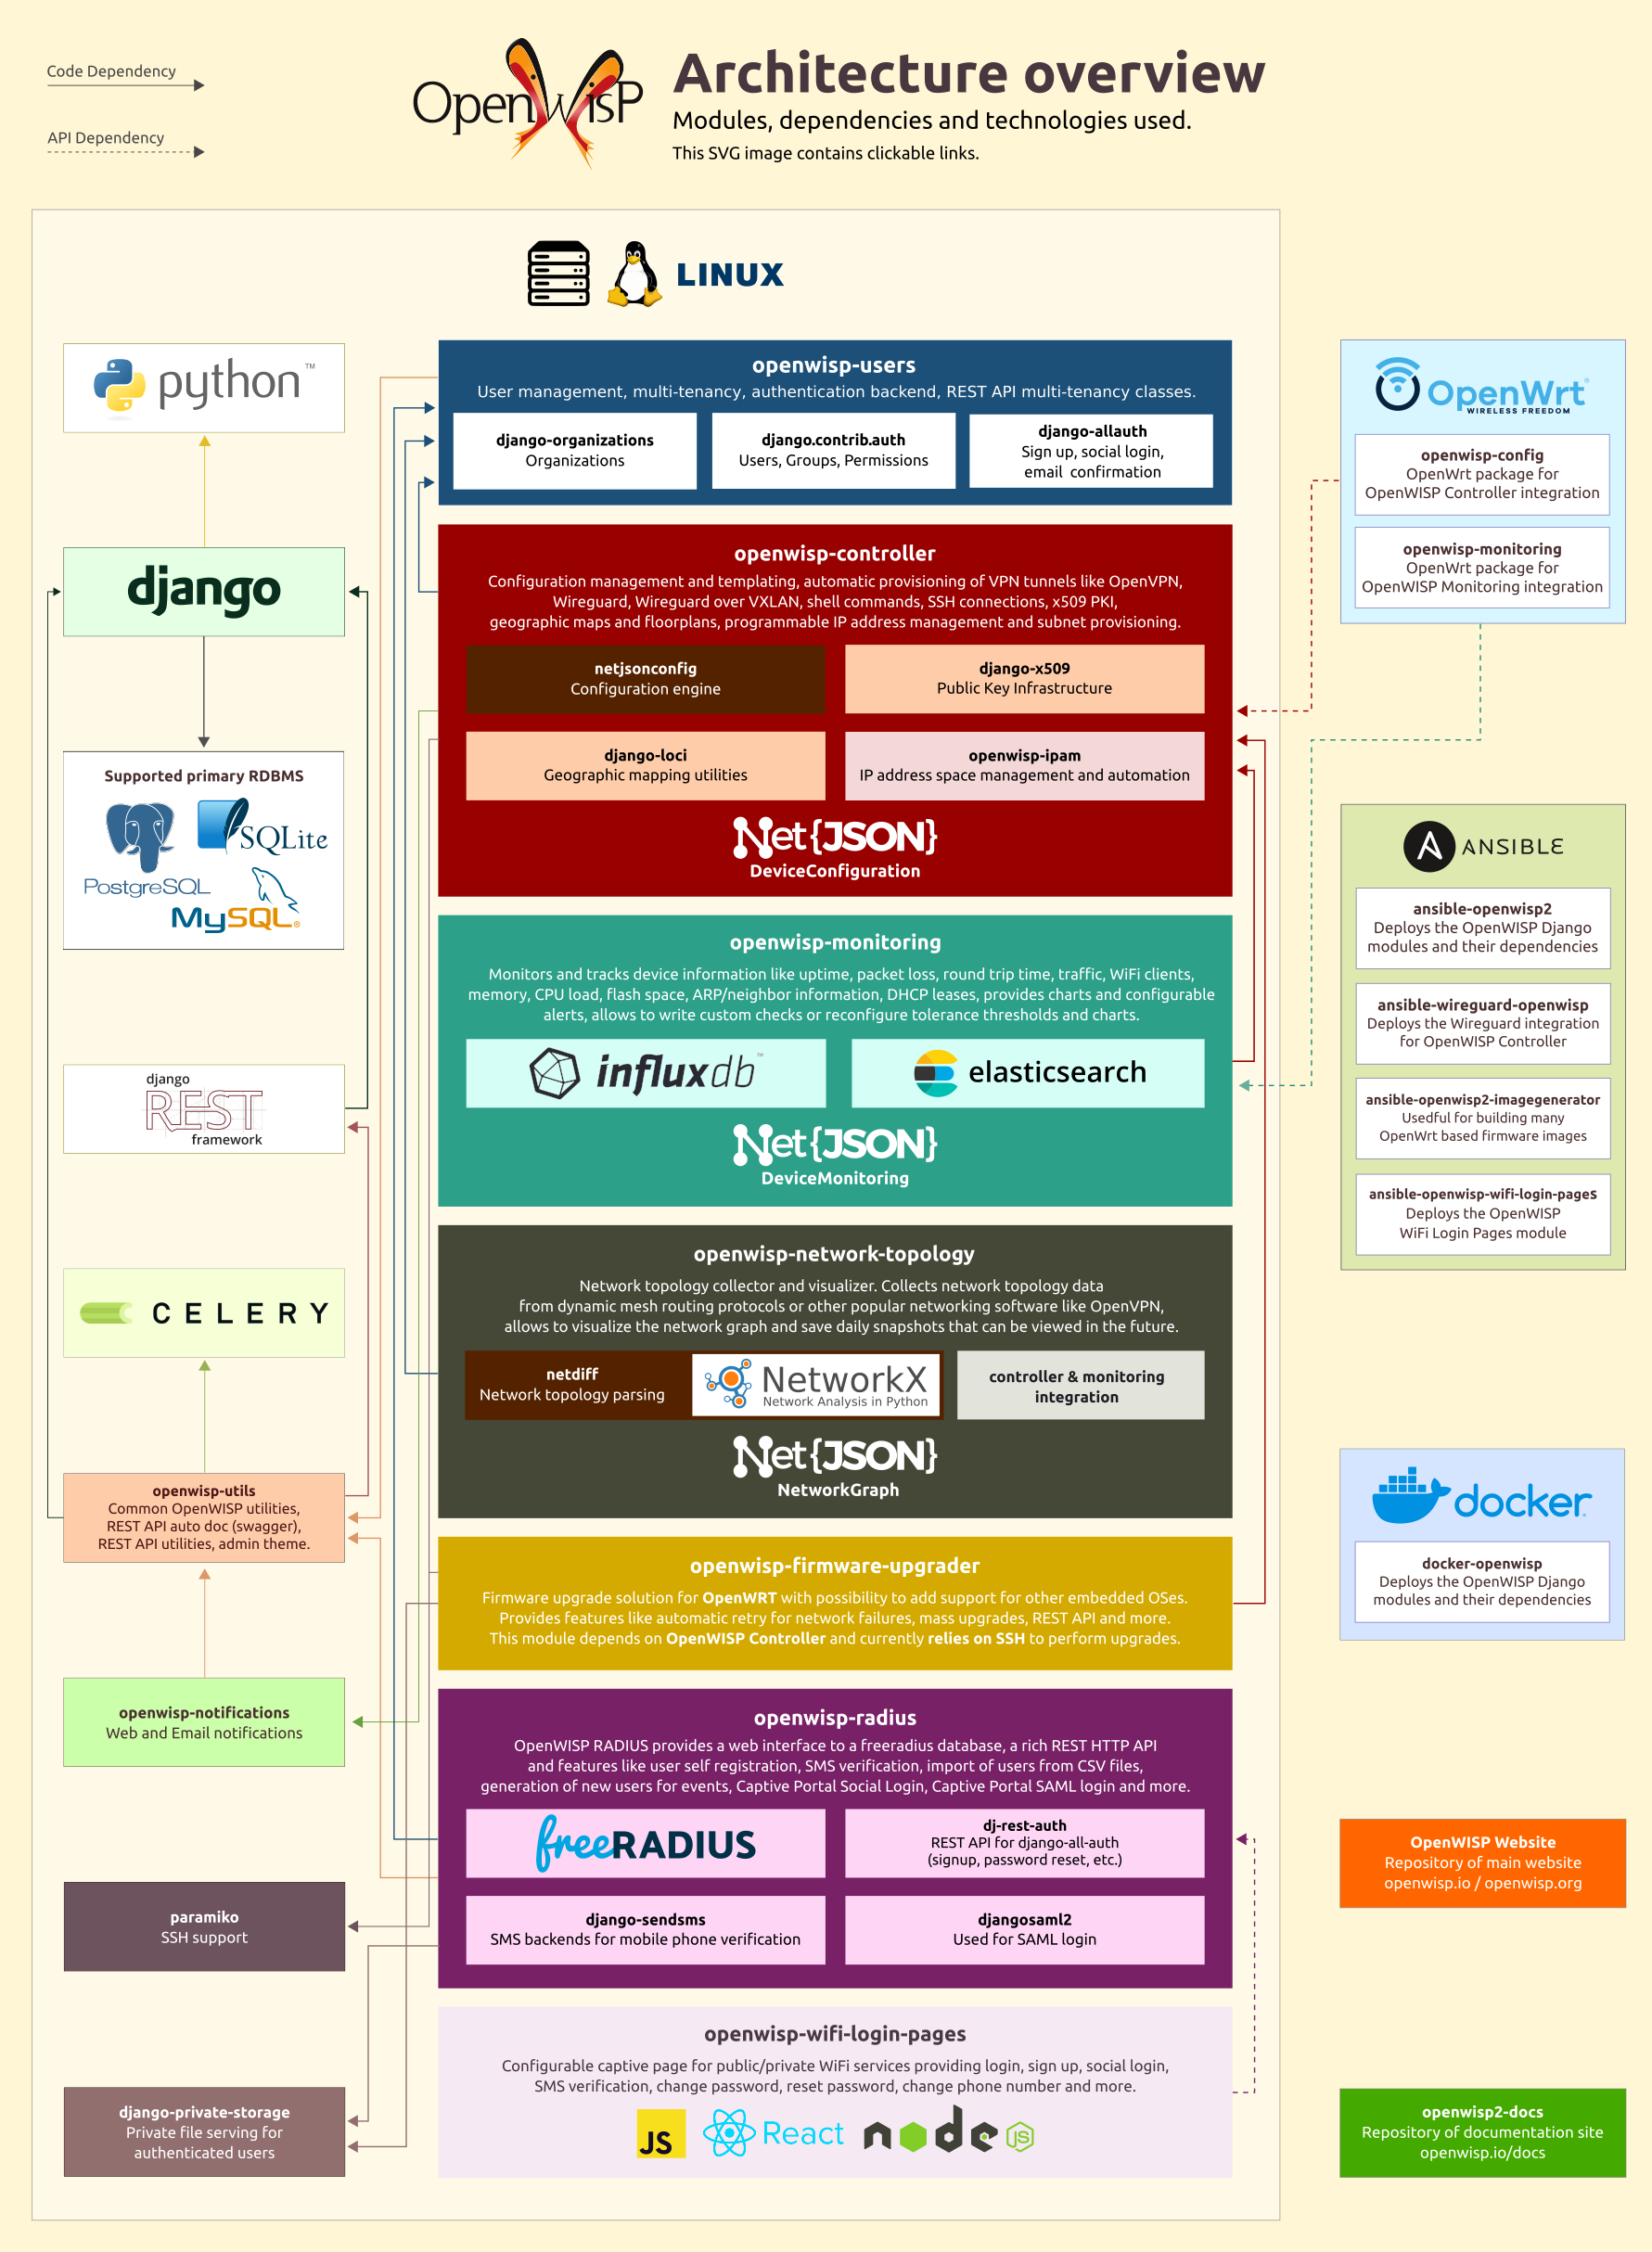
Architecture
If you are fond of Python, Django and Unix/Linux systems, you may find interesting to know more about what happens under the hood in OpenWISP 2.
For more information see also Applying the Unix Philosophy to Django projects: a report from the real world.
System Requirements
The following specifications will run a new, empty instance of OpenWISP. Please ensure you account for the amount of disk space your use case will require, e.g. allocate enough space for users to upload floor plan images.
Hardware (Minimum, excluding uploaded data)
- 1GB Memory
- 2GB free disk space
- Single core processor
Hardware (Recommended)
- 2GB Memory
- Disk space - depends on the projected size of your database and uploaded photo images
- Dual core processor
Software
Generally a fresh installation of one of the supported operating systems is sufficient; no pre-configuration required. The Ansible Playbook will install and configure all dependencies and leave you with a running OpenWISP installation.
Tips: Ensure the hostname of your target machine matches what is in your Ansible configuration file. Also, please ensure that Ansible can access your target machine by SSH, be it either with a key or password. For more information see the Ansible Getting Started Documentation.
Supported Operating Systems
See the section "OS Platforms" on the ansible-galaxy page of ansible-openwisp2.
Usage (tutorial)
If you don't know how to use ansible, don't panic, this procedure will guide you towards a fully working basic openwisp2 installation.
If you already know how to use ansible, you can skip this tutorial.
First of all you need to understand two key concepts:
- for "production server" we mean a server (not a laptop or a desktop computer!) with public ipv4 / ipv6 which is used to host openwisp2
- for "local machine" we mean the host from which you launch ansible, eg: your own laptop
Ansible is a configuration management tool that works by entering production servers via SSH, so you need to install it and configure it on the machine where you launch the deployment and this machine must be able to SSH into the production server.
Ansible will be run on your local machine and from there it will connect to the production server to install openwisp2.
If you are trying to install OpenWISP2 on your laptop or desktop pc just for testing purposes, please read Install OpenWISP2 for testing in a VirtualBox VM.
Install ansible
Install ansible (version 2.5 or higher) on your local machine (not the production server!) if you haven't done already.
To install ansible we suggest you follow the official ansible installation guide.
After having installed ansible, you need to install git (example for linux debian/ubuntu systems):
sudo apt-get install git
Install this role
For the sake of simplicity, the easiest thing is to install this role on your local machine
via ansible-galaxy (which was installed when installing ansible), therefore run:
ansible-galaxy install openwisp.openwisp2
Choose a working directory
Choose a working directory on your local machine where to put the configuration of openwisp2.
This will be useful when you will need to upgrade openwisp2.
Eg:
mkdir ~/openwisp2-ansible-playbook
cd ~/openwisp2-ansible-playbook
Putting this working directory under version control is also a very good idea.
Create inventory file
The inventory file is where group of servers are defined. In our simple case we can get away with defining just one group in which we will put just one server.
Create a new file called hosts in your local machine's working directory
(the directory just created in the previous step), with the following contents:
[openwisp2]
openwisp2.mydomain.com
Substitute openwisp2.mydomain.com with your production server's hostname - DO NOT REPLACE
openwisp2.mydomain.com WITH AN IP ADDRESS, otherwise email sending through postfix will break,
causing 500 internal server errors on some operations.
Create playbook file
Create a new playbook file playbook.yml on your local machine with the following contents:
- hosts: openwisp2
  become: "{{ become | default('yes') }}"
  roles:
    - openwisp.openwisp2
  vars:
    openwisp2_default_from_email: "[email protected]"
The line become: "{{ become | default('yes') }}" means ansible will use the sudo
program to run each command. You may remove this line if you don't need it (eg: if you are
using the root user on the production server).
You may replace openwisp2 on the hosts field with your production server's hostname if you desire.
Substitute [email protected] with what you deem most appropriate
as default sender for emails sent by OpenWISP 2.
Run the playbook
Now is time to deploy openwisp2 to the production server.
Run the playbook from your local machine with:
ansible-playbook -i hosts playbook.yml -u <user> -k --become -K
Substitute <user> with your production server's username.
The -k argument will need the sshpass program.
You can remove -k, --become and -K if your public SSH key is installed on the server.
Tips:
- If you have an error like
Authentication or permission failurethen try to use root useransible-playbook -i hosts playbook.yml -u root -k - If you have an error about adding the host's fingerprint to the
known_hostsfile, you can simply connect to the host via SSH and answer yes when prompted; then you can runansible-playbookagain.
When the playbook is done running, if you got no errors you can login at:
https://openwisp2.mydomain.com/admin
username: admin
password: admin
Substitute openwisp2.mydomain.com with your production server's hostname.
Now proceed with the following steps:
- change the password (and the username if you like) of the superuser as soon as possible
- update the
namefield of the defaultSiteobject to accurately display site name in email notifications - edit the information of the default organization
- in the default organization you just updated, note down the automatically generated shared secret option, you will need it to use the auto-registration feature of openwisp-config
- this Ansible role creates a default template to update
authorized_keyson networking devices using the default access credentials. The role will either use an existing SSH key pair or create a new one if no SSH key pair exists on the host machine.
Now you are ready to start configuring your network! If you need help you can ask questions on one of the official OpenWISP Support Channels.
Install ansible-openwisp2 for development
If you need to modify the logic of this ansible role and you need to test your changes here we explain how to do it.
First of all, create the directory where you want to place the repositories of the ansible roles and create directory roles.
    mkdir -p ~/openwisp-dev/roles
    cd ~/openwisp-dev/roles
Clone ansible-openwisp2 and Stouts.postfix as follows:
    git clone https://github.com/openwisp/ansible-openwisp2.git openwisp.openwisp2
    git clone https://github.com/nemesisdesign/Stouts.postfix
Now, go to the parent directory & create hosts file and playbook.yml:
    cd ../
    touch hosts
    touch playbook.yml
From here on you can follow the instructions available at the following sections:
Note: Please remember to install ansible.
All done!
How to run tests
If you want to contribute to ansible-openwisp2 you should run tests
in your development environment to ensure your changes are not breaking anything.
To do that, proceed with the following steps:
Step 1: Clone ansible-openwisp2
Clone repository by:
git clone https://github.com/<your_fork>/ansible-openwisp2.git
Step 2: Install docker
If you haven't installed docker yet, you need to install it (example for linux debian/ubuntu systems):
sudo apt-get install docker.io
Step 3: Install molecule and dependences
pip install molecule[docker] yamllint ansible-lint docker
Step 4: Download docker images
docker pull geerlingguy/docker-ubuntu2004-ansible:latest
docker pull geerlingguy/docker-ubuntu1804-ansible:latest
docker pull geerlingguy/docker-debian10-ansible:latest
Step 5: Run molecule test
molecule test -s local
If you don't get any error message it means that the tests ran successfully without errors.
ProTip: Use molecule test --destroy=never to speed up subsequent test runs.
Install OpenWISP2 for testing in a VirtualBox VM
If you want to try out OpenWISP 2 in your own development environment, the safest way is to use a VirtualBox Virtual Machine (from here on VM).
Using Vagrant
Since August 2018 there's a new fast and easy way to install OpenWISP 2 for testing purposes leveraging Vagrant, a popular open source tool for building and maintaining portable virtual software development environments.
To use this new way, clone the repository vagrant-openwisp2,
it contains the instructions (in the README.md) and the vagrant configuration
to perform the automatic installation.
Alternatively, you can read on to learn how to install VirtualBox and run ansible-openwisp2 manually, this is useful if you need to test advanced customisations of OpenWISP.
Installing Debian 9 on VirtualBox
Install VirtualBox and create a new Virtual Machine running Debian 10. A step-by-step guide is available here, however we need to change a few things to get ansible working.
VM configuration
Proceed with the installation as shown in the guide linked above, and come back here when you see this screen:
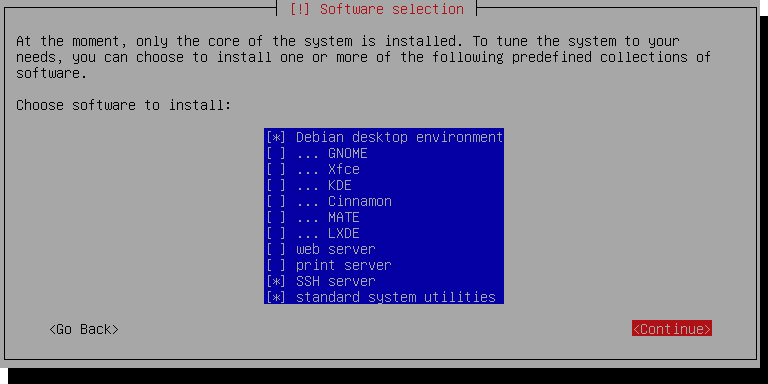
We're only running this as a server, so you can uncheck Debian desktop environment.
Make sure SSH server and standard system utilities are checked.
Next, add a Host-only Network Adapter and assign an IP address to the VM.
-
On the Main VirtualBox page, Go to
File > Host Network Manager -
Click the + icon to create a new adapter
-
Set the IPv4 address to
192.168.56.1and the IPv4 Network Mask to255.255.255.0. You may need to selectConfigure Adapter Manuallyto do this. The IPv6 settings can be ignored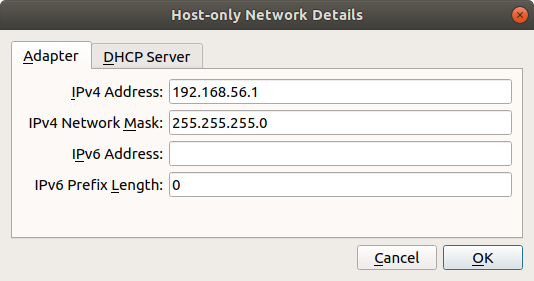
-
Shut off your VM
-
In your VM settings, in the Network section, click Adapter 2 and Enable this Adapter
-
Select Host-only adapter and the name of the adapter you created
-
Boot up your VM, run
su, and type in your superuser password -
Run
ls /sys/class/netand take note of the output -
Run
nano /etc/network/interfacesand add the following at the end of the file:auto enp0s8 iface enp0s8 inet static address 192.168.56.2 netmask 255.255.255.0 network 192.168.56.0 broadcast 192.168.56.255Replace
enp0s8with the network interface not present in the file but is shown when runningls /sys/class/net -
Save the file with CtrlO then Enter, and exit with CtrlX
-
Restart the machine by running
reboot
Make sure you can access your VM via ssh:
ssh 192.168.56.2
Back to your local machine
Proceed with these steps in your local machine, not the VM.
Step 1: Install ansible
Step 2: Install the OpenWISP2 role for Ansible
Step 3: Set up a working directory
Step 4: Create the hosts file
Create an ansible inventory file named hosts in your working directory
(i.e. not in the VM) with the following contents:
[openwisp2]
192.168.56.2
Step 5: Create the ansible playbook
In the same directory where you created the host file,
create an empty file named playbook.yml which contains the following:
- hosts: openwisp2
  roles:
    - openwisp.openwisp2
  # the following line is needed only when an IP address is used as the inventory hostname
  vars:
      postfix_myhostname: localhost
Step 6: Run the playbook
ansible-playbook -i hosts playbook.yml -b -k -K --become-method=su
When the playbook ran successfully, you can log in at:
https://192.168.56.2/admin
username: admin
password: admin
Enabling the network topology module
To enable the network topology module you need to set openwisp2_network_topology to true in
your playbook.yml file. Here's a short summary of how to do this:
Step 1: Install ansible
Step 2: Install this role
Step 3: Create inventory file
Step 4: Create a playbook file with following contents:
- hosts: openwisp2
  become: "{{ become | default('yes') }}"
  roles:
    - openwisp.openwisp2
  vars:
    openwisp2_network_topology: true
Step 5: Run the playbook
When the playbook is done running, if you got no errors you can login at:
https://openwisp2.mydomain.com/admin
username: admin
password: admin
Enabling the firmware upgrader module
Note: It is encouraged that you read the quick-start guide of openwisp-firmware-upgrader before going ahead.
To enable the firmware upgrader module you need to set openwisp2_firmware_upgrader to true in
your playbook.yml file. Here's a short summary of how to do this:
Step 1: Install ansible
Step 2: Install this role
Step 3: Create inventory file
Step 4: Create a playbook file with following contents:
- hosts: openwisp2
  become: "{{ become | default('yes') }}"
  roles:
    - openwisp.openwisp2
  vars:
    openwisp2_firmware_upgrader: true
Step 5: Run the playbook
When the playbook is done running, if you got no errors you can login at:
https://openwisp2.mydomain.com/admin
username: admin
password: admin
Note: You can configure openwisp-firmware-upgrader specific settings
using openwisp2_extra_django_settings variable of this ansible role.
For example if you want to enable the APIs of openwisp-firmware-upgrader,
you will update the above playbook as follows:
- hosts: openwisp2
  become: "{{ become | default('yes') }}"
  roles:
    - openwisp.openwisp2
  vars:
    openwisp2_firmware_upgrader: true
    openwisp2_extra_django_settings:
      OPENWISP_USERS_AUTH_API: true
      OPENWISP_FIRMWARE_UPGRADER_API: true
Troubleshooting
If encounter any issue, you can check the logs of OpenWISP 2 at /opt/openwisp2/log
(unless you changed the openwisp2_path variable in the ansible playbook configuration).
SSL certificate gotchas
When you access the admin website you will get an SSL certificate warning because the
playbook creates a self-signed (untrusted) SSL certificate. You can get rid of the warning by
installing your own trusted certificate and set the openwisp2_ssl_cert and openwisp2_ssl_key
variables accordingly or by following the instructions explained in the section
"Automatic SSL certificate".
If you keep the untrusted certificate, you will also need to disable SSL verification on devices
using openwisp-config by setting verify_ssl to 0,
although I advice against using this kind of setup in a production environment.
Automatic SSL certificate
This section explains how to automatically install and renew a valid SSL certificate signed by letsencrypt.
The first thing you have to do is to setup a valid domain for your openwisp2 instance, this means your inventory file (hosts) should look like the following:
[openwisp2]
openwisp2.yourdomain.com
You must be able to add a DNS record for openwisp2.yourdomain.com, you cannot use an ip address
in place of openwisp2.yourdomain.com.
Once your domain is set up and the DNS record is propagated, proceed by installing the ansible role thefinn93.letsencrypt:
ansible-galaxy install thefinn93.letsencrypt
Then proceed to edit your playbook.yml so that it will look similar to the following example:
- hosts: openwisp2
  become: "{{ become | default('yes') }}"
  roles:
    - thefinn93.letsencrypt
    - openwisp.openwisp2
  vars:
    # SSL certificates
    openwisp2_ssl_cert: "/etc/letsencrypt/live/{{ ansible_fqdn }}/fullchain.pem"
    openwisp2_ssl_key: "/etc/letsencrypt/live/{{ ansible_fqdn }}/privkey.pem"
    # letsencrypt configuration
    letsencrypt_webroot_path: "{{ openwisp2_path }}/public_html"
    letsencrypt_email: <YOUR_EMAIL_HERE>
    letsencrypt_renewal_command_args: '--renew-hook "service nginx restart"'
    letsencrypt_renewal_frequency:
      day: "*"
      hour: "7,19"  # renewal cronjob runs at 7 AM and at 7 PM
      minute: 0
Fill a real email address in place of <YOUR_EMAIL_HERE>, it may be used by letsencrypt
to send you important communications regarding your SSL certificate.
Once you have set up all the variables correctly, run the playbook again.
Upgrading openwisp2
Update this ansible-role via ansible-galaxy:
ansible-galaxy install --force openwisp.openwisp2
Run ansible-playbook again from your local machine:
ansible-playbook -i hosts playbook.yml
You may also run the playbook automatically periodically or when a new release of OpenWISP2, for example, by setting up a continuous integration system.
Role variables
This role has many variables values that can be changed to best suit your needs.
Below are listed all the variables you can customize (you may also want to take a look at the default values of these variables).
- hosts: yourhost
  roles:
  # you can add other roles here
    - openwisp.openwisp2
  vars:
    # openwisp-controler version
    openwisp2_controller_version: "0.4"
    # optional openwisp2 modules
    openwisp2_network_topology: false
    openwisp2_network_topology_version: "0.4"
    openwisp2_firmware_upgrader: false
    openwisp2_firmware_upgrader_version: "0.1"
    # you may replace the values of these variables with any URL
    # supported by pip (the python package installer)
    # use these to install forks, branches or development versions
    # WARNING: only do this if you know what you are doing; disruption
    # of service is very likely to occur during development
    openwisp2_controller_pip: false
    openwisp2_users_pip: false
    openwisp2_utils_pip: false
    openwisp2_notifications_pip: false
    openwisp2_django_x509_pip: false
    openwisp2_netjsonconfig_pip: false
    openwisp2_network_topology_pip: false
    openwisp2_firmware_upgrader_pip: false
    # by default python3 is used, if may need to set this to python2.7 for older systems
    openwisp2_python: python2.7
    # customize the app_path
    openwisp2_path: /opt/openwisp2
    # It is recommended that you change the value of this variable if you intend to use
    # OpenWISP2 in production, as a misconfiguration may result in emails not being sent
    openwisp2_default_from_email: "[email protected]"
    # edit database settings only if you are not using sqlite
    openwisp2_database:
        engine: django.db.backends.postgresql
        name: openwisp2
        user: postgres
        password: ""
        host: ""
        port: ""
        options: {}
    # SPATIALITE_LIBRARY_PATH django setting
    # The role will attempt determining the right mod-spatialite path automatically
    # But you can use this variable to customize the path or fix future arising issues
    openwisp2_spatialite_path: null
    # customize other django settings:
    openwisp2_language_code: en-gb
    openwisp2_time_zone: UTC
    # openwisp-controller context
    openwisp2_context: {}
    # additional allowed hosts
    openwisp2_allowed_hosts:
        - myadditionalhost.openwisp.org
    # geographic map settings
    openwisp2_leaflet_config:
        DEFAULT_CENTER: [42.06775, 12.62011]
        DEFAULT_ZOOM: 6
    # specify path to a valid SSL certificate and key
    # (a self-signed SSL cert will be generated if omitted)
    openwisp2_ssl_cert: "/etc/nginx/ssl/server.crt"
    openwisp2_ssl_key: "/etc/nginx/ssl/server.key"
    # customize the self-signed SSL certificate info if needed
    openwisp2_ssl_country: "US"
    openwisp2_ssl_state: "California"
    openwisp2_ssl_locality: "San Francisco"
    openwisp2_ssl_organization: "IT dep."
    # the following setting controls which ip address range
    # is allowed to access the controller via unencrypted HTTP
    # (this feature is disabled by default)
    openwisp2_http_allowed_ip: "10.8.0.0/16"
    # additional python packages that will be installed with pip
    openwisp2_extra_python_packages:
        - bpython
        - django-owm-legacy
    # additional django apps that will be added to settings.INSTALLED_APPS
    # (if the app needs to be installed, the name its python package
    # must be also added to the openwisp2_extra_python_packages var)
    openwisp2_extra_django_apps:
        - owm_legacy
    # additional django settings example
    openwisp2_extra_django_settings:
        CSRF_COOKIE_AGE: 2620800.0
    # in case you need to add python instructions to the django settings file
    openwisp2_extra_django_settings_instructions:
        - TEMPLATES[0]['OPTIONS']['loaders'].insert(0, 'apptemplates.Loader')
    # extra URL settings for django
    openwisp2_extra_urls:
      - "url(r'', include('my_custom_app.urls'))"
    # controller URL are enabled by default
    # but can be disabled in multi-VM installations if needed
    openwisp2_controller_urls: true
    # spdy protocol support (disabled by default)
    openwisp2_nginx_spdy: false
    # HTTP2 protocol support (disabled by default)
    openwisp2_nginx_http2: false
    # ipv6 must be enabled explicitly to avoid errors
    openwisp2_nginx_ipv6: false
    # nginx client_max_body_size setting
    openwisp2_nginx_client_max_body_size: 10M
    # dictionary containing more nginx settings for
    # the 443 section of the openwisp2 nginx configuration
    # IMPORTANT: 1. you can add more nginx settings in this dictionary
    #            2. here we list the default values used
    openwisp2_nginx_ssl_config:
        gzip: "on"
        gzip_comp_level: "6"
        gzip_proxied: "any"
        gzip_min_length: "1000"
        gzip_types:
            - "text/plain"
            - "text/html"
            - "image/svg+xml"
            - "application/json"
            - "application/javascript"
            - "text/xml"
            - "text/css"
            - "application/xml"
            - "application/x-font-ttf"
            - "font/opentype"
    # nginx error log configuration
    openwisp2_nginx_access_log: "{{ openwisp2_path }}/log/nginx.access.log"
    openwisp2_nginx_error_log: "{{ openwisp2_path }}/log/nginx.error.log error"
    # uwsgi gid, omitted by default
    openwisp2_uwsgi_gid: null
    # the following setting controls which ip address range
    # is allowed to access the openwisp2 admin web interface
    # (by default any IP is allowed)
    openwisp2_admin_allowed_network: null
    # install ntp client (enabled by default)
    openwisp2_install_ntp: true
    # enable sentry example
    openwisp2_sentry:
        dsn: "https://7d2e3cd61acc32eca1fb2a390f7b55e1:[email protected]:443/12345"
    openwisp2_default_cert_validity: 1825
    openwisp2_default_ca_validity: 3650
    # the following options for redis allow to configure an external redis instance if needed
    openwisp2_redis_install: true
    openwisp2_redis_host: localhost
    openwisp2_redis_port: 6379
    openwisp2_redis_cache_url: "redis://{{ openwisp2_redis_host }}:{{ openwisp2_redis_port }}/1"
    # celery concurrency for the default queue, by default the number of CPUs is used
    openwisp2_celery_concurrency: null
    # alternatively to the previous option, the celery autoscale option can be set if needed
    # for more info, consult the documentation of celery regarding "autoscaling"
    openwisp2_celery_autoscale: null
    # prefetch multiplier for the default queue,
    # the default value is calculated automatically by celery
    openwisp2_celery_prefetch_multiplier: null
    # celery queuing mode for the default queue,
    # leaving the default will work for most cases
    openwisp2_celery_optimization: default
    # whether the dedicated worker for the celery network queue is enabled
    # must be turned on unless there's another server running a worker for this queue
    openwisp2_celery_network: true
    # concurrency option for the network queue (a worker is dedicated solely to network operations)
    # the default is null because the autoscale option below is used
    openwisp2_celery_network_concurrency: null
    # the network queue is automatically set to have at least 2 workers
    # but it can increase up to 8 worker during peaks
    openwisp2_celery_network_autoscale: 4,8
    # prefetch multiplier for the network queue,
    # the default is 1, which mean no prefetching,
    # because the network tasks are long running and is better
    # to distribute the tasks to multiple processes
    openwisp2_celery_network_prefetch_multiplier: 1
    # celery queuing mode for the network queue,
    # fair mode is used in this case, which means
    # tasks will be equally distributed among workers
    openwisp2_celery_network_optimization: fair
    # whether the default celery task routes should be written to the settings.py file
    # turn this off if you're defining custom task routing rules
    openwisp2_celery_task_routes_defaults: true
    # celery settings
    openwisp2_celery_broker_url: redis://{{ openwisp2_redis_host }}:{{ openwisp2_redis_port }}/3
    openwisp2_celery_task_acks_late: true
    # maximum number of retries by celery before giving up when broker is unreachable
    openwisp2_celery_broker_max_tries: 10
    # whether to activate the django logging configuration in celery
    # if set to true, will log all the celery events in the same log stream used by django
    # which will cause log lines to be written to "{{ openwisp2_path }}/log/openwisp2.log"
    # instead of "{{ openwisp2_path }}/log/celery.log" and "{{ openwisp2_path }}/log/celerybeat.log"
    openwisp2_django_celery_logging: false
    # postfix is installed by default, set to false if you don't need it
    openwisp2_postfix_install: true
    # allow overriding default `postfix_smtp_sasl_auth_enable` variable
    postfix_smtp_sasl_auth_enable_override: true
    # allow overriding postfix_smtpd_relay_restrictions
    postfix_smtpd_relay_restrictions_override: permit_mynetworks
    # allows overriding the default duration for keeping notifications
    openwisp2_notifications_delete_old_notifications: 10