joelbarmettlerUZH / Auto Tinder
Programming Languages
Labels
Projects that are alternatives of or similar to Auto Tinder
Auto-Tinder - Train an AI to swipe tinder for you
Auto-tinder was created to train an API using Tensorflow and Python3 that learns your interests and automatically plays the tinder swiping-game for you.

In this document, I am going to explain the following steps that were needed to create auto-tinder:
- analyze the tinder webpage to find out what internal API calls tinder makes, reconstruct the API calls in Postman and analyze its content
- Build a api wrapper class in python that uses the tinder api to like/dislike/match etc.
- Download a bunch of images of people nearby
- Write a simple mouse-click classifier to label our images
- Develop a preprocessor that uses the tensorflow object detection API to only cut out the person in our image
- Retrain inceptionv3, a deep convolutional neural network, to learn on our classified data
- Use the classifier in combination with the tinder API wrapper to play tinder for us
Step 0: Motivation and disclaimer
Auto tinder is a concept project purely created for fun and educational purposes. It shall never be abused to harm anybody or spam the platform. The auto-tinder scripts should not be used with your tinder profile since they surely violate tinders terms of service.
I've written this piece of software mainly out of two reasons:
- Because I can and it was fun to create :)
- I wanted to find out whether an AI would actually be able to learn my preferences in the other sex and be a reliable left-right-swipe partner for me.
- (Purely fictional reason: I am a lazy person, so why not invest 15 hours to code auto-tinder + 5 hours to label all images to save me a few hours of actually swiping tinder myself? Sounds like a good deal to me!)
Step 1: Analyze the tinder API
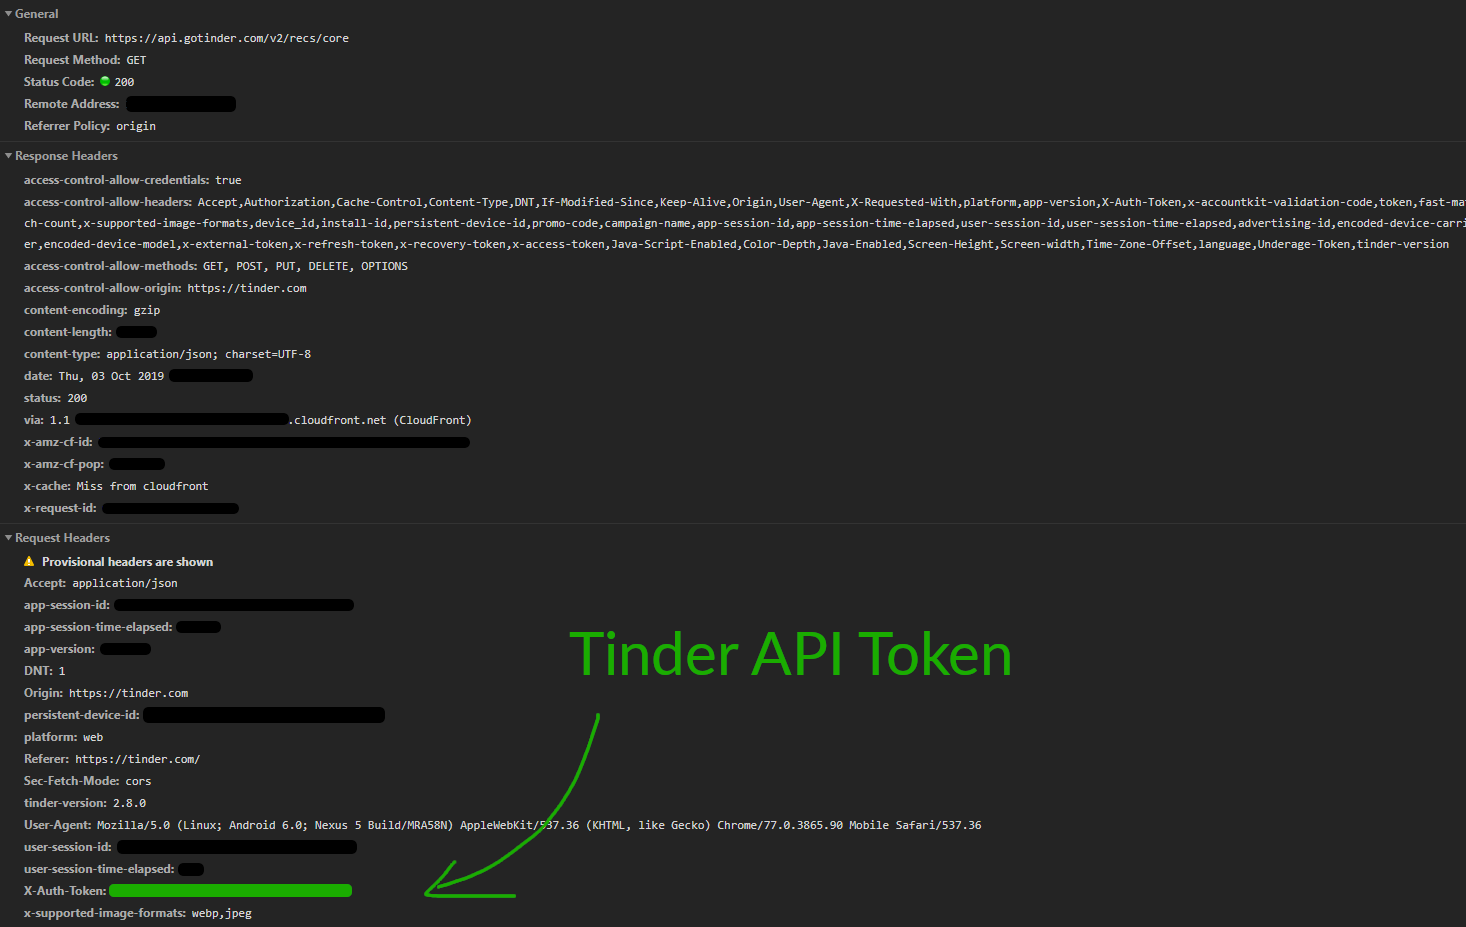
The first step is to find out how the tinder app communicates to tinders backend server. Since tinder offers a web version of its portal, this is as easy as going to tinder.com, opening up chrome devtools and have a quick look at the network protocol.

The content shown in the picture above was from a request to https://api.gotinder.com/v2/recs/core that is made when the tinder.com landing page is loading. Clearly, tinder has some sort of internal API that they are using to communicate between the front- and backend.
With analyzing the content of /recs/core, it becomes clear that this API endpoint returns a list of user profiles of people nearby.
The data includes (among many other fields), the following data:
{
    "meta": {
        "status": 200
    },
    "data": {
        "results": [
            {
                "type": "user",
                "user": {
                 "_id": "4adfwe547s8df64df",
                    "bio": "19y.",
                    "birth_date": "1997-17-06T18:21:44.654Z",
                    "name": "Anna",
                    "photos": [
                        {
                            "id": "879sdfert-lskdföj-8asdf879-987sdflkj",
                            "crop_info": {
                                "user": {
                                    "width_pct": 1,
                                    "x_offset_pct": 0,
                                    "height_pct": 0.8,
                                    "y_offset_pct": 0.08975463
                                },
                                "algo": {
                                    "width_pct": 0.45674357,
                                    "x_offset_pct": 0.984341657,
                                    "height_pct": 0.234165403,
                                    "y_offset_pct": 0.78902343
                                },
                                "processed_by_bullseye": true,
                                "user_customized": false
                            },
                            "url": "https://images-ssl.gotinder.com/4adfwe547s8df64df/original_879sdfert-lskdföj-8asdf879-987sdflkj.jpeg",
                            "processedFiles": [
                                {
                                    "url": "https://images-ssl.gotinder.com/4adfwe547s8df64df/640x800_879sdfert-lskdföj-8asdf879-987sdflkj.jpg",
                                    "height": 800,
                                    "width": 640
                                },
                                {
                                    "url": "https://images-ssl.gotinder.com/4adfwe547s8df64df/320x400_879sdfert-lskdföj-8asdf879-987sdflkj.jpg",
                                    "height": 400,
                                    "width": 320
                                },
                                {
                                    "url": "https://images-ssl.gotinder.com/4adfwe547s8df64df/172x216_879sdfert-lskdföj-8asdf879-987sdflkj.jpg",
                                    "height": 216,
                                    "width": 172
                                },
                                {
                                    "url": "https://images-ssl.gotinder.com/4adfwe547s8df64df/84x106_879sdfert-lskdföj-8asdf879-987sdflkj.jpg",
                                    "height": 106,
                                    "width": 84
                                }
                            ],
                            "last_update_time": "2019-10-03T16:18:30.532Z",
                            "fileName": "879sdfert-lskdföj-8asdf879-987sdflkj.webp",
                            "extension": "jpg,webp",
                            "webp_qf": [
                                75
                            ]
                        }
                    ],
                    "gender": 1,
                    "jobs": [],
                    "schools": [],
                    "show_gender_on_profile": false
                },
                "facebook": {
                    "common_connections": [],
                    "connection_count": 0,
                    "common_interests": []
                },
                "spotify": {
                    "spotify_connected": false
                },
                "distance_mi": 1,
                "content_hash": "slkadjfiuwejsdfuzkejhrsdbfskdzufiuerwer",
                "s_number": 9876540657341,
                "teaser": {
                    "string": ""
                },
                "teasers": [],
                "snap": {
                    "snaps": []
                }
            }
        ]
    }
}
A few things are very interesting here (note that I changed all the data to not violate this persons privacy):
- All images are publicly accessible. If you copy the image URL and open it in a private window, it still loads instantly - meaning that tinder uploads all user images publicly to the internet, free to be seen by anybody.
- The original photos accessible via the API are extremely high resolution. If you upload a photo to tinder, they will scale it down for the in-app usage, but they store the original version publicly on their servers, accessible by anybody.
- Even if you choose to "show_gender_on_profile", everybody can still see your gender via the API ("gender": 1, where 1=Woman, 0=Man)
- If you send multiple requests to the tinder API consecutively, you always get different results (e.g. different profiles). We can therefore just call this endpoint repeatedly to "farm" a bunch of pictures that we can later use to train our neural network.
With analyzing the content headers, we quickly find our private API Keys: X-Auth-Token.
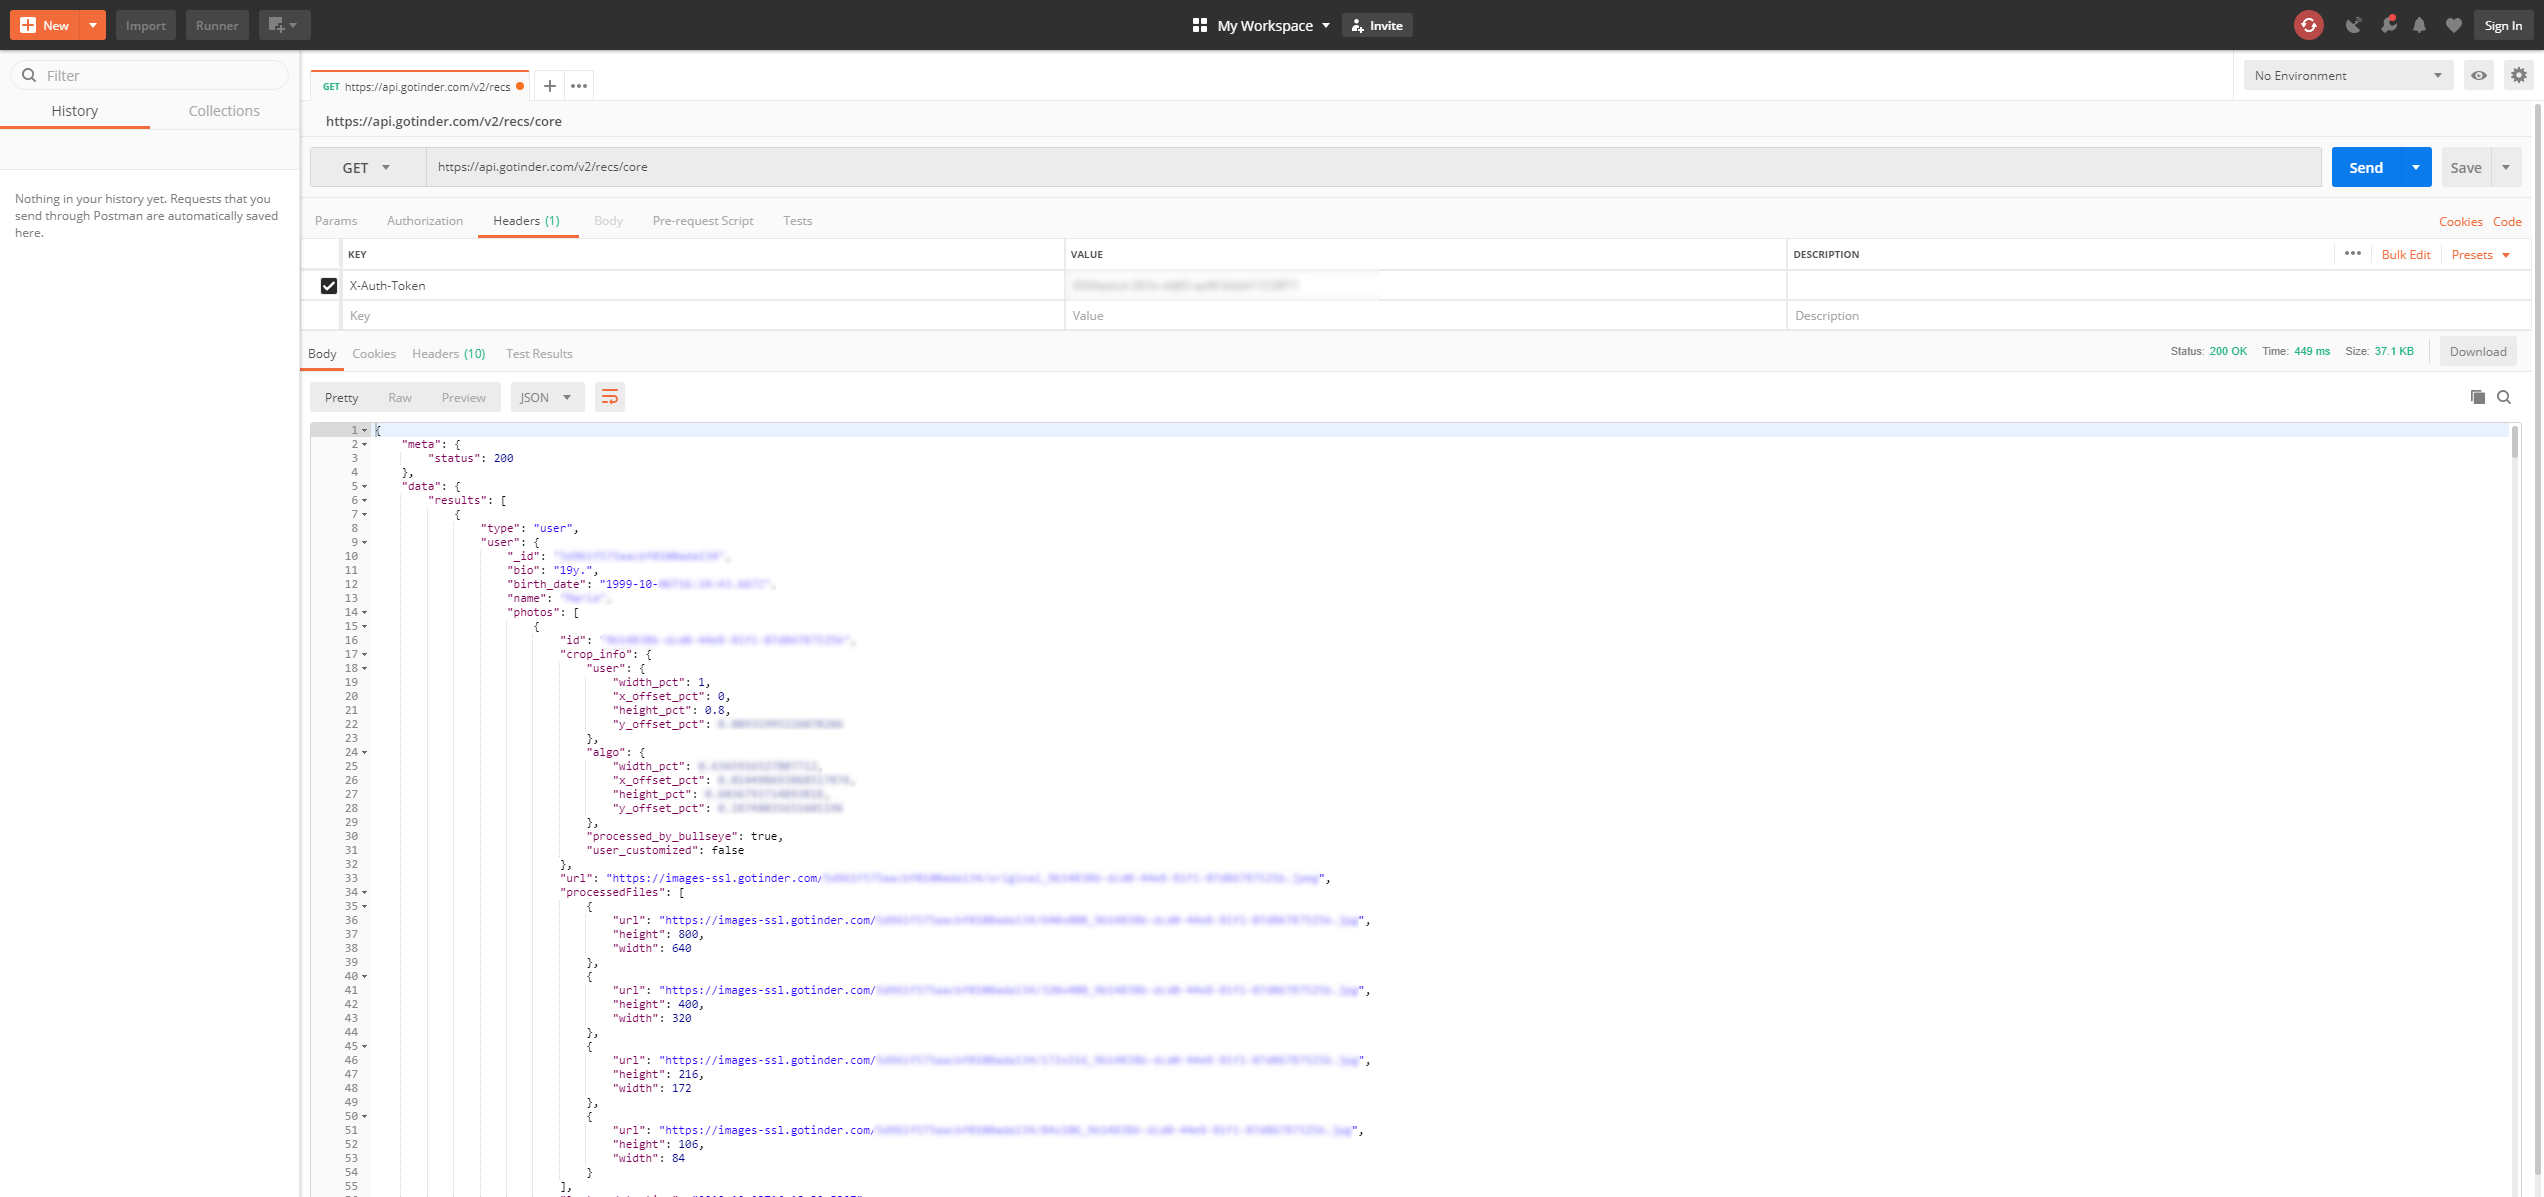
With copying this token and going over to Postman, we can validate that we can indeed freely communicate with the tinder API with just the right URL and our auth token.
With clicking a bit through tinders webapp, I quickly discover all relevant API endpoints:
| Type | URL | Description |
|---|---|---|
| GET | /v2/recs/core | Returns a list of people nearby |
| GET | /v2/profile?include=account%2Cuser | Returns all information about your own profile |
| GET | /v2/matches | Returns a list of all people that have matched with you |
| GET | /like/{user_id} | Likes the person with the given user_id |
| GET | /pass/{user_id} | Passes the person with the given user_id |
Step 2: Building an API Wrapper in Python
So let's get into the code. We will use the python Requests library to communicate with the API and write an API wrapper class around it for convenience.
Similarly, we write a small Person class that takes the API response from Tinder representing a Person and offers a few basic interfaces to the tinder API.
Let's start with the Person Class. It shall receive API data, a tinder-api object and save all relevant data into instance variables. It shall further offer some basic features like "like" or "dislike" that make a request to the tinder-api, which allows us to conveniently use "some_person.like()" in order to like a profile we find interesting.
import datetime
from geopy.geocoders import Nominatim

TINDER_URL = "https://api.gotinder.com"
geolocator = Nominatim(user_agent="auto-tinder")
PROF_FILE = "./images/unclassified/profiles.txt"

class Person(object):

    def __init__(self, data, api):
        self._api = api

        self.id = data["_id"]
        self.name = data.get("name", "Unknown")

        self.bio = data.get("bio", "")
        self.distance = data.get("distance_mi", 0) / 1.60934

        self.birth_date = datetime.datetime.strptime(data["birth_date"], '%Y-%m-%dT%H:%M:%S.%fZ') if data.get(
            "birth_date", False) else None
        self.gender = ["Male", "Female", "Unknown"][data.get("gender", 2)]

        self.images = list(map(lambda photo: photo["url"], data.get("photos", [])))

        self.jobs = list(
            map(lambda job: {"title": job.get("title", {}).get("name"), "company": job.get("company", {}).get("name")}, data.get("jobs", [])))
        self.schools = list(map(lambda school: school["name"], data.get("schools", [])))

        if data.get("pos", False):
            self.location = geolocator.reverse(f'{data["pos"]["lat"]}, {data["pos"]["lon"]}')


    def __repr__(self):
        return f"{self.id}  -  {self.name} ({self.birth_date.strftime('%d.%m.%Y')})"


    def like(self):
        return self._api.like(self.id)

    def dislike(self):
        return self._api.dislike(self.id)
Our API wrapper is not much more than a fancy way of calling the tinder API using a class:
import requests

TINDER_URL = "https://api.gotinder.com"

class tinderAPI():

    def __init__(self, token):
        self._token = token

    def profile(self):
        data = requests.get(TINDER_URL + "/v2/profile?include=account%2Cuser", headers={"X-Auth-Token": self._token}).json()
        return Profile(data["data"], self)

    def matches(self, limit=10):
        data = requests.get(TINDER_URL + f"/v2/matches?count={limit}", headers={"X-Auth-Token": self._token}).json()
        return list(map(lambda match: Person(match["person"], self), data["data"]["matches"]))

    def like(self, user_id):
        data = requests.get(TINDER_URL + f"/like/{user_id}", headers={"X-Auth-Token": self._token}).json()
        return {
            "is_match": data["match"],
            "liked_remaining": data["likes_remaining"]
        }

    def dislike(self, user_id):
        requests.get(TINDER_URL + f"/pass/{user_id}", headers={"X-Auth-Token": self._token}).json()
        return True

    def nearby_persons(self):
        data = requests.get(TINDER_URL + "/v2/recs/core", headers={"X-Auth-Token": self._token}).json()
        return list(map(lambda user: Person(user["user"], self), data["data"]["results"]))
We can now use the API to find people nearby and have a look at their profile, or even like all of them. Replace YOUR-API-TOKEN with the X-Auth-Token you found in the chrome dev console earlier.
if __name__ == "__main__":
    token = "YOUR-API-TOKEN"
    api = tinderAPI(token)

    while True:
        persons = api.nearby_persons()
        for person in persons:
            print(person)
            # person.like()
Step 3: Download images of people nearby
Next, we want to automatically download some images of people nearby that we can use for training our AI. With 'some', I mean like 1500-2500 images.
First, let's extend our Person class with a function that allows us to download images.
# At the top of auto_tinder.py
PROF_FILE = "./images/unclassified/profiles.txt"

# inside the Person-class
    def download_images(self, folder=".", sleep_max_for=0):
        with open(PROF_FILE, "r") as f:
            lines = f.readlines()
            if self.id in lines:
                return
        with open(PROF_FILE, "a") as f:
            f.write(self.id+"\r\n")
        index = -1
        for image_url in self.images:
            index += 1
            req = requests.get(image_url, stream=True)
            if req.status_code == 200:
                with open(f"{folder}/{self.id}_{self.name}_{index}.jpeg", "wb") as f:
                    f.write(req.content)
            sleep(random()*sleep_max_for)
Note that I added some random sleeps here and there, just because we will likely be blocked if we spam the tinder CDN and download many pictures in just a few seconds.
We write all the peoples profile IDs into a file called "profiles.txt". By first scanning the document whether a particular person is already in there, we can skip people we already encountered, and we ensure that we don't classify people several times (you will see later why this is a risk).
We can now just loop over nearby persons and download their images into an "unclassified" folder.
if __name__ == "__main__":
    token = "YOUR-API-TOKEN"
    api = tinderAPI(token)

    while True:
        persons = api.nearby_persons()
        for person in persons:
            person.download_images(folder="./images/unclassified", sleep_max_for=random()*3)
            sleep(random()*10)
        sleep(random()*10)
We can now simply start this script and let it run for a few hours to get a few hundret profile images of people nearby. If you are a tinder PRO user, update your location now and then to get new people.
Step 4: Classify the images manually
Now that we have a bunch of images to work with, let's build a really simple and ugly classifier.
It shall just loop over all the images in our "unclassified" folder and open the image in a GUI window. By right-clicking a person, we can mark the person as "dislike", while a left-click marks the person as "like". This will be represented in the filename later on: 4tz3kjldfj3482.jpg will be renamed to 1_4tz3kjldfj3482.jpg if we mark the image as "like", or 0_4tz3kjldfj3482.jpg otherwise. The label like/dislike is encoded as 1/0 in the beginning of the filenmae.
Let's use tkinter to write this GUI quickly:
from os import listdir, rename
from os.path import isfile, join
import tkinter as tk
from PIL import ImageTk, Image

IMAGE_FOLDER = "./images/unclassified"

images = [f for f in listdir(IMAGE_FOLDER) if isfile(join(IMAGE_FOLDER, f))]
unclassified_images = filter(lambda image: not (image.startswith("0_") or image.startswith("1_")), images)
current = None

def next_img():
    global current, unclassified_images
    try:
        current = next(unclassified_images)
    except StopIteration:
        root.quit()
    print(current)
    pil_img = Image.open(IMAGE_FOLDER+"/"+current)
    width, height = pil_img.size
    max_height = 1000
    if height > max_height:
        resize_factor = max_height / height
        pil_img = pil_img.resize((int(width*resize_factor), int(height*resize_factor)), resample=Image.LANCZOS)
    img_tk = ImageTk.PhotoImage(pil_img)
    img_label.img = img_tk
    img_label.config(image=img_label.img)

def positive(arg):
    global current
    rename(IMAGE_FOLDER+"/"+current, IMAGE_FOLDER+"/1_"+current)
    next_img()

def negative(arg):
    global current
    rename(IMAGE_FOLDER + "/" + current, IMAGE_FOLDER + "/0_" + current)
    next_img()


if __name__ == "__main__":

    root = tk.Tk()

    img_label = tk.Label(root)
    img_label.pack()
    img_label.bind("<Button-1>", positive)
    img_label.bind("<Button-3>", negative)

    btn = tk.Button(root, text='Next image', command=next_img)

    next_img() # load first image

    root.mainloop()
We load all unclassified images into the "unclassified_images" list, open up a tkinter window, pack the first image into it by calling next_img() and resize the image to fit onto the screen. Then, we register two clicks, left-and right mouse buttons, and call the functions positive/negative that renames the images according to their label and show the next image.
Ugly but effective.
Step 5: Develop a preprocessor to cut out only the person in our images
For the next step, we need to bring our image data into a format that allows us to do a classification. There are a few difficulties we have to consider given our dataset.
- Dataset Size: Our Dataset is relatively small. We deal with +-2000 Images, which is considered a very low amount of data, given the complexity of them (RGB Images with high resolution)
- Data Variance: The pictures sometimes contain people from behind, sometimes only faces, sometimes no people at all.
- Data Noise: Most pictures not only contain the person itself, but often the surrounding which can be distracting four our AI.
We combat these challenges by:
- Converting our images to greyscale, to reduce the amount of information that our AI has to learn by a factor of 3 (RGB to G)
- Cutting out only the part of the image that actually contains the person, nothing else

The first part is as easy as using Pillow to open up our image and convert it to greyscale. For the second part, we use the Tensorflow Object Detection API with the mobilenet network architecture, pretrained on the coco dataset that also contains a label for "Person".
Our script for person detection has four parts:
Part 1: Opening the pretrained mobilenet coco dataset as a Tensorflow graph
You find the .bp file for the tensorflow mobilenet coco graph in my Github repository. Let's open it as a Tensorflow graph:
import tensorflow as tf

def open_graph():
    detection_graph = tf.Graph()
    with detection_graph.as_default():
        od_graph_def = tf.GraphDef()
        with tf.gfile.GFile('ssd_mobilenet_v1_coco_2017_11_17/frozen_inference_graph.pb', 'rb') as fid:
            serialized_graph = fid.read()
            od_graph_def.ParseFromString(serialized_graph)
            tf.import_graph_def(od_graph_def, name='')
    return detection_graph
Part 2: Load in images as numpy arrays
We use Pillow for image manipulation. Since tensorflow needs raw numpy arrays to work with the data, let's write a small function that converts Pillow images to numpy arrays:
import numpy as np

def load_image_into_numpy_array(image):
    (im_width, im_height) = image.size
    return np.array(image.getdata()).reshape(
        (im_height, im_width, 3)).astype(np.uint8)
Part 3: Call object detection API
The next function takes an image and a tensorflow graph, runs a tensorflow session using it and return all informations about the detected classes (object types), bounding boxes and scores (certainty that the object was detected correctly).
import numpy as np
from object_detection.utils import ops as utils_ops
import tensorflow as tf

def run_inference_for_single_image(image, sess):
    ops = tf.get_default_graph().get_operations()
    all_tensor_names = {output.name for op in ops for output in op.outputs}
    tensor_dict = {}
    for key in [
        'num_detections', 'detection_boxes', 'detection_scores',
        'detection_classes', 'detection_masks'
    ]:
        tensor_name = key + ':0'
        if tensor_name in all_tensor_names:
            tensor_dict[key] = tf.get_default_graph().get_tensor_by_name(
                tensor_name)
    if 'detection_masks' in tensor_dict:
        # The following processing is only for single image
        detection_boxes = tf.squeeze(tensor_dict['detection_boxes'], [0])
        detection_masks = tf.squeeze(tensor_dict['detection_masks'], [0])
        # Reframe is required to translate mask from box coordinates to image coordinates and fit the image size.
        real_num_detection = tf.cast(tensor_dict['num_detections'][0], tf.int32)
        detection_boxes = tf.slice(detection_boxes, [0, 0], [real_num_detection, -1])
        detection_masks = tf.slice(detection_masks, [0, 0, 0], [real_num_detection, -1, -1])
        detection_masks_reframed = utils_ops.reframe_box_masks_to_image_masks(
            detection_masks, detection_boxes, image.shape[1], image.shape[2])
        detection_masks_reframed = tf.cast(
            tf.greater(detection_masks_reframed, 0.5), tf.uint8)
        # Follow the convention by adding back the batch dimension
        tensor_dict['detection_masks'] = tf.expand_dims(
            detection_masks_reframed, 0)
    image_tensor = tf.get_default_graph().get_tensor_by_name('image_tensor:0')

    # Run inference
    output_dict = sess.run(tensor_dict,
                           feed_dict={image_tensor: image})

    # all outputs are float32 numpy arrays, so convert types as appropriate
    output_dict['num_detections'] = int(output_dict['num_detections'][0])
    output_dict['detection_classes'] = output_dict[
        'detection_classes'][0].astype(np.int64)
    output_dict['detection_boxes'] = output_dict['detection_boxes'][0]
    output_dict['detection_scores'] = output_dict['detection_scores'][0]
    if 'detection_masks' in output_dict:
        output_dict['detection_masks'] = output_dict['detection_masks'][0]
    return output_dict
Part 4: Bringing it all together to find the person
The last step is to write a function that takes an image path, opens it using Pillow, calls the object detection api interface and crops the image according to the detected persons bounding box.
import numpy as np
from PIL import Image

PERSON_CLASS = 1
SCORE_THRESHOLD = 0.5

def get_person(image_path, sess):
    img = Image.open(image_path)
    image_np = load_image_into_numpy_array(img)
    image_np_expanded = np.expand_dims(image_np, axis=0)
    output_dict = run_inference_for_single_image(image_np_expanded, sess)

    persons_coordinates = []
    for i in range(len(output_dict["detection_boxes"])):
        score = output_dict["detection_scores"][i]
        classtype = output_dict["detection_classes"][i]
        if score > SCORE_THRESHOLD and classtype == PERSON_CLASS:
            persons_coordinates.append(output_dict["detection_boxes"][i])

    w, h = img.size
    for person_coordinate in persons_coordinates:
        cropped_img = img.crop((
            int(w * person_coordinate[1]),
            int(h * person_coordinate[0]),
            int(w * person_coordinate[3]),
            int(h * person_coordinate[2]),
        ))
        return cropped_img
    return None
Part 5: Move all images into according classified folder
As a last step, we write a script that loops over all images in the "unclassified" folder, checks whether they have an encoded label in the name copies the image in the according "classified" folder with applying the previously developed preprocessing steps:
import os
import person_detector
import tensorflow as tf

IMAGE_FOLDER = "./images/unclassified"
POS_FOLDER = "./images/classified/positive"
NEG_FOLDER = "./images/classified/negative"


if __name__ == "__main__":
    detection_graph = person_detector.open_graph()

    images = [f for f in os.listdir(IMAGE_FOLDER) if os.path.isfile(os.path.join(IMAGE_FOLDER, f))]
    positive_images = filter(lambda image: (image.startswith("1_")), images)
    negative_images = filter(lambda image: (image.startswith("0_")), images)

    with detection_graph.as_default():
        with tf.Session() as sess:

            for pos in positive_images:
                old_filename = IMAGE_FOLDER + "/" + pos
                new_filename = POS_FOLDER + "/" + pos[:-5] + ".jpg"
                if not os.path.isfile(new_filename):
                    img = person_detector.get_person(old_filename, sess)
                    if not img:
                        continue
                    img = img.convert('L')
                    img.save(new_filename, "jpeg")

            for neg in negative_images:
                old_filename = IMAGE_FOLDER + "/" + neg
                new_filename = NEG_FOLDER + "/" + neg[:-5] + ".jpg"
                if not os.path.isfile(new_filename):
                    img = person_detector.get_person(old_filename, sess)
                    if not img:
                        continue
                    img = img.convert('L')
                    img.save(new_filename, "jpeg")
Whenver we run this script, all labeled images are being processed and moved into corresponding subfolders in the "classified" directory.
Step 6: Retrain inceptionv3 and write a classifier
For the retraining part, we'll just use tensorflows retrain.py script with the inceptionv3 model.
Call the script in your project root directory with the following parameters:
python retrain.py --bottleneck_dir=tf/training_data/bottlenecks --model_dir=tf/training_data/inception --summaries_dir=tf/training_data/summaries/basic --output_graph=tf/training_output/retrained_graph.pb --output_labels=tf/training_output/retrained_labels.txt --image_dir=./images/classified --how_many_training_steps=50000 --testing_percentage=20 --learning_rate=0.001
The learning takes roughly 15 minutes on a GTX 1080 ti, with a final accuracy of about 80% for my labeled dataset, but this heavily depends on the quality of your input data and your labeling.
The result of the training process is a retrained inceptionV3 model in the "tf/training_output/retrained_graph.pb" file. We must now write a Classifier class that efficiently uses the new weights in the tensorflow graph to make a classification prediction.
Let's write a Classifier-Class that opens the graph as a session and offers a "classify" method with an image file that returns a dict with certainty values matching our labels "positive" and "negative".
The class takes as input both the path to the graph as well as the path to the label file, both sitting in our "tf/training_output/" folder. We develop helper functions for converting an image file to a tensor that we can feed into our graph, a helper function for loading the graph and labels and an important little function to close our graph after we are done using it.
import numpy as np
import tensorflow as tf

class Classifier():
    def __init__(self, graph, labels):

        self._graph = self.load_graph(graph)
        self._labels = self.load_labels(labels)

        self._input_operation = self._graph.get_operation_by_name("import/Placeholder")
        self._output_operation = self._graph.get_operation_by_name("import/final_result")

        self._session = tf.Session(graph=self._graph)

    def classify(self, file_name):
        t = self.read_tensor_from_image_file(file_name)

        # Open up a new tensorflow session and run it on the input
        results = self._session.run(self._output_operation.outputs[0], {self._input_operation.outputs[0]: t})
        results = np.squeeze(results)

        # Sort the output predictions by prediction accuracy
        top_k = results.argsort()[-5:][::-1]

        result = {}
        for i in top_k:
            result[self._labels[i]] = results[i]

        # Return sorted result tuples
        return result

    def close(self):
        self._session.close()


    @staticmethod
    def load_graph(model_file):
        graph = tf.Graph()
        graph_def = tf.GraphDef()
        with open(model_file, "rb") as f:
            graph_def.ParseFromString(f.read())
        with graph.as_default():
            tf.import_graph_def(graph_def)
        return graph

    @staticmethod
    def load_labels(label_file):
        label = []
        proto_as_ascii_lines = tf.gfile.GFile(label_file).readlines()
        for l in proto_as_ascii_lines:
            label.append(l.rstrip())
        return label

    @staticmethod
    def read_tensor_from_image_file(file_name,
                                    input_height=299,
                                    input_width=299,
                                    input_mean=0,
                                    input_std=255):
        input_name = "file_reader"
        file_reader = tf.read_file(file_name, input_name)
        image_reader = tf.image.decode_jpeg(
            file_reader, channels=3, name="jpeg_reader")
        float_caster = tf.cast(image_reader, tf.float32)
        dims_expander = tf.expand_dims(float_caster, 0)
        resized = tf.image.resize_bilinear(dims_expander, [input_height, input_width])
        normalized = tf.divide(tf.subtract(resized, [input_mean]), [input_std])
        sess = tf.Session()
        result = sess.run(normalized)
        return result
Step 7: Use all this to actually auto-play tinder
Now that we have our classifier in place, let's extend the "Person" class from earlier and extend it with a "predict_likeliness" function that uses a classifier instance to verify whether a given person should be liked or not.
# In the Person class

    def predict_likeliness(self, classifier, sess):
        ratings = []
        for image in self.images:
            req = requests.get(image, stream=True)
            tmp_filename = f"./images/tmp/run.jpg"
            if req.status_code == 200:
                with open(tmp_filename, "wb") as f:
                    f.write(req.content)
            img = person_detector.get_person(tmp_filename, sess)
            if img:
                img = img.convert('L')
                img.save(tmp_filename, "jpeg")
                certainty = classifier.classify(tmp_filename)
                pos = certainty["positive"]
                ratings.append(pos)
        ratings.sort(reverse=True)
        ratings = ratings[:5]
        if len(ratings) == 0:
            return 0.001
        return ratings[0]*0.6 + sum(ratings[1:])/len(ratings[1:])*0.4
Now we have to bring all the puzzle pieces together.
First, let's initialize the tinder API with our api token. Then, we open up our classification tensorflow graph as a tensorflow session using our retrained graph and labels. Then, we fetch persons nearby and make a likeliness prediction.
As a little bonus, I added a likeliness-multiplier of 1.2 if the person on Tinder goes to the same university as I do, so that I am more likely to match with local students.
For all people that have a predicted likeliness score of 0.8, I call a like, for all the other a dislike.
I developed the script to auto-play for the next 2 hours after it is started.
from likeliness_classifier import Classifier
import person_detector
import tensorflow as tf
from time import time

if __name__ == "__main__":
    token = "YOUR-API-TOKEN"
    api = tinderAPI(token)

    detection_graph = person_detector.open_graph()
    with detection_graph.as_default():
        with tf.Session() as sess:

            classifier = Classifier(graph="./tf/training_output/retrained_graph.pb",
                                    labels="./tf/training_output/retrained_labels.txt")

            end_time = time() + 60*60*2
            while time() < end_time:
                try:
                    persons = api.nearby_persons()
                    pos_schools = ["Universität Zürich", "University of Zurich", "UZH"]

                    for person in persons:
                        score = person.predict_likeliness(classifier, sess)

                        for school in pos_schools:
                            if school in person.schools:
                                print()
                                score *= 1.2

                        print("-------------------------")
                        print("ID: ", person.id)
                        print("Name: ", person.name)
                        print("Schools: ", person.schools)
                        print("Images: ", person.images)
                        print(score)

                        if score > 0.8:
                            res = person.like()
                            print("LIKE")
                        else:
                            res = person.dislike()
                            print("DISLIKE")
                except Exception:
                    pass

    classifier.close()
That's it! We can now let our script run for as long as we like and play tinder without abusing our thumb!
If you have questions or found bugs, feel free to contribute to my Github Repository.
License
MIT License
Copyright (c) 2018 Joel Barmettler
Permission is hereby granted, free of charge, to any person obtaining a copy of this software and associated documentation files (the "Software"), to deal in the Software without restriction, including without limitation the rights to use, copy, modify, merge, publish, distribute, sublicense, and/or sell copies of the Software, and to permit persons to whom the Software is furnished to do so, subject to the following conditions:
The above copyright notice and this permission notice shall be included in all copies or substantial portions of the Software.
THE SOFTWARE IS PROVIDED "AS IS", WITHOUT WARRANTY OF ANY KIND, EXPRESS OR IMPLIED, INCLUDING BUT NOT LIMITED TO THE WARRANTIES OF MERCHANTABILITY, FITNESS FOR A PARTICULAR PURPOSE AND NONINFRINGEMENT. IN NO EVENT SHALL THE AUTHORS OR COPYRIGHT HOLDERS BE LIABLE FOR ANY CLAIM, DAMAGES OR OTHER LIABILITY, WHETHER IN AN ACTION OF CONTRACT, TORT OR OTHERWISE, ARISING FROM, OUT OF OR IN CONNECTION WITH THE SOFTWARE OR THE USE OR OTHER DEALINGS IN THE SOFTWARE.
Hire us: Software Entwickler in Zürich!