Astronomy/Weather Clock
This project is designed to create a desktop clock which provides weather and astronomical information while additionally functioning as an alarm clock. Although primarily designed to run on a Raspberry Pi, the project generates a Node.js server and a client web app which can be run on other computers and operating systems, albeit without the Raspberry Pi’s hardware-level support for wired and wireless temperature/humidity sensors. GPS support is also primarily aimed at the Raspberry Pi, but might work with other Linux variants if similarly configured.
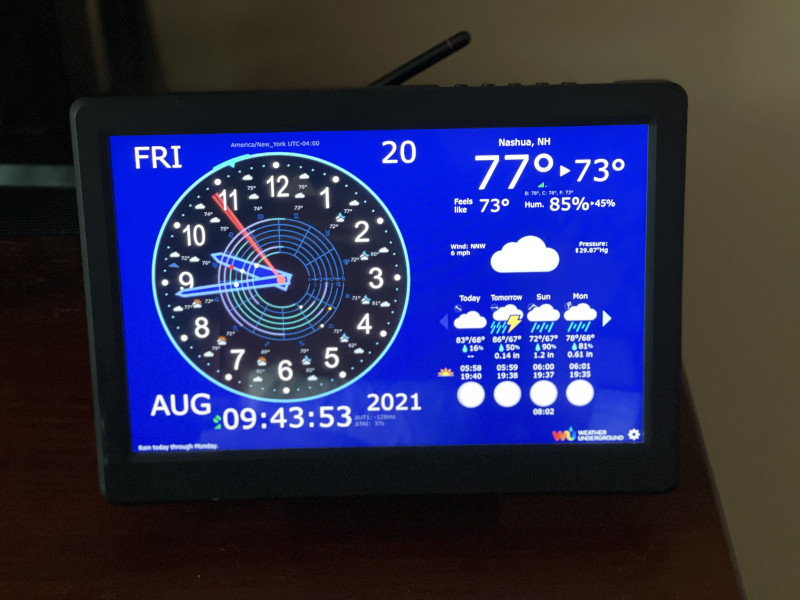
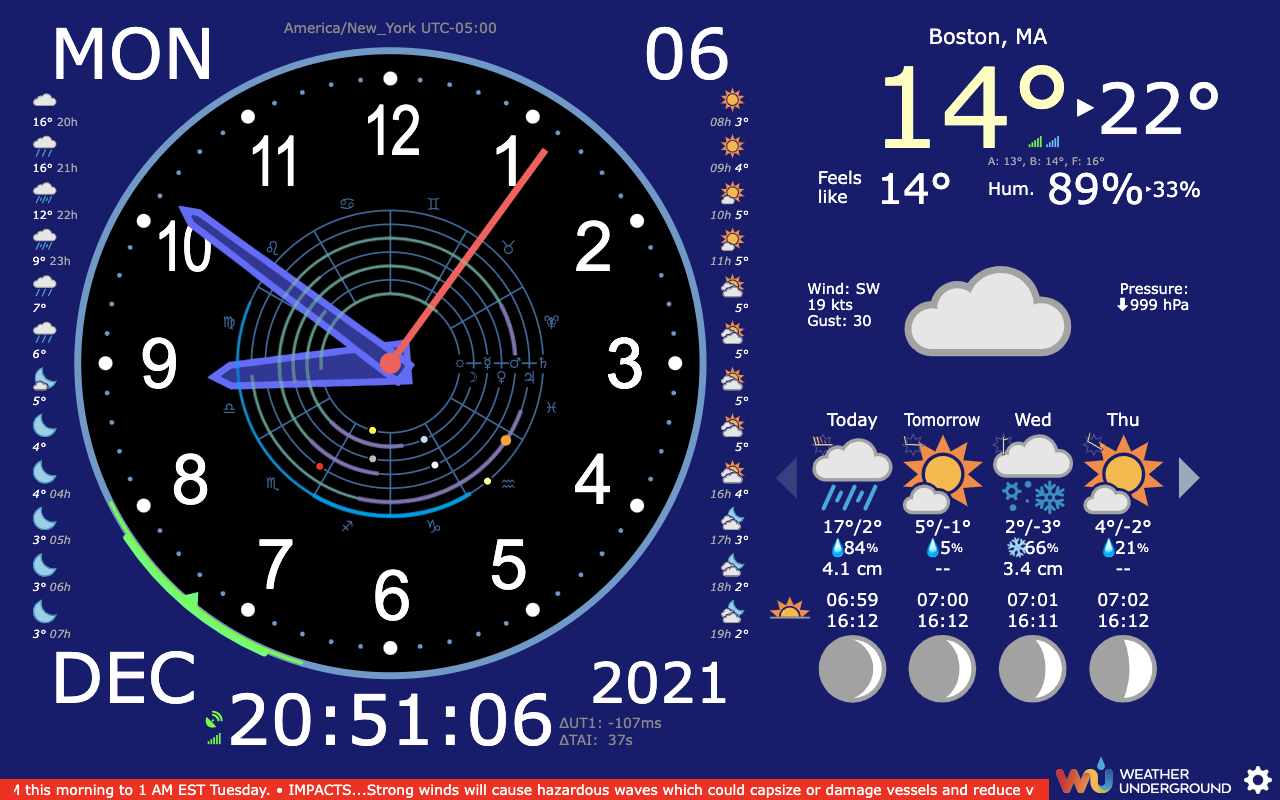
The clock displays the time and date in both analog and digital form, in 12- or 24-hour format, and has a special display mode for the occasional leap second. The clock also displays current weather conditions, hourly conditions for 24 hours, a seven*-day forecast, filterable weather alerts, sunrise and sunset times, moonrise and moonset times*, moon phases, equinoxes, solstices, and the positions of the Sun, Moon, and major planets along the ecliptic.
When displaying 24-hour time, that time can either be local time or UTC.
On a display which is narrower than a 16-by-9 aspect ratio, four forecast days can be seen at one time without scrolling. On 16-by-9 or wider displays, five days are visible at a glance.
Multiple alarms can be set as either daily alarms (on selectable days of the week), or one-time alarms triggered at a specific date and time. Various alarms tones are available, and each alarm can be accompanied by an on-screen message. Alarms can be set to snooze for 5, 10, or 15 minutes.
When viewing the sky map feature you can choose to see a multicolor sky, shaded to indicate daylight, sunrise and sunset, twilight, and even solar eclipse conditions. Or the sky can be shown as black all the time for easier viewing of the positions of the stars. Constellation lines can be optionally displayed as well.
*A touchscreen or mouse is required to display the last two or three days of the seven-day forecast, to switch the display from sunrise/sunset to moonrise/moonset, from clock face to sky map, or to switch from hourly temperatures to hourly probability-of-precipitation.


Getting started
The following instructions are primarily aimed at turning a Raspberry Pi into a dedicated Astronomy/Weather Clock, meaning serving as a clock will be the Raspberry Pi’s primary, if not sole, function. The Pi will boot up directly into full-screen kiosk mode running the Astronomy/Weather Clock software.
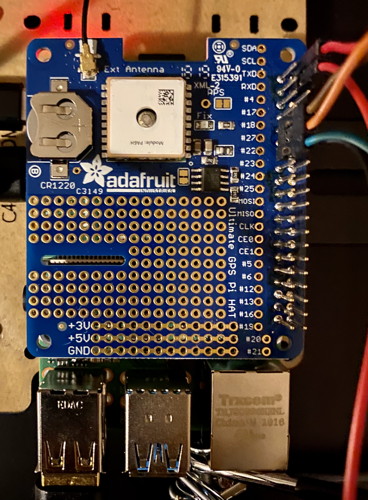
The first step, if you want GPS support, is to install a GPS device according to the manufacturer’s instructions. This device must provide a PPS (Pulse Per Second) signal for precise time keeping (something USB dongles do not provide), and must be configured to work with ntpd. I recommend the Adafruit Ultimate GPS HAT, not only because it works well, but because it’s the only GPS hardware I’ve tested. I’ve also provided notes on the Adafruit GPS HAT installation at the end of this document.
In my own case I needed to use an active GPS antenna to get a good signal, but you might not need one, depending on where you locate your device.
The next step (or the first, if you’re skipping GPS) is to clone the repository into your home directory (typically /home/pi, but any other user-owned directory will do) and perform the initial set-up:
$ git clone https://github.com/kshetline/aw-clock.git
$ cd aw-clock
$ sudo ./build.sh -i
There will possibly be a long delay the first time you run this script while Node.js (if not already present) and various npm packages are installed as a prerequisite to running the rest of the installation procedure.
You’ll then be prompted in the console for the initial configuration you desire. If you leave the -i off the end of the build.sh command above, and add --ddev, an all-defaults installation will be performed automatically, with support for wired and wireless temperature/humidity sensors initially disabled, no alternative weather services beyond Weather Underground, and no geocoding support.
If you want to use the alarm clock feature, it’s important that you use the default kiosk mode. This ensures that audio can be played by the Chrome web browser without you having to interact with the browser first (working around a web browser safety feature designed to protect you from annoying ads on websites that could otherwise suddenly blast you with sound).
Respond Y to the prompt “Allow user to reboot, shutdown, update, etc.?” if you want to be able to use the clock’s Settings dialog to perform these basic administrative functions. This is especially convenient if you’re using a touchscreen, and you don’t want to have to use SSH or VNC to perform these operations.
Weather
As of v2.1.0 of this software no API key is required to get weather data. The default weather data, however, is now being acquired by “page scraping” Weather Underground, not via a guaranteed stable API.
Having a back-up weather data source is still, therefore, a good idea. For that there are three options:
-
Get an API key for Weatherbit.io via RapidAPI. You can get a free key, but with a hard maximum of 125 API calls allowed per day, that will only be good for occasional back-up service, not full-time weather information (it takes multiple API calls to get a full forecast). The US$10/month Pro plan is more than sufficient, however. With a Weatherbit.io API key, you’ll also be able to handle geolocation (turning GPS latitude/longitude into city/place names) without needing to set up a Google API key.
-
Get an API key for Visual Crossing. You can get an essentially free API key for this service. You have to provide billing information, but the allowance of 1000 free calls per day should be more than sufficient.
-
There’s a limited capability in this software to fall back on using my personal RapidAPI/Weatherbit.io account, but depending on how much traffic I get, there’s no guarantee that this back-up will always be there.
Note: The Dark Sky weather API has been discontinued. Support for Dark Sky in this application has been removed.
Time keeping
By default, this application uses GPS-synced system time, if available, or uses a default pool of NTP time servers (keeping its own time via NTP, rather than using the system clock). You can configure the use of different time servers, however, you should not choose Google or Facebook time servers, or any other NTP server that implements “leap second smearing”, if you want the Astronomy/Weather Clock to be able to accurately display leap seconds as shown below:
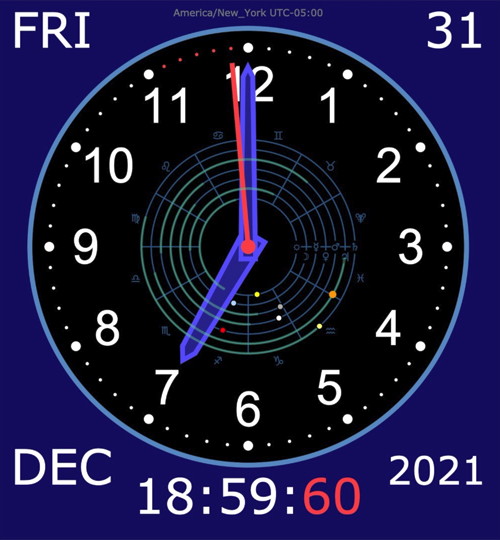
This image is hypothetical — the pictured moment in time was not an actual leap second. Video here: https://shetline.com/video/leap_second_display.mp4
Web browser client options
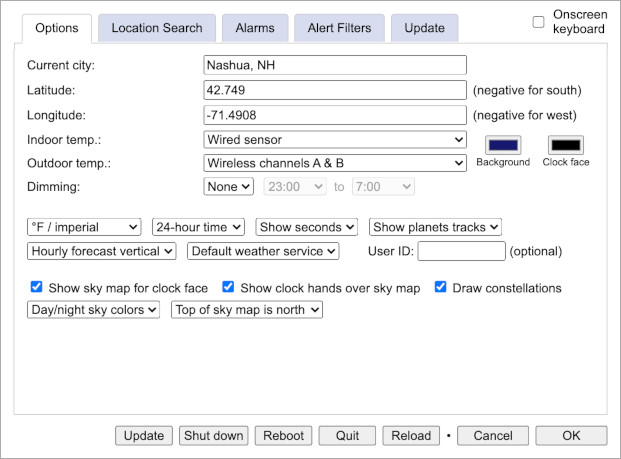
As soon as you’ve got the Astronomy/Weather Clock up and running the first time, you might want to click on the gear icon in the lower right corner of the web browser display to adjust the various user options which aren’t queried as part of the initial set-up.
Your city might be filled in automatically by using your IP address — but then again, it might not. If you’re using this clock in a bedroom you might find the Dimming options very useful, as they establish a schedule during which the display will be reduced in brightness.

To close the web browser while it’s running in full-screen kiosk mode, press Alt-F4, or use the Settings/Quit button if available. To get out of full screen mode, but leave the browser running, press Alt-F11.
Hardware set-up for temperature/humidity sensors
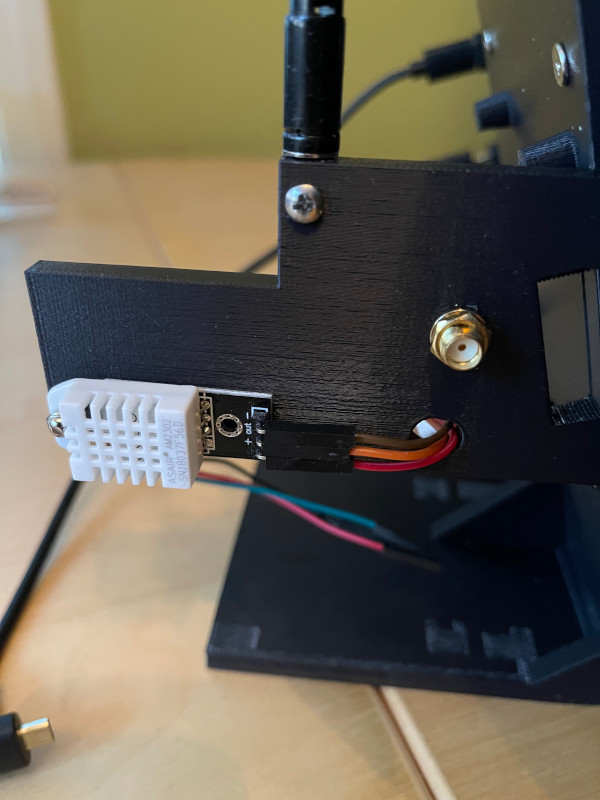
If you are running the server on a Raspberry Pi you have the option to display indoor temperature and humidity using a direct-wired DHT22/AM2302 sensor, as seen here: https://www.amazon.com/HiLetgo-Temperature-Humidity-Electronic-Practice/dp/B01N9BA0O4/. The wiring I describe below is specifically for the AM2302 version of the DHT22, with a built-in pull-up resistor.
With your Raspberry Pi shut down and disconnected from power, connect the DHT22/AM2302 sensor. The code defaults to assuming the signal lead (“out”) of the sensor is connected to GPIO 17* (physical pin 11 on the 40-pin J8 header). The + lead from the sensor needs to be connected to 5V (I chose pin 2 on the 40-pin J8 header) and the - lead needs to be connected to ground (I chose pin 9). In the image below, the signal lead is orange, the ground is brown, and +5 is the upper red wire.
*This default was GPIO 4 (physical pin 7) before version 2.4.0, but the Adafruit GPS HAT is pre-wired to use that pin, hence the new default.
Also for the Raspberry Pi you have the option to provide wireless indoor conditions and outdoor weather data using 433 MHz Acu Rite 06002M wireless temperature and humidity sensors paired with a 433 MHz receiver module.
You can use one wireless sensor in lieu of a wired DHT22/AM2302 for indoor temperature and humidity, and you can use one or two wireless sensors for outdoor temperature and humidity. (When using multiple sensors, each must be set to a different channel — A, B, or C.)
An outdoor two-sensor set-up is useful when it’s difficult to find a single location for a sensor that isn’t overly warmed by the sun for at least part of the day. When you have two sensors, and signal is available from both, values from the cooler of the two sensors will be displayed.
With either one or two outdoor sensors the temperature displayed (in the largest text) will be pinned to be within ±2°C (±4°F) of the temperature supplied by the online weather service (a yellow tint of the temperature value indicates pinning is in effect). The “Feels like” temperature always comes from the weather service, not from your wireless sensors.
In small, gray print you can see the individual temperature values for each wireless sensor and from the forecast, regardless of what is displayed in large format. If any of your wireless sensors are running low on battery power, a red indicator will appear in the upper right corner of the display.
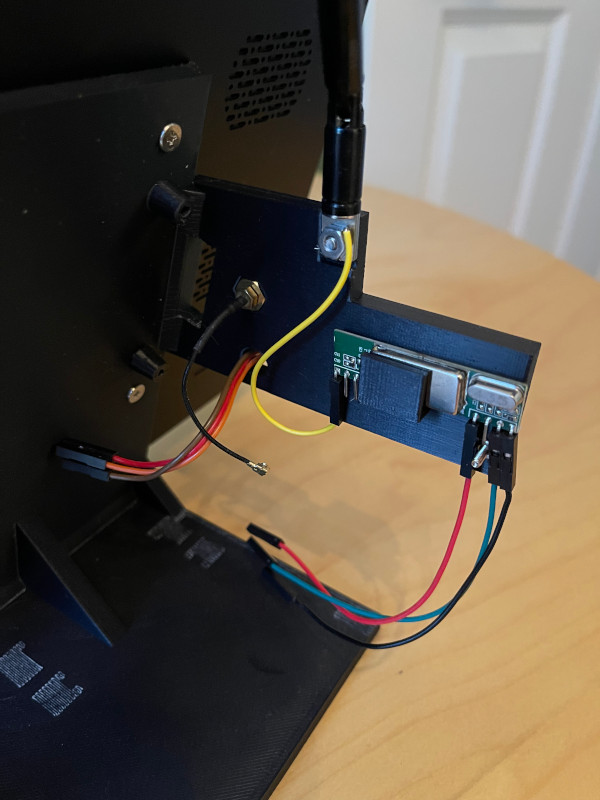
When connecting the 433 MHz receiver module follow the same precautions as specified for connecting the DHT22/AM2302. For my own set-up, I’ve connected the receiver’s +5V lead to physical pin 4 of the 40-pin J8 connector, ground to pin 14, and data to pin 13 (GPIO 27, the set-up default value). These correspond to the lower red wire in the picture above, the black wire (hard to see, to the right of the blue wire), and the blue wire.
Touchscreen/mouse features
A touchscreen is the most practical way to use the alarm features of this clock, so that alarms can conveniently be silenced, “snoozed”, or temporarily disabled at a touch. Other functionality is enhanced as follows:
- Swipe left or right on the daily forecast to view the full seven-day forecast. You can also tap/click on the left/right arrows on either side of the forecast. After one minute, the display reverts to the first four (or five) days.
- Tap/click in the center of the clock face to temporarily view a current sky map. The sky map can also be set as your default view, so that a tap/click in the center of the sky map will temporarily display the clock face. After one minute, the display reverts to your default view.
- Tap/click on a forecast day, and a textual summary (if available) of that day’s weather will appear.
- Tap/click on the rise/set icon, or the rise/set times, to switch between sun and moon rise and set times. After one minute, the display reverts to sunrise/sunset.
- Tap/click on the hourly weather icons, or the hourly temperatures, to see hourly probabilities of precipitation and wind speed. Tap/click again to toggle back to weather icons and temperatures. After one minute, the display reverts to weather icons and hourly temperatures.
- Tap/click on the (sometimes) scrolling banner at the bottom of the screen to see the full text of alert messages without having to wait for all of the text to scroll by. In this full text view you can acknowledge alerts and thus remove them from the banner.
- Tap/click on the gear icon in the lower right corner of the display to bring up the Settings dialog. An onscreen keyboard option is available. If you answered “Yes” to the set-up question “Allow user to reboot, shutdown, update, etc.?”, extra options for managing your Raspberry Pi will be available.
Alarm keyboard control
As an alternative to silencing and snoozing alarms with a touchscreen, there are also keypress values associated with these actions. While you probably wouldn’t want a full-size keyboard attached to your clock all the time, a small set of programmable USB keys, or even a single key, could be used to provide a more tactile yet compact way of controlling alarms.
A Bluetooth numeric keypad, while not exactly the ideal form factor, can provide a convenient and inexpensive means of remotely silencing and snoozing alarms.
Stop alarm: <space> or Enter
Snooze 5 minutes: 5
Snooze 10 minutes: 0 or S
Snooze 15 minutes: . (period)
Custom alarm tones
When you perform the standard dedicated device installation, a folder will be created for your own alarm tones at /home/pi/awc-alarm-tones. Simply add MP3, MP4, or OGG audio files to this folder to make them available for alarms.
Temporarily disabling upcoming alarms
Ever wake up before your alarm goes off, don’t walk to worry about the alarm going off when you aren’t around, but you're also worried that if you turn the alarm off you’ll forget to turn it back on again for when you need it next?
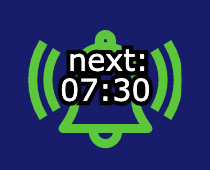
When an alarm is coming up within the next 24 hours a green alarm indicator is displayed, as seen above, near the middle of the top of the screen, to the right of the current date. The time of the next upcoming alarm is shown.
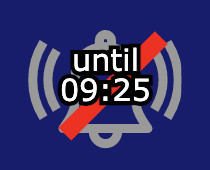
If you tap/click on this indicator, alarms will be temporarily disabled for the next 3, 6, 12, or 24 hours, increasing with each tap. (Tap once more in this sequence to re-enable alarms.) The time when alarms will resume again is displayed.
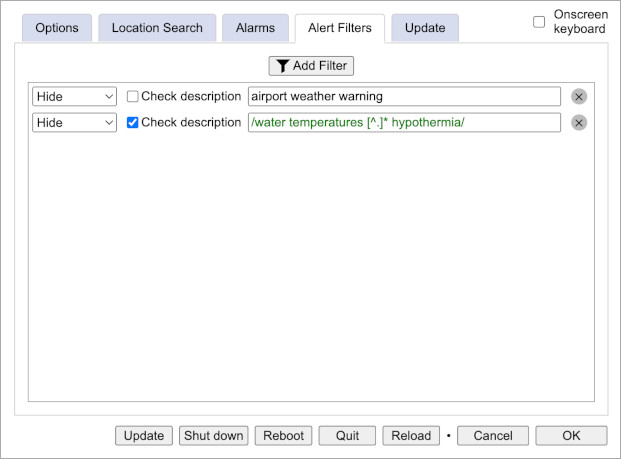
Weather Alert Filters
It’s a really good idea to look out for water that might be very cold, even though high air temperatures might fool you into thinking the water might be warmer and safe for a swim.
I get that. I don't need a scrolling banner warning me everytime this situation arises, however. I'm also not personally particularly concerned about airport weather warnings either.
This is where weather alert filters come in. You can enter a word or phrase, either found in the title of an alert, or in the full description of the alert, and either have that alert hidden from the banner at the bottom of the screen, or have the alert downgraded to general information without an associated alert color.
A color coded icon will be appended to the banner for each hidden alert. If you tap/click on the banner for the full-text display, all alerts will be shown.
The filter text you enter is case-insensitive. Advanced users can enter regular expressions for complex matching by enclosing their filter text in slashes (with an optional u flag after the last slash for Unicode regular expression features).
Wind speed

Wind speed is displayed using wind barbs. When using imperial units, the wind barbs represent wind speed in knots, rounded to the nearest multiple of 5 knots, up to a maximum of 100 knots. In metric mode the wind barbs, by default, represent wind speed in meters per second, in increments of 2.5 m/s (in the diagram above, divide the captions by 2 for m/s).
In the Settings dialog, however, you can choose to display wind speed in knots while still using metric (°C, cm) for temperature and precipitation. When using imperial units (°F, in) wind speed (apart from wind barbs) is by default shown in mph, but you can optionally use knots for the textual display of wind speed as well.
| Imperial | Metric | |
|---|---|---|
| Half barb | 5 knots | 2.5 m/s |
| Full barb | 10 knots | 5 m/s |
| Pennant | 50 knots | 25 m/s |
The barbed ends of the wind barbs point in the direction from which the wind is blowing, with north being upward. Wind gust speed is represented by a red wind barb drawn underneath the non-gust wind barb, such that only the excess gust speed is seen, peeking out from behind.
Current wind speed is also shown as an arc along the edge of the clock face, changing in size and color (from cyan to green, to yellow, to orange, and to red) as wind speed increases. If there is a gust speed, which will show as a second thinner but wider arc. These arcs are centered on the direction from which the wind is coming, with an inward pointer pointing in the direction toward which the wind is blowing. There are no arcs drawn for wind below 2.5 knots (or below 1.25 m/s).
How the planet display works
The circular tracks around the center of the clock face display the ecliptic longitude of the Sun, the Moon, Mercury, Venus, Mars, Jupiter, and Saturn (in that order, from the innermost track outward), starting with 0° (the First Point of Aries) at three o’clock, and increasing counterclockwise from there. Over time the planets will slowly move around the clock face, mostly moving counterclockwise, but occasionally clockwise when retrograde.
When the symbol for a planet is drawn larger, and it appears on top of one of the green and/or purple arcs along the planet tracks, this indicates the planet is above the local horizon. Otherwise, it is below the horizon. The green/purple arcs turn clockwise, so the clockwise end of each arc represents when a planet rises, and the counter-clockwise end represents when a planet sets. When a planet is on top of the purple portion of an arc, this indicates that the sun is below the horizon at that time — the planet is therefore in the night sky, and likely visible if twilight doesn’t overpower it.
For roughly half an hour after a planet sets, its horizon arcs will be colored blue, indicating that the rise-to-set period being displayed is in the past. Arcs in green and purple represent the current or upcoming rise/set period.
If an arc becomes a full circle, that means the corresponding planet on that track is above the horizon all day. If there is no arc at all, the planet is below the horizon all day. (These two situations only occur at extreme northern or southern latitudes.)
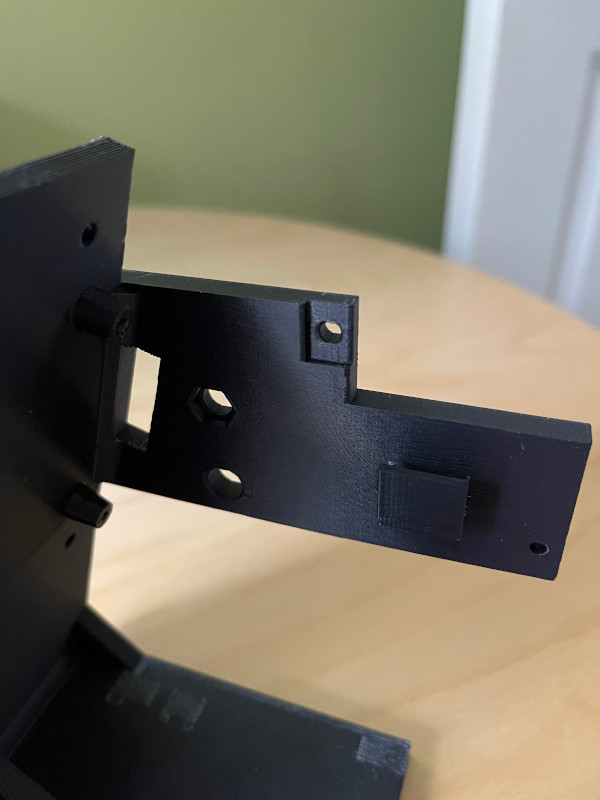
Construction with 3D-Printed Stand
Rearview of stand
The 3D model for this stand is provided by the project file raspberry_pi_setup/monitor_stand.stl. Below is how that model came out when printed using black ABS, 20% infill, at a cost of about $28 USD.
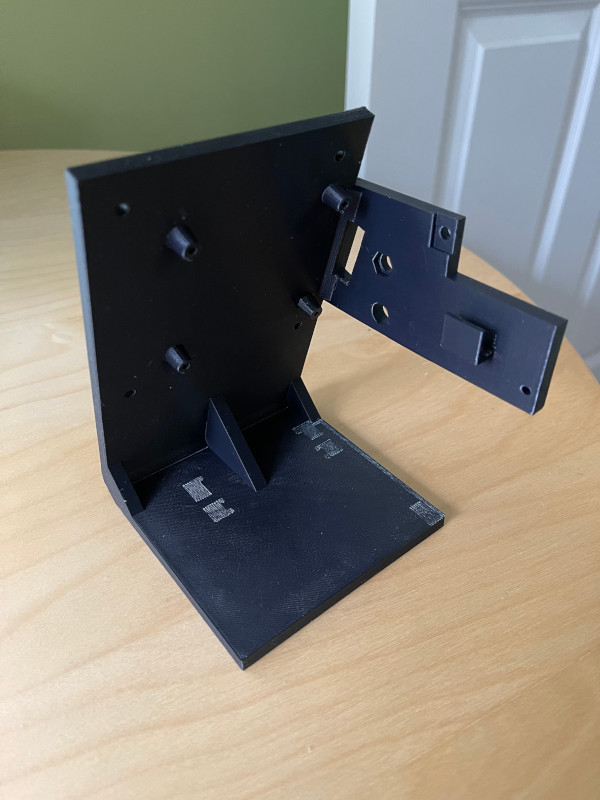
This is my second design of this stand, after making a few improvements from my first design. I made this version shorter, improved wire routing, and added an access hole where (using tweezers) it’s possible to access the SD card slot without disassembling the clock.
UPDATE: While upgrading my Raspberry Pi to Bullseye I finally had an opportunity to use the access hole I’d designed for reaching the SD card. It worked, but it was a struggle to get a decent grip on the card using tweezers, especially since I couldn’t both aim the tweezers straight into the hole and get my fingers where they needed to be to squeeze hard on the tweezers at the same time. I suspect a tool like a hemostat might have done a better job.
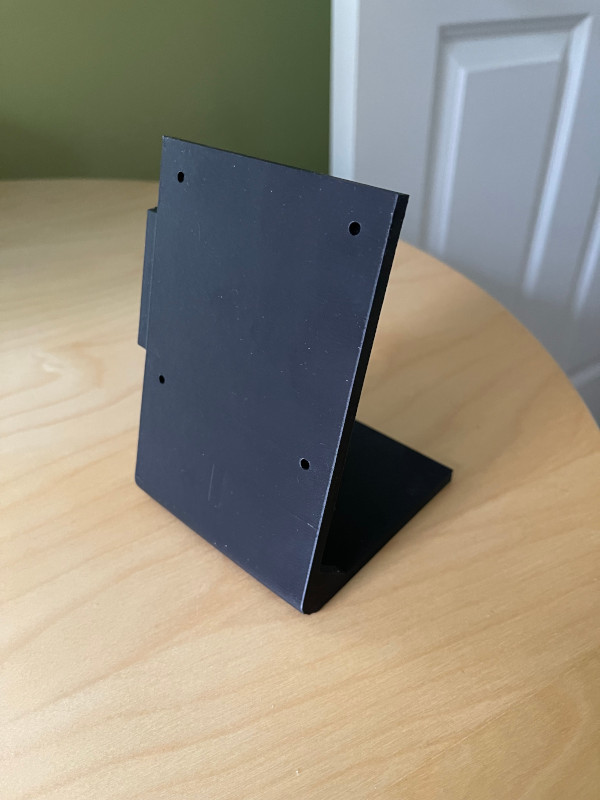
Front view
Side mounting panel
The side panel has a place to attach a quarter-wave 433 MHz antenna, a clip to hold a 433 MHz receiving module, a hole for a female SMA coaxial connector for GPS, and (on the reverse side) a mounting position for a DHT22/AM2302 temperature/humidity sensor.
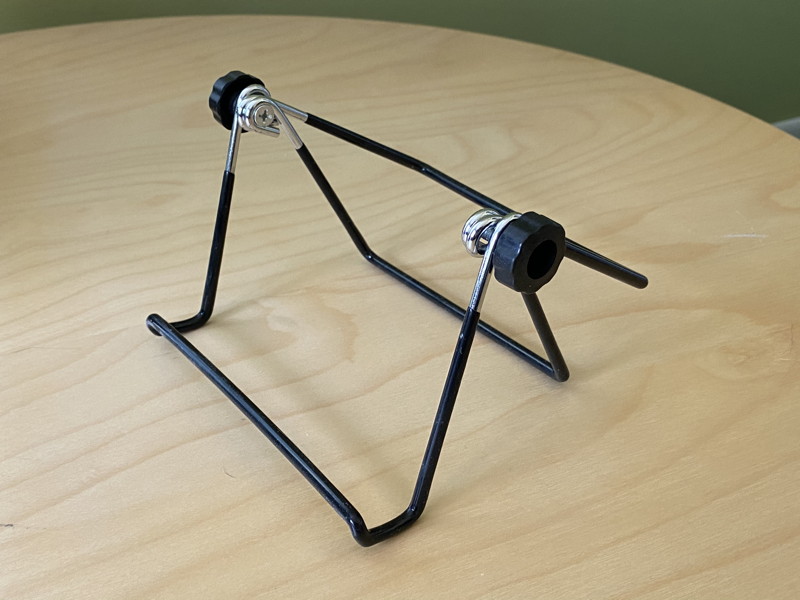
Original monitor stand
This is the original stand that came with the 2560x1600 ELECROW 10.1" touchscreen monitor. It’s not a bad stand in general, but, with the Raspberry Pi attached to the back of the monitor, the cables and wires were an awkward fit. The stand had to be skewed off-center quite a bit for it to work at all.
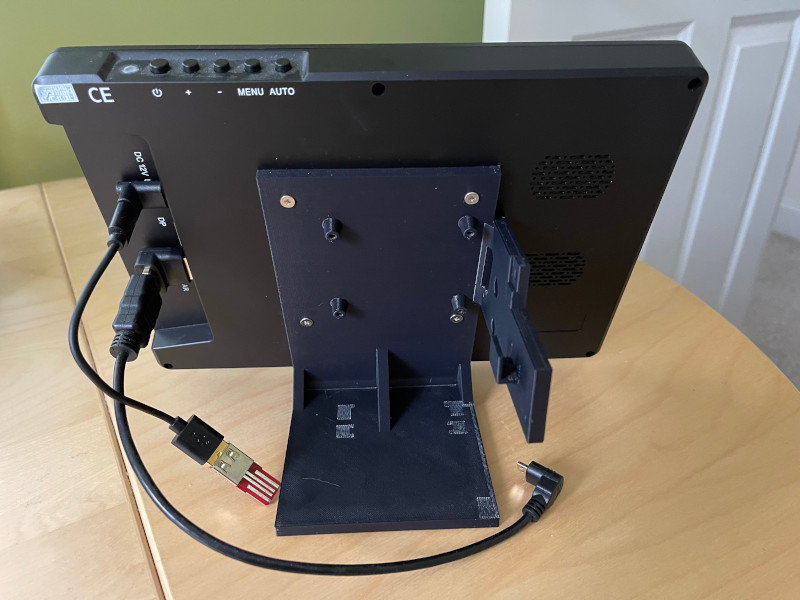
Stand attached to monitor
The stand is attached using 4 M3 x 10 mm wafer-head machine screws. Please note that M4 is the typical size screw for a VESA mount of this size (75 mm square spacing), so it’s a little unusual M3s were needed instead.
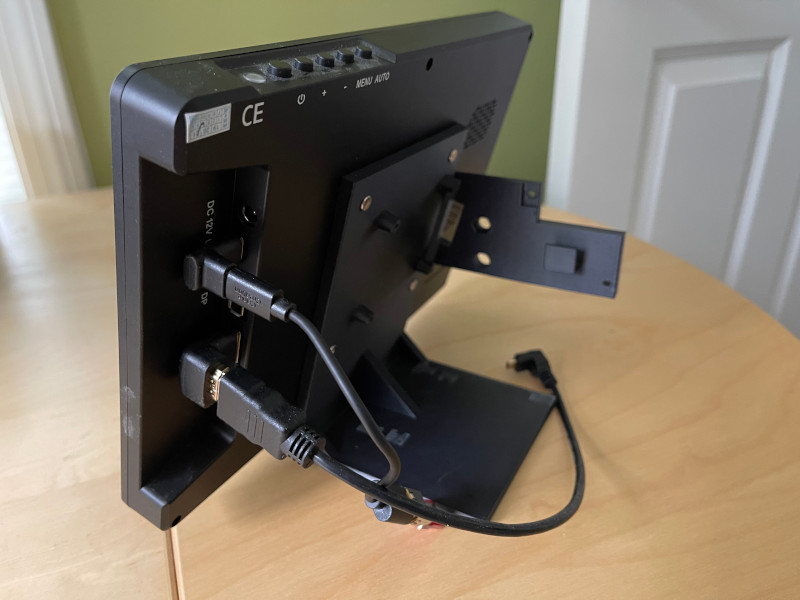
Stand attached to monitor, side view
Side panel with components attached
The long arm that reaches out from the side panel is designed so the temperature/humidity sensor can be placed at a distance from the heat generated by the Raspberry Pi. The open design is also to prevent heat build-up that an enclosure might cause, which could also skew indoor temperature readings.
A small piece of non-conductive foam wedged behind the RF module helps keep the module in place.
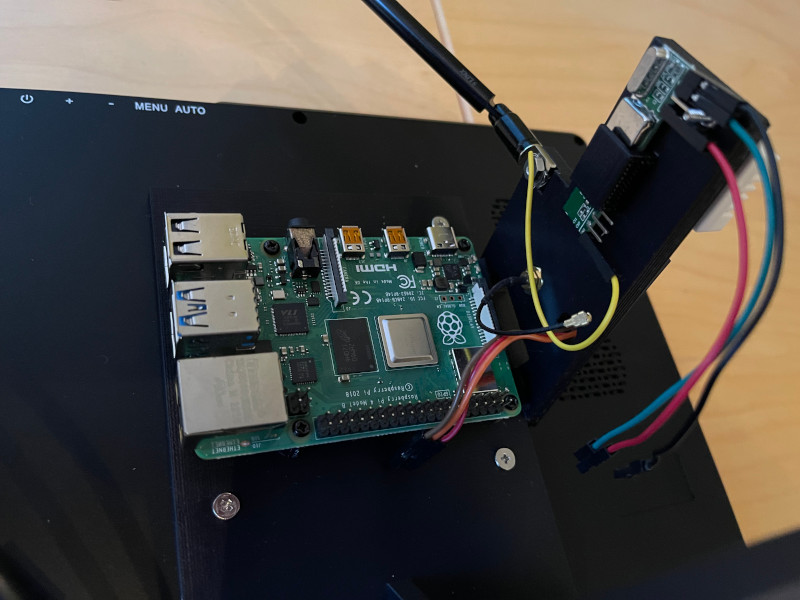
Raspberry Pi Model 4 attached to stand-offs
I was a bit uncertain how well machine screws would work with the stand-offs that I’d designed, since I wanted them to function like self-tapping screws. As it turned out, the four M2.5 x 6 mm pan-head machine screws fit quite nicely and snugly, without being difficult to turn. If the Pi were to be repeatedly removed and reattached, however, this design might not be durable enough. For my current purposes, it’s just fine.
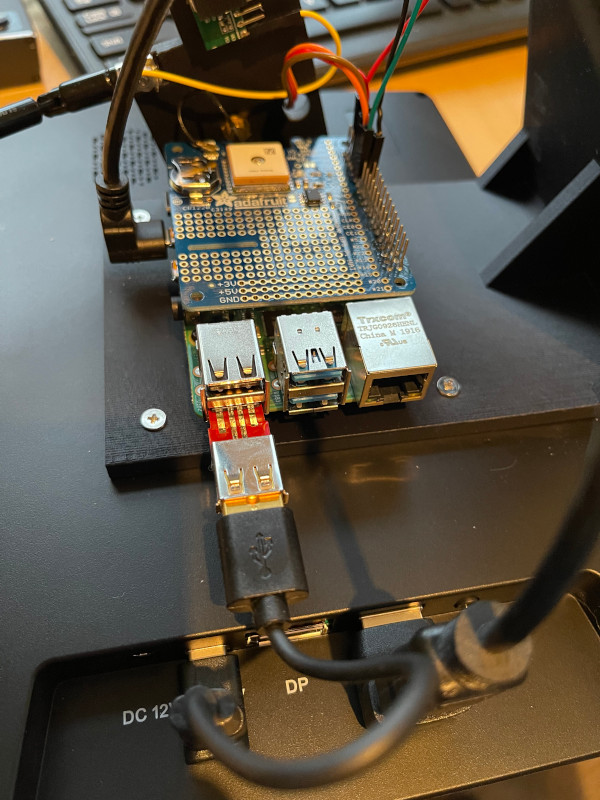
GPS HAT added, and components wired together

Monitor connections for HDMI video and USB touchscreen
I was able to find a single, short HDMI cable with a 90°-down micro HDMI connector on one end. This is great for use with the Pi 4, replacing the two separate cables plugged together I started out with when I got the 4: a short dual HDMI male cable combined with an HDMI-to-micro-HDMI adapter cable. I added a full-sized HDMI right-angle adapter as well to improve cable management.
I couldn’t find a right-angle USB-C cable for hooking up the touchscreen, but I did find a right-angle adapter and a short male USB-C to male USB A 2.0 cable.
The odd reddish-brown object at the end of the USB cable is an adapter that blocks power flow, so the USB connection is a data-only connection. This was needed to because the monitor otherwise supplies power to the Raspberry PI over the USB connector.
While this would actually be a good thing if it meant I could hook up the clock with only one power cable, not two, the power from the monitor only keeps the Raspberry Pi running after the Pi has been separately powered up using its own power supply. The result is no simplification of the power connections, but merely making it harder to shut the clock down without adding this power isolating adapter.
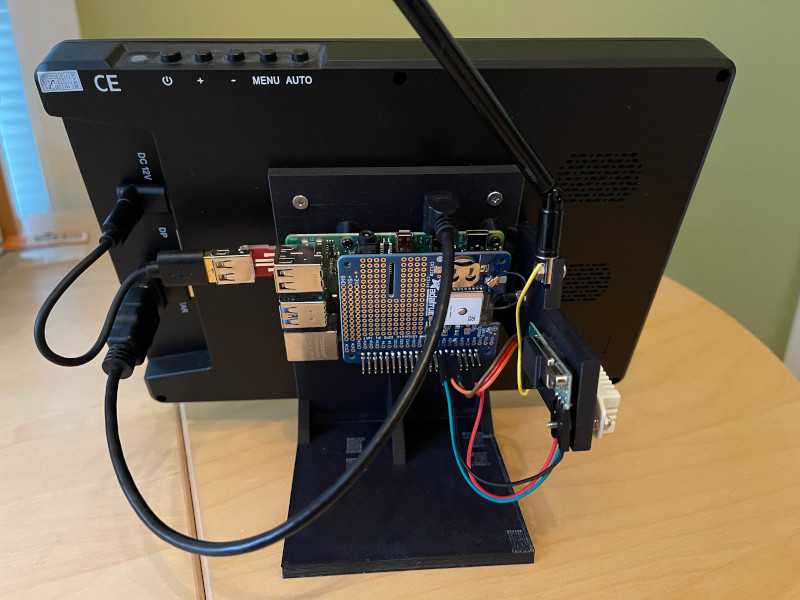
Rearview of completed clock project
Parts
- Raspberry Pi 4 with 2 GB RAM
- Adafruit Ultimate GPS HAT (connected using a stacking header, so it was still easy to attach the leads for the temperature/humidity sensor and the RF receiver)
- Active GPS antenna
- 2560x1600 ELECROW 10.1" touchscreen (in pixel doubling mode (see note))
- Custom-printed 3D stand
- Wired DHT22/AM2302 sensor
- 2 x 433 MHz Acu Rite 06002M wireless temperature and humidity sensors
- 433 MHz receiver module
- ¼-wave 433 MHz antenna
- Right-angle HDMI adapter
- 12-inch 90°-down micro HDMI male to HDMI male cable
- USB power blocker (Data blockers are easy to find — power blockers, not!)
- Miscellaneous other jumper wires, cables, machine screws (some specifics listed above), etc.
Info for code development, testing, and non-Raspberry Pi use
To build and run this project you can use the following commands:
- “
sudo ./build.sh” [ various-options ]” to run the installer. - “
npm run first-install” to install all npm packages needed for both the client and the server (a separate, inner project) with one command. - “
npm run build” [‑‑ various-options ]” to build. (Please note the‑‑(double-dash) all by itself, which must come before all other options.) - “
npm run start-server” to start the data server for this project (except on Windows) onlocalhost:4201. (You may need to make this precede this command withsudo.) The server will be automatically restarted whenever you edit the code. - “
npm run start-server-win” to start the data server for this project (on Windows) onlocalhost:4201. - “
npm start” to serve the web client using webpack-dev-server onlocalhost:4200. The client will be automatically restarted whenever you edit the code. (Note that for development and testing, two different ports are used (4200, 4201), but that when the server is deployed, all content and data is served on a single port, by default 8080.)
To build the server along with the web client, use npm run build, possibly followed by ‑‑ and other options listed below:
‑‑acu |
Install support for wireless temperature/humidity sensors using a 433 MHz receiver module. |
‑‑acu‑ |
Clears saved ‑‑acu setting when not using interactive mode. |
‑‑admin |
Enables the user actions “Update”, “Shut down”, “Reboot”, and “Quit” in the Settings dialog. |
‑‑admin- |
Clears the --admin setting. |
‑‑ddev |
This stands for “dedicated device”. This is for setting up a Raspberry Pi to primarily serve as an Astronomy/Weather Clock, automatically booting as a clock in full-screen mode. This implies the ‑‑sd option. |
‑‑dht |
Install support for a wired DHT22/AM2302 temperature/humidity sensor. |
‑‑dht‑ |
Clears saved ‑‑dht setting when not using interactive mode. |
‑‑help |
Display brief help message. |
‑i |
Interactive mode. This prompts you to enter various configuration options, and implies the ‑‑ddev option. |
‑‑launch |
When installation is finished, launch the software. |
‑‑kiosk |
Start web browser in kiosk mode (this is the default). |
‑‑kiosk- |
Do not start web browser in kiosk mode. |
‑‑pt |
This stands for “plain text”. It defeats console colors and animation. |
‑‑reboot |
When installation is finished, reboot your system. |
‑‑sd |
This stands for “standard deployment”. It causes the generated code to be moved to the ~/weather directory, first deleting whatever might have already been there first. |
‑‑skip‑upgrade |
This disables the apt-get update and upgrade normally performed as a standard part of the dedicated device set-up |
‑‑tarp |
This stands for “treat as Raspberry Pi”. This option can be used on a Linux Debian system, using the LXDE desktop, to simulate most Raspberry Pi functionality. |
Server configuration
The following environment variables affect how the server part of this software runs. They are defined in the file /etc/defaults/weatherService for the purposes of the dedicated device set-up.
AWC_ALLOW_ADMIN: Iftrue, an app user on localhost will be able to perform update, shut down, reboot, and quit operations via the Settings dialog.AWC_ALLOW_CORS: CORS stands for “Cross-Origin Resource Sharing”, and is an HTTP security feature. Most HTTP servers disable CORS by default. This software, however, turns CORS on by default (by setting this environment variable totrue) to allow data sharing when the server is running on port 4201 and the client on port 4200 during development testing. When running the clock as a deployed service, however, you can disable CORS by deletingAWC_ALLOW_CORSfrom the/etc/defaults/weatherServicefile, or by setting it tofalse.AWC_GIT_REPO_PATH: The path to your aw-clock Git repository.AWC_GOOGLE_API_KEY: An API key for Google geocoding, used to convert GPS latitude/longitude into city and place names. As an alternative, or in addition, you can set upAWC_WEATHERBIT_API_KEYfor both geocoding and weather data.AWC_KIOSK_MODE:trueorfalsefor whether or not the dedicated-device web browser is launched in kiosk mode (the default) or not. (Note: Changing this setting alone will not change kiosk behavior. If you want to change kiosk mode without runningbuild.shagain, you must edit the file/home/pi/.config/lxsession/LXDE-pi/autostartto add or remove the--kioskparameter from thechromium-browsercommand.)AWC_LOG_CACHE_ACTIVITY: As a debugging/development aid, set totrueto enable additional logging of the server’s web cache behavior.AWC_NTP_SERVERS: Optional alternate NTP servers used by this software, as a comma-separated list of domain names. (See previous comments about selecting alternate servers.)AWC_PORT: By default the deployed server runs on localhost port 8080, but you can use a different port if you prefer.AWC_PREFERRED_WS: Your preferred weather service,weatherbit,wunderground, orvisual_x.wundergroundis the default.AWC_VISUAL_CROSSING_API_KEY: If you want to use Visual Crossing either as a primary or back-up weather data service, this must be set to a valid Visual Crossing API key. (See https://www.visualcrossing.com/weather-api/ for further details.).AWC_WEATHERBIT_API_KEY: A RapidAPI API key for the Weatherbit.io weather service. This will also function for geocoding (seeAWC_GOOGLE_API_KEY).AWC_WIRED_TH_GPIO: The GPIO number for a wired indoor temperature/humidity sensor, if any. Delete (or do not define) this entry if you don’t have the wired sensor hardware connected.AWC_WIRELESS_TH_GPIO: The GPIO number for the 433 MHz RF module that receives wireless temperature/humidity data, if any. Delete (or do not define) this entry if you don’t have the RF module connected, or the necessary wireless sensors.
Don’t forget to run sudo update-rc.d weatherService defaults after editing the weatherService file.
Installation details
For reference, here’s a breakdown of the steps performed by a full installation:
- Node.js is installed if not present, or updated if earlier than version 14. A switch to Node 14 using nvm (Node Version Manager) may occur if nvm is installed.
- If Node.js is greater than version 14, nvm will be used to step down to version 14, installing nvm if necessary to do so.
- For Node.js version 14, substitute version 12 in the descriptions above for a Raspberry Pi with less than 2 GB RAM.
- An
npm installis performed to bootstrap the rest of the installation process, which is written in TypeScript and requires Node.js and several npm packages to function. This can be very slow the first time. - A check for GPS configuration is performed.
- If running in interactive mode (
‑i), the user is queried about various configuration and installation options. - If the
weatherServiceservice is running, it’s stopped. apt-get updateandapt-get upgradeare executed, unless defeated with the‑‑skip‑upgradeoption.- The following packages are installed, if not already present:
pigpio,chromium-browser(just plainchromiumon Debian),unclutter,forever(a global npm package, not via apt-get), and a few fonts as well. xscreensaveris then disabled. Why install a screen saver just to turn around and disable it? To make sure no other screen saver blanks the screen - the display of the clock is intended to stay on 24/7.- The application client is built.
- The application server is built.
- If you’re running
build.sh, your Git branch was clean before running the installer, and the only thing that changes as far as Git is concerned are yourpackage-lock.jsonfiles, agit --reset hardwill be performed to revert those changes and keep your branch clean. - If specified, server options for wired and/or wireless sensors are installed.
- A combined client/server distribution directory is created.
- If any of the options
‑‑ddev,‑i, or‑‑sdare used, the distribution is copied to the~/weatherdirectory (typically/home/pi/weather), deleting anything which might have previously been present in that directory.
No further steps listed below are performed except as part of dedicated device set-up (options ‑‑ddev or ‑i).
- The file
weatherService(located in theraspberry_pi_setupfolder) is copied to/etc/init.d/, and changed to root ownership. - Server set-up options are saved to
/etc/defaults/weatherService, which is also owned by root. Rather than re-running the installer to change the server set-up, you can edit this file directly, update the service withsudo update-rc.d weatherService defaults, then restart the server either by rebooting your system, or using the commandsudo service weatherService restart. - The commands
sudo update-rc.d weatherService defaultsandsudo systemctl enable weatherServiceare performed to establish and enable the service. - An
autostartfile is created in~/.config/lxsession/LXDE-pi/(no-pion the end for Debian), or the existingautostartfile is modified, to launch the Chromium web browser in kiosk mode, displaying the Astronomy/Weather Clock. - The included file
autostart_extra.shis also copied to the above directory. This adds code to make sure Chromium doesn’t launch complaining it was shut down improperly, which could interfere with an otherwise smooth automatic start-up. . The options‑‑launchor‑‑rebootare performed if specified.
Pixel doubling using Raspbian Bullseye
When using a high resolution display like the 2560x1600 ELECROW 10.1" monitor I chose to use, which is nearly 300 ppi (~120 pixels per cm) you’ll often want to apply a scaling/zooming factor to the display, otherwise text and other details will be impractically small to see. Before the Bullseye release of Debian Linux for the Raspberry Pi, this kind of scaling was typically done using the pixel doubling option below:
When I set this mode after a fresh installation of Bullseye, however, I ended up with a blank screen, had to reboot via SSH, and was back to squinting at my screen. The above method turns out to not be the best way to handle display scaling with Bullseye’s new GTK+3 UI toolkit.
The generally recommended approach is to go into Preferences/Appearance Settings/Defaults and select “Set Defaults” “For large screens”. This doesn’t scale everything for all apps at once, however, and I found editing the file /usr/share/dispsetup.sh as follows to produce better results for me:
#!/bin/sh
xrandr --output HDMI-1 --primary --scale 0.5x0.5
Adafruit GPS HAT installation notes
Adafruit provides its own instructions on initial set-up of their GPS HAT here: https://learn.adafruit.com/adafruit-ultimate-gps-hat-for-raspberry-pi/pi-setup
...but I’m including some extra details and clarifications below for the particular steps that helped with this clock set-up.
As documented by Adafruit, I used sudo raspi-config to disable shell access via the serial console while leaving the serial hardware enabled. Then I installed GPS and NTP tools as follows:
sudo apt-get update
sudo apt install pps-tools gpsd gpsd-clients ntp
I added the following lines to the end of /boot/config.txt (enable_uart=1 is probably already there due to raspi-config):
enable_uart=1

# GPS
dtoverlay=pps-gpio,gpiopin=4
I added the following lines to the end of /etc/ntp.conf:
# GPS PPS reference
server 127.127.28.2 prefer
fudge  127.127.28.2 refid PPS

# get time from SHM from gpsd
server 127.127.28.0
fudge  127.127.28.0 refid GPS
And the entirety of my /etc/default/gpsd is as follows:
# Devices gpsd should collect to at boot time.
# They need to be read/writeable, either by user gpsd or the group dialout.
DEVICES="/dev/serial0 /dev/pps0"

# Other options you want to pass to gpsd
GPSD_OPTIONS="-n"

# Automatically hot add/remove USB GPS devices via gpsdctl
USBAUTO="false"

# Start the gpsd daemon automatically at boot time
START_DAEMON="true"
Developer notes
To greatly improve the speed and reliability of automated installations and updates, the often troublesome node-sass has been moved into a separate sass directory. To set up node-sass, cd into the sass directory and enter npm i. This prepares you for translating the source file styles.scss into styles.css.
Once this is set up, you can use npm run build:sass to make sure any changes you make to styles.scss are carried over into styles.css. styles.css is also automatically updated any time you use npm start.
To update any changes made to build.ts, use npm run build:build