herwonowr / Catchme
Programming Languages
Projects that are alternatives of or similar to Catchme
![]()
CatchME
WiFi Fun Box

![]()


Contents
- Introduction
- Features
- Installing and Updating Options
- Documentation
- Issues
- Contributing
- Code of Conduct
- License and Credits
CatchME Introduction
CatchME is developed by (Herwono W. Wijaya) @HerwonoWr, this project based upon the awesome work of (Stefan Kremser) @spacehuhn, (Sam Denty) @samdenty99, and other contributors. This project is a proof of concept for testing and educational purposes.
CatchME allows you to perform deauth attack, beacon, probe request flooding, and WiFi sniffing. CatchME (deauth attack) works by exploiting an old and known (deauth attack) vulnerability in the 802.11 WiFi protocol. CatchME also allows you to detect Deauth Attack.
CatchME has two operation mode, Attack Mode and Detector Mode, Detector Mode allows you to detect Deauth Attack.
WARNING
Use it only against your own networks and devices!. I don't take any responsibility for what you do with CatchME.
Please check the legal regulations in your country before using it. Do not redistribute, advertise or sell of this software as "jammer"!.
Features
- Fully web based UI management
- WiFi client mode - access CatchME on the WiFi network
- Deauth attack, beacon, probe request flooding, and WiFi sniffing
- Attack mode and detector mode for deauth attack
- ESP8266 system info
- Double reset press button - factory default configurations
- Flash button - attack mode
- OTA update
Installing and Updating
In order to install the firmware, you can use one of the following installation methods. Using NodeMCU Flasher or Arduino IDE, and for updating the firmware, you can use either NodeMCU Flasher, Arduino IDE, and CatchME UI. The NodeMCU Flasher method is easier overall but using Arduino IDE is better for debugging.
For the first time firmware installation, use NodeMCU Flasher or Arduino IDE. CatchME UI method is only can be use for updating the firmware.
YOU ONLY NEED TO DO ONE OF THE INSTALLATION METHODS!
Requirements
- ESP8266 Module
- ESP8266 Core library, must be version 2.0.0!
- ESP8266 Patch library
- ESP8266 Driver
ESP8266 board variants:
| CP210x | CH34x |
|---|---|
 |
 |
Using NodeMCU Flasher
- Download NodeMCU Flasher
- Download the current firmware release (binary version)
- Upload the firmware
.binfile using NodeMCU Flasher - Connect your ESP8266 (making sure the correct drivers are installed) and open up the NodeMCU Flasher
- Go to the
Advancedtab and select the correct values for your board - Navigate to the
configtab and click the gear icon for the first entry - Browse for the
.binfile you just downloaded and click open - Switch back to the
Operationtab and click Flash(F)
Note: This guide is for Windows users
Using Arduino IDE
-
Download and install Arduino IDE
-
Download the current firmware release (source version)
-
MacOS Users
- Go to
Arduino>Preferences - Add
http://arduino.esp8266.com/stable/package_esp8266com_index.jsonto the Additional Boards Manager URLs
- Go to
-
Windows Users
- Go to
File>Preferences - Add
http://arduino.esp8266.com/stable/package_esp8266com_index.jsonto the Additional Boards Manager URLs
- Go to
-
Go to
Tools>Board>Boards Manager -
Type in
esp8266 -
Select version
2.0.0and click onInstall(must be version 2.0.0!)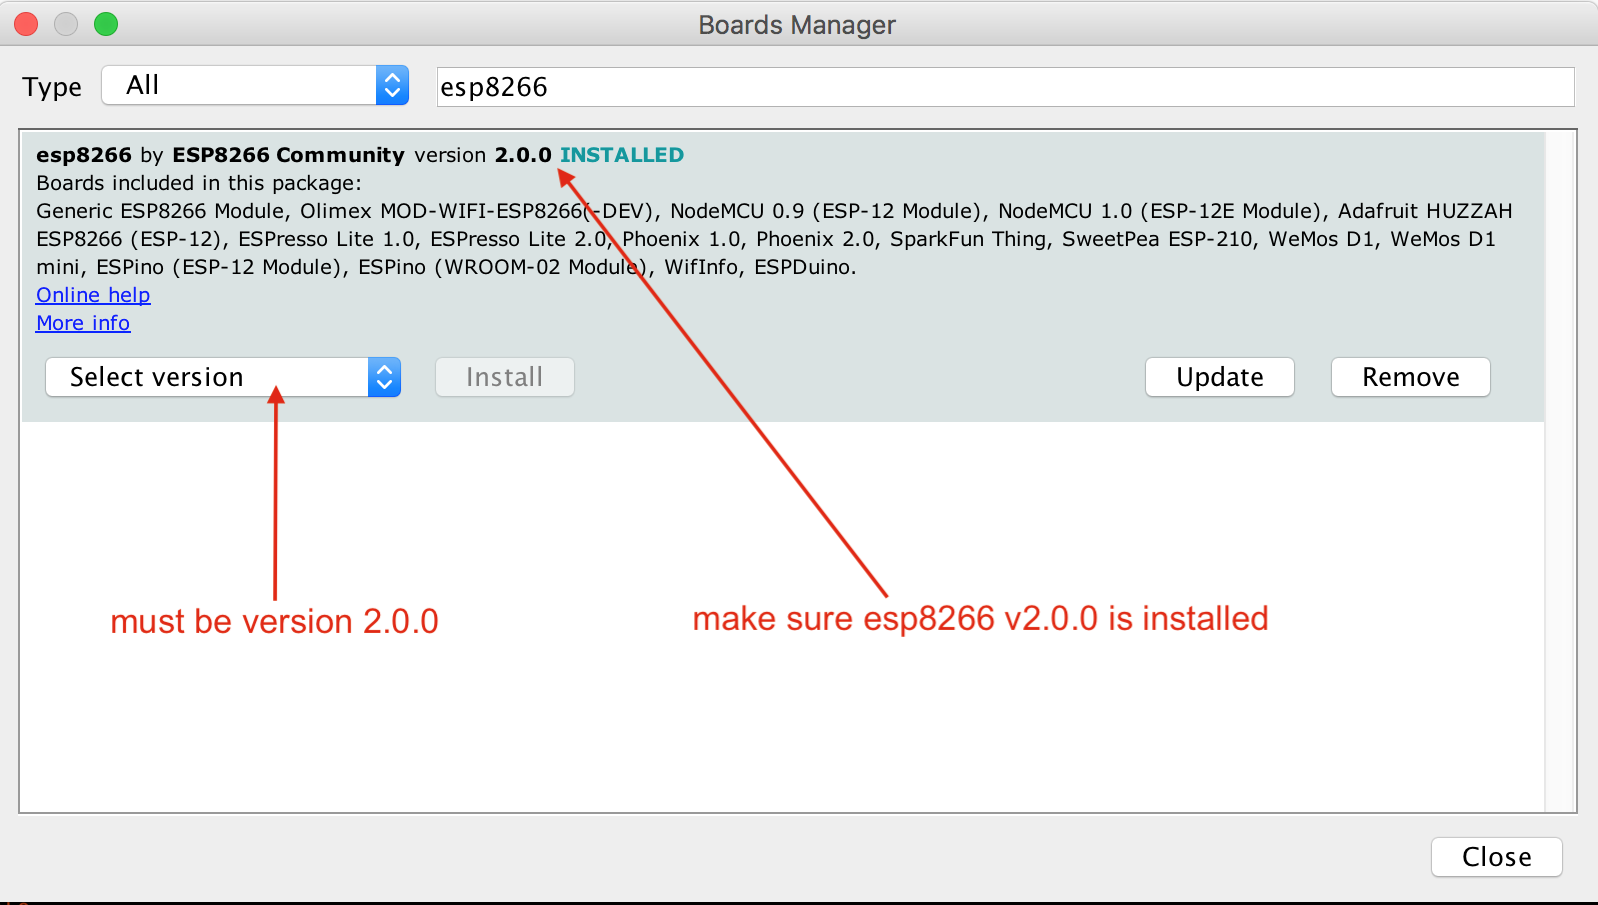
-
Patching ESP8266 v2.0.0 Core
- Check your ESP8266 packages location
- MacOS Users
-
Go to
Arduino>PreferencesFind your packages path location under text
More preferences can be edited directly in the file
-
- Windows Users
-
Go to
File>PreferencesFind your packages path location under text
More preferences can be edited directly in the file
-
- MacOS Users
- Check your ESP8266 packages location
-
Copy patch files in the esp8266-Patch folder to the following locations
Patch File Path Location Folder user_interface.h [packages-location] /packages/esp8266/hardware/esp8266/2.0.0/tools/sdk/includeincludeESP8266WiFi.cpp
ESP8266WiFi.h[packages-location] /packages/esp8266/hardware/esp8266/2.0.0/libraries/ESP8266WiFi/srcsrcESP8266HTTPUpdateServer.cpp [packages-location] /packages/esp8266/hardware/esp8266/2.0.0/libraries/ESP8266HTTPUpdateServer/srcsrc -
Go to
CatchMEfolder, and openCatchME.inofile in Arduino IDE -
Select your ESP8266 board module (this guide using NodeMCU 1.0 (ESP12-E Module)) and the right port
- Go to
Tools>Board, select the right board module - Go to
Tools>Port, select the right port
- Go to
-
Depending on your ESP8266 board, you may have to adjust the board configurations
-
Here is an example board configuration for NodeMCU 1.0 (ESP12-E Module)
Conf Value CPU Frequency 80Mhz Flash Size 4M (3M SPIFFS) Upload Speed 115200
-
-
Click Upload

Note: This guide is for MacOS and Windows users
Using CatchME UI
CatchME UI method only for updating the firmware, this method can't be use for first time installation.
- Download the current firmware release (binary version)
- Connect to your CatchME network
- Open CatchME UI IP address from your browser
- Go to
SYSTEM INFOmenu, and clickSELECT FIRMWARE FILE .BIN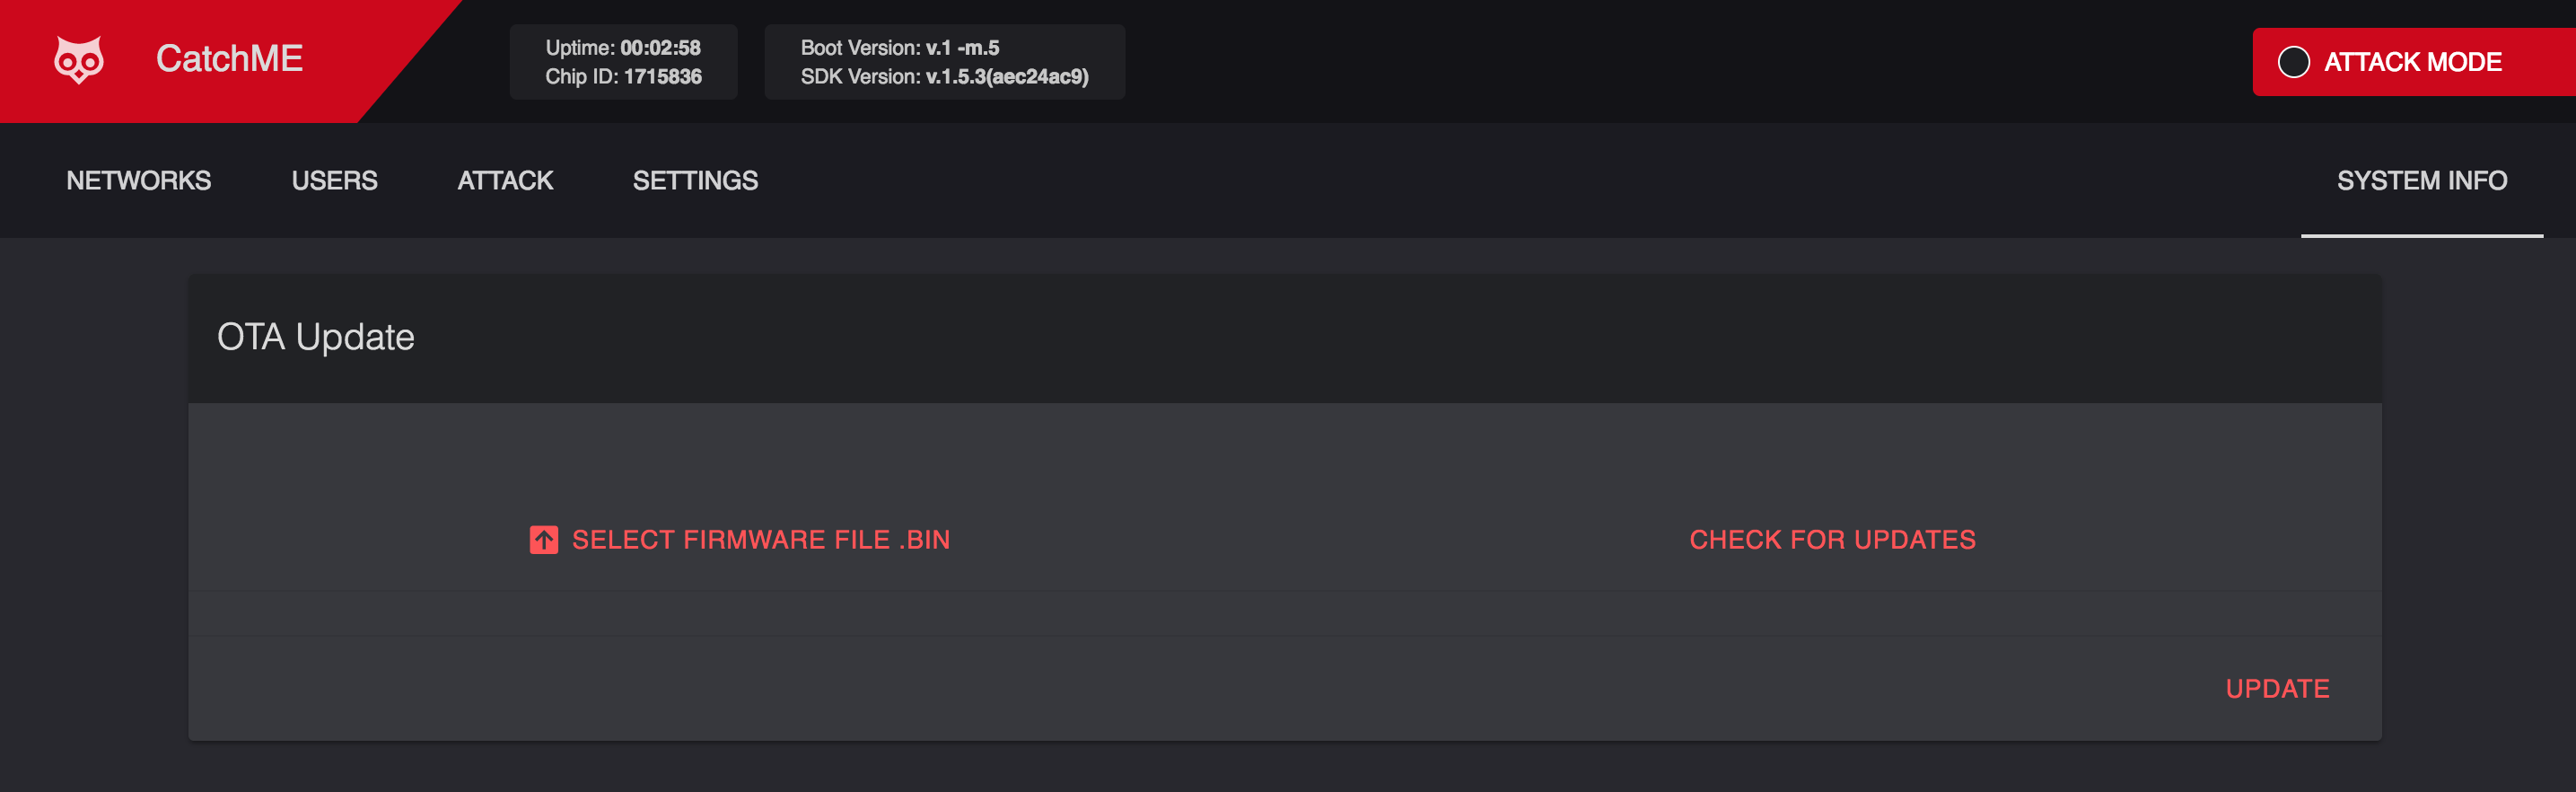
- Browse for the
.binfile you just downloaded and click open - Click UPDATE

Documentation
Issues
If you encounter an issue, you are welcome to submit it here.
Please provide as much context as possible:
- ESP8266 Arduino core version which you are using.
- Your sketch code; please wrap it into a code block, see Github markdown manual.
- For issues which happen at compile time, enable verbose compiler output in the IDE preferences, and attach that output (also inside a code block).
- ESP8266 development board model.
- IDE settings (board choich, flash size).
Contributing
Please check Contributing Guidelines to understand some basic conventions for contributing to this project.
General
Please make sure there are no existing pull requests to address the mentioned new features or issues. And, please check for issues related to the update, as someone else may be working on the issue.
Code of Conduct
Please check CODE OF CONDUCT to understand CatchME contributor covenant Code of Conduct.
License and Credits
CatchME is developed and maintained by (Herwono W. Wijaya) @HerwonoWr. This project is licensed under MIT License.
ESP8266 deauther and DeauthDetector written by (Stefan Kremser) is used in this project. It is distributed under MIT license.
Wi-PWN written by (Sam Denty) is used in this project. It is distributed under CC BY-NC 4.0.
Credits
Thanks for the awesome works:
- (Stefan Kremser) @spacehuhn
- (Sam Denty) @samdenty99
- (Aur élien Hernandez) @N0vaPixel
- (SaltyViper) @SaltyViper
- (Tobozo) @tobozo
- (Larz Jacobs) @LarzJ
- (Stimons) @StijnSimons
- (Andrbmgi) @andrbmgi
- (Samuel KS) @SamuelKlit
- (Helmut) @schinfo
- (Erick Belluci Tedeschi) @ericktedeschi
- (Antonio Navarro Perez) @ajnavarro
Thanks to
- (MAC Address List) - Wireshark manufacturer database
- (Wave.js) - Click effect inspired by Google's Material Design
- (Material Design Icons) - Icons assets