voroshkov / Chorus Rf Laptimer
Programming Languages
Projects that are alternatives of or similar to Chorus Rf Laptimer
Chorus RF Laptimer

Chorus [ˈkɔr əs] - 1. (Music) a group of persons singing in unison.
NOTE: This project is currently in a "public beta" stage. Changes to schematic and software are very likely. Feel free to contribute and/or share your usage results to improve the project.
This is a VTX Radio Frequency Lap Timing solution for drone racers - the evolution of a Solo DIY RF Laptimer project. Several updated Solo Laptimer devices connected together make up a Chorus Laptimer device which is capable of tracking several drones at once. This is a "lightweight" alternative to IR lap timing systems having the advantage that it does not require any additional equipment on drones except VTX.
NEWS FEED:
- 2019-01: Chorus32 project by Alessandro Carcione gets popular. It's a port of Chorus to ESP32 which is under active development now
- 2018-10: Chorus is now basically supported in LiveTime Scoring Engine - racing organization PC software
- 2018-07: Added support for USB devices in Android app (you can use wired connection or 433/915MHz telemetry modules for better range)
- 2018-06: Integration with LiveTime is in progress
- 2018-06: Arduinos got new API (v.4), incompatible with prev versions. All mobile apps are up to date with the new API.
- 2018-06: New threshold setup algorithm is implemented. Instead of measuring immediate RSSI at some point in space it's now a staged process
- 2018-05: Philipp Seidel published his great open source 4-node PCB: https://github.com/ps915/Chorus-RF-Laptimer-PCB
- 2017-11: iOS app is live on AppStore: https://itunes.apple.com/app/id1296647206. All credits go to Lazar Djordjevic!
- 2017-10: WiFi modules (DT-06) are now supported as an alternative to Bluetooth connection! (still not sure how stable the connection will be with these modules, so use at your own risk and report if you discover any odd behavior with them)
- 2017-10: Android app is now available on Google Play only. The source code remains here.
Support the project:
If you'd like to support the project, please contribute. This is the main benefit of the open-source ideology.
If you feel like spending some money for the purspose - I'd also be very grateful for that.
 - 1KHfQpKfSFZtc9c7b9ZPSsX3uqRcXgJuow
Thanks for your support!
Featured references:
- This project's Wiki page: https://github.com/voroshkov/Chorus-RF-Laptimer/wiki
- Chorus RF Laptimer Facebook group (primary news feed and knowledge sharing place): https://www.facebook.com/groups/ChorusRFLaptimer/
- Chorus RF Laptimer discussion thread @ RC Groups (deprecated: low activity): https://www.rcgroups.com/forums/showthread.php?2801815
- PC GUI Interface project for Chorus RF Laptimer (outdated: doesn't support latest Arduino firmware): https://github.com/anunique/ChorusGUI
- Delta5 Race Timer Facebook group (alternative DIY race timer project): https://www.facebook.com/groups/Delta5RaceTimer/
- LiveTime Scoring Engine (PC software for racing organization with support for Chorus): https://www.livetimescoring.com/
- Chorus32 project (very promising port of Chorus API to ESP32 hardware): https://github.com/AlessandroAU/Chorus32-ESP32LapTimer
Add-ins/Extensions:
- LED Finish Gate Module: https://github.com/voroshkov/Chorus-LED-Module
- Chorus RSSI Monitoring Android app (paid): https://play.google.com/store/apps/details?id=app.andrey_voroshkov.chorus_monitor
Contents
- Terminology
- Features
- Limitations
- How it works
- Hardware
- Software
- Setup and Usage Guide
- Troubleshooting
- Contributors
- Contacts
Terminology
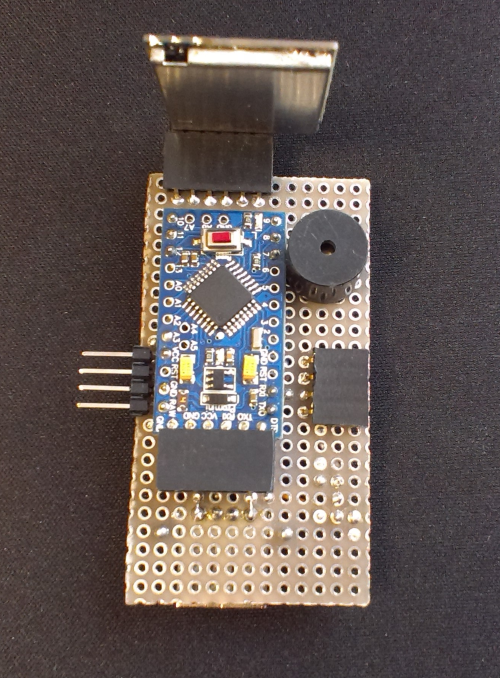
Solo or Chorus node - device for tracking a single drone. Parts cost about $12. Consists of Arduino Pro mini, RX5808 module, connectors, optional buzzer, optional resistors:
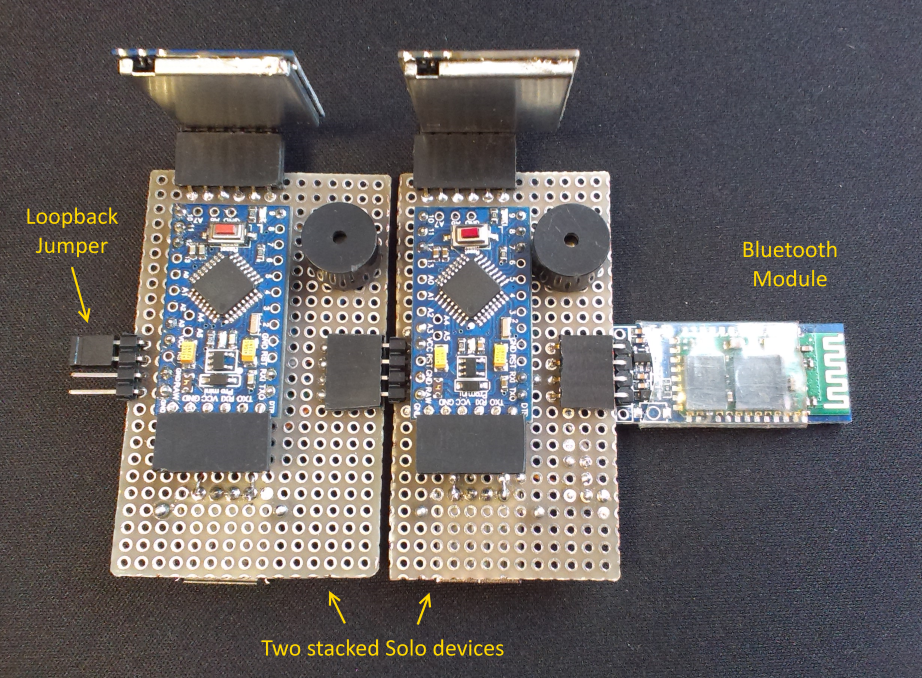
Chorus - several (2+) connected Solo devices (nodes):
Features
- No additional equipment besides 5.8GHz Video Transmitter required on a drone.
- Measure lap times with 1ms resolution.
- Android application for controlling the device via Bluetooth or WiFi.
- 5V * 250 mA power consumption (per device)
- Low cost (around $16 per device, excluding power supply), compared to similar solutions available on market.
- Can be tuned to any RF band/channel (R, A, B, E, F, D and even a bit of Connex)
- Monitors several frequencies simultaneously (corresponding to a number of devices)
- Expandable: make one Solo device and track your solo flight times; make more devices, connect them into a Chorus and compete with teammates
- Automatic detection of a number of Solo devices in a Chorus
- Spoken notifications, including lap results
- Adjustable LiPo battery monitoring and spoken notifications of low battery
Limitations
- Tracks up to 100 laps per heat.
- Limited support for digital VTx equipment (Connex)
- Although expandable, definitely has a physical limit on a number of stacked devices (depending on UART throughput of the last device in a chain)
- Software for iOS is on the way! (thanks to contributors)
How it works
Each Solo device measures a VTx signal strength (RSSI value) and compares it with a threshold set up. If the RSSI value is above the threshold, the corresponding drone is considered passing a finish gate.
Hardware
Used parts
- RX5808 (with SPI patch) (N items)
- Arduino Pro Mini 5V 16MHz or Nano v.3.0 (N items)
- HC-06/HC-05 (HM-10 for iOS) Bluetooth module (1 item)
- DT-06 Geekcreit WiFi module as an alternative to Bluetooth module (@Banggood) (1 item)
- 5V power supply (for example 2-4S LiPo with 5V BEC) (1 item)
- Piezo buzzer (5V, without built-in generator) - optional (N items)
- 2 Resistors (1K and 10K) for LiPo Voltage monitoring - optional (N items)
Bluetooth module setup
Make sure your bluetooth module baud rate is set to 115200 (use any of numerous tutorials on internet).
Generalized steps:
- Connect HC-06 -> USB-UART Adapter -> PC
- Open Arduino IDE, set adapter's COM port, run Serial Monitor
- Send commands
More details for HC-06 are on this wiki page
WiFi module setup
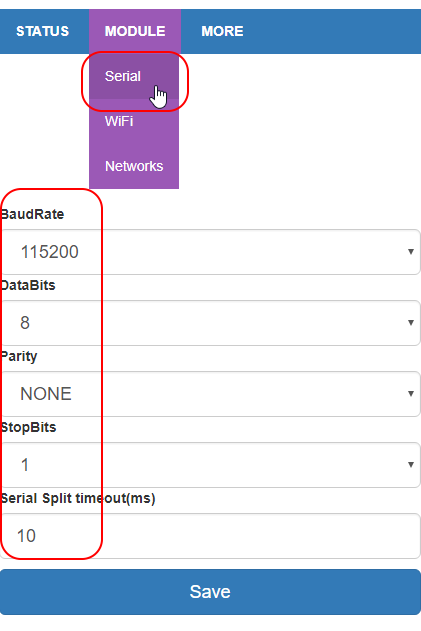
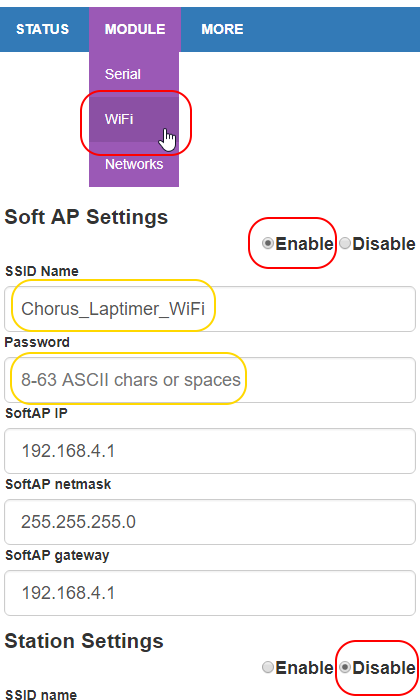
Geekcreit DT-06 modules by default operate as WiFi access point with IP 192.168.4.1. So open your browser, connect to http://192.168.4.1 and set up as follows:
Don't forget to save each page after making the changes!
Change Baud Rate to 115200, Serial Split Timeout(ms) to 10, leave other settings as shown:
On the WiFi page you may specify the name for your WiFi network and set a password:
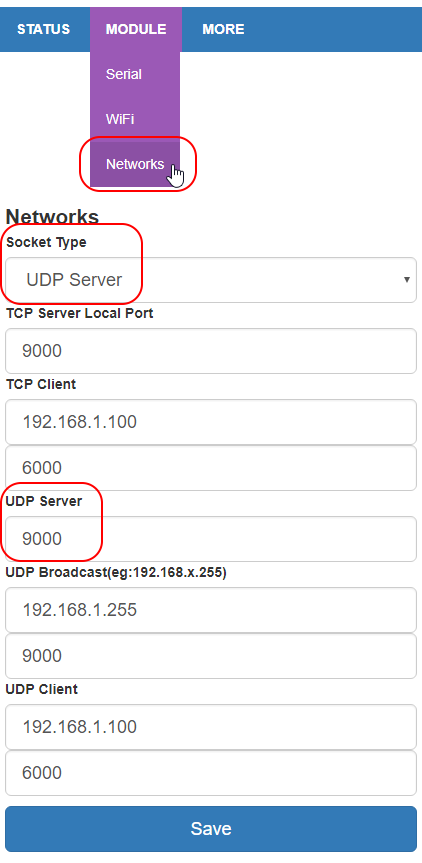
On the Networks page you should select UDP Server and make sure the UDP port is set to 9000:
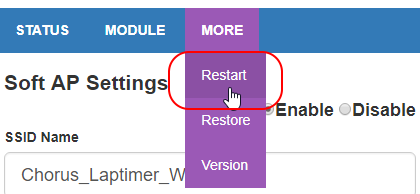
Make sure to restart the module to apply the changes. They'll remain until you "Restore" the module to defaults.
RX5808 SPI patch (required)
(copied from sheaivey/rx5808-pro-diversity repo)
In order to get the RX5808 to use SPI you will need to open it and remove a single SMD resistor.
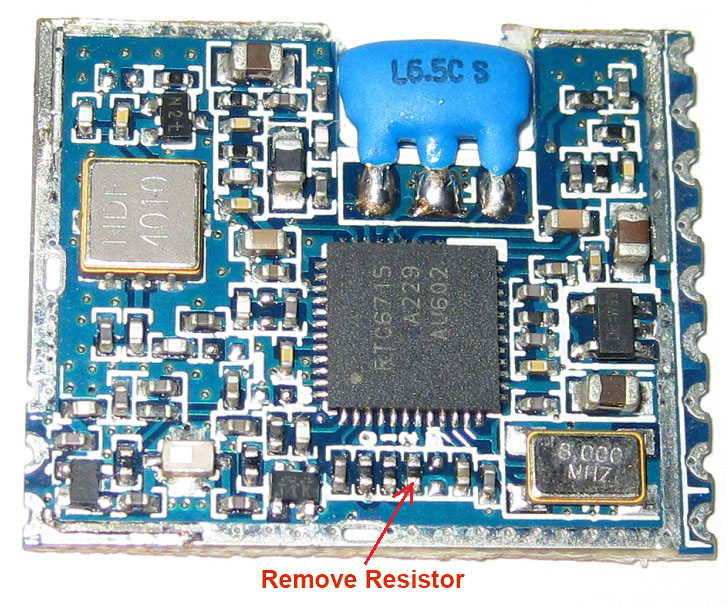
For older versions of RX5808 use these instructions.
Wiring of a Solo device
Parts may be connected directly without using any additional components:
UPDATE: powering RX5808 from Arduino's VCC was a bad idea - Pro Mini's linear regulator might not be able to provide enough power for RX, so use raw 5V power instead.
UPDATE #2: powering Arduino via RAW pin is also a bad idea if you use external stabilized 5V power supply - Arduino's internal voltage regulator might significantly drop voltage thus making LiPo monitor calculations wrong. Supply 5V power to VCC pin instead (as shown on the updated wiring diagram).
Note the resistor divider for LiPo Battery monitoring. Although just one of the Solo devices in a Chorus should be connected to LiPo battery for monitoring, but make sure to have A0 Arduino pins on all other Solo devices connected to Ground (via 1K resistor) or just solder the resistors on each Solo device according to schematic.
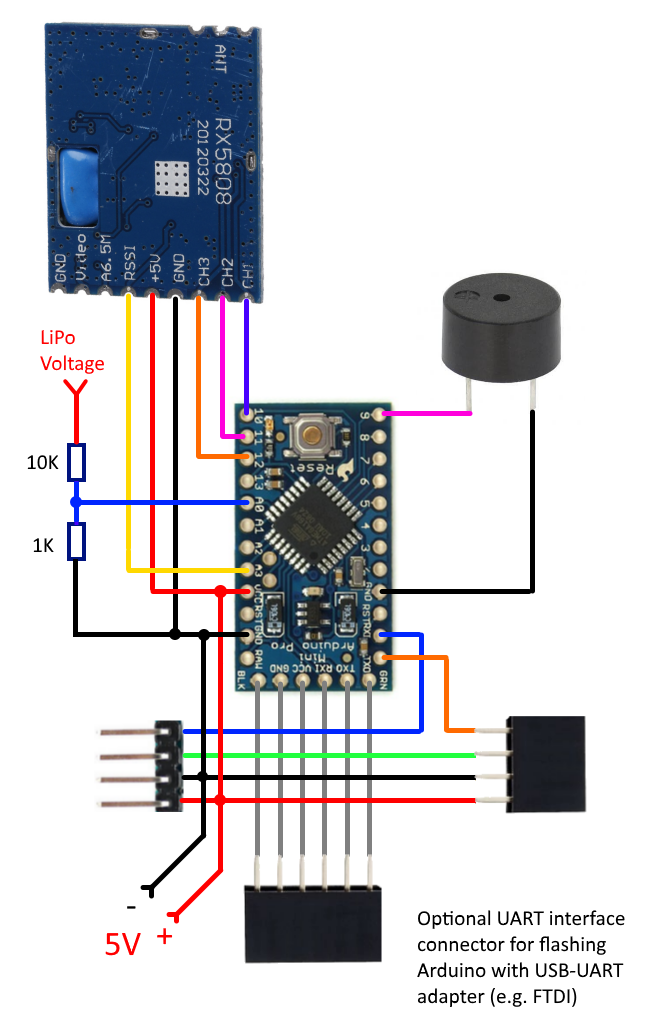
It seems to work fine being connected this way, however adding 100 Ω resistors in line on SPI wires (Arduino pins 10, 11, 12) is a good idea to prevent possible glitches with channel selection:
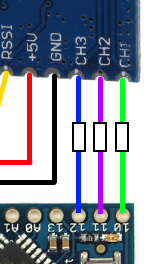
Schematic and PCBs
Schematic and PCB design in DipTrace format are available in the DipTrace folder.

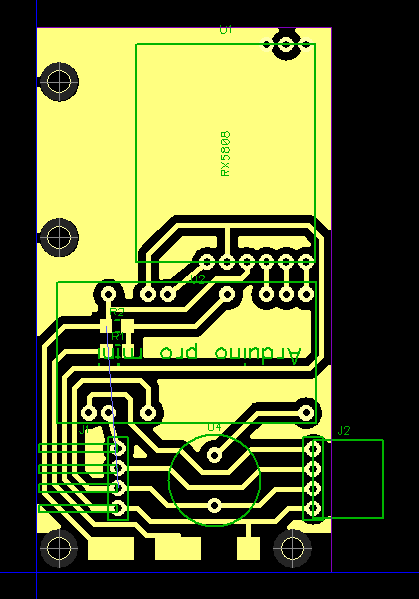
PCB by Joao Reis (Gerber format, SeedStudio compatible):
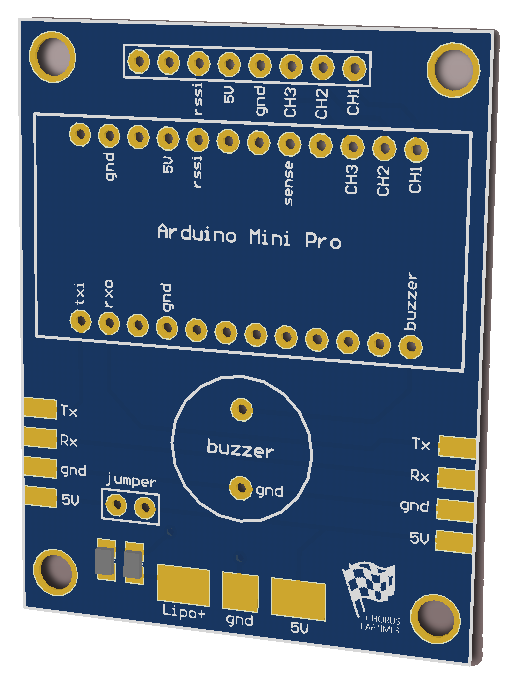
PCB by Philip Seidel (4 node, DipTrace, Gerber):
Assembly of a Solo device
Correct positioning of RX5808 module against the finish gate area is vital for correct measurements.
I tried using different types of antennas and shields with RX5808 to achieve the best possible accuracy, and finally found that the module itself works as a short-range directional antenna. The non-shielded side of the module is a surface that should face the gate, so consider this fact upon assembling.
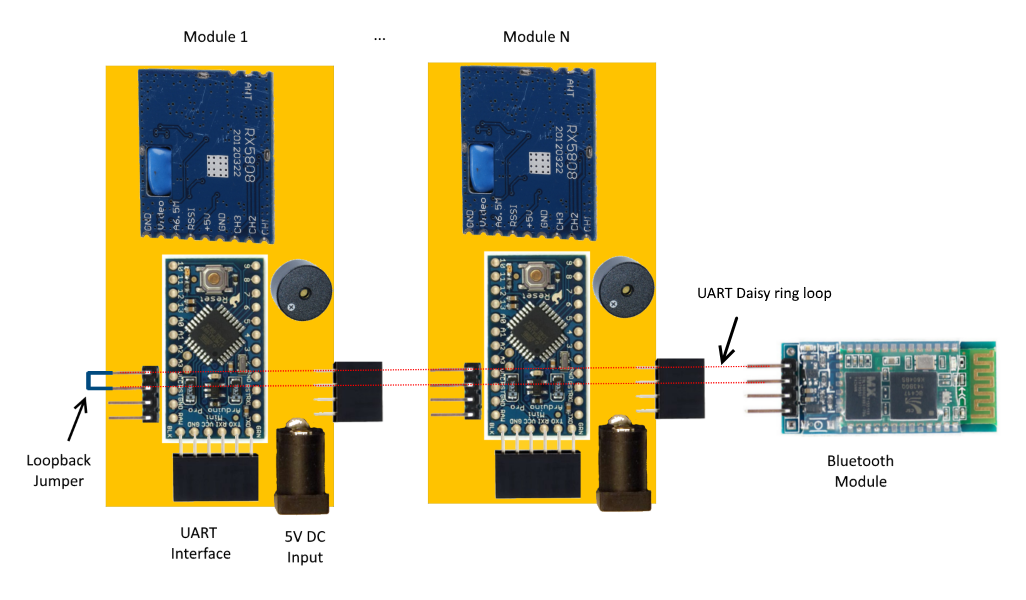
Assembly of a Chorus device
- Make several Solo devices.
- Connect them together.
- Connect a Bluetooth module to the last Solo device in a chain.
- Use a jumper on the first Solo device to shorten two upper pins.
- Attach 5V power supply to one of the Solo devices (make sure to supply enough power - each Solo device consumes about 250mA).
- Optionally attach LiPo battery to one of the solo devices that has a resistor divider for LiPo Monitoring feature
Software
Arduino
Download the project from Arduino folder, open chorus-rf-laptimer.ino file with Arduino IDE and upload to each Solo device.
Android App
The app is now available on Google Play.
iOS App
Lazar Djordjevic is the creator of the iOS app. Thanks, Lazar!
The app is available on App Store.
Note for iOS users: Apple devices don't work with HC-05/06 modules. You should use HM-10 Bluetooth module instead. (Or wait for WiFi modules support in iOS version :))
App User Guide
Android app is used as the illustration for the guide.
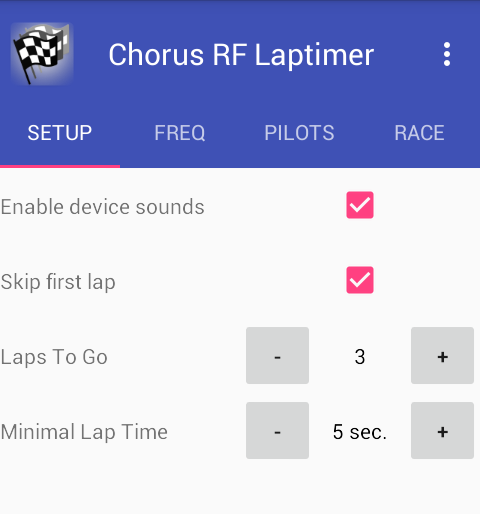
Application startup screen:
Use "⋮" menu to connect/disconnect to your Chorus device.
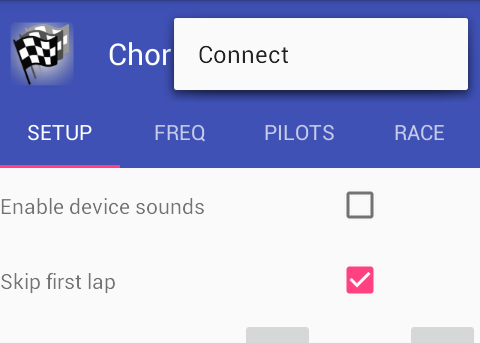
Connection is available via Bluetooth or WiFi, depending on the connectivity module you use for your Chorus.
Bluetooth connection assumes that Bluetooth is enabled and the Bluetooth module is paired with the phone.
WiFi connection assumes that the module operates in Access Point mode (AP), UDP server is up and running on port 9000, and you are connected directly to its WiFi network.
Once connected to Chorus device, the app automatically detects a number of stacked Solo devices and shows corresponding controls.
The app consists of 4 tabs:
- SETUP - race preconditions and device settings:
- FREQ - VTX channel/band for each Solo device
- PILOTS - Pilot name and RSSI threshold for each channel
- RACE - start/stop race and race results
Controls on the tabs are mostly self-explanatory. Still some clarifications might be useful:
- Enable device sounds: tick to enable device buzzers.
- Minimal Lap Time: use +/- to increase/decrease minimal lap time. Set enough time to let a drone leave the "above-threshold RSSI area" after lap time is captured.
- Skip first lap: tick if start table is located before the start/finish gate (first lap time will be skipped because it's not a full lap); untick if start table is located right behind the laptimer (first lap time will be tracked only if minimal lap time is passed after the race start).
- RSSI Threshold: use +/- to fine-tune RSSI threshold.
- Clear/Set: clear current RSSI threshold / set threshold automatically (described below).
- Calibrate Timers: different Arduino devices have different oscillators accuracy and it may slightly deviate from 16MHz. In order to make sure that same timespan is measured equally on different devices, you need to calibrate them before the race.
- Start Race: tap to start tracking laps. This same button is used to Stop the race.
When you stop the race, Chorus device immediately clears saved lap times, but they remain visible in the application until new race is started. Also the Race data is saved in CSV reports on your device (if you grant the Write to SD Card permissions)
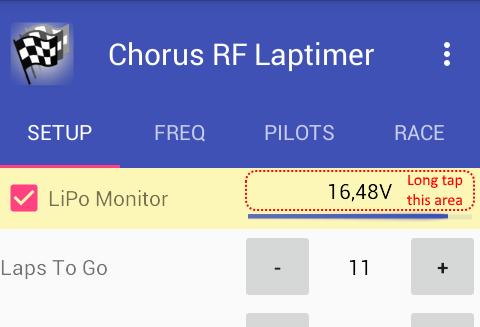
LiPo Monitoring feature has a "hidden" possibility for adjustment. If voltage measured by LiPo Monitor in Android App doesn't correspond to real voltage of your battery, perform a long tap on a voltage value to see the Adjustment controls:
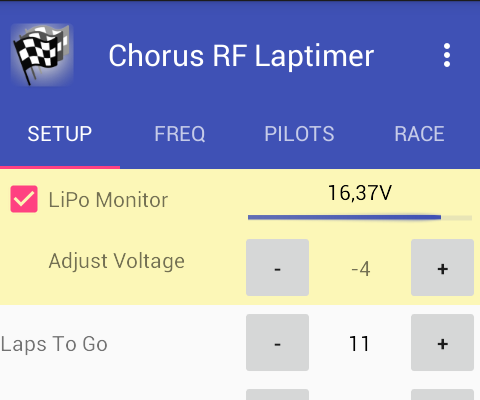
Adjust until measured voltage corresponds to the voltage of your LiPo battery while it's powering the Chorus device.
Setup and Usage Guide
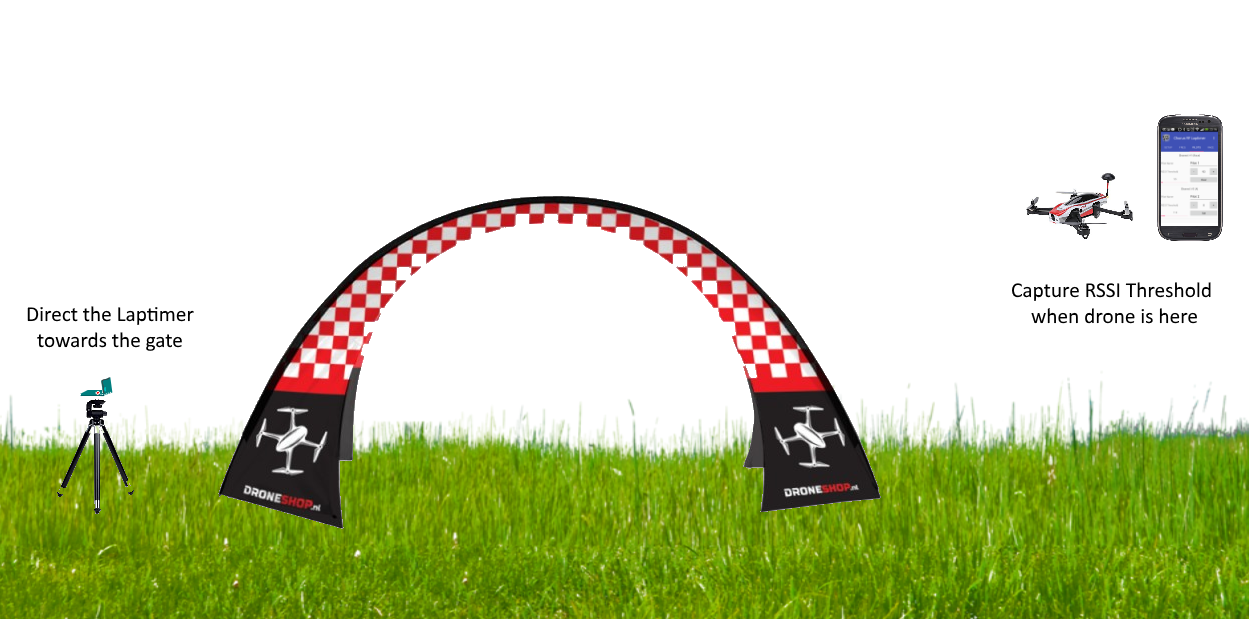
- Power on the Chorus device and put it on the ground in a corner of the finish gate facing the opposite side at 45 degrees upwards.
- Start the mobile app and connect to the Chorus device.
- Setup VTX Band/Channel for each Solo device in Android app on the "Freq" tab.
- Fully prepare racing drones and power them up (VTX must be powered in racing mode).
- Setup threshold values for each channel on the "Pilots" tab (see detailed description below).
- Repeat step 5 for each drone taking part in a race.
- Calibrate timers using the corresponding button on a "Race" tab (in case you have more than 1 Solo device).
- Start Race in the app.
- Fly the track and see the lap times being captured.
Also consider shielding the Chorus device with a piece of metal on one side where drones are approaching from. It might increase the accuracy by partially blocking the VTx signal before a drone is inside a gate.
RSSI Threshold Setup
When you first start the device, it has predefined threshold values of 190 on each channel, which is more or less suitable value for 25mW VTx. But if you want to have accurate laps tracking, you should consider individual thresholds setup for each participating drone.
You can set RSSI threshold in 2 alternative ways:
Manually:
- Hold a powered drone at the opposite side of the gate.
- Note the RSSI value.
- Use +/- buttons to change the threshold to match the noted value (short press changes by 1, long press changes by 30).
Automatically:
- Hold a powered drone far enough from the device (10-20 meters), so that current RSSI is significantly lower compared to when the drone is near.
- Long press "Set" button - notice yellow circle progress bar which means that Chorus is wating for RSSI to start rising.
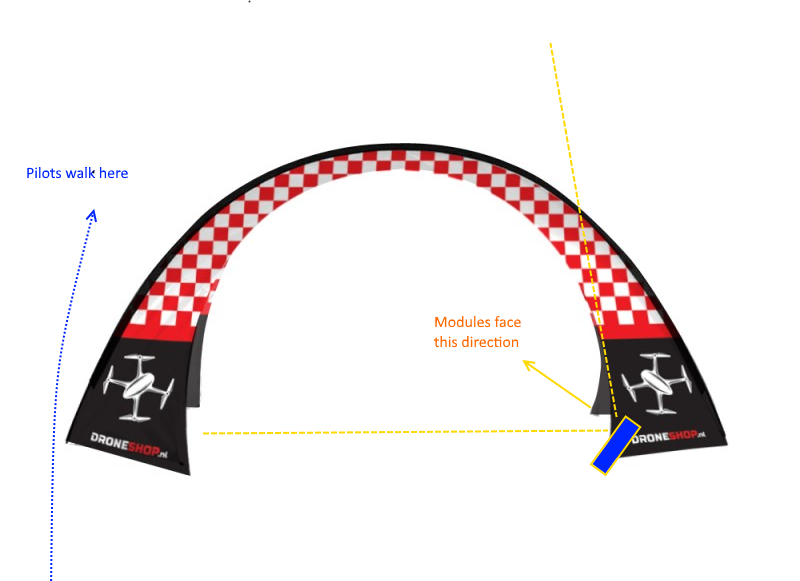
- Walk towards the opposite side of the gate. At some point notice the yellow progress bar changing color to blue, which means that Chorus recognized the rise of RSSI and is now tracking the maximum value). Continue approaching the gate (RSSI should rise).
- Pass the gate (don't stop) and move away from it (either return or go forward). Make sure that you pass Chorus a bit farther than the most distant point of the gate where you want Chorus to capture a flying drone during the race.
- At some point distant from the gate, the blue progress bar will change to the captured RSSI threshold value. You're done!
Note: you can set thresholds for all pilots in a heat at once. Just start threshold setup for each pilot and have all pilots walk by the gate.
Troubleshooting
If the app connects to Bluetooth module but doesn't seem to communicate with the device, check the following:
- Arduino must be 5V 16Mhz (proper work of 3.3V 8Mhz is not guaranteed)
- Bluetooth module baud rate must correspond to Arduino's: 115200 baud
- Loopback jumper must be in place.
- Wiring :)
Contributors
Big thanks to all contributors to this project:
Android app:
- Louis Plett (highway11) - voice speaking
- Ray Erik Rabe (raveerk) - CSV reports generation
- evgen48 - display frequencies in MHz
- Gleb Godonoga (SidhNor) - internationalization support, Russian localization, permissions tuning
- Jose Luis Ortiz (JLOFPV) - Spanish localization
- thestealth131205, anunique - German localization
- Nicola Gorghetto (nikybiasion) - Italian localization
- Kevin (@Smeat) - power-down mode for inactive nodes, fix for wifi connectivity on Android 10 (#112)
- @Nisse43 - Fix connectivity issue #81
Arduino app:
- anunique - arbitrary frequency setting, predefined Connex frequencies, improvements to Arduino code
- Kevin (@Smeat) - power-down mode for inactive nodes
iOS app:
- Lazar Djordjevic (lazar89nis) - entire app implementation!
Alternative PCB design:
- Joao Reis
- Philipp Seidel
LiveTime integration:
- David Lewis - building and contributing several Chorus nodes to LiveTime team for integration testing
- Cory Kroll - implementation of Chorus support in LiveTime
Contacts
- YouTube channel: https://www.youtube.com/user/voroshkov
- Facebook: https://www.facebook.com/andrey.voroshkov
- RCGroups discussion thread: https://www.rcgroups.com/forums/showthread.php?2801815
Feel free to ask questions, suggest improvements, report your usage results.
Happy flying!
/Google Play and the Google Play logo are trademarks of Google LLC./


