leVirve / Crawlertutorial
Programming Languages
Projects that are alternatives of or similar to Crawlertutorial
爬蟲教學 CrawlerTutorial
18 Jul 2015. Update: 2018/05/16.
隨著 PTT Web 改版加入了許多原本 BBS 才有的功能,本教學也同步更新~教學如何讓爬蟲學會新把戲!

本著作由leVirve製作,以創用CC 姓名標示 4.0 國際 授權條款釋出。
概述
相關專案:
- dcard-spider: 透過 Dcard API 抓取/下載資料的高效能爬蟲。
- ptt-spider: PTT 高效能爬蟲,使用 lxml 快速解析並利用 asynio/coroutines 提高效率。
-
ptt-scrapy: 使用
scrapy穩定爬取 PTT 資料。 - ptt-viewer: 將取得的資訊透過 Web UI 介面視覺化顯示。
爬蟲範例教學: PTT 批踢踢
基本環境
本教學範例皆使用 Python3,而過程中所需要的套件都會使用 pip 來安裝。
-
requests發送接收 HTTP 請求及回應- 官方標語:
Python HTTP Requests for Humans™,這才是真正給人用的介面啊,建議不要直接使用內建的urllib模組!
- 官方標語:
-
requests_html用來分析與抓取 html 中的元素- 標語:
Pythonic HTML Parsing for Humans™,由 Kenneth 大神 (開發上面那個requests的作者) 寫的專案 - 整合
lxml與PyQuery,不用再為了選擇該使用哪個套件解析而困擾,輕鬆自在的交叉使用!
- 標語:
-
(另外選擇) 獨立使用
lxml或PyQuery來解析 html 中的元素-
PyQuery簡單好用(!),解析速度比之前介紹的BeautifulSoup快多了!只要學過網頁,會 CSSselector語法就會寫 -
lxml簡單好用(?),解析速度快!不過需要先熟悉xpath語法,但也挺容易學的~pip install requests requests_html pip install lxml
-
[基礎篇] PTT 爬蟲實際演練:
用 PTT 的電影版文章作為我們的爬蟲目標囉!第一步:所看即所抓
What you see is what you retrieve, but all in text!

使用 requests.get() 函式仿造瀏覽器發出 HTTP GET 方法來「瀏覽」網頁,並取得網址所在頁面的內容;與平時使用瀏覽器看網頁的差異在於沒有渲染出得到的「文字」資訊。
這個方法的回傳結果是一個 requests.Response 包裝起來的物件,而我們現在的目標是取得頁面原始碼即可;而網頁原始碼就在 resp.text 中。
但目前的做法直接套用到 Gossiping 板時會發生錯誤,原因是因為在"第一次"瀏覽八卦版時會先有一個確認年齡是否滿十八歲的頁面,而當點擊過後瀏覽器會記錄下 cookies 所以下次再次進入時就不會在被詢問(可以使用無痕打開測試看看八卦版首頁)。所以對爬蟲而言,只要把該筆特殊的 cookies 記錄下來,那麼在瀏覽時就能假裝已經通過滿十八歲測試。
import requests

def fetch(url):
    response = requests.get(url)
    response = requests.get(url, cookies={'over18': '1'})  # 一直向 server 回答滿 18 歲了 !
    return response

url = 'https://www.ptt.cc/bbs/movie/index.html'
resp = fetch(url)  # step-1

print(resp.text) # result of setp-1
第二步:說說看你看到了什麼?
Interpretate the retrieved text like a browser

一般情況下瀏覽器拿到了網頁原始碼之後,會先解析然後把畫面顯示成我們平常看見的樣子;但這邊我們並不做顯示只想分析原始碼內的資訊。所以用 requests_html.HTML 來分析剛剛抓到的文字,在 HTML() 的建構式參數放入 html=剛剛 requests.Response 裡的 html 也就是 resp.text。
而藉由我們打開瀏覽器查看網頁原始碼 (可用F12 開發人員工具) 得知 PTT 網頁版中,每一篇文章的標題訊息皆放在 class="r-ent" 的 div 標籤裡。這裡我們使用到 find 方法與 CSS selector 語法來操作 HTML() 物件並指定尋找目標,找到之後的結果是一串文章列表資訊。那在 CSS 中,想要找到 class 為 "r-ent" 且元素為 div 的語法是 div.r-ent,在操作 find() 時直接將一模一樣的語法字串放進去即可達成目標。
from requests_html import HTML

def parse_article_entries(doc):
    html = HTML(html=doc)
    post_entries = html.find('div.r-ent')
    return post_entries

url = 'https://www.ptt.cc/bbs/movie/index.html'
resp = fetch(url)  # step-1
post_entries = parse_article_entries(resp.text)  # step-2

print(post_entries)  # result of setp-2
第三步:所以我說那個標題資訊呢?
Hey, here's metadata
剛剛說過 find() 回傳符合的結果,而這串結果是個 list 型態的東西,所以我們用 for-loop 來一個一個印出來看看。
而因為 HTML 本來就是具有階層式的標記語言,可以透過觀察剛剛 開發人員工具 的 Elements 頁籤來判斷到底放在哪個標籤哪一階層裡,例如:標題就在 <div class='r-ent'> 這個標籤下的 <div class='title'> 的文字裡。所以接下來就是對每個 entry 進行近一步的解析,而對應的 CSS selector 語法為 div.title 並且是操作於 entry 物件上。而從上一步驟可以知道,.find() 會回傳一串的結果但在這邊 metadata (後設資料) 的解析中,我們通常最後只會選中唯一元素,所以增加一個 first=True 參數讓它直接回傳該結果元素。

示範內容抓出:推文數 (push)、標題名稱 (title)、作者 (author)、發文日期 (date) 和文章網址 (link) 等文本內容;而提取(extraction)的相關語法可以參見 PyQuery 與 requests_html 的官方文件都有清楚的介紹。不過在這次範例中其實只會用上幾個常見的程式語法,這邊直接以程式碼呈現。
def parse_article_meta(entry):
    '''
    每筆資料都存在 dict() 類型中:key-value paird data
    '''
    return {
        'title': entry.find('div.title', first=True).text,
        'push': entry.find('div.nrec', first=True).text,
        'date': entry.find('div.date', first=True).text,
        'author': entry.find('div.author', first=True).text,
        'link': entry.find('div.title > a', first=True).attrs['href'],
    }

url = 'https://www.ptt.cc/bbs/movie/index.html'
resp = fetch(url)  # step-1
post_entries = parse_article_entries(resp.text)  # step-2

for entry in post_entries:
    meta = parse_article_meta(entry)
    print(meta_article)  # result of setp-3

    # pretty_print(meta['push'], meta['title'], meta['date'], meta['author'])  # for below results
執行結果

特殊處理: 沒事多寫點程式碼啊!把天賦通通點在美化上吧~ (字元寬度處理參考自 urwid)
把這段程式碼 import 到剛剛的 basic_crawler.py 裡,並把 print 換成 pretty_print。漂亮的輸出就出現囉!
widths = [
        (126,    1), (159,    0), (687,     1), (710,   0), (711,   1),
        (727,    0), (733,    1), (879,     0), (1154,  1), (1161,  0),
        (4347,   1), (4447,   2), (7467,    1), (7521,  0), (8369,  1),
        (8426,   0), (9000,   1), (9002,    2), (11021, 1), (12350, 2),
        (12351,  1), (12438,  2), (12442,   0), (19893, 2), (19967, 1),
        (55203,  2), (63743,  1), (64106,   2), (65039, 1), (65059, 0),
        (65131,  2), (65279,  1), (65376,   2), (65500, 1), (65510, 2),
        (120831, 1), (262141, 2), (1114109, 1),
]


def calc_len(string):
    def chr_width(o):
        global widths
        if o == 0xe or o == 0xf:
            return 0
        for num, wid in widths:
            if o <= num:
                return wid
        return 1
    return sum(chr_width(ord(c)) for c in string)


def pretty_print(push, title, date, author):
    pattern = '%3s\t%s%s%s\t%s'
    padding = ' ' * (50 - calc_len(title))
    print(pattern % (push, title, padding, date, author))
第四步:現在資料分析時代欸!
Give me data!
好,那就再用 觀察法 模式,去找找上一頁的連結在哪裡?
找到了嗎?不是問你頁面上的按鈕在哪裡喔!是看 source tree 啊!

相信都有發現了,關於頁面跳轉的超連結就放在 <div class='action-bar> 的 <a class='btn wide'> 裡,所以我們可以像這樣抓到他們:
# 控制頁面選項: 最舊/上頁/下頁/最新
controls = html.find('.action-bar a.btn.wide')

# note: 當然也有其他更簡單或更複雜(?)的寫法
# 如:controls = html.find('a.btn')
# 不過這邊我們為了保證精準抓到元素,採用相對穩定存在的元素層層遞進定位
而我們需要的是上一頁的功能,為什麼呢?因為 PTT 是最新的文章顯示在前面啊~所以要挖資料必須往前翻。
那怎麼使用呢?先去抓出 control 中第二個(index 為 1)的 href,然後他可能長這樣 /bbs/movie/index3237.html;而完整的網址 (URL) 必須要有 https://www.ptt.cc/ (domain url) 開頭,所以用 urljoin() (或是字串直接相接) 把 Movie 首頁連結和新的 link 比對合併成完整的 URL!
link = controls[1].get('href')
page_url = urllib.parse.urljoin('https://www.ptt.cc/', link)
另外,或許會發現怎麼前面的程式有時候會出錯啊?!看看網頁版發現原來當該頁面中有文章被刪除時,網頁上的 <本文已被刪除> 這個元素的原始碼 結構 和原本不一樣哇!所以我們可以對 Step3 的 parser 進行進一步的強化來李文章被刪除的情況。
def parse_article_meta(ent):
    ''' Step-3 (revised): parse the metadata in article entry '''
    # 基本要素都還在
    meta = {
        'title': ent.find('div.title', first=True).text,
        'push': ent.find('div.nrec', first=True).text,
        'date': ent.find('div.date', first=True).text,
    }

    try:
        # 正常狀況取得資料
        meta['author'] = ent.find('div.author', first=True).text
        meta['link'] = ent.find('div.title > a', first=True).attrs['href']
    except AttributeError:
        # 但碰上文章被刪除時,就沒有辦法像原本的方法取得 作者 跟 連結
        if '(本文已被刪除)' in meta['title']:
            # e.g., "(本文已被刪除) [haudai]"
            match_author = re.search('\[(\w*)\]', meta['title'])
            if match_author:
                meta['author'] = match_author.group(1)
        elif re.search('已被\w*刪除', meta['title']):
            # e.g., "(已被cappa刪除) <edisonchu> op"
            match_author = re.search('\<(\w*)\>', meta['title'])
            if match_author:
                meta['author'] = match_author.group(1)
    return meta

    # 最終仍回傳統一的 dict() 形式 paired data
    return meta
現在我們將函式重新定義,讓:
-
get_metadata_from(url): 抓取一頁 (某頁面 URL) 中所有的文章的 metadata,並回傳一串key-value類型的資料及下一頁的 URL。 -
get_paged_meta(num_pages): 抓取最新的num_pages個頁面,並指派get_paged_meta去抓每頁面中的資料,把每一串資料合併成一大串後回傳。
而 get_metadata_from(url) 和 get_paged_meta(num_pages) 回傳的就是這樣的一串資料:
[
{'push': '4', 'title': '[新聞] 侯孝賢:「一個導演,沒有自覺,就不用玩', 'date': ' 9/07', 'author': 'soulx', 'link': '/bbs/movie/M.1441633354.A.961.html'},
{'push': '', 'title': '[請益] 倖存者(The Remaining)的結局', 'date': ' 9/07', 'author': 'Takuri', 'link': '/bbs/movie/M.1441636396.A.D64.html'},
{'push': '', 'title': '本文已被刪除', 'date': ' 9/07', 'author': '-', 'link': None},
{'push': '1', 'title': '[好雷] Hero電影版', 'date': ' 9/07', 'author': 'peichuan', 'link': '/bbs/movie/M.1441637098.A.854.html'},
{'push': '', 'title': '[新聞] 「夢想海洋」主題曲 魏德聖王大陸力挺', 'date': ' 9/07', 'author': 'fireguard119', 'link': '/bbs/movie/M.1441637150.A.DA1.html'},
{'push': '', 'title': '[贈票] 未知之境 餘鬼狂歡~2015女性影展特映會', 'date': ' 9/07', 'author': 'epmt', 'link': '/bbs/movie/M.1441637513.A.14E.html'},
{'push': '', 'title': '[問片] 問幾部港片/國片', 'date': ' 9/07', 'author': 'ogcxd', 'link': '/bbs/movie/M.1441637531.A.E5A.html'},
...
]
另外要說明的是 from utils import pretty_print,把剛剛 Step3 那個漂亮的輸出功能數十行的程式碼放到同目錄底下的新檔案 utils.py 中 (檔案名字你喜歡就好,只要記得 from xxx import pretty_print 要記得一起改),然後在這邊 import (相當於 C語言中的 include) 就能繼續沿用功能!
import urllib.parse
from utils import pretty_print

def get_metadata_from(url):

    def parse_next_link(doc):
        html = HTML(html=doc)
        controls = html.find('.action-bar a.btn.wide')
        link = controls[1].attrs.get('href')
        return urllib.parse.urljoin(domain, link)

    resp = fetch(url)
    post_entries = parse_article_entries(resp.text)
    next_link = parse_next_link(resp.text)

    metadata = [parse_article_meta(entry) for entry in post_entries]
    return metadata, next_link

def get_paged_meta(url, num_pages):
    collected_meta = []

    for _ in range(num_pages):
        posts, link = get_metadata_from(url)
        collected_meta += posts
        url = urllib.parse.urljoin(domain, link)

    return collected_meta

start_url = 'https://www.ptt.cc/bbs/movie/index.html'
metadata = get_paged_meta(start_url, num_pages=5)
for meta in metadata:
    pretty_print(meta['push'], meta['title'], meta['date'], meta['author'])
Output:
...

 10     [討論] 心目中不可取代的電影                    5/15  ot3973
 99     [討論] 哪些遊戲劇情很適合拍成電影               5/15  ken6303
 32     [情報] 皇后樂團《波希米亞狂想曲》新預告          5/15  soaping
        (本文已被刪除) [gp03sp]                        5/15  gp03sp
        [新聞] 珍芳達:想和昆汀塔倫提諾合作              5/15  qpr322
  3     [ 好雷] 死侍                                   5/15  nwtk
        (本文已被刪除) [lgng66133]                      5/15  lgng66133
 17     [超級好雷]死侍2 開創新時代的 先鋒                5/15  jamie1995
  爆    [討論] 國外網友對復仇者聯盟4的預測(可能有巨雷     5/15  KuoChingYa
 13     [好雷雷] 死侍2 認真滿喜歡                       5/15  asagiyuu
 12     [好雷] 死侍 美中不足的地方                    5/15  ckshchen
 23     [請益] 死侍2跟1哪個比較血腥?                   5/15  iredeem
第五步:加油好嗎,能不能爬快點!
Come on! Run! Run faster!
取得文章列表資訊(meta list)後,重要的是接下來取得文章內容(post content)
在 metadata 中的 link 就是每篇文章的連結,所以用 urllib.parse.urljoin 串接出完整網址之後發出 request 取得該頁面的內容。但在這裡並沒有做進一步的文章內容解析(parse),並沒有解析文章標題、作者、內容、推文等等,請大家自行練習分析頁面取得資訊。
url = urllib.parse.urljoin(domain, link)
resp = requests.get(url)

# 文章 html 在 resp.text 中
這一步使用 Python 的內建 library multiprocessing 來加速爬蟲的效率!
使用 Python 內建寫好的 ProcessPool 來做 high-level 的 multiprocessing programming~這是 Python 中使用 multi-process 最簡單最方便的方法!非常適合這種 SIMD (Single Instruction Multiple Data) 的場景。
from multiprocessing import Pool
然後在使用時使用 with statement 語法讓使用完之後將 process 資源自動釋放,with Pool(processes=8) as pool,而中間的 processes=8 則代表要開多少的 processes 來完成任務。而 ProcessPool 的用法也很簡單,pool.map(function, items),有點像 functional programming 的概念,將 function 套用在每一個 item 上,最後得出跟 items 一樣數量的結果清單(list)。
使用在前面介紹的抓取文章內容的任務上:
def get_articles(metadata):
    post_links = [...]  # 一串文章的 URL
    with Pool(processes=8) as pool:
        responses = pool.map(fetch_article_content, post_links)
        return responses
取得的 responses 會是 list() of requests.Response 的內容,所以最後可以迭代拿出其中的資訊 resp.text,以下附上範例程式碼以及操作。
import time
from multiprocessing import Pool


def get_posts(metadata):
    # 將所有文章連結收集並串接成完整 URL
    post_links = [
        urllib.parse.urljoin(domain, meta['link'])
        for meta in metadata if 'link' in meta
    ]

    with Pool(processes=8) as pool:
        contents = pool.map(fetch, post_links)
        return contents

if __name__ == '__main__':
    pages = 5

    start = time.time()

    metadata = get_paged_meta(start_url, num_pages=pages)
    resps = get_posts(metadata)

    print('花費: %f 秒' % (time.time() - start))

    print('共%d項結果:' % len(resps))
    for post, resps in zip(metadata, resps):
        print('{0} {1: <15} {2}, 網頁內容共 {3} 字'.format(
            post['date'], post['author'], post['title'], len(resps.text)))
這份程式 basic_crawler.py 中用到 time.time() 計時,可以試看看用多少 process 和不用 multiprocessing 的時間差距~
附上實驗實測結果:
$ python crawler_multiprocess.py  # with 1-process
花費: 18.773823 秒

$ python crawler_multiprocess.py  # with 8-process
花費: 4.885024 秒
可以看出整體執行速度加速了將近四倍,但是並不一定 Process 越多越好,除了必須看 CPU 等硬體規格,主要還是取決於網卡、網速等外部裝置的限制。
上面的程式碼都可以在 (src/basic_crawler.py) 中可以找到!
[進階篇] PTT 搜尋功能:
PTT Web 新功能:搜尋! 終於可以在網頁版使用了
一樣使用 PTT 的電影版作為我們的爬蟲目標囉!在新版功能中可以搜尋的內容包含,
- 標題關鍵字 (title keywords)
- 相同標題文章 (thread title)
- 同作者文章 (author)
- 推文數多的文章 (recommend)

前三者都可以從新版的頁面原始碼及送出請求發現規則,不過推文數搜尋似乎還沒有在網頁版 UI 介面中出現;所以這邊是筆者從 PTT 網站原始碼 中挖掘出來的參數。平常我們瀏覽的 PTT 其實包含 BBS server (就是 BBS),以及前台的 Web server (網頁版),而前台的 Web server 是用 Go 語言 (Golang) 寫的,可以直接存取後端 BBS 資料,並且以一般網站互動模式將內容渲染成網頁形式供瀏覽。
那其實要使用這些新功能非常簡單,只需要透過 HTTP GET 形式的 request 並且加上標準的 query string 方式就能獲得這些資訊。提供搜尋功能的 endpoint URL 為 /bbs/{看板名稱}/search,只要用對應的 query 即可從這邊獲得搜尋結果。首先以標題關鍵字為例,

從圖片中右下角可以看出,在搜尋時其實是對 endpoint 送出 q=三 的 GET 請求,所以整個完整的 URL 應該像是 https://www.ptt.cc/bbs/movie/search?q=三,不過從網址列複製下來的網址可能會是 https://www.ptt.cc/bbs/movie/search?q=%E4%B8%89 這樣的形式,是因為中文被 HTML encode 過了但代表的是相同意思。而在 requests 中,想要增加額外的 query 參數不用自己手動建構字串形式,只要透過 param= 的 dict() 放到函式參數即可,就像是這樣:
search_endpoint_url = 'https://www.ptt.cc/bbs/movie/search'

resp = requests.get(search_endpoint_url, params={'q': '三'})

在搜尋相同文章 (thread) 時,可以由右下角資訊看出,其實就是將 thread: 這個字串串到標題前面後送出查詢。
resp = requests.get(search_endpoint_url, params={'q': 'thread:[ 好雷] 死侍2的各種彩蛋討論'})

在搜尋相同作者文章 (author) 時,同樣由右下角資訊看出是將 author: 這個字串串上作者名字後送出查詢。
resp = requests.get(search_endpoint_url, params={'q': 'author:rogerwang86'})

在搜尋推文數大於多少 (recommend) 的文章時,就是將 recommend: 這個字串串上希望搜尋到的最低推文數後送出查詢。另外可以從 PTT Web server 原始碼中發現推文數只能設定在 ±100 間。
resp = requests.get(search_endpoint_url, params={'q': 'recommend:50'})
-
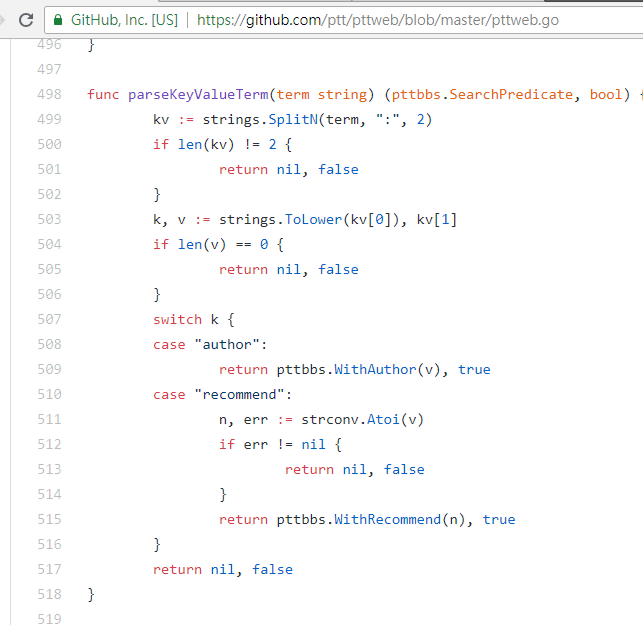
PTT Web parsing 這些參數的 function 原始碼

另外值得一提的是,搜尋結果最後的呈現也跟基礎篇裡提到的一般版面相同,所以可以直接將前面的 function 再拿來重複利用,Don't do it again!
resp = requests.get(search_endpoint_url, params={'q': 'recommend:50'})

post_entries = parse_article_entries(resp.text)  # [沿用]
metadata = [parse_article_meta(entry) for entry in post_entries]  # [沿用]
在搜尋中有另一個參數,頁數 page 就跟 Google 搜尋一樣,搜尋到的東西也許有很多頁,那麼就可以透過這個額外的參數來控制要取得第幾頁結果,而不需要再去 parse 頁面上的 link。
resp = requests.get(search_endpoint_url, params={'q': 'recommend:50', 'page': 2})
[API篇] - 我把 PTT 全包了
將前面所有的功能通通整合進 ptt-parser,可以提供 command-line 功能以及可程式化呼叫的 API 形式的 爬蟲。