dev-setup
Motivation
Setting up a new developer machine can be an ad-hoc, manual, and time-consuming process. dev-setup aims to simplify the process with easy-to-understand instructions and dotfiles/scripts to automate the setup of the following:
- OS X updates and Xcode Command Line Tools
- OS X defaults geared towards developers
- Developer tools: Vim, bash, tab completion, curl, git, GNU core utils, Python, Ruby, etc
- Developer apps: iTerm2, Sublime Text, Atom, VirtualBox, Vagrant, Docker, Chrome, etc
- Python data analysis: IPython Notebook, NumPy, Pandas, Scikit-Learn, Matplotlib, etc
- Big Data platforms: Spark (with IPython Notebook integration) and MapReduce
- Cloud services: Amazon Web Services (Boto, AWS CLI, S3cmd, etc) and Heroku
- Common data stores: MySQL, PostgreSQL, MongoDB, Redis, and Elasticsearch
- Javascript web development: Node.js, JSHint, and Less
- Android development: Java, Android SDK, Android Studio, IntelliJ IDEA
But...I Don't Need All These Tools!
dev-setup is geared to be more of an organized reference of various developer tools.
You're not meant to install everything.
If you're interested in automation, dev-setup provides a customizable setup script. There's really no one-size-fits-all solution for developers so you're encouraged to make tweaks to suit your needs.
Credits: This repo builds on the awesome work from Mathias Bynens and Nicolas Hery.
For Automation, What About Vagrant, Docker, or Boxen?
Vagrant and Docker are great tools and are set up by this repo. I've found that Vagrant works well to ensure dev matches up with test and production tiers. I've only started playing around with Docker for side projects and it looks very promising. However, for Mac users, Docker and Vagrant both rely on virtual machines, which have their own considerations/pros/cons.
Boxen is a cool solution, although some might find it better geared towards "more mature companies or devops teams". I've seen some discussions of difficulties as it is using Puppet under the hood.
This repo takes a more light-weight approach to automation using a combination of Homebrew, Homebrew Cask, and shell scripts to do basic system setup. It also provides easy-to understand instructions for installation, configuration, and usage for each developer app or tool.
Sections Summary
- Section 1 contains the dotfiles/scripts and instructions to set up your system.
- Sections 2 through 7 detail more information about installation, configuration, and usage for topics in Section 1.
Section 1: Installation
Scripts tested on OS X 10.10 Yosemite and 10.11 El Capitan.
- Single Setup Script
- bootstrap.sh script
- Syncs dev-setup to your local home directory
~
- Syncs dev-setup to your local home directory
- osxprep.sh script
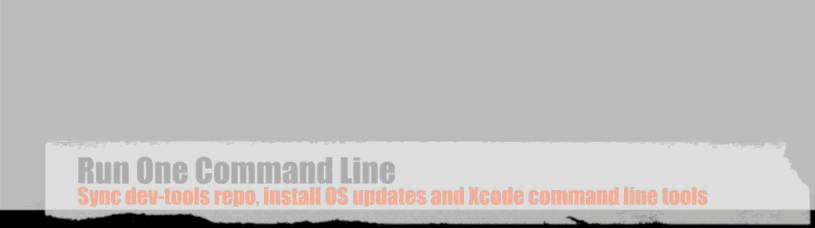
- Updates OS X and installs Xcode command line tools
- brew.sh script
- Installs common Homebrew formulae and apps
- osx.sh script
- Sets up OS X defaults geared towards developers
- pydata.sh script
- Sets up python for data analysis
- aws.sh script
- Sets up Spark, Hadoop MapReduce, and Amazon Web Services
- datastores.sh script
- Sets up common data stores
- web.sh script
- Sets up JavaScript web development
- android.sh script
- Sets up Android development
Section 2: General Apps and Tools
- Sublime Text
- Atom
- Terminal Customization
- iTerm2
- Vim
- Git
- VirtualBox
- Vagrant
- Docker
- Homebrew
- Ruby and rbenv
- Python
- Pip
- Virtualenv
- Virtualenvwrapper
Section 3: Python Data Analysis
Section 4: Big Data, AWS, and Heroku
- Spark
- MapReduce
- Awesome AWS
- AWS Account
- AWS CLI
- SAWS
- Boto
- S3cmd
- S3DistCp
- S3-parallel-put
- Redshift
- Kinesis
- Lambda
- AWS Machine Learning
- Heroku
Section 5: Data Stores
Section 6: JavaScript Web Development
Section 7: Android Development
Section 8: Misc
Section 1: Installation
Single Setup Script
Running with Git
Clone the Repo
$ git clone https://github.com/donnemartin/dev-setup.git && cd dev-setup
Run the .dots Script with Command Line Arguments
Since you probably don't want to install every section, the .dots script supports command line arguments to run only specified sections. Simply pass in the scripts that you want to install. Below are some examples.
For more customization, you can clone or fork the repo and tweak the .dots script and its associated components to suit your needs.
Run all:
$ ./.dots all
Run bootstrap.sh, osxprep.sh, brew.sh, and osx.sh:
$ ./.dots bootstrap osxprep brew osx
Run bootstrap.sh, osxprep.sh, brew.sh, and osx.sh, pydata.sh, aws.sh, and datastores.sh:
$ ./.dots bootstrap osxprep brew osx pydata aws datastores
Running without Git
$ curl -O https://raw.githubusercontent.com/donnemartin/dev-setup/master/.dots && ./.dots [Add ARGS Here]
Scripts
- .dots
- Runs specified scripts
- bootstrap.sh
- Syncs dev-setup to your local home directory
~
- Syncs dev-setup to your local home directory
- osxprep.sh
- Updates OS X and installs Xcode command line tools
- brew.sh
- Installs common Homebrew formulae and apps
- osx.sh
- Sets up OS X defaults geared towards developers
- pydata.sh
- Sets up python for data analysis
- aws.sh
- Sets up Spark, Hadoop MapReduce, and Amazon Web Services
- datastores.sh
- Sets up common data stores
- web.sh
- Sets up JavaScript web development
- android.sh
- Sets up Android development
Notes:
.dotswill initially prompt you to enter your password..dotsmight ask you to re-enter your password at certain stages of the installation.- If OS X updates require a restart, simply run
.dotsagain to resume where you left off. - When installing the Xcode command line tools, a dialog box will confirm installation.
- Once Xcode is installed, follow the instructions on the terminal to continue.
.dotsrunsbrew.sh, which takes awhile to complete as some formulae need to be installed from source.- When
.dotscompletes, be sure to restart your computer for all updates to take effect.
I encourage you to read through Section 1 so you have a better idea of what each installation script does. The following discussions describe in greater detail what is executed when running the .dots script.
bootstrap.sh script
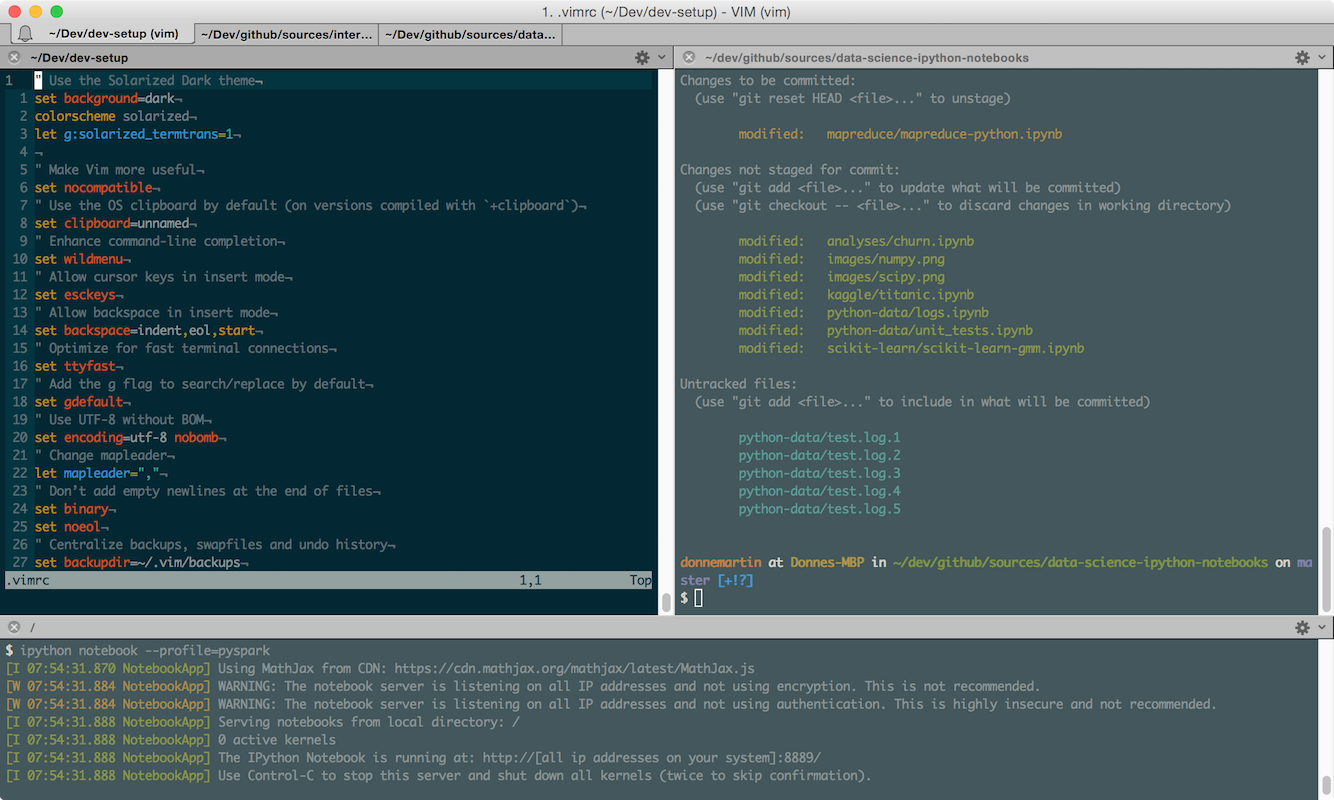
The bootstrap.sh script will sync the dev-setup repo to your local home directory. This will include customizations for Vim, bash, curl, git, tab completion, aliases, a number of utility functions, etc. Section 2 of this repo describes some of the customizations.
Running with Git
First, fork or clone the repo. The bootstrap.sh script will pull in the latest version and copy the files to your home folder ~:
$ source bootstrap.sh
To update later on, just run that command again.
Alternatively, to update while avoiding the confirmation prompt:
$ set -- -f; source bootstrap.sh
Running without Git
To sync dev-setup to your local home directory without Git, run the following:
$ cd ~; curl -#L https://github.com/donnemartin/dev-setup/tarball/master | tar -xzv --strip-components 1 --exclude={README.md,bootstrap.sh,LICENSE}
To update later on, just run that command again.
Optional: Specify PATH
If ~/.path exists, it will be sourced along with the other files before any feature testing (such as detecting which version of ls is being used takes place.
Here’s an example ~/.path file that adds /usr/local/bin to the $PATH:
export PATH="/usr/local/bin:$PATH"Optional: Add Custom Commands
If ~/.extra exists, it will be sourced along with the other files. You can use this to add a few custom commands without the need to fork this entire repository, or to add commands you don’t want to commit to a public repository.
My ~/.extra looks something like this:
# Git credentials
GIT_AUTHOR_NAME="Donne Martin"
GIT_COMMITTER_NAME="$GIT_AUTHOR_NAME"
git config --global user.name "$GIT_AUTHOR_NAME"
GIT_AUTHOR_EMAIL="[email protected]"
GIT_COMMITTER_EMAIL="$GIT_AUTHOR_EMAIL"
git config --global user.email "$GIT_AUTHOR_EMAIL"

# Pip should only run if there is a virtualenv currently activated
export PIP_REQUIRE_VIRTUALENV=true

# Install or upgrade a global package
# Usage: gpip install –upgrade pip setuptools virtualenv
gpip(){
   PIP_REQUIRE_VIRTUALENV="" pip "$@"
}
You could also use ~/.extra to override settings, functions, and aliases from the dev-setup repository, although it’s probably better to fork the dev-setup repository.
osxprep.sh script

Run the osxprep.sh script:
$ ./osxprep.sh
osxprep.sh will first install all updates. If a restart is required, simply run the script again. Once all updates are installed, osxprep.sh will then Install Xcode Command Line Tools.
If you want to go the manual route, you can also install all updates by running "App Store", selecting the "Updates" icon, then updating both the OS and installed apps.
Install Xcode Command Line Tools
An important dependency before many tools such as Homebrew can work is the Command Line Tools for Xcode. These include compilers like gcc that will allow you to build from source.
If you are running OS X 10.9 Mavericks or later, then you can install the Xcode Command Line Tools directly from the command line with:
$ xcode-select --install
Note: the osxprep.sh script executes this command.
Running the command above will display a dialog where you can either:
- Install Xcode and the command line tools
- Install the command line tools only
- Cancel the install
OS X 10.8 and Older
If you're running 10.8 or older, you'll need to go to http://developer.apple.com/downloads, and sign in with your Apple ID (the same one you use for iTunes and app purchases). Unfortunately, you're greeted by a rather annoying questionnaire. All questions are required, so feel free to answer at random.
Once you reach the downloads page, search for "command line tools", and download the latest Command Line Tools (OS X Mountain Lion) for Xcode. Open the .dmg file once it's done downloading, and double-click on the .mpkg installer to launch the installation. When it's done, you can unmount the disk in Finder.
brew.sh script

When setting up a new Mac, you may want to install Homebrew, a package manager that simplifies installing and updating applications or libraries.
Some of the apps installed by the brew.sh script include: Chrome, Firefox, Sublime Text, Atom, Dropbox, Evernote, Skype, Slack, Alfred, VirtualBox, Vagrant, Docker, etc. For a full listing of installed formulae and apps, refer to the commented brew.sh source file directly and tweak it to suit your needs.
Run the brew.sh script:
$ ./brew.sh
The brew.sh script takes awhile to complete, as some formulae need to be installed from source.
For your terminal customization to take full effect, quit and re-start the terminal
osx.sh script

When setting up a new Mac, you may want to set OS X defaults geared towards developers. The osx.sh script also configures common third-party apps such Sublime Text and Chrome.
Note: I strongly encourage you read through the commented osx.sh source file and tweak any settings based on your personal preferences. The script defaults are intended for you to customize. For example, if you are not running an SSD you might want to change some of the settings listed in the SSD section.
Run the osx.sh script:
$ ./osx.sh
For your terminal customization to take full effect, quit and re-start the terminal.
pydata.sh script

To set up a development environment to work with Python and data analysis without relying on the more heavyweight Anaconda distribution, run the pydata.sh script:
$ ./pydata.sh
This will install Virtualenv and Virtualenvwrapper. It will then set up two virtual environments loaded with the packages you will need to work with data in Python 2 and Python 3.
To switch to the Python 2 virtual environment, run the following Virtualenvwrapper command:
$ workon py2-data
To switch to the Python 3 virtual environment, run the following Virtualenvwrapper command:
$ workon py3-data
Then start working with the installed packages, for example:
$ ipython notebook
Section 3: Python Data Analysis describes the installed packages and usage.
aws.sh script

To set up a development environment to work with Spark, Hadoop MapReduce, and Amazon Web Services, run the aws.sh script:
$ ./aws.sh
Section 4: Big Data, AWS, and Heroku describes the installed packages and usage.
datastores.sh script
To set up common data stores, run the datastores.sh script:
$ ./datastores.sh
Section 5: Data Stores describes the installed packages and usage.
web.sh script
To set up a JavaScript web development environment, Run the web.sh script:
$ ./web.sh
Section 6: Web Development describes the installed packages and usage.
android.sh script

To set up an Android development environment, run the android.sh script:
$ ./android.sh
Section 7: Android Development describes the installed packages and usage.
Section 2: General Apps and Tools
Sublime Text
With the terminal, the text editor is a developer's most important tool. Everyone has their preferences, but unless you're a hardcore Vim user, a lot of people are going to tell you that Sublime Text is currently the best one out there.
Installation
The brew.sh script installs Sublime Text.
If you prefer to install it separately, go ahead and download it. Open the .dmg file, drag-and-drop in the Applications folder.
Note: At this point I'm going to create a shortcut on the OS X Dock for both for Sublime Text. To do so, right-click on the running application and select Options > Keep in Dock.
Sublime Text is not free, but I think it has an unlimited "evaluation period". Anyhow, we're going to be using it so much that even the seemingly expensive $70 price tag is worth every penny. If you can afford it, I suggest you support this awesome tool.
Configuration
The osx.sh script contains Sublime Text configurations.
Soda Theme
The Soda Theme is a great UI theme for Sublime Text, especially if you use a dark theme and think the side bar sticks out like a sore thumb.
Installation with Sublime Package Control
If you are using Will Bond's excellent Sublime Package Control, you can easily install Soda Theme via the Package Control: Install Package menu item. The Soda Theme package is listed as Theme - Soda in the packages list.
Installation with Git
Alternatively, if you are a git user, you can install the theme and keep up to date by cloning the repo directly into your Packages directory in the Sublime Text application settings area.
You can locate your Sublime Text Packages directory by using the menu item Preferences -> Browse Packages....
While inside the Packages directory, clone the theme repository using the command below:
$ git clone https://github.com/buymeasoda/soda-theme/ "Theme - Soda"
Activating the Theme on Sublime Text 2
- Open your User Settings Preferences file
Sublime Text 2 -> Preferences -> Settings - User - Add (or update) your theme entry to be
"theme": "Soda Light.sublime-theme"or"theme": "Soda Dark.sublime-theme"
Example Sublime Text 2 User Settings
{
    "theme": "Soda Light.sublime-theme"
}
Activating the Theme on Sublime Text 3
- Open your User Settings Preferences file
Sublime Text -> Preferences -> Settings - User - Add (or update) your theme entry to be
"theme": "Soda Light 3.sublime-theme"or"theme": "Soda Dark 3.sublime-theme"
Example Sublime Text 3 User Settings
{
    "theme": "Soda Light 3.sublime-theme"
}
Changing Monokai Comment Color
Although Monokai is a great color scheme, I find that comments can be difficult to see. You can follow these instructions to change the color of the default theme.
I set my comments color to #E6DB74.
<dict>
    ...
    <dict>
        <key>foreground</key>
        <string>#E6DB74</string>
    </dict>
    ...
</dict>
Atom
Atom is a great open-source editor from GitHub that is rapidly gaining contributors and popularity.
Installation
The brew.sh script installs Atom.
If you prefer to install it separately, download it, open the .dmg file, drag-and-drop in the Applications folder.
Configuration
Atom has a great package manager that allows you to easily install both core and community packages.
Terminal Customization
Since we spend so much time in the terminal, we should try to make it a more pleasant and colorful place.
Configuration
The bootstrap.sh script and osx.sh script contain terminal customizations.
iTerm2
I prefer iTerm2 over the stock Terminal, as it has some additional great features. Download and install iTerm2 (the newest version, even if it says "beta release").
In Finder, drag and drop the iTerm Application file into the Applications folder.
You can now launch iTerm, through the Launchpad for instance.
Let's just quickly change some preferences. In iTerm > Preferences..., in the tab Profiles, create a new one with the "+" icon, and rename it to your first name for example. Then, select Other Actions... > Set as Default. Under the section Window, change the size to something better, like Columns: 125 and Rows: 35. I also like to set General > Working Directory > Reuse previous session's directory. Finally, I change the way the option key works so that I can quickly jump between words as described here.
When done, hit the red "X" in the upper left (saving is automatic in OS X preference panes). Close the window and open a new one to see the size change.
Configuration
Since we spend so much time in the terminal, we should try to make it a more pleasant and colorful place. What follows might seem like a lot of work, but trust me, it'll make the development experience so much better.
Now let's add some color. I'm a big fan of the Solarized color scheme. It is supposed to be scientifically optimal for the eyes. I just find it pretty.
- In iTerm2 Preferences, under Profiles and Colors, go to Load Presets... and select Solarized Dark to activate it. Voila!
At this point you can also change your computer's name, which shows up in this terminal prompt. If you want to do so, go to System Preferences > Sharing. For example, I changed mine from "Donne's MacBook Pro" to just "MacBook Pro", so it shows up as MacBook-Pro in the terminal.
Now we have a terminal we can work with!
Vim
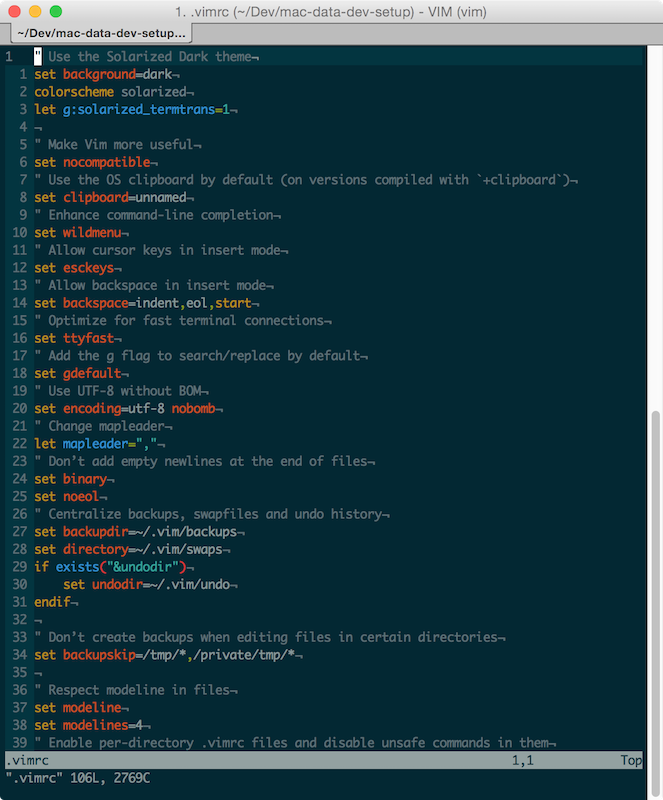
Although Sublime Text will be our main editor, it is a good idea to learn some very basic usage of Vim. It is a very popular text editor inside the terminal, and is usually pre-installed on any Unix system.
For example, when you run a Git commit, it will open Vim to allow you to type the commit message.
I suggest you read a tutorial on Vim. Grasping the concept of the two "modes" of the editor, Insert (by pressing i) and Normal (by pressing Esc to exit Insert mode), will be the part that feels most unnatural. After that it's just remembering a few important keys.
Configuration
The bootstrap.sh script contains Vim customizations.
VirtualBox

VirtualBox creates and manages virtual machines. It's a solid free solution to its commercial rival VMware.
Installation
The brew.sh script installs VirtualBox
If you prefer to install it separately, you can download it here or run:
$ brew update
$ brew install caskroom/cask/brew-cask
$ brew cask install --appdir="/Applications" virtualbox
Vagrant

Vagrant creates and configures development environments. You can think of it as a higher-level wrapper around VirtualBox and configuration management tools like Ansible, Chef, Puppet, and Salt. Vagrant also supports Docker containers and server environments like Amazon EC2.
Installation
The brew.sh script installs Vagrant.
If you prefer to install it separately, you can download it here or run:
$ brew update
$ brew install caskroom/cask/brew-cask
$ brew cask install --appdir="/Applications" vagrant
Docker

Docker automates the deployment of applications inside software containers. I think the following quote explains docker nicely: "Docker is a tool that can package an application and its dependencies in a virtual container that can run on any Linux server. This helps enable flexibility and portability on where the application can run, whether on premise, public cloud, private cloud, bare metal, etc".
Installation
The brew.sh script installs Docker.
If you prefer to install it separately, you can download it here or run:
$ brew update
$ brew install docker
$ brew install boot2docker
Configuration
Initialize and start boot2docker (only need to do this once):
$ boot2docker init
Start the VM:
$ boot2docker up
Set the DOCKER_HOST environment variable and fill in IP and PORT based on the output from the boot2coker up command:
$ export DOCKER_HOST=tcp://IP:PORT
Git
What's a developer without Git?
Installation
Git should have been installed when you ran through the Install Xcode Command Line Tools section.
Configuration
To check your version of Git, run the following command:
$ git --version
And $ which git should output /usr/local/bin/git.
Let's set up some basic configuration. Download the .gitconfig file to your home directory:
$ cd ~
$ curl -O https://raw.githubusercontent.com/donnemartin/dev-setup/master/.gitconfig
It will add some color to the status, branch, and diff Git commands, as well as a couple aliases. Feel free to take a look at the contents of the file, and add to it to your liking.
Next, we'll define your Git user (should be the same name and email you use for GitHub and Heroku):
$ git config --global user.name "Your Name Here"
$ git config --global user.email "[email protected]"
They will get added to your .gitconfig file.
To push code to your GitHub repositories, we're going to use the recommended HTTPS method (versus SSH). So you don't have to type your username and password everytime, let's enable Git password caching as described here:
$ git config --global credential.helper osxkeychain
Note: On a Mac, it is important to remember to add .DS_Store (a hidden OS X system file that's put in folders) to your .gitignore files. You can take a look at this repository's .gitignore file for inspiration. Also check out GitHub's collection of .gitignore templates.
Homebrew
Package managers make it so much easier to install and update applications (for Operating Systems) or libraries (for programming languages). The most popular one for OS X is Homebrew.
Installation
The brew.sh script installs Homebrew and a number of useful Homebrew formulae and apps.
If you prefer to install it separately, run the following command and follow the steps on the screen:
$ ruby -e "$(curl -fsSL https://raw.githubusercontent.com/Homebrew/install/master/install)"
Usage
To install a package (or Formula in Homebrew vocabulary) simply type:
$ brew install <formula>
To update Homebrew's directory of formulae, run:
$ brew update
Note: I've seen that command fail sometimes because of a bug. If that ever happens, run the following (when you have Git installed):
$ cd /usr/local
$ git fetch origin
$ git reset --hard origin/master
To see if any of your packages need to be updated:
$ brew outdated
To update a package:
$ brew upgrade <formula>
Homebrew keeps older versions of packages installed, in case you want to roll back. That rarely is necessary, so you can do some cleanup to get rid of those old versions:
$ brew cleanup
To see what you have installed (with their version numbers):
$ brew list --versions
Ruby and rbenv

Ruby is already installed on Unix systems, but we don't want to mess around with that installation. More importantly, we want to be able to use the latest version of Ruby.
Installation
brew.sh provides rbenv and ruby-build which allow you to manage multiple versions of Ruby on the same machine. brew.sh adds the following line to your .extra file to initialize rbenv:
eval "$(rbenv init -)"
Usage
rbenv uses ruby-build to download, compile, and install new versions of Ruby. You can see all versions available to download and install:
$ ruby-build --definitions
To install a new version of Ruby:
# list all available versions installed on the system:
$ rbenv install -l

# install a Ruby version:
$ rbenv install 2.2.3
To switch Ruby versions:
# set a local application-specific Ruby version in the current directory
$ rbenv local 1.9.3

# set the global version of Ruby to be used in all shells
$ rbenv global 2.0.0
rbenv by default will install Ruby versions into a directory of the same name under ~/.rbenv/versions. Because your user owns this directory, you no longer need to use sudo to install gems.
Python

OS X, like Linux, ships with Python already installed. But you don't want to mess with the system Python (some system tools rely on it, etc.), so we'll install our own version with Homebrew. It will also allow us to get the very latest version of Python 2.7 and Python 3.
Installation
The brew.sh script installs the latest versions of Python 2 and Python 3.
Pip
Pip is the Python package manager.
Installation
The pydata.sh script installs pip.
Usage
Here are a couple Pip commands to get you started. To install a Python package:
$ pip install <package>
To upgrade a package:
$ pip install --upgrade <package>
To see what's installed:
$ pip freeze
To uninstall a package:
$ pip uninstall <package>
Virtualenv
Virtualenv is a tool that creates an isolated Python environment for each of your projects. For a particular project, instead of installing required packages globally, it is best to install them in an isolated folder in the project (say a folder named venv), that will be managed by virtualenv.
The advantage is that different projects might require different versions of packages, and it would be hard to manage that if you install packages globally. It also allows you to keep your global /usr/local/lib/python2.7/site-packages folder clean.
Installation
The pydata.sh script installs Virtualenv.
Usage
Let's say you have a project in a directory called myproject. To set up virtualenv for that project:
$ cd myproject/
$ virtualenv venv --distribute
If you want your virtualenv to also inherit globally installed packages (like IPython or Numpy mentioned above), use:
$ virtualenv venv --distribute --system-site-packages
These commands create a venv subdirectory in your project where everything is installed. You need to activate it first though (in every terminal where you are working on your project):
$ source venv/bin/activate
You should see a (venv) appear at the beginning of your terminal prompt indicating that you are working inside the virtualenv. Now when you install something:
$ pip install <package>
It will get installed in the venv folder, and not conflict with other projects.
Important: Remember to add venv to your project's .gitignore file so you don't include all of that in your source code!
Virtualenvwrapper
Virtualenvwrapper is a set of extensions that includes wrappers for creating and deleting virtual environments and otherwise managing your development workflow, making it easier to work on more than one project at a time without introducing conflicts in their dependencies.
Main features include:
- Organizes all of your virtual environments in one place.
- Wrappers for managing your virtual environments (create, delete, copy).
- Use a single command to switch between environments.
- Tab completion for commands that take a virtual environment as argument.
Installation
The pydata.sh script installs Virtualenvwrapper.
Usage
Create a new virtual environment. When you create a new environment it automatically becomes the active environment:
$ mkvirtualenv [env name]
Remove an existing virtual environment. The environment must be deactivated (see below) before it can be removed:
$ rmvirtualenv [env name]
Activate a virtual environment. Will also list all existing virtual environments if no argument is passed:
$ workon [env name]
Deactivate the currently active virtual environment. Note that workonwill automatically deactivate the current environment before activating a new one:
$ deactivate
Section 3: Python Data Analysis
Anaconda

Anaconda is a free distribution of the Python programming language for large-scale data processing, predictive analytics, and scientific computing that aims to simplify package management and deployment.
Installation
The pydata.sh script installs packages you need to run Python data applications. Alternatively, you can install the more heavy-weight Anaconda instead.
Follow instructions to install Anaconda or the more lightweight miniconda.
IPython Notebook
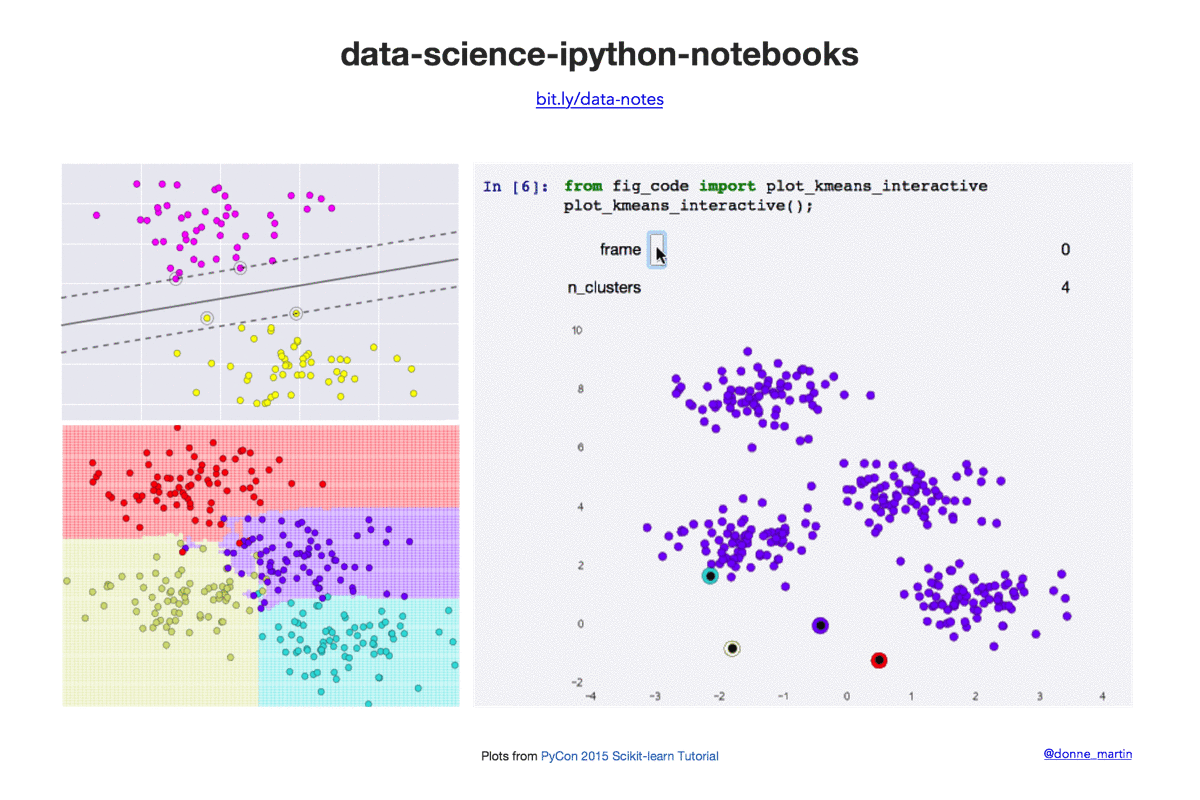
IPython is an awesome project which provides a much better Python shell than the one you get from running $ python in the command-line. It has many cool functions (running Unix commands from the Python shell, easy copy & paste, creating Matplotlib charts in-line, etc.) and I'll let you refer to the documentation to discover them.
IPython Notebook is a web-based interactive computational environment where you can combine code execution, text, mathematics, plots and rich media into a single document.
Installation
The pydata.sh script installs IPython Notebook. If you prefer to install it separately, run:
$ pip install "ipython[notebook]"
If you run into an issue about pyzmq, refer to the following Stack Overflow post and run:
$ pip uninstall ipython
$ pip install "ipython[all]"
Usage
$ ipython notebook
If you'd like to see some examples here are a couple of my repos that use IPython Notebooks heavily:
NumPy

NumPy adds Python support for large, multi-dimensional arrays and matrices, along with a large library of high-level mathematical functions to operate on these arrays.
Installation
The pydata.sh script installs NumPy. If you prefer to install it separately, run:
$ pip install numpy
Usage
Refer to the following Numpy IPython Notebook.
Pandas
Pandas is a software library written for data manipulation and analysis in Python. Offers data structures and operations for manipulating numerical tables and time series.
Installation
The pydata.sh script installs Pandas. If you prefer to install it separately, run:
$ pip install pandas
Usage
Refer to the following pandas IPython Notebooks.
Matplotlib

Matplotlib is a Python 2D plotting library which produces publication quality figures in a variety of hardcopy formats and interactive environments across platforms.
Installation
The pydata.sh script installs matplotlib. If you prefer to install it separately, run:
$ pip install matplotlib
Usage
Refer to the following matplotlib IPython Notebooks.
Seaborn
Seaborn is a Python visualization library based on matplotlib. It provides a high-level interface for drawing attractive statistical graphics.
Installation
The pydata.sh script installs matplotlib. If you prefer to install it separately, run:
$ pip install seaborn
Usage
Refer to the following matplotlib with Seaborn IPython Notebooks.
Scikit-learn

Scikit-learn adds Python support for large, multi-dimensional arrays and matrices, along with a large library of high-level mathematical functions to operate on these arrays.
Installation
The pydata.sh script installs Scikit-learn. If you prefer to install it separately, run:
$ pip install scikit-learn
Usage
Refer to the following scikit-learn IPython Notebooks.
SciPy

SciPy is a collection of mathematical algorithms and convenience functions built on the Numpy extension of Python. It adds significant power to the interactive Python session by providing the user with high-level commands and classes for manipulating and visualizing data.
Installation
The pydata.sh script installs SciPy. If you prefer to install it separately, run:
$ pip install scipy
Usage
Refer to the following SciPy IPython Notebooks.
Flask

Flask is a micro web application framework written in Python.
Installation
The pydata.sh script installs SciPy. If you prefer to install it separately, run:
$ pip install Flask
Usage
[Coming Soon] Refer to the following Flask IPython Notebooks.
Bokeh

Bokeh is a Python interactive visualization library that targets modern web browsers for presentation. Its goal is to provide elegant, concise construction of novel graphics in the style of D3.js, but also deliver this capability with high-performance interactivity over very large or streaming datasets. Bokeh can help anyone who would like to quickly and easily create interactive plots, dashboards, and data applications.
Installation
The pydata.sh script installs Bokeh. If you prefer to install it separately, run:
$ pip install bokeh
Usage
[Coming Soon] Refer to the following Bokeh IPython Notebooks.
Section 4: Big Data, AWS, and Heroku
Spark

Spark is an in-memory cluster computing framework, up to 100 times faster for certain applications and is well suited for machine learning algorithms.
Installation
The aws.sh script installs Spark locally. It also hooks up Spark to run within the IPython Notebook by configuring your .bash_profile and adding the repo's profile_pyspark/ to .ipython.
If you prefer to install it separately, run:
$ brew install apache-spark
Usage
Run Spark locally:
$ pyspark
Run Spark within IPython Notebook:
$ ipython notebook --profile=pyspark
Refer to the following Spark IPython Notebook.
Spark is also supported on AWS Elastic MapReduce as described here. To create a cluster, run the following command with the AWS CLI, replacing myKeyPair with the name of your keypair to SSH into your cluster:
$ aws emr create-cluster --name "Spark cluster" --ami-version 3.8 --applications Name=Spark --ec2-attributes KeyName=myKeyPair --instance-type m3.xlarge --instance-count 3 --use-default-roles
MapReduce

Mrjob supports MapReduce jobs in Python, running them locally or on Hadoop clusters such as AWS Elastic MapReduce (EMR).
Installation
Mrjob is Python 2 only.
The aws.sh script installs mrjob locally. If you prefer to install it separately, run:
$ pip install mrjob
The aws.sh script also syncs the template .mrjob.conf file to your home folder. Note running the aws.sh script will overwrite any existing ~/.mrjob.conf file. Update the config file with your credentials, keypair, region, and S3 bucket paths:
runners:
  emr:
    aws_access_key_id: YOURACCESSKEY
    aws_secret_access_key: YOURSECRETKEY
    aws_region: us-east-1
    ec2_key_pair: YOURKEYPAIR
    ec2_key_pair_file: ~/.ssh/YOURKEYPAIR.pem
    ...
    s3_scratch_uri: s3://YOURBUCKETSCRATCH
    s3_log_uri: s3://YOURBUCKETLOG
    ...
Usage
Refer to the following mrjob IPython Notebook.
Awesome AWS 

Awesome AWS is a curated list of awesome AWS libraries, open source repos, guides, blogs, and other resources. It's a great way to stay up-to-date with the various aws-backed and community-led efforts geared towards AWS.
The Fiery Meter of AWSome
'Hot' repos in Awesome AWS are visually tagged based on their popularity:
- Repo with 0100+ Stars:
🔥 - Repo with 0200+ Stars:
🔥 🔥 - Repo with 0500+ Stars:
🔥 🔥 🔥 - Repo with 1000+ Stars:
🔥 🔥 🔥 🔥 - Repo with 2000+ Stars:
🔥 🔥 🔥 🔥 🔥
Repos not on The Fiery Meter of AWSome can still be awesome, see A Note on Repo AWSomeness.
AWS Account
To start using AWS, you first need to sign up for an account.
Sign up for AWS
When you sign up for Amazon Web Services (AWS), your AWS account is automatically signed up for all services in AWS. You are charged only for the services that you use. New users are eligible for 12 months of usage through the AWS Free Tier.
To create an AWS account, open http://aws.amazon.com/, and then click Sign Up. Follow the on-screen instructions. Part of the sign-up procedure involves receiving a phone call and entering a PIN using the phone keypad. Note your AWS account ID.
AWS CLI
The AWS Command Line Interface is a unified tool to manage AWS services, allowing you to control multiple AWS services from the command line and to automate them through scripts.
Installation
The aws.sh script installs the AWS CLI. If you prefer to install it separately, run:
$ pip install awscli
Run the following command to configure the AWS CLI:
$ aws configure
Alternatively, the aws.sh script also syncs the template .aws/ folder to your home folder. Note running the aws.sh script will overwrite any existing ~/.aws/ folder. Update the config file with your credentials and location:
[default]
region = us-east-1
[default]
aws_access_key_id = YOURACCESSKEY
aws_secret_access_key = YOURSECRETKEY
Be careful you do not accidentally check in your credentials. The .gitignore file is set to ignore files with credentials.
Usage
Refer to the following AWS CLI IPython Notebook.
SAWS

Although the AWS CLI is a great resource to manage your AWS-powered services, it's tough to remember usage of:
- 50+ top-level commands
- 1400+ subcommands
- Countless command-specific options
- Resources such as instance tags and buckets
SAWS: A Supercharged AWS CLI
SAWS aims to supercharge the AWS CLI with features focusing on:
- Improving ease-of-use
- Increasing productivity
Under the hood, SAWS is powered by the AWS CLI and supports the same commands and command structure.
SAWS and AWS CLI Usage:
aws <command> <subcommand> [parameters] [options]
SAWS features:
- Auto-completion of:
- Commands
- Subcommands
- Options
- Auto-completion of resources:
- Bucket names
- Instance ids
- Instance tags
- More coming soon!
- Customizable shortcuts
- Fuzzy completion of resources and shortcuts
- Syntax and output highlighting
- Execution of shell commands
- Command history
- Contextual help
- Toolbar options
SAWS is available for Mac, Linux, Unix, and Windows.

Installation and Usage.
Refer to the repo link.
Boto

Boto is the official AWS SDK for Python.
Installation
The aws.sh script installs boto. If you prefer to install it separately, run:
$ pip install boto
Boto uses the same configuration as described in the AWS CLI section.
Usage
Refer to the following Boto IPython Notebook.
S3cmd
Before I discovered S3cmd, I had been using the S3 console to do basic operations and boto to do more of the heavy lifting. However, sometimes I just want to hack away at a command line to do my work.
I've found S3cmd to be a great command line tool for interacting with S3 on AWS. S3cmd is written in Python, is open source, and is free even for commercial use. It offers more advanced features than those found in the AWS CLI.
Installation
S3cmd is Python 2 only.
The aws.sh script installs s3cmd. If you prefer to install it separately, run:
$ pip install s3cmd
Running the following command will prompt you to enter your AWS access and AWS secret keys. To follow security best practices, make sure you are using an IAM account as opposed to using the root account.
I also suggest enabling GPG encryption which will encrypt your data at rest, and enabling HTTPS to encrypt your data in transit. Note this might impact performance.
$ s3cmd --configure
Alternatively, the aws.sh script also syncs the template .s3cfg file to your home folder. Note running the aws.sh script will overwrite any existing ~/.s3cfg file. Update the config file with your credentials and location:
[Credentials]
aws_access_key_id = YOURACCESSKEY
aws_secret_access_key = YOURSECRETKEY
...
bucket_location = US
...
gpg_passphrase = YOURPASSPHRASE
Be careful you do not accidentally check in your credentials. The .gitignore file is set to ignore files with credentials.
Usage
Refer to the following s3cmd IPython Notebook.
S3DistCp
S3DistCp is an extension of DistCp that is optimized to work with Amazon S3. S3DistCp is useful for combining smaller files and aggregate them together, taking in a pattern and target file to combine smaller input files to larger ones. S3DistCp can also be used to transfer large volumes of data from S3 to your Hadoop cluster.
Installation
S3DistCp comes bundled with the AWS CLI.
Usage
Refer to the following S3DistCp IPython Notebook.
S3-parallel-put
s3-parallel-put is a great tool for uploading multiple files to S3 in parallel.
Installation
$ git clone https://github.com/twpayne/s3-parallel-put.git
Usage
Refer to the following s3-parallel-put IPython Notebook.
Redshift

Redshift is a fast data warehouse built on top of technology from massive parallel processing (MPP).
Setup
Follow these instructions.
Usage
Refer to the following Redshift IPython Notebook.
Kinesis

Kinesis streams data in real time with the ability to process thousands of data streams per second.
Setup
Follow these instructions.
Usage
Refer to the following Kinesis IPython Notebook.
Lambda

Lambda runs code in response to events, automatically managing compute resources.
Setup
Follow these instructions.
Usage
Refer to the following Lambda IPython Notebook.
AWS Machine Learning

Amazon Machine Learning is a service that makes it easy for developers of all skill levels to use machine learning technology. Amazon Machine Learning provides visualization tools and wizards that guide you through the process of creating machine learning (ML) models without having to learn complex ML algorithms and technology. Once your models are ready, Amazon Machine Learning makes it easy to obtain predictions for your application using simple APIs, without having to implement custom prediction generation code, or manage any infrastructure.
Setup
Follow these instructions.
Usage
[Coming Soon] Refer to the following AWS Machine Learning IPython Notebook.
Heroku

Heroku, if you're not already familiar with it, is a Platform-as-a-Service (PaaS) that makes it really easy to deploy your apps online. There are other similar solutions out there, but Heroku was among the first and is currently the most popular. Not only does it make a developer's life easier, but I find that having Heroku deployment in mind when building an app forces you to follow modern app development best practices.
Installation
Assuming that you have an account (sign up if you don't), let's install the Heroku Client for the command-line. Heroku offers a Mac OS X installer, the Heroku Toolbelt, that includes the client. But for these kind of tools, I prefer using Homebrew. It allows us to keep better track of what we have installed. Luckily for us, Homebrew includes a heroku-toolbelt formula:
$ brew install heroku-toolbelt
The formula might not have the latest version of the Heroku Client, which is updated pretty often. Let's update it now:
$ brew upgrade heroku-toolbelt
Don't be afraid to run heroku update every now and then to always have the most recent version.
Usage
Login to your Heroku account using your email and password:
$ heroku login
If this is a new account, and since you don't already have a public SSH key in your ~/.ssh directory, it will offer to create one for you. Say yes! It will also upload the key to your Heroku account, which will allow you to deploy apps from this computer.
If it didn't offer create the SSH key for you (i.e. your Heroku account already has SSH keys associated with it), you can do so manually by running:
 $ mkdir ~/.ssh
 $ ssh-keygen -t rsa
Keep the default file name and skip the passphrase by just hitting Enter both times. Then, add the key to your Heroku account:
$ heroku keys:add
Once the key business is done, you're ready to deploy apps! Heroku has a great Getting Started guide, so I'll let you refer to that (the one linked here is for Python, but there is one for every popular language). Heroku uses Git to push code for deployment, so make sure your app is under Git version control. A quick cheat sheet (if you've used Heroku before):
$ cd myapp/
$ heroku create myapp
$ git push heroku master
$ heroku ps
$ heroku logs -t
The Heroku Dev Center is full of great resources, so be sure to check it out!
Section 5: Data Stores
MySQL

Installation
The datastores.sh script installs MySQL. If you prefer to install it separately, run:
$ brew update # Always good to do
$ brew install mysql
As you can see in the ouput from Homebrew, before we can use MySQL we first need to set it up with:
$ unset TMPDIR
$ mkdir /usr/local/var
$ mysql_install_db --verbose --user=`whoami` --basedir="$(brew --prefix mysql)" --datadir=/usr/local/var/mysql --tmpdir=/tmp
Usage
To start the MySQL server, use the mysql.server tool:
$ mysql.server start
To stop it when you are done, run:
$ mysql.server stop
You can see the different commands available for mysql.server with:
$ mysql.server --help
To connect with the command-line client, run:
$ mysql -uroot
(Use exit to quit the MySQL shell.)
Note: By default, the MySQL user root has no password. It doesn't really matter for a local development database. If you wish to change it though, you can use $ mysqladmin -u root password 'new-password'.
MySQL Workbench
In terms of a GUI client for MySQL, I'm used to the official and free MySQL Workbench. But feel free to use whichever you prefer.
Installation
The datastores.sh script installs MySQL Workbench. If you prefer to install it separately, run:
$ brew install caskroom/cask/brew-cask
$ brew cask install --appdir="/Applications" mysqlworkbench
You can also find the MySQL Workbench download here. (Note: It will ask you to sign in, you don't need to, just click on "No thanks, just start my download!" at the bottom.)
MongoDB

MongoDB is a popular NoSQL database.
Installation
The datastores.sh script installs MongoDB. If you prefer to install it separately, run:
$ brew update
$ brew install mongo
Usage
In a terminal, start the MongoDB server:
$ mongod
In another terminal, connect to the database with the Mongo shell using:
$ mongo
I'll let you refer to MongoDB's Getting Started guide for more!
Redis

Redis is a blazing fast, in-memory, key-value store, that uses the disk for persistence. It's kind of like a NoSQL database, but there are a lot of cool things that you can do with it that would be hard or inefficient with other database solutions. For example, it's often used as session management or caching by web apps, but it has many other uses.
Installation
The datastores.sh script installs Redis. If you prefer to install it separately, run:
$ brew update
$ brew install redis
Usage
Start a local Redis server using the default configuration settings with:
$ redis-server
For advanced usage, you can tweak the configuration file at /usr/local/etc/redis.conf (I suggest making a backup first), and use those settings with:
$ redis-server /usr/local/etc/redis.conf
In another terminal, connect to the server with the Redis command-line interface using:
$ redis-cli
I'll let you refer to Redis' documentation or other tutorials for more information.
Elasticsearch

As it says on the box, Elasticsearch is a "powerful open source, distributed real-time search and analytics engine". It uses an HTTP REST API, making it really easy to work with from any programming language.
You can use elasticsearch for such cool things as real-time search results, autocomplete, recommendations, machine learning, and more.
Installation
The datastores.sh script installs Elasticsearch. If you prefer to install it separately, check out the following discussion.
Elasticsearch runs on Java, so check if you have it installed by running:
$ java -version
If Java isn't installed yet, a window will appear prompting you to install it. Go ahead and click "Install".
Next, install elasticsearch with:
$ brew install elasticsearch
Note: Elasticsearch also has a plugin program that gets moved to your PATH. I find that too generic of a name, so I rename it to elasticsearch-plugin by running (will need to do that again if you update elasticsearch):
$ mv /usr/local/bin/plugin /usr/local/bin/elasticsearch-plugin
Below I will use elasticsearch-plugin, just replace it with plugin if you haven't followed this step.
As you guessed, you can add plugins to elasticsearch. A popular one is elasticsearch-head, which gives you a web interface to the REST API. Install it with:
$ elasticsearch-plugin --install mobz/elasticsearch-head
Usage
Start a local elasticsearch server with:
$ elasticsearch
Test that the server is working correctly by running:
$ curl -XGET 'http://localhost:9200/'
If you installed the elasticsearch-head plugin, you can visit its interface at http://localhost:9200/_plugin/head/.
Elasticsearch's documentation is more of a reference. To get started, I suggest reading some of the blog posts linked on this StackOverflow answer.
Section 6: Web Development
Node.js
Installation
The web.sh script installs Node.js. You can also install it manually with Homebrew:
$ brew update
$ brew install node
The formula also installs the npm package manager. However, as suggested by the Homebrew output, we need to add /usr/local/share/npm/bin to our path so that npm-installed modules with executables will have them picked up.
To do so, add this line to your ~/.path file, before the export PATH line:
PATH=/usr/local/share/npm/bin:$PATHOpen a new terminal for the $PATH changes to take effect.
We also need to tell npm where to find the Xcode Command Line Tools, by running:
$ sudo xcode-select -switch /usr/bin
(If Xcode Command Line Tools were installed by Xcode, try instead:)
$ sudo xcode-select -switch /Applications/Xcode.app/Contents/Developer
Node modules are installed locally in the node_modules folder of each project by default, but there are at least two that are worth installing globally. Those are CoffeeScript and Grunt:
$ npm install -g coffee-script
$ npm install -g grunt-cli
Npm usage
To install a package:
$ npm install <package> # Install locally
$ npm install -g <package> # Install globally
To install a package and save it in your project's package.json file:
$ npm install <package> --save
To see what's installed:
$ npm list # Local
$ npm list -g # Global
To find outdated packages (locally or globally):
$ npm outdated [-g]
To upgrade all or a particular package:
$ npm update [<package>]
To uninstall a package:
$ npm uninstall <package>
JSHint

JSHint is a JavaScript developer's best friend.
If the extra credit assignment to install Sublime Package Manager was completed, JSHint can be run as part of Sublime Text.
Installation
The web.sh script installs JSHint. You can also install it manually via via npm:
$ npm install -g jshint
Follow additional instructions on the JSHint Package Manager page or build it manually.
LESS

CSS preprocessors are becoming quite popular, the most popular processors are LESS and SASS. Preprocessing is a lot like compiling code for CSS. It allows you to reuse CSS in many different ways. Let's start out with using LESS as a basic preprocessor, it's used by a lot of popular CSS frameworks like Bootstrap.
Installation
The web.sh script installs LESS. To install LESS manually you have to use NPM / Node, which you installed earlier using Homebrew. In the terminal use:
$ npm install -g less
Note: the -g flag is optional but it prevents having to mess around with file paths. You can install without the flag, just know what you're doing.
You can check that it installed properly by using:
$ lessc --version
This should output some information about the compiler:
lessc 1.5.1 (LESS Compiler) [JavaScript]
Okay, LESS is installed and running. Great!
Usage
There's a lot of different ways to use LESS. Generally I use it to compile my stylesheet locally. You can do that by using this command in the terminal:
$ lessc template.less template.css
The two options are the "input" and "output" files for the compiler. The command looks in the current directory for the LESS stylesheet, compiles it, and outputs it to the second file in the same directory. You can add in paths to keep your project files organized:
$ lessc less/template.less css/template.css
Read more about LESS on their page here: http://lesscss.org/
Section 7: Android Development
This section is under development.
Java
Installation
The android.sh script installs Java.
If you prefer to install it separately, you can download the JDK here or run:
$ brew update
$ brew install caskroom/cask/brew-cask
$ brew cask install --appdir="~/Applications" java
Android SDK

The android.sh script installs the Android SDK.
If you prefer to install it separately, you can download it here.
Android Studio

The android.sh script installs Android Studio.
If you prefer to install it separately, you can download it here or run:
$ brew update
$ brew install caskroom/cask/brew-cask
$ brew cask install --appdir="~/Applications" android-studio
IntelliJ IDEA

The android.sh script installs Java.
If you prefer to install it separately, you can download it here or run:
$ brew update
$ brew install caskroom/cask/brew-cask
$ brew cask install --appdir="~/Applications" intellij-idea-ce
Section 8: Misc
Contributions
Bug reports, suggestions, and pull requests are welcome!
Credits
See the Credits Page.
Contact Info
Feel free to contact me to discuss any issues, questions, or comments.
My contact info can be found on my GitHub page.
License
This repository contains a variety of content; some developed by Donne Martin, and some from third-parties. The third-party content is distributed under the license provided by those parties.
The content developed by Donne Martin is distributed under the following license:
I am providing code and resources in this repository to you under an open source license. Because this is my personal repository, the license you receive to my code and resources is from me and not my employer (Facebook).
Copyright 2015 Donne Martin

Licensed under the Apache License, Version 2.0 (the "License");
you may not use this file except in compliance with the License.
You may obtain a copy of the License at

   http://www.apache.org/licenses/LICENSE-2.0

Unless required by applicable law or agreed to in writing, software
distributed under the License is distributed on an "AS IS" BASIS,
WITHOUT WARRANTIES OR CONDITIONS OF ANY KIND, either express or implied.
See the License for the specific language governing permissions and
limitations under the License.