twtrubiks / Docker Jenkins Django Tutorial
Projects that are alternatives of or similar to Docker Jenkins Django Tutorial
docker-jenkins-django-tutorial
實戰 Docker + Jenkins + Django + Postgres 📝
這篇文章主要延續之前的教學文,建議對 Docker 以及 Django 有基礎的認識,可參考
Docker 基本教學 - 從無到有 Docker-Beginners-Guide
Django-REST-framework 基本教學 - 從無到有 DRF-Beginners-Guide 📝
- Youtube Tutorial PART 1 - CI ( Continuous Integration ) / CD (Continuous Delivery / Continuous Deployment) 介紹
- Youtube Tutorial PART 2 - Docker + Jenkins + Django + Postgres 設定
- Youtube Tutorial PART 3 - Jenkins 基本設定
- Youtube Tutorial PART 4 - Jenkins + GitHub Integration 實戰
- Youtube Tutorial PART 5 - Jenkins + GitHub Webhooks 實戰
- Youtube Tutorial PART 6 - Jenkins + BitBucket private repo 實戰
- Youtube Tutorial PART 7 - Jenkins + Notifications - Send Email 實戰
- Youtube Tutorial PART 8 - Jenkins + Slack 實戰
- Youtube Tutorial PART 9 - Jenkins Job chaining tutorial
- Youtube Tutorial PART 10 - Jenkins + Delivery Pipeline tutorial
- Youtube Tutorial PART 11 - Jenkins + Build Pipeline tutorial
- Youtube Tutorial PART 12 - Jenkins + Remote access API tutorial
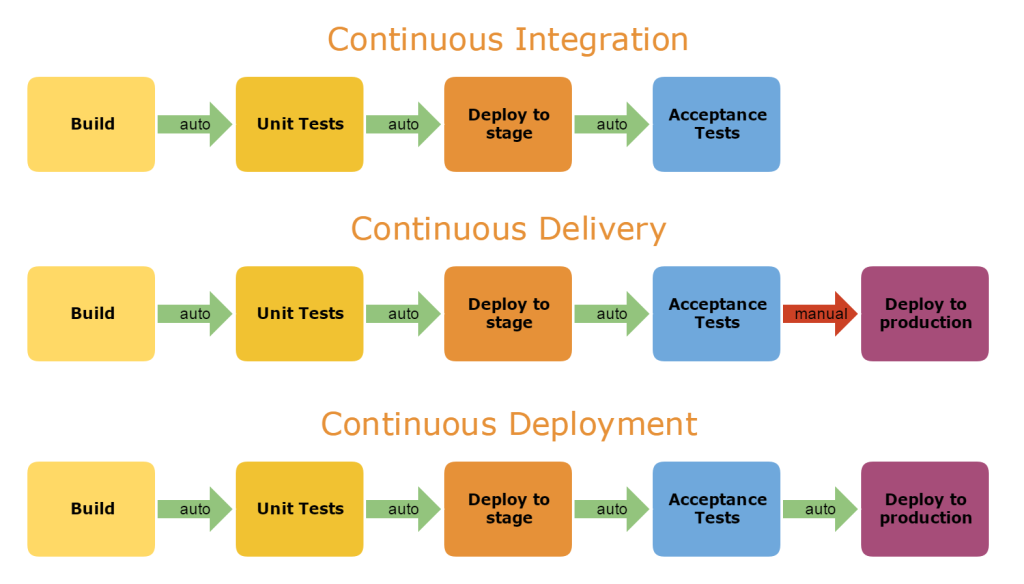
CI / CD 介紹
在開始介紹前,先帶大家了解幾個名詞,相信大家一定常常聽到別人說 CI / CD,
CI : Continuous Integration , 又稱 持續整合。
CD : Continuous Delivery / Continuous Deployment , 又稱 持續交付 / 持續佈署。

圖片來源 http://www.code-maze.com/wp-content/uploads/2016/02/ci-4-1024x584.png
詳細的定義在這裡我就不另外做介紹,培養大家 google 的能力 😃
CI / CD 的好處
CI 對團隊來講有非常多的好處,一個良好的 CI 能加速整個團隊的工作流程,而且 developer 不用擔心
push 後整個專案可能會掛掉。也因為持續的佈署與測試,可以在早期就發現程式的漏洞( 盡早修正 bug
,越晚發現付出的代價越高 😱 )。
透過 CI,可以為團隊帶來更好的溝通,也可以更容易的進行 Code Review ,提升整個工作團隊的效率,
減少不必要的手動流程 ( 自動化 ),developer 可以更專注的在開發程式。
CI 不只對 developer 有好處,也對管理者有好處,可以隨時監控目前整個團隊的工作流程以及品質。
該選擇哪一款 CI / CD 呢
因為這類工具很多,在這裡我挑幾個


該選擇哪一個呢 ?
基本上,還是要依照自己的的需求、技術、工作流程來選擇最適合你們團隊的。
但這篇文章的主角是 Jenkins 😄
Docker + Jenkins + Django + Postgres 設定
使用 Docker 基本教學 - 從無到有 Docker-Beginners-Guide 當作範例,
主要是 docker-compose.yml 裡面的設定,有兩種設定方式,
一種是將路徑同步到你的 host 本機,另一種是 Named volume。
可參考官網 volumes 設定方式 docker-short-syntax
方法一: 同步到你的 host 本機
可參考 jenkins_host
version: '3'
services:

    db:
      image: postgres
      environment:
        POSTGRES_PASSWORD: password123
      ports:
        - "5432:5432"
      volumes:
        - pgdata_jenkins_host:/var/lib/postgresql/data/

    api:
      build: ./api
      restart: always
      command: python manage.py runserver 0.0.0.0:8000
      ports:
        - "8002:8000"
      volumes:
        - ./workspace/workspace/demo/api:/docker_api
      depends_on:
        - db

    jenkins:
          build: ./jenkins
          restart: always
          ports:
              - "8080:8080"
              - "50000:50000"
          volumes:
              - ./workspace:/var/jenkins_home
volumes:
    pgdata_jenkins_host:
方法二: Named volume
可參考 jenkins_volume
version: '3'
services:

    db:
      image: postgres
      environment:
        POSTGRES_PASSWORD: password123
      ports:
        - "5432:5432"
      volumes:
        - pgdata_jenkins:/var/lib/postgresql/data/

    api:
      build: ./api
      restart: always
      command: python /var/jenkins_home/workspace/demo/api/manage.py runserver 0.0.0.0:8000
      ports:
        - "8002:8000"
      volumes:
        - api_data:/docker_api
        - jenkins_data:/var/jenkins_home
      depends_on:
        - db

    jenkins:
          build: ./jenkins
          restart: always
          ports:
              - "8080:8080"
              - "50000:50000"
          volumes:
              - jenkins_data:/var/jenkins_home
volumes:
    api_data:
    jenkins_data:
    pgdata_jenkins:
Docker + Jenkins + Django + Postgres 實戰教學
一樣一行指令啟動☺️
docker-compose up
直接瀏覽 http://localhost:8080/,會看到下圖

進入 jenkins container
cat /var/jenkins_home/secrets/initialAdminPassword

將得到的 password 貼到 Administrator password 即可,
再來是安裝套件,請依照自己的需求選擇套件,也可以都不要裝,
需要的時候再補裝套件😏

依照你選擇的套件決定安裝速度

設定你的帳號密碼

接著我們就可以開始了

Jenkins + GitHub Integration Plugin
整合 Jenkins + GitHub 😆
先點選左側的 管理 Jenkins

選擇 管理外掛程式

接著搜尋 GitHub Integration Plugin,如果你已經安裝則會出現在已安裝那邊

安裝完成後,點選左側的新增作業

建立一個專案稱為 demo

描述可以輸入對這專案的說明

選擇 Git , 這邊使用 public 的 REPO,
Docker 基本教學 - 從無到有 Docker-Beginners-Guide 教你用 Docker 建立 Django + PostgreSQL
( 後面會說明如何使用 private 的 REPO )

設定完畢之後,選擇馬上建置,你會發現他開始 build 了 😁

接著你可以到工作區看,你會發現已經把剛剛的專案順利 clone 下來了👍

接著建議將 api 重新啟動,然後進入 api container 執行必要的指令
python manage.py makemigrations musics
python manage.py migrate
python manage.py createsuperuser


執行完畢之後,我們就可以到 http://localhost:8002/api/music/ 瀏覽。

也可以設定遠端觸發建置

也就是設定一組 token,例如 twtrubiks,
當我輸入網址 http://localhost:8080/job/demo/build?token=twtrubiks 就會自動開始 build 。
Jenkins + GitHub Webhooks 實戰
聰明的你現在一定會問,這樣我每次 push 完,都要自己再去 jenkins build ,有夠麻煩 😑
能不能 push 之後,透過 Webhooks 讓 jenkins 偵測到,然後自動 build 呢 ❓
當然可以 😳
由於需要 https , 所以我們透過 ngrok 幫助我們完成,可參考 如何使用 ngrok
./ngrok http 8080
port 設定 8080 是因為 jenkins 的 port 為 8080

點選組態

找到建置觸發程序,並選擇 GitHub hook trigger for GITScm polling

接著到 Docker 基本教學 - 從無到有 Docker-Beginners-Guide 教你用 Docker 建立 Django + PostgreSQL
專案中設定 Webhooks ( 你可以直接 fork 這個專案去改 )

Payload URL 就是填入 ngrok 幫你產生的 https 的網址,記得要在網址後面補上 github-webhook,
例如範例的 https://65daeaf5.ngrok.io/github-webhook/

如果設定正確,會有一個綠色的小勾勾

這時候,你可以對 Docker 基本教學 - 從無到有 Docker-Beginners-Guide 教你用 Docker 建立 Django + PostgreSQL
專案 commit 後再 push,你會發現 jenkins 自動開始 build 了 😆

也可以點選左側的 GitHub Hook Log 觀看紀錄

Jenkins + BitBucket private repo 實戰
如果你是使用 private 的 REPO, 需要多設定 SSH KEY ,這裡使用 BitBucket 當作範例。
首先,進入你的 jenkins container 產生 ssh key ,可參考 generating-a-new-ssh-key。
如果還是不懂,也可參考 Git-Tutorials GIT 基本使用教學,或是直接看之前的影片教學
github 基本教學 - 從無到有,影片教學包含如何產生 SSH key。

cat /var/jenkins_home/.ssh/id_rsa.pub

到你的 BitBucket private repo 的地方設定

貼上剛剛的 id_rsa.pub

如果你貼上一個 private repository,你會發現會有紅色警告

這時候有兩種方法 Add Credentials
第一種

第二種 ( 安全一點 😛 )

如果設定正確,你會發現紅字消失了

Jenkins + Notifications - Send Email
管理 Jenkins -> 設定系統

找到電子郵件通知,並且設定,這邊使用 gmail 當作範例,
測設定完成後你也可以寄測試信看看設定有沒有正確 ☺️

如果你使用 gmail,然後一直寄不出去,你可以參考 使用-gmail-寄信---前置作業 的設定。
接著再回到專案的組態
選擇電子郵件通知

輸入建立失敗時,誰要收到 email 通知

Jenkins + Slack
這裡使用 Slack 當作範例 😊
之前我也有簡單整合過 Slack,
可參考使用Hubot建立屬於自己的機器人 (Build Your Own Robot With Hubot)。
安裝 Slack Notification Plugin

接著到你自己的 Slack ( 申請步驟這邊不介紹了 ),點選左邊 Channels 的 +

建立一個 channel

點選右上角齒輪 Add an app

搜尋 jenkins

Install

接著會有圖文教學教你如何將 Slack 整合進去 jenkins

要設定的有三個地方,分別為 Base URL、Integration Token、Chnnel

你的 Post to Channel

回到 Jenkins,左側管理 Jenkins,設定系統

找到 Global Slack Notifier Settings,將 Base URL、Integration Token、Chnnel 貼上去,
Integration Token 也有兩種方式設定
第一種

第二種 Integration Token Credential ID ( 使用這個安全一點☺️ )
Add Credential


可以點 Test Connection 測試看看是否設定正確,如果正確會顯示 Success 😁
接著再回到 jenkins 專案裡的組態

點選 建置後動作 並選擇 Slack Notifications

依照自己需求通知的做設定

接著設定完成,讓我們來試試看 😳
可以手動點選馬上建置或是如果你已經 GitHub Integration Plugin 直接 commit push 一次即可,
回到你的 slack 你會發現成功了 😆

軟體版本週期
既然都對 CI / CD 有基本的認識了,那麼你一定要再了解軟體版本週期。這個是什麼呢?我相信
大家一定常常聽導什麼 Alpha Beta 之類的,其實這就是指軟體版本的週期,以下我將簡單介紹他
的週期。
Alpha
Alpha( α )版本基本上就是測試版本,很多功能都未完善,因為是屬於軟體版本週期中的最初階
段。這階段通常會由開發者下去做測試。
Beta
Beta 版本是最早對外公開的軟體版本,由一般大眾協助測試,通常 Beta 版本包含所有的功能,但
可能會有一些已知的 bug,Beta 版本有時候也會作為測試市場對產品的反應。
Release Candidate
Release Candidate( 簡稱 RC ),通常這版本會成為最終產品候選的版本,這階段通常不會有嚴重
的 bug,有些開源軟體會推出 RC2,而 RC2 則會成為正式版本。
Release to Manufacting
Release to Manufacting( 簡稱 RTM ),這版本基本上是已經要上線了。
General availability
General availability( 簡稱 GA ),這階段軟體基本上已機上線了。
Job chaining in Jenkins
依照文章最開始的 CI / CD 介紹的圖,使用簡單 Build -> Deploy -> Test 的 workflow,
依照這個 workflow,我將介紹 Jenkins 的 Job chaining
Build / Delivery Pipeline Plugin
剛剛介紹了 Job chaining 的概念,接下來要推薦大家可以將 Job chaining 視覺化的套件。
Delivery Pipeline Plugin
Delivery Pipeline Plugin 要求 job 要有 downstream/upstream relationships (上下游的關係)。
Build Pipeline Plugin
Remote access API
建議看影片,實戰給大家看會比較有感覺 😁
可參考 Remote access API。
主要是我們可以透過 terminal 呼叫 API,達到幫我們 build 的功能。
如何取得自己的 User ID 以及 API Token ,請先點選右上角

設定 -> API Token

點選顯示 API Token 後,

溫馨小提醒 ❤️
以下使用 curl 來當做範例,如果你是 windows 或 Linux 用戶,
請自己安裝 curl,這邊就不再做介紹了☺️
官方範例
curl -X POST JENKINS_URL/job/JOB_NAME/build \
  --user USER:TOKEN \
  --data-urlencode json='{"parameter": [{"name":"id", "value":"123"}, {"name":"verbosity", "value":"high"}]}'
範例,假設 job 為 demo
curl -X POST http://localhost:8080/job/demo \
   --user twtrubiks:8d3215553ca9623300f4967827c61291
-d 參數說明
-d/--data , Send specified data in POST request.
--data-urlencode 參數說明
--data-urlencode , (HTTP) This posts data, similar to the other -d, --data options with the exception that this performs URL-encoding.
-u 參數說明
-u/--user <user[:password]> , Set user and password
範例
curl --user name:password http://www.example.com
curl -u user:password http://www.example.com
-X 參數說明
-X/--request The request method to use.
範例
curl -X POST http://www.example.com
如果在 terminal 中輸入後,什麼都沒發生,就代表成功了( 但通常應該都會有錯誤😅 ),
如果,你看到以下錯誤
....
<title>Error 403 No valid crumb was included in the request</title>
....

就代表你有啟動比較安全的機制 CSRF Protection( 預設是啟動的 )。
要如何解決呢? 請繼續往下看😊
CSRF Protection
主要是防止 CSRF 攻擊,
如果不知道什麼是 CSRF ,可參考我之前寫的 CSRF-tutorial 📝
管理 Jenkins -> 設定全域安全性

防範 CSRF 入侵預設有被打勾

把打勾取消,就可以用剛剛的方法了。
但是,如果我還是希望打勾防範 CSRF 入侵,那我該怎麼辦呢😬
這時候,必須先得到 Jenkins-Crumb
curl -s -u twtrubiks:8d3215553ca9623300f4967827c61291 http://localhost:8080/crumbIssuer/api/json

-s 參數說明
-s/--silent Silent mode. Don't output anything
然後再將 Jenkins-Crumb 的值帶進去,如下( 假設 job 為 demo )
curl -X POST http://localhost:8080/job/demo/build --user twtrubiks:8d3215553ca9623300f4967827c61291 -H "Jenkins-Crumb:6fbe69cd42a261330cb37e74af1ed1d1"

-H 參數說明
-H/--header Custom header
如果沒跳出任何資訊 ( 有跳訊息通常是有錯誤 ),就代表成功了👍

你可以回到你的 Jenkins ,你會發現他自動開始 build 了 😆
後記:
這次和大家介紹 Jenkins,相信大家一定覺得 Jenkins 超棒 😍 ,我也只介紹比較基本的功能,如果要全部介紹完,
要花好多時間 ( 默默研究中😅 )。如果你是沒有導入CI 的團隊,我會建議先導入幾個重要的部份就好,整個流程不一
定要完全的複製到你們的團隊上,可以一小部分一小部分慢慢導入,這樣整個團隊的反彈也不會那麼大。
最後大家可以朝下面這張圖的目標前進

圖片來源 https://chrisshayan.atlassian.net/wiki/spaces/my/blog/2013/07/23/4227074/Continuous+Delivery+Matrix
執行環境
- Mac
- Python 3.6.2
- windows 10
Reference
Donation
文章都是我自己研究內化後原創,如果有幫助到您,也想鼓勵我的話,歡迎請我喝一杯咖啡😆

License
MIT license