koalazak / Dorita980
Programming Languages
Projects that are alternatives of or similar to Dorita980
dorita980

![]()
Unofficial iRobot Roomba (i7/i7+, 980, 960, e5, 690, 675, etc) node.js library (SDK).
With this library you can send commands to your wifi enabled Roomba through the iRobot cloud API or directly from your LAN and integrate your roboot with your own Home Automation or IoT project.
See rest980 if you need a HTTP REST API interface.
Advice
If you enjoy dorita980 and it works nice for you, I recommend blocking the internet access to your robot to avoid the OTA firmware updates. New firmware changes can cause dorita980 to stop working. Blocking firmware updates can be performed using the parental control options on your router.
When a new firmware is published, you can come here to verify if dorita980 is still compatible. Once dorita980 is compatible you can temporarily enable internet access for your robot to get the firmware upgrade.
If you have firmware version 1.6.x click here to see the old documentation.
Features
- Compatible robots: all 600, 800, 900, e5 and i7/i7+ series with HOME app and Braava m6.
- Get your username/password easily.
- Auto discovery robot IP (optional).
- Local API control (from your LAN).
- Simplified Cleaning Preferences settings.
- Firmware 1.6.x compatible.
- Firmware 2.x.x compatible (latest serie 900 uses firmware v2, not v3).
- Firmware 3.2.x compatible (latest serie 800 uses firmware v3).
- See rest980 if you need a HTTP REST API interface to use dorita980 through it.
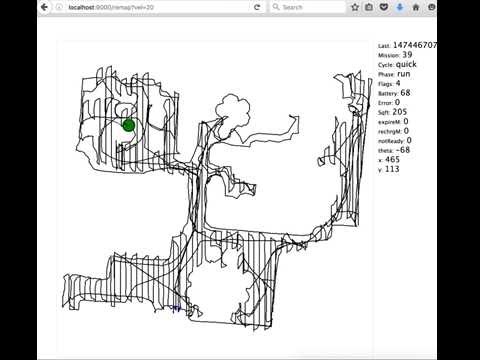
Video: Realtime cleaning map using dorita980 lib in rest980.
Supported Features by Firmware Version
| 1.6.x Local | 1.6.x Cloud | 2.x.x Local | 2.x.x Cloud | 3.x.x Local | |
|---|---|---|---|---|---|
| Clean/Start/Stop/Pause/Dock/Resume/CleanRoom | yes | yes | yes | pending | yes |
| Get Preferences | yes | yes | yes | pending | yes |
| Set Preferences | yes | yes | yes | pending | yes |
| Get x,y,d Position | yes | yes | yes | pending | - |
| Get Mission | yes | yes | yes | pending | yes |
| Get Mission number | no | no | yes | pending | yes |
| Get General Info | yes | yes | yes | pending | yes |
| Get Schedule | yes | yes | yes | pending | yes |
| Set Schedule | yes | yes | yes | pending | yes |
| Set CarpetBoost (performance, eco, auto) | yes | yes | yes | pending | - |
| Set Edge Clean | yes | yes | yes | pending | - |
| Set Cleaning Passes (auto, on, two) | yes | yes | yes | pending | - |
| set Always Finish | yes | yes | yes | pending | - |
| MQTT Custom events | - | - | yes | pending | yes |
| HTTP API | yes | yes | - | - | - |
| Discovery Robot IP | yes | - | yes | - | yes |
| Get BLID and Password | yes | - | yes | - | yes |
| Support multiples clients at the same time | yes | yes | no | pending | no |
Install
First you need node.js installed and then:
$ npm install dorita980 --save
Quick start via Local request on your LAN
You can control the robot from your local network.
Create myapp.js file with this content:
var dorita980 = require('dorita980');

var myRobotViaLocal = new dorita980.Local('MyUsernameBlid', 'MyPassword', '192.168.1.104'); // robot IP address

myRobotViaLocal.on('connect', init);

function init () {
  myRobotViaLocal.clean()
  .then(() => myRobotViaLocal.end()) // disconnect to leave free the channel for the mobile app.
  .catch(console.log);
}
Then install dorita980 using npm and run your program:
$ npm install dorita980 --save
$ node myapp.js
Examples
Pause the robot via Local request:
var dorita980 = require('dorita980');

var myRobotViaLocal = new dorita980.Local('MyUsernameBlid', 'MyPassword', '192.168.1.104'); // robot IP address

myRobotViaLocal.on('connect', init);

function init () {
  myRobotViaLocal.pause()
  .then(() => myRobotViaLocal.end()) // disconnect to leave free the channel for the mobile app.
  .catch(console.log);
}
Get robot week schedule
var dorita980 = require('dorita980');

var myRobotViaLocal = new dorita980.Local('MyUsernameBlid', 'MyPassword', '192.168.1.104'); // robot IP address

myRobotViaLocal.on('connect', init);

function init () {
  myRobotViaLocal.getWeek()
  .then((weekConfig) => {
    console.log(weekConfig)
    myRobotViaLocal.end()
  })
  .catch(console.log);
}
How to get your username/blid and password
(Needed for Cloud and Local requests)
You need to know your robot IP address (look in your router or scan your LAN network with nmap to find it). Or use the dorita980.getRobotIP() method.
Install dorita980 globally and then run the get-roomba-password command:
$ npm install -g dorita980
$ get-roomba-password <robotIP>
or clone the repo and then run the npm script:
$ git clone https://github.com/koalazak/dorita980.git
$ cd dorita980
$ npm install
$ npm run getpassword <robotIP>
or docker run command:
docker run -it node sh -c "npm install -g dorita980 && get-roomba-password <robotIP>"
Example Output:
$ npm install -g dorita980
$ get-roomba-password 192.168.1.103

Make sure your robot is on the Home Base and powered on. Then press and hold the HOME button on your robot until it plays a series of tones (about 2 seconds). Release the button and your robot will flash WIFI light.
Then press any key...
{ ver: '2',
  hostname: 'Roomba-xxxxxxxxxxxxx',
  robotname: 'Dorita',
  ip: '192.168.1.103',
  mac: '12:12:12:12:12:12',
  sw: 'v2.0.0-34',
  sku: 'R98----',
  nc: 0,
  proto: 'mqtt',
  blid: 'xxxxxxxxxxxxx' <---- username/blid
}
Password=> :1:1486937829:gktkDoYpWaDxCfGh <= Yes, all this string.
Use this credentials in dorita980 lib :)
Auto discover IP address for local request:
If you don't known which IP address to use in dorita980.Local() you can use dorita980.getRobotIP() to find it.
This process takes 1-2 seconds, so if you know the IP you can just use it explicity.
You need UDP brodcast enable in your network!
var dorita980 = require('dorita980');

dorita980.getRobotIP((ierr, ip) => {
  if (ierr) return console.log('error looking for robot IP');

  var myRobotViaLocal = new dorita980.Local('MyUsernameBlid', 'MyPassword', ip);

  myRobotViaLocal.getMission()
  .then((mission) => {
    console.log(mission);
  }).catch((err) => {
    console.log(err);
  });
});
You can also use .discovery method to get all the robots discovery data:
You need UDP brodcast enabled in your network!
var dorita980 = require('dorita980');

dorita980.discovery((ierr, data) => {
  console.log(data);
});
Will print:
{ ver: '2',
  hostname: 'Roomba-xxxxxxxxxxxxx',
  robotname: 'Dorita',
  ip: '192.168.1.103',
  mac: '12:12:12:12:12:12',
  sw: 'v2.0.0-34',
  sku: 'R98----',
  nc: 0,
  proto: 'mqtt' }
Local API
The library send commands directly over wifi to your robot. You dont need an internet connection.
dorita980.Local(blid, password, ip, firmwareVersion)myRobot.end()myRobot.getRobotState(waitForFields)myRobot.getPreferences()myRobot.setPreferences(newPreferences)myRobot.getMission()myRobot.getBasicMission()myRobot.getWirelessStatus()myRobot.getTime()myRobot.getBbrun()myRobot.getLangs()myRobot.getSys()myRobot.getWirelessLastStatus()myRobot.getWeek()myRobot.setWeek(newWeek)myRobot.getCloudConfig()myRobot.start()myRobot.clean()myRobot.cleanRoom(args)myRobot.cleanRoom(args) for multiple roomsmyRobot.pause()myRobot.stop()myRobot.resume()myRobot.dock()myRobot.setCarpetBoostAuto()myRobot.setCarpetBoostPerformance()myRobot.setCarpetBoostEco()myRobot.setEdgeCleanOn()myRobot.setEdgeCleanOff()myRobot.setCleaningPassesAuto()myRobot.setCleaningPassesOne()myRobot.setCleaningPassesTwo()myRobot.setAlwaysFinishOn()myRobot.setAlwaysFinishOff()myRobot.on('connect', callback)myRobot.on('close', callback)myRobot.on('offline', callback)myRobot.on('update', callback)myRobot.on('mission', callback)myRobot.on('state', callback)myRobot.publish('topic', rawJsonMessageAsString, callback)
Methods
end()
Close the connection to the robot. It's important if you want to send commands via the official mobile app via Local network. There's a maximum of 1 connection at any time in local network, so if your app is connected, the official mobile app only works via cloud access.
While dorita980 is connected, you can call other methods to send commands and listen for the events to get data. Just call the .end() method if you want. While dorita980 is connected, the official mobile app will only work via the cloud to send commands to your robot.
getRobotState(Array waitForFields)
Get the robot state but wait for the waitForFields fields before return.
The state object starts empty and the robot will add data over time.
myRobotViaLocal.getRobotState(['batPct', 'bbchg3']).then((actualState) => {
  console.log(actualState);
});
Full state should contain:
{ netinfo:
   { dhcp: true,
     addr: 4294967040,
     mask: 4294967040,
     gw: 4294967040,
     dns1: 4294967040,
     dns2: 0,
     bssid: '12:12:12:12:12:12',
     sec: 4 },
  wifistat: { wifi: 1, uap: false, cloud: 4 },
  wlcfg: { sec: 7, ssid: '123123123123123123123123' },
  mac: '34:34:34:34:34:34',
  country: 'US',
  cloudEnv: 'prod',
  svcEndpoints: { svcDeplId: 'v005' },
  localtimeoffset: -180,
  utctime: 1487103319,
  pose: { theta: 61, point: { x: 171, y: -113 } },
  batPct: 100,
  dock: { known: true },
  bin: { present: true, full: false },
  audio: { active: false },
  cleanMissionStatus:
   { cycle: 'none',
     phase: 'charge',
     expireM: 0,
     rechrgM: 0,
     error: 0,
     notReady: 0,
     mssnM: 2,
     sqft: 29,
     initiator: 'manual',
     nMssn: 324 },
  language: 2,
  noAutoPasses: false,
  noPP: false,
  ecoCharge: false,
  vacHigh: false,
  binPause: false,
  carpetBoost: true,
  openOnly: false,
  twoPass: false,
  schedHold: false,
  lastCommand: { command: 'dock', time: 1487103424, initiator: 'manual' },
  langs:
   [ { 'en-US': 0 },
     { 'fr-FR': 1 },
     { 'es-ES': 2 },
     { 'de-DE': 3 },
     { 'it-IT': 4 } ],
  bbnav: { aMtrack: 45, nGoodLmrks: 15, aGain: 12, aExpo: 9 },
  bbpanic: { panics: [ 8, 8, 8, 14, 8 ] },
  bbpause: { pauses: [ 15, 0, 0, 0, 0, 0, 0, 0, 0, 17 ] },
  bbmssn:
   { nMssn: 323,
     nMssnOk: 218,
     nMssnC: 99,
     nMssnF: 1,
     aMssnM: 35,
     aCycleM: 31 },
  bbrstinfo: { nNavRst: 41, nMobRst: 0, causes: '0000' },
  cap: { pose: 1, ota: 2, multiPass: 2, carpetBoost: 1 },
  sku: 'R98----',
  batteryType: 'lith',
  soundVer: '31',
  uiSwVer: '4582',
  navSwVer: '01.09.09',
  wifiSwVer: '20902',
  mobilityVer: '5309',
  bootloaderVer: '3580',
  umiVer: '5',
  softwareVer: 'v2.0.0-34',
  tz:
   { events: [ { dt: 0, off: -180 }, { dt: 0, off: -180 }, { dt: 0, off: 0 } ],
     ver: 2 },
  timezone: 'America/Buenos_Aires',
  name: 'robotNAme',
  cleanSchedule:
   { cycle: [ 'none', 'none', 'none', 'none', 'none', 'none', 'none' ],
     h: [ 17, 10, 10, 12, 10, 13, 17 ],
     m: [ 0, 30, 30, 0, 30, 30, 0 ] },
  bbchg3:
   { avgMin: 158,
     hOnDock: 6110,
     nAvail: 1280,
     estCap: 12311,
     nLithChrg: 233,
     nNimhChrg: 0,
     nDocks: 98 },
  bbchg: { nChgOk: 226, nLithF: 0, aborts: [ 4, 4, 4 ] },
  bbswitch: { nBumper: 55889, nClean: 300, nSpot: 47, nDock: 98, nDrops: 300 },
  bbrun:
   { hr: 211,
     min: 48,
     sqft: 566,
     nStuck: 17,
     nScrubs: 85,
     nPicks: 592,
     nPanics: 178,
     nCliffsF: 1532,
     nCliffsR: 2224,
     nMBStll: 0,
     nWStll: 1,
     nCBump: 0 },
  bbsys: { hr: 6522, min: 54 },
  signal: { rssi: -43, snr: 40 } }
getPreferences()
Get the full robot state but wait for the ['cleanMissionStatus', 'cleanSchedule', 'name', 'vacHigh', 'pose'] fields before returning.
Alias for getRobotState(['cleanMissionStatus', 'cleanSchedule', 'name', 'vacHigh', 'pose', 'signal'])
Waits for the 'signal' to make sure we have the full state object.
Use getRobotState(['cleanMissionStatus', 'cleanSchedule', 'name', 'vacHigh', 'signal']) without pose in models without navigation like E6 models.
setPreferences(newPreferences)
Partially overwrites the robot state to configure it.
var newPreferences = {
 binPause: false
};

myRobotViaLocal.setPreferences(newPreferences)
Response:
{"ok":null}
getMission()
With this you can draw a map :) in models with position reporting. Use getBasicMission() in robots without position reporting feature like E5 models.
{ cleanMissionStatus:
   { cycle: 'none',
     phase: 'charge',
     expireM: 0,
     rechrgM: 0,
     error: 0,
     notReady: 0,
     mssnM: 15,
     sqft: 0,
     initiator: 'localApp',
     nMssn: 323 },
  pose: { theta: -160, point: { x: 166, y: -11 } } }
getBasicMission()
Same as getMission but don't wait for pose information
{ cleanMissionStatus:
   { cycle: 'none',
     phase: 'charge',
     expireM: 0,
     rechrgM: 0,
     error: 0,
     notReady: 0,
     mssnM: 15,
     sqft: 0,
     initiator: 'localApp',
     nMssn: 323 }}
getWirelessStatus()
{ wifistat: { wifi: 1, uap: false, cloud: 4 },
  netinfo:
   { dhcp: true,
     addr: 3232235880,
     mask: 4294967040,
     gw: 3232235777,
     dns1: 3232235777,
     dns2: 0,
     bssid: 'c0:56:27:70:3b:fe',
     sec: 4 } }
getTime()
1487100141
getBbrun()
 { hr: 211,
   min: 48,
   sqft: 566,
   nStuck: 17,
   nScrubs: 85,
   nPicks: 592,
   nPanics: 178,
   nCliffsF: 1532,
   nCliffsR: 2224,
   nMBStll: 0,
   nWStll: 1,
   nCBump: 0 }
getLangs()
 [ { 'en-US': 0 },
   { 'fr-FR': 1 },
   { 'es-ES': 2 },
   { 'de-DE': 3 },
   { 'it-IT': 4 } ]
getSys()
{ bbrstinfo: { nNavRst: 41, nMobRst: 0, causes: '0000' },
  cap: { pose: 1, ota: 2, multiPass: 2, carpetBoost: 1 },
  sku: 'R98----',
  batteryType: 'lith',
  soundVer: '31',
  uiSwVer: '4582',
  navSwVer: '01.09.09',
  wifiSwVer: '20902',
  mobilityVer: '5309',
  bootloaderVer: '3580',
  umiVer: '5',
  softwareVer: 'v2.0.0-34',
  audio: { active: false },
  bin: { present: true, full: false } }
getWirelessLastStatus()
{ wifi: 1, uap: false, cloud: 4 },
  wlcfg: { sec: 7, ssid: '1234567890796857336364' }
getWeek()
Disable Monday and start every day at 10:30am
{ cycle: [ 'none', 'none', 'none', 'none', 'none', 'none', 'none' ],
  h: [ 17, 10, 10, 12, 10, 13, 17 ],
  m: [ 0, 30, 30, 0, 30, 30, 0 ] }
setWeek(newWeek)
Disable Sunday and start every day at 10:30am
var newWeek = {"cycle":["none","start","start","start","start","start","start"],"h":[10,10,10,10,10,10,10],"m":[30,30,30,30,30,30,30]}
myRobotViaLocal.setWeek(newWeek)
Response:
{"ok":null}
getCloudConfig()
prod
start()
{"ok":null}
clean()
{"ok":null}
cleanRoom(args)
cleanRoom is an alias for start - but with arguments. To clean a room - you need a structure similar to:
const args = {
  "pmap_id": "ABCDEFG123456FGKS789",
  "regions": [
    { "region_id": "5", "region_name": "Hallway", "region_type": "hallway", "type": "rid"}
  ],
  "user_pmapv_id": "190917T20125Z"
};

myRobotViaLocal.cleanRoom(args);
{"ok":null}
The easiest way to find this information is to start a clean using the iRobot app and then call the getRobotState method and copy the lastCommand values from it. Using this you can derive the pmap_id, user_pmapv_id and regions data. Or looking into pmaps property in the state.
cleanRoom(args) for multiple rooms
By adding more regions to the regions array, a set of rooms will be cleaned.
At least from firmware Version 3.8.3 you can set the desired order, when cleaning multiple rooms by adding ordered = 1:
const args = {
  "ordered": 1,
  "pmap_id": "ABCDEFG123456FGKS789",
  "regions": [
    { "region_id": "5", "region_name": "Hallway", "region_type": "hallway", "type": "rid"},
    { "region_id": "0", "region_name": "living room", "region_type": "familiy room", "type": "rid"},
    { "region_id": "1", "region_name": "kitchen", "region_type": "kitchen", "type": "rid"}
  ],
  "user_pmapv_id": "190917T20125Z"
};

myRobotViaLocal.cleanRoom(args);
{"ok":null}
pause()
{"ok":null}
stop()
{"ok":null}
resume()
{"ok":null}
dock()
Note: before dock you need to pause() or stop() your robot.
{"ok":null}
Simplifications to set Cleaning Preferences:
This methods use setPreferences() with the correct flags for each setting.
setCarpetBoostAuto()
{"ok":null}
setCarpetBoostPerformance()
setCarpetBoostEco()
setEdgeCleanOn()
setEdgeCleanOff()
setCleaningPassesAuto()
setCleaningPassesOne()
setCleaningPassesTwo()
setAlwaysFinishOn()
setAlwaysFinishOff()
publish(topic, rawJsonMessageAsString, callback)
Just to experiment with raw commands using the MQTT client. Known topics are cmd and delta. But Experiment with other topics and message formats!
The delta commands tipicaly have the following json format:
{'state': newState}
The cmd commands tipicaly have the following json format:
{'command': command, time: Date.now() / 1000 | 0, initiator: 'localApp'};
For example to send a clean command:
let myCommand = {command: 'clean', time: Date.now() / 1000 | 0, initiator: 'localApp'};

myRobotViaLocal.publish('cmd', JSON.stringify(myCommand), function(e) {
  if(e) console.log('error', e);
});
Dont forget stringify the json message with JSON.stringify(rawJsonMessageAsString).
You can see undocument commands and preferences in this thread
Events
connect event
Emitted on successful Connection.
function () {}
Put your code inside this callback.
close event
Emitted after a disconnection.
offline event
Emitted when the client goes offline.
update event
Emitted every time the Robot publishes a new message to the mqtt bus.
function (data) {}
-
dataData published by the Robot
myRobotViaLocal.on('update', function (data) {
 console.log(data);
});
Will print:
{ state:
   { reported:
      { soundVer: '31',
        uiSwVer: '4582',
        navSwVer: '01.09.09',
        wifiSwVer: '20902',
        mobilityVer: '5309',
        bootloaderVer: '3580',
        umiVer: '5',
        softwareVer: 'v2.0.0-34' } } }
mission event
Emitted every emitIntervalTime milliseconds with the mission data. (util for mapping in models with position reporting)
function (data) {}
-
dataMission data withcleanMissionStatusandposestate properties.
var cleanMissionStatus = 300; // default is 800ms
var myRobotViaLocal = new dorita980.Local('MyUsernameBlid', 'MyPassword', '192.168.1.104', 2, cleanMissionStatus); // Note Firmware version.

myRobotViaLocal.on('mission', function (data) {
  console.log(data);
});
Will print each 300ms:
{ cleanMissionStatus:
   { cycle: 'none',
     phase: 'charge',
     expireM: 0,
     rechrgM: 0,
     error: 0,
     notReady: 0,
     mssnM: 15,
     sqft: 0,
     initiator: 'localApp',
     nMssn: 323 },
  pose: { theta: -160, point: { x: 166, y: -11 } } }
state event
Emitted every time the Robot publish a new message to the mqtt bus.
function (data) {}
-
dataFull robot state object
myRobotViaLocal.on('state', function (data) {
 console.log(data);
});
Will print the Full robot state!
Cloud API
Not implemented yet in Firmware 2.0.0. Help wanted!
Note for node.js v0.10 users
dorita980 is compatible with node.js > 4.0 But you can use the getpassword feature in node.js < 4.0 using --harmony flag like that:
$ node --harmony ./bin/getpassword.js "192.168.1.104"
Custom tls cipher
You can set ROBOT_CIPHERS environment variable to overwrite the cipher suit used in tls connection to the robot. Default is AES128-SHA256
$ ROBOT_CIPHERS=AES128-SHA node myscript.js