PoslinskiNet / Ember Testing Guide
Programming Languages
Projects that are alternatives of or similar to Ember Testing Guide

Introduction
There are so many areas to discover on the subject of testing in Ember's world. This guide covers topics such as: when to use different types of tests and the addons that can help you overcome common challenges. The guide presents the most common use-cases, challenges and answers that every developer may have when dealing with tests. It includes code examples that show you how to use proper strategies.
This guide has been designed to be a great starting point for every team wanting to begin their testing journey. Along the way, you will learn the best practices that improve your work and the efficiency of your team. It is also a great common source for all looking for standardization of testing practices.
OK, it's time to get your hands dirty with some tests!
Table of Contents
Fundamentals
Testing basics
Setup
Setting up your test environment
Classification
How to test in a variety of scenarios
Behaviour mimicking
AKA I’m not what I seem to be
Workflow
Write tests with pleasure, not pain
- Debugging
- Make sure that all assertions passed
- Keep the test setup slim
- Blueprints
- Avoid implementation lock-in
- Animations
- Check the flow
Refactoring
Improve readability
Superpowers
Swiss army knife
Why should I test?
In the beginning, writing tests may feel like a waste of time, but in fact, it will pay off in the future when your codebase grows. If your product operates for months or even years, it means that you have to do manual testing of your app every time you introduce changes to the code. It is not a problem if you have dedicated resources for that purpose, but in the end, a lot of the work that is repeatable, instead of being automated, is handled over and over, increasing the risk of introducing a mistake. We are just humans, after all.
Now imagine that our Team grows. A new member is not aware of every decision that the other developers made. They can break the existing code base and features. Then, there is a chance that a reviewer will miss this breaking change and move it to the production codebase if it is not well-tested.
Of course, tests are not the answer to every possible error in our application. However, they can significantly reduce the chances that the app gets broken over time. Also, they can bulletproof our most sensitive business processes - we make sure that the happy paths that are critical for our app remain operational. Finally, an important benefit is that we save time on manual testing. Our continuous integration can provide feedback before anyone can look at the code change.
Testing good practices
- Write the test first, then implement the chunk of code that is tested. That will define the component acceptance criteria. In this step, we should focus on the interface of our component (for instance). Your code is like a puzzle, that could be easily replaced or rewritten under the hood. The only part that should stay consistent is the public interface and behaviour.
- Follow Single Responsibility Principle in your implementation (https://en.wikipedia.org/wiki/Single_responsibility_principle). Let's assume we change the implementation of a small chunk of code. Only the tests related to this code can break. We can easily fix all the problems instead of looking at huge parts of a code that can interact with our changes. It also reduces the changes in the codebase. This simplifies tracking those changes for your teammates as well as the merging process in general.
- Keep the setup as tiny and as explicit for each test as possible. Only use global before/after setup when it is shared across all tests in an individual file. This approach speeds up the process of writing tests, because you don’t have to worry about the “global” setup of your suite. You can focus on the “local” setup. Since you are not wasting resources when you don’t have to, your test suite may also run faster.
- Make sure you have tested all cases without false-positive effect. Broken implementation can't pass the tests, but we could still end up with false positive tests if we don't have enough test cases.
- Avoid using non-explicit dependencies like not publicly visible/defined dependencies of your code. For example, our component shouldn’t rely on service objects that are globally injected in the application. They should be self-contained and independent. It allows us to avoid difficult debugging process and stay aware of the proper setup of the application. Avoiding coupling is the way to go, but sometimes you need to rely on other things. If you do so, try to be as transparent for other developers as possible.
Classification of tests
In general, in terms of frontend development, tests can be split into the following categories:
- Manual tests - they verify critical scenarios, sometimes referred to as acceptance criteria. They require a human effort to check if a feature is working as expected.
- Acceptance tests - these automated tests check the whole application behaviour. They are similar to manual tests. They are, however, usually more time consuming at the beginning of a project compared to later on when developers have examples they can follow.
- Integration tests - these are lighter than acceptance tests. They usually test integration between multiple parts of the application. For instance, they might test the interaction between a component and the service it relies on. We are focusing on the behaviour of the given component without knowing how it is implemented underneath.
- Unit tests - these automated tests are the fastest and are coupled with the implementation. If we change our implementation in a way that affects the inner or outer interface, the corresponding test should fail.
It is worth noting that there are subcategories available within the groups above, for instance:
- Visual tests - which can be automated and detects breaking changes in terms of the visual aspects of our application. Usually works on comparison of expected design of the application - a past screenshot is compared to the state of the application after changes were introduced.
There is a pretty good classification chart that describes the relationship between the cost of each type of test in correlation to business value:
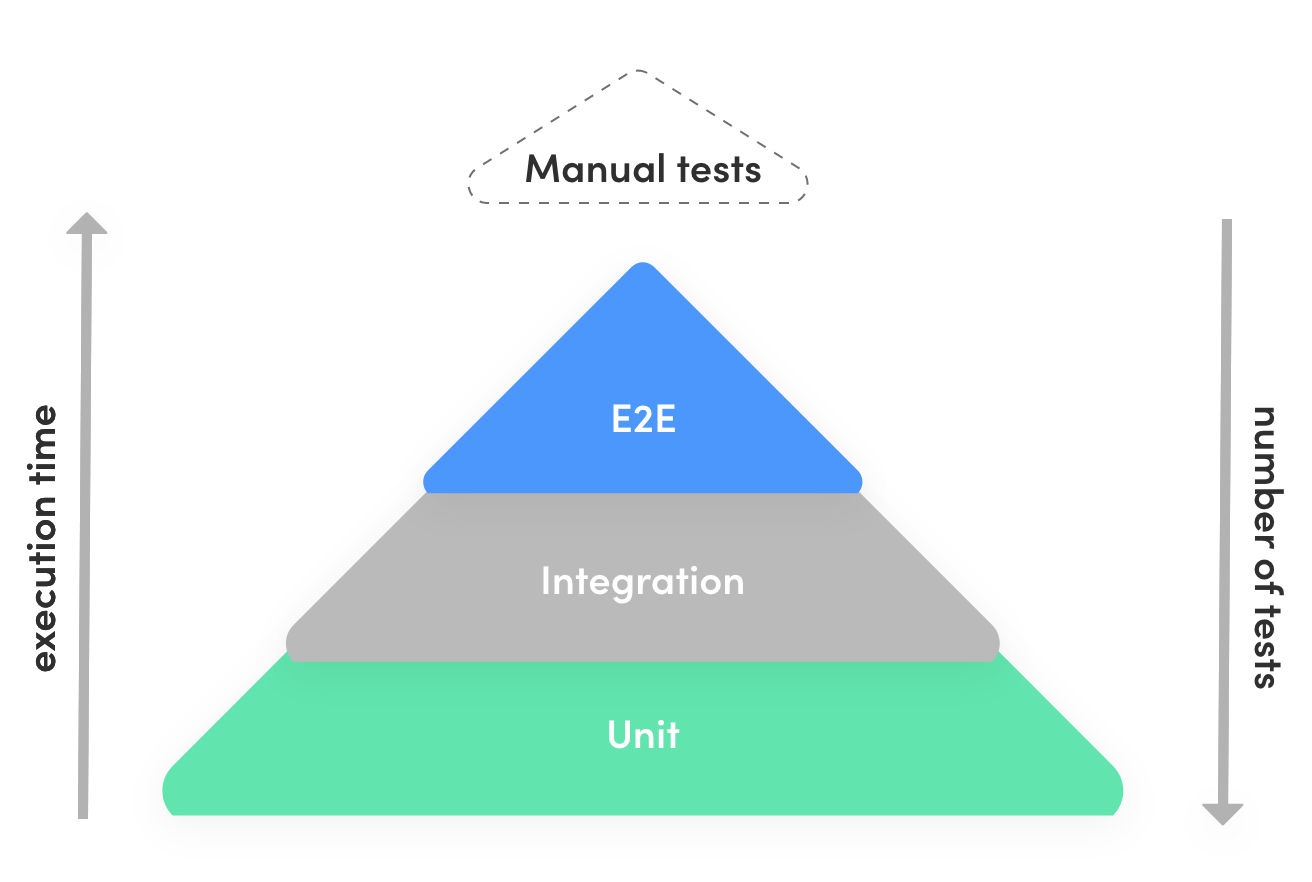
Learn more about testing classification and Testing Pyramid: https://dzone.com/articles/testing-triangle-circle-and
How to run tests
A few useful commands that you should know:
// run the suite in the terminal
$ ember test

// run the suite in the terminal in watch mode - you can also inspect the app in that mode
$ ember test -s

// filter the test suite and running only the tests that match the filter
$ ember test -f 'some string'
Also, by default, the test runner is available in /tests tab of your app: http://localhost:4200/tests.
However, when you visit that URL, your tests would be running in a development environment instead of testing, which has subtle differences that could lead to incorrect test results.
Fake backend
Let's write a simple backend for our app so we can test it easily and we don't have to wait for the real backend to be up and running. We can also decouple our client app test suite from another application. The other upside of such an approach is that we document how the backend should work. We can send such definition to backend devs so they can align their work with our code.
When API devs implement a complete solution based on our fake backend, everything should work the same. Our app can just use the API in the production without further adjustments.
Let's use the ember-cli-mirage addon to make our fake backend:
$ ember install ember-cli-mirage
We will set up the simplest possible endpoint to return some users for us via /api/authors:
// mirage/config.js
export default function() {
  this.namespace = 'api';

  this.get('/authors', () => {
    return {
      authors: [
        {id: 1, name: 'John'},
        {id: 2, name: 'Doe'}
      ]
    };
  });
}
Make sure that your application adapter has the namespace property set:
namespace: 'api'
If we want to use Mirage in our test, we need to set it up in each test. For instance, in case of integration tests, it can look like this:
import { module } from 'qunit';
import { setupRenderingTest } from 'ember-qunit';
import { setupMirage } from 'ember-cli-mirage/test-support';

module('Integration | Component | FindRecord', function(hooks) {
  setupRenderingTest(hooks);
  setupMirage(hooks);
  // ....
})
Mirage contains a lot of cool features, such as delaying responses, dynamic paths, customized responses, scenarios, factories, and many more.
More about Mirage: https://www.ember-cli-mirage.com
Unit tests
This type of test has a strong connection to our implementation, especially in terms of the public contract of our classes/functions etc. With that said, by changing the interface of our unit tested implementation, it should usually cause a test fail.
We only focus on the atomic part of the application, for instance, single component/service/helper etc. and how it changes or maintains its state.

Let's generate a service test for our theme manager service:
$ ember generate service-test theme-switcher
A sample service that switches the theme could look like this:
// app/services/theme-switcher.js
import Service from '@ember/service';
import { tracked } from '@glimmer/tracking';

export default class ThemeSwitcherService extends Service {
  @tracked darkMode = false;

  toggleDarkMode() {
    this.darkMode = !this.darkMode;
  }
};
Here is a test for the service:
// tests/unit/services/theme-switcher-test.js
import { module, test } from 'qunit';
import { setupTest } from 'ember-qunit';

module('Unit | Service | Theme switcher', function(hooks) {
  setupTest(hooks);

  test('should switch dark mode on & off', function(assert) {
    const themeManager = this.owner.lookup('service:theme-switcher');

    // default
    assert.equal(themeManager.get('darkMode'), false);

    themeManager.toggleDarkMode(); // first run
    assert.equal(themeManager.get('darkMode'), true);

    themeManager.toggleDarkMode(); // second run
    assert.equal(themeManager.get('darkMode'), false);
  });
});
By accessing public interface, we are just checking if its inner implementation interacts with a public property that can be used within the application.
More info: https://guides.emberjs.com/release/testing/unit-testing-basics/
Integration tests
We can imagine an integration test (aka components test) as something between unit and acceptance tests. On the one hand, we need to follow the interface (of a component in the given case). On the other hand, we focus on the behaviour of the component after rendering or, even better, interacting with it.
Let's generate a component test for our user-details component:
$ ember generate component-test user-details
A sample component that prints info about our user and the test for it can look as follows:
<!-- app/components/user-details/template.hbs -->
{{@user.name}} | Tasks: {{@user.tasks.length}} | Comments: {{@user.comments.length}}
// tests/integration/component/user-details-test.js
import { module, test } from 'qunit';
import { setupRenderingTest } from 'ember-qunit';
import { render } from '@ember/test-helpers';
import hbs from 'htmlbars-inline-precompile';

module('Integration | Component | user details', function(hooks) {
  setupRenderingTest(hooks);

  test('it renders', async function(assert) {
    assert.expect(1);

    this.set('user', {
        name: 'John Doe',
        tasks: { length: 5 },
        comments: { length: 3 }
    });

    await render(hbs`<UserDetails @user={{this.user}}/>`);

    assert.dom(this.element).hasText('John Doe | Tasks: 5 | Comments: 3');
  });
});
Another example could be a data provider component mixed with presentation component.

Let's create 2 components:
CommentsProvider will be responsible for comments data:
// app/components/comments-provider/component.js
import Component from '@ember/component';

export default class CommentsProvider extends Component {
  get comments() {
    return ['It was great', 'Epic!', 'Congratulations m8'];
  }
}
<!-- app/components/comments-provider/template.hbs -->
{{yield comments}}
The CommentPresenter component will take care of presenting a comment:
<!-- app/components/comment-presenter/template.hbs -->
<div class="comments__line">
  {{@comment}}
</div>
Test that can check if everything is working as expected, could look as follows:
// tests/integration/component/comments-provider-test.js
import { module, test } from 'qunit';
import { setupRenderingTest } from 'ember-qunit';
import { render } from '@ember/test-helpers';
import hbs from 'htmlbars-inline-precompile';

module('Integration | Component | comments-provider', function(hooks) {
  setupRenderingTest(hooks);

  test('it renders', async function(assert) {
    assert.expect(3);

    await render(hbs`
      <CommentsProvider as |comments|>
        {{#each comments as |comment|}}
          <CommentPresenter comment={{comment}} />
        {{/each}}
      </CommentsProvider>
    `);

    assert.dom(this.element).includesText('It was great');
    assert.dom(this.element).includesText('Epic!');
    assert.dom(this.element).includesText('Congratulations m8');
  });
});
More info: https://guides.emberjs.com/release/testing/testing-components/
Acceptance tests
This type of test shouldn't rely on any implementation details of our application, like the names of functions and variables. Typical acceptance tests should focus on user flow testing. It includes happy paths testing, or in a small scope, checking multiple components integrated together on specific a page.

A typical scenario that most apps needs to handle is the creation of a new user. After user creation, the app redirects to the listing on /users route.
We can use an Ember CLI command to create a new acceptance test:
$ ember generate acceptance-test add-user
A sample test can look as follows:
import { module, test } from 'qunit';
import { click, fillIn, visit } from '@ember/test-helpers';
import { setupApplicationTest } from 'ember-qunit';

module('Acceptance | users', function(hooks) {
  setupApplicationTest(hooks);

  test('should add a new user', async function(assert) {
    await visit('/users/new');
    await fillIn('input.name', 'John Doe');
    await click('button.submit');

    assert.dom('ul.users li').hasText('John Doe');
    assert.equal(currentURL(), '/users');
  });
});
In the example above, there are a lot of implementation details involved, such as specific querySelectors (input.name & button.submit). We will abstract such implementation details in the next section with page-objects, so our test can be even more descriptive.
You can find more info about test-helpers in the API Reference
To learn about acceptance tests, see https://guides.emberjs.com/release/testing/acceptance/
Stubs
We can stub methods that are heavy, require complex setup and usually are not the target of our tests. With stubs, we also improve their readability.
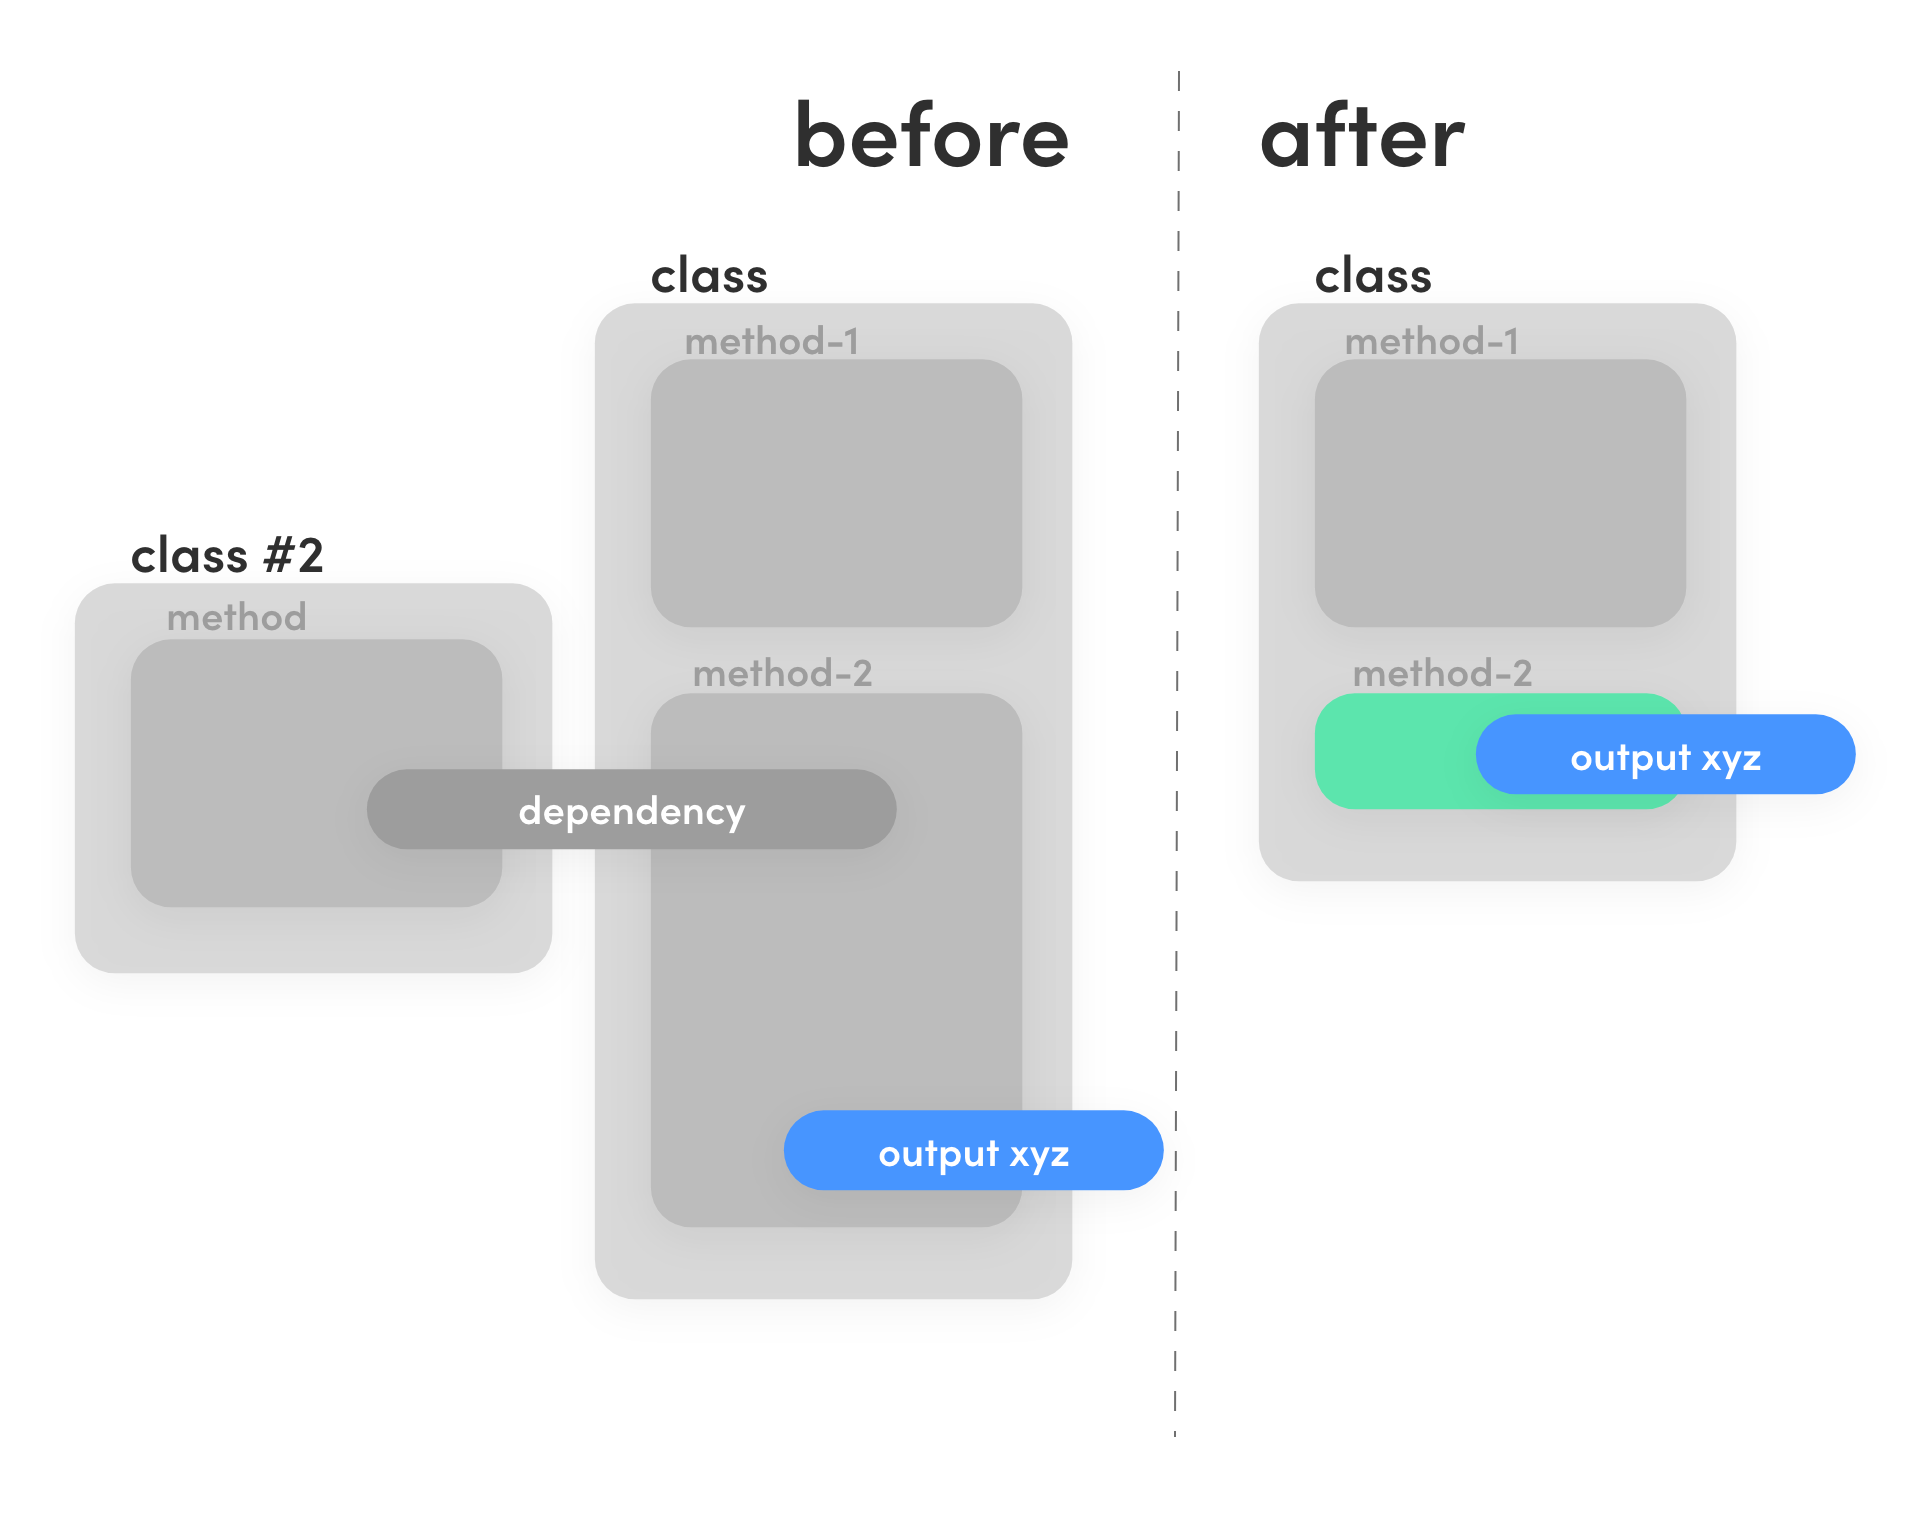
Let's assume that we have a service which has a complex method usersTeams used by our component. It is complex and has multiple dependencies. In this case, the setup would be quite complicated and would bloat our test suite. Our component test's goal is to test the component, not the service! usersTeams should be covered separately in the proper unit test of the service instead.
In this case, we can assume that the usersTeams service works fine because it has its own unit tests, so let's stub it. A stub mimics a function's behaviour by overriding it with simple result.
This is what we want to achieve:
One of the options is to use only the power of JavaScript. The other is to use dedicated libs that can provide a handy interface for stubs, such as Sinon.
import sinon from 'sinon';

const store = this.owner.lookup('service:store');
sinon.stub(store, 'usersTeams').returns(store.peekAll('user'));
Now, we can be sure of what happens when our component hits the usersTeams method. It will return our records with no further delay (if any are provided for example via Mirage).
https://sinonjs.org/releases/latest/stubs/
Mocks
Quite often in tests, we need only simple objects rather than instances of full implementation of a given class. A good example are models where we are using Mirage objects instead of Ember Data models. They differ from their inner implementation and it speeds up tests.
If we have Mirage in our application, we have a globally available server that can help us create new models.
const user = {
        id: '1',
        firstName: 'Test',
        lastName: 'User'
      };
const mockedUser = server.create('user', user);
You can even mock complete objects with Sinon (without Mirage) or use plain JavaScript objects:
https://sinonjs.org/releases/latest/mocks/
Spies
A Spy allows you to check if your method was called with proper params.
Example:
let setValuesFunction = sinon.spy();
this.set('setValuesFunction', setValuesFunction);

await doSomething();

assert.equal(setValuesFunction.calledWith([1, 2, 3]), true);
Side note: for simple cases, you can just use plain JavaScript by overwriting the function with a proper assertion inside. Sinon may be useful as an abstraction for complex cases that reduce the code bloatware.
https://sinonjs.org/releases/latest/spies/
Lookup & Register
Let's imagine a scenario where we want to test the behaviour of our users/ page which is accessible only for administrators. Our apps use ember-simple-auth for authentication as well as ember-can. We don't want to go through the whole login process in each acceptance test. It slows down the test and increases the risk of breaking many tests when only the login page is broken.
One of the good examples of mocking behaviour of the service thanks to lookup is authenticateSession helper provided by ember-simple-auth.
What can we do about it?
Usually, our logic relies on the state of service objects. We need to make sure that we stub a proper method or override a proper variable of the specific service object. How can we achieve that? We can use lookup. A lookup can find a reference to the specific factory for us so in a test, we can do something like this:
this.owner.lookup('service:store') // returns store
this.owner.lookup('component:my-component') // returns specific component
What if we don't have the service in place in our application but it is still needed? We can register our own service easily. We can do the same for other types such as components, controllers, helpers etc. How? By using .register method:
this.owner.register('service:my-service', EmberObject.create({})
this.owner.register('component:my-component' Component.create({}) // etc...
Debugging
QUnit brings a utility method that helps us examine and stop the execution of our test:
await this.pauseTest();
Every time we put it, we are able to see the intermediate state of the application inside the certain test. We can also use a browser console to do some extra checks and experiments.
If we want to run our code, we can just call resumeTest() in the console.
Make sure that all assertions passed
QUnit allows us to make sure that all assertions passed in the given test:
assert.expect(2);
expect is most useful when we want to check if a stubbed method has been called, and if it has been called with the correct arguments.
Sometimes, in such scenarios, we can use spy instead (for simpler objects).
Example:
module('when skipping', function() {
  test('fires the on-skip action', async function(assert) {
    assert.expect(1);

    this.set('onSkip', (step) => {
      assert.equal(step, this.steps[0])
    });

    await render(hbs`
      <IntroJs
        @steps={{this.steps}}
        @startIf=true
        onSkip={{action this.onSkip}}
      />
    `);

    await introJSSkip();
  })
});
Keep the test setup slim
Those hooks should be fulfilled with setup only for the most shared part of the given test file. If you need a setup that is very specific to only a single test in your test file, you should always put it into the specific test, rather than in the general setup (beforeEach/afterEach).
Otherwise, it can lead to many problems and reduce the readability of the test. Also, it makes it harder to change tests, because you can break some of them when you modify the body of those hooks.
To sum it up, avoid tight coupling between common part of the test suite setup and specific test setup.
Blueprints
You can save your time with blueprints. The available blueprints are listed here:
https://github.com/emberjs/ember.js/tree/master/blueprints
Some useful ones in terms of tests:
$ ember generate component-test component-name
$ ember generate route-test route-name
$ ember generate util-test util-tested-thing-name
$ ember generate acceptance-test acceptance-tested-thing-name
$ ember generate service-test service-name
$ ember generate helper-test helper-name
You can also create your own blueprints if many tests share the same setup.
Avoid implementation lock-in
One challenge of writing acceptance tests is that intentional changes to markup, such as renaming classes, can break the DOM selectors that our tests rely on.
We can overcome this by using tools like ember-test-selectors
First, we need to install the addon:
ember install ember-test-selectors
ember-test-selectors allow us to add a data attribute within our templates. The data attribute will work as a stable identifier in our tests. The cool thing about it is the fact, that we won't have to rely on ids, element types, or classes (simply DOM selectors) of our DOM elements which can change over time. Instead of that, we will use data attributes that will be enabled only in the testing environment (in the production build they are stripped). Even if we change the styling of our component it can still work without any extra changes in the test - and it is our goal.
After adding the ember-test-selectors addon, you are able to use data-test-* attributes in your templates:
<article>
  <h1 data-test-post-title data-test-resource-id="{{@post.id}}">{{@post.title}}</h1>
  <p>{{@post.body}}</p>
</article>
Once you've done that, you can use attribute selectors to look up the elements in a test:
// in Acceptance Tests:
find('[data-test-post-title]')
find('[data-test-resource-id="2"]')

// in Component Integration Tests:
this.querySelector('[data-test-post-title]').click()
this.querySelector('[data-test-resource-id="2"]').click()
More info on how to use them can be found here: https://github.com/simplabs/ember-test-selectors
Animations
When we need to make sure that our app finished all the animations, ember-test-helpers covers this case. You can use
await settled()
We can even get more information about the state of our app when animations are present - more info can be found here
Check the flow

Sometimes you need to verify the sequence of function calls in your code. There is a very handy tool available called steps!
Let's take a look at an example:
const displayResults = () => assert.step('displayResults');
const validateForm = () => assert.step('validateForm');
const prepareData = () => assert.step('prepareData');

const submitForm = () => {
  prepareData();
  validateForm();
  displayResults();
}

submitForm();

assert.verifySteps([
  'prepareData',
  'validateForm',
  'displayResults'
]);
You can also imagine async use cases that could benefit from steps.
Test helpers
Some libraries provide their own set of helpers that are very useful in our tests. So, when you choose an addon, it is a good practice to be at least aware if the add-on provides some of the test helpers by reviewing its readme.
Example:
For example, ember-power-select provides helpers like typeInSearch.
import {
  typeInSearch,
} from 'ember-power-select/test-support/helpers';

await typeInSearch('Test phrase');
This allows to easily set up the search phrase for the input. When you see that an addon misses a test helper that could be useful, don't hesitate to contribute to it and add it yourself!
Page objects
Page objects offer an extra layer for our acceptance tests that simplifies them, improves readability, and allows us to write tests more quickly. Page objects hide the implementation details behind an interface.
Let's install the addon:
$ ember install ember-cli-page-object
Let's take our previous acceptance test from above and clean it up with page object:
// tests/page-objects/users/new.js
import { create, visitable, fillable, clickable, text } from 'ember-cli-page-object';

export default create({
  visit: visitable('/users/new'),

  username: fillable('input.name'),

  submit: clickable('button.submit'),
  error: text('.errors')
});
We can also provide another page object for easy access to /users page details.
// tests/page-objects/users.js
import { create, visitable, fillable, clickable, text } from 'ember-cli-page-object';

export default create({
  path: '/users',

  firstUser: text('ul.users:first-child')
});
Now let's use it into our acceptance test:
// tests/acceptance/users-test.js
import { module, test } from 'qunit';
import { click, fillIn, visit } from '@ember/test-helpers';
import { setupApplicationTest } from 'ember-qunit';
import usersNewPage from '../page-objects/users/new';
import usersPage from '../page-objects/users';

module('Acceptance | users', function(hooks) {
    setupApplicationTest(hooks);
    test('my awesome readable login test', async function(assert) {
      await usersNewPage
        .visit()
        .username('John Doe')
        .submit();

      assert.equal(currentURL(), usersPage.path);
      assert.equal(usersPage.firstUser(), 'John Doe');
    });
});
It's much cleaner, isn't it?
More info: http://ember-cli-page-object.js.org
High-Level DOM Assertions
To clean up your tests, you should use qunit-dom add-on:
$ npm install --save-dev qunit-dom
# or
$ yarn add --dev qunit-dom
It allows you to change this:
assert.equal(this.querySelector('#title').textContent, "My header");
into this:
assert.dom('#title').hasText('My header');
It simplifies the most common calls with a very clear and descriptive interface.
Full documentation can be found here: https://github.com/simplabs/qunit-dom
The most useful part for us: https://github.com/simplabs/qunit-dom/blob/master/API.md
Type your code
It may not be connected with testing at a first glance, but using a type system for your code can be a kind of testing as well.
In the Ember ecosystem, we have an addon called ember-cli-typescript that adds easy support for TypeScript. We can write our code in .ts and then it will be automatically compiled into a compatible js code with a type check.
It can be very useful for unit-level tests, where part of the issues may only be connected to an incorrect type of the variable passed to the interface. Thanks to strong typing, you will get feedback from your code before the runtime.
More info can be found in an add-on repo: https://github.com/typed-ember/ember-cli-typescript
Time travelling
From time to time, we need to ensure that our code behaves differently depending on the actual date/timezone context. Let’s assume our component presents date in the custom date format and we want to make sure it will work well in any given month. We need to let our test runner know that we are time travelling to the given date. How to do it? We can use an addon that wraps Timecop library:
ember install ember-cli-timecop
More info on how to use it can be found here: https://github.com/jamesarosen/Timecop.js
You may also consider an alternative: https://github.com/Ticketfly/ember-mockdate-shim
Enforce locale
A similar case to the one above may happen in terms of the locale of our app - to enforce the proper locale we can use setupIntl or setLocale from Intl add-on.
More details with examples: https://github.com/ember-intl/ember-intl/blob/fde23d17ec7b3d7d8df602778a6c0c79c060e1fd/docs/testing.md
Accessibility / A11y
Our apps should also support accessibility features, for instance, screen readers. Luckily, there are tons of ready-to-use tools that we can use. Furthermore, there is a dedicated organization on which combines well-documented Ember a11y addons in one place: https://github.com/ember-a11y.
Ok, but is there anything that we can do right now to get some meaningful feedback about the current state of the accessibility in our application, without diving into all the documentation details? There is!
Let's install an addon that automatically checks for common issues like color contrast, missing form labels, and more:
ember install ember-a11y-testing
Now, in our acceptance test, we can use audit helper:
import a11yAudit from 'ember-a11y-testing/test-support/audit';
// ...
test('accessibility check of the our app root', async function (assert) {
  await visit('/');
  await a11yAudit();
  assert.ok(true, 'no a11y errors found!');
});
As a good starting point, I recommend beginning with the following article by Jen Weber: https://www.emberjs.com/blog/2018/06/17/ember-accessibility-and-a11y-tools.html
Engines
When you deal with ember-engines and you would like to test your engine code (e.g. components), you need to make sure that the test environment for your dummy application has access to the engine component. To make sure it does, you need to replace the default resolver with a proper engine resolver from an addon:
import engineResolverFor from 'ember-engines/test-support/engine-resolver-for';
To use it, you pass it as a param to your setup call. For instance, in case of unit tests, you replace the default...
setupTest(hooks);
... and use this instead:
setupTest(hooks, {
  resolver: engineResolverFor('your-engine-name')
});
Visual testing
Guess what - Ember got you covered again! Thanks to ember-percy and the Percy service, visual regression testing is extremely easy to integrate with our acceptance tests. All you need to do in order to create and compare visual snapshots is to add the following code within the specific test:
percySnapshot('homepage');
Tool prepares side-by-side comparison report if anything is different than desired snapshot:
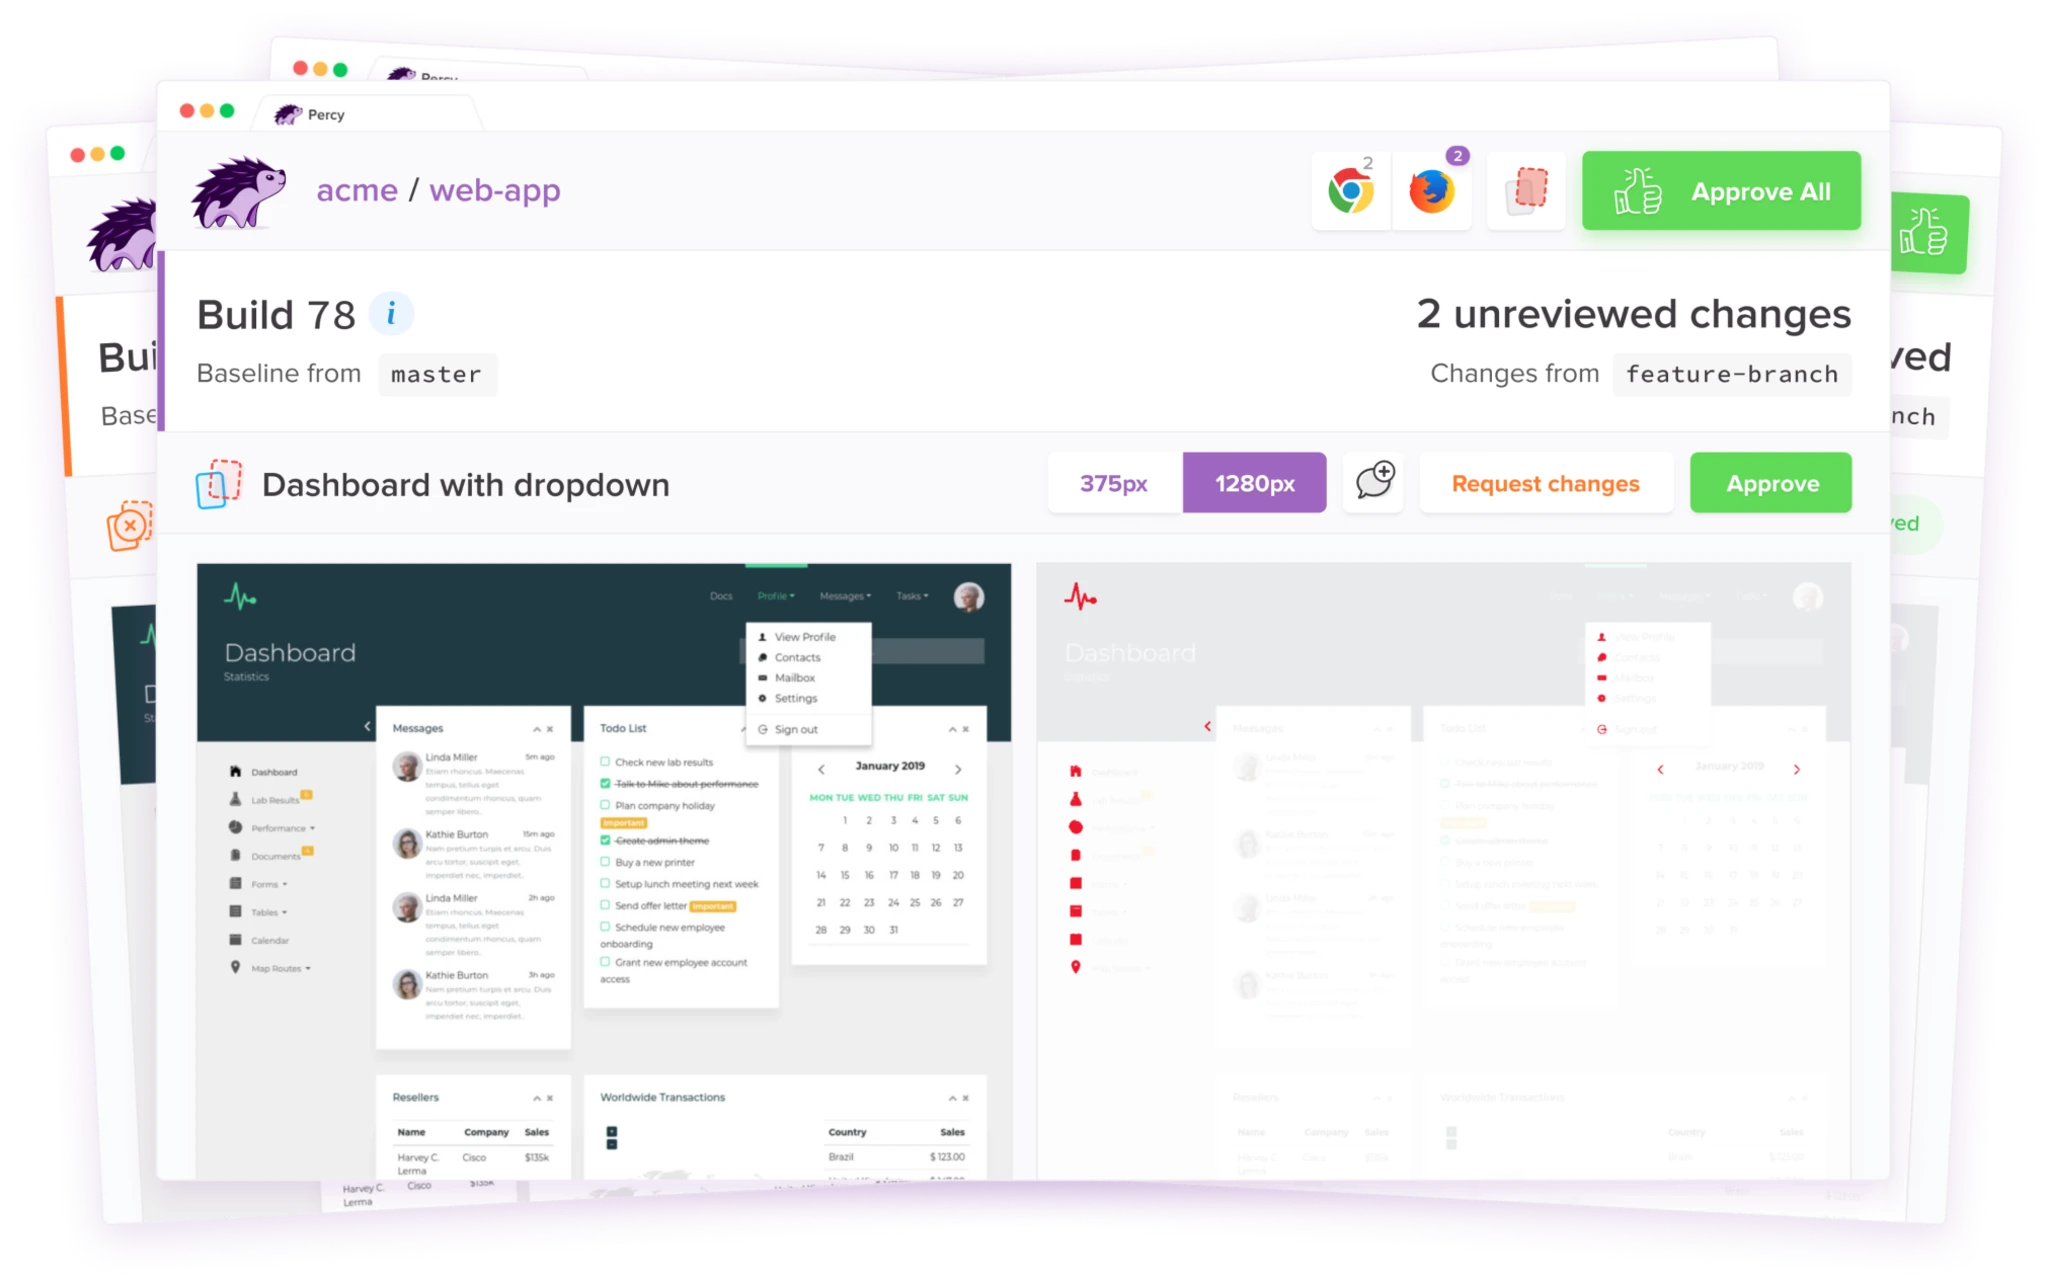
It also requires some additional setup related to the Percy service itself. To find out more, check out the Percy page.
You can check out the alternative ember-backstop described in the article.