Maps in EQEmu are used to do many things, we have different files that are responsible for different functions
File Structure
- maps/base/zoneshortname.map
- maps/nav/zoneshortname.nav
- maps/water/zoneshortname.wtr
- maps/path/zoneshortname.path (Deprecated)
Base Maps (.map)
- Base map files are responsible for a few core critical things
- Line of Sight (LOS) eg: Can this spell be casted if there is a wall or object between me and the target?
- Calculating Best Z The server is constantly doing Z calculations to keep NPC's on level plane, to prevent from dipping into the ground which was a much larger issue in the past
- Maps are genereated via Azone
Water Maps (.wtr)
- Water maps are responsible for one if not obvious, determining whether or not a client is inside water. Server side we determine different combat logic and pathing logic when a mob and/or client is in the water
- Water maps takes a point (x, y, z) and determines what type of region said point is marked as eg water, lava, normal
- Water maps are generated via Awater
Navigation Mesh (.nav)
- Navmesh is modern navigation mesh technology, we use it server side to determine shortest path to a target in NPC AI decision making processes, it's what the server uses to determine what NPC's can walk on and they will strictly adhere to this mesh when making pathing decisions. The end result is a very smooth path-making decisions
- Example of this in game: https://www.youtube.com/watch?v=ujtqipXAP1E
- Another explanation of Navmesh on Stack Overflow
Download
Source
What is Navmesh?
From [[Maps Introduction]]
- Navmesh is modern navigation mesh technology, we use it server side to determine shortest path to a target in NPC AI decision making processes, it's what the server uses to determine what NPC's can walk on and they will strictly adhere to this mesh when making pathing decisions. The end result is a very smooth path-making decisions
- Example of this in game: https://www.youtube.com/watch?v=ujtqipXAP1E
- Another explanation of Navmesh on Stack Overflow
File Structure
- maps/base/zoneshortname.map
- maps/nav/zoneshortname.nav
- maps/water/zoneshortname.wtr
- maps/volume/zoneshortname.wtr
- maps/project/zoneshortname.navprj
Creation Example
Lets walk through the process of creating a .nav file for Najena.
When you start map_edit you will be presented with this screen
![]()
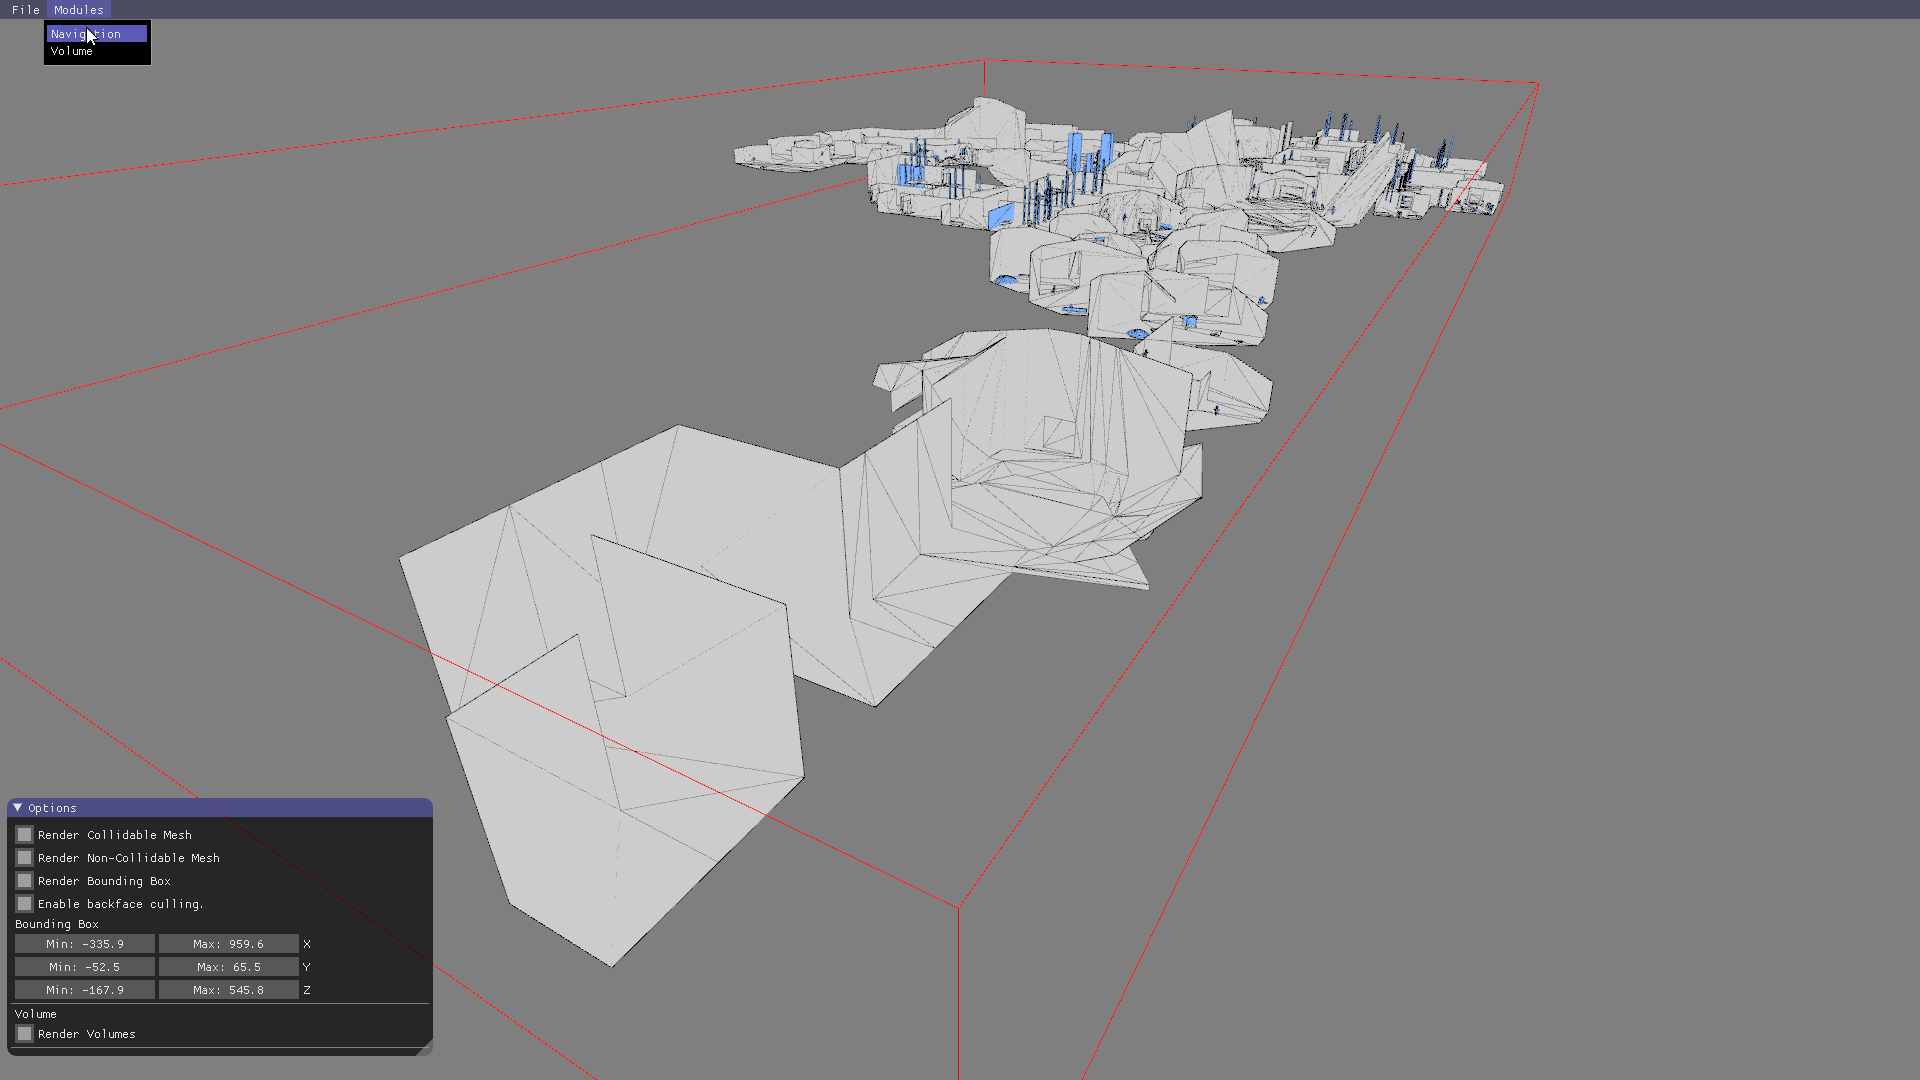
You will notice that no zone is loaded and the navigation module is not yet activated.
- Navigate to the file menu and select Open(CTRL + O) and type the zone you would like to open.


In this case we open Najena

From here you can view the collidable geometry of the zone in grey, the non-collidable geometry of the zone in light blue and surrounded by a red wire box that represents the bounding box of the zone.
Options Menu
- Quickly lets cover the options menu, navigate to File -> Options(ALT + O)

From here you see various options:
- Render Collidable Mesh A checkbox that controls whether the grey geometry is drawn.
- Render Non-Collidable Mesh A checkbox that controls whether the light blue geometry is drawn.
- Render Bounding Box A checkbox that controls whether the bounding box is drawn.
- Enable Backface Culling A checkbox that controls whether polygons facing away from the camera are drawn. (See example below)
- Bounding Box Six sliders that let you control the bounding box used by this zone, you can CTRL+Click on the values to be able to manually type in a value.
- Render Volumes A checkbox that controls whether EQG volumes (watermaps) are rendered (s3d volumes/watermaps are never rendered).

This is a visual example of backface culling enabled which proves useful for being able to see in zone detail for some indoor zones.
- Next we need to enable the Navigation module. Navigate to the Modules menu and select Navigation.
- Now that navigation is enabled you will see Navigation and NavMesh properties windows.
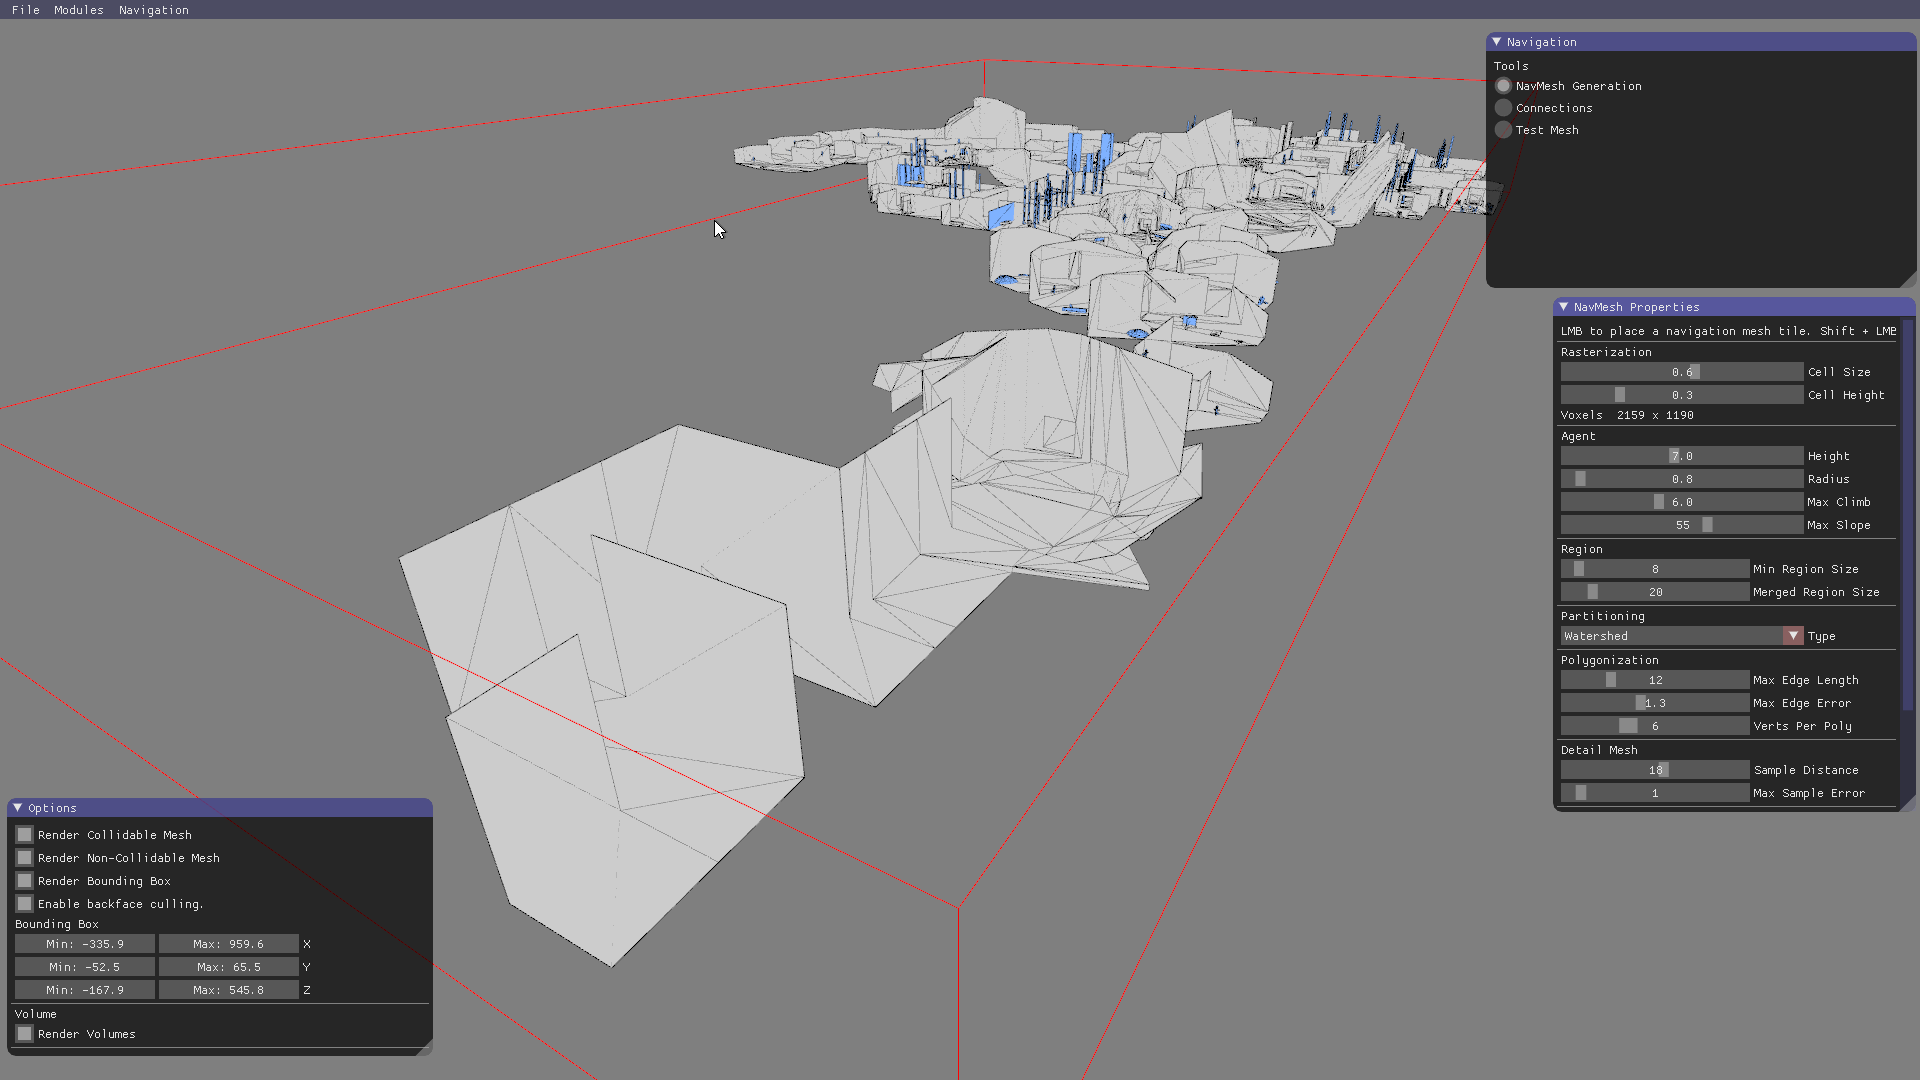
Modes
The tools let you switch between three different modes of operation
- NavMesh Generation
- Connections
- Testing
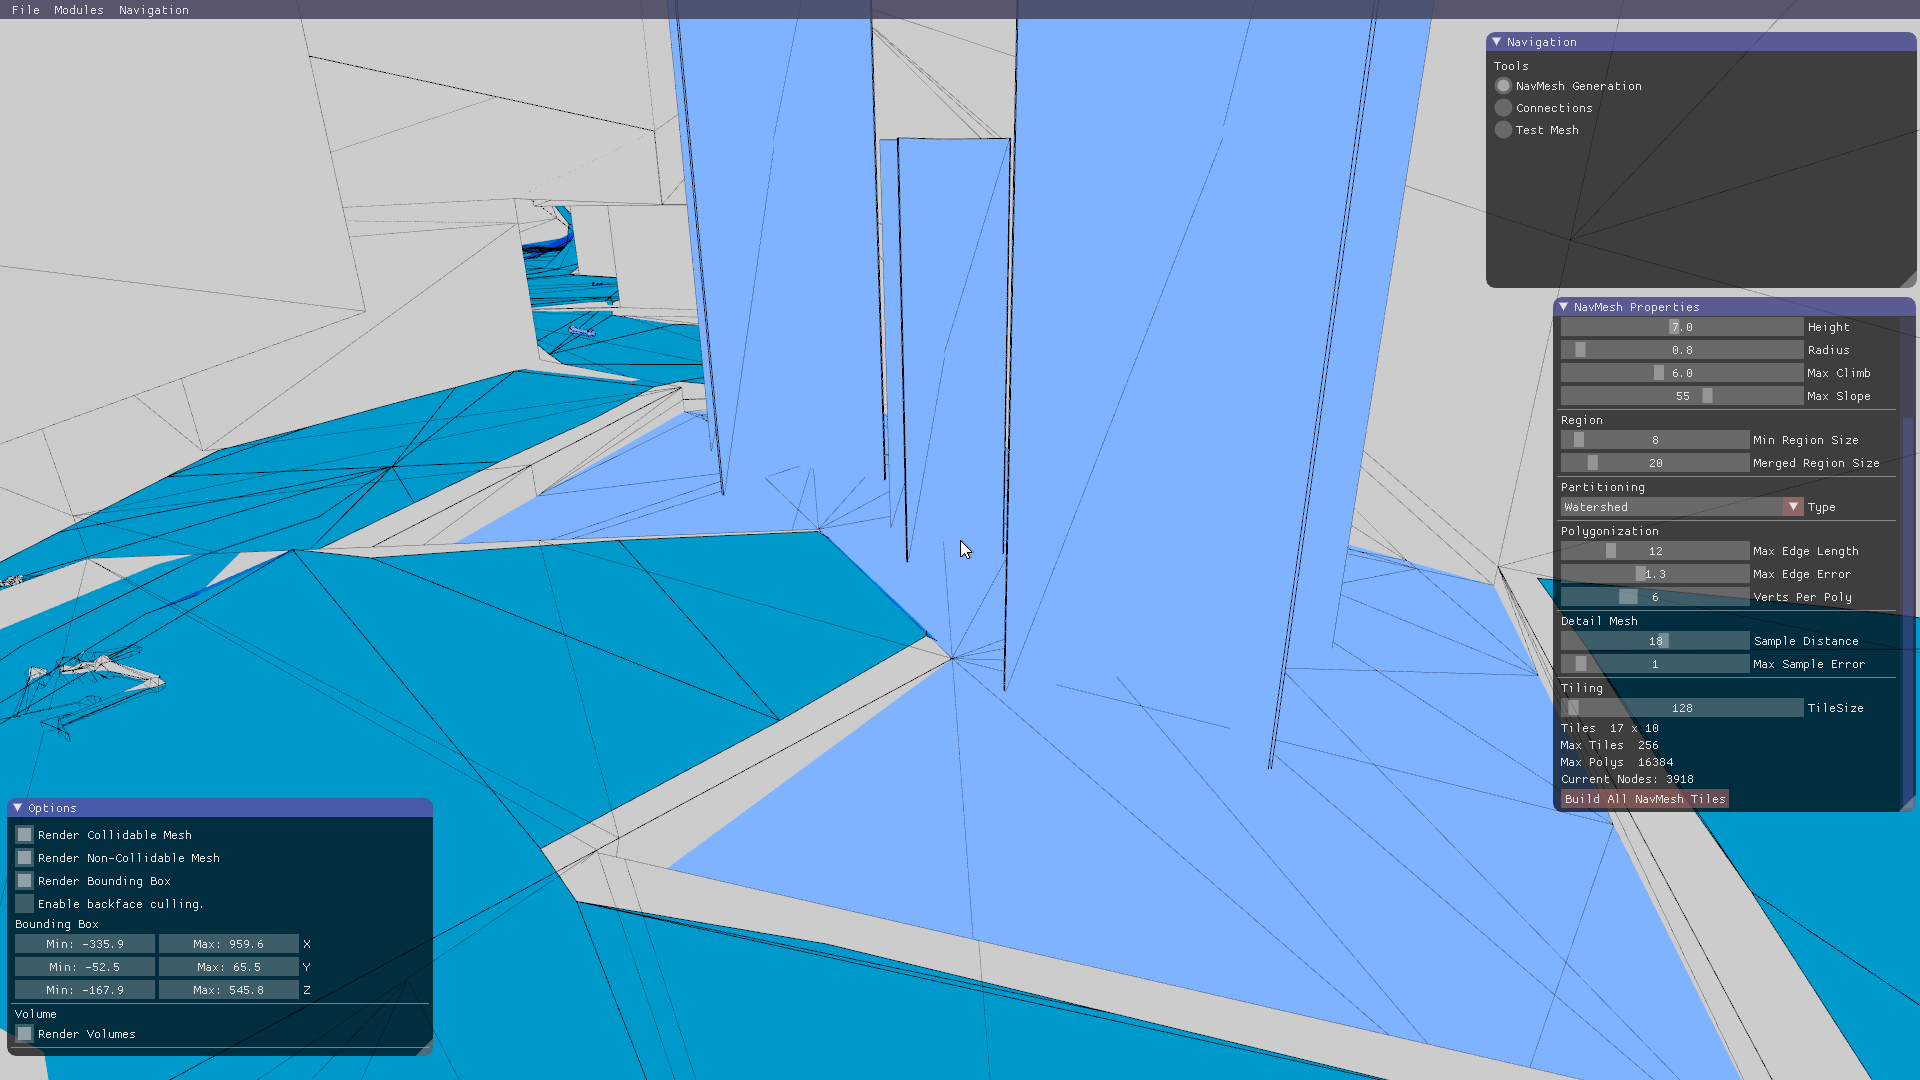
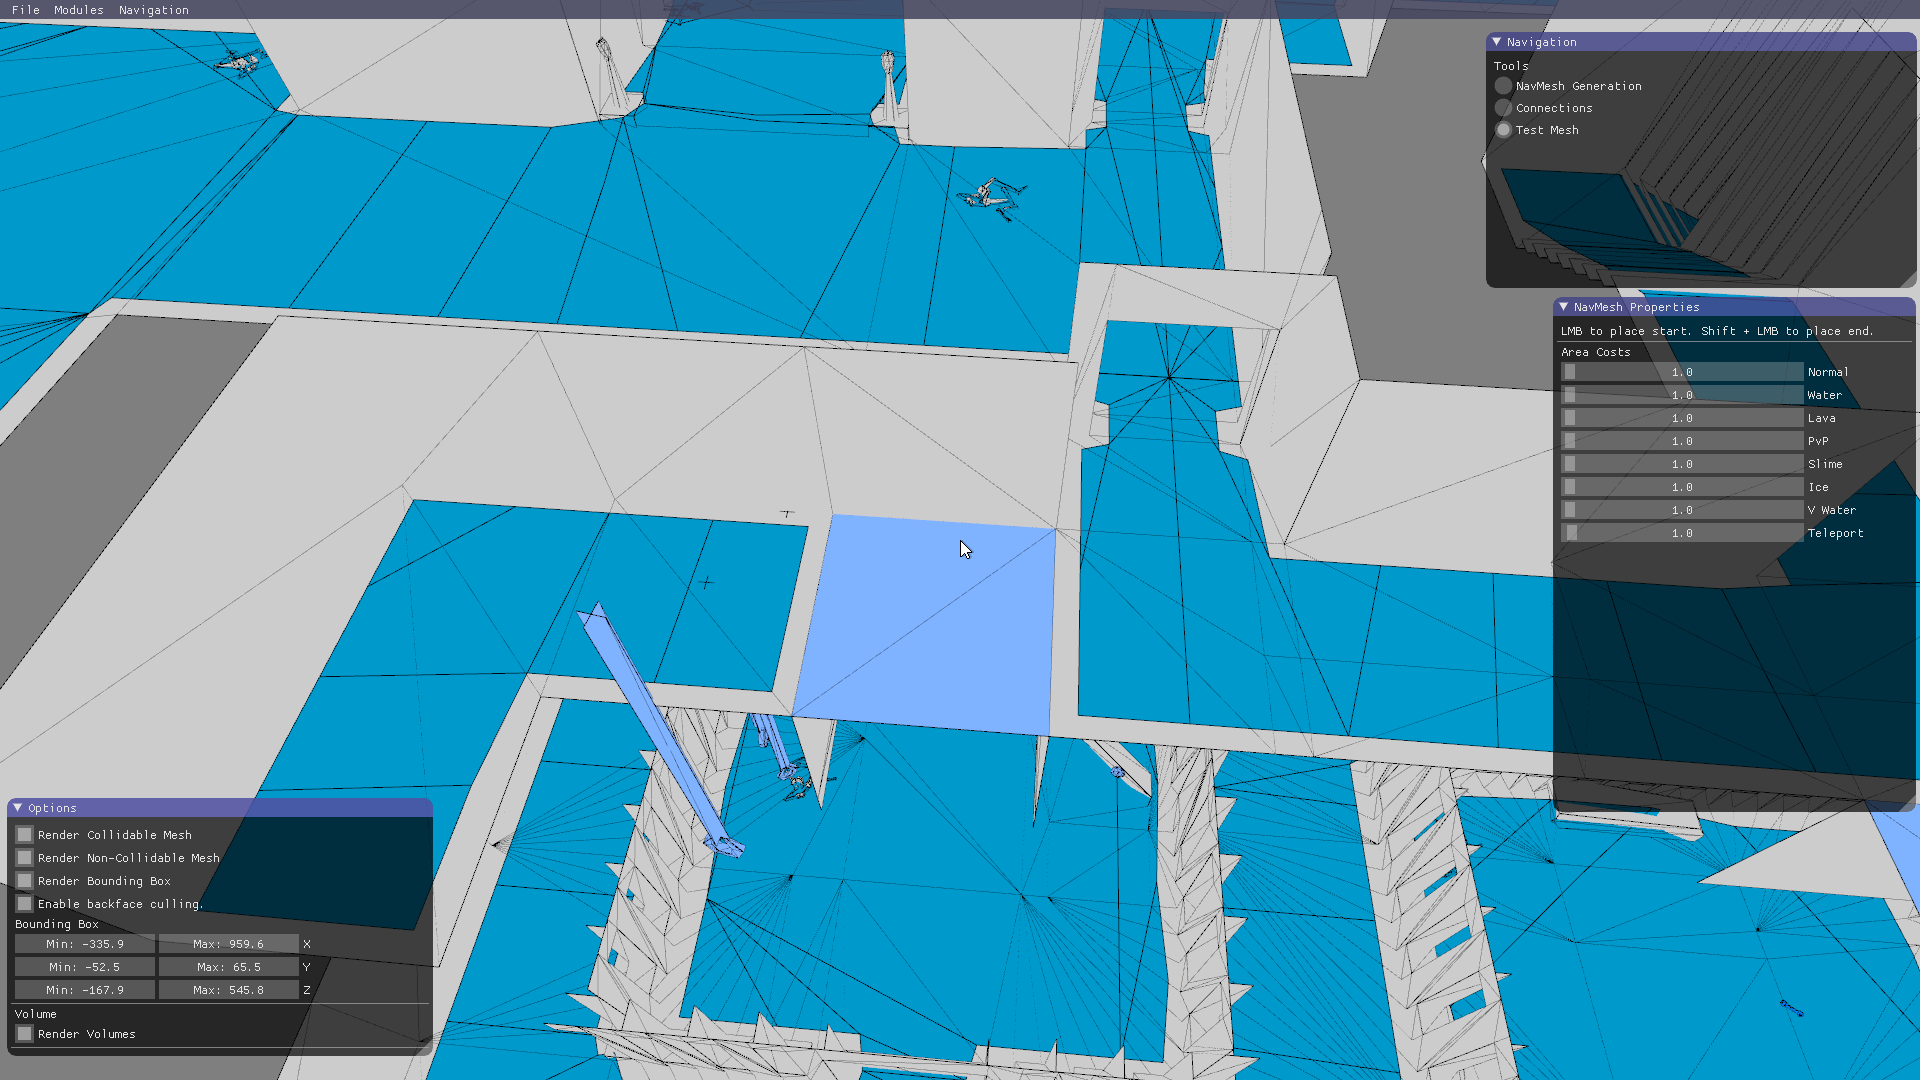
Lets generate an initial NavMesh, scroll to the bottom of NavMesh Properties window and click on Build All NavMesh Tiles.
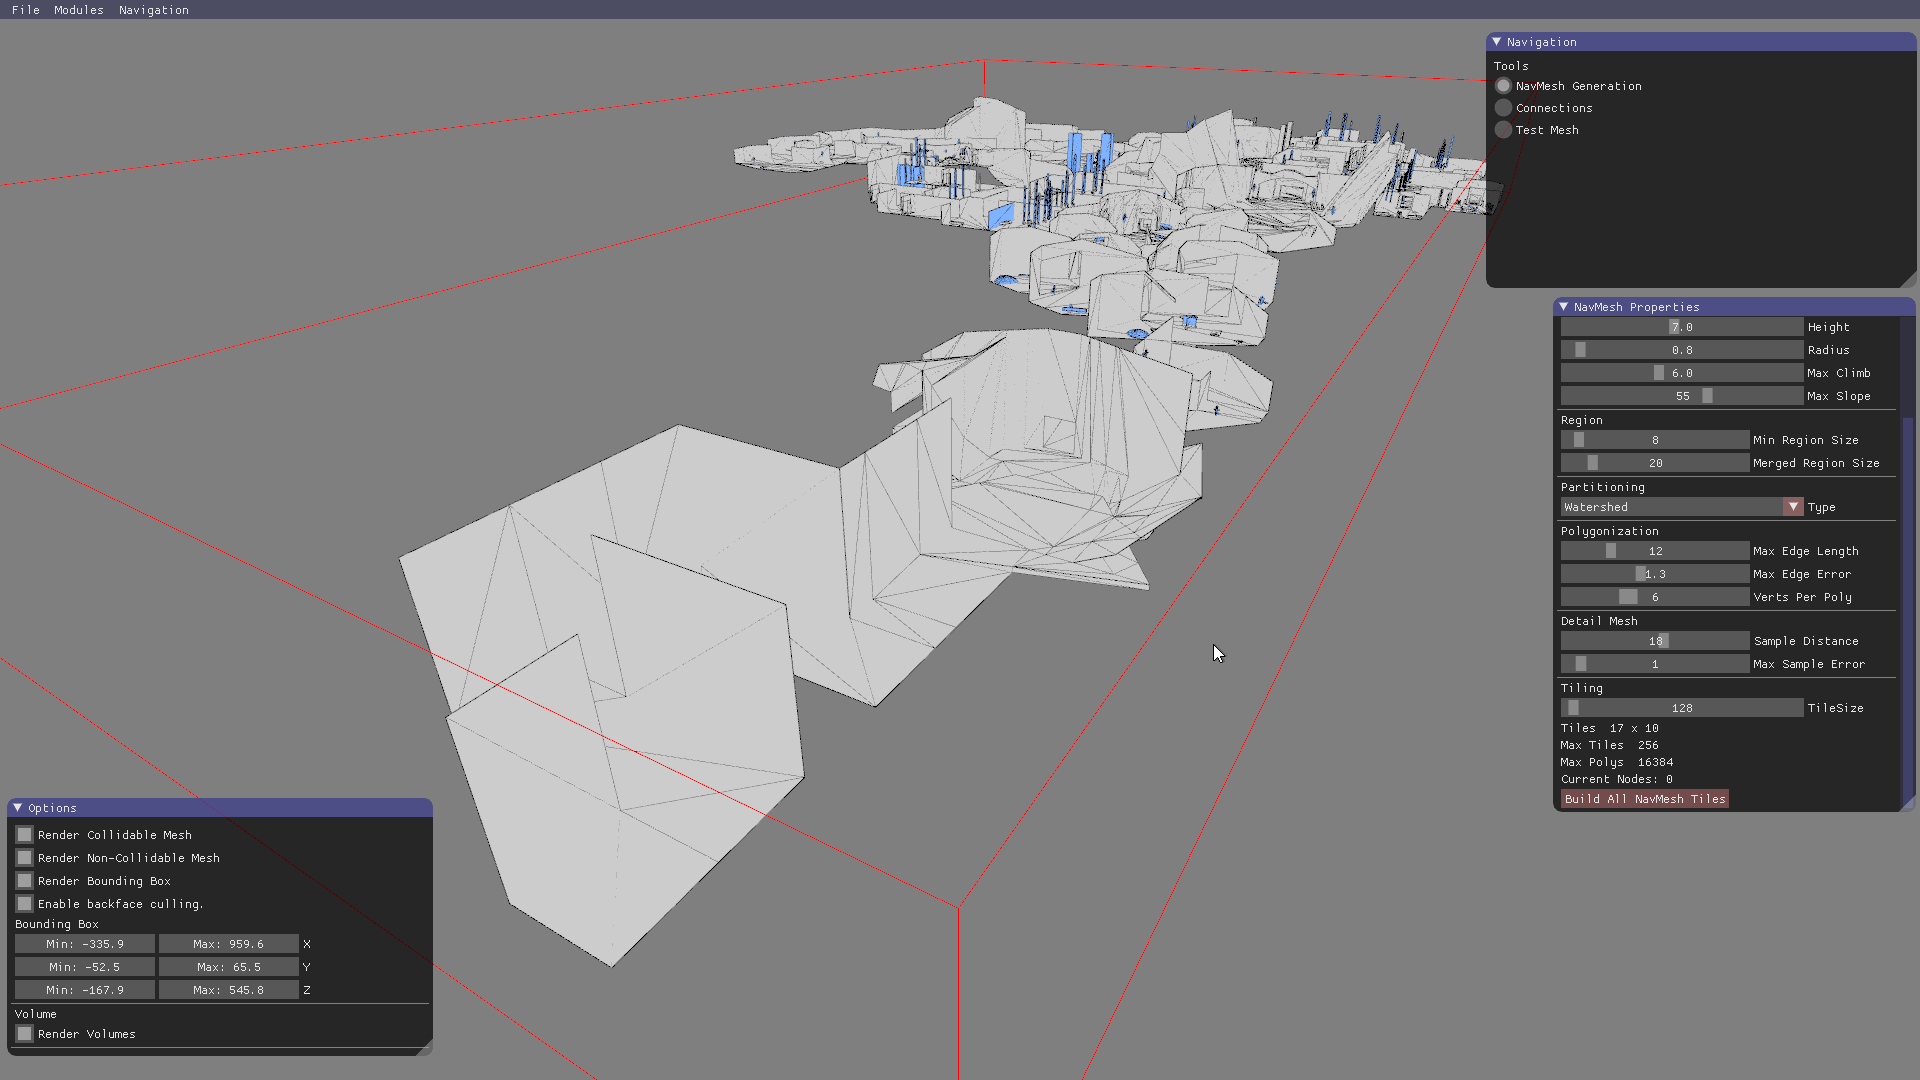
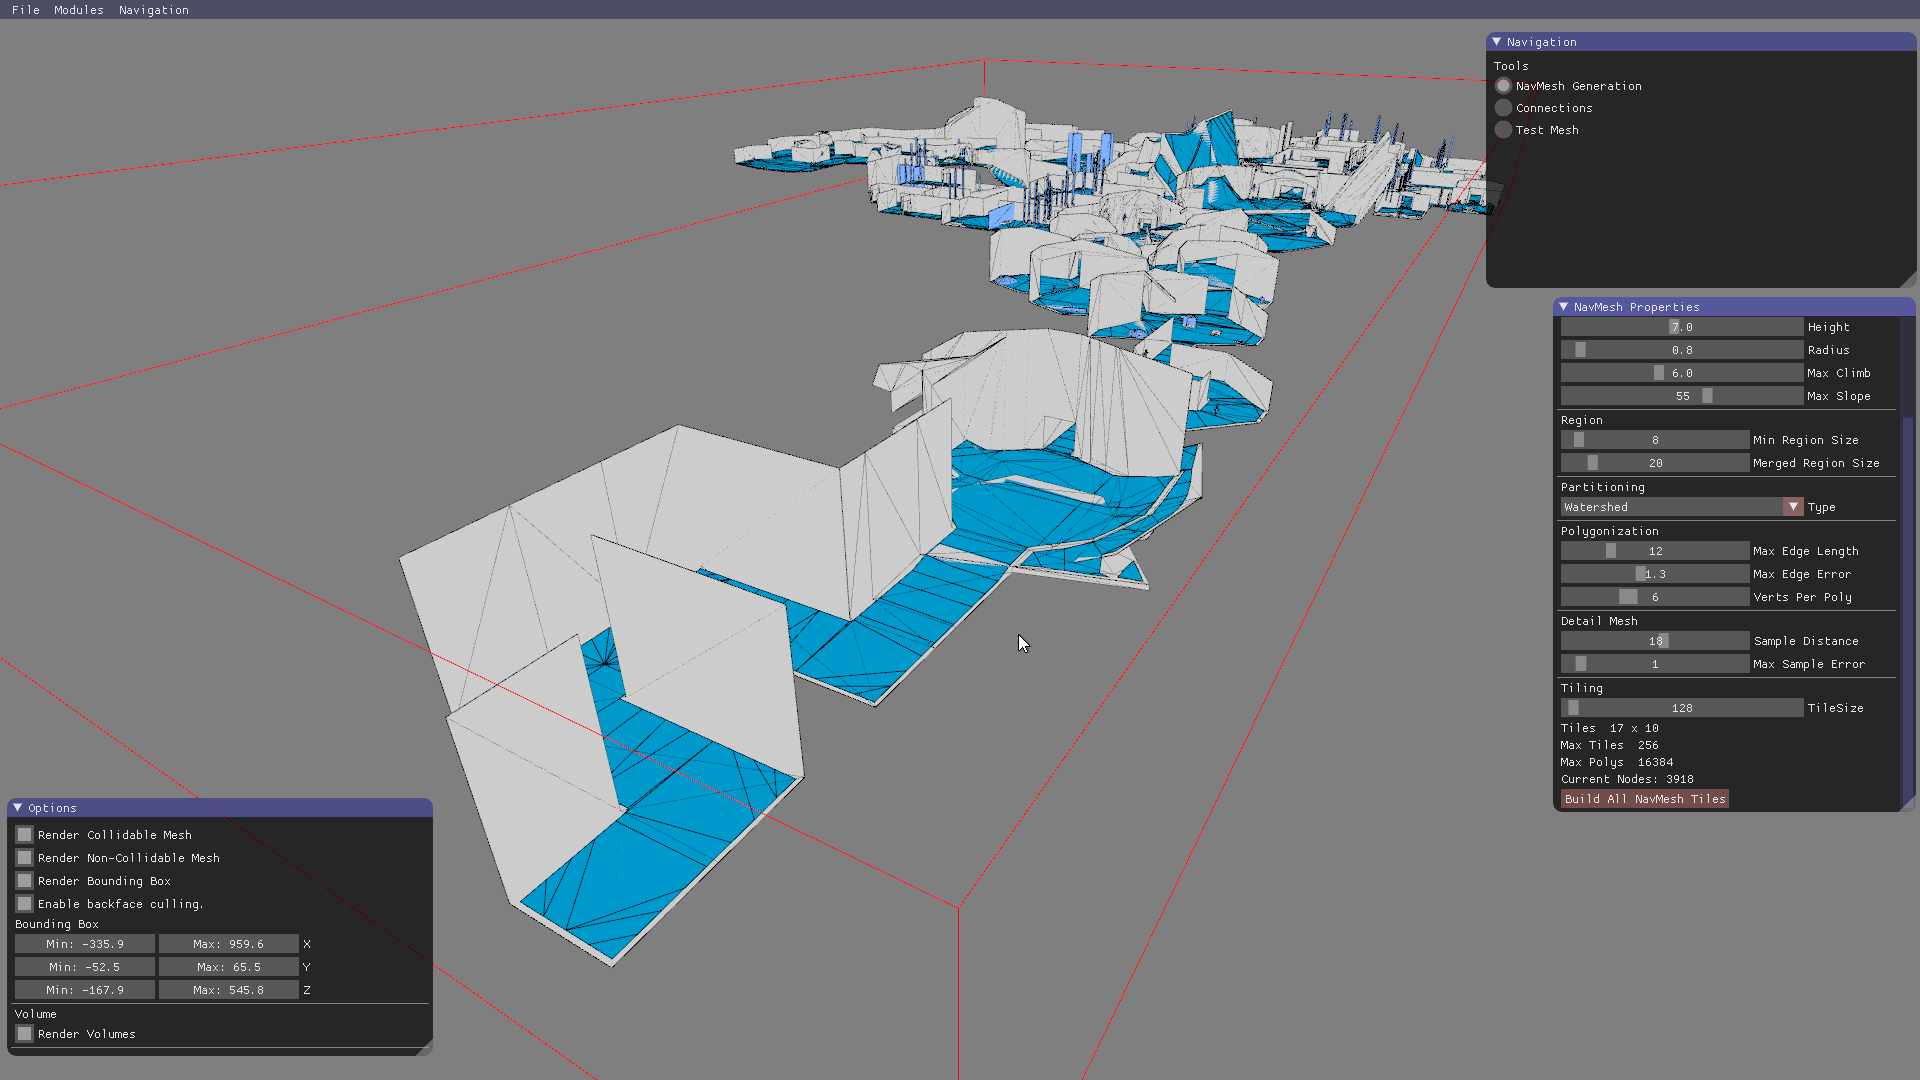
After a time a mesh will be generated and will show as blue overlay on the geometry. This is a small graph of walkable polygons and works quite well in most places.
Options
| Option | Description |
|---|---|
| Cell Size | The size of voxels on the xz plane for this nav mesh. The smaller this is the more detail and longer a map will take to generate. Some zones do not play nicely with very large or very small values of this and you may need to play with this if you're having trouble or seeing artifacts. Smaller values generally lead to meshes with more nodes as well. |
| Cell Height | Generally recommended that this is 1/2 of Cell Size but not required otherwise the same as cell size just on the y axis. |
| Radius | The agent's radius, same basic idea as height but this is how fat the agent is. |
| Max Climb | The max height the agent will be allowed to climb in one step. If the agent has to climb something larger than this then a gap will be generated. |
| Max Slope | The max slope the agent will be allowed to climb in one step. If the agent has to climb something steeper than this then a gap will be generated. |
| Min Region Size | The min size a region can be to be segmented off into its own polygon. |
| Merged Region Size | The minimum size a region needs to be before the algorithm attempt to merge a region into another. |
| Partitioning Type | The algorithm used for partitioning internally. Have never found much reason to change this from default but it causes the algorithm to generate slightly different meshes. |
| Max Edge Length | Maximum length an edge can be in the basic polygon mesh output. The bigger this is the larger polygons can be. For flat surfaces that are very large (eg ocean bottoms) this can dramatically reduce polygon count. |
| Max Edge Error | The maximum deviation an edge can have in the basic polygon mesh output. |
| Verts per Poly | Maximum verts any poly can have. Do not set above 6. Setting this to something really low would probably needlessly complicate the mesh. |
| Sample Distance | When creating the detail mesh it samples from points nearby. This is the distance to sample around a point. Generally going the smaller the number the more accurate the mesh is but also the more nodes that need to be generated. |
| Max Sample Error | Maximum error, like distance this is the maximum the error can be before the detail mesh discards a sample point. Smaller leads to more accurate but slower meshes. |
| Tile Size | The tile size of the map, the larger the tile the fewer of them that need to be generated but also the longer they need to be generated. |
-
Generally you wont have to change this but something to keep note of is there is a maximum amount of nodes a tile can contain and connections (covered below) can only connect a tile either to itself or to one of its potential 8 adjacent tiles.
-
So you may need to up this if you have a large portal or decrease it if you find it having difficulty creating a tile at all.|
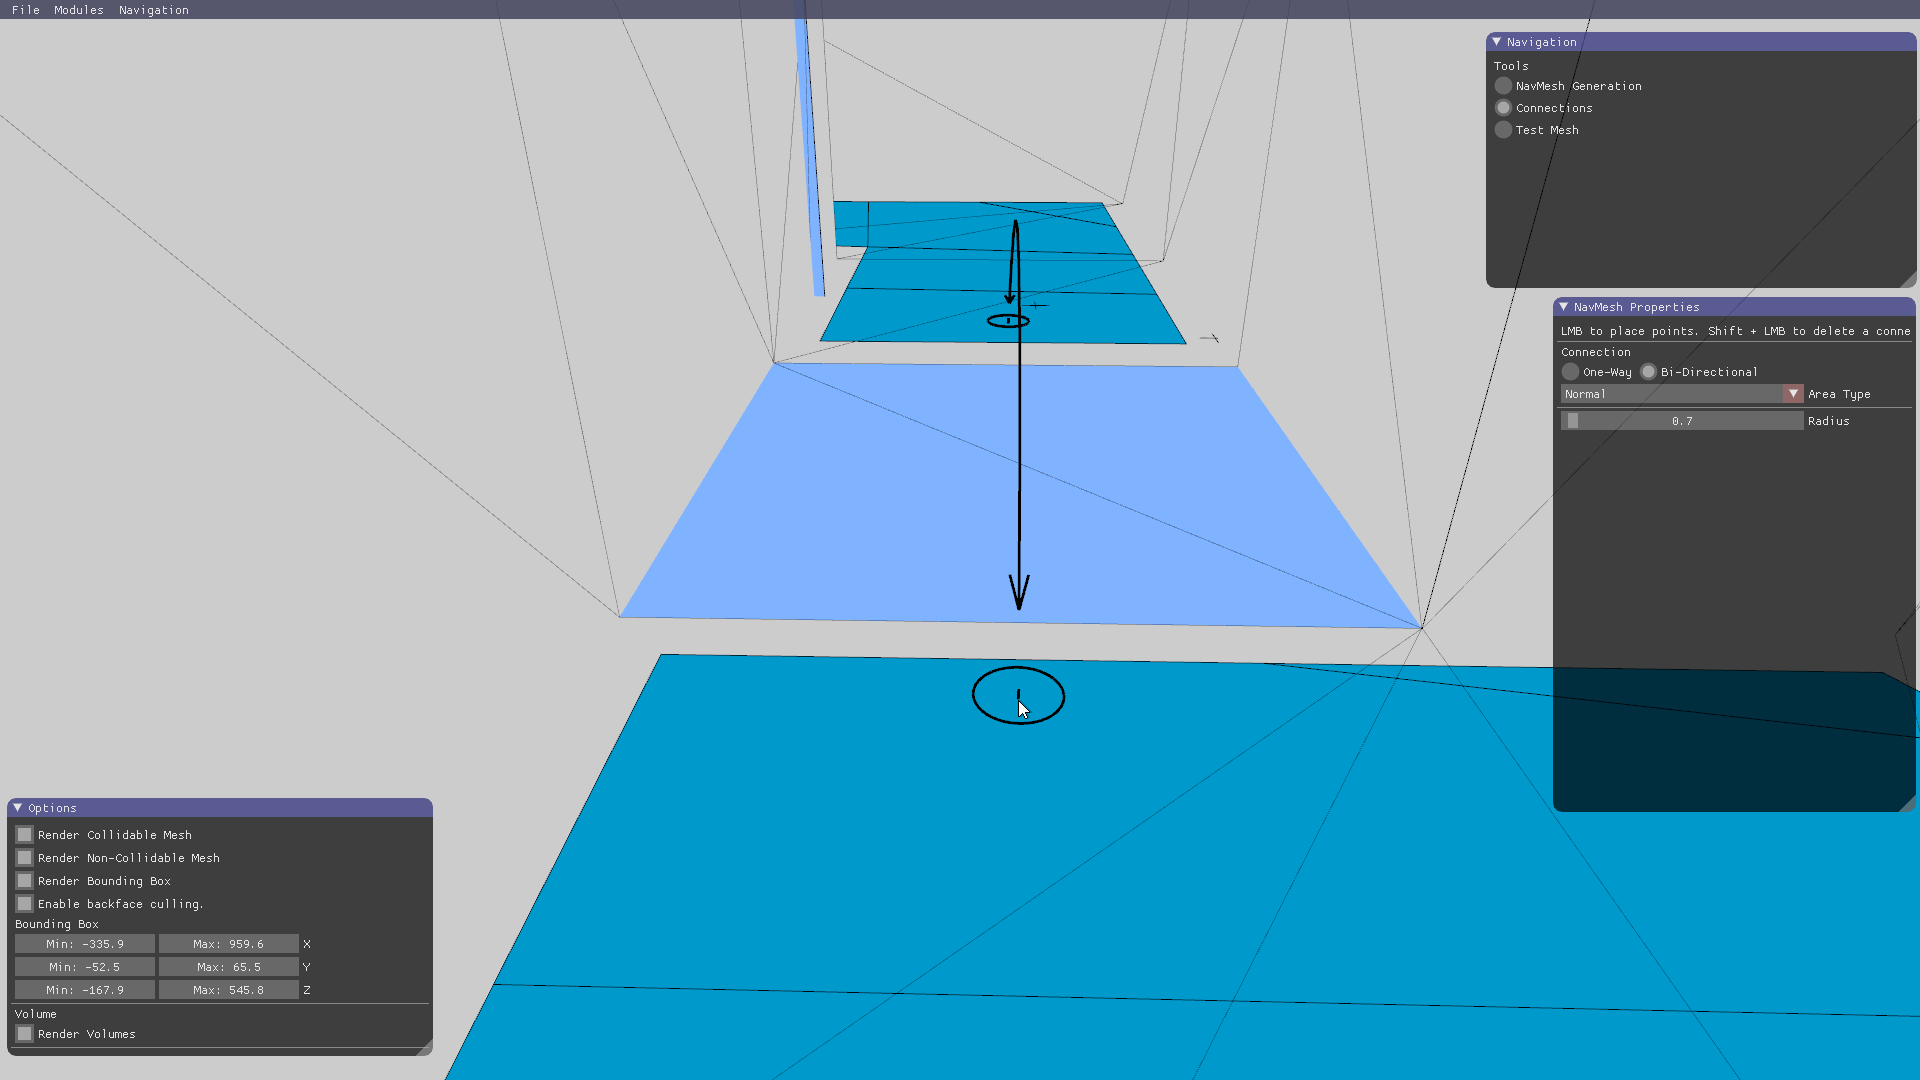
Fixing Navmesh Gaps
What we see here is a pool of water, these are common places to find gaps in older zones.
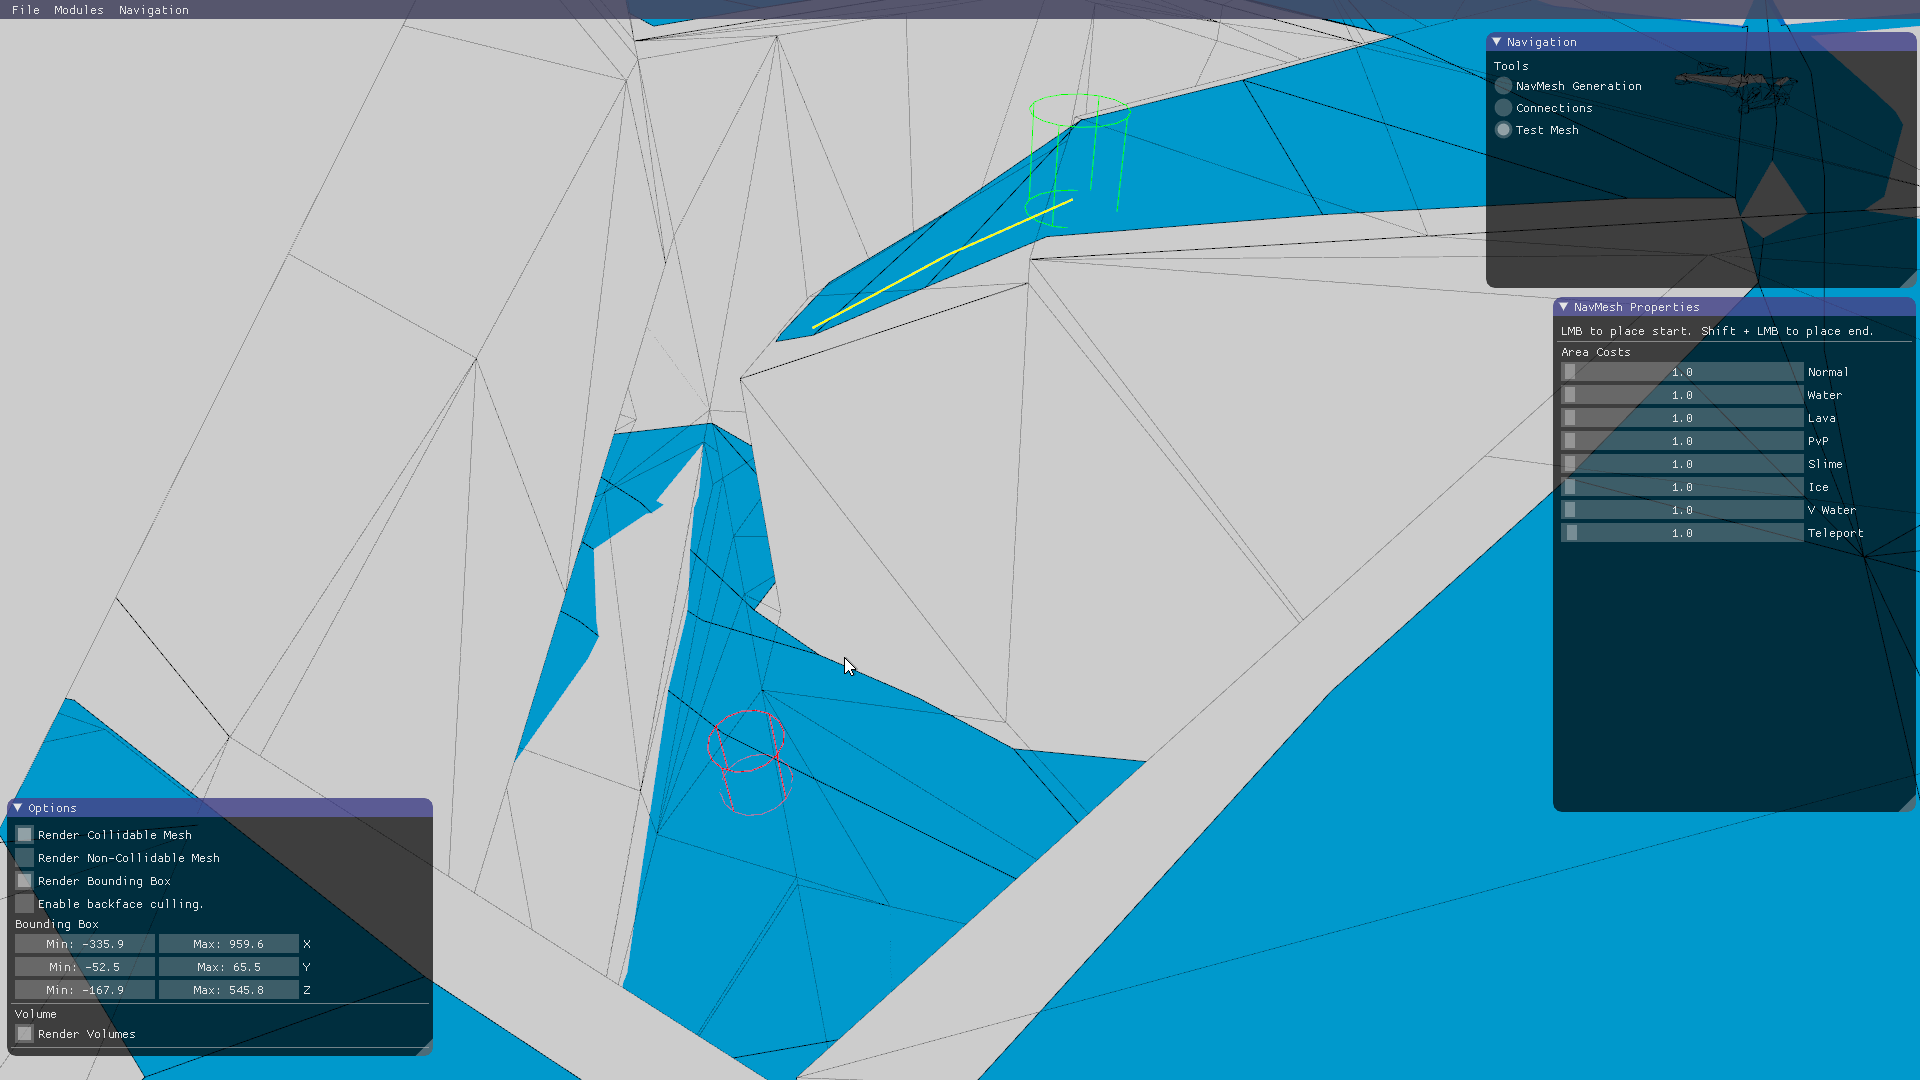
By turning off the non-collidable mesh and using the test tool we can confirm that indeed this pool cannot be pathed into because of a gap in the navmesh.
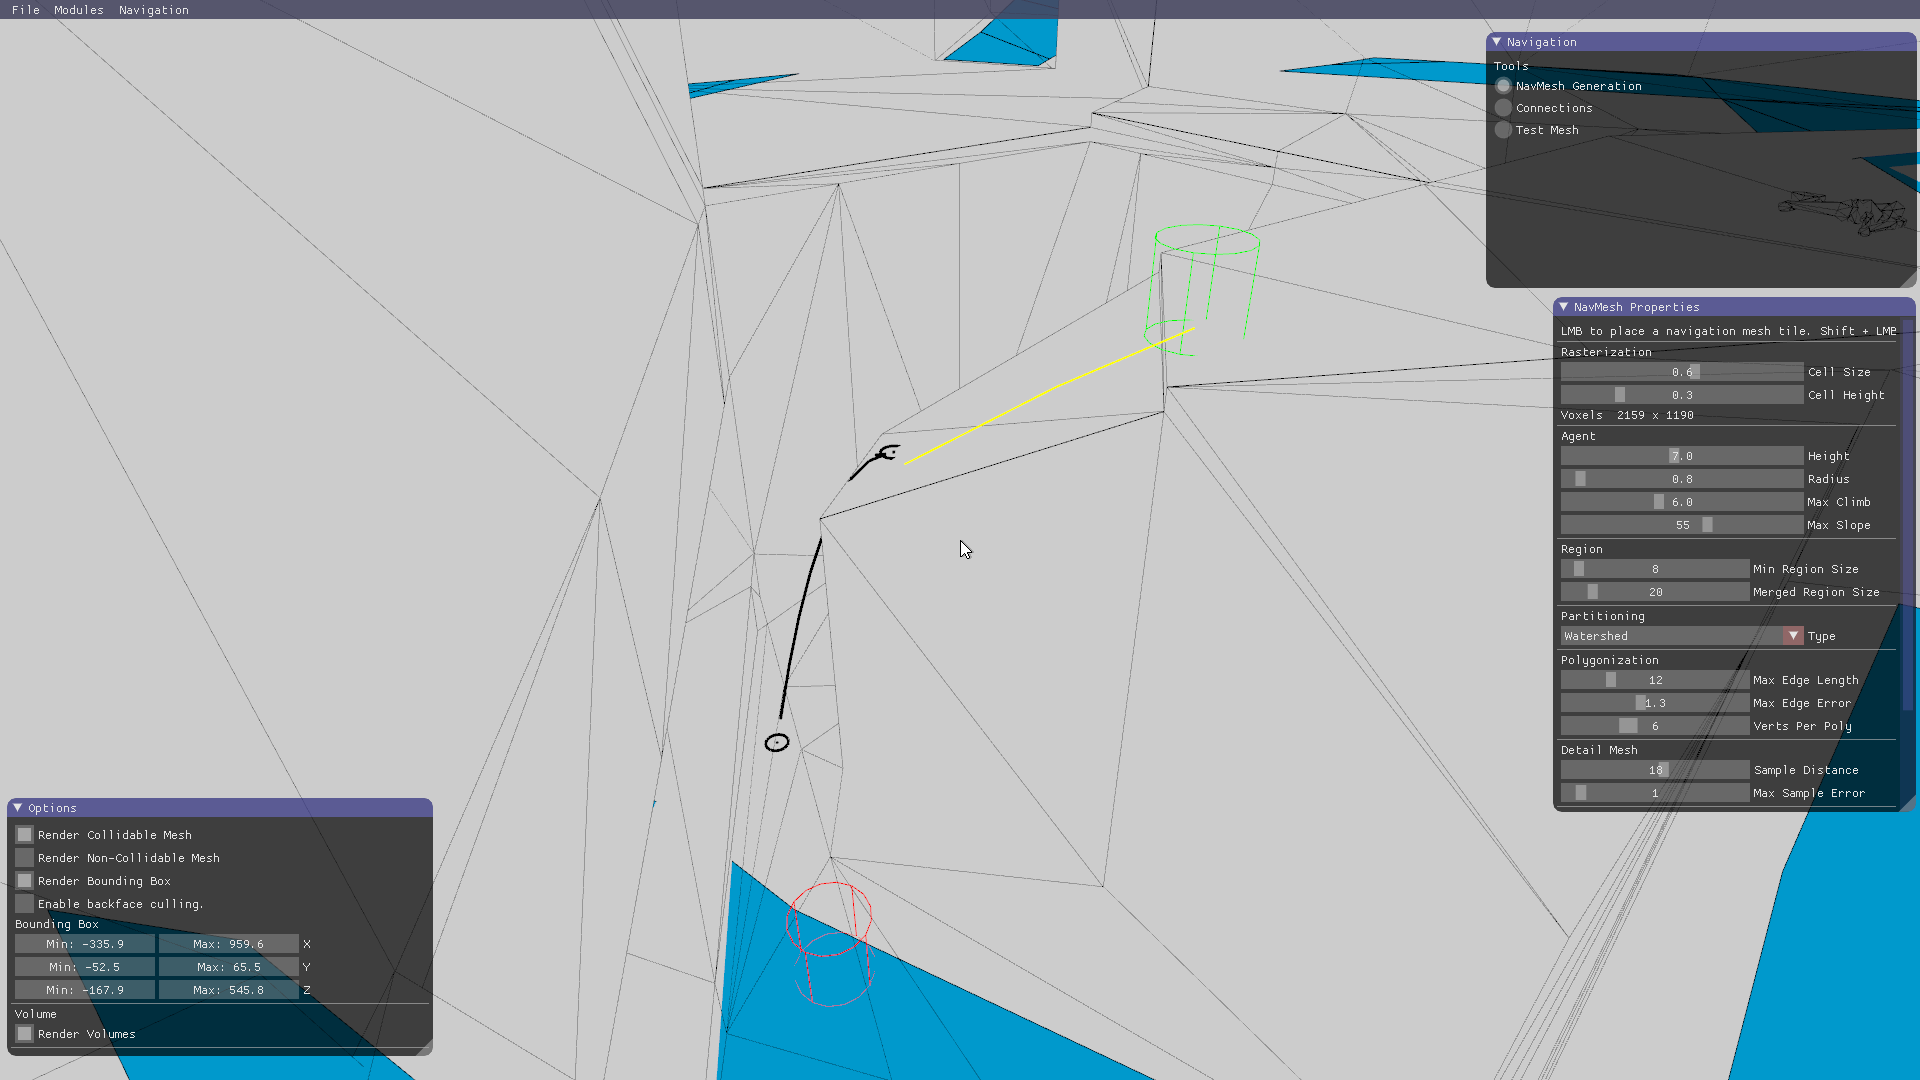
Connections Mode

-
You'll see a few options, what we want in this case is a bi-directional connection as these can move in either direction. We also want the area type to be "Water" as it is going into and out of a pool of water.
-
Place the connection by clicking on the mesh once (for start pos) and again (for end pos)

We now have a connection that connects these two meshes together but if we try to retest it we find they still are not connected. That is because connections are only made on navmesh tile creation.
Generation Mode
- Switch back to NavMesh Generation mode and Shift+Click the area around that connection we just made.
The tile for that area has just been removed from the overall mesh.
Re-Adding the Tile
- Re-add the tile by Clicking the area around the connection.
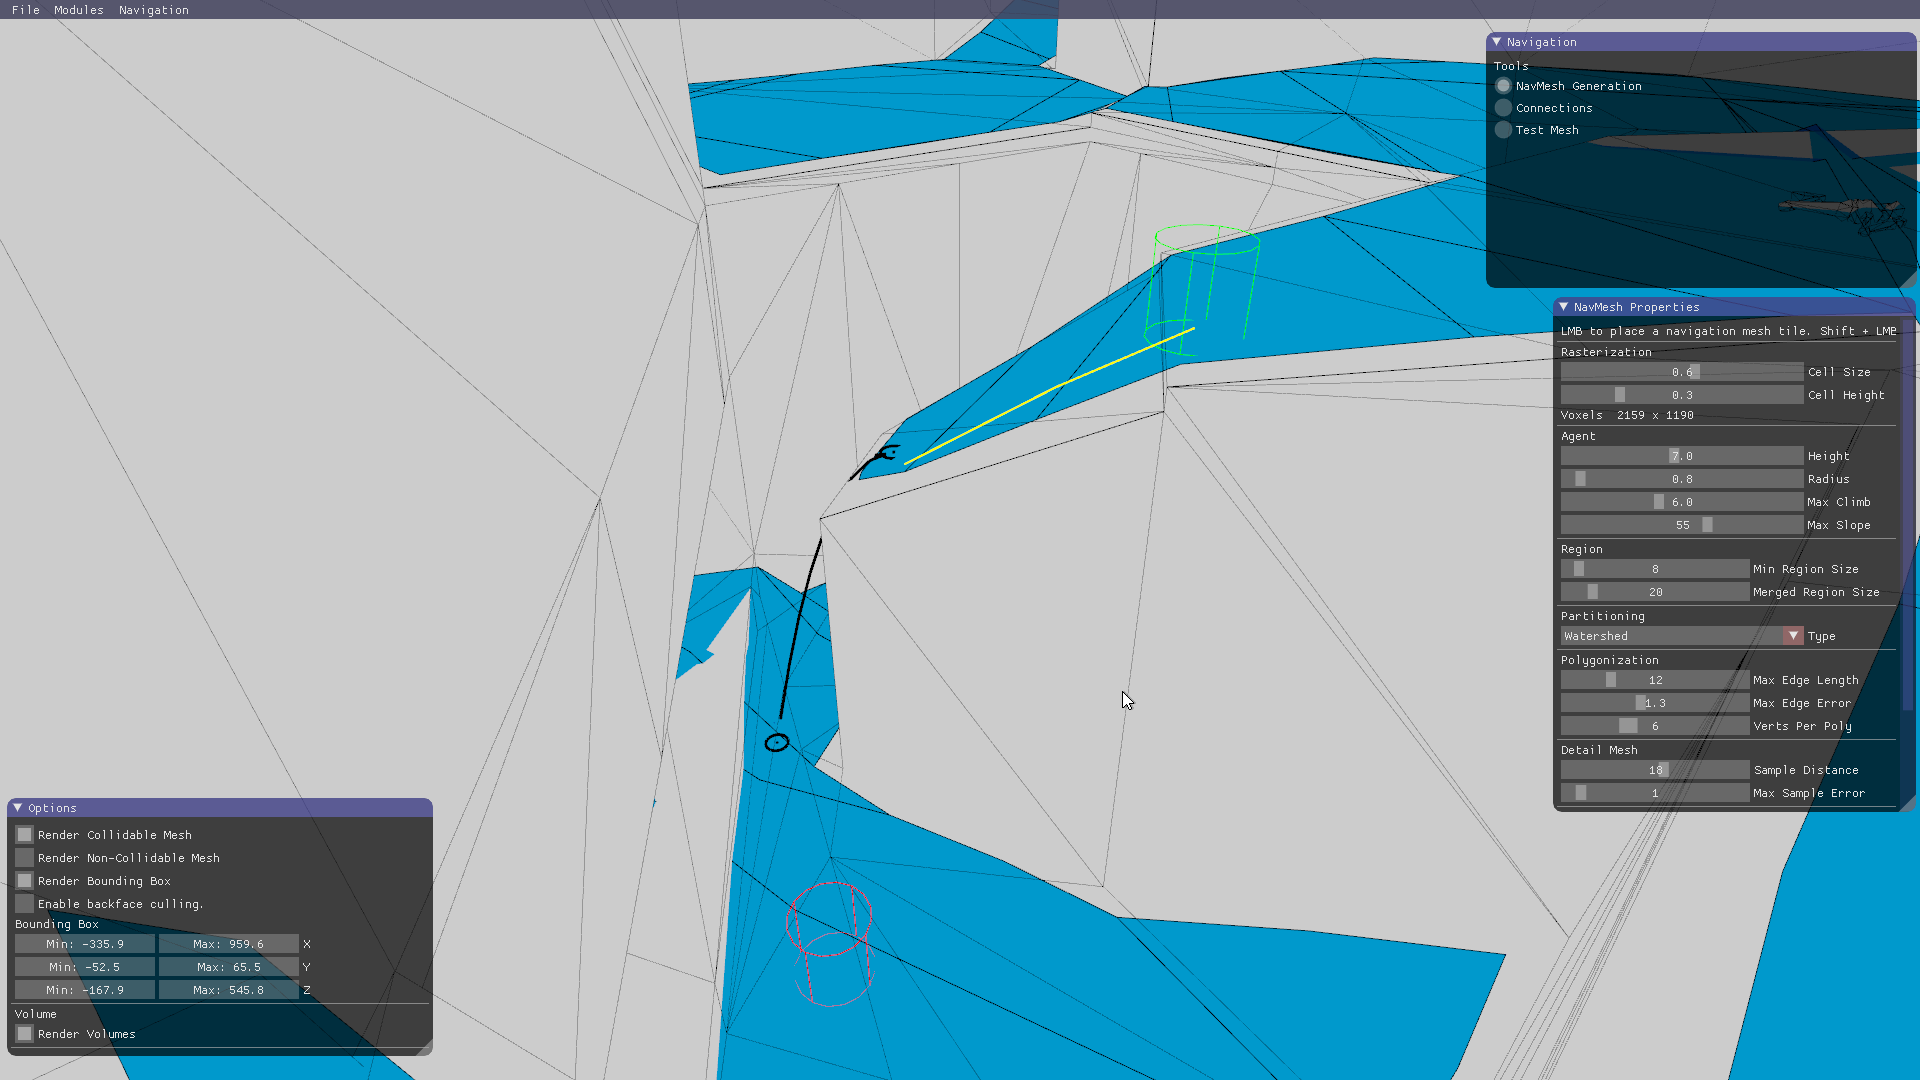
The tile has returned and if we retest it we notice that the connection now works.

Another Gap
We come to a spot where the floor is not solid because the player is intended to fall into this "trap" if they're inexperienced.
Bi-Directional Connection Spanning
- Lets add a normal bi-directional connection spanning the gap so npcs at least just hop over it and don't get stuck
This would work but a player that had a npc chasing them and fell down this hole would create a massive train through a long part of the zone. Wouldn't it be nice if the npc could also jump down this hole instantly?
Portal One-Way
- Lets create a set of portal one-way connections from the top sides of the mesh down into the trap

Now that the connections are created don't forget to regenerate any nav mesh tiles that the connections have landed on.
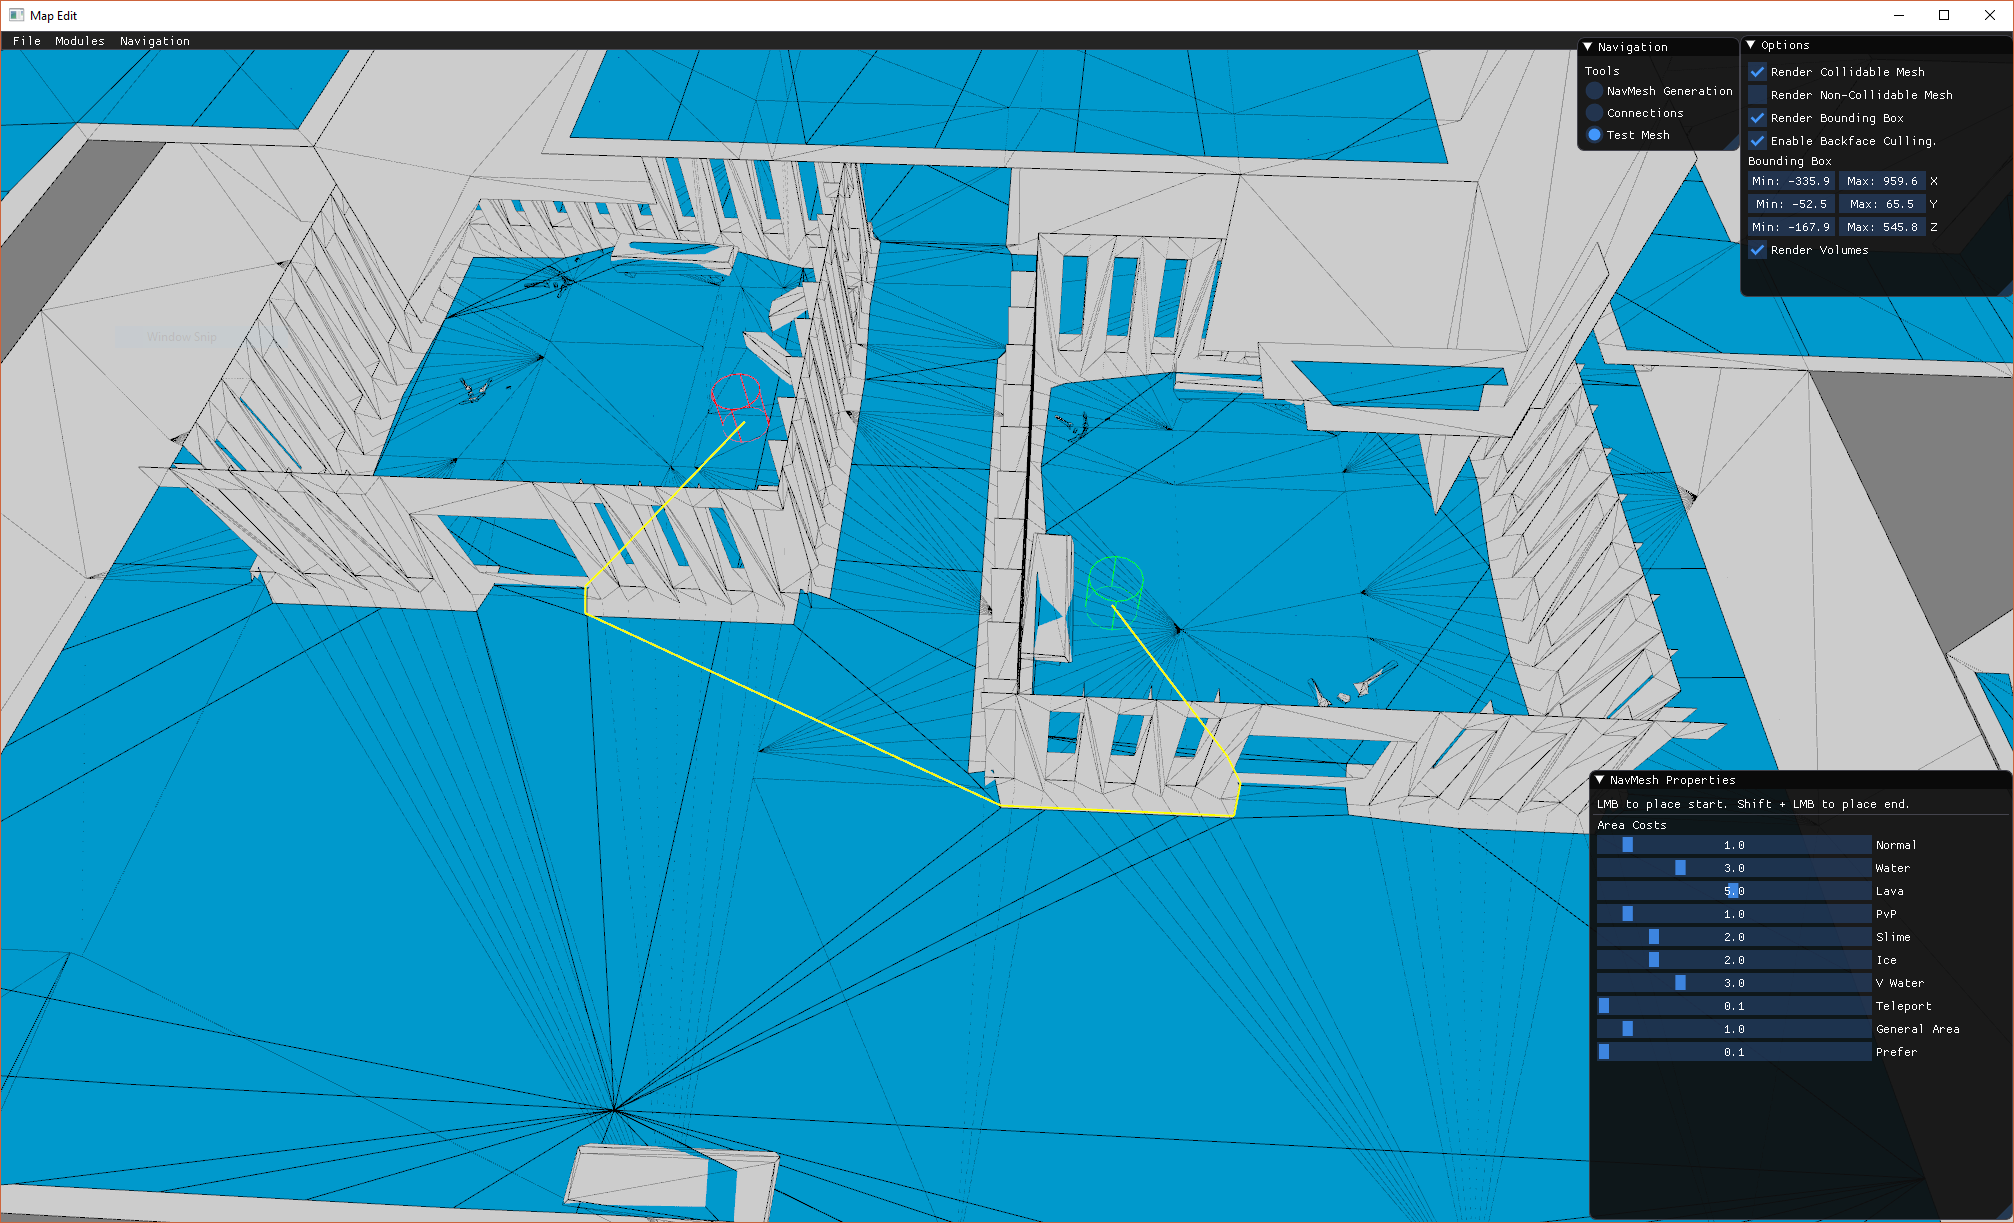
Test the Created Jumps

Instead of going all through the zone instead green jumps down into the trap to chase red.
Create Preferred Path
- There are some cases where pathing may be too close to world objects and you would like to setup a preferred path. The process is the same as creating connectors except you will select "Bi-Directional Prefer" area type.
We will add the connection to force pathing around the edge of the doorway.

Regenerate the navmesh and the test should now yield the desired results.

Create Disable Volume
- If you want to disable pathing for a specific region, you can achieve this via volumes.
Start by opening up the volumes menu.

Shift left click to place a basic volume where you would like the general region to be.

Select the area type of "Disable NavigationMesh" then use the various sliders to adjust the size and orientation of the volume.

That is basically it, make sure to save before you exit otherwise you will lose all your work.