IBM / Evote
Programming Languages
Projects that are alternatives of or similar to Evote
WARNING: This repository is no longer maintained ⚠️
This repository will not be updated. I will check periodically for pull requests, but do not expect a quick response.
Create a fair evoting application to ensure correct election results with Hyperledger Fabric and IBM Blockchain Platform
NOTE: This developer pattern creates a blockchain network on IBM Blockchain Platform version 2.5 using the Hyperledger Fabric version 1.4.
Have you ever wondered how exactly the votes in a presidential election counted? What if instead of having volunteers that are spending hours a day counting votes manually, we have an app that was backed by blockchain, recording each vote made by a voter, ensuring double-voting is not possible? That's what this code pattern explains how to do. We aim to build a web-app in which the voter can register with their drivers license, get a unique voterId which is used to login to the app, and cast the vote. The vote is tallied on the blockchain, and the web-app shows the current standings of the polls.
Voting using Public Key Infrastructure
At the start of the application, the user registers to vote by providing their drivers license number, registrar district, and first and last name. In this step, we can check to see if the drivers license is valid, and has not been registered previously. If all goes well, we create a private and public key for the voter with our certificate authority that is running on the cloud, and add those keys to the wallet. To read more about public key infrastructure, and how Hyperledger Fabric implements identity using this technology, go here.
After that, we use our drivers license number to submit our vote, during which the application checks if this drivers license number has voted before and tells the user they have already submitted a vote if so. If all goes well, the political party which the voter has chosen is given a vote, and the world state is updated. The application then updates our current standings of the election to show how many votes each political party currently has.
Since each transaction that is submitted to the ordering service must have a signature from a valid public-private key pair, we can trace back each transaction to a registered voter of the application, in the case of an audit.
In conclusion, although this is a simple application, the developer can see how they can implement a Hyperledger Fabric web-app to decrease the chance of election-meddling, and enhance a voting application by using blockchain technology.
When the reader has completed this code pattern, they will understand how to:
- Create, build, and use the IBM Blockchain Platform service.
- Build a blockchain back-end using Hyperledger Fabric API's
- Create and use a (free) Kubernetes Cluster to deploy and monitor our Hyperledger Fabric nodes.
- Deploy a Node.js app that will interact with our deployed smart contract.
Flow Diagram
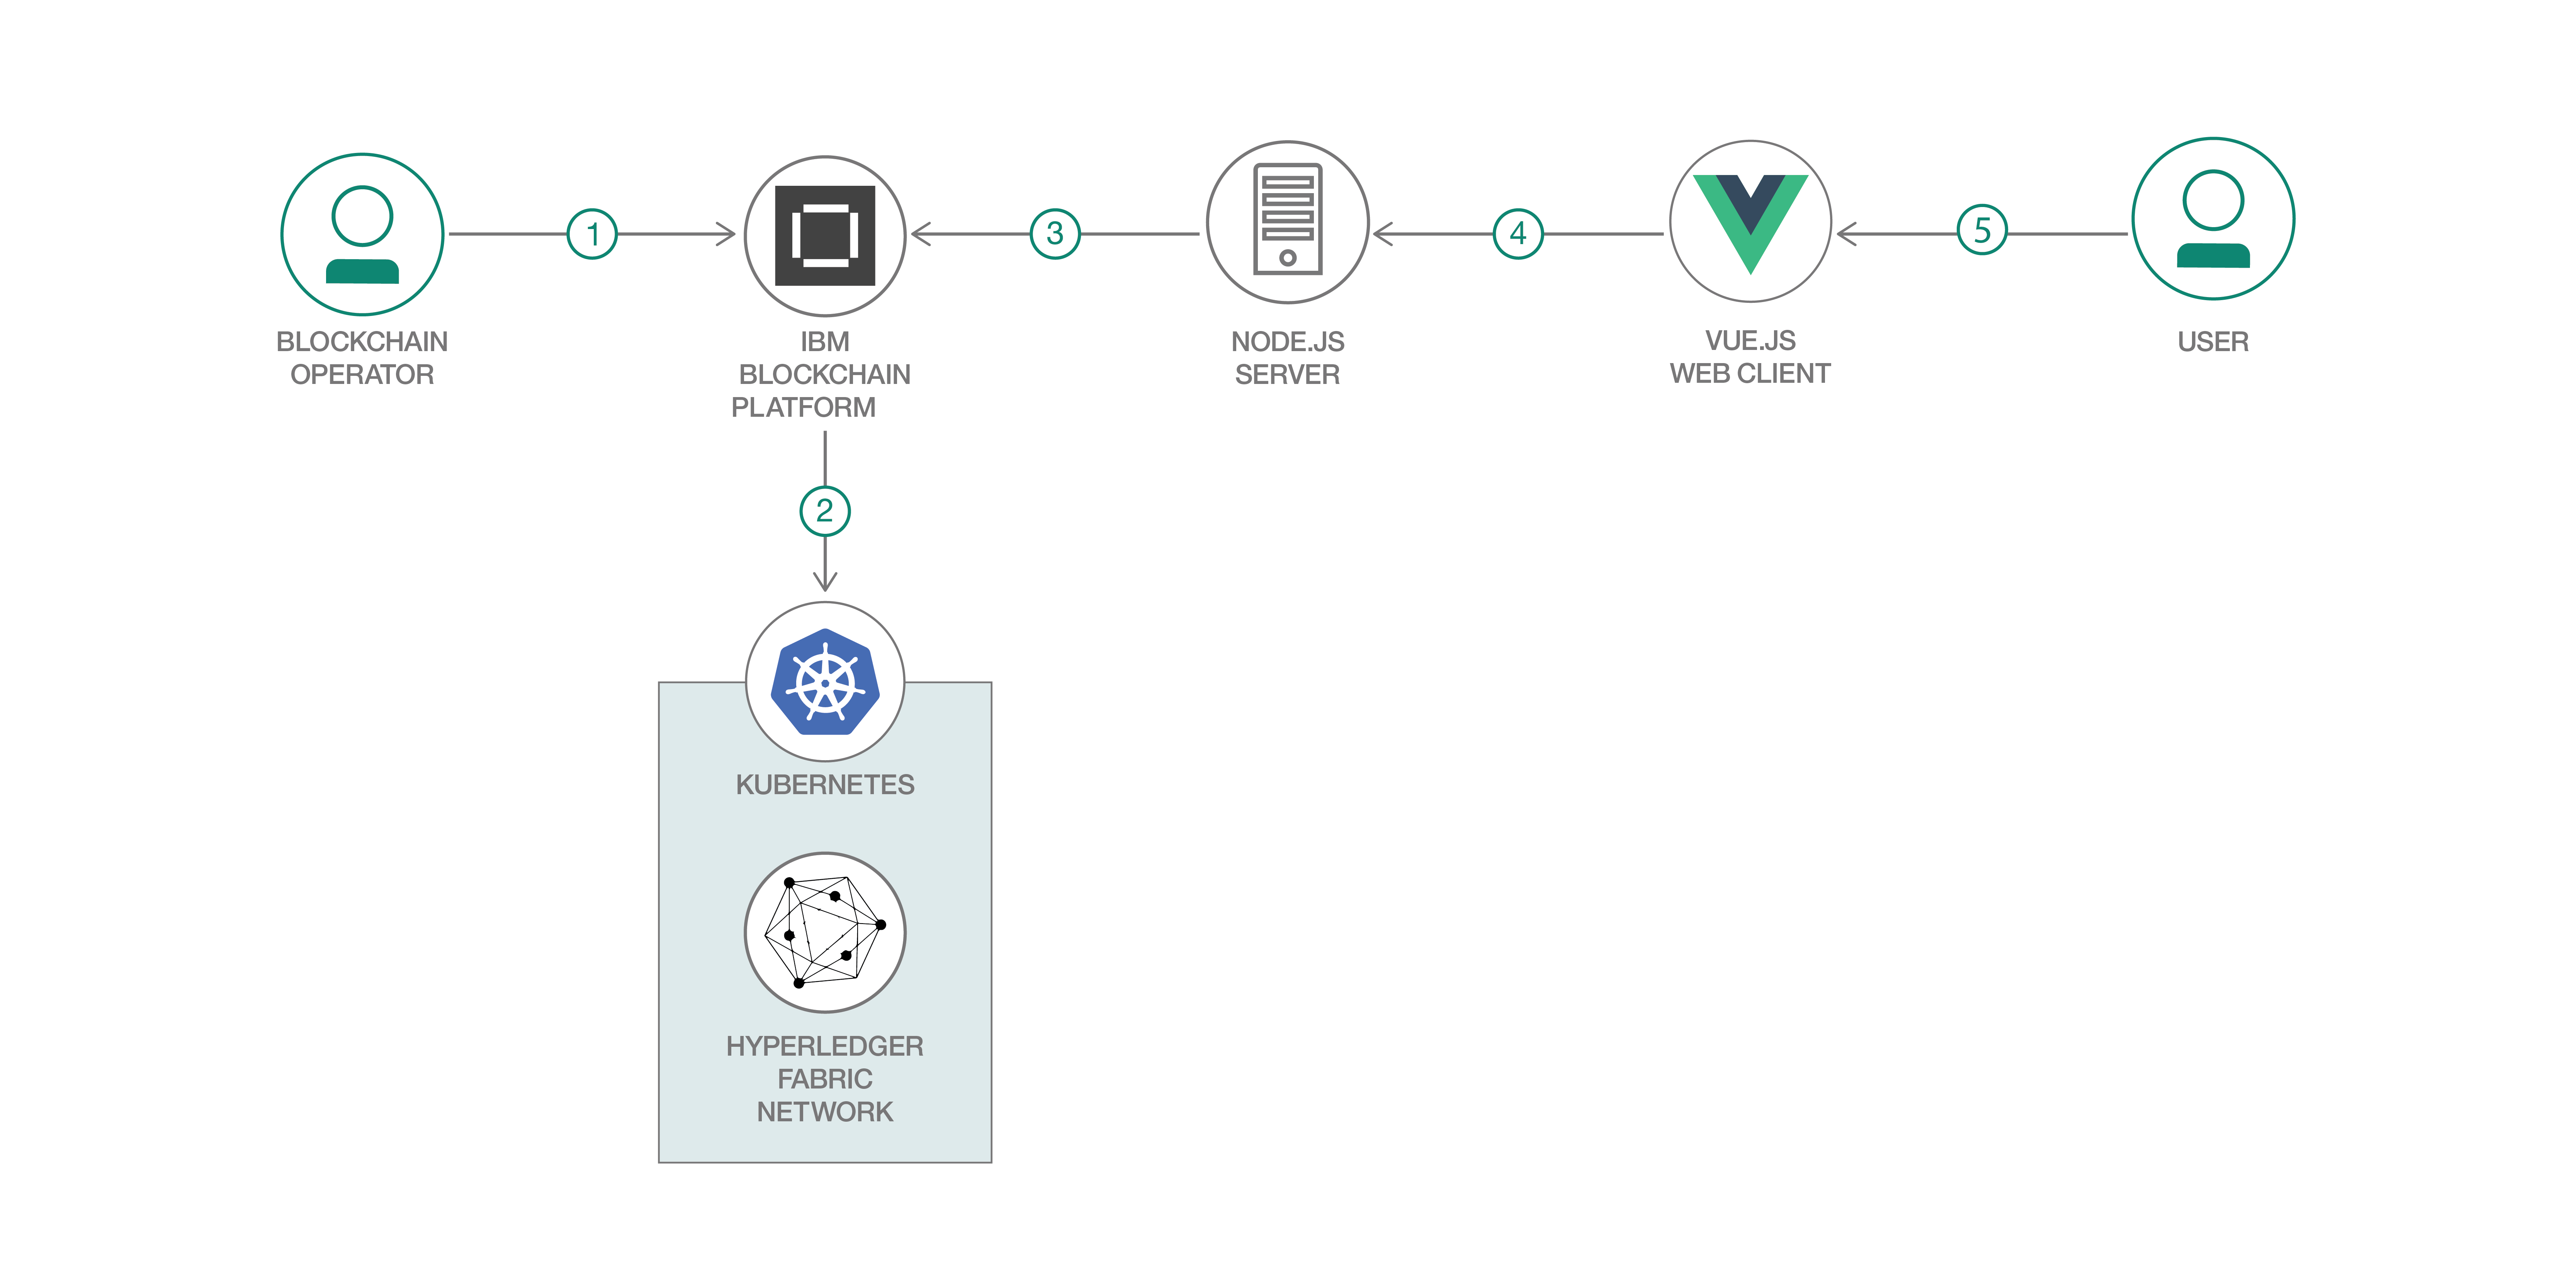
Flow Description
- The blockchain operator sets up the IBM Blockchain Platform 2.5 service.
- The IBM Blockchain Platform 2.5 creates a Hyperledger Fabric network on an IBM Kubernetes Service, and the operator installs and instantiates the smart contract on the network.
- The Node.js application server uses the Fabric SDK to interact with the deployed network on IBM Blockchain Platform 2.5 and creates APIs for a web client.
- The Vue.js client uses the Node.js application API to interact with the network.
- The user interacts with the Vue.js web interface to cast their ballot and and query the world state to see current poll standings.
Included components
- IBM Blockchain Platform gives you total control of your blockchain network with a user interface that can simplify and accelerate your journey to deploy and manage blockchain components on the IBM Cloud Kubernetes Service.
- IBM Cloud Kubernetes Service creates a cluster of compute hosts and deploys highly available containers. A Kubernetes cluster lets you securely manage the resources that you need to quickly deploy, update, and scale applications.
- IBM Blockchain Platform Extension for VS Code is designed to assist users in developing, testing, and deploying smart contracts -- including connecting to Hyperledger Fabric environments.
Featured technologies
- Hyperledger Fabric v1.4 is a platform for distributed ledger solutions, underpinned by a modular architecture that delivers high degrees of confidentiality, resiliency, flexibility, and scalability.
- Node.js is an open source, cross-platform JavaScript run-time environment that executes server-side JavaScript code.
- Vue.js 2.6.10 Vue.js is an open-source JavaScript framework for building user interfaces and single-page applications.
Watch the Video - Intro (Cloud)
Watch the Video - Build and Run the App (Cloud)
Watch the Video - Code walkthrough (User Authentication)
Watch the Video - Code walkthrough (Routes)
Prerequisites (Cloud)
This Cloud pattern assumes you have an IBM Cloud account.
You do not technically need VSCode or the IBM Blockchain Platform extension for VSCode if you are running the Cloud pattern, but if you want to make any changes to the smart contract, you will need the extension to package your smart contract project.
Prerequisites (Local)
If you want to run this pattern locally, without any Cloud services, then all you need is VSCode and the IBM Blockchain Platform extension.
- Install VSCode version 1.39
- Install IBM Blockchain Platform Extension for VSCode
- Node v8.9.0
- npm v6.11.3
🚧🚧Note: you will need Node 8.x to run this pattern!🚧🚧
For example, to install and run Node 8.9.0:
  brew install nvm
  nvm install 8.9.0
  nvm use 8.9.0
Steps (Local Deployment)
To run a local network, you can find steps here.
Steps (Cloud Deployment)
- Clone the Repo
- Create IBM Cloud services
- Build a network
- Deploy voterContract Smart Contract on the network
- Connect application to the network
- Run the application
Step 1. Clone the Repo
Git clone this repo onto your computer in the destination of your choice, then go into the web-app folder:
HoreaPorutiu$ git clone https://github.com/IBM/evote
Step 2. Create IBM Cloud services
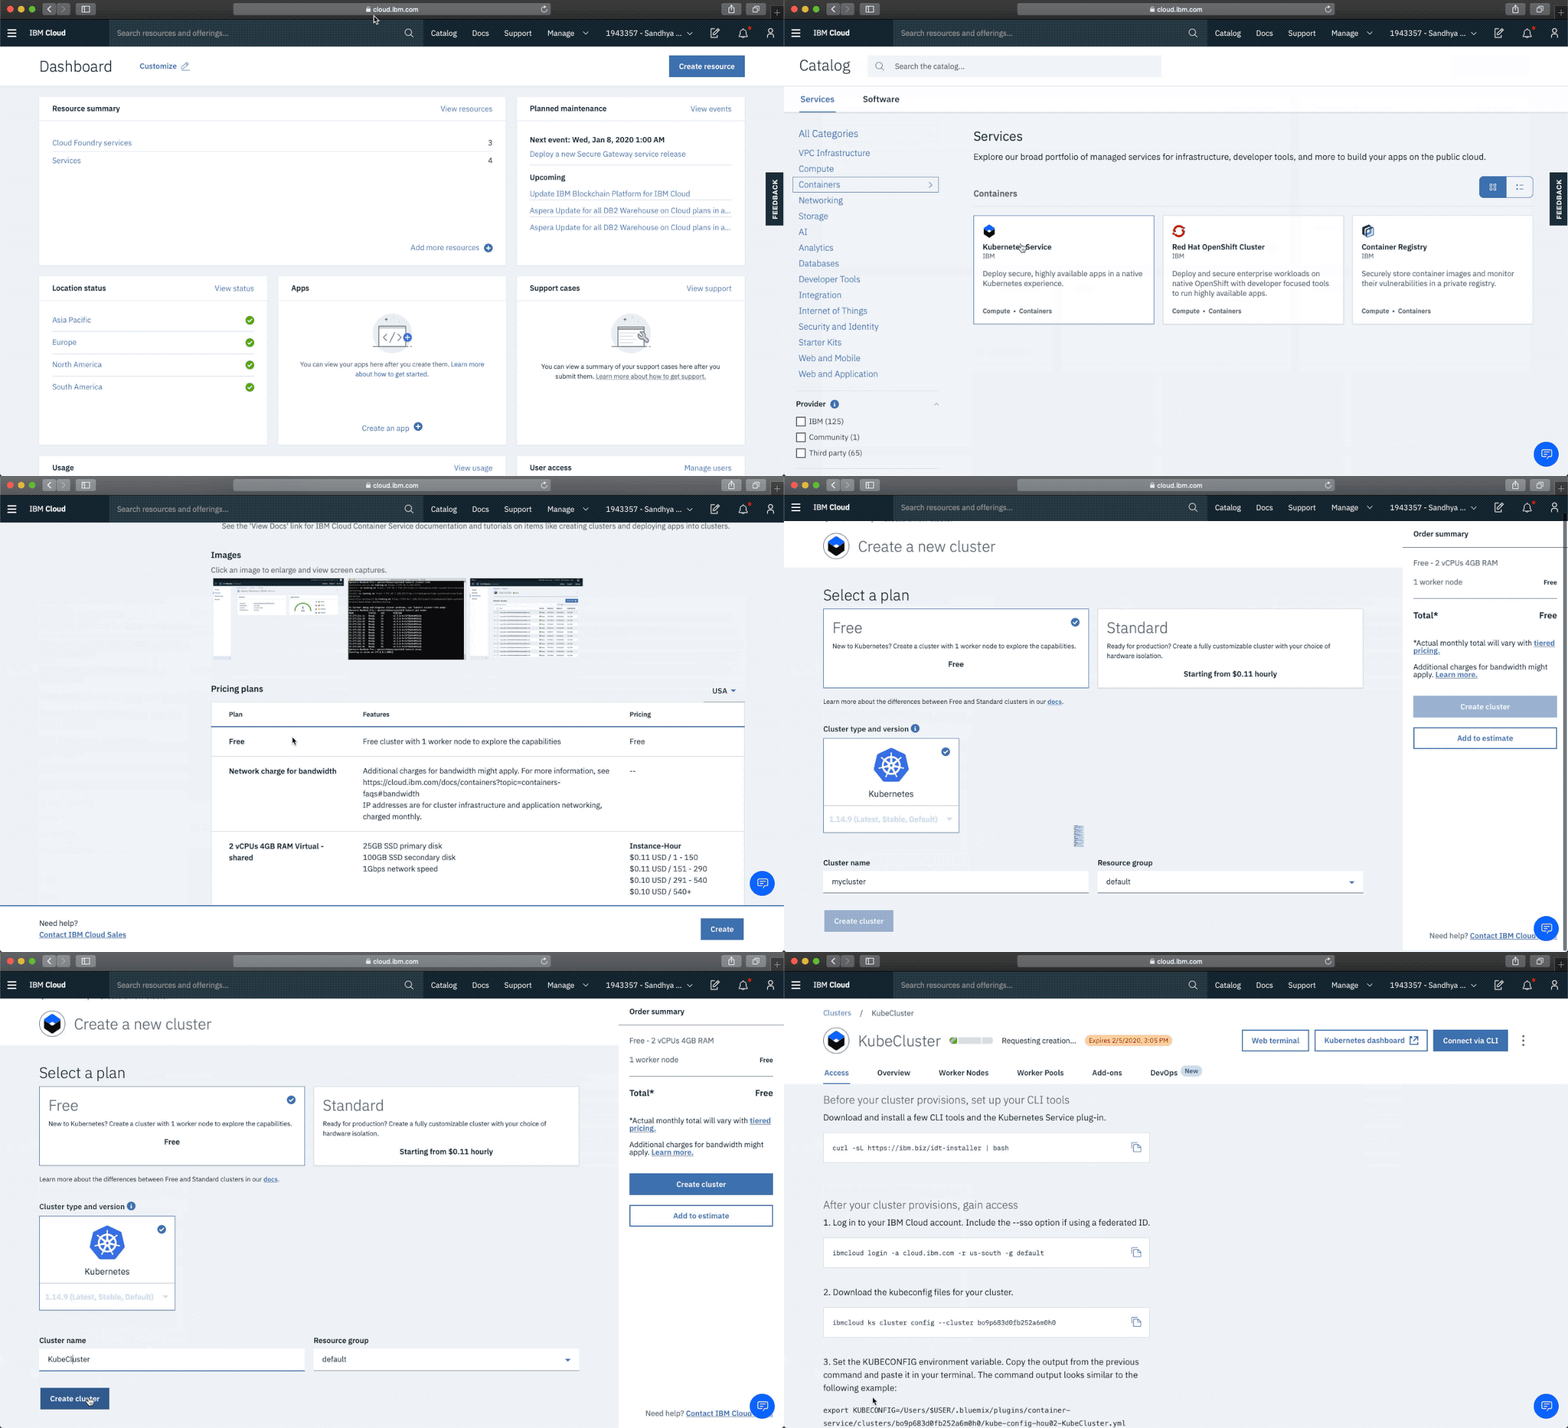
- Create the IBM Cloud Kubernetes Service. You can find the service in the
Catalog. For this code pattern, we can use theFreecluster, and give it a name. Note, that the IBM Cloud allows one instance of a free cluster and expires after 30 days. The cluster takes around 20 minutes to provision, so please be patient!
-
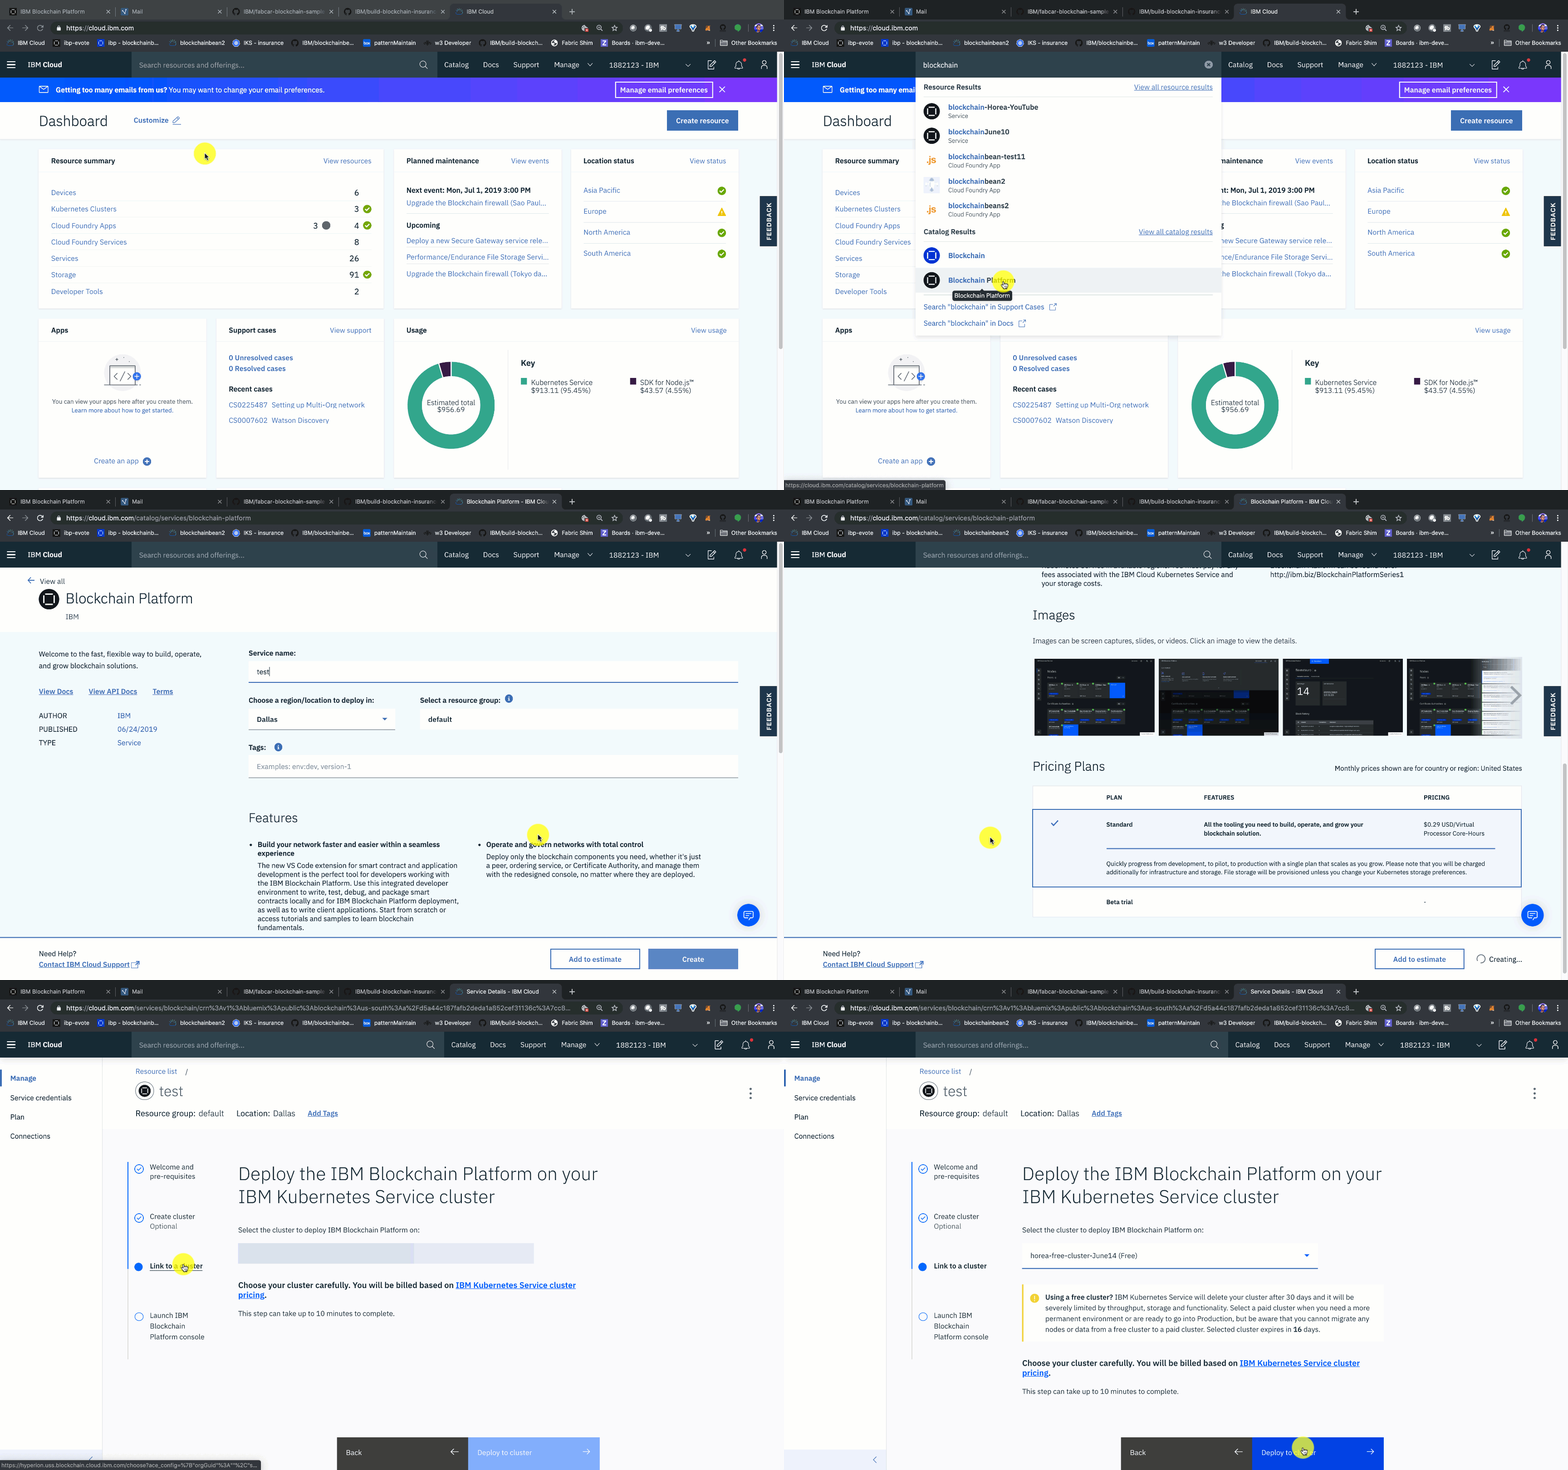
Create the IBM Blockchain Platform service on the IBM Cloud. You can find the service in the
Catalog, and give a name. -
After your Kubernetes cluster is up and running, you can deploy your IBM Blockchain Platform service on the cluster. The service walks through few steps and finds your cluster on the IBM Cloud to deploy the service on.
-
In the gif below, you can see me choosing my free cluster to deploy my IBM Blockchain Platform.
-
Once the Blockchain Platform is deployed on the Kubernetes cluster (which can take a couple of minutes, you can launch the console to start operating on your blockchain network by clicking on Launch the IBM Blockchain Platform.
Step 3. Build a network
We will build a network as provided by the IBM Blockchain Platform documentation. This will include creating a channel with a single peer organization with its own MSP and CA (Certificate Authority), and an orderer organization with its own MSP and CA. We will create the respective identities to deploy peers and operate nodes.
Create your organization and your entry point to your blockchain
-
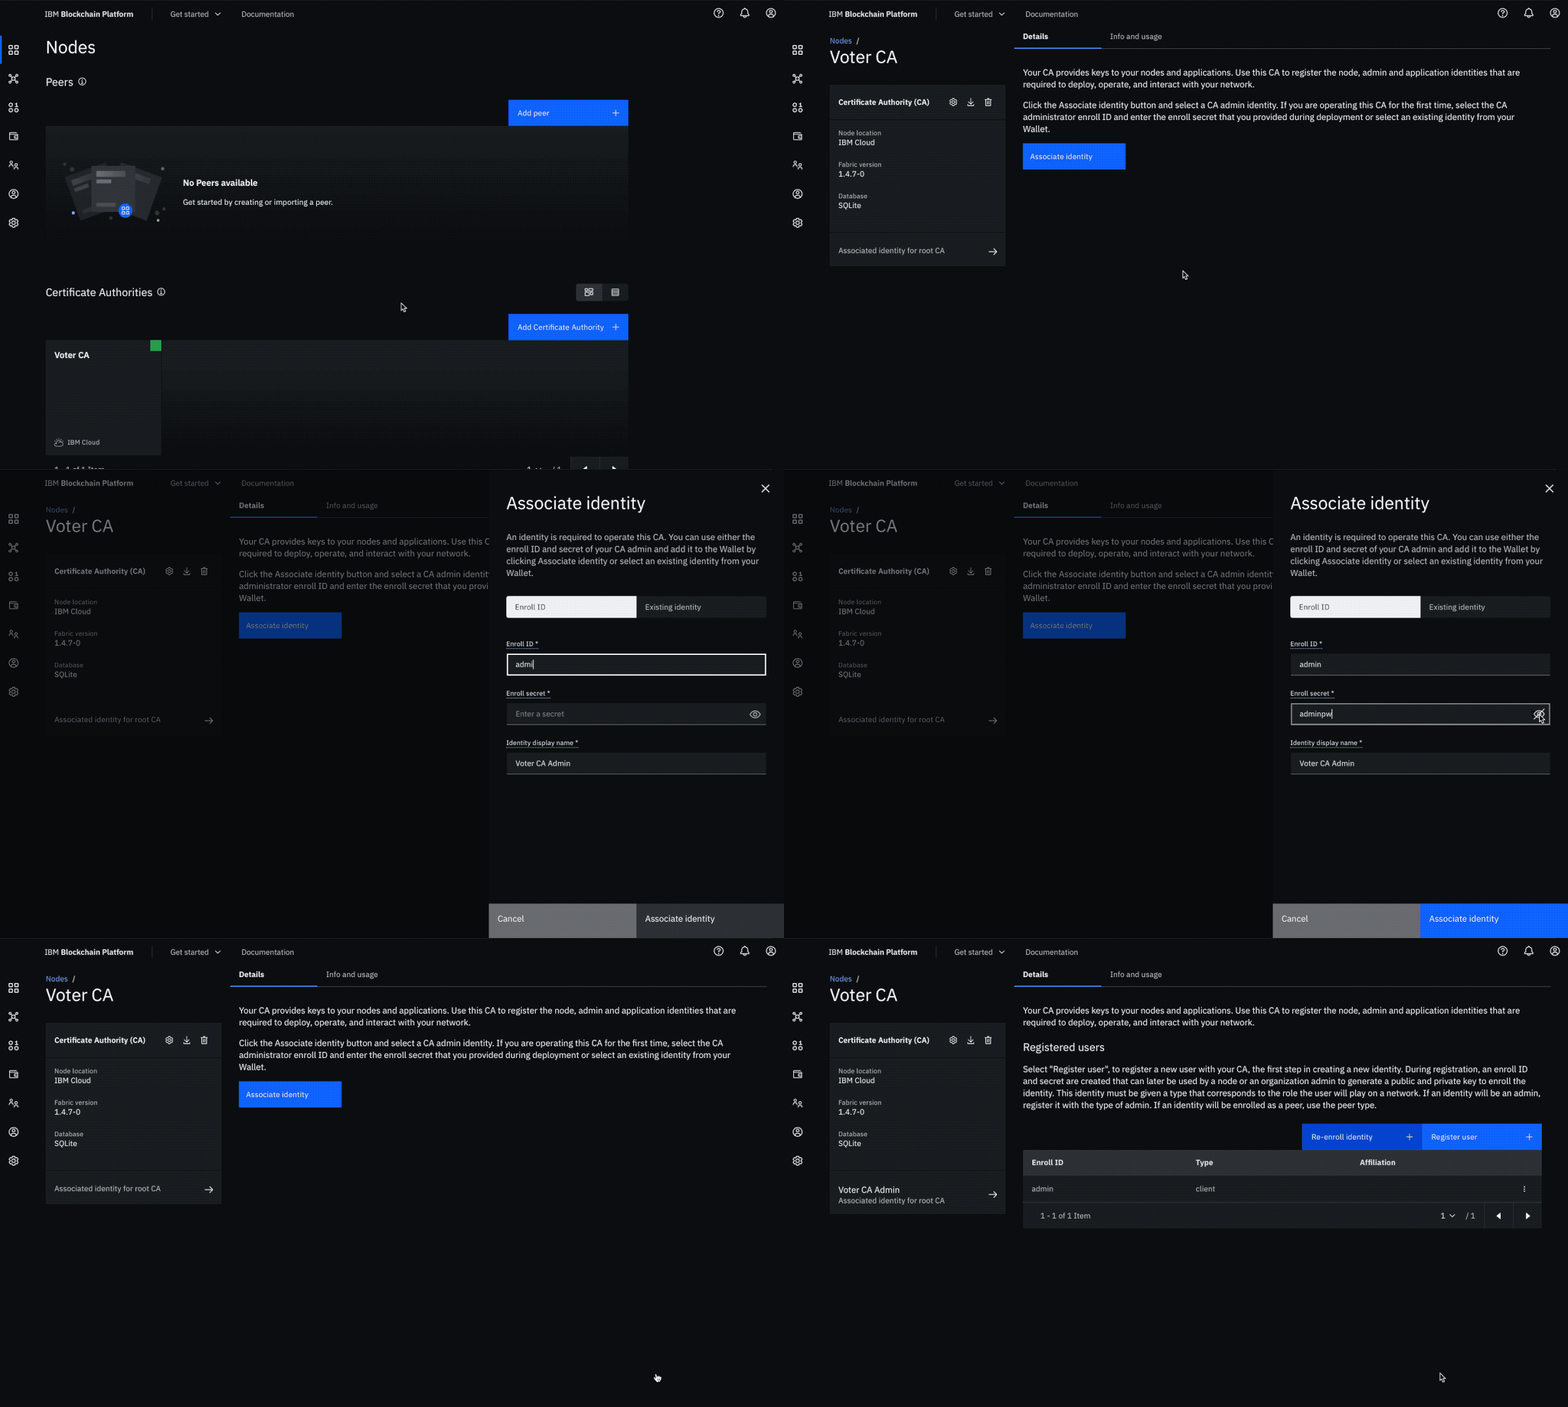
Create your Voter Organization CA
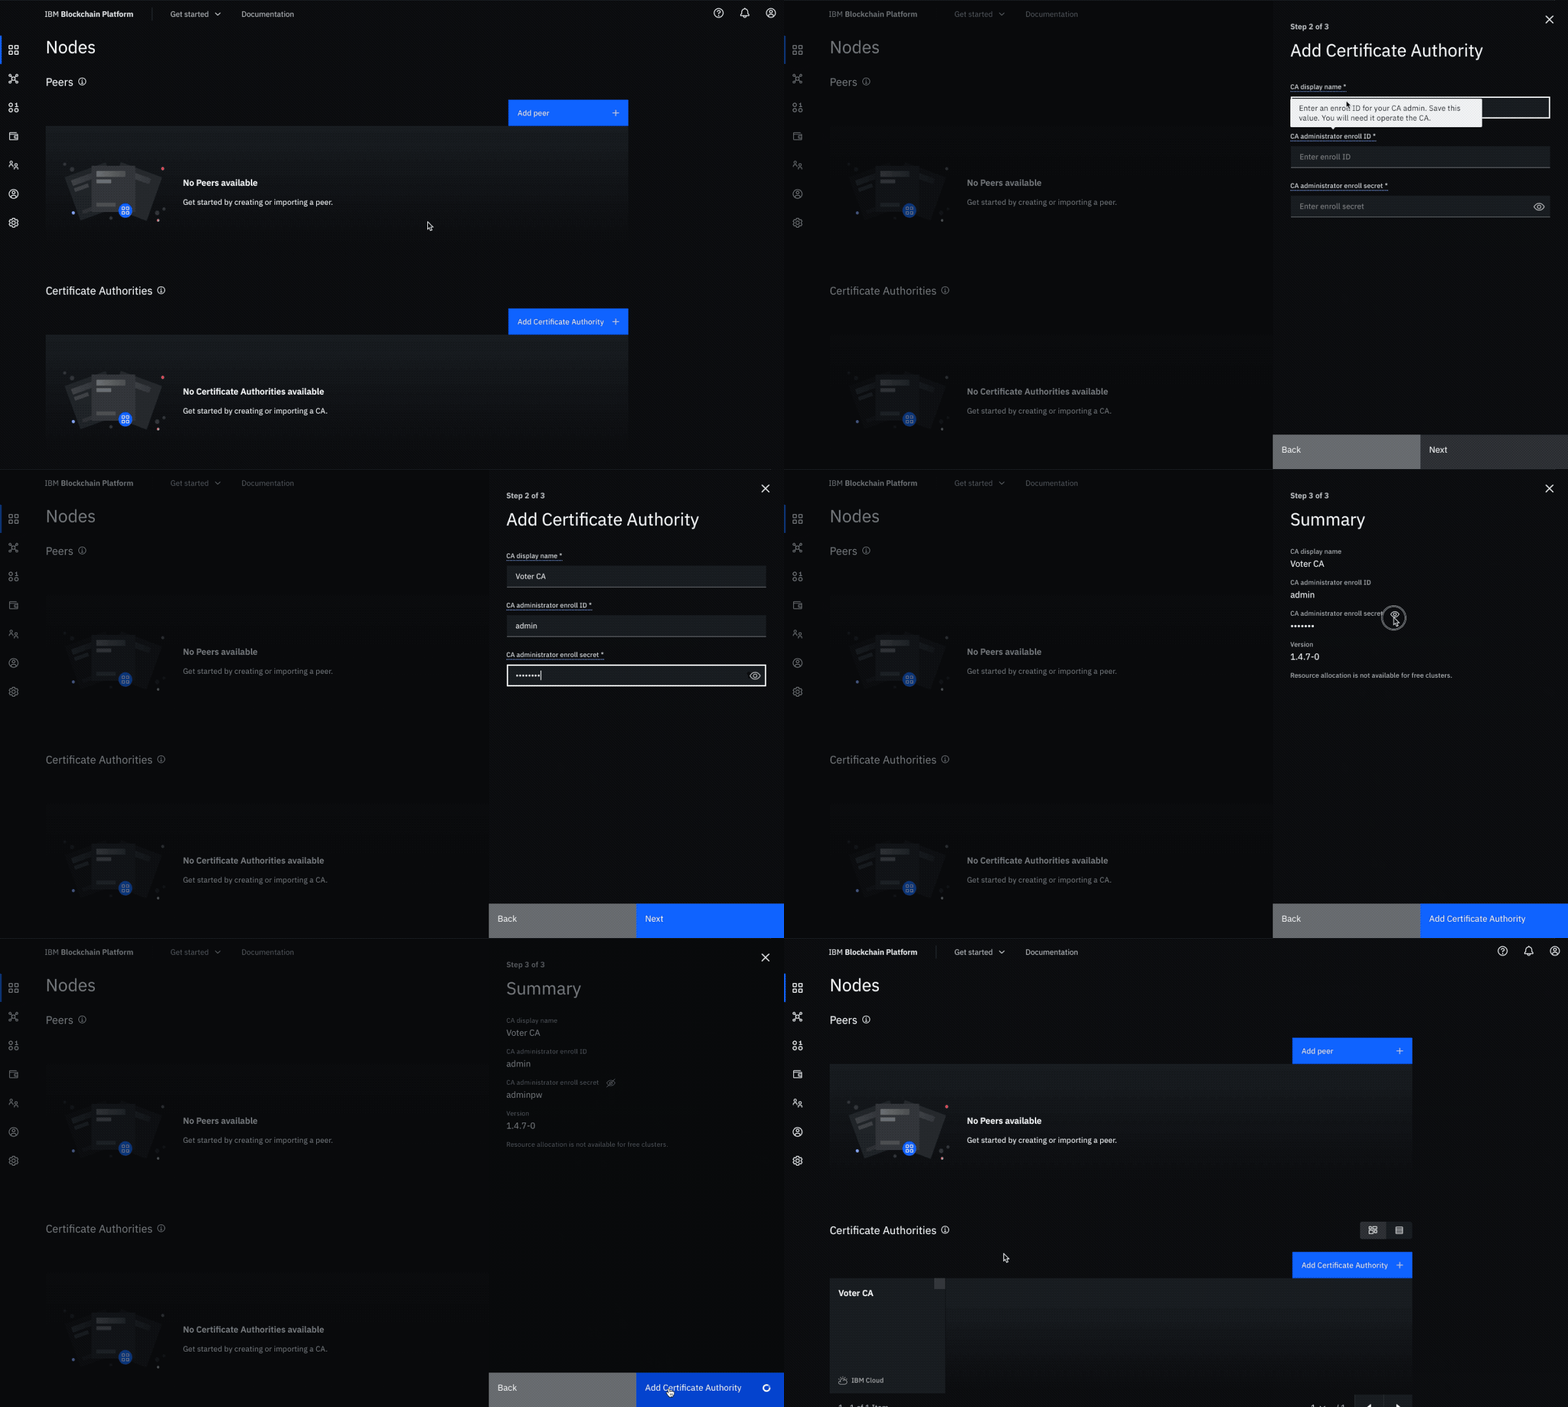
- Navigate to the Nodes tab in the left navigation and click Add Certificate Authority +.
- Click Create a Certificate Authority + and click Next.
- Give it a CA display name of
Voter CA, a CA administrator enroll ID ofadminand a CA administrator enroll secret ofadminpw, then click Next. - Review the summary and click Add Certificate Authority.
-
Associate the voter organization CA admin identity
- In the Nodes tab, select the Voter CA once it is running (indicated by the green box in the tile).
- Click Associate identity on the CA overview panel.
- On the side panel, select the Enroll ID tab.
- Provide an Enroll ID of
adminand an Enroll secret ofadminpw. Use the default value ofVoter CA Adminfor the Identity display name. - Click Associate identity to add the identity into your wallet and associate the admin identity with the Voter CA.
-
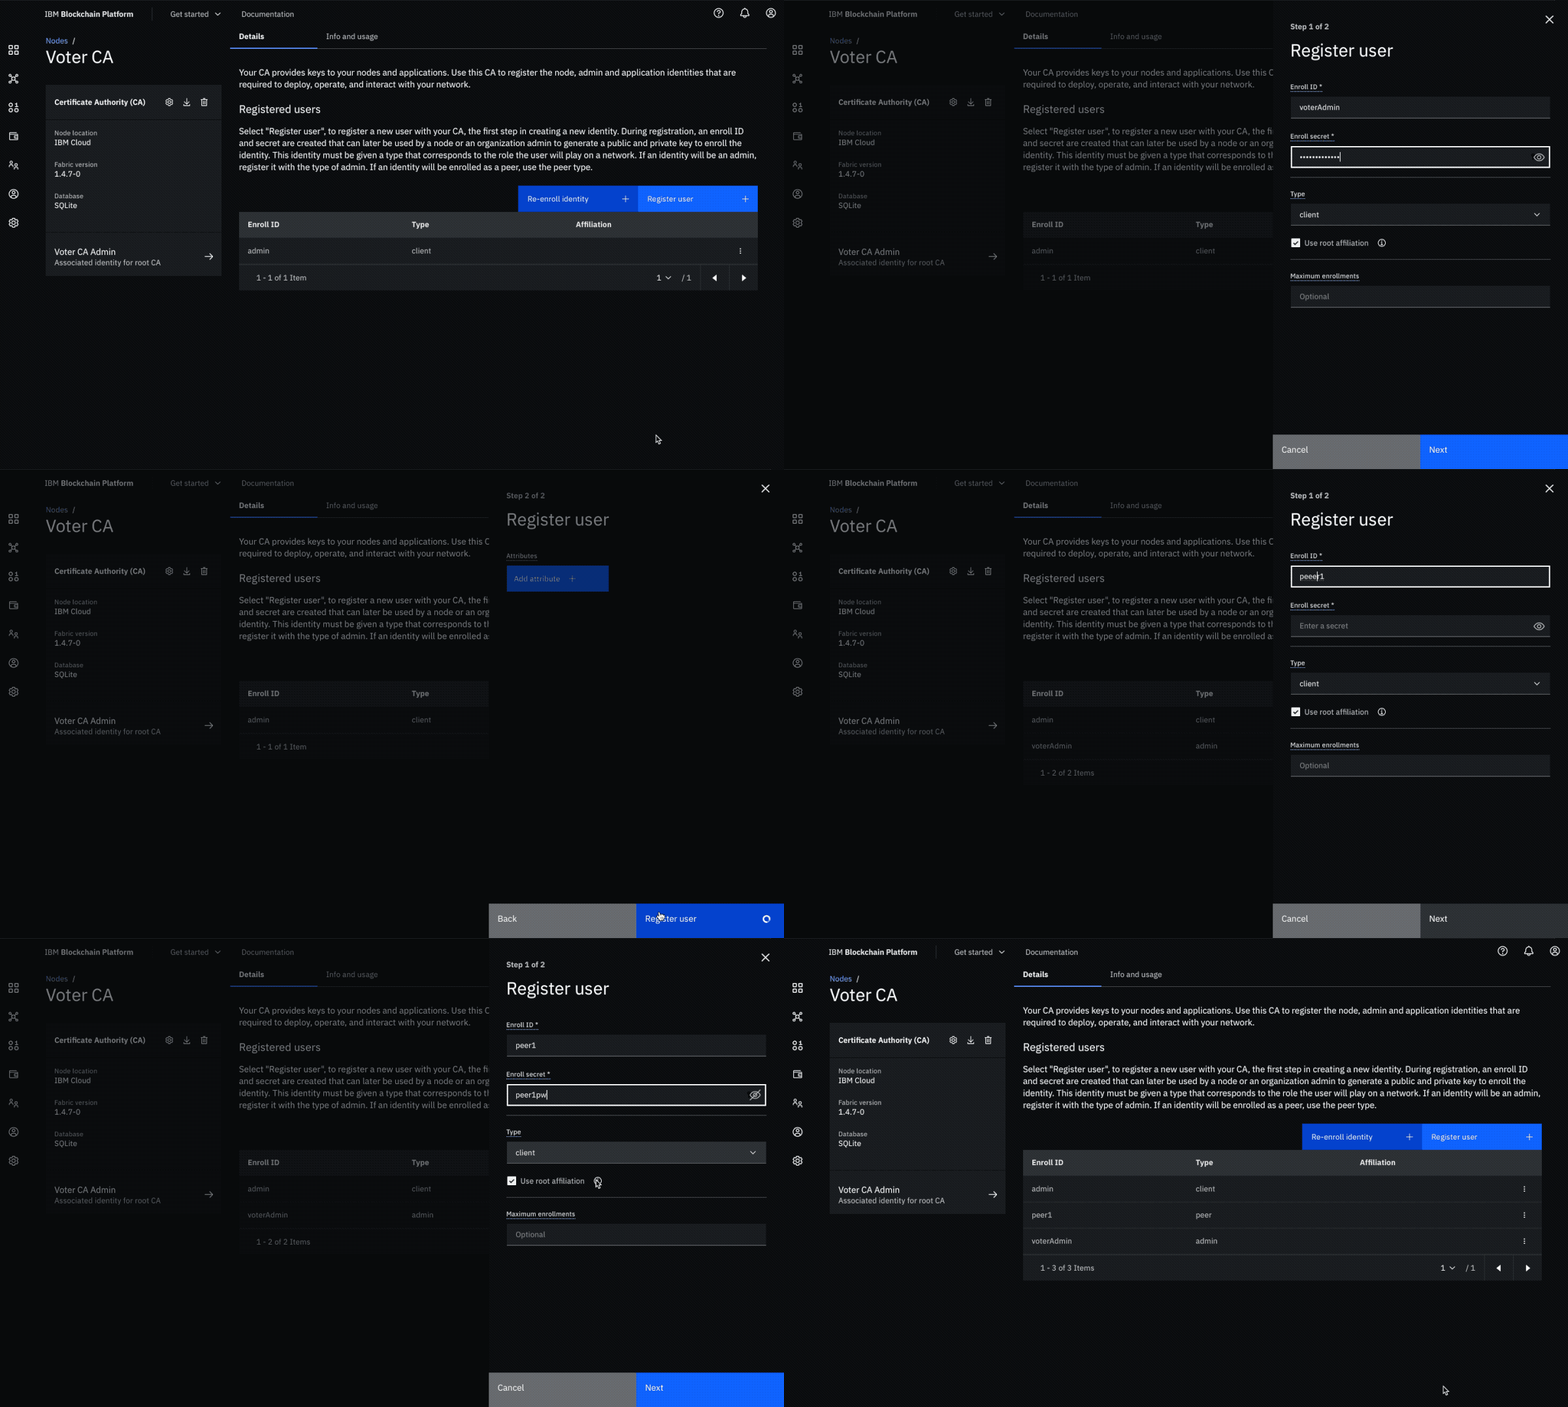
Use your CA to register identities
- Select the Voter CA Certificate Authority and ensure the
adminidentity that was created for the CA is visible in the table. - The next step is to register an admin for the organization "Voter". Click on the Register User + button. Give an Enroll ID of
voterAdminand an Enroll secret ofvoterAdminpw. Set the Type for this identity asadmin. Specify to Use root affiliation. Leave the Maximum enrollments field blank. Click Next. - Skip the section to add attributes to this user and click Register user.
- Repeat the process to create an identity of the peer. Click on the Register User + button. Give an Enroll ID of
peer1and an Enroll secret ofpeer1pw. Set the Type for this identity aspeer. Specify to Use root affiliation. Leave the Maximum enrollments field blank. Click Next. - Skip the section to add attributes to this user and click Register user.
- Select the Voter CA Certificate Authority and ensure the
-
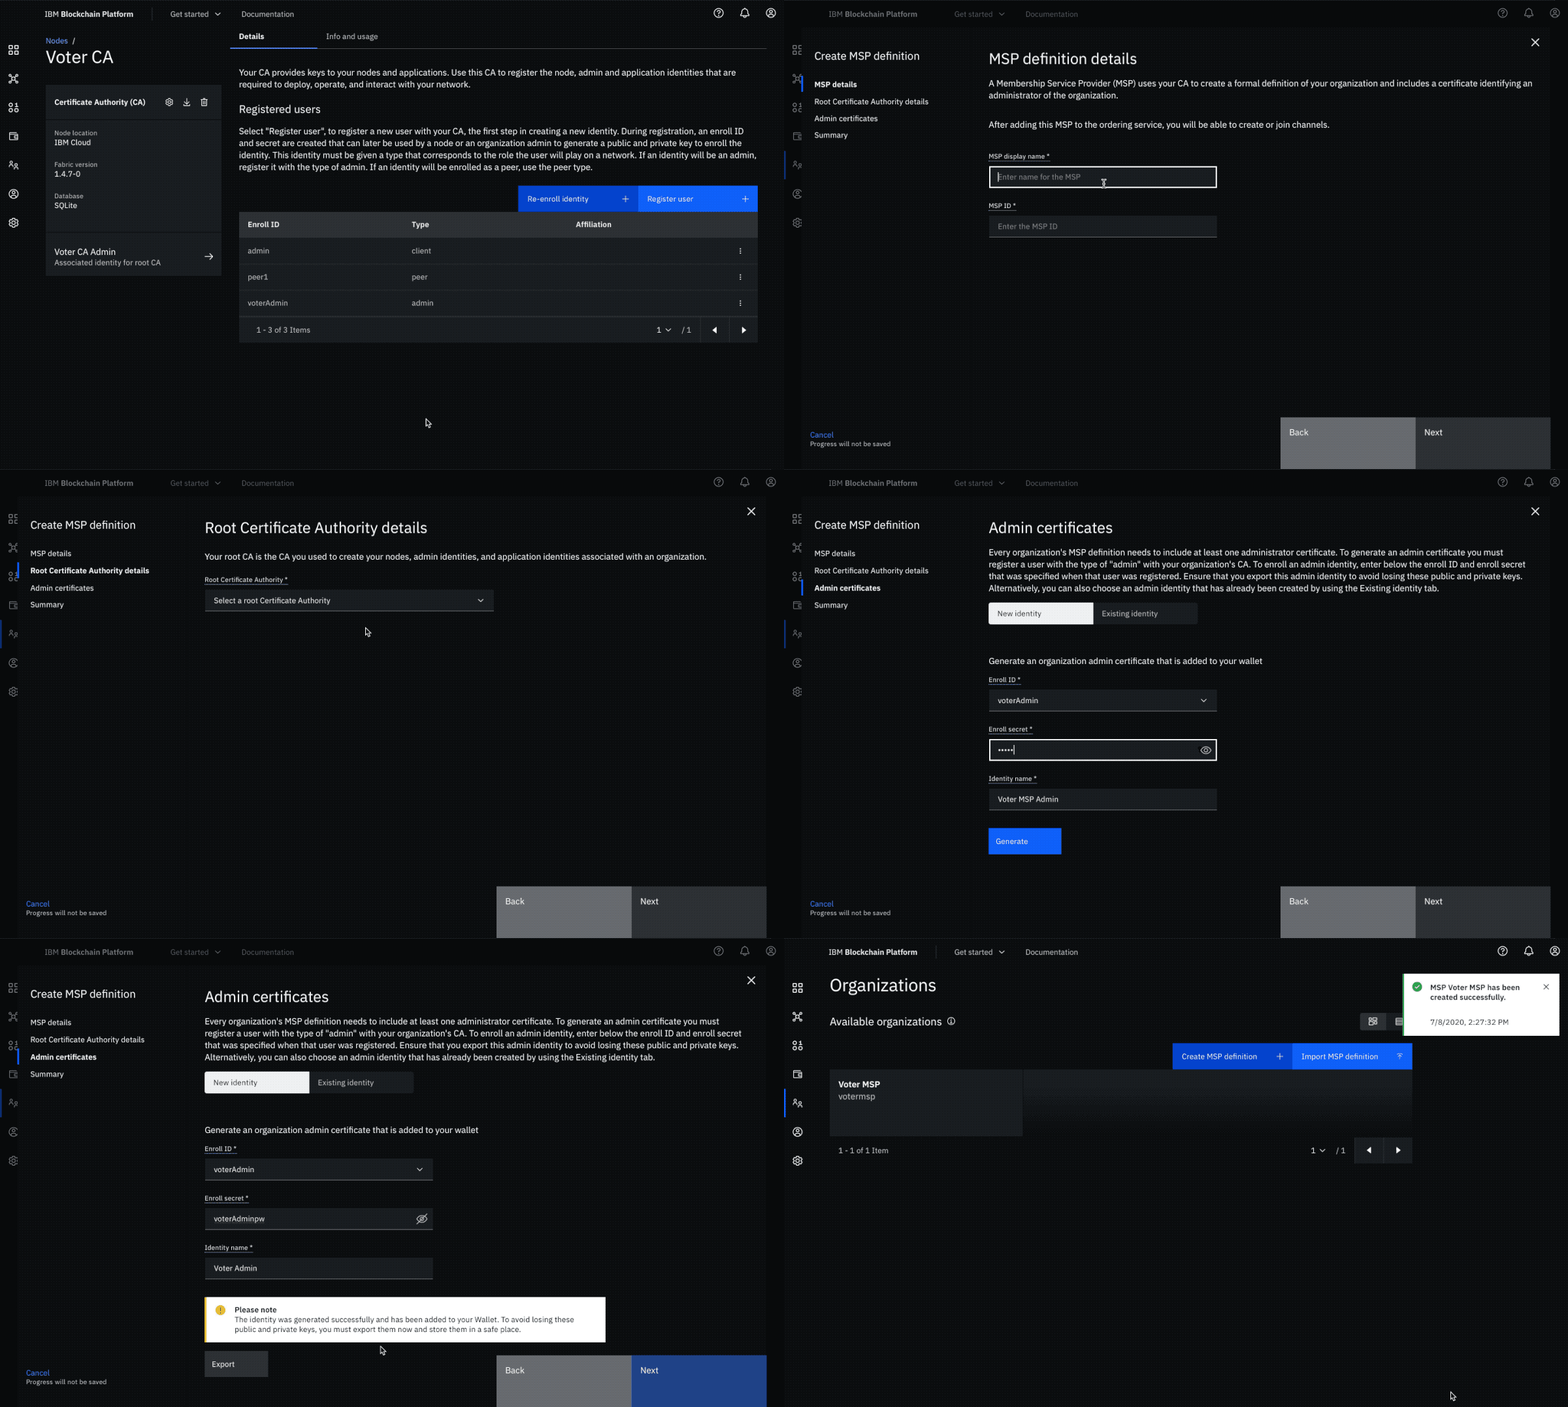
Create the peer organization MSP definition
- Navigate to the Organizations tab in the left navigation and click Create MSP definition +.
- Enter the MSP display name as
Voter MSPand the MSP ID asvotermsp. Click Next. - Specify
Voter CAas the Root Certificate Authority. Click Next. - Select the New identity tab. Give the Enroll ID and Enroll secret for your organization admin, i.e.
voterAdminandvoterAdminpwrespectively. Then, give the Identity name asVoter Admin. - Click the Generate button to enroll this identity as the admin of your organization and add the identity to the wallet. Click Export to export the admin certificates to your file system. Click Next.
- Review all the information and click Create MSP definition.
-
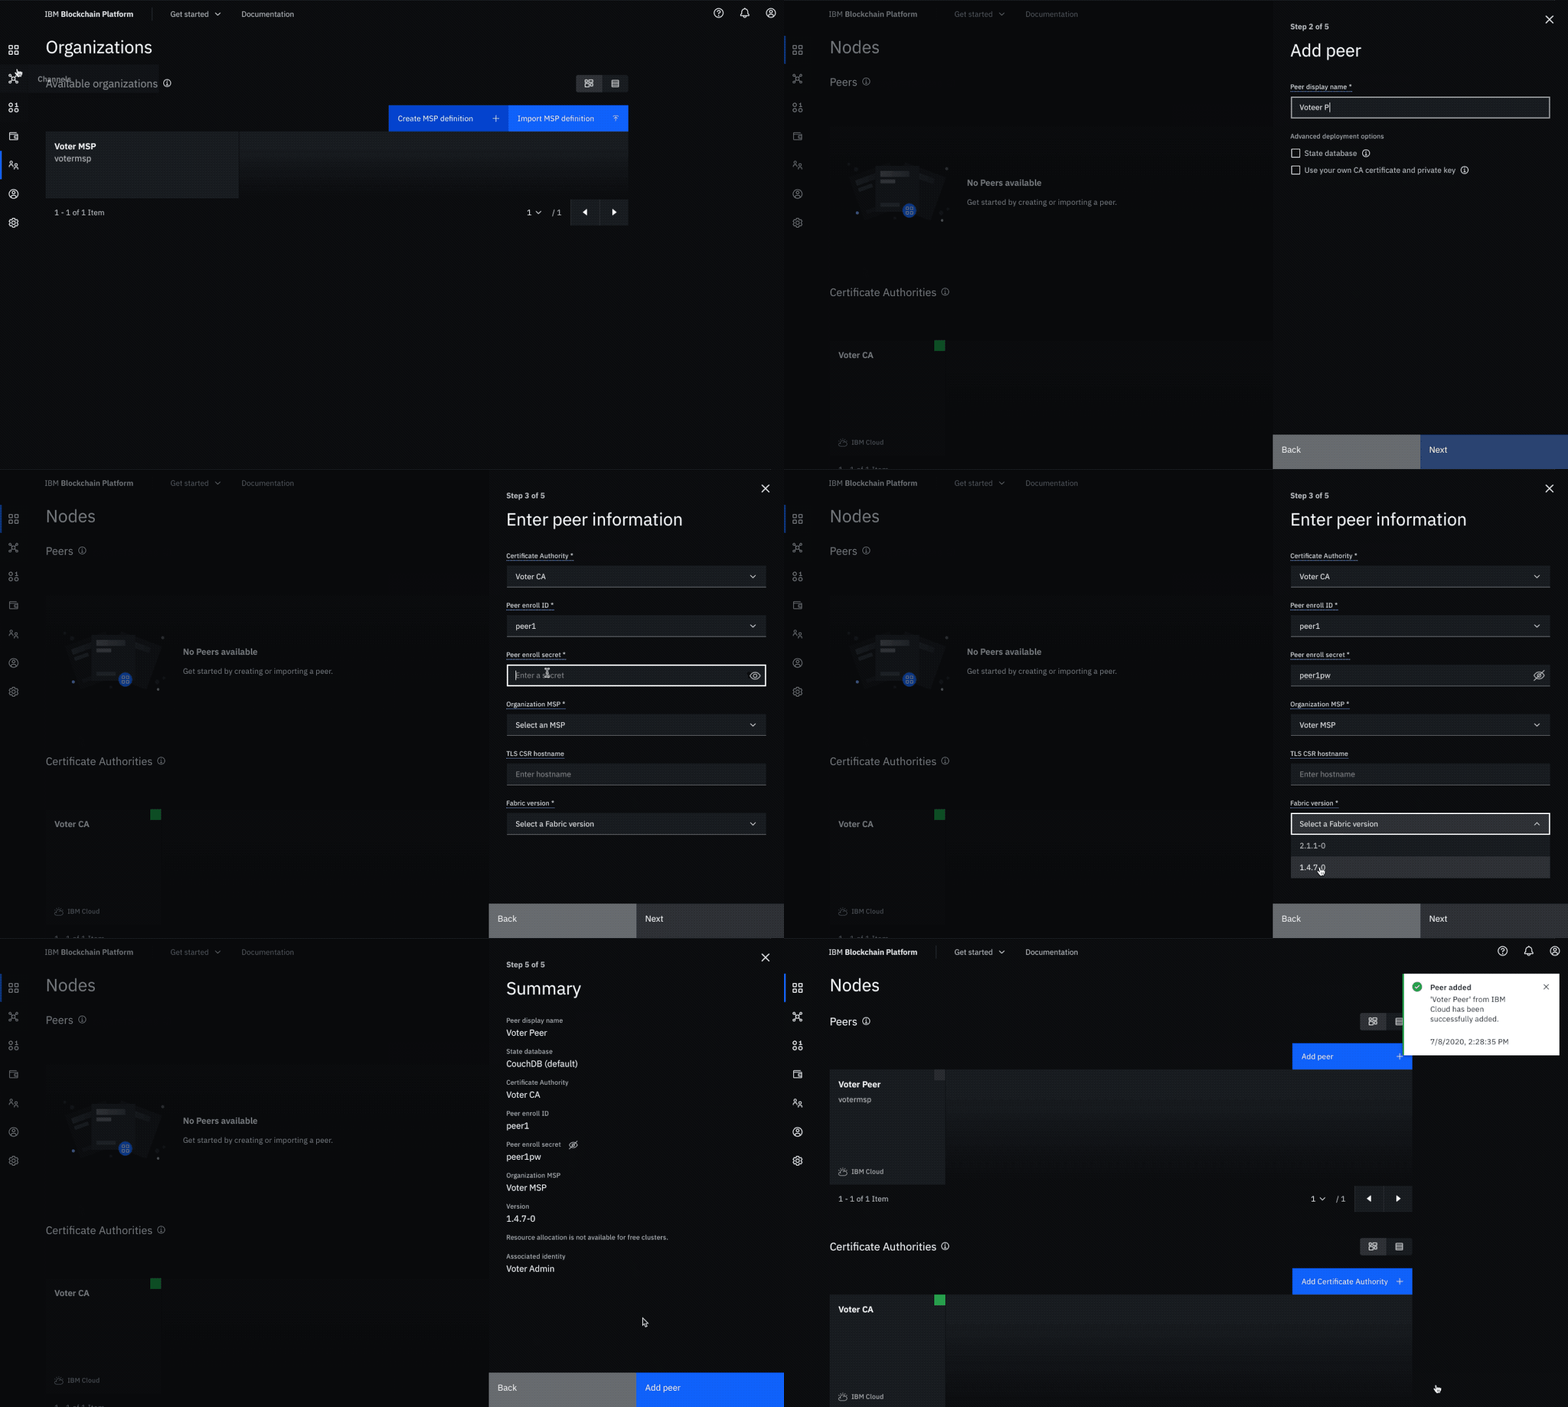
Create a peer
- Navigate to the Nodes tab in the left navigation and click Add peer +.
- Click Create a peer + and then click Next.
- Give the Peer display name as
Voter Peerand click Next. - On the next screen, select
Voter CAas the Certificate Authority. Then, give the Peer enroll ID and Peer enroll secret aspeer1andpeer1pwrespectively. Select the Organization MSP asVoter MSP. Leave the TLS CSR hostname blank and select1.4.7-0in the drop-down for Fabric version. Click Next. - Provide
Voter Adminas the Peer administrator identity and click Next. - Review the summary and click Add peer.
Create the node that orders transactions
-
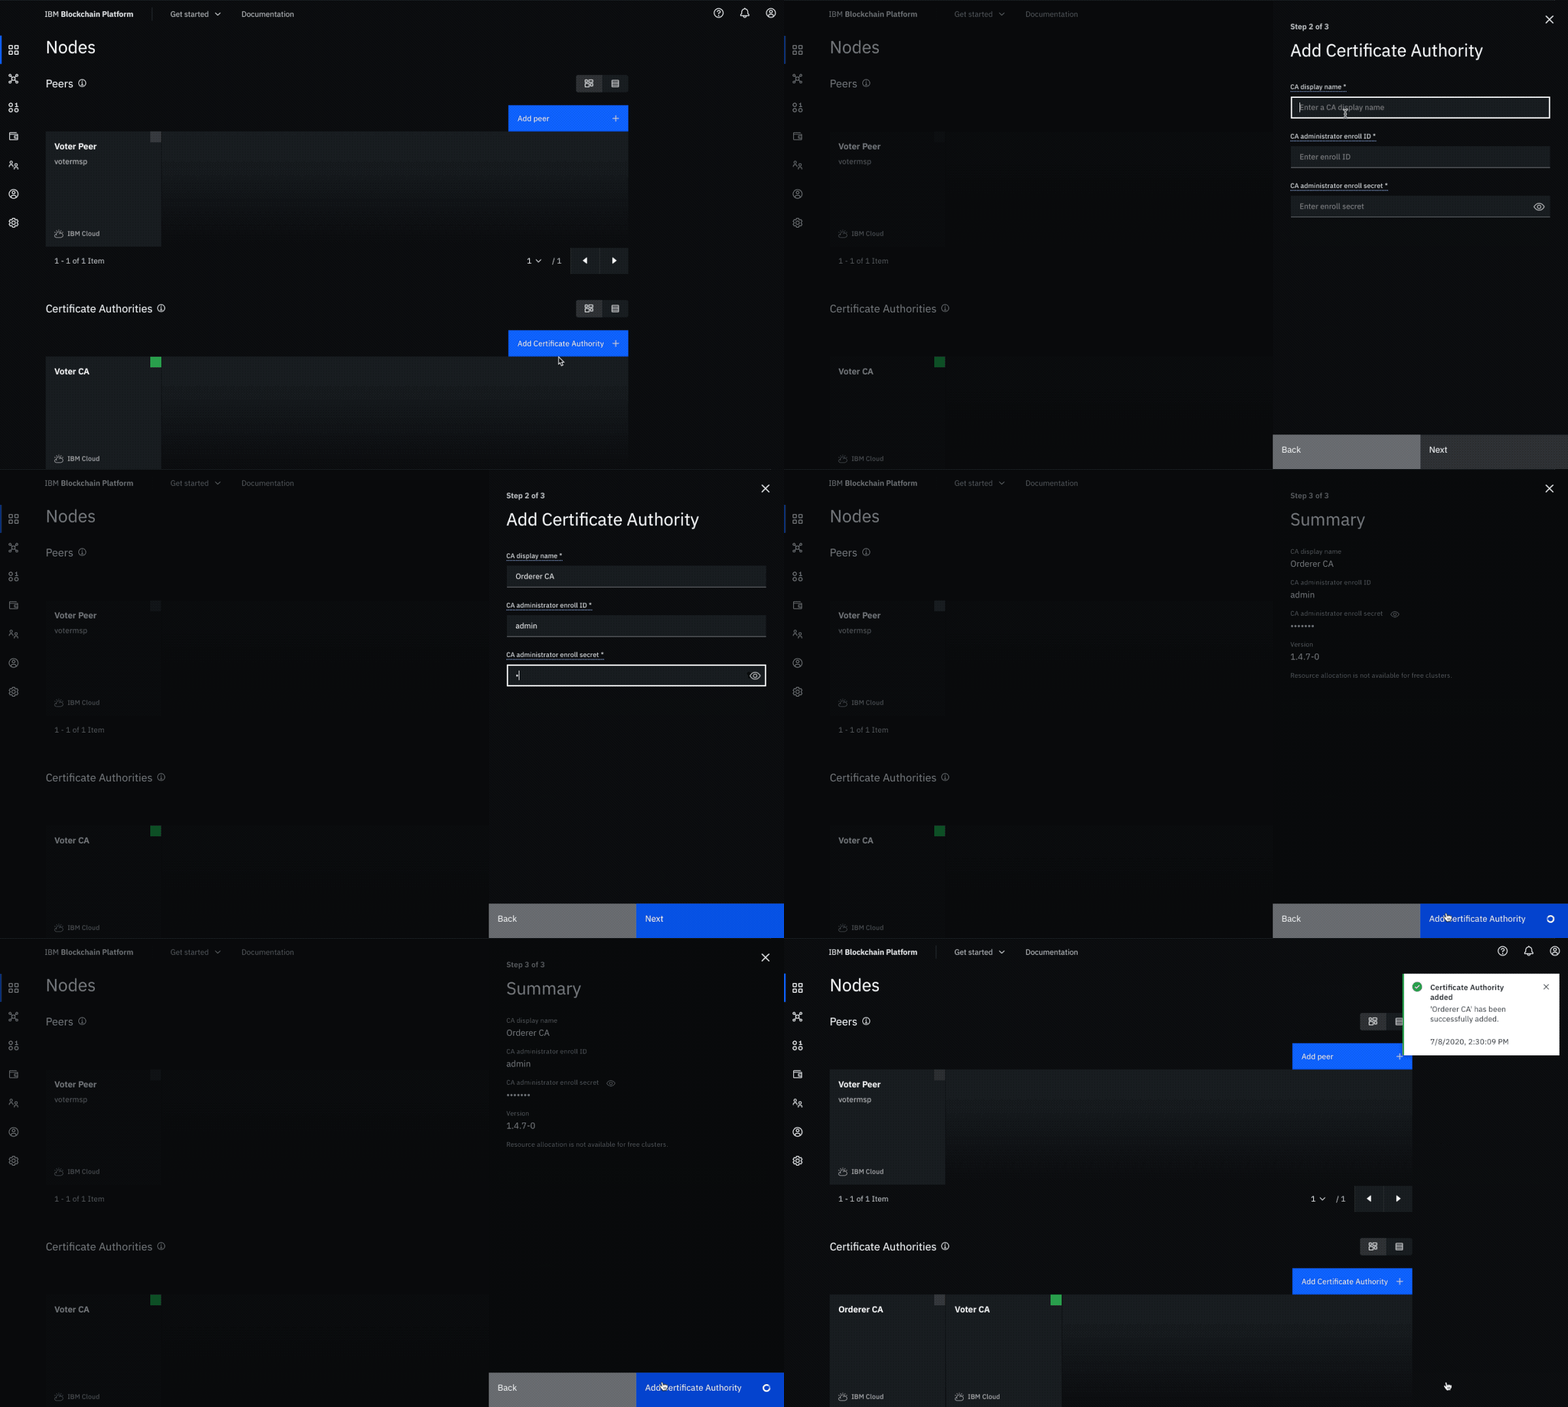
Create your orderer organization CA
- Navigate to the Nodes tab in the left navigation and click Add Certificate Authority +.
- Click Create a Certificate Authority + and click Next.
- Give it a CA display name of
Orderer CA, a CA administrator enroll ID ofadminand a CA administrator enroll secret ofadminpw, then click Next. - Review the summary and click Add Certificate Authority.
-
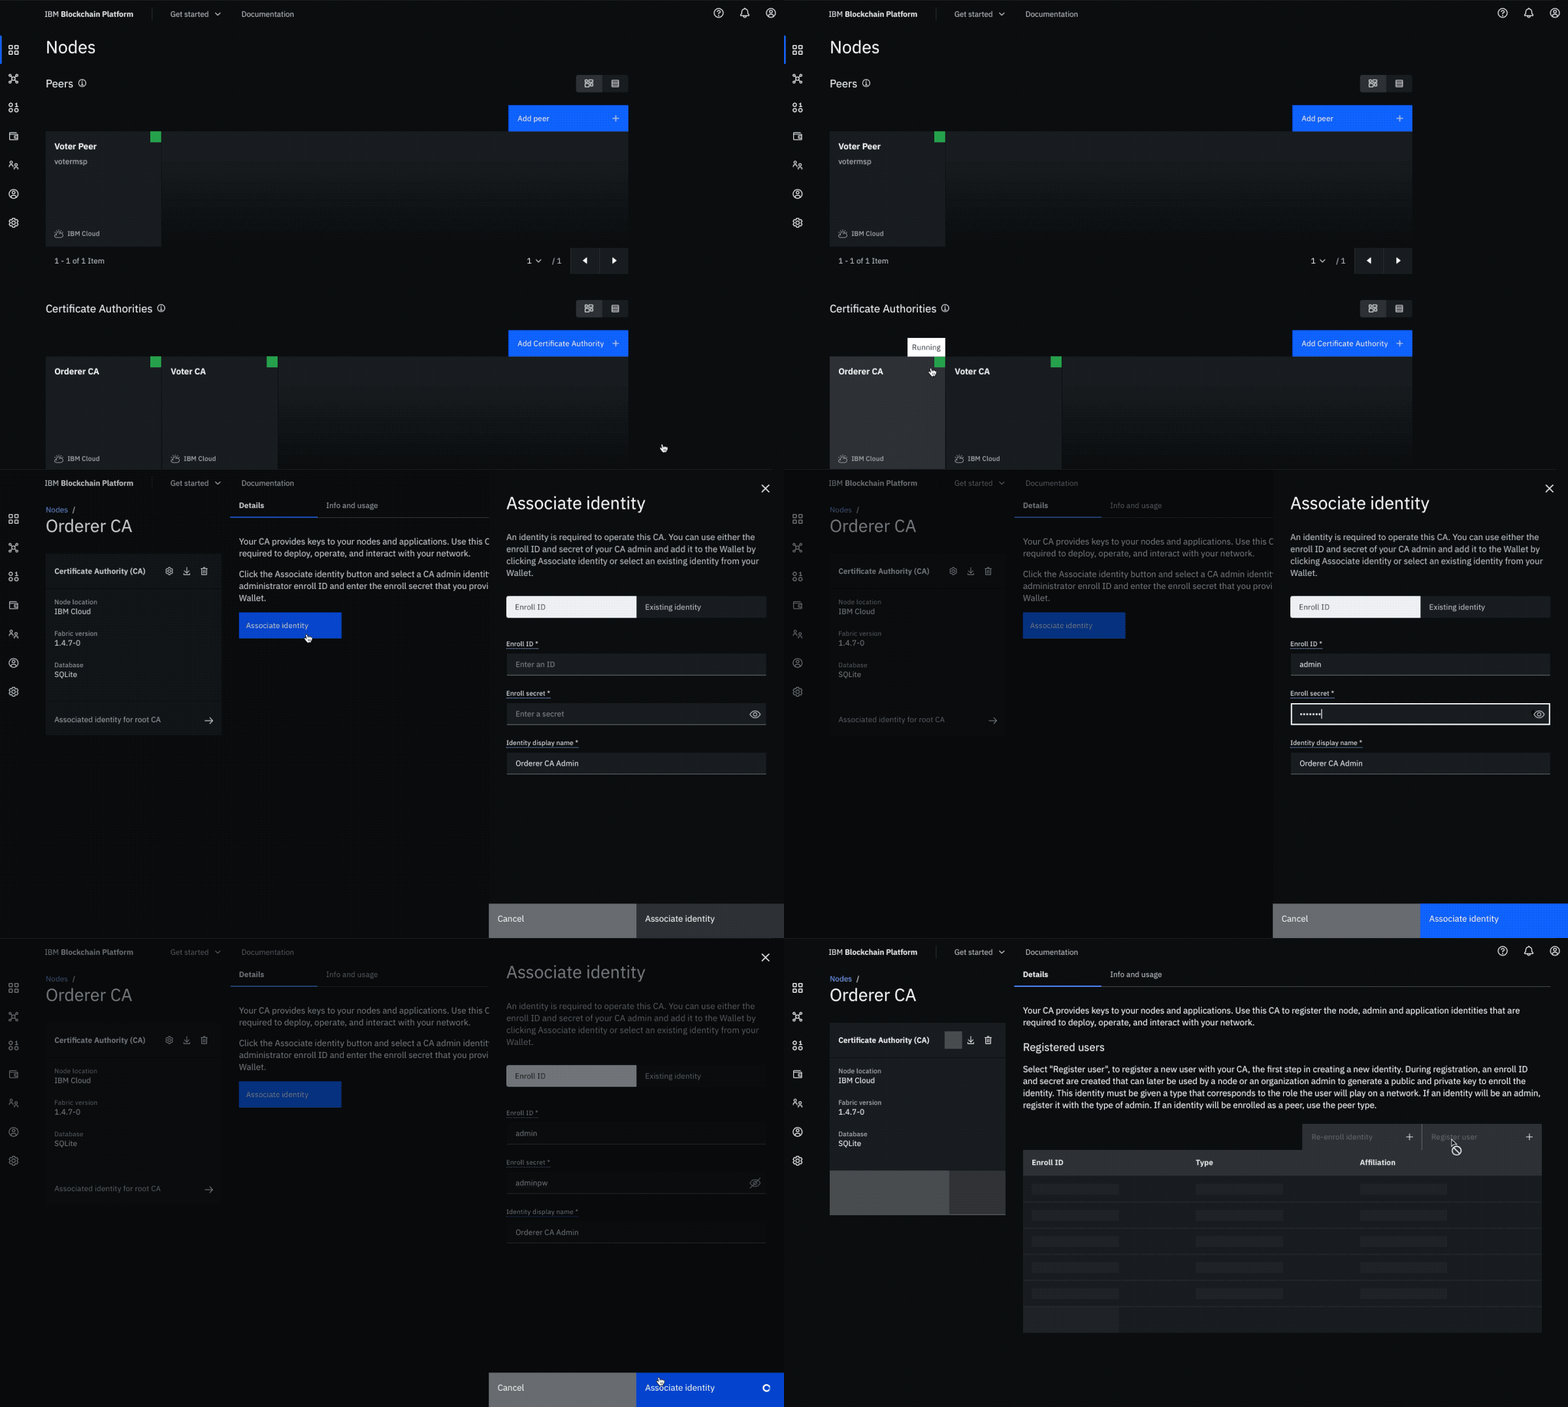
Associate the orderer organization CA admin identity
- In the Nodes tab, select the Orderer CA once it is running (indicated by the green box in the tile).
- Click Associate identity on the CA overview panel.
- On the side panel, select the Enroll ID tab.
- Provide an Enroll ID of
adminand an Enroll secret ofadminpw. Use the default value ofOrderer CA Adminfor the Identity display name. - Click Associate identity to add the identity into your wallet and associate the admin identity with the Orderer CA.
-
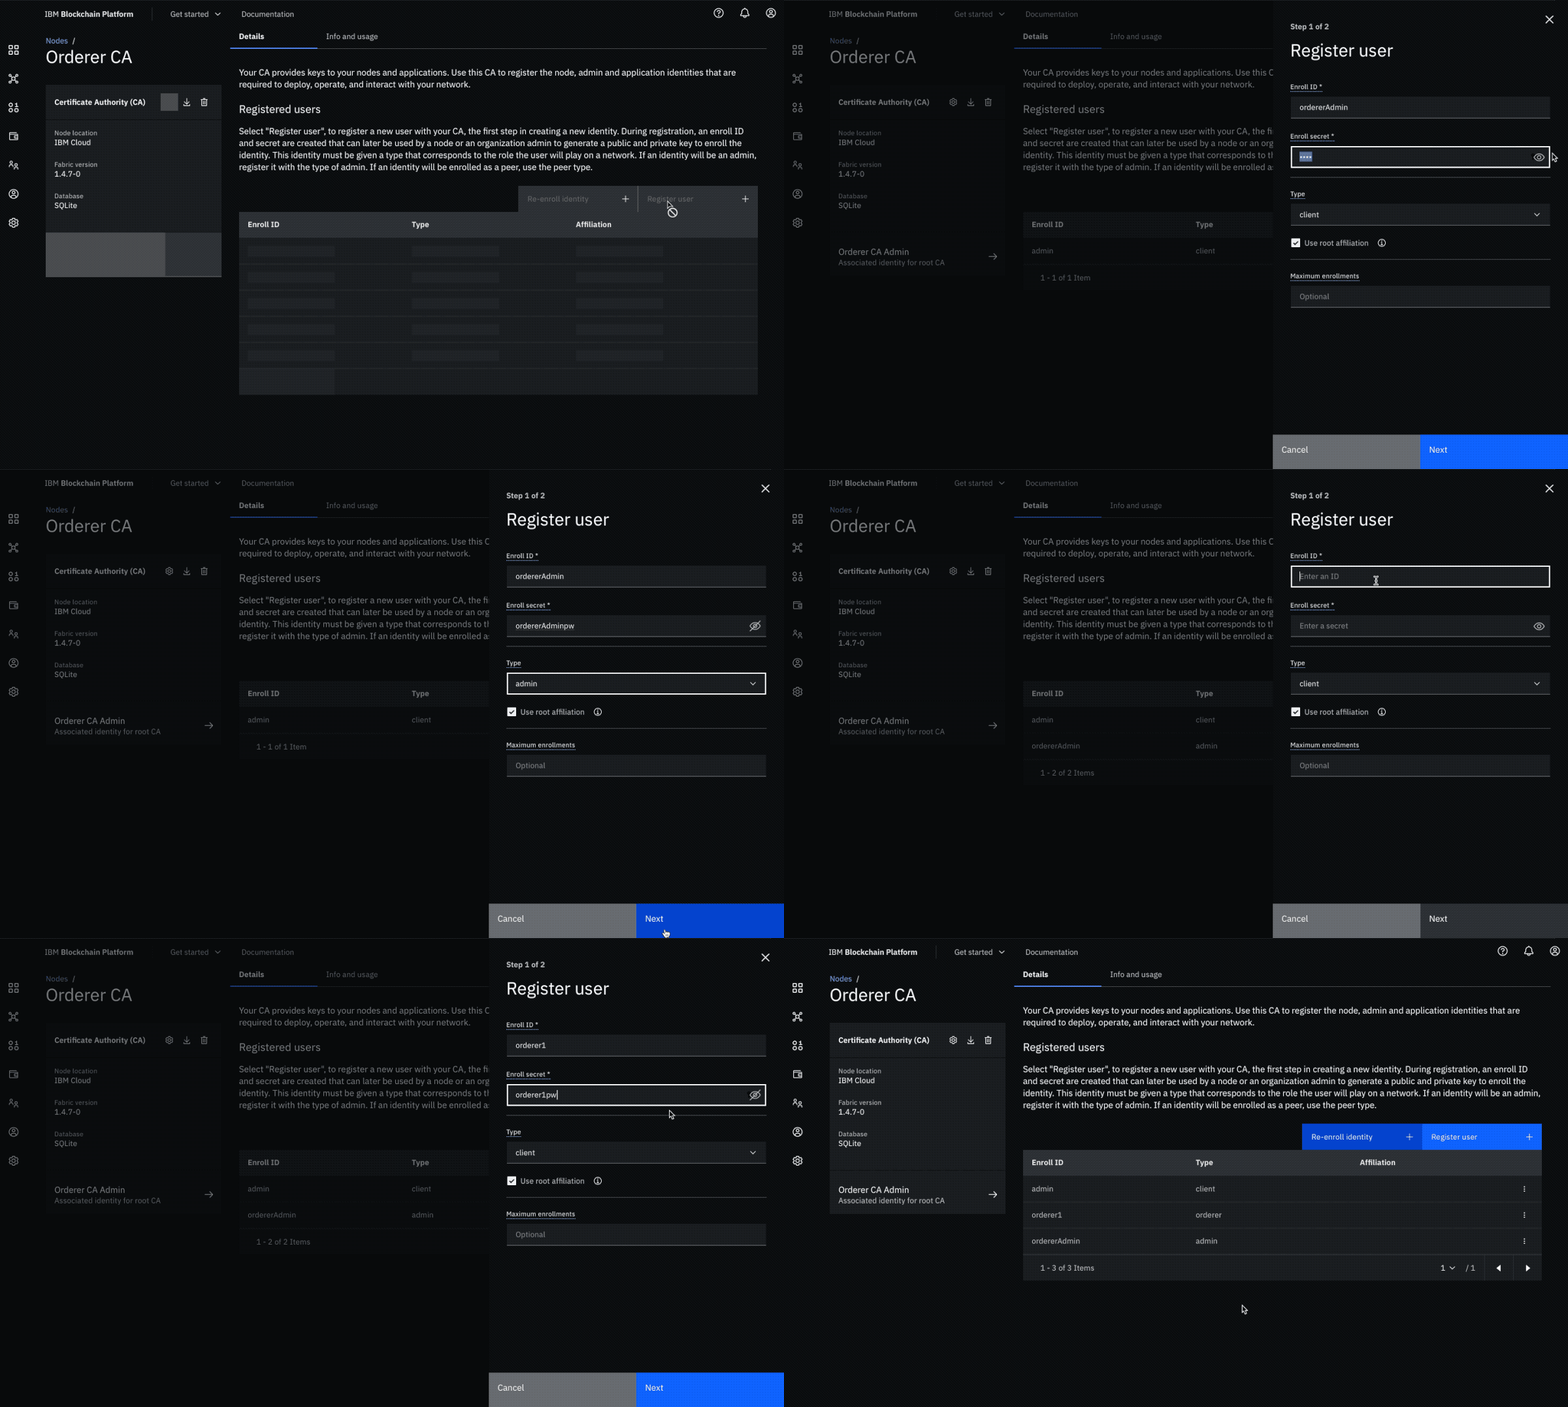
Use your CA to register orderer and orderer admin identities
- Select the Orderer CA Certificate Authority and ensure the
adminidentity that was created for the CA is visible in the table. - The next step is to register an admin for the organization "Orderer". Click on the Register User + button. Give an Enroll ID of
ordererAdminand an Enroll secret ofordererAdminpw. Set the Type for this identity asadmin. Specify to Use root affiliation. Leave the Maximum enrollments field blank. Click Next. - Skip the section to add attributes to this user and click Register user.
- Repeat the process to create an identity of the orderer. Click on the Register User + button. Give an Enroll ID of
orderer1and an Enroll secret oforderer1pw. Set the Type for this identity asorderer. Specify to Use root affiliation. Leave the Maximum enrollments field blank. Click Next. - Skip the section to add attributes to this user and click Register user.
- Select the Orderer CA Certificate Authority and ensure the
-
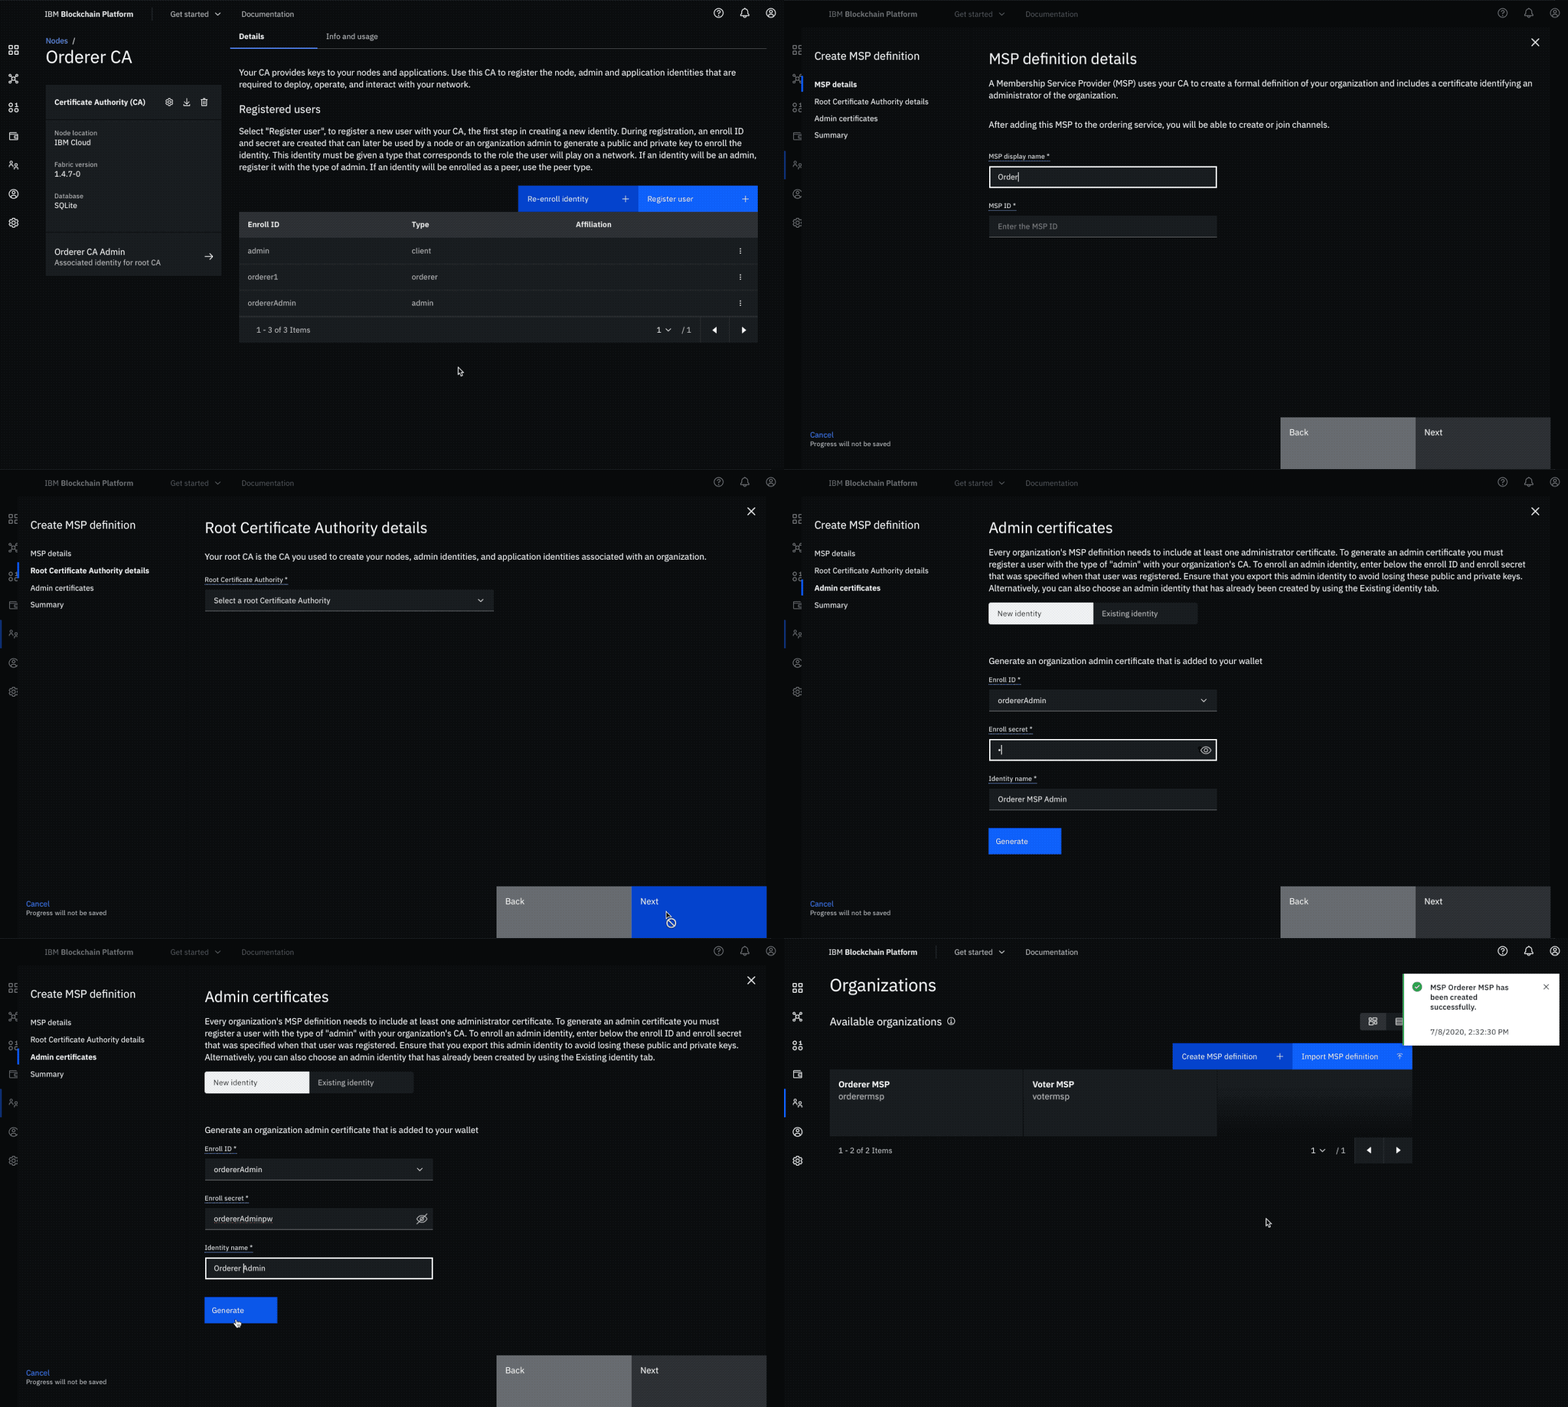
Create the orderer organization MSP definition
- Navigate to the Organizations tab in the left navigation and click Create MSP definition +.
- Enter the MSP display name as
Orderer MSPand the MSP ID asorderermsp. Click Next. - Specify
Orderer CAas the Root Certificate Authority. Click Next. - Select the New identity tab. Give the Enroll ID and Enroll secret for your organization admin, i.e.
ordererAdminandordererAdminpwrespectively. Then, give the Identity name asOrderer Admin. - Click the Generate button to enroll this identity as the admin of your organization and add the identity to the wallet. Click Export to export the admin certificates to your file system. Click Next.
- Review all the information and click Create MSP definition.
-
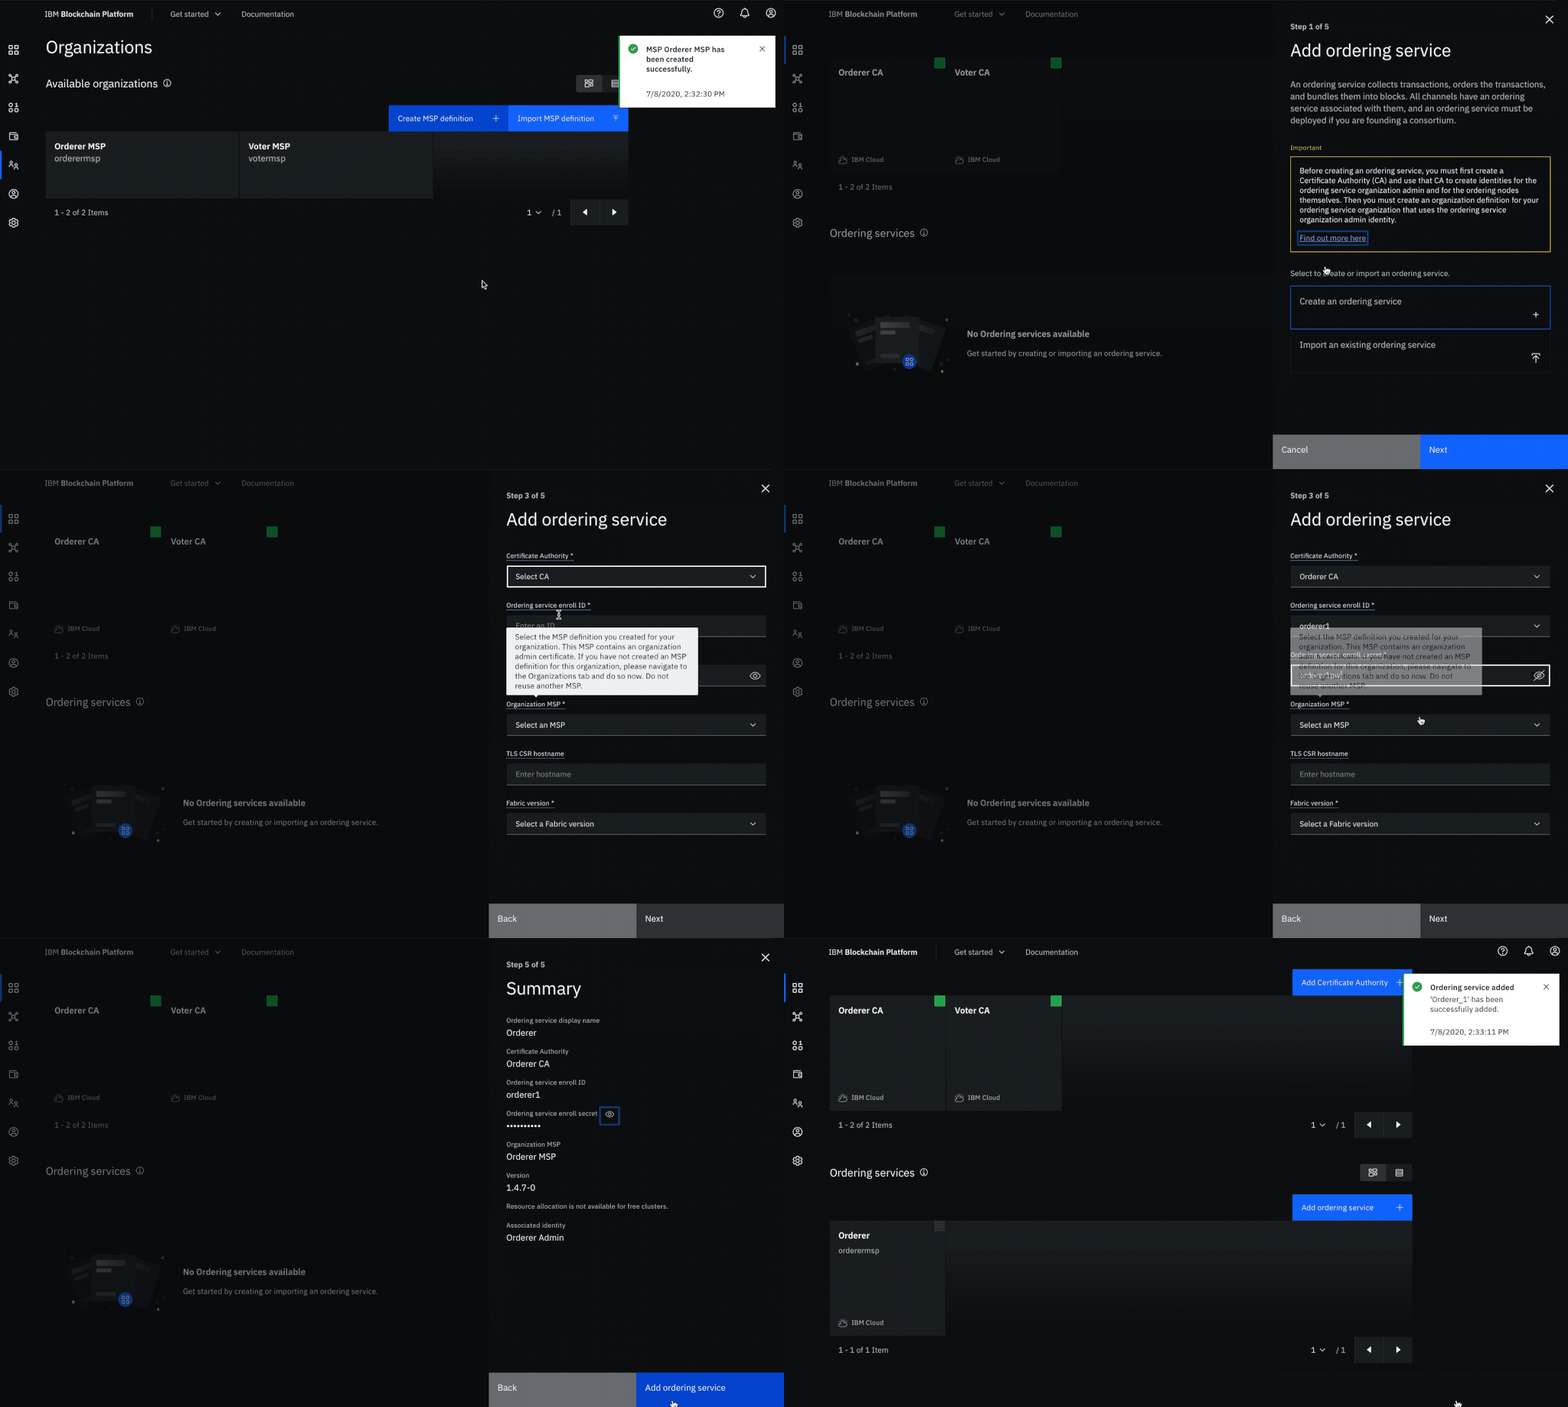
Create an orderer
- Navigate to the Nodes tab in the left navigation and click Add ordering service +.
- Click Create an ordering service + and then click Next.
- Give the Ordering service display name as
Ordererand click Next. - On the next screen, select
Orderer CAas the Certificate Authority. Then, give the Ordering service enroll ID and Ordering service enroll secret asorderer1andorderer1pwrespectively. Select the Organization MSP asOrderer MSP. Leave the TLS CSR hostname blank and select1.4.7-0in the drop-down for Fabric version. Click Next. - Provide
Orderer Adminas the Orderer administrator identity and click Next. - Review the summary and click Add ordering service.
-
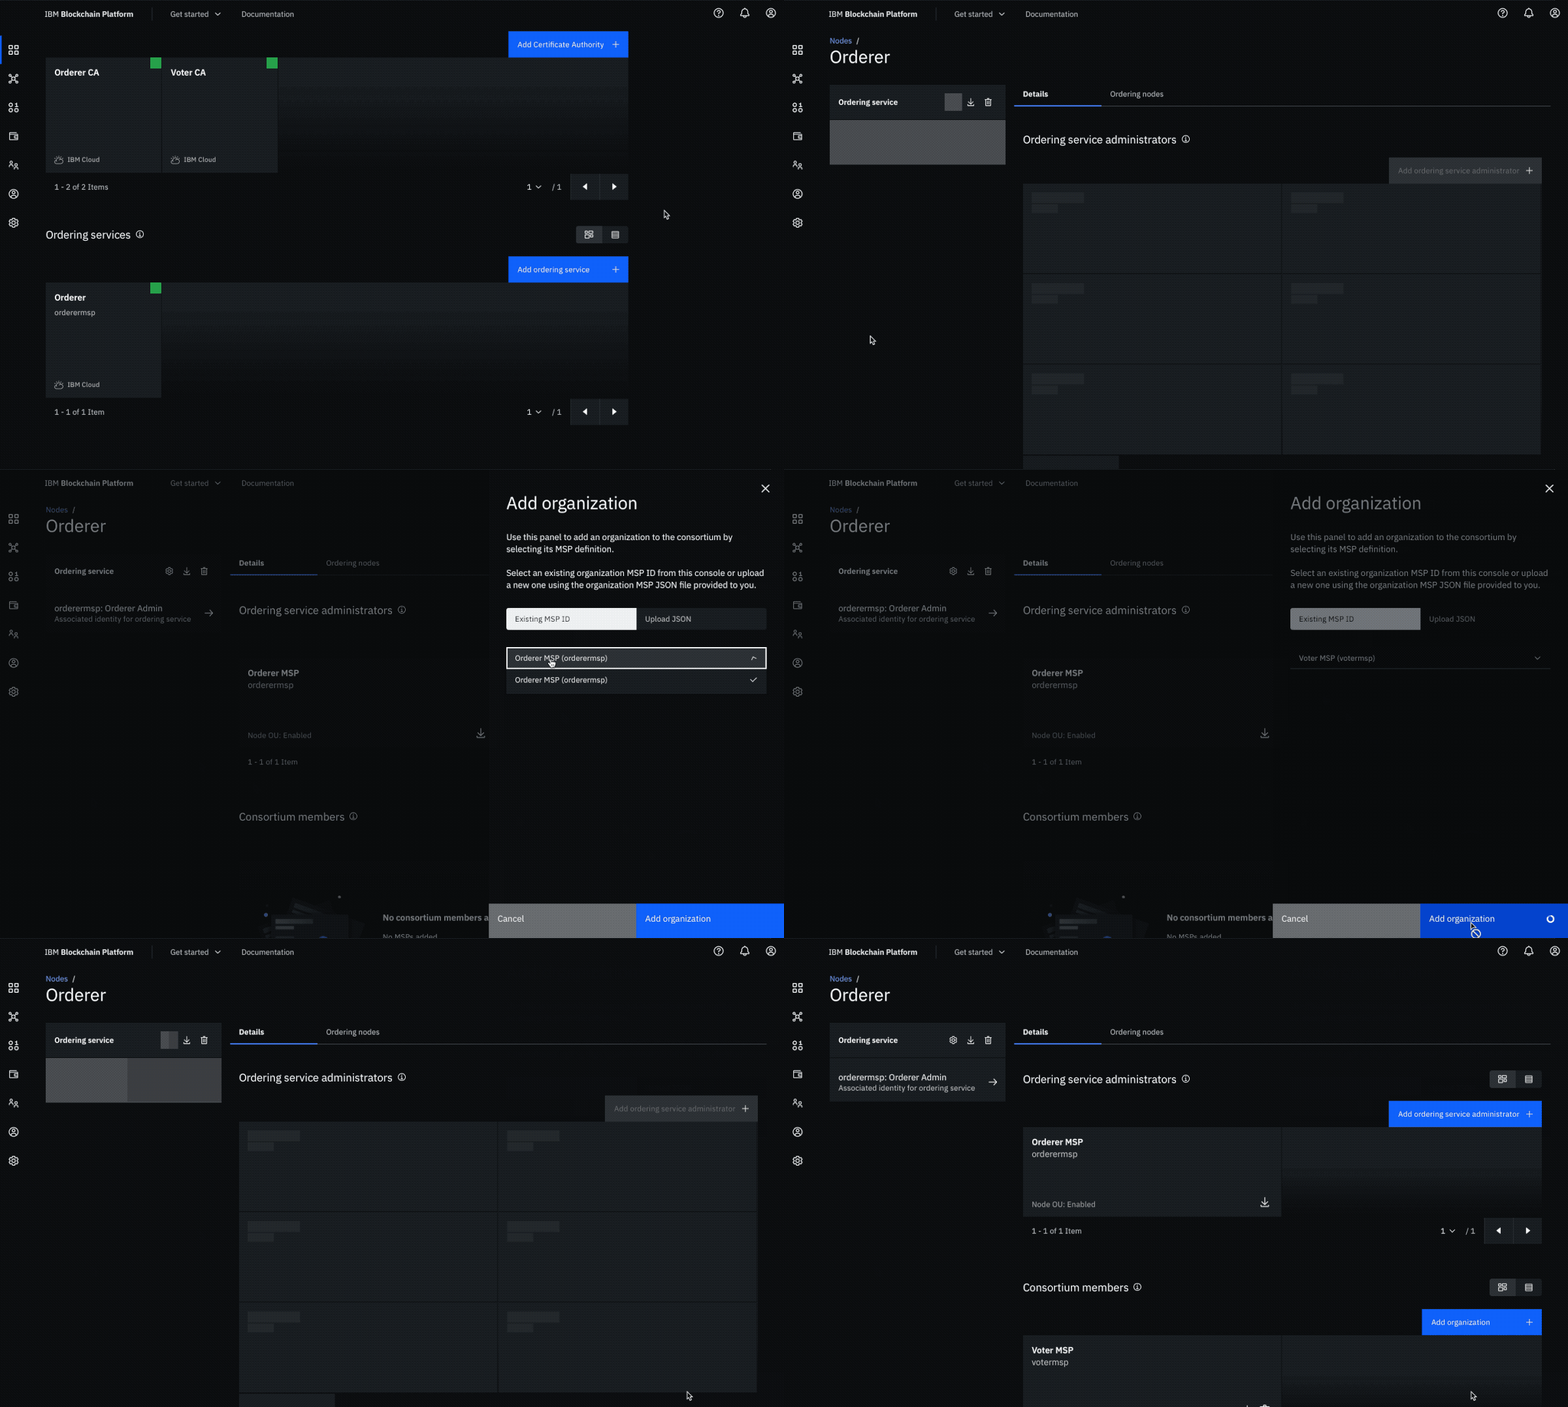
Add organization as Consortium Member on the orderer to transact
- Navigate to the Nodes tab, and click on the Orderer that was created.
- Under Consortium Members, click Add organization +.
- Select the Existing MSP ID tab. From the drop-down list, select
Voter MSP (votermsp), as this is the MSP that represents the peer's organization "Voter". - Click Add organization.
Create and join channel
-
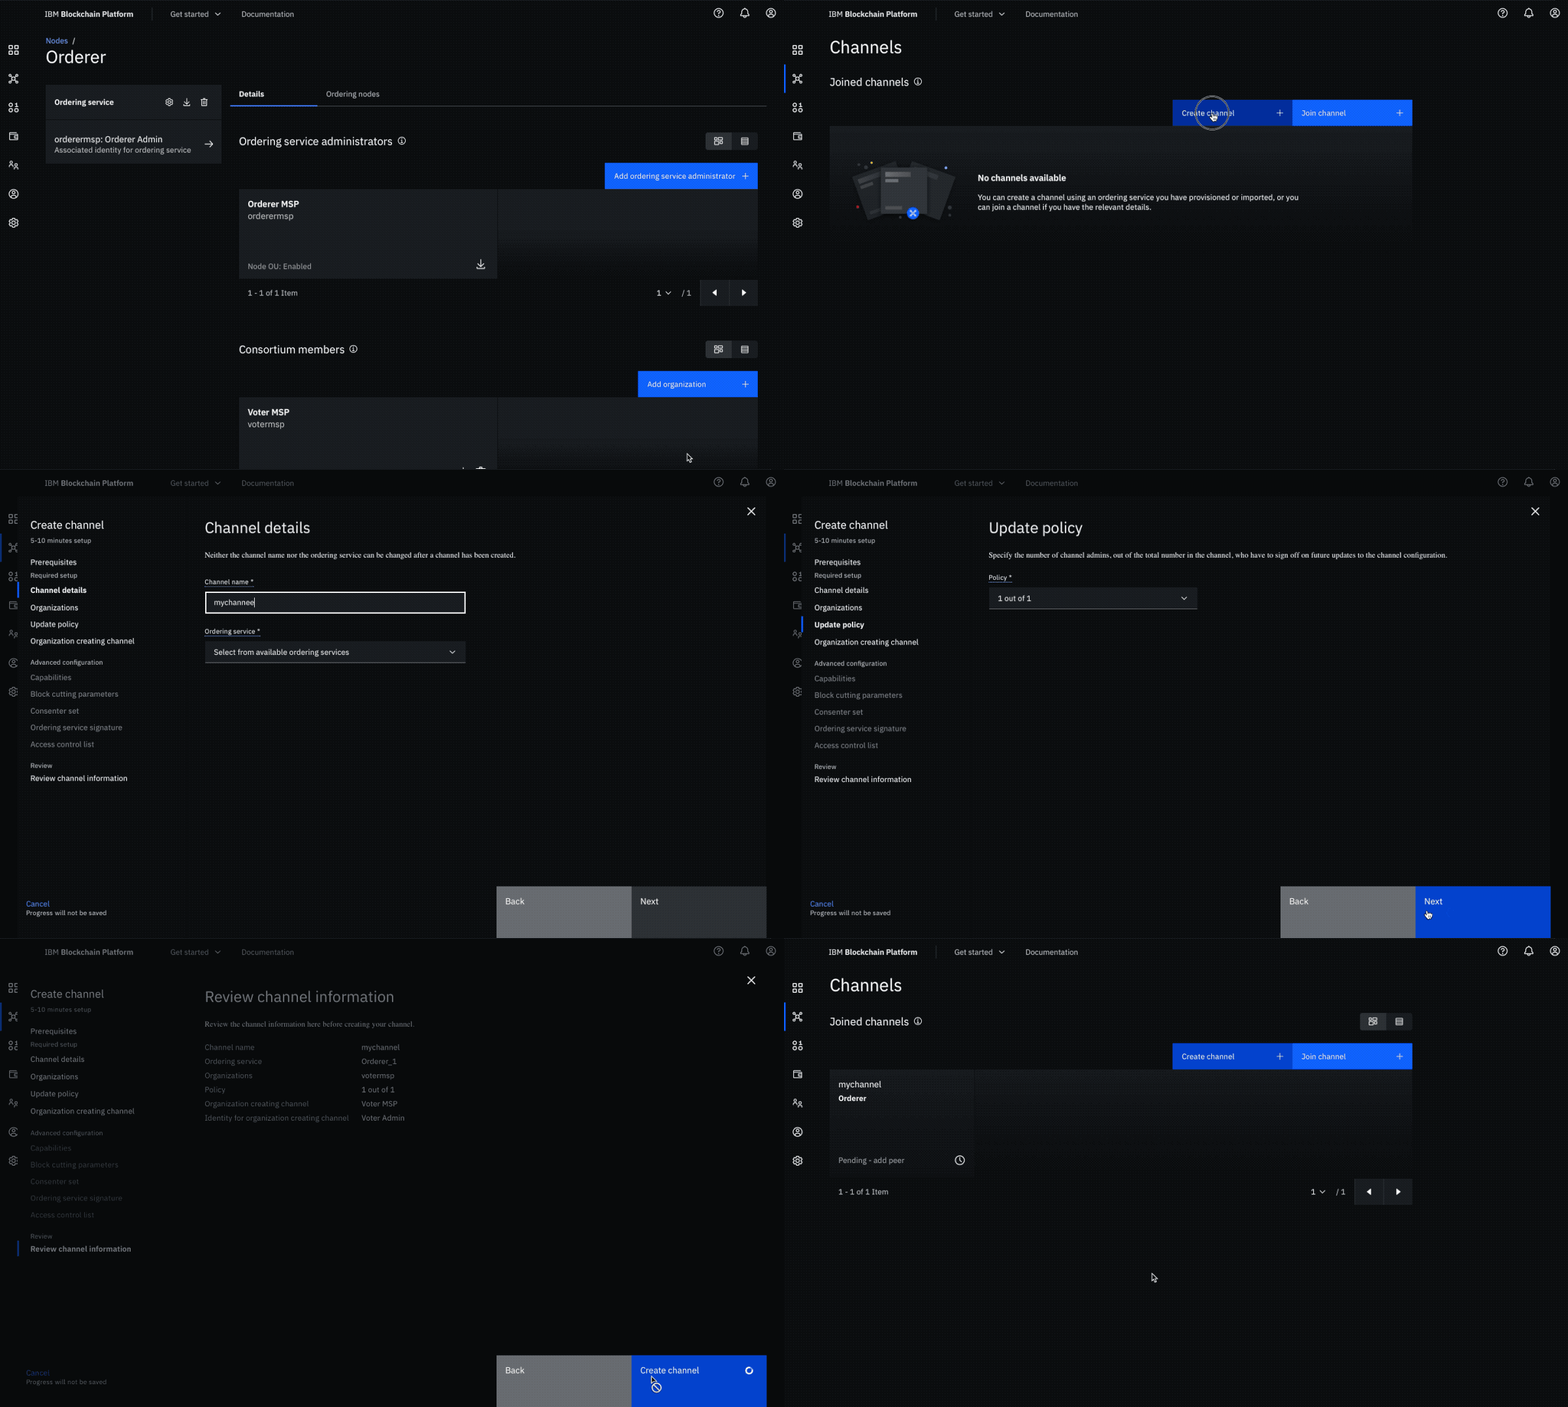
Create the channel
- Navigate to the Channels tab in the left navigation and click Create channel +.
- Click Next.
- Give the Channel name as
mychannel. SelectOrdererfrom the Ordering service drop-down list. Click Next. - Under Organizations, select
Voter MSP (votermsp)from the drop-down list to add the organization "Voter" as a member of this channel. Click the Add button. Set the permissions for this member as Operator. Click Next. - Leave the Policy as the default value i.e.
1 out of 1. Click Next. - Select the Channel creator MSP as
Voter MSP (votermsp)and the Identity asVoter Admin. Click Next. - Review the summary and click Create channel.
-
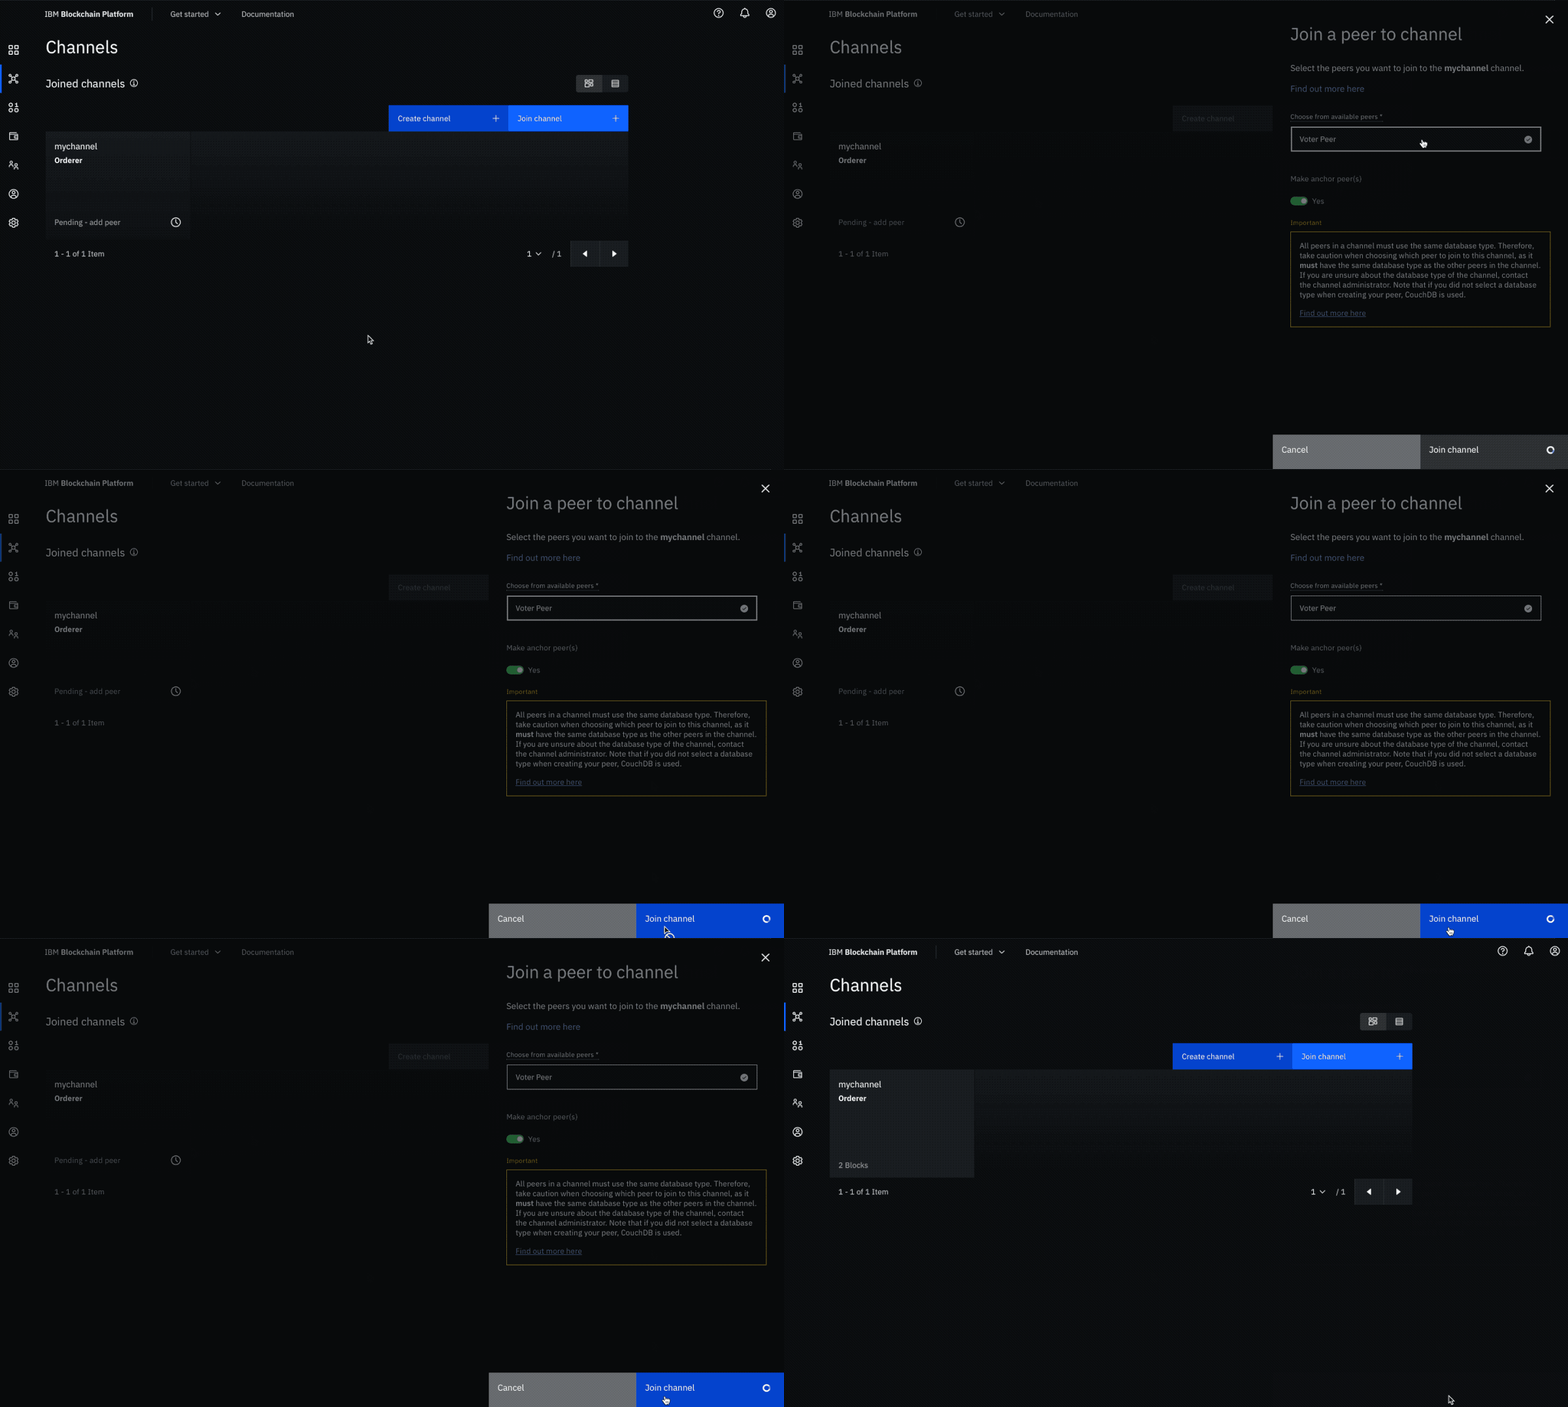
Join your peer to the channel
- Click on the newly created channel mychannel.
- In the side panel that opens, under Choose from available peers, select
Voter Peer. Once the peer is selected, a check mark will be displayed next to it. Ensure that Make anchor peer(s) is marked asYes. Click Join channel.
Step 4. Deploy voterContract Smart Contract on the network
-
Install a smart contract
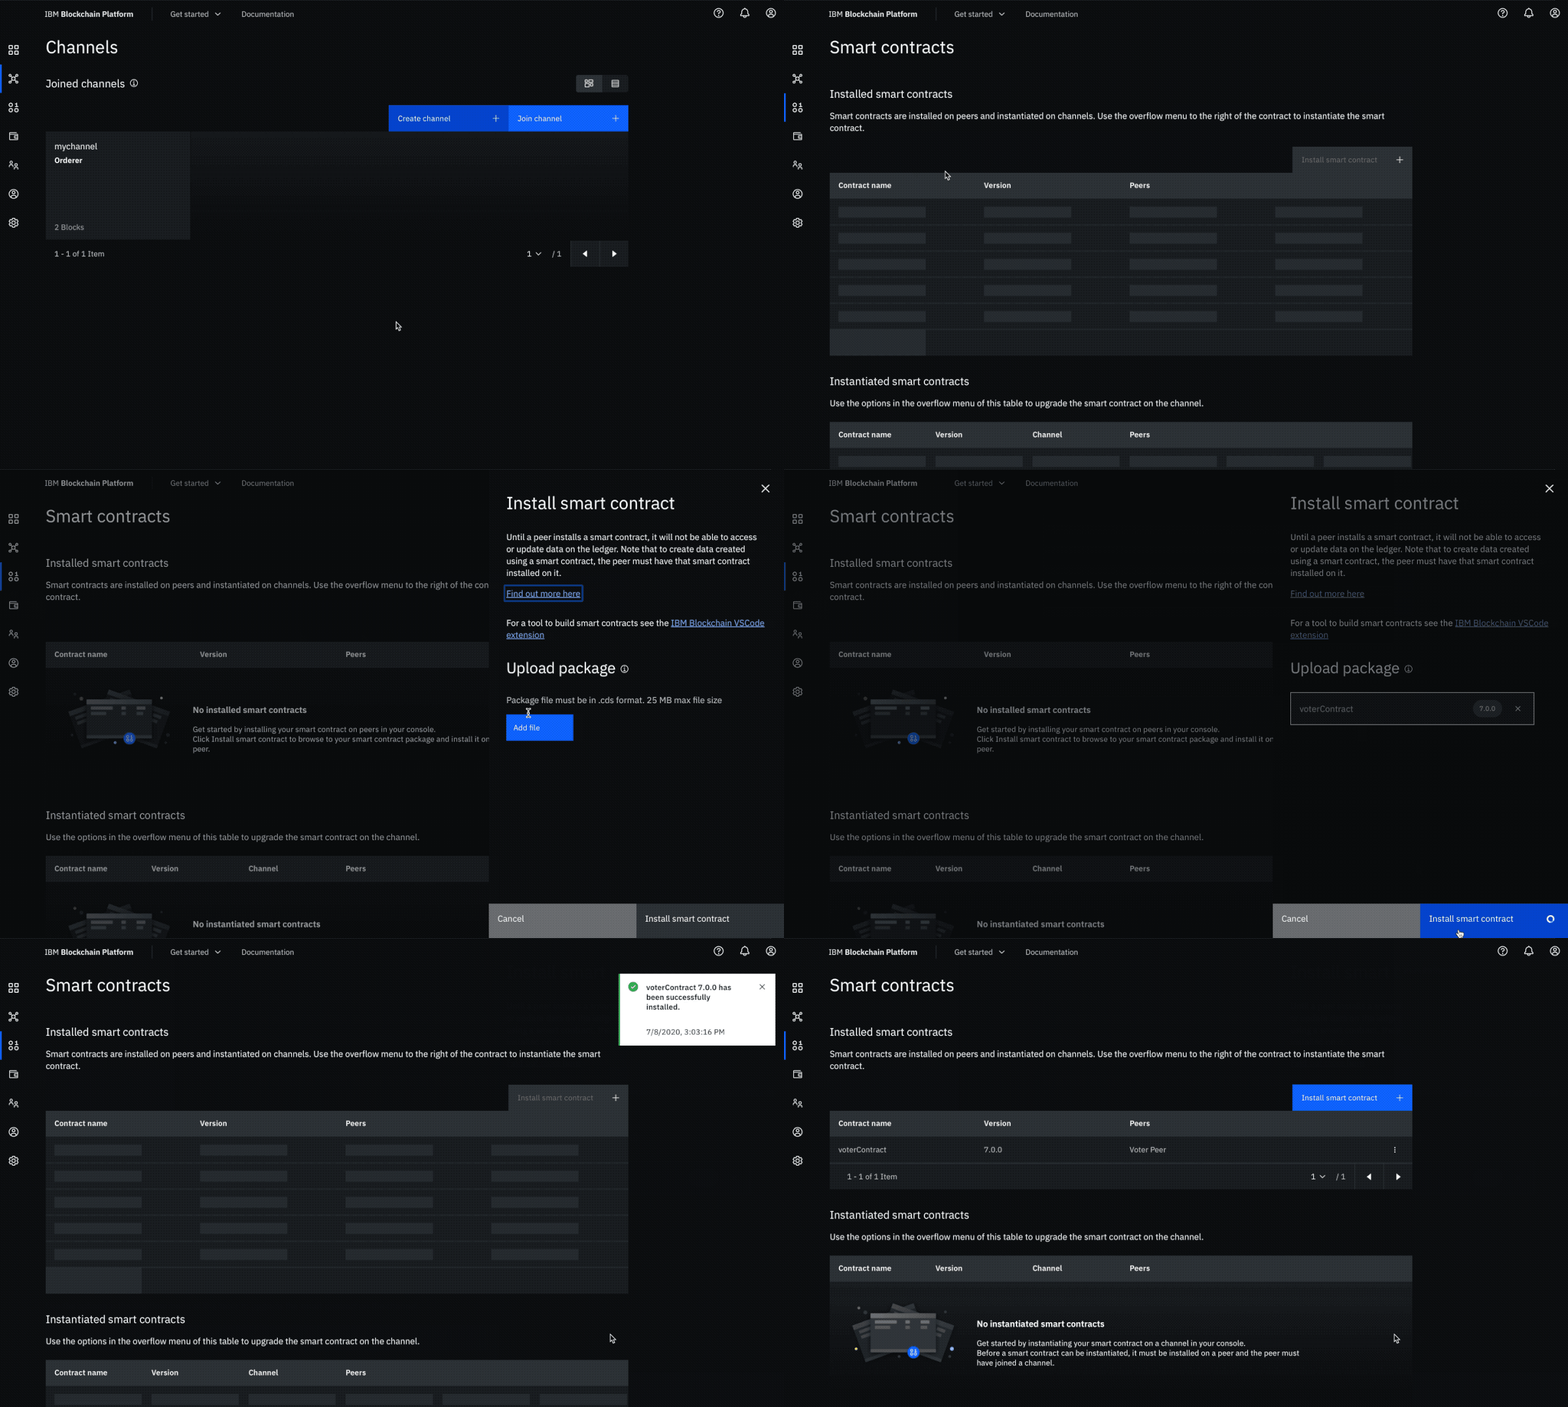
- Navigate to the Smart contracts tab in the left navigation and click Install smart contract +.
- Click on Add file.
- Browse to the location of the voterContract smart contract package file, which is in the root of the repo we cloned - the file is called
voterContract.cds. - Once the contract is uploaded, click Install smart contract.
-
Instantiate smart contract
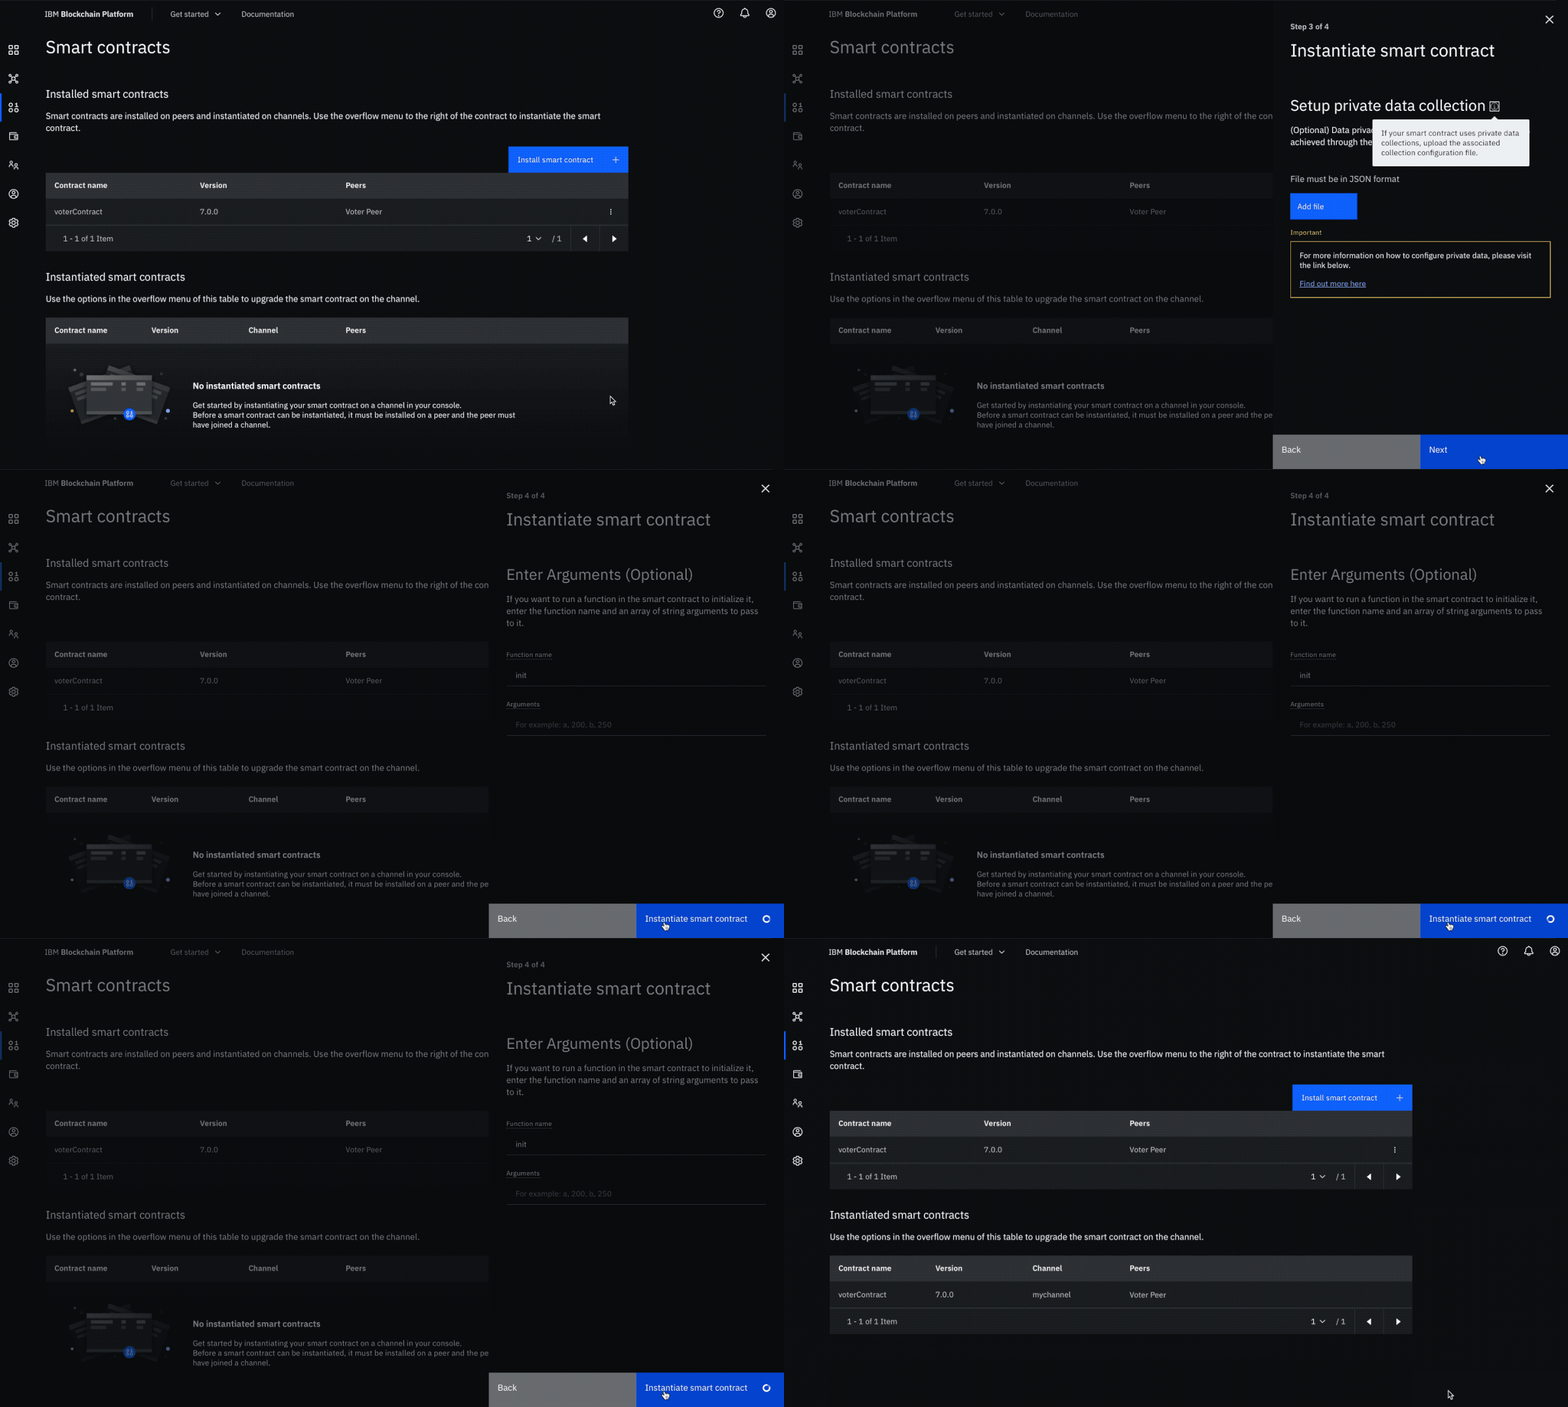
- Under Installed smart contracts, find the smart contract from the list (Note: ours is called voterContract) installed on our peer and click Instantiate from the overflow menu on the right side of the row.
- On the side panel that opens, select the channel,
mychannelon which to instantiate the smart contract. Click Next. - Select
Voter MSPas the organization member to be included in the endorsement policy. Click Next. - Skip the Setup private data collection step and simply click Next.
- Give the Function name as
initand leave the Arguments blank. Note: init is the method in the voterContract.js file that initiates the smart contracts on the peer. - Click Instantiate smart contract.
Step 5. Connect application to the network
-
Connect with sdk through connection profile
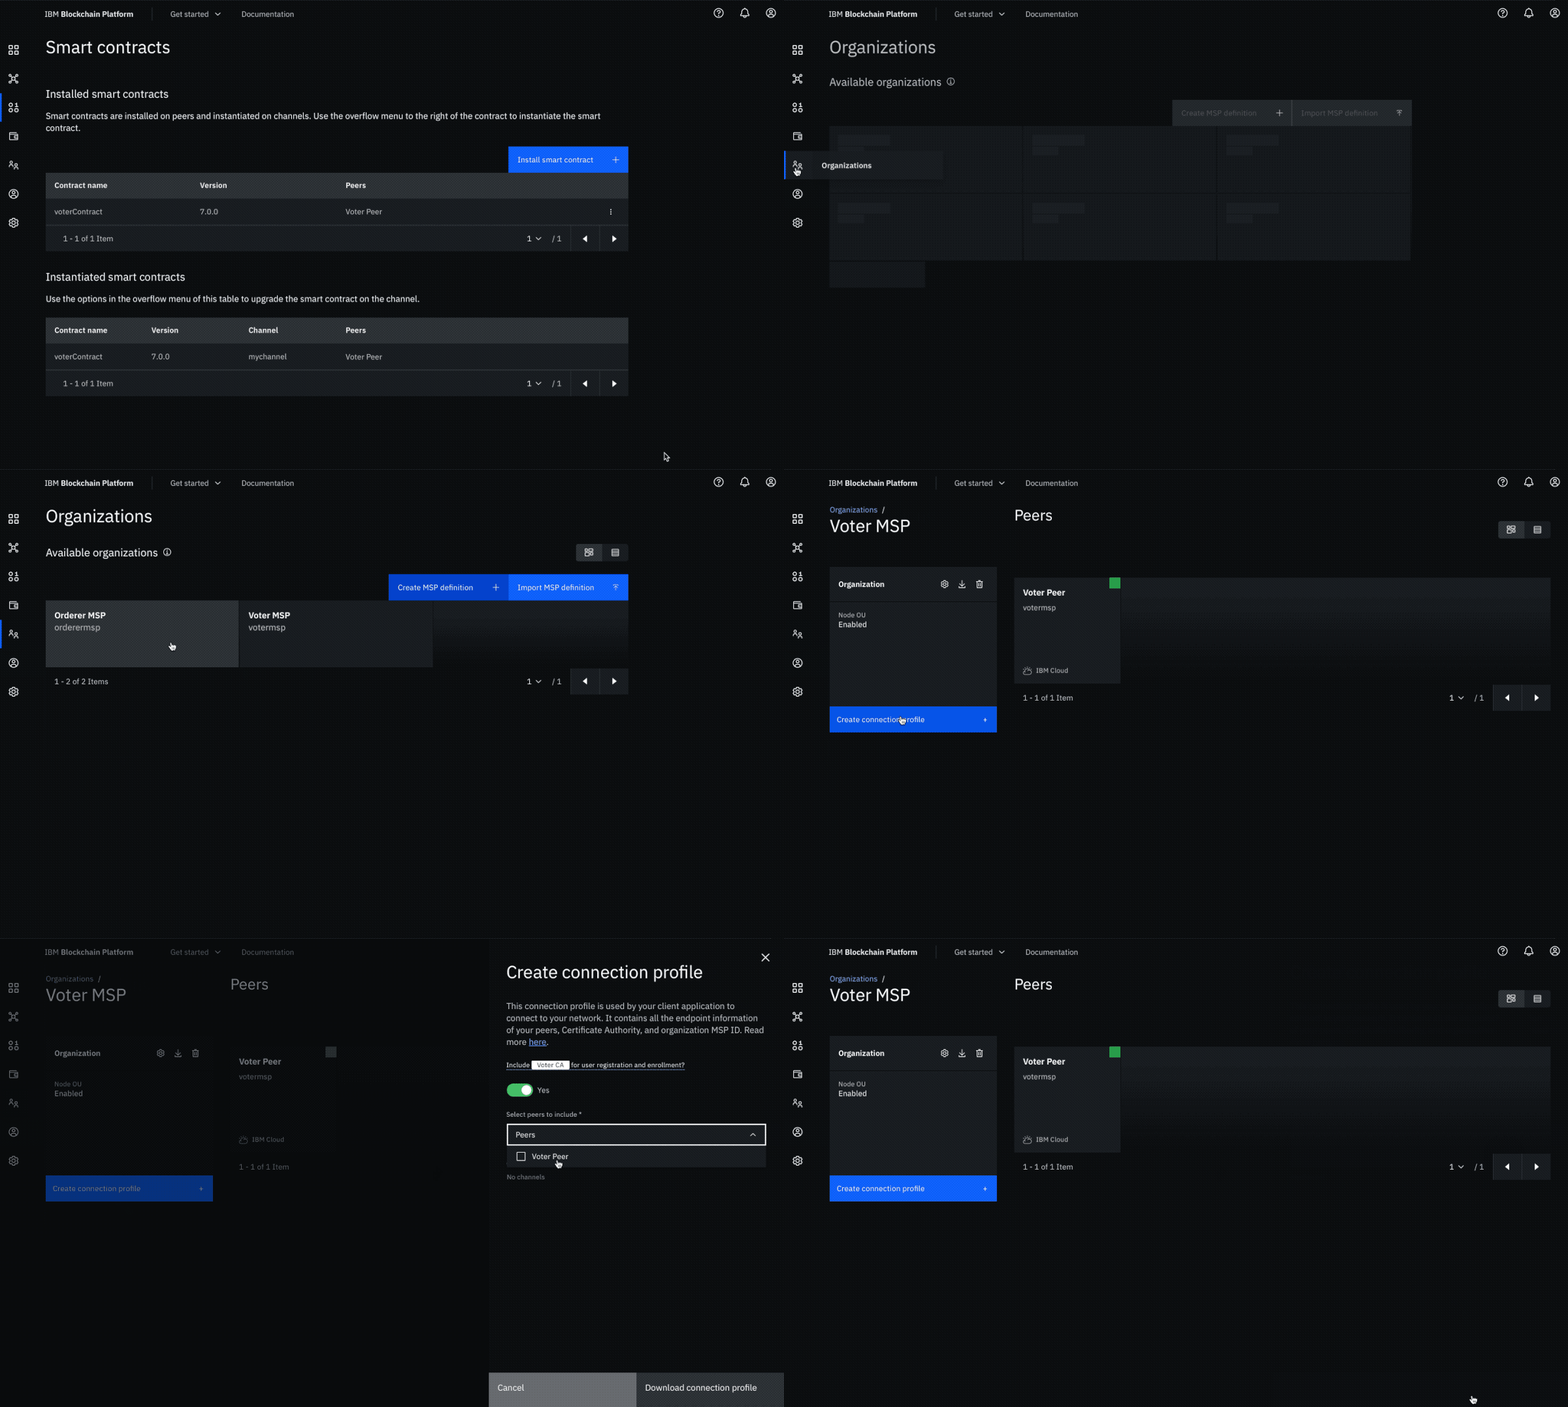
- Navigate to the Organizations tab in the left navigation, and click on Voter MSP.
- Click on Download Connection Profile.
- In the side panel that opens up, select
Yesas the response for Include Voter CA for user registration and enrollment?. Under Select peers to include, selectVoter Peer. Then click Download connection profile. This will download the connection json which we will use to establish a connection between the Node.js web application and the Blockchain Network.
-
Create an application admin
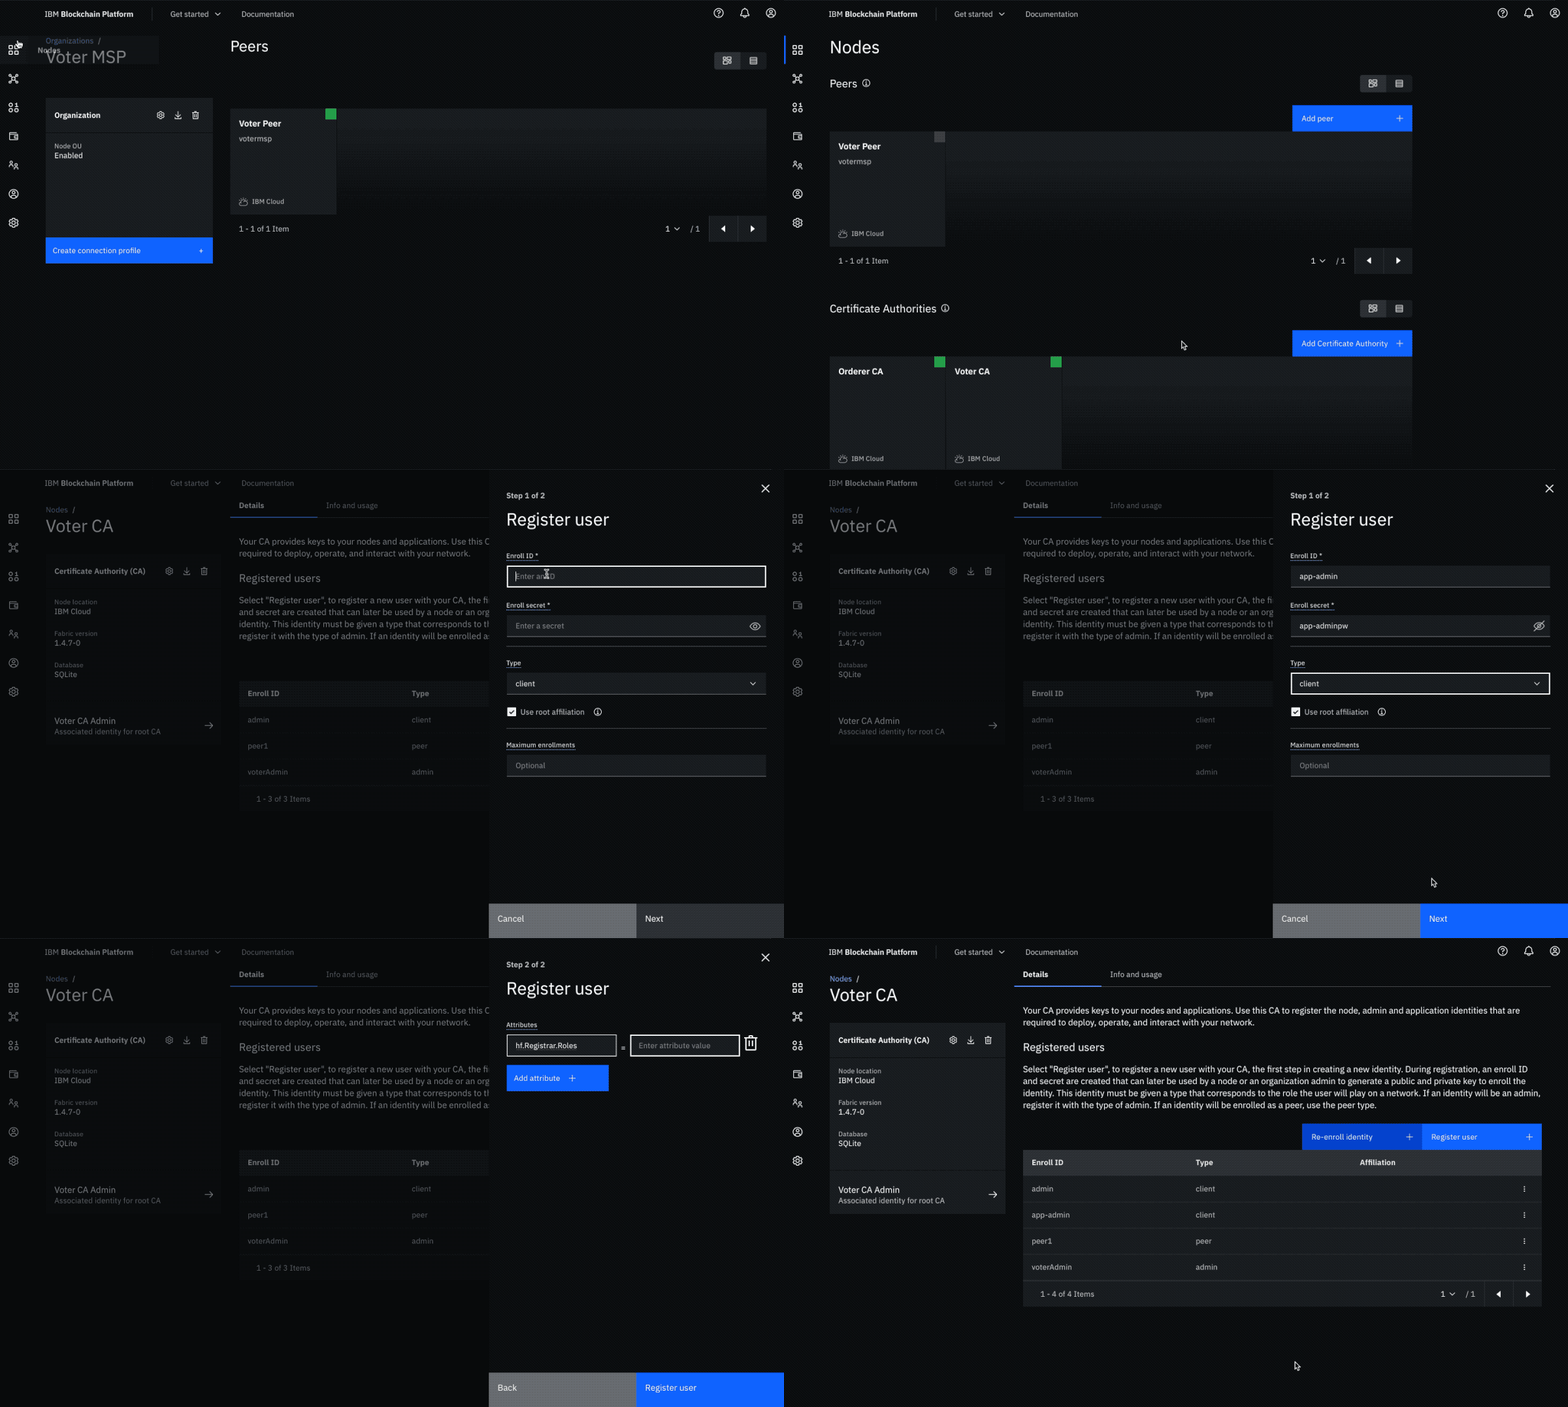
- Navigate to the Nodes tab in the left navigation, and under Certificate Authorities, choose Voter CA.
- Click on the Register User + button. Give an Enroll ID of
app-adminand an Enroll secret ofapp-adminpw. Set the Type for this identity asclient. Specify to Use root affiliation. Leave the Maximum enrollments field blank. Click Next. - Click on Add attribute +. Enter the attribute name as
hf.Registrar.Rolesand the attribute value as*. Click Register user.
-
Update application connection
- Copy the connection profile you downloaded into server folder
- Rename the connection profile you downloaded ibpConnection.json
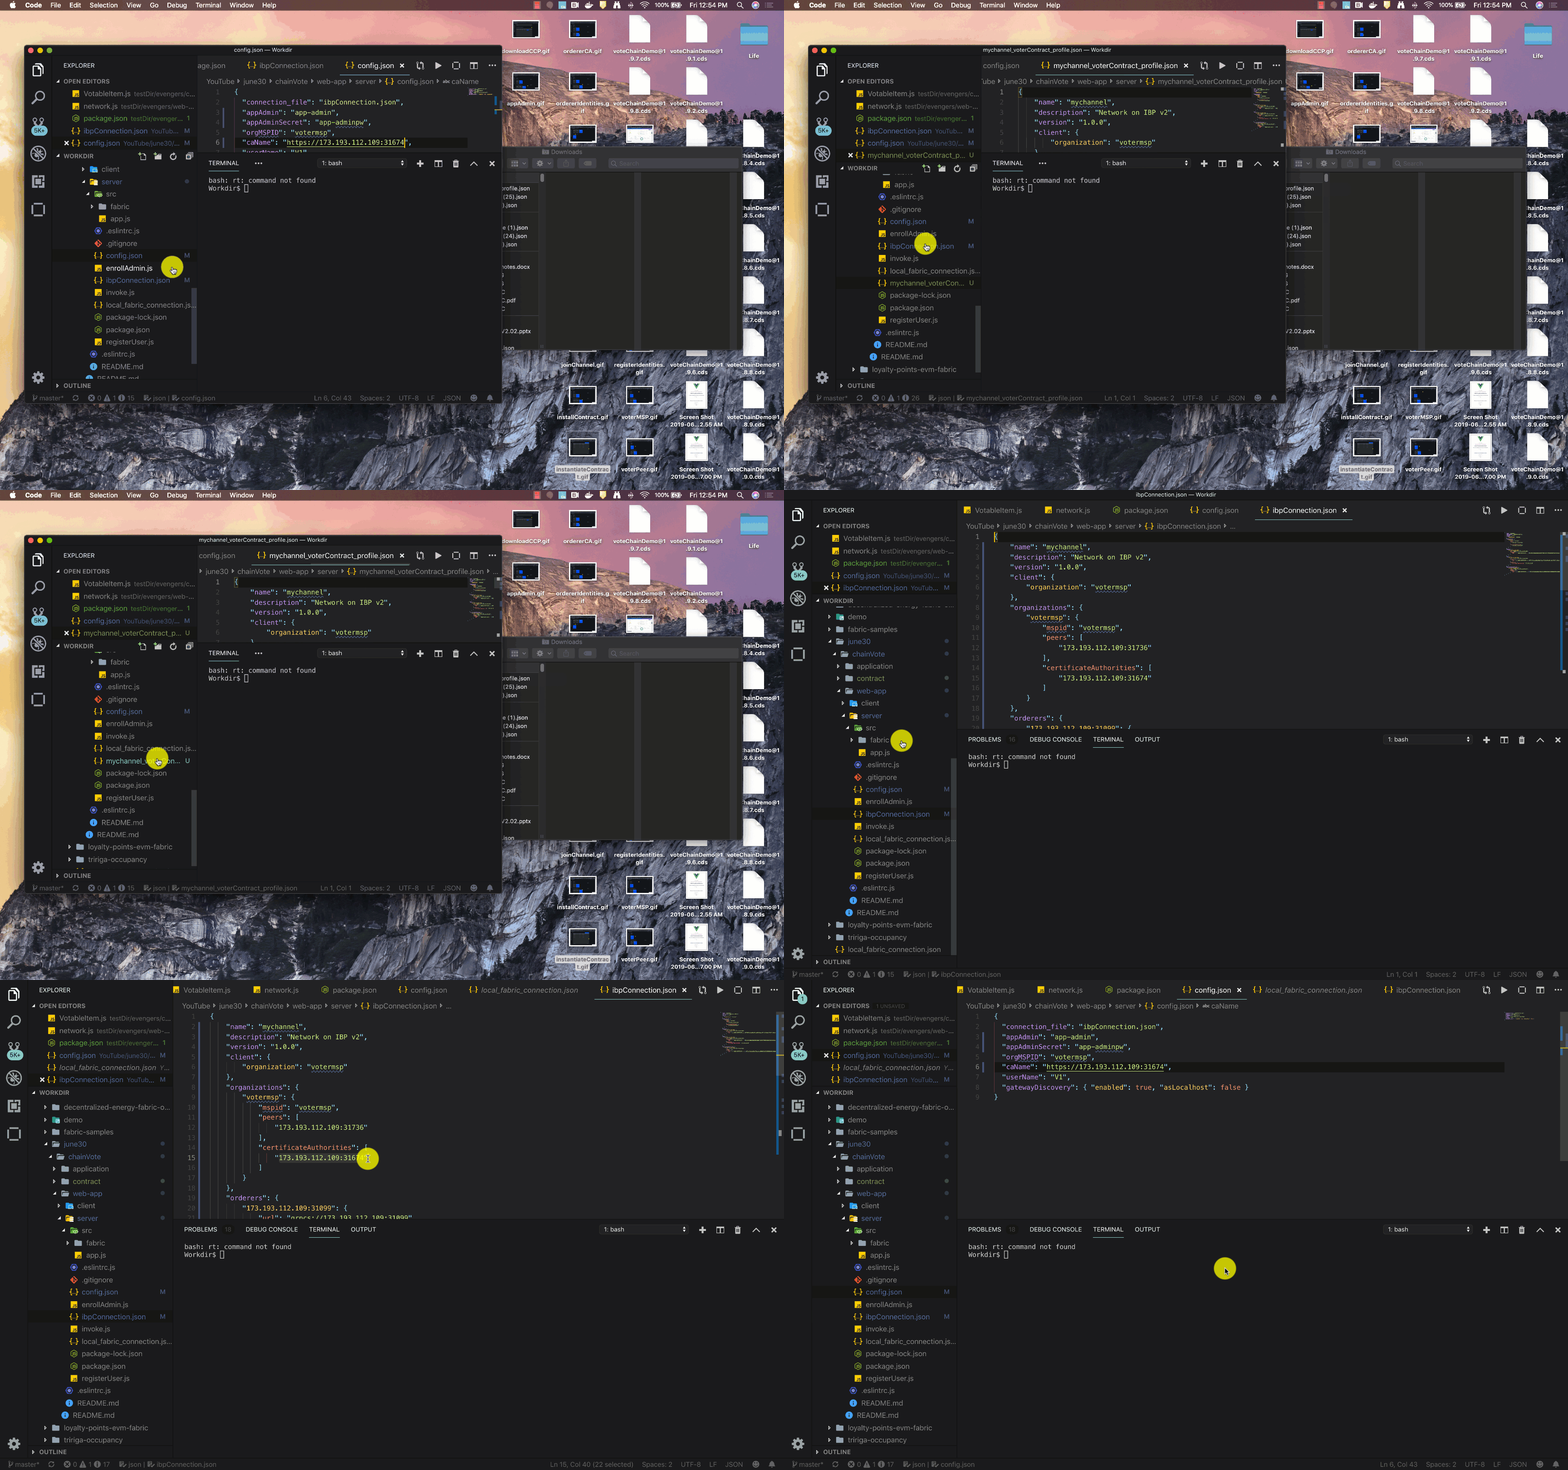
- Update the config.json file with:
-
ibpConnection.json. - The enroll id and enroll secret for your app admin, which we earlier provided as
app-adminandapp-adminpw. - The orgMSP ID, which we provided as
votermsp. - The caName, which can be found in your connection json file under "organizations" -> "votermsp" -> certificateAuthorities". This would be like an IP address and a port. You should also use the
httpsversion of the certificateAuthorities line. - The username you would like to register.
- Update gateway discovery to
{ enabled: true, asLocalhost: false }to connect to IBP.
-
- Once you are done, the final version of the config.json should look something like this:
{
    "connection_file": "ibpConnection.json",
    "appAdmin": "app-admin",
    "appAdminSecret": "app-adminpw",
    "orgMSPID": "votermsp",
    "caName": "https://173.193.106.28:32634",
    "userName": "V1",
    "gatewayDiscovery": { "enabled": true, "asLocalhost": false }
}
Step 6. Run the application
-
Enroll admin
-
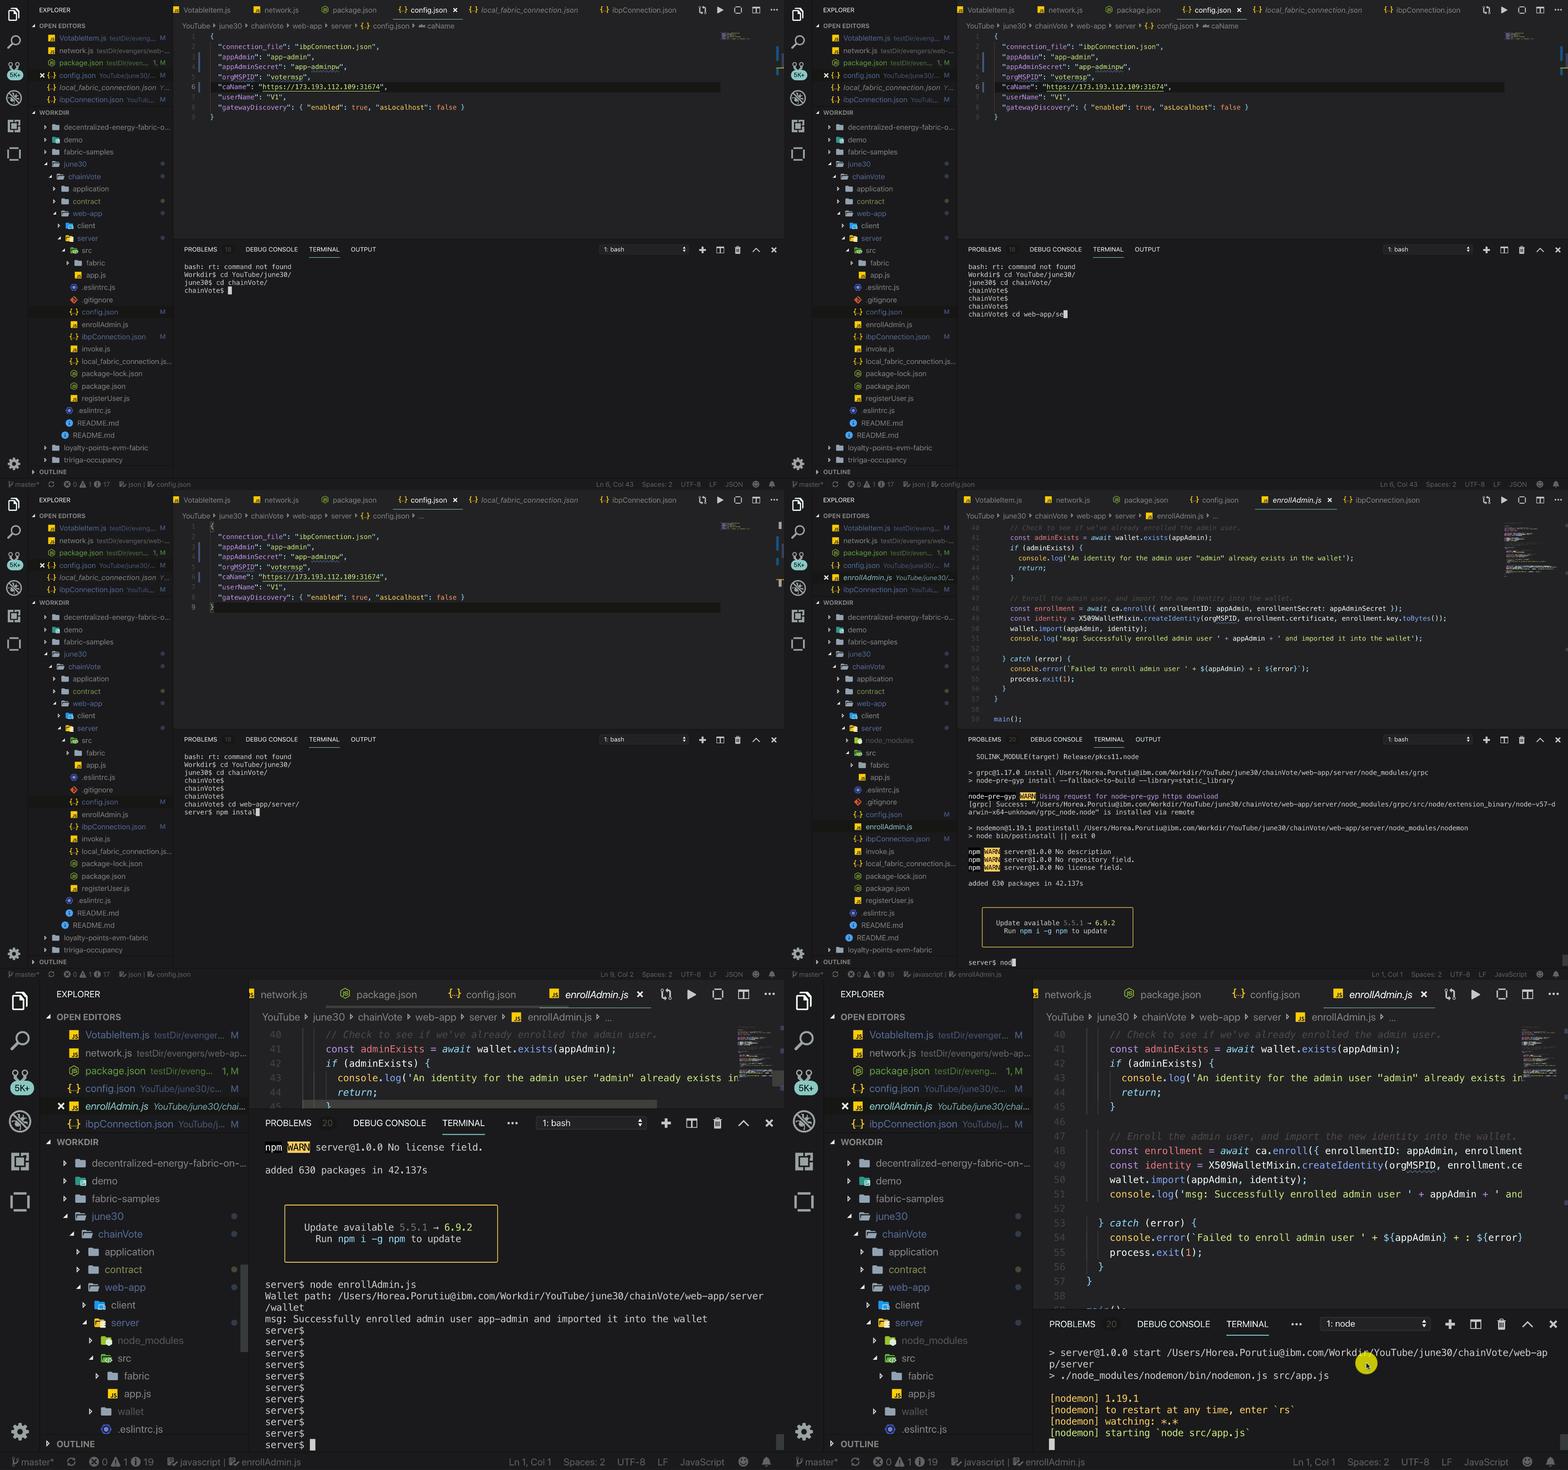
First, navigate to the
web-app/serverdirectory, and install the node dependencies.cd web-app/server npm install
-
Run the
enrollAdmin.jsscriptnode enrollAdmin.js
-
You should see the following in the terminal:
msg: Successfully enrolled admin user app-admin and imported it into the wallet
-
Start the server:
npm start
-
-
Start the web client
-
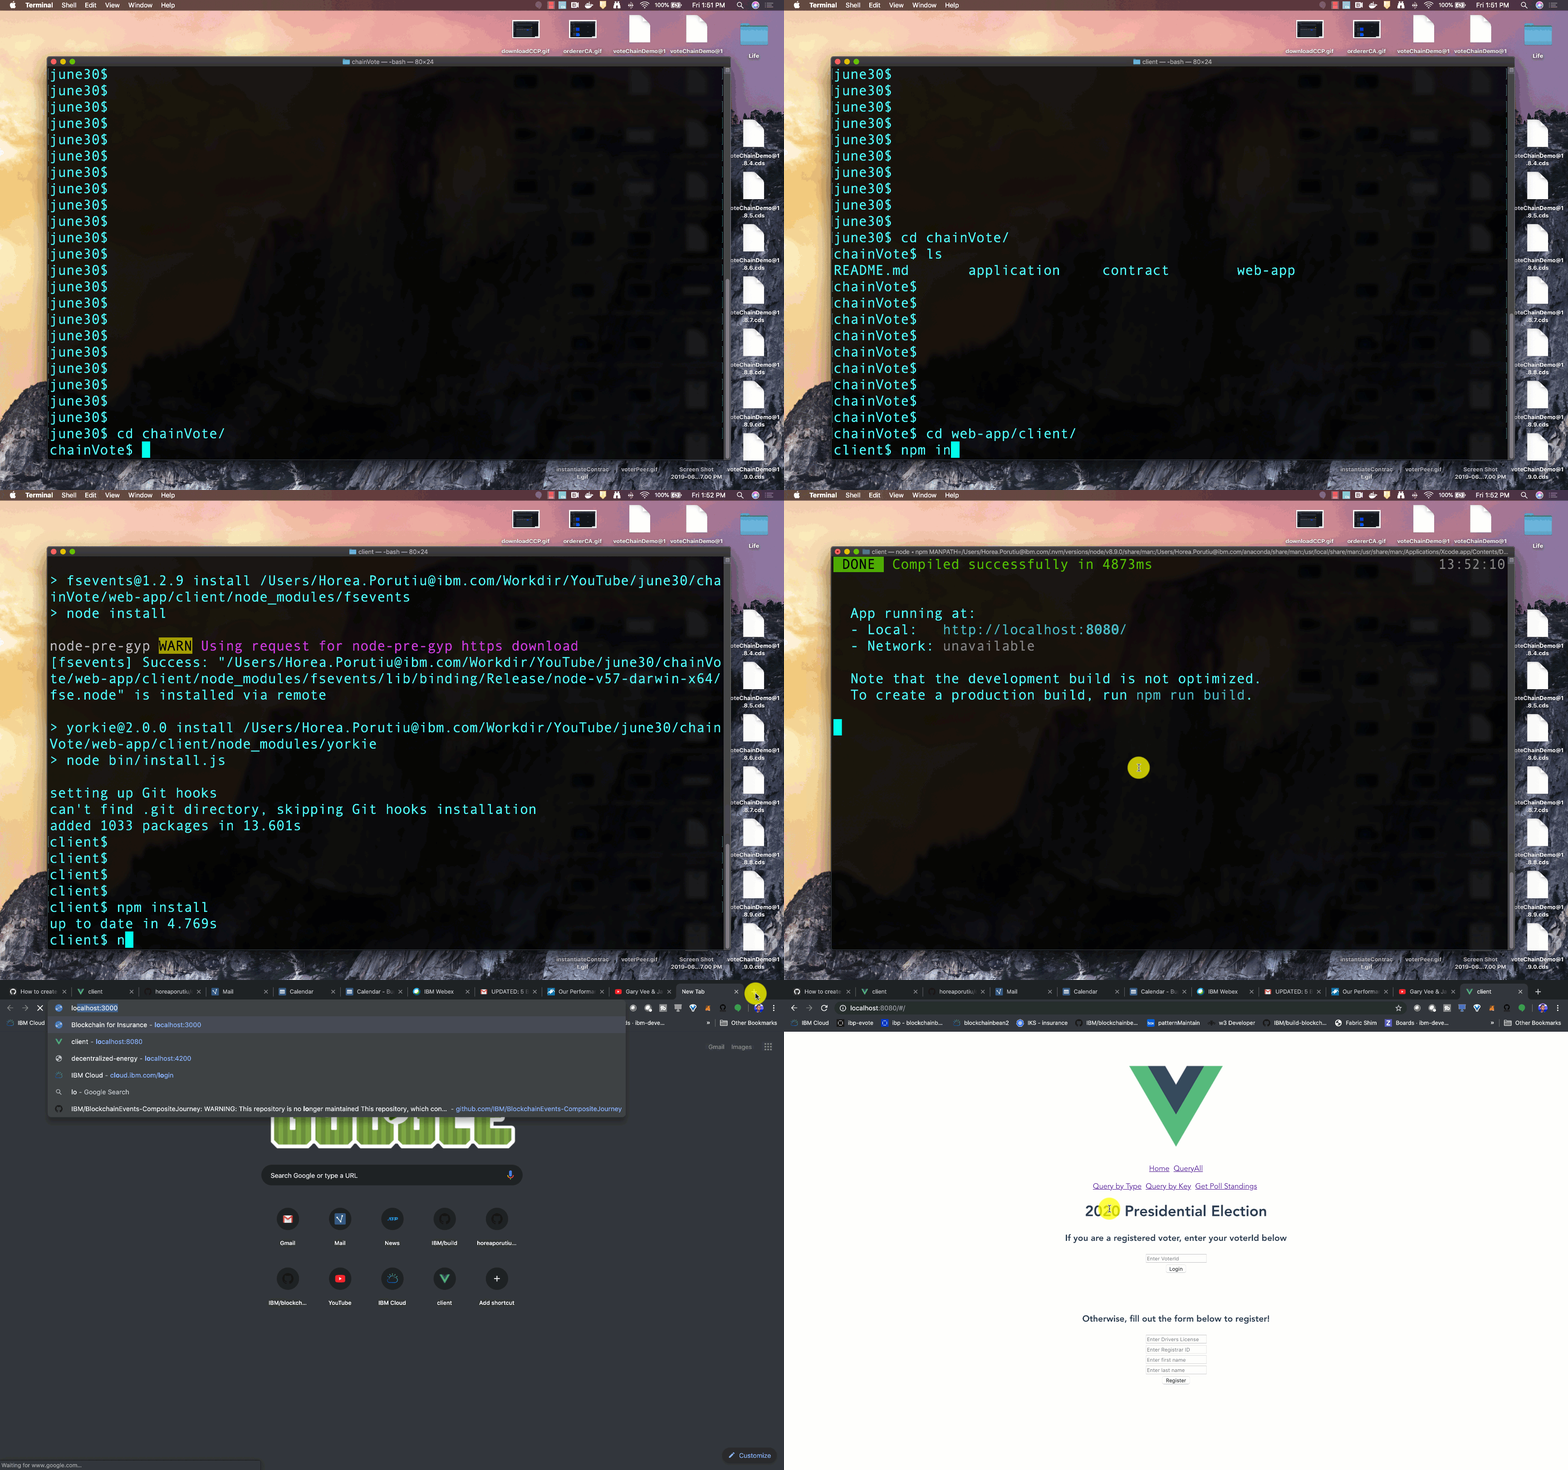
In a new terminal, open the
web-app/clientfolder from the root directory. Install the required dependencies withnpm install.cd web-app/client npm install
-
Start the client:
npm run serve
-
In a browser of your choice, go to http://localhost:8080/#/. If all goes well, you should see something like the gif below:
-
You can find the app running at http://localhost:8080/ If all goes well, you should be greeted with the homepage that says 2020 Presidential Election
Now, we can start interacting with the app.
First, we need to register as a voter, and create our digital identity with
which we will submit our vote with. To do this, we will need to enter
a uniqueId (drivers license) with a registrarId, and our first and last names.
After we do that, and click register the world state will be updated with
our voterId and our name and registrarId.
If all goes well, you should see voter with voterId {} is updated in the world state. Use voterId to login above.
Note: on the first try, the app can take a second to start up. If you click on register and nothing
happens, try to fill in the form and click register again!
Next, we can login to the app with our voterId.
Once we login, we can cast our vote. We will use our voterId again to cast our
vote. Since we are voting for the presidential
election for 2020, we can choose the party of our liking. Once we are done, we
can choose submit, and then our vote is cast. As long as this voterId hasn't
voted before, all is well. Next, we can view the poll standings by clicking
Get Poll Standings and clicking Check Poll. This will query the world
state and get the current number of votes for each political party.
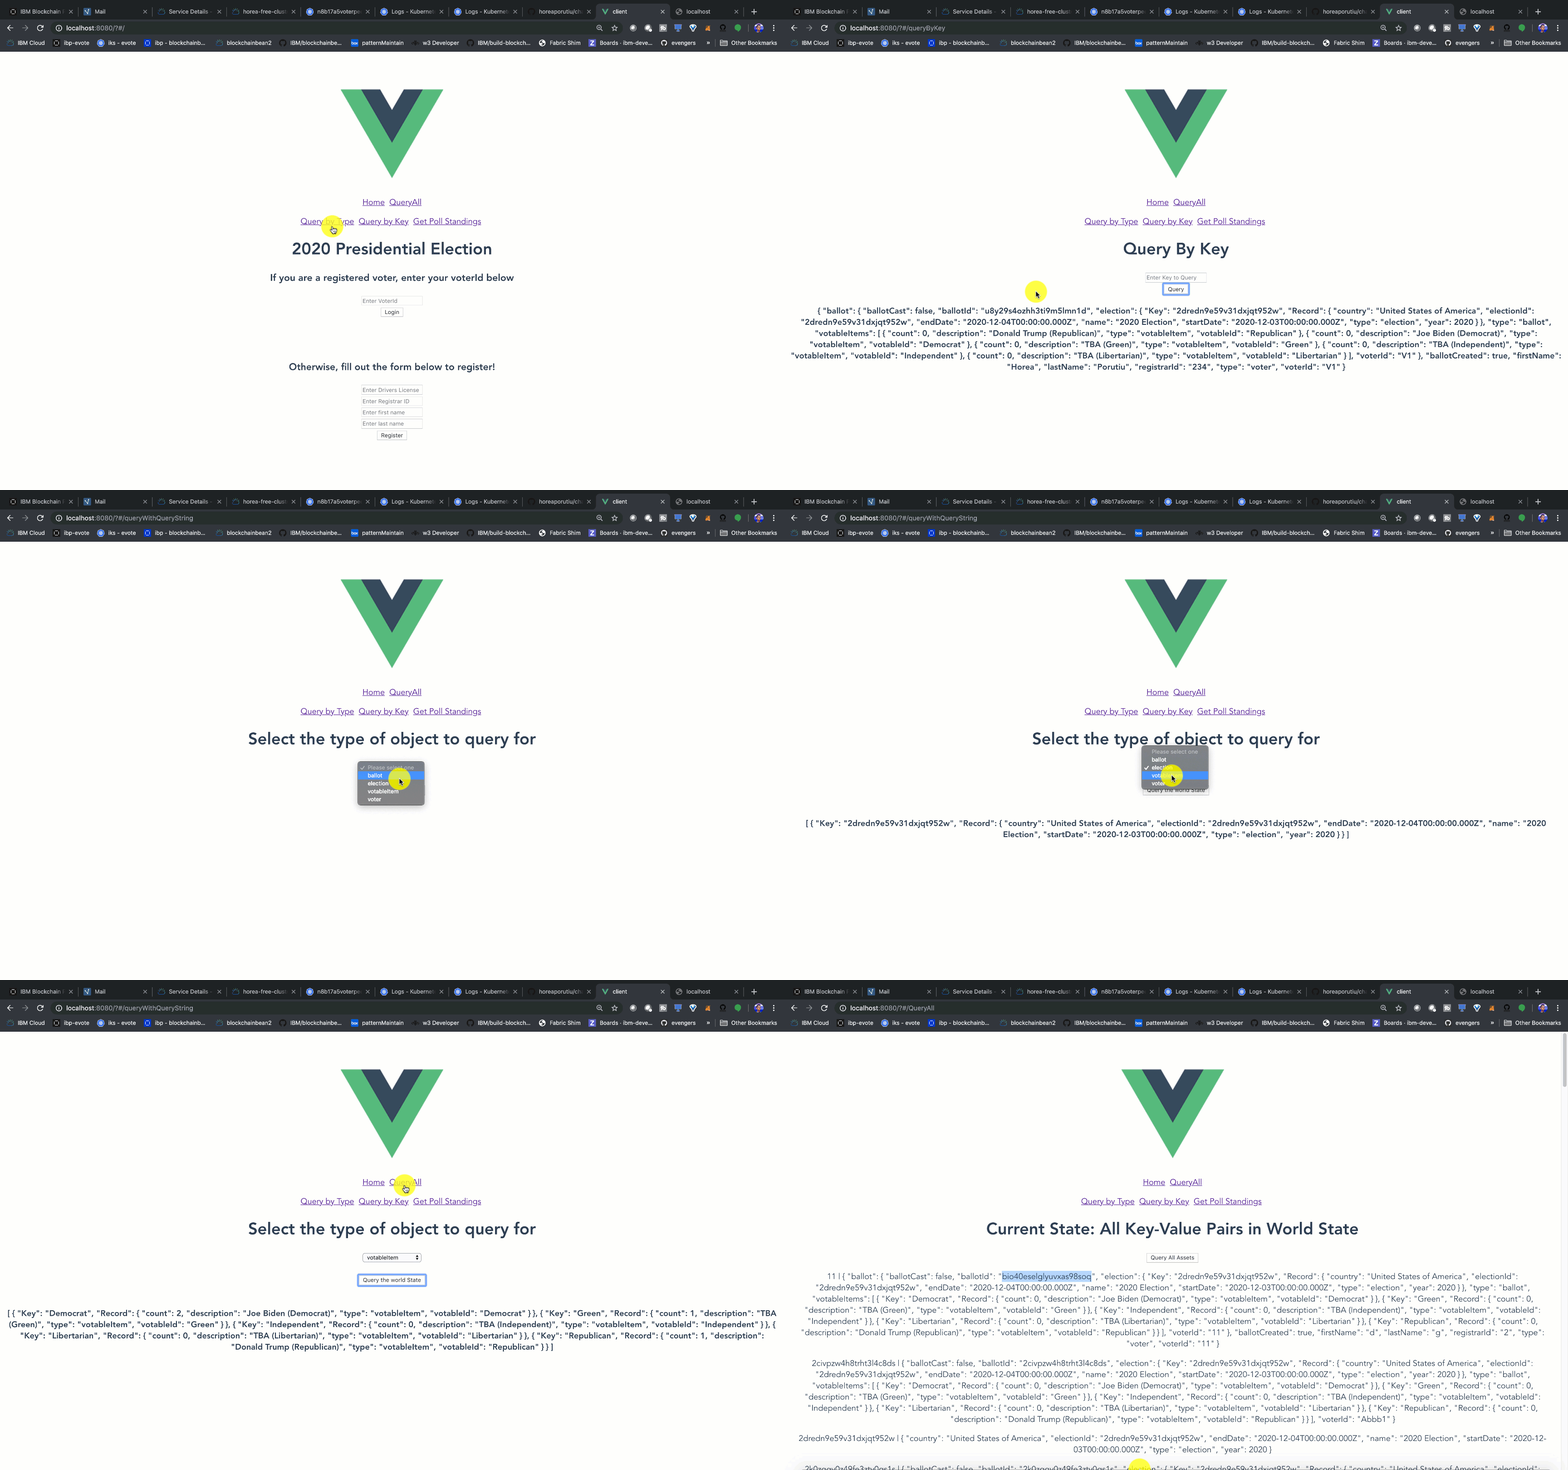
If we want to query for a particular voterId, we can do so in the Query by Key tab.
If we want to query by object, we can do so by clicking on the Query by Type
tab, and entering a type, such as voter. This will return all voter objects
that are currently in the state. QueryAll will return all objects in the state.
Extending the code pattern
Pull requests and contribution are always welcome. Remember that a code pattern is a path to a solution, and not a complete solution on its own. To make this a more complete solution, this application can be expanded in a couple of ways:
- Use an API to verify the drivers license to make sure it is valid, and registered with the DMV.
- Use a more complex consensus mechanism where multiple organizations (DMV, US Federal Government, US State Government) have to approve a vote before it is successfully recorded onto the blockchain.
- Use ordering service which uses Raft consensus mechanism.
Troubleshooting
- If you get an error that says
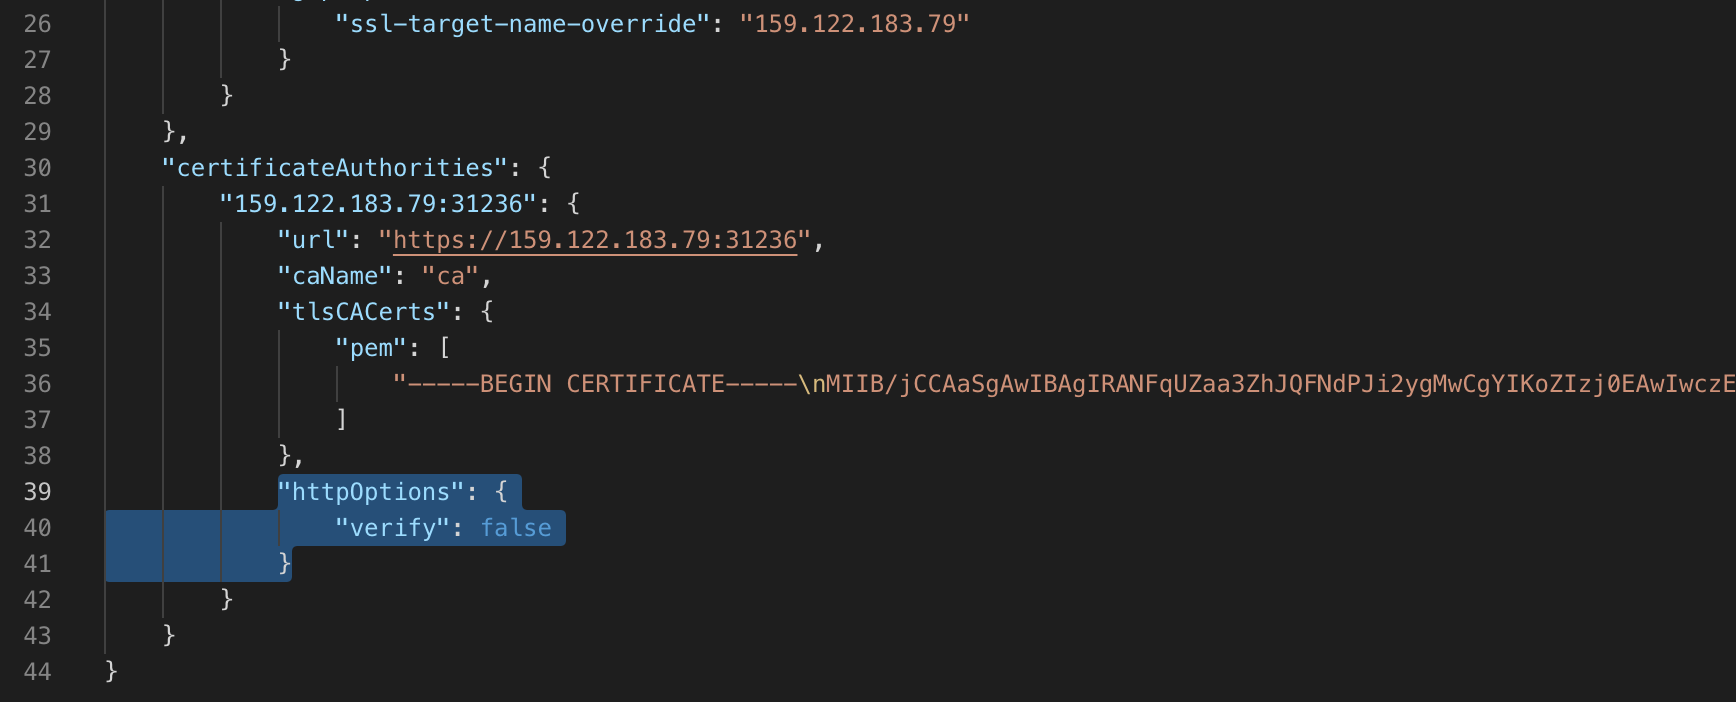
Error: Calling register endpoint failed with error [Error: self signed certificate], you can get past this by adding"httpOptions": {"verify": false}to the certificateAuthorities section of the connection profile that was downloaded from IBM Blockchain Platform.
Related Links
License
This code pattern is licensed under the Apache Software License, Version 2. Separate third-party code objects invoked within this code pattern are licensed by their respective providers pursuant to their own separate licenses. Contributions are subject to the Developer Certificate of Origin, Version 1.1 (DCO) and the Apache Software License, Version 2.


