kubernetes-localdev
Kubernetes Hands-On Self-Paced Course
Create a local Kubernetes development environment on macOS or Windows and WSL2.
Throughout this self-paced course, you'll gain hands-on experience with:
- Creating a local Kubernetes cluster with minikube
- Deploying applications in Kubernetes using kubectl and this project's YAML files
- Serving applications securely via HTTPS with NGINX Ingress Controller (LoadBalancer) and cert-manager
- Managing Kubernetes resources as packages using Helm v3
- Authenticating users with Google as an Identity Provider (IdP), implementing both OAuth2 and OAuth2+OIDC using oauth2-proxy
- Building the webserver application docker-cats and deploying it to the Kubernetes cluster with kubectl rollout
Updates
-
05-Feb-2022: Updated to Kubernetes v1.21.2
-
04-May-2021: Added Challenges (Exercises): That is the first and last time you'll see the word
exercisein this repository. So from now on, I'll refer to it as achallenge. I've added the challenges directory, which currently, contains two challenges, see challenges/README.md. Feel free to post your feedback in the Discussions section. I'll add more challenges, according to your feedback (yes, your feedback). -
06-Apr-2021: Asynchronous Support And Discussions: If you have any questions, suggestions, ideas, or even if you want to show and tell about your work, feel free to create a discussion in the Discussions section.
Table Of Contents
Expand/Collapse
- Updates
- Architecture
- Requirements
- Create a Kubernetes Cluster
- Enable secured HTTPS access from Host to minikube
- Configure LENS
- NGINX Ingress Controller
- A Few Words About Helm
- Support DNS resolution in Host
- HTTP
- HTTPS
- Authentication - OAuth2
- Authentication - OIDC
- Authentication Summary
- Docker Daemon And Minikube
- Local Development (CI) And Deployment (CD)
- Cleanup
- Troubleshooting
- References
- Authors
- License
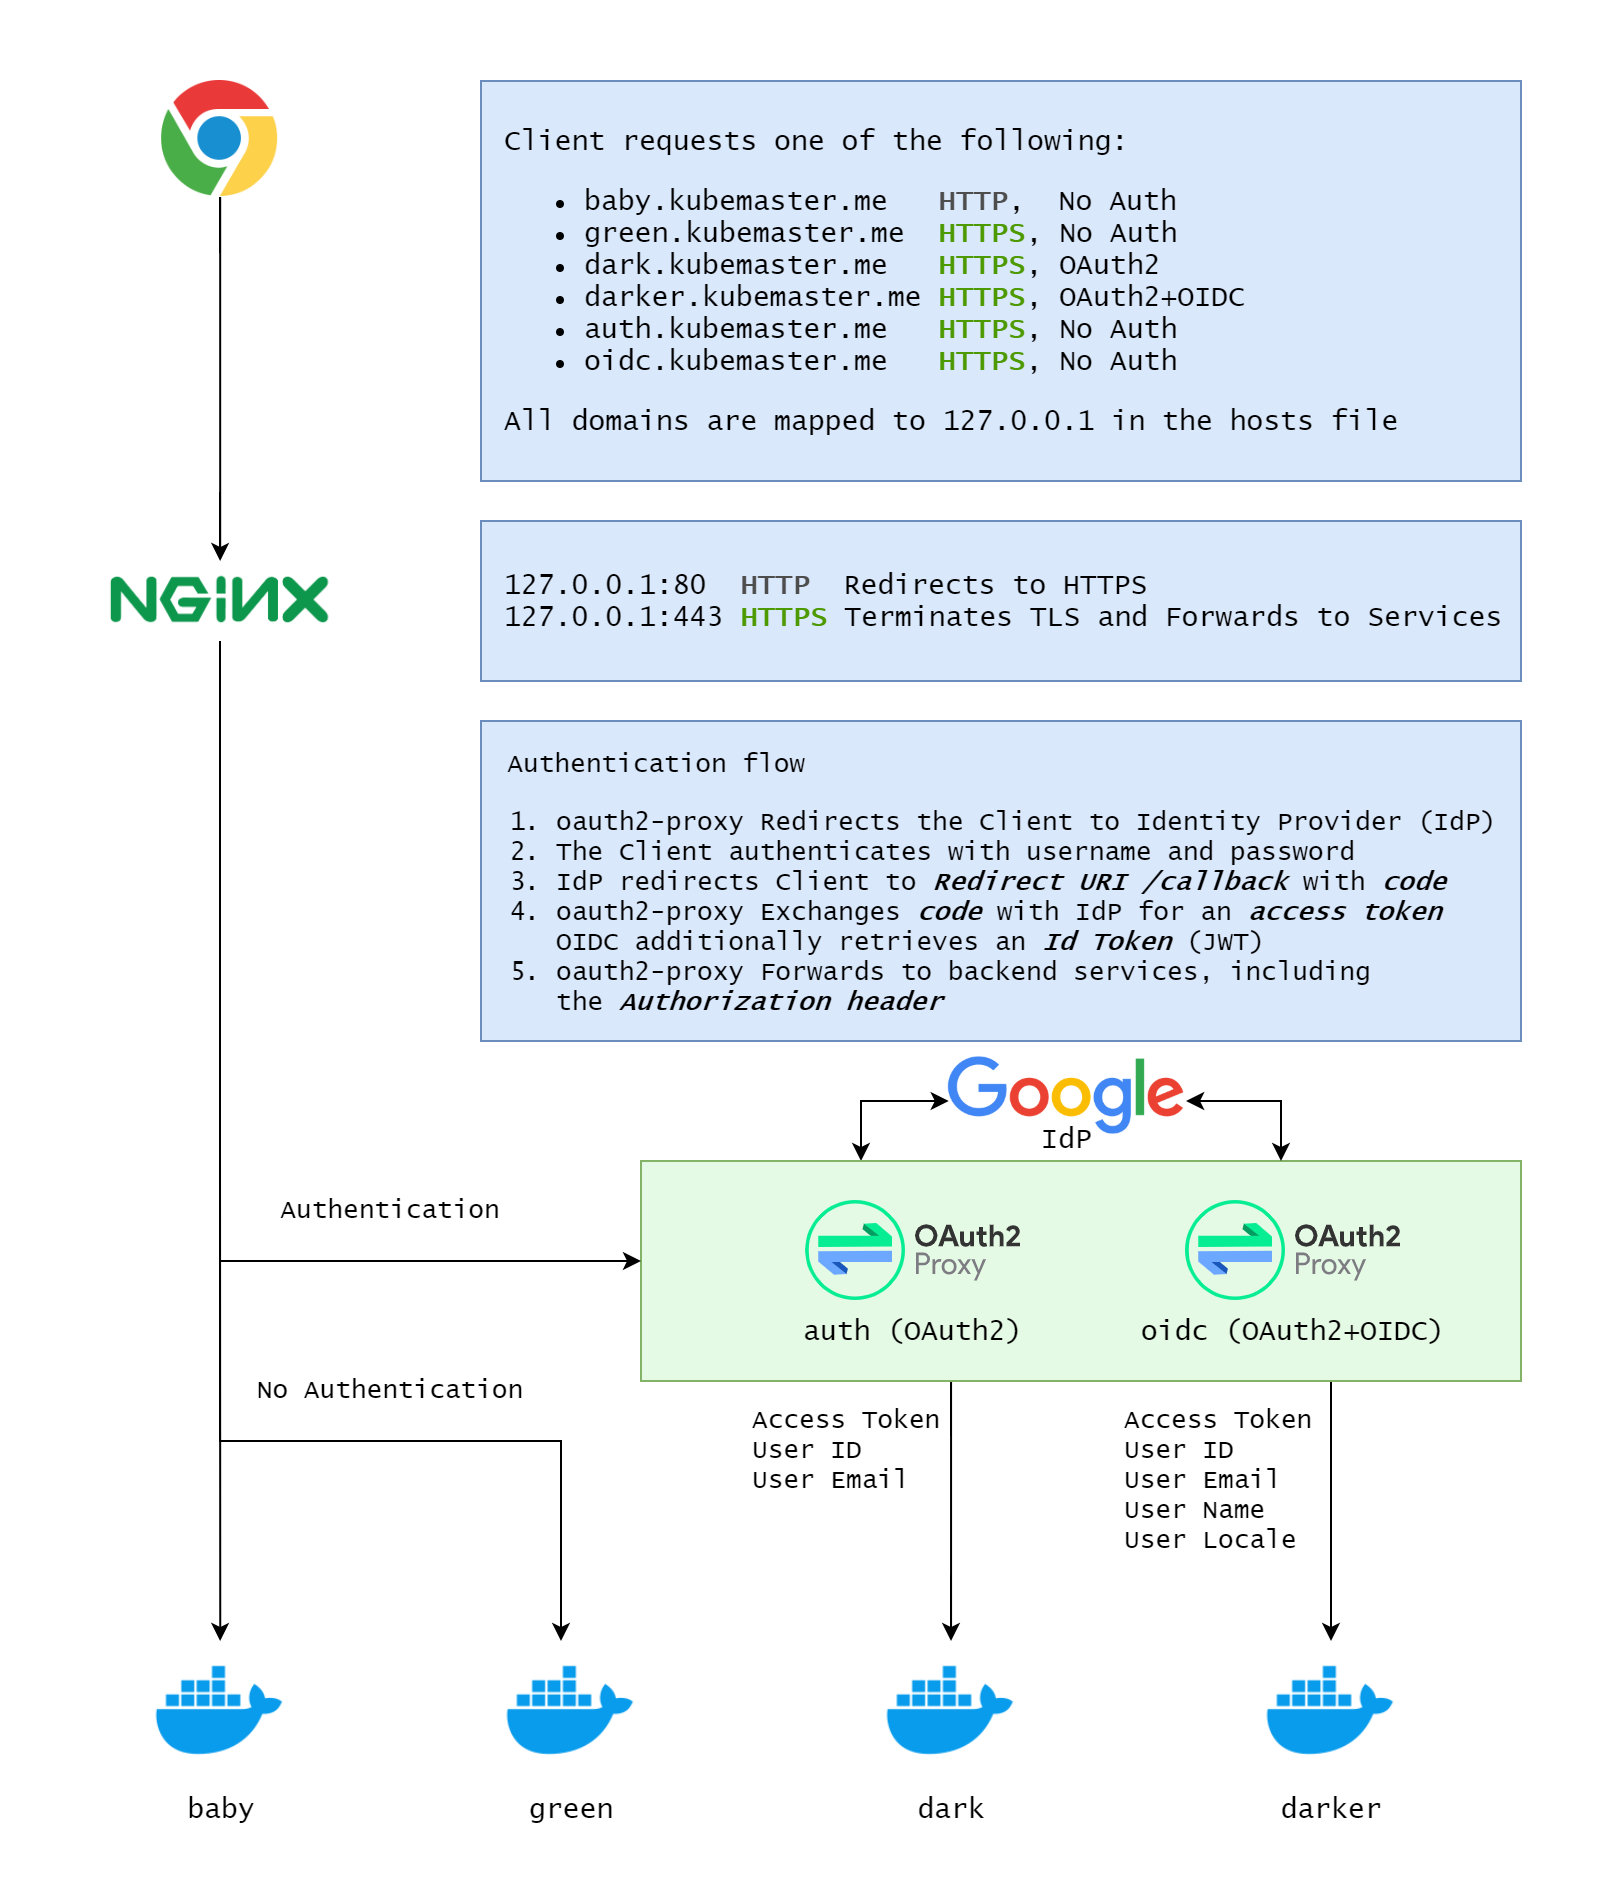
Architecture
Expand/Collapse
Requirements
macOS
Expand/Collapse
-
macOS: Docker Desktop for macOS
-
macOS: VSCode
-
macOS: mkcert - mkcert is a simple tool for making locally-trusted development certificates. It requires no configuration.
curl -L -o mkcert "https://github.com/FiloSottile/mkcert/releases/download/v1.4.3/mkcert-v1.4.3-darwin-amd64" && \
chmod +x mkcert && \
sudo mv mkcert /usr/local/bin/mkcert
# Verify installation
mkcert --version
# Valid output:
# v1.4.3
-
macOS: LENS 5.3.4+ - The Kubernetes IDE
-
macOS: minikube v1.21.0 - a tool that lets you run a Kubernetes cluster locally
curl -o minikube-bin -L https://storage.googleapis.com/minikube/releases/v1.21.0/minikube-darwin-amd64
# curl -o minikube-bin -L https://storage.googleapis.com/minikube/releases/v1.21.0/minikube-darwin-arm64
sudo install minikube-bin /usr/local/bin/minikube
# Verify Installation minikube version # Valid output: # minikube version: v1.21.0 # commit: 76d74191d82c47883dc7e1319ef7cebd3e00ee11
-
macOS: Helm v3.x - the package manager for Kubernetes
curl -fsSL -o get_helm.sh https://raw.githubusercontent.com/helm/helm/master/scripts/get-helm-3 && \
chmod 700 get_helm.sh && \
./get_helm.sh && \
rm get_helm.sh # cleanup
helm version
# Valid output:
# version.BuildInfo{Version:"v3.8.0", GitCommit:"d14138609b01886f544b2025f5000351c9eb092e", GitTreeState:"clean", GoVersion:"go1.17.5"}
Windows
Expand/Collapse
-
Windows: Windows version 1903 with build 18362 and above (including Version 20H2), hit WINKEY+R and run
winverto check -
Windows: WSL2 - Windows Subsystem Linux running on Ubuntu 20.04
-
Windows: Docker Desktop for Windows - Use WSL2 backend
-
Windows: VSCode and the Remote - WSL extension
-
Windows: mkcert - mkcert is a simple tool for making locally-trusted development certificates. It requires no configuration. Open a new PowerShell window as Administrator (elevated)
$WebClient = New-Object System.Net.WebClient; if ($?) { $WebClient.DownloadFile("https://github.com/FiloSottile/mkcert/releases/download/v1.4.3/mkcert-v1.4.3-windows-amd64.exe", "c:\windows\system32\mkcert.exe")}# Verify installation mkcert -version # Valid output: # v1.4.3
-
Windows: LENS 5.3.4 - The Kubernetes IDE - Download and install on Windows
-
WSL2: minikube - a tool that lets you run Kubernetes locally
curl -LO https://storage.googleapis.com/minikube/releases/v1.21.0/minikube-linux-amd64 && \
sudo install minikube-linux-amd64 /usr/local/bin/minikube && \
rm minikube-linux-amd64
# Verify Installation minikube version # Valid output: # minikube version: v1.21.0 # commit: 76d74191d82c47883dc7e1319ef7cebd3e00ee11
-
WSL2: Helm v3.x - the package manager for Kubernetes
curl -fsSL -o get_helm.sh https://raw.githubusercontent.com/helm/helm/master/scripts/get-helm-3 && \
chmod 700 get_helm.sh && \
./get_helm.sh && \
rm get_helm.sh
helm version
# Valid output:
# version.BuildInfo{Version:"v3.8.0", GitCommit:"d14138609b01886f544b2025f5000351c9eb092e", GitTreeState:"clean", GoVersion:"go1.17.5"}
Create a Kubernetes Cluster
-
macOS/WSL2: Start the Docker daemon on your local machine; The simplest way is to run Docker For Desktop
-
macOS/WSL2: Create a Kubernetes cluster with minkube
minikube start --driver=docker --kubernetes-version=v1.21.2
# ...
# 🏄  Done! kubectl is now configured to use "minikube" cluster and "default" namespace by default
-
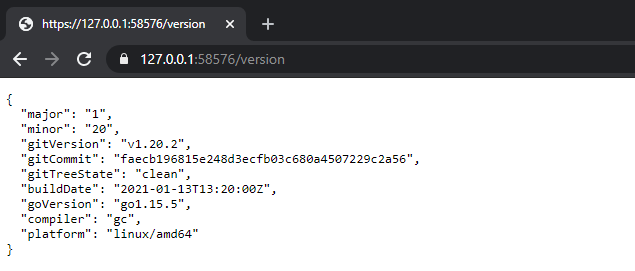
macOS/WSL2: Check connectivity - HTTPS should work since we're using
ca.crtMINIKUBE_EXPOSED_PORT="$(kubectl config view -o jsonpath='{.clusters[?(@.name == "minikube")].cluster.server}' | cut -d":" -f3)" && \ export MINIKUBE_EXPOSED_PORT=${MINIKUBE_EXPOSED_PORT} && \ curl -L --cacert ~/.minikube/ca.crt "https://127.0.0.1:${MINIKUBE_EXPOSED_PORT}/version" ; echo # adds extra line
A valid response
{
  "major": "1",
  "minor": "21",
  "gitVersion": "v1.21.2",
  "gitCommit":   "092fbfbf53427de67cac1e9fa54aaa09a28371d7",
  "gitTreeState": "clean",
  "buildDate": "2021-06-16T12:53:14Z",
  "goVersion": "go1.16.5",
  "compiler": "gc",
  "platform": "linux/amd64"
}
Enable secured HTTPS access from Host to minikube
The term Host refers to your machine (macOS/Windows). In this section, we're going to install CA certificates on the Host machine (macOS/Windows)
macOS
Expand/Collapse
- macOS: Install the rootCA certificate
ca.crtin the Keychainsudo security add-trusted-cert -d -r trustRoot -k /Library/Keychains/System.keychain "$HOME/.minikube/ca.crt" - macOS: Execute the following command to print minikube's endpoint URL
export MINIKUBE_EXPOSED_PORT="$(kubectl config view -o jsonpath='{.clusters[?(@.name == "minikube")].cluster.server}' | cut -d":" -f3)" && \
echo " Open a new browser Incognito/Private window - https://127.0.0.1:${MINIKUBE_EXPOSED_PORT}/version"
Windows
Expand/Collapse
-
WSL2: Copy KUBECONFIG to Windows host, change the HOST_USERNAME to your Windows host user name, mine is
unfor19# Set variable HOST_USERNAME="unfor19" # <-- CHANGE THIS!
# Copy KUBECONFIG and certs from WSL2 to host
mkdir -p "/mnt/c/Users/${HOST_USERNAME}/.kube/certs" && \
cp "${HOME}/.kube/config" "/mnt/c/Users/${HOST_USERNAME}" && \
# Change paths from `/home/$USER/*.minikube` to `certs`
sed 's~/home/'"${USER}"'.*.minikube~certs~g' "${HOME}/.kube/config" > "/mnt/c/Users/${HOST_USERNAME}/.kube/config"
-
WSL2: Copy minikube's certificates to Windows host
MINIKUBE_EXPOSED_PORT="$(kubectl config view -o jsonpath='{.clusters[?(@.name == "minikube")].cluster.server}' | cut -d":" -f3)" && \
# Client certificate
cp  "${HOME}/.minikube/profiles/minikube/client.crt" "${HOME}/.minikube/profiles/minikube/client.key" "${HOME}/.minikube/ca.crt" "/mnt/c/Users/${HOST_USERNAME}/.kube/certs/" && \
# Prepare URL for Windows
echo "Install the certificates and then open a new browser Incognito/Private window - https://127.0.0.1:${MINIKUBE_EXPOSED_PORT}/version"
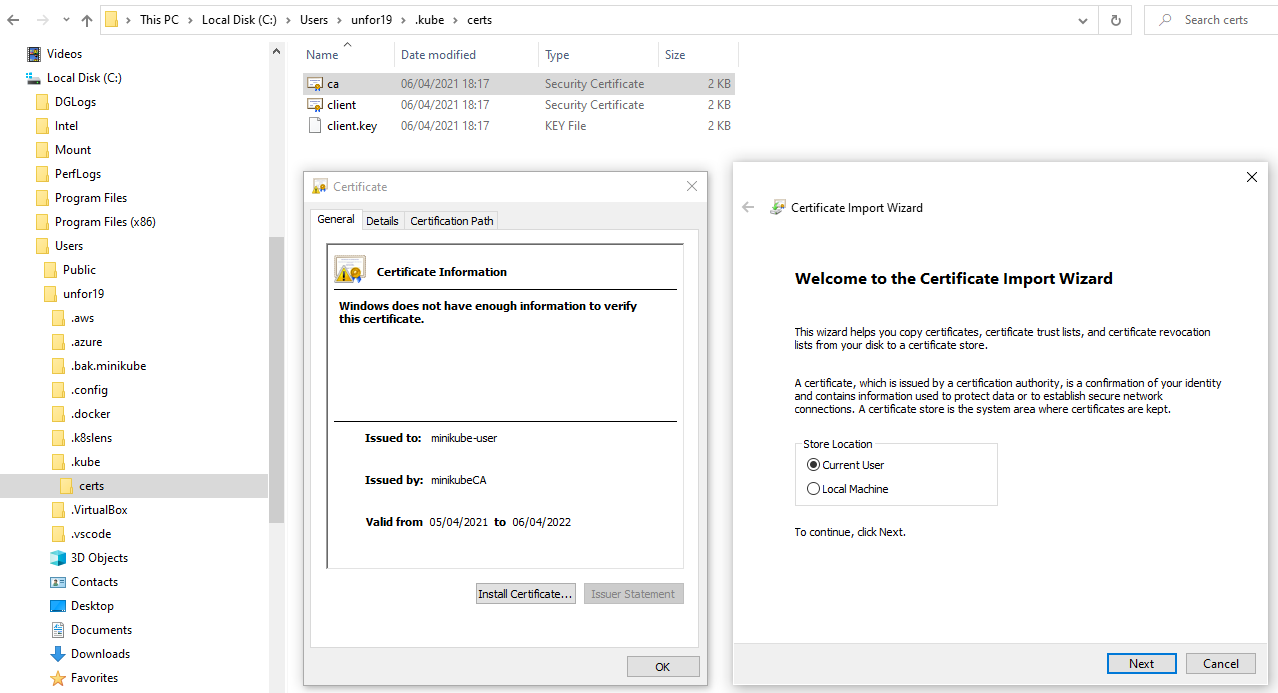
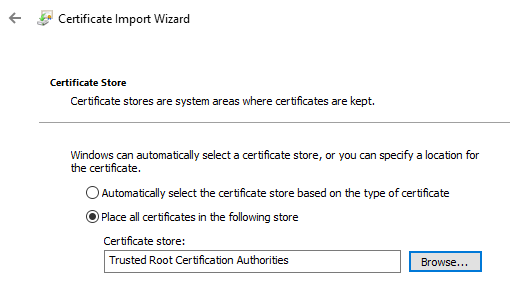
-
Windows: Install the certificate
ca.crtfor the Current User in the certificate store Trusted Root Certification Authorities (double click both files)
Check HTTPS Access From The Host to minikube
-
macOS/Windows: Check access to the cluster's endpoint by opening the browser in
https://127.0.0.1:${MINIKUBE_EXPOSED_PORT}/version
Why does the Host need HTTPS access to minikube?
Upon completing this course, you might ask Why does the Host need HTTPS access to minikube?. I've answered this question in the Dicussions section.
"Picture this - You want to access the Kubernetes APIs, from the Host with HTTPS, how would you do that? See Access Clusters Using the Kubernetes API. All the examples use
HTTP, while with our setup we can useHTTPS, hooray for us🎉 "
IMPORTANT: In the latest version of minikube, v1.25.1 as of today, 26-Jan-2022, the rootCA is generated for longer than 397 days; To overcome that, use version 1.21.0.
Configure LENS
-
macOS/Windows: LENS is so smart! Click on the Catalog icon (top left corner) and the
minikubeKubernetes cluster will appear. LENS recognizes the kubernetes cluster context, according to the$HOME/.kube/configfile.Select All namespaces


NGINX Ingress Controller
The main reasons why we deploy a Kubernetes Ingress Controller
- Load balancing traffic to services
- A single endpoint that is exposed to the Host (macOS/Windows) and routes traffic to relevant services (apps)
- Integrated HTTPS TLS termination, when appropriately configured
😉
An ingress controller is handy for exposing multiple services on the same set of ports (e.g., 80, 443). That is also a good practice for production environments where you hide your services in a private network and allow traffic only from a known external endpoint, such as a load balancer.
In this project, I chose to implement a Kubernetes Ingress Controller with NGINX's Ingress Controller. A great alternative is Traefik, though NGINX is probably the most popular.
- macOS/WSL2: Add the relevant Helm's repository and deploy the ingress controller
helm repo add ingress-nginx https://kubernetes.github.io/ingress-nginx && \
helm repo update && \
helm upgrade --install nginx ingress-nginx/ingress-nginx --set controller.kind=DaemonSet # `upgrade --install` makes it idempotent
A Few Words About Helm
Helm is Kubernetes's package manager, which is similar to Python's package manager pip and Node's package manager npm. Though in Helm, "packages" are called Charts.
Helm uses a packaging format called charts. A chart is a collection of files that describe a related set of Kubernetes resources. A single chart might be used to deploy something simple, like a memcached pod, or something complex, like a full web app stack with HTTP servers, databases, caches, and so on. Source
A chart usually contains a default set of values, and those values are defined in the values.yaml of the Helm chart.
For the sake of simplicity, when installing the NGINX's Helm Chart, I used the argument --set controller.kind=DaemonSet to override the default value controller.kind=Deployment. Choosing the Kubernetes DaemonSet kind means that NGINX's Kubernetes Pods are deployed to all Kubernetes Nodes. I chose this setup for enabling High-Availability when adding more nodes to the cluster. High-Availability is probably irrelevant in a local development environment, but it undoubtedly helped me cover some core Kubernetes components. NGINX's default deployment kind is a Kubernetes Deployment with a single replica. To see the default values check NGINX's Helm chart values.yaml file.
Another option for overriding the default values is to use a user-defined values.yaml file, a modified version of the original values.yaml file.
- macOS/WSL2: Copy the values.yaml file from the Chart's repository to your local machine
curl -L -o values.yaml "https://raw.githubusercontent.com/kubernetes/ingress-nginx/master/charts/ingress-nginx/values.yaml" - macOS/WSL2: Edit
values.yamlwith your favorite text editor (Vim?😃 ) and changekind: Deploymenttokind: DaemonSet# Edit the file with your favotire text editor vim vim values.yaml - Install the helm chart and add the argument
-f values.yaml# There's no need to execute this command as we already did it in the previous section with `--set` helm upgrade --install nginx ingress-nginx/ingress-nginx -f values.yaml
Support DNS resolution in Host
To access the NGINX Ingress Controller from the Host machine (macOS/Windows), we need to map its domain name to 127.0.0.1, which will listen to ports 80 and 443.
- Edit the
hostsfile- macOS: Edit
/etc/hostswith your favotire editor
sudo vim /etc/hosts
- Windows: Edit
C:\Windows\System32\drivers\etc\hostswith Notepad or Notepad++ as Administrator
- macOS: Edit
- Add the following line
127.0.0.1 baby.kubemaster.me green.kubemaster.me dark.kubemaster.me darker.kubemaster.me auth.kubemaster.me oidc.kubemaster.me
The downside is that you have to add any subdomain the application uses since wildcard domains such as *.mydomain.com are not allowed in the hosts file. The silver lining is you won't add all the subdomains that the application uses in production since the main goal is to test/develop only the necessary endpoints.
| DNS Record | App | HTTPS | Requires Authentication |
|---|---|---|---|
| baby | docker-cats | ||
| green | |||
| dark | |||
| darker | |||
| auth | oauth2-proxy | ||
| oidc |
HTTP
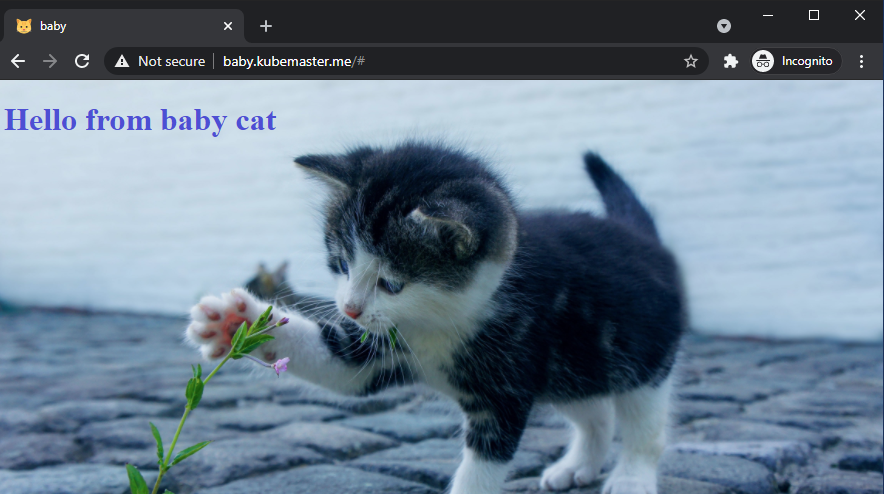
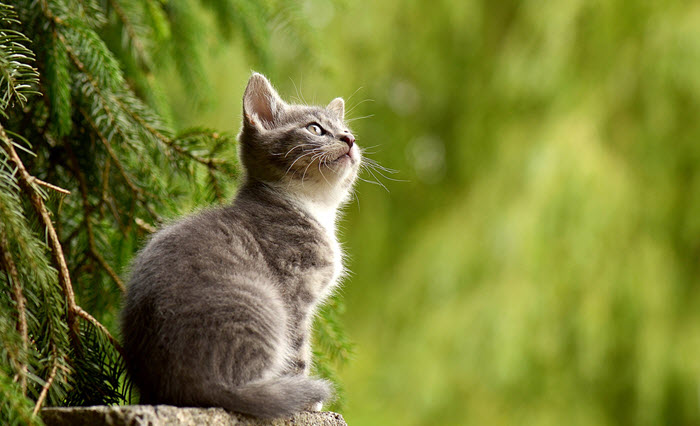
Deploy the 1-baby.yaml app, a simple web application that serves static content and exposed to the Host (macOS/Windows) with a Kubernetes Ingress.
-
macOS/WSL2: Clone this repo
git clone https://github.com/unfor19/kubernetes-localdev.git cd kubernetes-localdev -
IMPORTANT: From now on, the working directory
$PWDshould be the cloned repository -
macOS/WSL2: Deploy the application
kubectl apply -f 1-baby.yaml
-
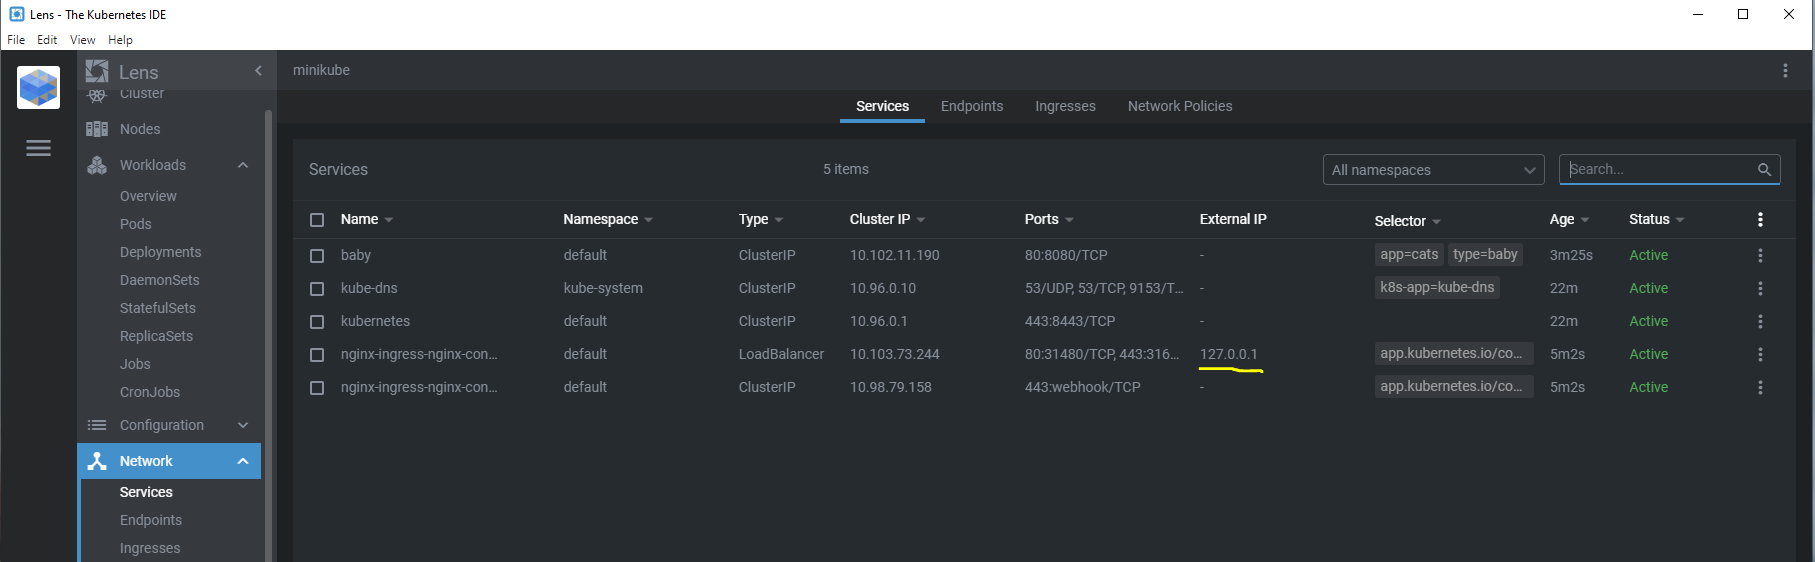
macOS/WSL2: Open a new terminal window and serve NGINX Ingress Controller on localhost (127.0.0.1), ports 80 and 443. That will provide the
nginx-ingress-nginx-controllerKubernetes Service an External IP of the Windows host127.0.0.1. Keep it running in the backgroundminikube tunnel # ❗ The service nginx-ingress-nginx-controller requires privileged ports to be exposed: [80 443] # 🔑 sudo permission will be asked for it. # 🏃 Starting tunnel for service nginx-ingress-nginx-controller
-
macOS/Windows: Check that minikube exposes NGINX Ingress Controller service on 127.0.0.1
-
macOS/Windows: Open your browser in a new Incognito/Private window and navigate to http://baby.kubemaster.me/ (port 80). You should see a cute baby cat
IMPORTANT: The rest of this tutorial assumes that minikube tunnel runs in the background in a separated terminal.
HTTPS
Create a local Certificate Authority certificate and key with mkcert and install it to Trusted Root Certificate Authorities on Windows, and to System Keychain on macOS. We'll use that certificate authority to create a TLS certificate for local development.
Create A Certificate Authority (CA) Certificate And Key
We're going to use cert-manager for issuing HTTPS/TLS certificates. Before we can do that, we need to create a Certificate Authority Certificate (rootCA.pem) and a Certificate Authority Key (rootCA-key.pem). Check out the the difference between the two.
You can quickly generate a CA certificate and key with mkcert, which will also install both of them. There's no need to search for .crt files and install them.
macOS
Expand/Collapse
-
macOS: Install mkcert root certificate
mkcert -install
# The local CA is now installed in the system trust store! ⚡️
mkcert -CAROOT # Print CA Location
# /Users/$HOST_USERNAME/Library/Application Support/mkcert
-
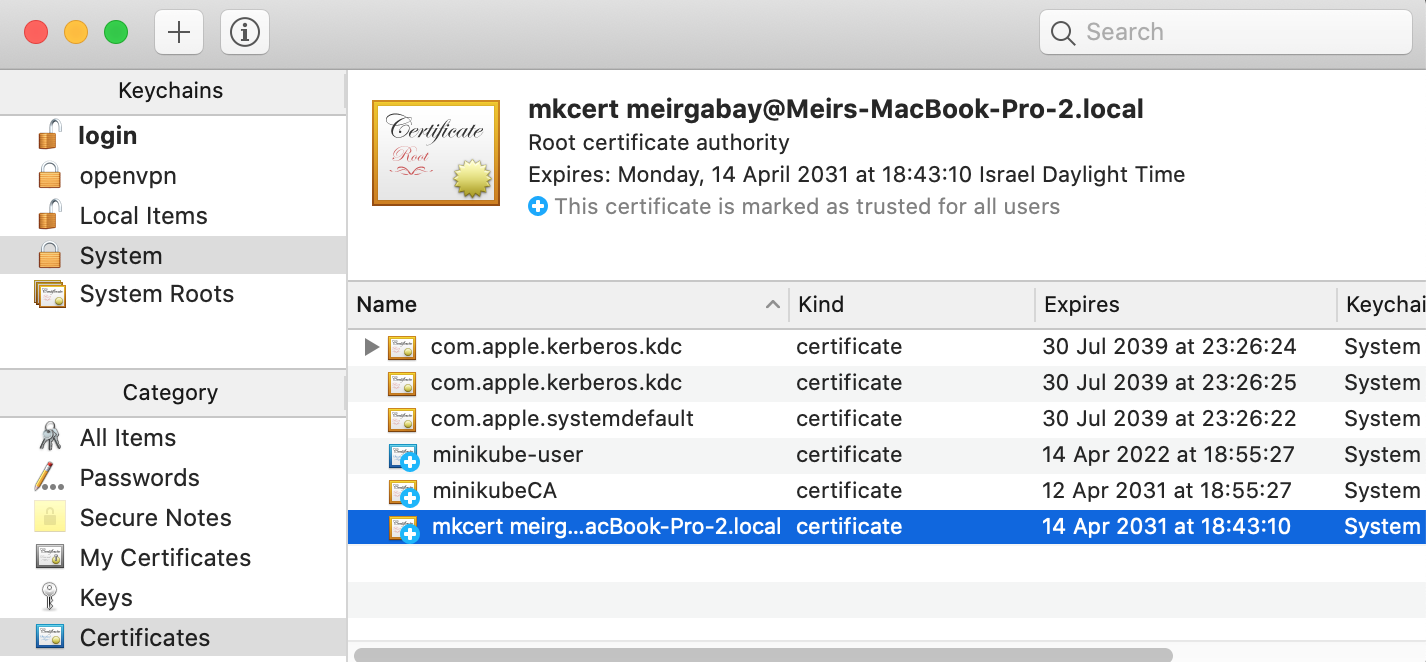
macOS: Verify Installed Certificate
- Hit CMD+SPACE > Run
Keychain Access - The result should be as below
- Hit CMD+SPACE > Run
Windows
Expand/Collapse
-
Windows: Install mkcert root certificate - Open Windows PowerShell as Administrator (elevated)
mkcert -install # Click Yes when prompted
# The local CA is now installed in the system trust store! ⚡️
mkcert -CAROOT
# C:\Users\$HOST_USER\AppData\Local\mkcert
-
Windows: Verify Installed Certificates
- Hit WINKEY+R > Run
certmgr.msc - Certificate - Current User > Trusted Root Certificate Authorities > Certificates > Issuted to and by is
mkcert $MACHINE_NAME ... - The end result should be as below
TIP: Can't see it? Close and re-open
certmgr.mscas it doesn't auto-refresh upon adding certificates. - Hit WINKEY+R > Run

Load CA Certificates To A Kubernetes Secret
macOS
Expand/Collapse
We'll create a Kubernetes Namespace and name it cert-manager. That is where all cert-manager's resources (Kubernetes Objects) will be deployed (next section). The last step is to create a Kubernetes Secret type TLS which cert-manager will use to issue certificates.
- macOS: Create the cert-manager namespace and create a Kubernetes Secret type TLS
CAROOT_DIR="$(mkcert -CAROOT)" && \
kubectl create namespace cert-manager && \
kubectl -n cert-manager create secret tls kubemaster-me-ca-tls-secret --key="${CAROOT_DIR}/rootCA-key.pem" --cert="${CAROOT_DIR}/rootCA.pem"
Windows
Expand/Collapse
So far, the certificates are recognized by the Windows machine. Now it's time to create a symlink (shortcut) from WSL2 to the Windows Host. That will make the certificates available in WSL2.
Following that, we'll create a Kubernetes Namespace and name it cert-manager. That is where all cert-manager's resources (Kubernetes Objects) will be deployed (next section). The last step is to create a Kubernetes Secret type TLS which cert-manager will use to issue certificates.
NOTE: I preferred to use a symlink to sync between Windows and WSL2, without the need to cp every time something changes. I haven't done it for .kube/config since I got some weird errors, so I used cp as an alternative.
-
WSL2: Mount the certificates that were created with
mkcertfrom the Windows host to WSL# Set variable HOST_USERNAME="unfor19" # <-- CHANGE THIS!
# Create symlink `ln -s`
CAROOT_DIR="/mnt/caroot" && \
sudo ln -s "/mnt/c/Users/${HOST_USERNAME}/AppData/Local/mkcert" "$CAROOT_DIR"
# Validate symlink
ls -l "$CAROOT_DIR" && ls "$CAROOT_DIR"

# Valid Output
# lrwxrwxrwx 1 root root 41 Apr 10 13:12 /mnt/caroot -> /mnt/c/Users/unfor19/AppData/Local/mkcert
# rootCA-key.pem  rootCA.pem
-
WSL2: Create the cert-manager namespace and create a Kubernetes Secret type TLS
kubectl create namespace cert-manager && \
kubectl -n cert-manager create secret tls kubemaster-me-ca-tls-secret --key="${CAROOT_DIR}/rootCA-key.pem" --cert="${CAROOT_DIR}/rootCA.pem"
Why Do I Need Cert-Manager?
We're using cert-manager to issue TLS certificates per Ingress automatically. Adding the annotation cert-manager.io/cluster-issuer to the Ingress triggers the following process:
- cert-manager spotted an ingress with the
cert-manager.io/cluster-issuerannotation - cert-manager checks if the
cluster-issuerexists and aborts if it doesn't - cert-manager checks if the ingress includes
spec.tls[].secretName- Secret exists - aborts since it's a one-to-one relationship between a Kubernetes Ingress and a Kubernetes Secret when using the
cluster-issuerannotation - Secret doesn't exists - creates a secret in the Ingress's namespace. The secret's data is generated according to
spec.tls[].hosts[]and the provided ClusterIssuer.
- Secret exists - aborts since it's a one-to-one relationship between a Kubernetes Ingress and a Kubernetes Secret when using the
You can also create a Certificate (Kubernetes TLS Secret) and set its spec.dnsNames[] to *.kubemaster.me, that will enable multiple ingresses to use the same secretName. The downside of manually managing Certificates is that you have to create a Certificate per Kubernetes Namespace.
That is where the cluster-issuer annotation shines since it's "namespace independent". The Kubernetes Secret is created in the Ingress's namespace automatically.
Here's the snippet of 2-green.yaml's Kubernetes Ingress
apiVersion: networking.k8s.io/v1beta1 # NGINX Ingress Controller supports this version
kind: Ingress
metadata:
  name: green
  annotations:
    cert-manager.io/cluster-issuer: tls-ca-issuer # Will be created in the next section
spec:
  tls:
  - hosts:
    - green.kubemaster.me
    secretName: green-tls-secret # Unique per ingress
Install Cert-Manager And Issue A Self-Signed Certificate
We're going to create cert-manager's custom resource definitions (CRDs), and then deploy cert-manager with Helm. Following that, we'll create the previously mentioned ClusterIssuer.
Eventually, the NGINX Ingress controller will use the generated Kubernetes TLS Secret to terminate TLS connections (HTTPS --> HTTP).
-
macOS/WSL2: Add cert-manager to the Helm's repo, create cert-manager's CRDs and deploy cert-manager.
helm repo add jetstack https://charts.jetstack.io              && \
helm repo update                                               && \
kubectl apply -f https://github.com/jetstack/cert-manager/releases/download/v1.6.2/cert-manager.crds.yaml && \
helm upgrade --install --wait cert-manager jetstack/cert-manager --namespace cert-manager --version v1.6.2
-
IMPORTANT: The ClusterIssuer will fail to create if cert-manager is not ready; see the Troubleshooting section if you experience any issues
-
macOS/WSL2: Create the cert-manager/clusterissuer.yaml and deploy the 2-green.yaml application.
# This issuer uses the TLS secret `kubemaster-me-ca-tls-secret` to create certificates for the ingresses
kubectl apply -f cert-manager/clusterissuer.yaml && \
# Deploy sample app
kubectl apply -f 2-green.yaml
-
macOS/Windows: Check connectivity to the deployed
greenapp, open browser, and navigate to https://green.kubemaster.me (port 443). You should see a cat in a green scenery

Authentication - OAuth2
We'll use oauth2-proxy to proxy requests to Google's OAuth 2.0 authentication service. Authenticated users are redirected to the initial URL that was requested (https://$host$escaped_request_uri).

Image Source: https://github.com/oauth2-proxy/oauth2-proxy
Create Google's Credentials
- macOS/Windows: Google Developer Console > Create a New Project
- Project Name:
kubemaster - Organization: Leave empty
- Project Name:
- macOS/Windows: OAuth consent screen > Select External > Click CREATE
- App name:
kubemaster - User support email:
your email address - Authorised domains > Add domain >
kubemaster.me - Developer contact information:
your email addressClick SAVE AND CONTINUE
- App name:
- macOS/Windows: Scopes > Click SAVE AND CONTINTUE - there's no need for a scope, we don't plan on using Google APIs (authorization), we just need the authentication mechanism (OAuth2/OIDC)
- (Optional) macOS/Windows: Test users > Click SAVE AND CONTINTUE - it's irrelevant since either way we're allowing any Google user to login to the app since it's a local app
- macOS/Windows: Summary > Click BACK TO DASHBOARD
- NOTE: There's no need to PUBLISH APP, keep it in sandbox mode
- macOS/Windows: Credentials > Click CREATE CREDENTIALS > Select OAuth Client ID > Select Application type Web application
- Name:
kubemaster - Authorised JavaScript origins ADD URI >
https://auth.kubemaster.me - Authorised JavaScript origins ADD URI >
https://oidc.kubemaster.me(will use it later on) - Authorised redirect URIs ADD URI >
https://auth.kubemaster.me/oauth2/callback - Authorised redirect URIs ADD URI >
https://oidc.kubemaster.me/oauth2/callback(will use it later on) Click CREATE - Save Your Client ID and Your Client Secret in a safe place, we'll use them in the following section
- Name:
Create Kubernetes Secrets For Google's Credentials
-
macOS/WSL2:
# Values from Google's Developer Console - the space at the beginning of the command is on purpose to keep it out from Bash's history
 OAUTH2_PROXY_CLIENT_ID="google_oauth2_project_client_id"
 OAUTH2_PROXY_CLIENT_SECRET="google_oauth2_project_client_secret"
# Create the Kubernetes Secret
kubectl -n default create secret generic google-credentials \
    --from-literal=google_client_id="${OAUTH2_PROXY_CLIENT_ID}" \
    --from-literal=google_client_secret="${OAUTH2_PROXY_CLIENT_SECRET}"
Deploy OAuth2-Proxy And Protect An Application
-
macOS/WSL2: Deploy 3-oauth2-proxy.yaml and the sample 3-dark.yaml application
# Create a Kubernetes Secret for oauth2-proxy `cookie-secret`
kubectl -n default create secret generic oauth2-proxy-cookie-secret --from-literal=oauth2_proxy_cookie_secret="$(docker run --rm python:3.9.1-alpine python -c 'import os,base64; print(base64.urlsafe_b64encode(os.urandom(16)).decode())')"
# Deploy oauth2-proxy
kubectl apply -f 3-oauth2-proxy.yaml
# Deploy sample app `dark`, served via HTTPS and protected with Google authentication
kubectl apply -f 3-dark.yaml
-
macOS/Windows: Open a browser in a new Incognito/Private window and navigate to https://dark.kubemaster.me and login with your Google user. You should see a cat in a dark scenery.
Authentication - OIDC
OAuth2 was used for authentication in the previous step, though its primary purpose is for authorization. For authentication, it is best to use Open ID Connect (OIDC) whenever it's possible. The main benefit is that OIDC also provides the endpoint /userinfo, so the application can easily read a JSON Web Token (JWT) and get the user details such as full name and locale (preferred language).
As demonstrated in the below image, OIDC does not replace OAuth2. OIDC is a layer on top of OAuth2, which provides a better way to handle authentication.
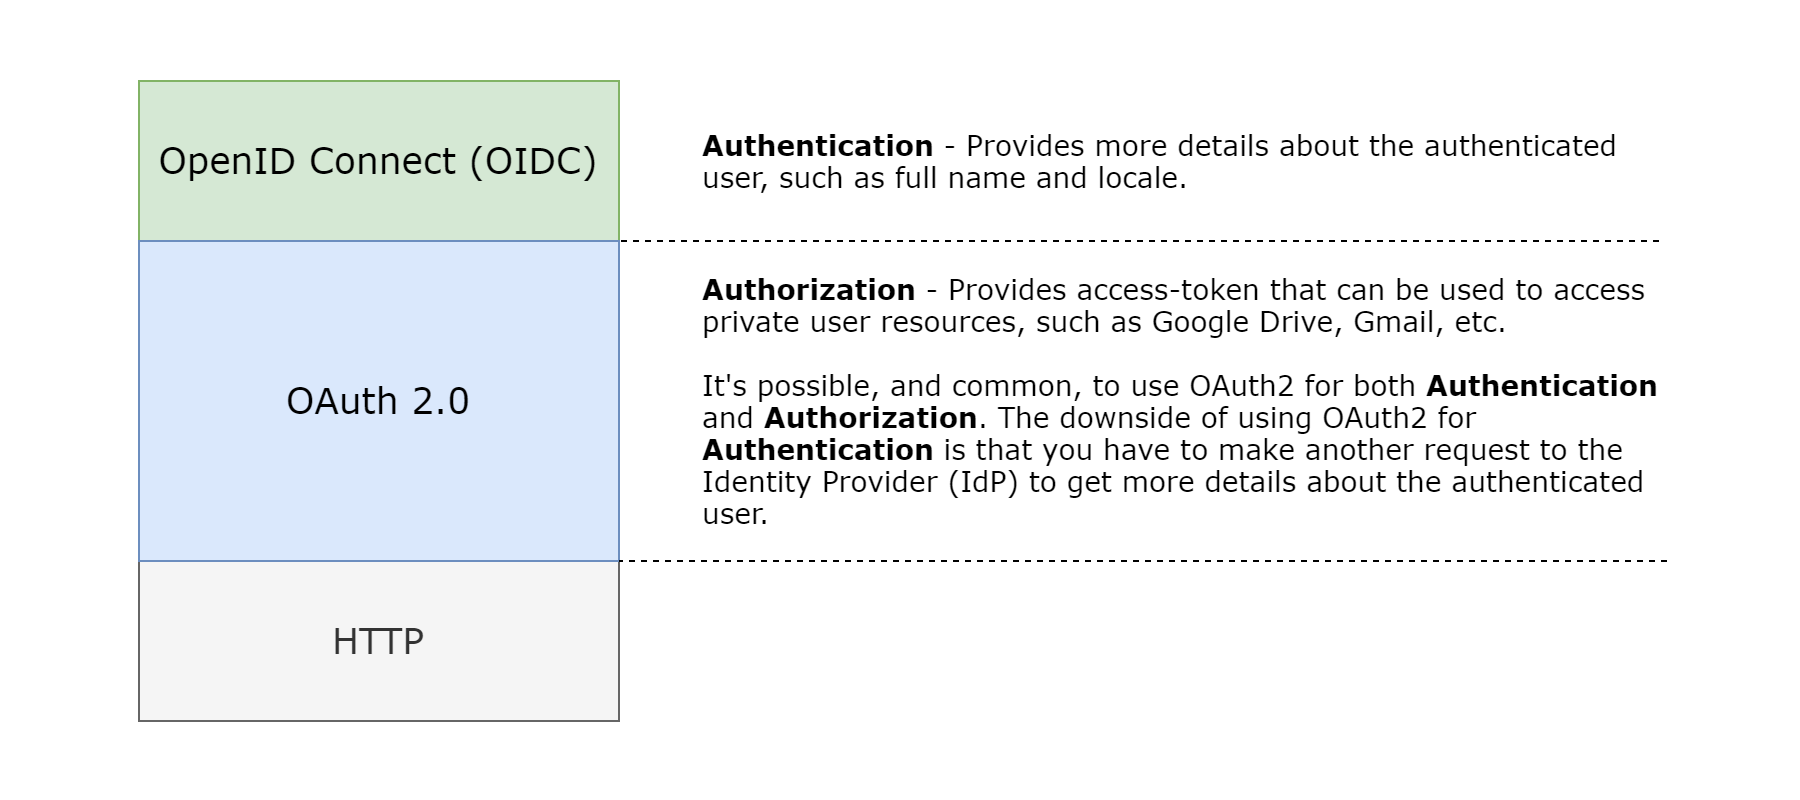
Inspired by: https://developer.okta.com/blog/2018/11/26/spring-boot-2-dot-1-oidc-oauth2-reactive-apis
Deploy OAuth2-Proxy And Use OIDC
The deployment steps are same as before, though I do recommend viewing the files 4-oauth2-proxy-oidc.yaml and 4-darker.yaml, while comparing them to 3-oauth2-proxy.yaml and 3-dark.yaml.
The main difference is in the args of oauth2-proxy's Deployment, where the provider is not using the default OAuth2 protocol for authentication; instead, it's using the OIDC protocol.
-
macOS/WSL2: Deploy 4-oauth2-proxy-oidc.yaml and the sample 4-darker.yaml application
# Deploy oauth2-proxy
kubectl apply -f 4-oauth2-proxy-oidc.yaml
# Deploy sample app `darker`, served via HTTPS and protected with Google authentication (OIDC)
kubectl apply -f 4-darker.yaml
-
macOS/Windows: Open a browser in a new Incognito/Private window and navigate to https://darker.kubemaster.me and login with your Google user. You should see the same dark cat, but the message now contains your full name.
-
NOTE: If you have an existing browser window, even if it's incognito, then you might have already authenticated. You can verify it by checking if the cookie
_oauth2_proxyexists. To get the entire flow, close all incognito windows and then open a new browser window in incognito https://darker.kubemaster.me -
NOTE: If you've already authenticated when you navigated to https://dark.kubemaster.me (OAuth2), then you won't be prompted to be logged in when you navigate to https://darker.kubemaster.me (OIDC). Authentication occurs once, and then
oauth-proxy2verifies the authenticated user with the secret cookie_oauth2_proxyfor all subsequent requests. The cookie's domain is.kubemaster.me(includes any subdomain). That goes the other way around; if you've already authenticated on https://darker.kubemaster.me, you can also access https://dark.kubemaster.me. -
NOTE: Authenticating with OIDC (darker) provides more details about the authenticated user; therefore, it's possible to inject the user's name into the application. If you logged in with OAuth2 (dark), then your name won't be displayed in the message "Hello YOUR_GOOGLE_NAME". Google specifies the available user attributes in the ID token's payload. Click the Expand/Collapse buttons to view the available attributes for OIDC and OAuth2.
OIDC - ID token's payload - Expand/Collapse
{
    /*
    The Issuer Identifier for the Issuer of the response. Always https://accounts.google.com or accounts.google.com for Google ID tokens.
    */
    "iss": "https://accounts.google.com",

    /*
    The client_id of the authorized presenter. This claim is only needed when the party requesting the ID token is not the same as the audience of the ID token.
    This may be the case at Google for hybrid apps where a web application and Android app have a different OAuth 2.0 client_id but share the same Google APIs project.
    */
    "azp": "GOOGLE_CLIENT_ID",

    /*
    The audience that this ID token is intended for. It must be one of the OAuth 2.0 client IDs of your application.
    */
    "aud": "GOOGLE_CLIENT_ID",

    /*
    An identifier for the user, unique among all Google accounts and never reused.
    A Google account can have multiple email addresses at different points in time, but the sub value is never changed.
    Use sub within your application as the unique-identifier key for the user. Maximum length of 255 case-sensitive ASCII characters.
    */
    "sub": "USER_ID",

    /*
    The user's email address. This value may not be unique to this user and is not suitable for use as a primary key.
    Provided only if your scope included the email scope value.
    */
    "email": "[email protected]",

    /*
    True if the user's e-mail address has been verified; otherwise false.
    */
    "email_verified": true,

    /*
    Access token hash. Provides validation that the access token is tied to the identity token.
    If the ID token is issued with an access_token value in the server flow, this claim is always included.
    This claim can be used as an alternate mechanism to protect against cross-site request forgery attacks.
    If you follow:
    https://developers.google.com/identity/protocols/oauth2/openid-connect#createxsrftoken
    and
    https://developers.google.com/identity/protocols/oauth2/openid-connect#confirmxsrftoken
    it is not necessary to verify the access token.
    */
    "at_hash": "someNiceOverHere",

    /*
    The user's full name, in a displayable form. Might be provided when:
    The request scope included the string "profile"
    The ID token is returned from a token refresh
    When name claims are present, you can use them to update your app's user records. Note that this claim is never guaranteed to be present.
    */
    "name": "Meir Gabay",

    /*
    The URL of the user's profile picture. Might be provided when:
    The request scope included the string "profile"
    The ID token is returned from a token refresh
    When picture claims are present, you can use them to update your app's user records. Note that this claim is never guaranteed to be present.
    */
    "picture": "https://lh3.googleusercontent.com/a-/AOh14Gg2SJeDqusILfvvSG0boxvXX65QYrx5U3KK38xj-A=s96-c",

    /*
    The user's given name(s) or first name(s). Might be provided when a name claim is present.
    */
    "given_name": "Meir",

    /*
    The user's surname(s) or last name(s). Might be provided when a name claim is present.
    */
    "family_name": "Gabay",

    /*
    The user's locale, represented by a BCP 47 language tag. Might be provided when a name claim is present.
    */
    "locale": "en-GB",

    /*
    The time the ID token was issued. Represented in Unix time (integer seconds).
    */
    "iat": 1618059677,

    /*
    Expiration time on or after which the ID token must not be accepted. Represented in Unix time (integer seconds).
    */
    "exp": 1618063277
}
OAuth2 - ID token's payload - Expand/Collapse
{
    /*
    The Issuer Identifier for the Issuer of the response. Always https://accounts.google.com or accounts.google.com for Google ID tokens.
    */
    "iss": "https://accounts.google.com",

    /*
    The client_id of the authorized presenter. This claim is only needed when the party requesting the ID token is not the same as the audience of the ID token.
    This may be the case at Google for hybrid apps where a web application and Android app have a different OAuth 2.0 client_id but share the same Google APIs project.
    */
    "azp": "GOOGLE_CLIENT_ID",

    /*
    The audience that this ID token is intended for. It must be one of the OAuth 2.0 client IDs of your application.
    */
    "aud": "GOOGLE_CLIENT_ID",

    /*
    An identifier for the user, unique among all Google accounts and never reused.
    A Google account can have multiple email addresses at different points in time, but the sub value is never changed.
    Use sub within your application as the unique-identifier key for the user. Maximum length of 255 case-sensitive ASCII characters.
    */
    "sub": "USER_ID",

    /*
    The user's email address. This value may not be unique to this user and is not suitable for use as a primary key.
    Provided only if your scope included the email scope value.
    */
    "email": "[email protected]",

    /*
    True if the user's e-mail address has been verified; otherwise false.
    */
    "email_verified": true,

    /*
    Access token hash. Provides validation that the access token is tied to the identity token.
    If the ID token is issued with an access_token value in the server flow, this claim is always included.
    This claim can be used as an alternate mechanism to protect against cross-site request forgery attacks.
    If you follow:
    https://developers.google.com/identity/protocols/oauth2/openid-connect#createxsrftoken
    and
    https://developers.google.com/identity/protocols/oauth2/openid-connect#confirmxsrftoken
    it is not necessary to verify the access token.
    */
    "at_hash": "someNiceOverHere",

    /*
    The time the ID token was issued. Represented in Unix time (integer seconds).
    */
    "iat": 1618059677,

    /*
    Expiration time on or after which the ID token must not be accepted. Represented in Unix time (integer seconds).
    */
    "exp": 1618063277
}
-

Authentication Summary
- I find it best to have a dedicated subdomain for Authentication services, as it allows using cookies with
*.kubemaster.meand acts as an isolated service from the entire application - The Authorised JavaScript origins and Authorised redirect URIs in Google's Developer Console are used by oauth2-proxy. There's not a single time where Google tries to query your domains; this is why it's possible to make it work locally.
- Here's great 1 hour session about OAuth2 and OIDC - OAuth 2.0 and OpenID Connect (in plain English). I watched every bit of it, and it helped me to understand the whole flow.
- Using bare OAuth2 (without OIDC) means that if the app needs more details about the authenticated user, such as
name, then the app will have to make another request from the backend to get this information. With OAuth2 + OIDC, you benefit from having extra details about the user in a single request. - It's possible to access private resources by logging into https://auth.kubemaster.me and https://oidc.kubemaster.me since they both use the same Google's Credentials and COOKIE_SECRET (I think?)
Docker Daemon And Minikube
We're running two Docker Daemons, the first one runs on the Host machine (macOS/Windows), and the second one runs in minikube's Docker Container. I find it very hard to understand this architecture, so I've created a diagram to visualize it.

Let's run some commands to see if it makes sense.
-
macOS/WSL2: Print the list of the running containers on the Host machine
docker ps
# Valid output - minikube's container name is `minikube`
CONTAINER ID   IMAGE                                 COMMAND                  CREATED      STATUS       PORTS                                                                                                                                  NAMES
9cab890fc446   gcr.io/k8s-minikube/kicbase:v0.0.18   "/usr/local/bin/entr…"   5 days ago   Up 2 hours   127.0.0.1:63682->22/tcp, 127.0.0.      1:63683->2376/tcp, 127.0.0.1:63680->5000/tcp, 127.0.0.1:63681->8443/tcp, 127.0.0.1:63684->32443/tcp   minikube
-
macOS/WSL2: Use docker exec to get into minikube's container
docker exec -it minikube bash -
NOTE: For testing/debugging purposes, I prefer using
docker execover minikube ssh becausedocker execallows logging asroot, whileminikube sshas the non-root userdocker. -
macOS/WSL2: Print the list of the running containers on minikube
docker ps
# Valid output
# root@minikube:/# docker ps
CONTAINER ID   IMAGE                  COMMAND                  CREATED       STATUS       PORTS     NAMES
d11f495c71a5   85069258b98a           "/storage-provisioner"   2 hours ago   Up 2 hours             8s_storage-provisioner_storage-provisioner_kube-system_eb1bac83-2db5-41e8-9bdd-805e3969930b_3
 ...
5fbaf3683d33   k8s.gcr.io/pause:3.2   "/pause"                 2 hours ago   Up 2 hours             k8s_POD_etcd-minikube_kube-system_c31fe6a5afdd142cf3450ac972274b36_1
Remember the section Create a Kubernetes Cluster? We used the argument --driver=docker, which instructs minikube to use its docker driver. From the Kubernetes perspective, it's equivalent for choosing the Docker runtime as the Container runtime. Eventually, this means that Kubernetes Workloads will run as Docker Containers.
As you can see from the last step, minikube's Docker Daemon runs containers that belong to the Kubernetes Cluster. The Kubernetes object representing a group of containers, or a single container, is called a Kubernetes Pod. If you're already familiar with Docker Compose, then writing a Pod's YAML configuration is quite similar to writing a docker-compose.yaml file.
Curl The Docker Daemons
If you think about it, the Docker CLI sends API requests to the Docker Engine API, which is part of the Docker Daemon. Let's do a quick test to see if we can curl the Host's (macOS/Windows) Docker Daemon and minikube's Docker Daemon.
-
macOS/WSL2: curl the info endpoint of the Host's Docker Daemon
# Socket Request `--unix-socket` curl --unix-socket /var/run/docker.sock http://127.0.0.1/info -
macOS/WSL2: curl the
infoendpoint of minikube's Docker Daemon# HTTPS Request curl --cacert ~/.minikube/certs/ca.pem \ --key ~/.minikube/certs/key.pem --cert ~/.minikube/certs/cert.pem \ https://127.0.0.1:$(minikube docker-env | grep DOCKER_HOST | cut -d":" -f3 | cut -d'"' -f1)/info
I haven't added the expected output since it's too long and can vary significantly between different Hosts. Search the attribute Name in the output; for example, on WSL2, it's docker-desktop (Host) and minikube.
Local Development (CI) And Deployment (CD)
Initially, I've tried using a private local Docker repository, which was a nightmare (see my StackOverflow question). A more straightforward solution - using minikube's Docker Daemon, instead of the Host's (macOS/Windows) Docker Daemon for building Docker images.
Build The Application (CI)
-
macOS/WSL2: Set
dockercommand to use minikube's Docker Daemoneval `minikube docker-env` # from now on, the `docker` command refers to minikube's Docker Daemon # To undo the above command and use macOS/Windows's Docker Daemon eval `minikube docker-env --unset`
-
macOS/WSL2: Build the docker-cats application locally using minikube's Docker Daemon
git clone https://github.com/unfor19/docker-cats.git
cd docker-cats

eval `minikube docker-env` # Using minikube's Docker Daemon
docker build -t unfor19/docker-cats:latest .
Deploy The Application (CD)
We'll use the built-in kubectl command rollout restart deployment/deployment-name. And of course, we'll probably create some Makefile or a bash script that runs both build and deploy.
- macOS/WSL2:
kubectl rollout restart deployment/baby deployment/green deployment/dark deployment/darker
Cleanup
IMPORTANT: Quit LENS before proceeding
- macOS/WSL2: Delete minikube's Kubernetes Cluster and CA certificates
minikube delete --purge --all
- macOS/Windows: Uninstall mkcert's TLS certifictes, run PowerShell in elevated mode
mkcert -uninstall # The local CA is now uninstalled from the system trust store(s)! - Delete all relevant TLS certificates
- macOS: Hit CMD+SPACE and run
Keychain Access, delete all minikubeCA and minikube-user - Windows: Hit WINKEY+R and run
certmgr.msc- Certificates - Current User > Trusted Root Certification Authorities > Certificates
- Delete all minikube's certificates - minikubeCA and minikube-user
- macOS: Hit CMD+SPACE and run
Troubleshooting
-
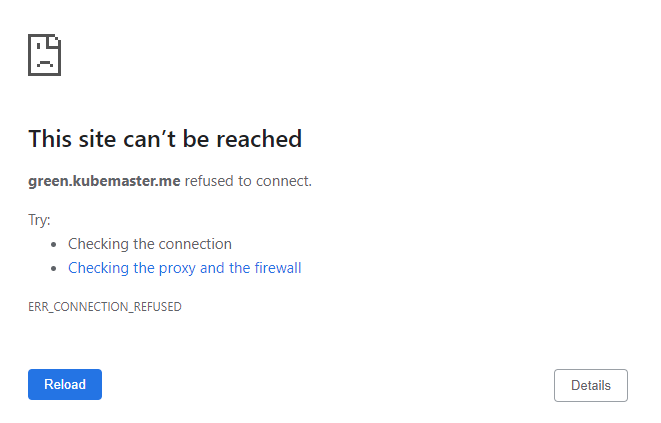
Ingress: Make sure you expose the cluster to the Host with
minikube tunnelbefore trying to access the application with the browser- ERR_CONNECTION_REFUSED
- ERR_CONNECTION_REFUSED
-
Ingress: Path-based ingresses issues, For example
app.kubemaster.me/babywould not work properly because the app serves static files in the root dir. The request to the HTML pageindex.htmlis successful, but subsequent requests toapp.kubemaster.me/baby/images/baby.pngwill fail since NGINX's upstream can't serve static content. It's best to use Path-based ingresses for serving APIs, for example,app.kubemaster.me/api/v1/get/something. Use bare (/) Host-based ingresses for serving static pages, just like I did in this project. -
Ingress: version deprecation warning - ignore this warning; this is the latest version supported by the NGINX Ingress Controller
Warning: networking.k8s.io/v1beta1 Ingress is deprecated in v1.19+, unavailable in v1.22+; use networking.k8s.io/v1 Ingress
-
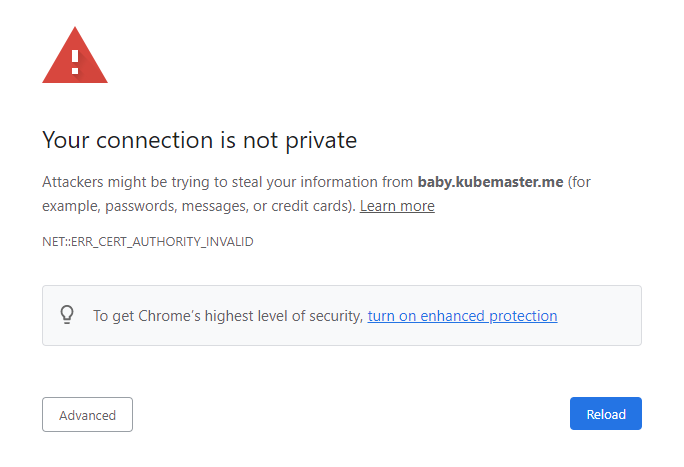
HTTPS: Certificate is invalid in the browser - Open your browser a new Incognito/Private window
-
ERR_CONNECTION_REFUSED
-
ERR_CERT_AUTHORITY_INVALID
-
-
cert-manager: Errors applying cert-manager resources
- Delete the secret
kubemaster-me-ca-tls-secret, re-create it and then re-applycert-manager/clusterissuer.yamlError from server (NotFound): error when deleting "cert-manager/clusterissuer.yaml": clusterissuers.cert-manager.io "tls-ca-issuer" not found - Wait for cert-manager to be healthy, check all logs of the pods
cert-manager,cert-manager-cainjector, andcert-manager-webhookError from server (InternalError): error when creating "cert-manager/clusterissuer.yaml": Internal error occurred: failed calling webhook "webhook.cert-manager.io": Post "https://cert-manager-webhook.cert-manager.svc:443/mutate?timeout=10s": dial tcp 10.102.252.218:443: connect: connection refused
- Delete the secret
-
Authentication: After after a successful login you get redirected to
/#404 - Make sure the ingress annotation isoauth2/start?rd=https://$host$escaped_request_uri, for examplenginx.ingress.kubernetes.io/auth-signin: https://auth.kubemaster.me/oauth2/start?rd=https://$host$escaped_request_uri
NOTE: Even though you got to a 404 page, it's still possible to access private resources (dark and darker) check your Application cookies
-
LENS: Can't connect to cluster due to missing keys - Make sure you copied
client.crt,client.keyandca.crtfrom WSL2 to the Windows hostC:\Users\$HOST_USERNAME\.kube\certserror: unable to read client-key C:\Users\unfor19\.kube\certs\client.key for minikube due to open C:\Users\unfor19\.kube\certs\client.key: The system cannot find the file specified.
References
- How to Set Up an Nginx Ingress with Cert-Manager on DigitalOcean Kubernetes
- cert-manager docs
- minikube docker driver
- GitLab - Developing for Kubernetes with Minikube
Related Blog Posts
- Docker Tips And Best Practices
- Troubleshooting the right way
- Boosting terminal productivity tips
- Parsing Command Line Arguments In Bash
Images
Cats Images
- baby.jpg - source https://www.maxpixel.net/Animals-Stone-Kitten-Cats-Cat-Flower-Pet-Flowers-2536662
- green.jpg - source http://challengethestorm.org/cat-taught-love/ - img
- dark.jpg - source https://www.findcatnames.com/great-black-cat-names/ - img
Cover Photo Images
- HackerBoy Emoticon - http://123emoji.com/wp-content/uploads/2016/08/5609229801667168449.png
- Helm - https://helm.sh/img/helm.svg
- NGINX - https://www.nginx.com/wp-content/uploads/2018/08/NGINX-logo-rgb-large.png
- Cert Manager - https://d33wubrfki0l68.cloudfront.net/f424659d40ec64748389d27b333510b3bd46f509/ed868/img/png/cert-manager-icon.png
- Kubernetes - https://kubernetes.io/images/kubernetes-horizontal-color.png
- OAuth2 Proxy - https://oauth2-proxy.github.io/oauth2-proxy/
- minikube - https://minikube.sigs.k8s.io/docs/
Authors
Created and maintained by Meir Gabay
License
This project is licensed under the MIT License - see the LICENSE file for details